MyBatis-Plus 快速入门
1.简介
MyBatis-Plus (简称 MP)是一个 MyBatis 的增强工具,在 MyBatis 的基础上只做增强不做改变,为简化开发、提高效率而生。
1.1.特性
- 无侵入:只做增强不做改变,引入它不会对现有工程产生影响,如丝般顺滑
- 损耗小:启动即会自动注入基本 CURD,性能基本无损耗,直接面向对象操作
- 强大的 CRUD 操作:内置通用 Mapper、通用 Service,仅仅通过少量配置即可实现单表大部分 CRUD 操作,更有强大的条件构造器,满足各类使用需求
- 支持 Lambda 形式调用:通过 Lambda 表达式,方便的编写各类查询条件,无需再担心字段写错
- 支持主键自动生成:支持多达 4 种主键策略(内含分布式唯一 ID 生成器 - Sequence),可自由配置,完美解决主键问题
- 支持 ActiveRecord 模式:支持 ActiveRecord 形式调用,实体类只需继承 Model 类即可进行强大的 CRUD 操作
- 支持自定义全局通用操作:支持全局通用方法注入( Write once, use anywhere )
- 内置代码生成器:采用代码或者 Maven 插件可快速生成 Mapper 、 Model 、 Service 、 Controller 层代码,支持模板引擎,更有超多自定义配置等您来使用
- 内置分页插件:基于 MyBatis 物理分页,开发者无需关心具体操作,配置好插件之后,写分页等同于普通 List 查询
- 分页插件支持多种数据库:支持 MySQL、MariaDB、Oracle、DB2、H2、HSQL、SQLite、Postgre、SQLServer 等多种数据库
- 内置性能分析插件:可输出 SQL 语句以及其执行时间,建议开发测试时启用该功能,能快速揪出慢查询
- 内置全局拦截插件:提供全表 delete 、 update 操作智能分析阻断,也可自定义拦截规则,预防误操作
1.2.支持数据库
任何能使用
mybatis进行 CRUD, 并且支持标准 SQL 的数据库,具体支持情况如下,如果不在下列表查看分页部分教程 PR 您的支持。
- mysql,oracle,db2,h2,hsql,sqlite,postgresql,sqlserver,Phoenix,Gauss ,clickhouse,Sybase,OceanBase,Firebird,cubrid,goldilocks,csiidb
- 达梦数据库,虚谷数据库,人大金仓数据库,南大通用(华库)数据库,南大通用数据库,神通数据库,瀚高数据库
1.3.框架结构
2.快速上手
2.1.pom.xml导入MyBatis Plus依赖
<dependency>
        <groupId>com.baomidou</groupId>
        <artifactId>mybatis-plus-boot-starter</artifactId>
        <version>Latest Version</version>
</dependency>
2.2.在application.yml中配置数据源
# 配置数据源
spring:
  datasource:
    driver-class-name: com.mysql.cj.jdbc.Driver
    url: jdbc:mysql://localhost:3306/wyl? useSSL=false&useUnicode=true&characterEncoding=utf-8&serverTimezone=GMT%2B8
    username: root
    password: 123456

# 配置日志,输出更详细日志信息
mybatis-plus:
  configuration:
    log-impl: org.apache.ibatis.logging.stdout.StdOutImpl
2.3.根据数据库表创建实体类
@Data
@AllArgsConstructor
@NoArgsConstructor
public class User {
    private Long id;
    private String name;
    private Integer age;
    private String email;
}
2.4.创建Mapper接口
//在对应的mapper上面继承基本的接口BaseMapper
@ResponseBody //代表持久层
public interface UserMapper extends BaseMapper<User> {
    //所有的CRUD操作都已经编写完成了
    //你不需要像以前的配置一大堆文件了
}
2.5.测试
启动类需要加 @MapperScan("mapper所在的包"),否则无法加载mapper bean
@SpringBootTest
class MybatisPlusApplicationTests {
    //继承了BaseMapper,所有的方法都来自父类
    //我们也可以编写自己的扩展方法
    @Autowired
    private UserMapper userMapper;

    @Test
    void contextLoads() {
        //参数是一个Wrapper,条件构造器,这里我们先不用 null
        //查询全部用户
        List<User> users = userMapper.selectList(null);
        users.forEach(System.out::println);
    }
}
那么我的sql 谁写的,方法又去哪了,其实都是mybatis plus。
3.配置日志
我们所有的sql现在是不可见的,我们希望知道他是怎么执行的,所以我们必须要看日志!
# 配置日志
mybatis-plus.configuration.log-impl=org.apache.ibatis.logging.stdout.StdOutImpl
4.CRUD
4.1.Service CRUD 接口
4.1.1.Save
// 插入一条记录(选择字段,策略插入)
boolean save(T entity);
// 插入(批量)
boolean saveBatch(Collection<T> entityList);
// 插入(批量)
boolean saveBatch(Collection<T> entityList, int batchSize);
4.1.2.SaveOrUpdate
// TableId 注解存在更新记录,否插入一条记录
boolean saveOrUpdate(T entity);
// 根据updateWrapper尝试更新,否继续执行saveOrUpdate(T)方法
boolean saveOrUpdate(T entity, Wrapper<T> updateWrapper);
// 批量修改插入
boolean saveOrUpdateBatch(Collection<T> entityList);
// 批量修改插入
boolean saveOrUpdateBatch(Collection<T> entityList, int batchSize);
4.1.3.Remove
// 根据 entity 条件,删除记录
boolean remove(Wrapper<T> queryWrapper);
// 根据 ID 删除
boolean removeById(Serializable id);
// 根据 columnMap 条件,删除记录
boolean removeByMap(Map<String, Object> columnMap);
// 删除(根据ID 批量删除)
boolean removeByIds(Collection<? extends Serializable> idList);
4.1.4.Update
// 根据 UpdateWrapper 条件,更新记录 需要设置sqlset
boolean update(Wrapper<T> updateWrapper);
// 根据 whereWrapper 条件,更新记录
boolean update(T updateEntity, Wrapper<T> whereWrapper);
// 根据 ID 选择修改
boolean updateById(T entity);
// 根据ID 批量更新
boolean updateBatchById(Collection<T> entityList);
// 根据ID 批量更新
boolean updateBatchById(Collection<T> entityList, int batchSize);
4.1.5.Get
// 根据 ID 查询
T getById(Serializable id);
// 根据 Wrapper,查询一条记录。结果集,如果是多个会抛出异常,随机取一条加上限制条件 wrapper.last("LIMIT 1")
T getOne(Wrapper<T> queryWrapper);
// 根据 Wrapper,查询一条记录
T getOne(Wrapper<T> queryWrapper, boolean throwEx);
// 根据 Wrapper,查询一条记录
Map<String, Object> getMap(Wrapper<T> queryWrapper);
// 根据 Wrapper,查询一条记录
<V> V getObj(Wrapper<T> queryWrapper, Function<? super Object, V> mapper);
4.1.6.List
// 查询所有
List<T> list();
// 查询列表
List<T> list(Wrapper<T> queryWrapper);
// 查询(根据ID 批量查询)
Collection<T> listByIds(Collection<? extends Serializable> idList);
// 查询(根据 columnMap 条件)
Collection<T> listByMap(Map<String, Object> columnMap);
// 查询所有列表
List<Map<String, Object>> listMaps();
// 查询列表
List<Map<String, Object>> listMaps(Wrapper<T> queryWrapper);
// 查询全部记录
List<Object> listObjs();
// 查询全部记录
<V> List<V> listObjs(Function<? super Object, V> mapper);
// 根据 Wrapper 条件,查询全部记录
List<Object> listObjs(Wrapper<T> queryWrapper);
// 根据 Wrapper 条件,查询全部记录
<V> List<V> listObjs(Wrapper<T> queryWrapper, Function<? super Object, V> mapper);
4.1.7.Page
// 无条件分页查询
IPage<T> page(IPage<T> page);
// 条件分页查询
IPage<T> page(IPage<T> page, Wrapper<T> queryWrapper);
// 无条件分页查询
IPage<Map<String, Object>> pageMaps(IPage<T> page);
// 条件分页查询
IPage<Map<String, Object>> pageMaps(IPage<T> page, Wrapper<T> queryWrapper);
4.1.8.Count
// 查询总记录数
int count();
// 根据 Wrapper 条件,查询总记录数
int count(Wrapper<T> queryWrapper);
4.1.9.Chain
query
// 链式查询 普通
QueryChainWrapper<T> query();
// 链式查询 lambda 式。注意:不支持 Kotlin
LambdaQueryChainWrapper<T> lambdaQuery();

// 示例:
query().eq("column", value).one();
lambdaQuery().eq(Entity::getId, value).list();
update
// 链式更改 普通
UpdateChainWrapper<T> update();
// 链式更改 lambda 式。注意:不支持 Kotlin
LambdaUpdateChainWrapper<T> lambdaUpdate();

// 示例:
update().eq("column", value).remove();
lambdaUpdate().eq(Entity::getId, value).update(entity);
4.2.Mapper CRUD 接口
4.2.1.Insert
// 插入一条记录
int insert(T entity);
4.2.2.Delete
// 根据 entity 条件,删除记录
int delete(@Param(Constants.WRAPPER) Wrapper<T> wrapper);
// 删除(根据ID 批量删除)
int deleteBatchIds(@Param(Constants.COLLECTION) Collection<? extends Serializable> idList);
// 根据 ID 删除
int deleteById(Serializable id);
// 根据 columnMap 条件,删除记录
int deleteByMap(@Param(Constants.COLUMN_MAP) Map<String, Object> columnMap);
4.2.3.Update
// 根据 whereWrapper 条件,更新记录
int update(@Param(Constants.ENTITY) T updateEntity, @Param(Constants.WRAPPER) Wrapper<T> whereWrapper);
// 根据 ID 修改
int updateById(@Param(Constants.ENTITY) T entity);
4.2.4.Select
// 根据 ID 查询
T selectById(Serializable id);
// 根据 entity 条件,查询一条记录
T selectOne(@Param(Constants.WRAPPER) Wrapper<T> queryWrapper);

// 查询(根据ID 批量查询)
List<T> selectBatchIds(@Param(Constants.COLLECTION) Collection<? extends Serializable> idList);
// 根据 entity 条件,查询全部记录
List<T> selectList(@Param(Constants.WRAPPER) Wrapper<T> queryWrapper);
// 查询(根据 columnMap 条件)
List<T> selectByMap(@Param(Constants.COLUMN_MAP) Map<String, Object> columnMap);
// 根据 Wrapper 条件,查询全部记录
List<Map<String, Object>> selectMaps(@Param(Constants.WRAPPER) Wrapper<T> queryWrapper);
// 根据 Wrapper 条件,查询全部记录。注意: 只返回第一个字段的值
List<Object> selectObjs(@Param(Constants.WRAPPER) Wrapper<T> queryWrapper);

// 根据 entity 条件,查询全部记录(并翻页)
IPage<T> selectPage(IPage<T> page, @Param(Constants.WRAPPER) Wrapper<T> queryWrapper);
// 根据 Wrapper 条件,查询全部记录(并翻页)
IPage<Map<String, Object>> selectMapsPage(IPage<T> page, @Param(Constants.WRAPPER) Wrapper<T> queryWrapper);
// 根据 Wrapper 条件,查询总记录数
Integer selectCount(@Param(Constants.WRAPPER) Wrapper<T> queryWrapper);
案例
List<User> userList1 = user.selectList(
        new EntityWrapper<User>().eq("name", "王延领")
);
分页
// 分页查询 10 条姓名为‘wyl’的用户记录
List<User> userList = user.selectPage(
        new Page<User>(1, 10),
        new EntityWrapper<User>().eq("name", "wyl")
).getRecords();
结合
// 分页查询 10 条姓名为‘wyl’、性别为男,且年龄在18至50之间的用户记录
List<User> userList = userMapper.selectPage(
        new Page<User>(1, 10),
        new EntityWrapper<User>().eq("name", "wyl")
                .eq("sex", 0)
                .between("age", "18", "50")
);
4.3.mapper 层 选装件
AlwaysUpdateSomeColumnById
int alwaysUpdateSomeColumnById(T entity);
insertBatchSomeColumn
int insertBatchSomeColumn(List<T> entityList);
logicDeleteByIdWithFill
int logicDeleteByIdWithFill(T entity);
4.4.条件构造器
十分重要:Wappper
我们写一些复杂的SQL就可以使用他来替代!

1、测试一,记住查看输出的SQL进行分析
@Test
void contextLoads() {
    //查询name不为空的用户,并且邮箱不为空的用户,年龄大于12
    QueryWrapper<User> wrapper = new QueryWrapper<>();
    wrapper.isNotNull("name")
            .isNotNull("email")
            .ge("age", 12);
    userMapper.selectList(wrapper).forEach(System.out::println); //和我们刚刚学习的map对比一下
}
2、测试二,记住查看输出的SQL进行分析
@Test
void test2(){
    //查询名字Chanv
    QueryWrapper<User> wrapper = new QueryWrapper<>();
    wrapper.eq("name", "Chanv");
    User user = userMapper.selectOne(wrapper);
    System.out.println(user);
}
3、测试三
@Test
void test3(){
    //查询年龄在19到30岁之间的用户
    QueryWrapper<User> wrapper = new QueryWrapper<>();
    wrapper.between("age", 19, 30); //区间
    Integer count = userMapper.selectCount(wrapper);
    System.out.println(count);
}
4、测试四,记住查看输出的SQL进行分析
//模糊查询
@Test
void test4(){
    //查询年龄在19到30岁之间的用户
    QueryWrapper<User> wrapper = new QueryWrapper<>();
    //左和右
    wrapper.notLike("name", "b")
            .likeRight("email", "t");
    List<Map<String, Object>> maps = userMapper.selectMaps(wrapper);
    maps.forEach(System.out::println);
}
5、测试五
@Test
void test5(){
    QueryWrapper<User> wrapper = new QueryWrapper<>();
    //id 在子查询中查出来
    wrapper.inSql("id", "select id from user where id < 3");
    List<Object> objects = userMapper.selectObjs(wrapper);
    objects.forEach(System.out::println);
}
6、测试六
@Test
void test6(){
    QueryWrapper<User> wrapper = new QueryWrapper<>();
    //通过id进行排序
    wrapper.orderByDesc("id");
    List<User> users = userMapper.selectList(wrapper);
    users.forEach(System.out::println);
}
5.代码生成器
dao、pojo、service、controller都给我自己去编写完成!
AutoGenerator 是 MyBatis-Plus 的代码生成器,通过 AutoGenerator 可以快速生成 Entity、Mapper、Mapper XML、Service、Controller 等各个模块的代码,极大的提升了开发效率。
5.1.导入依赖
<!-- 代码生成器依赖 -->
<dependency>
    <groupId>com.baomidou</groupId>
    <artifactId>mybatis-plus-generator</artifactId>
    <version>3.3.1.tmp</version>
</dependency>
<!-- 生成器需要根据模板生成各种组件,所以模板也需要导入 -->
<!-- velocity是默认的模板,除了它以外常用的还有:Freemarker、Beetl -->
<dependency>
    <groupId>org.apache.velocity</groupId>
    <artifactId>velocity</artifactId>
    <version>1.7</version>
</dependency>
5.2、启动类,任意一个main、@Test方法都行
package com.wyl.mybatisplus;
import com.baomidou.mybatisplus.annotation.DbType;
import com.baomidou.mybatisplus.generator.AutoGenerator;
import com.baomidou.mybatisplus.generator.config.DataSourceConfig;
import com.baomidou.mybatisplus.generator.config.GlobalConfig;
import com.baomidou.mybatisplus.generator.config.PackageConfig;
import com.baomidou.mybatisplus.generator.config.StrategyConfig;
import com.baomidou.mybatisplus.generator.config.rules.NamingStrategy;
public class Code {
    public static void main(String[] args) {
        //需要构建一个 代码自动生成器 对象
        // 代码生成器
        AutoGenerator mpg = new AutoGenerator();
        //配置策略

        //1、全局配置
        GlobalConfig gc = new GlobalConfig();
        String projectPath = System.getProperty("user.dir");
        gc.setOutputDir(projectPath + "/src/main/java");
        gc.setAuthor("ChanV");
        gc.setOpen(false);
        gc.setFileOverride(false);  //是否覆盖
        gc.setServiceName("%sService"); //去Service的I前缀
        gc.setIdType(IdType.ID_WORKER);
        gc.setDateType(DateType.ONLY_DATE);
        gc.setSwagger2(true);
        mpg.setGlobalConfig(gc);

        //2、设置数据源
        DataSourceConfig dsc = new DataSourceConfig();
        dsc.setUrl("jdbc:mysql://localhost:3306/mybatis-plus?useSSL=false&useUnicode=true&characterEncoding=utf-8&serverTimezone=GMT%2B8");
        dsc.setDriverName("com.mysql.cj.jdbc.Driver");
        dsc.setUsername("root");
        dsc.setPassword("root");
        dsc.setDbType(DbType.MYSQL);
        mpg.setDataSource(dsc);

        //3、包的配置
        PackageConfig pc = new PackageConfig();
        pc.setModuleName("blog");
        pc.setParent("com.chanv");
        pc.setEntity("pojo");
        pc.setMapper("mapper");
        pc.setService("service");
        pc.setController("controller");
        mpg.setPackageInfo(pc);

        //4、策略配置
        StrategyConfig strategy = new StrategyConfig();
        strategy.setInclude("user");    //设置要映射的表名
        strategy.setNaming(NamingStrategy.underline_to_camel);
        strategy.setColumnNaming(NamingStrategy.underline_to_camel);
        strategy.setEntityLombokModel(true);    //自动lombok
        strategy.setLogicDeleteFieldName("deleted");
        //自动填充配置
        TableFill createTime = new TableFill("create_time", FieldFill.INSERT);
        TableFill updateTime = new TableFill("update_time", FieldFill.UPDATE);
        ArrayList<TableFill> tableFills = new ArrayList<>();
        tableFills.add(createTime);
        tableFills.add(updateTime);
        strategy.setTableFillList(tableFills);
        //乐观锁
        strategy.setVersionFieldName("version");
        strategy.setRestControllerStyle(true);
        strategy.setControllerMappingHyphenStyle(true);     //localhost:8080/hello_id_2
        mpg.setStrategy(strategy);

        mpg.execute();  //执行代码构造器
    }
}
以上两步即可完成生成代码功能!
启动类上扫描
@SpringBootApplication  // 启动类
@MapperScan(value = {"com.wyl.mybatisplus.generator.mapper"})  // 扫描mapper
public class MybatisplusApplication {
    public static void main(String[] args) {
        SpringApplication.run(MybatisplusApplication.class, args);
    }
}
测试类上扫描
@SpringBootTest
@MapperScan(value = {"com.wyl.mybatisplus.generator.mapper"})  // @MapperScan("mapper的包位置")
class UserServiceTest {

    @Autowired
    private UserMapper mapper;

    @Test
    public void test(){
        mapper.selectList(null).forEach(System.out::println);
    }
}
5.3.测试MVC
5.3.1.后端:controller.java
package com.wyl.mybatisplus.generator.controller;
import com.wyl.mybatisplus.generator.service.UserService;
import org.springframework.beans.factory.annotation.Autowired;
import org.springframework.web.bind.annotation.GetMapping;
import org.springframework.web.bind.annotation.RequestMapping;
import org.springframework.stereotype.Controller;
import org.springframework.web.servlet.ModelAndView;

@Controller
@RequestMapping("/generator/user")
public class UserController {

    @Autowired
    private UserService userService;

    @GetMapping("/success")
    public ModelAndView index(){
        ModelAndView mav = new ModelAndView();
        mav.setViewName("success");
        mav.addObject("list",userService.list());
        return mav;
    }
}
5.3.2.前端:html
记得放在templates下哦
index.html
<h1>Index Page...</h1>
<a href="/generator/user/success">展示数据</a>
succuss.html
<!DOCTYPE html>
<html lang="en">
<!-- 配置thymeleaf模板标签库 -->
<html xmlns:th="http://www.thymeleaf.org">
<head>
    <meta charset="UTF-8">
    <title>Success Page</title>
</head>
<body>

<h1>Success Page...</h1>

<table border="1" cellspacing="0" cellpadding="1">
    <tr>
        <th>编号</th>
        <th>用户名</th>
        <th>年龄</th>
    </tr>
    <tr th:each="user:${list}">
        <td th:text="${user.id}"></td>
        <td th:text="${user.userName}"></td>
        <td th:text="${user.userAge}"></td>
    </tr>
</table>

</body>
</html>
前端用到thymeleaf模板引擎,需要配置application.yml
spring:
# 视图解析
  thymeleaf:
    prefix: classpath:/templates/
    suffix: .html
6.MybatisX 快速开发插件
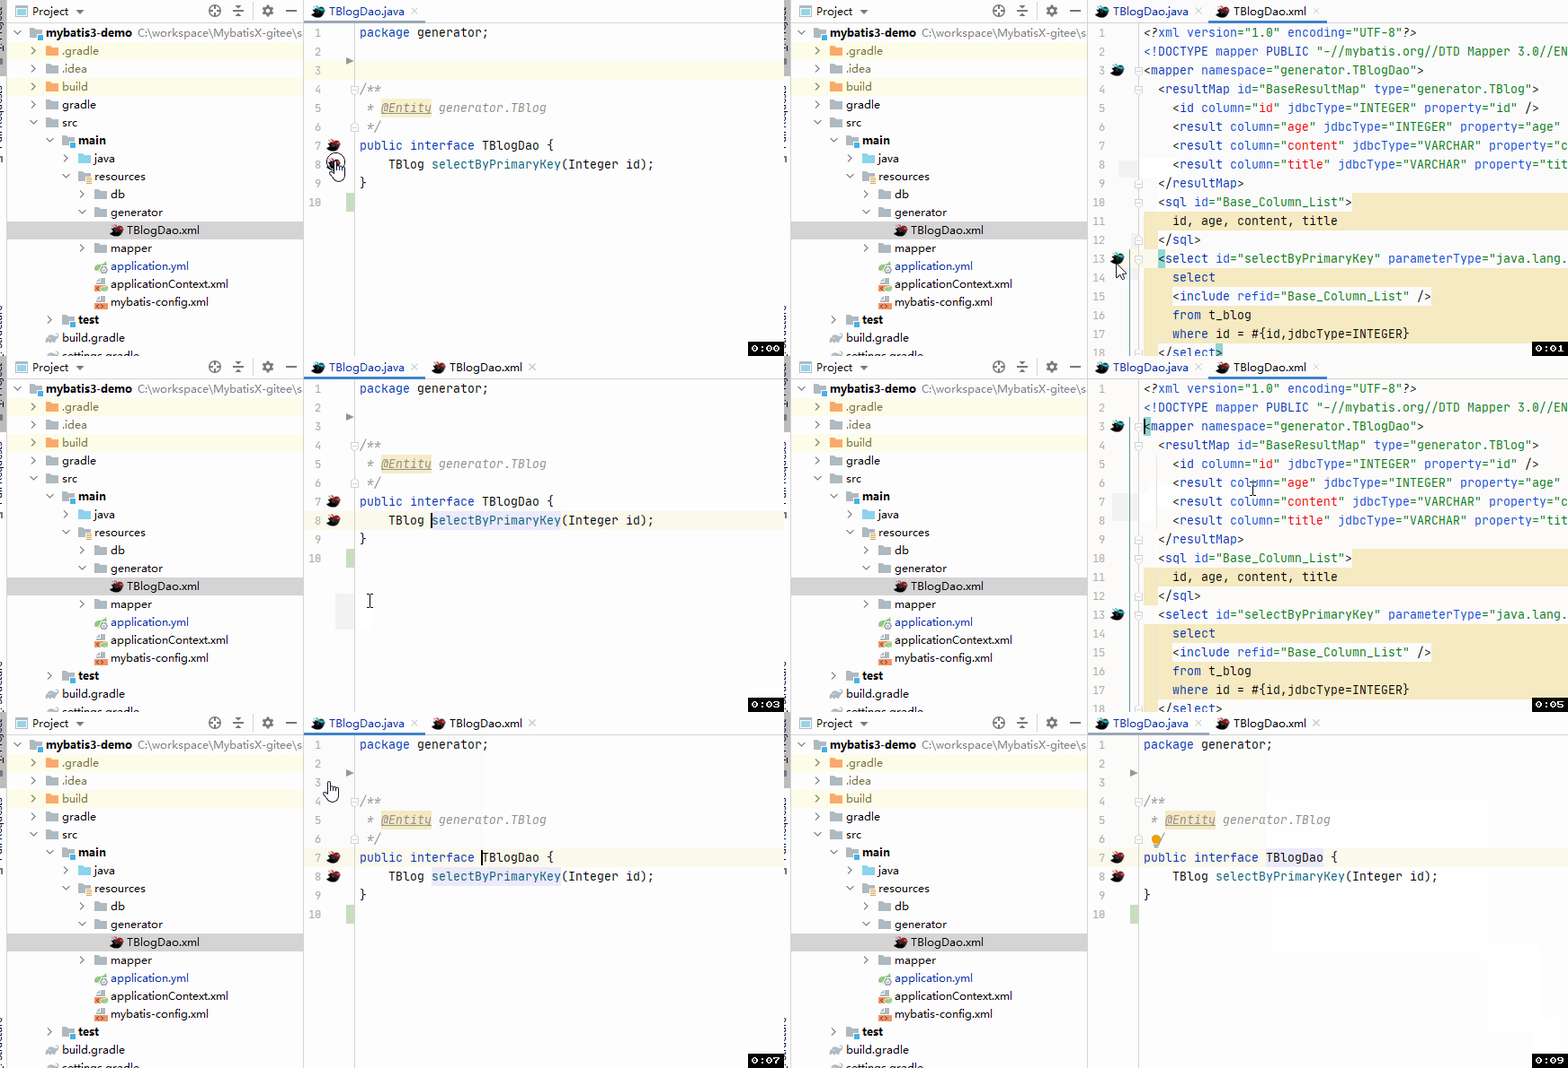
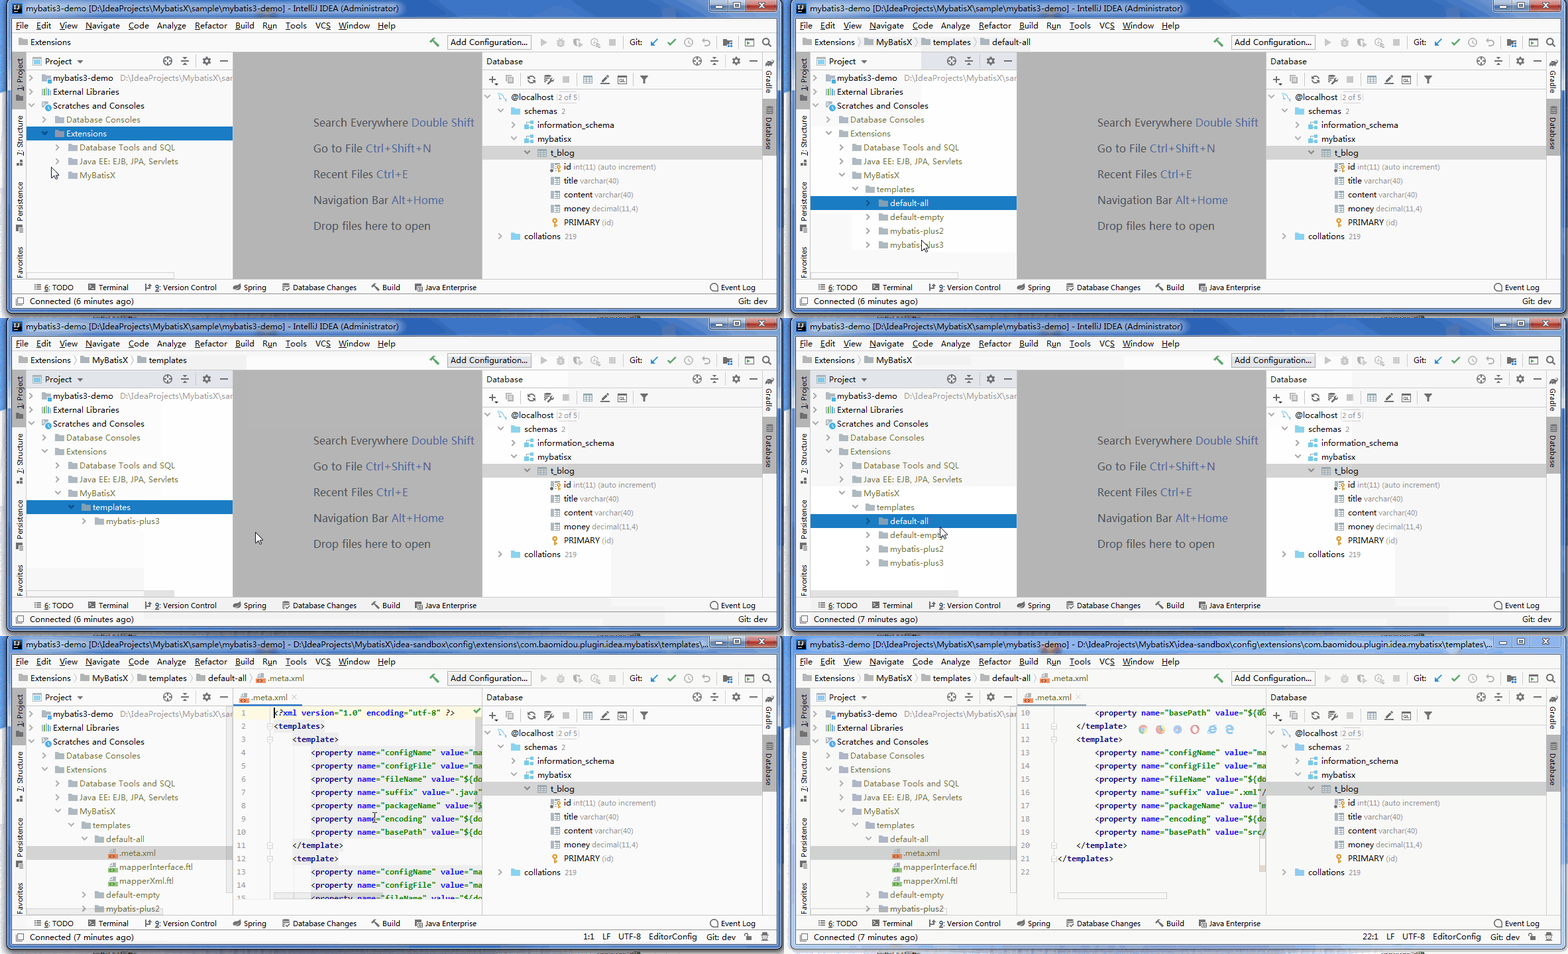
MybatisX 是一款基于 IDEA 的快速开发插件,为效率而生。
功能
XML跳转
生成代码(需先在idea配置Database配置数据源)
重置模板
JPA提示
生成新增
生成查询
生成修改
生成删除
8.乐观锁
在面试过程中,我们经常会被问到乐观锁,悲观锁!这个其实非常简单!
原子引用!
乐观锁:顾名思义十分乐观,他总是认为不会出现问题,无论干什么不去上锁!如果出现了问题,再次更新值测试!
悲观锁:顾名思义十分悲观,他总是任务总是出现问题,无论干什么都会上锁!再去操作!
我们这里主要讲解,乐观锁机制!
乐观锁实现方式:
- 取出记录,获取当前version
- 更新时,带上这个version
- 执行更新时,set version = new version where version = oldversion
- 如果version不对,就更新失败
乐观锁:1、先查询,获得版本号 version = 1
-- A
update user set name = "wyl", version = version + 1
where id = 2 and version = 1

-- B 线程抢先完成,这个时候 version = 2,会导致 A 修改失败!
update user set name = "wjm", version = version + 1
where id = 2 and version = 1
测试一下MP的乐观锁插件
1、给数据库中增加version字段!
//测试乐观锁成功!
@Test
public void testOptimisticLocker(){
    //1、查询用户信息
    User user = userMapper.selectById(1330080433207046145L);
    //2、修改用户信息
    user.setName("ChanV");
    user.setEmail("1277077741@qq.com");
    //3、执行更新操作
    userMapper.updateById(user);
}

//测试乐观锁失败!多线程下
@Test
public void testOptimisticLocker2(){
    //线程1
    User user = userMapper.selectById(5L);
    user.setName("ChanV111");
    user.setEmail("1277077741@qq.com");
    //模拟另一个线程执行了插队操作
    User user2 = userMapper.selectById(5L);
    user2.setName("ChanV222");
    user2.setEmail("1277077741@qq.com");
    userMapper.updateById(user2);

    //自旋锁多次尝试提交
    userMapper.updateById(user);    //如果没有乐观锁就会覆盖队线程的值
}
9.全局策略配置:
通过上面的小案例我们可以发现,实体类需要加@TableName注解指定数据库表名,通过@TableId注解指定id的增长策略。实体类少倒也无所谓,实体类一多的话也麻烦。所以可以在spring-dao.xml的文件中进行全局策略配置。
<!-- 5、mybatisplus的全局策略配置 -->
<bean id="globalConfiguration" class="com.baomidou.mybatisplus.entity.GlobalConfiguration">
        <!-- 2.3版本后,驼峰命名默认值就是true,所以可不配置 -->
        <!--<property name="dbColumnUnderline" value="true"/>-->
        <!-- 全局主键自增策略,0表示auto -->
        <property name="idType" value="0"/>
        <!-- 全局表前缀配置 -->
        <property name="tablePrefix" value="tb_"/>
</bean>
这里配置了还没用,还需要在sqlSessionFactory中注入配置才会生效。如下:
<!-- 3、配置mybatisplus的sqlSessionFactory -->
<bean id="sqlSessionFactory" class="com.baomidou.mybatisplus.spring.MybatisSqlSessionFactoryBean">
        <property name="dataSource" ref="dataSource" />
        <property name="configLocation" value="classpath:mybatis-config.xml"/>
        <property name="typeAliasesPackage" value="com.zhu.mybatisplus.entity"/>
        <!-- 注入全局配置 -->
        <property name="globalConfig" ref="globalConfiguration"/>
</bean>
如此一来,实体类中的@TableName注解和@TableId注解就可以去掉了。


