
Idea实现java+TestNG接口自动化(Mac)
参考https://www.jianshu.com/p/f087e9051726
1、软件安装
下载IntelliJ IDEA CE 并安装
链接: https://pan.baidu.com/s/1MJa-vy8vmzZpnzXpmkb-hQ 提取码: az5m
2、引入testng
1.新建maven项目:
(1)打开idea,new project,新建一个maven项目
(2)搜索maven中央仓库 - https://mvnrepository.com/,进入后搜索testng
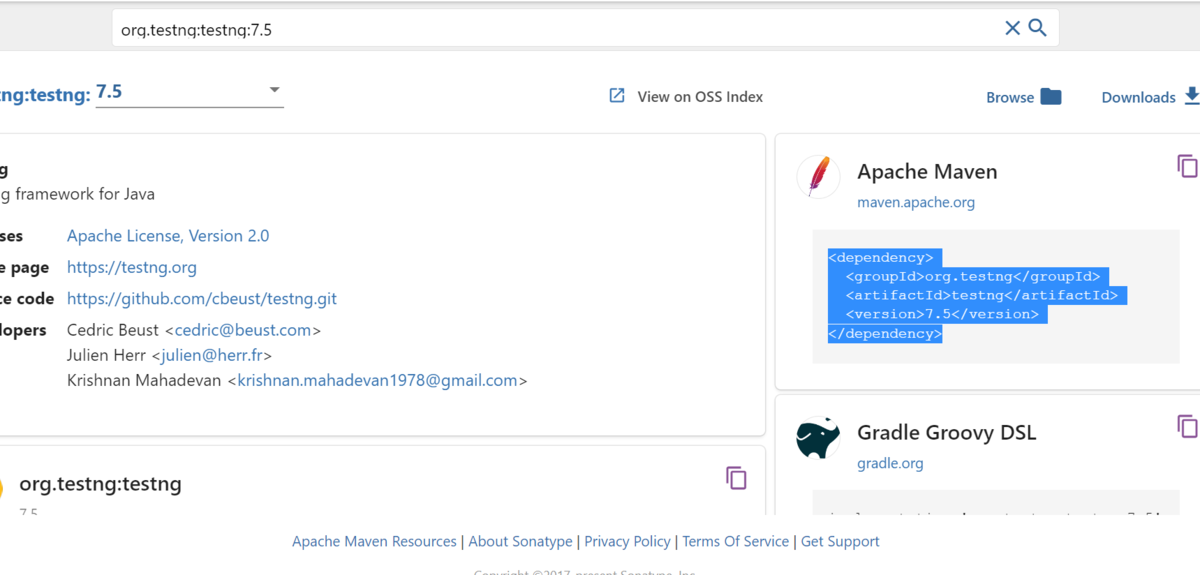
(3)复制如下内容,放入pom.xml文件中
<dependency>
  <groupId>org.testng</groupId>
  <artifactId>testng</artifactId>
  <version>7.5</version>
</dependency>
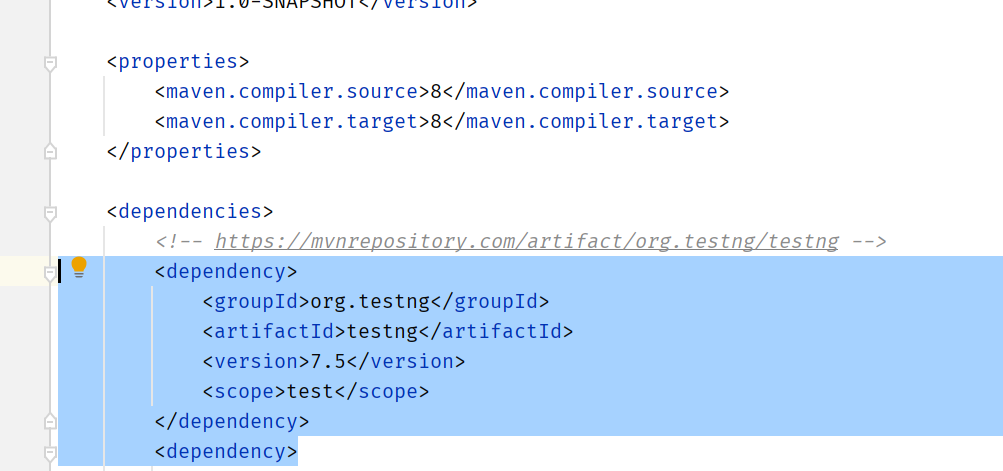
完成以上步骤,testng就完成引入了。
2.安装testng.xml :
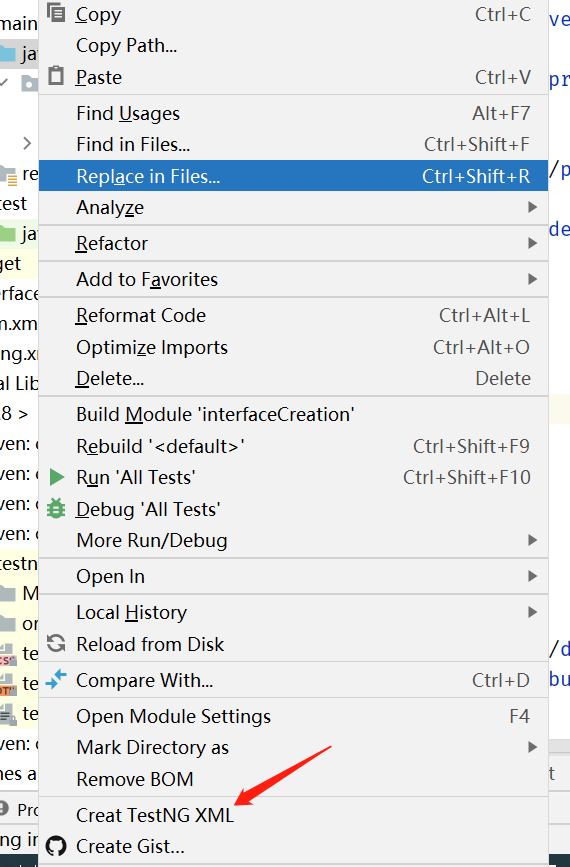
(1)下载插件:https://plugins.jetbrains.com/plugin/9556-create-testng-xml
(2)通过idea 中找到下载的这个插件,进行安装
菜单栏【IntelliJ Idea】-【Settings】

(3)重启idea,右击这个文件就可以看到 create testng xml了
3.编写第一个测试用例:
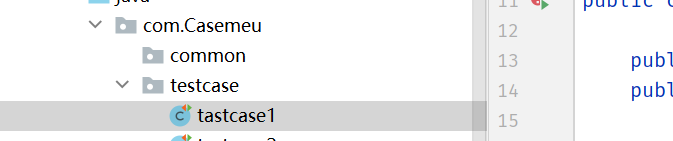
(1)在src/main/java下新建文件 com.Casemeu.testcase,在testcase新建.javaClass文件testcase1
(2)如下代码使用 @test注解,代表这是一个可执行的测试用例,并使用Assert进行断言
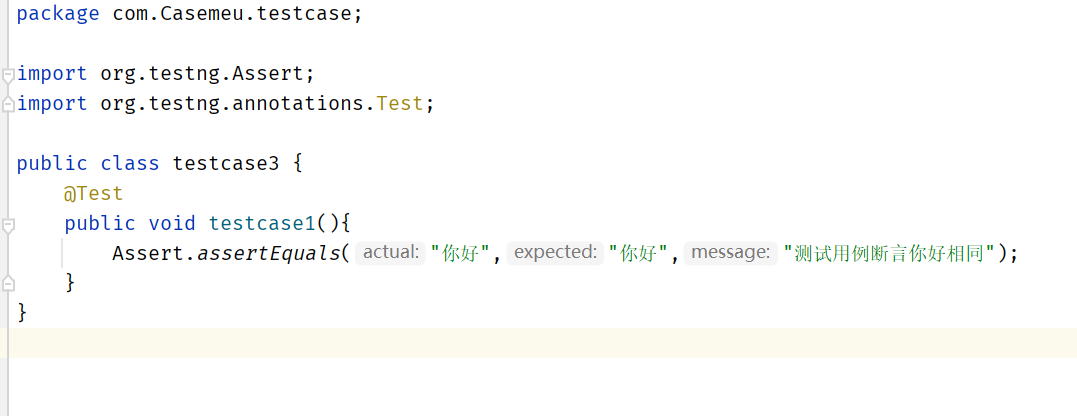
//在idea中写Assert.assertEquals时,可以不敲actual,expected,message,直接敲“你好”...,软件会自动带入actual,expected,message,要不然会报错
Assert.assertEquals("你好", "你好", "测试用例断言你好相同");
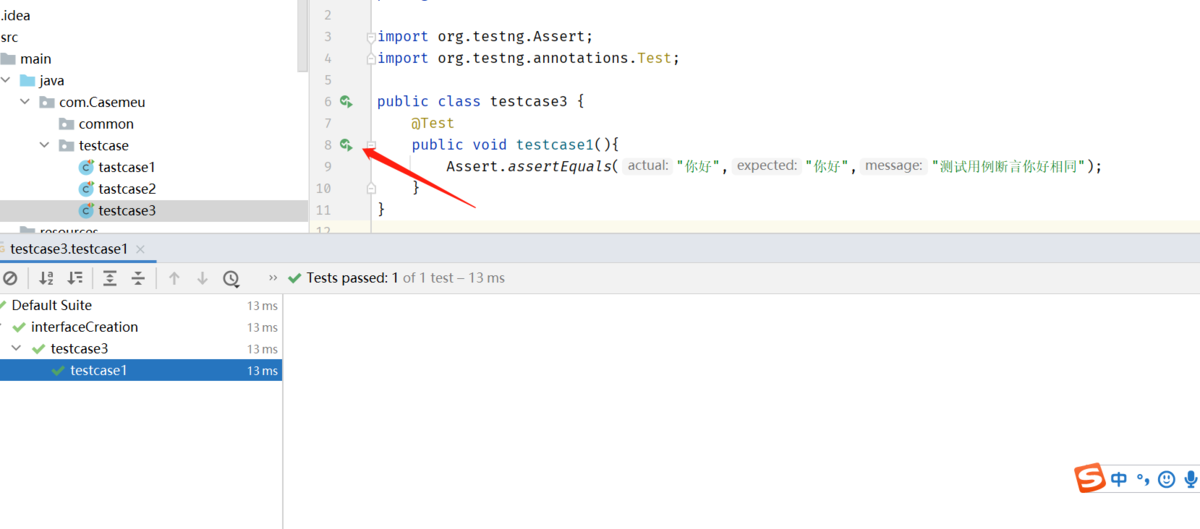
(3)执行测试用例,点击运行按钮即可,执行结果如下:
4.使用xml批量执行用例:
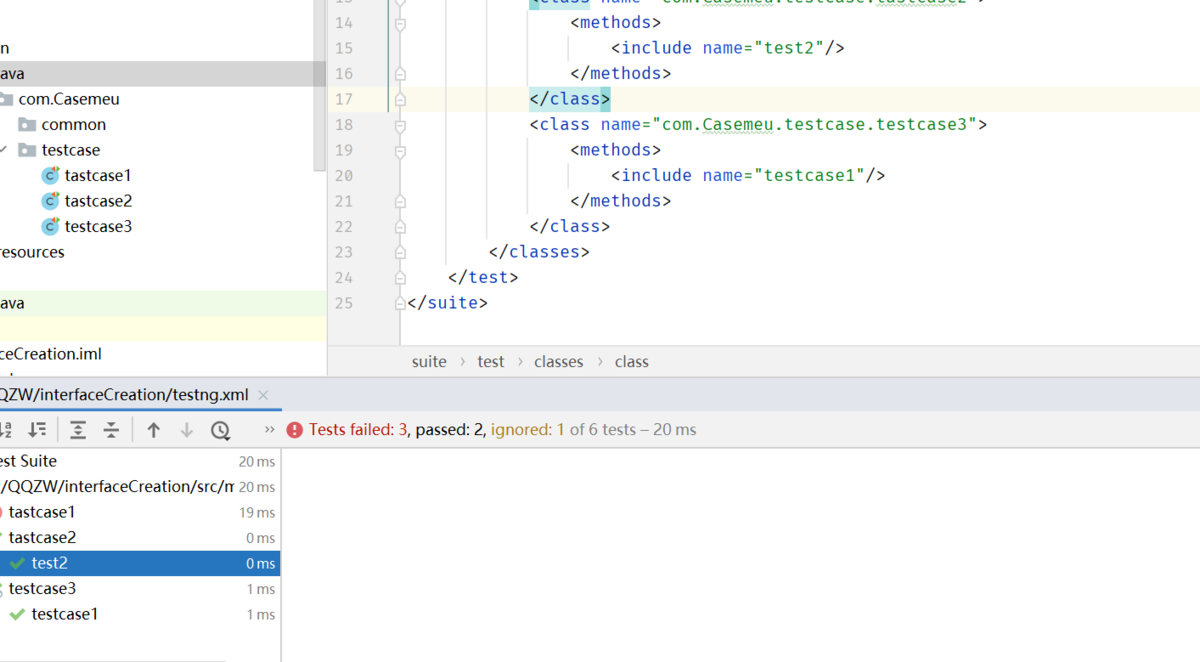
(1)右击任意一个文件点击create testng xml,然后重启idea,即可生成testng.xml文件,右击执行run testng.xml 可批量执行所有的用例:
5.@Test常用参数
(1) enable 是否执行此用例,若enable = false,则不执行此方法,若enable = true 则此方法执行,如图test1的enable设置为false,则只执行了test2,test3用例:

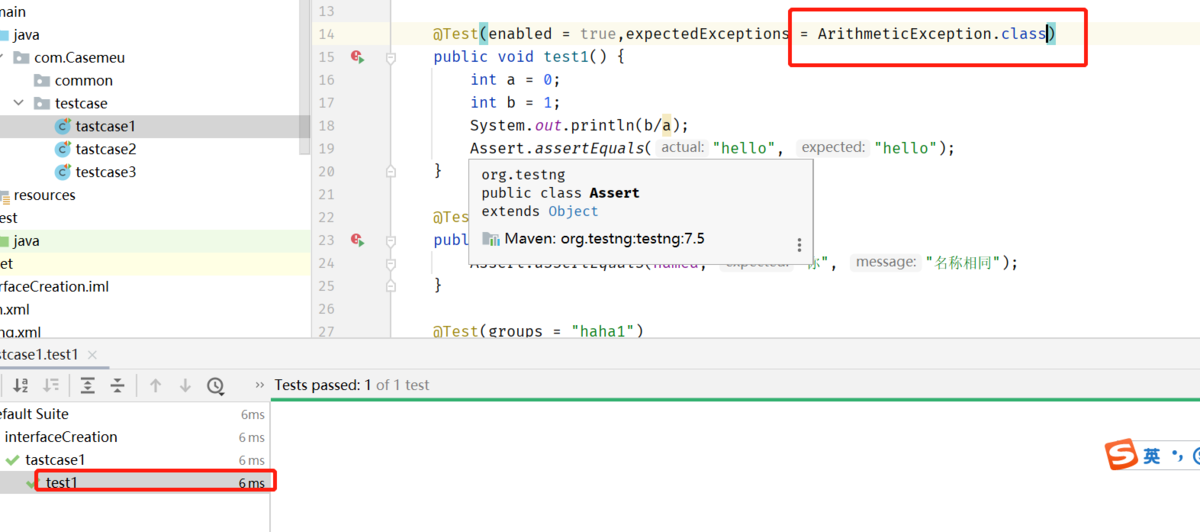
例如:使用1除以0 除数为0 则会抛出
java.lang.ArithmeticException: / by zero的异常如图所示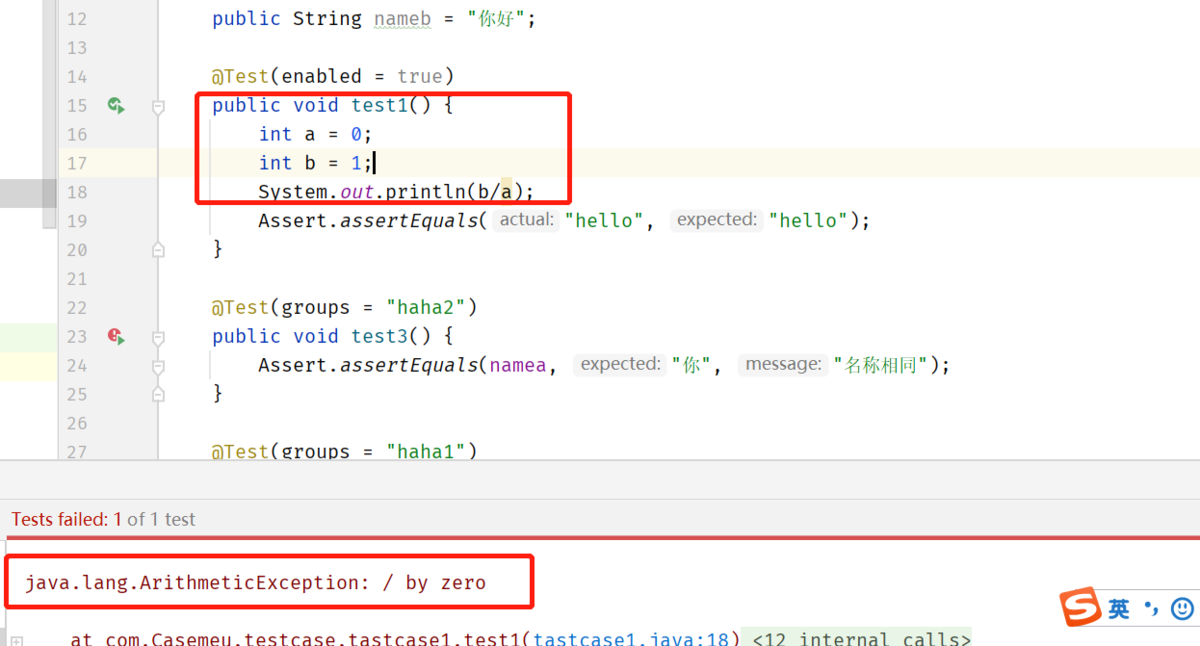
但是此时用例的断言是通过的,所以我们不需要获取此类异常。此时我们增加参数expectedException = ArithmeticException.class,再次运行代码:
当然,预期异常也可以设置多个,例如:
@Test(expectedExceptions = {ArithmeticException.class, ArithmeticException2.class,... })(3)timeout 超时时间设置,
timeout =2 即超时时长2ms,如图所示若用例执行超过2ms则会报错超时。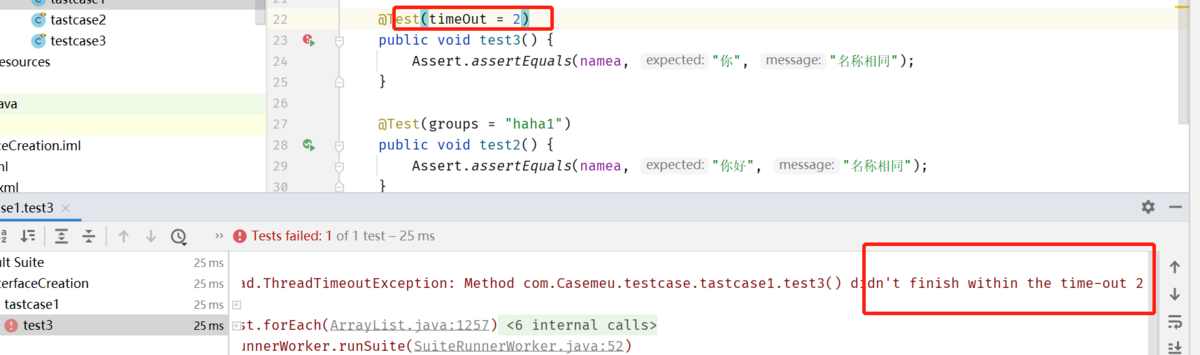
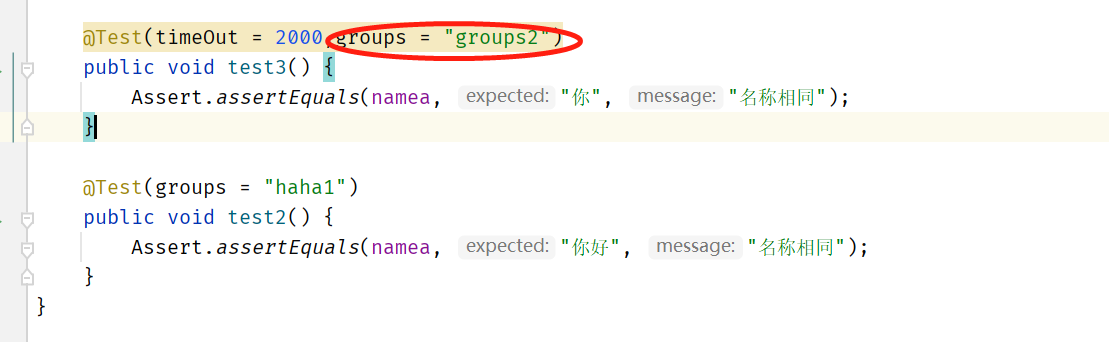
(4)goups 用例分组,testng可以通过分组的方式运行测试用例,将同组的用例放在一起运行。
编写如下代码,使用groups = "分组名"来定义分组
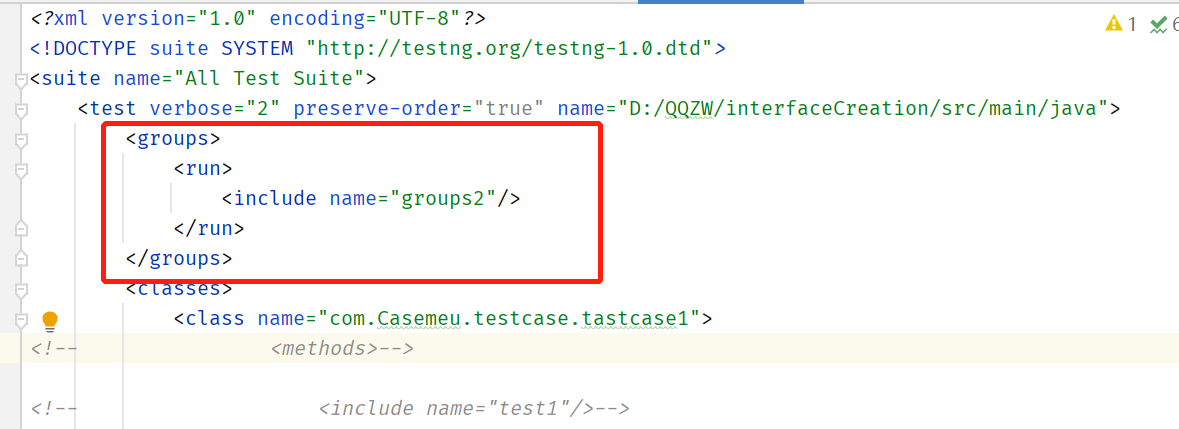
然后通过testng.xml文件配置分组信息执行:
一个用例也可以同时有多个分组,可以使用```groups = {"groups2","groups2"}
同时testng.xml中需要修改为:
        <groups>
            <run>
                <include name="groups2"/>
                <include name="groups1"/>
            </run>
        </groups>

一个定义分组后,各个用例引用这个分组的例子:
首先新建一个文件用于定义分组
文件名:groups
public class groups {
    public static final String BVT = "BVT";
    public static final String NORMAL = "NORMAL";
    public static final String ABNORMAL = "NORMAL";
}
然后使用测试用例引用这个分组进行分组分类
文件名:testcase1
import static com.Casemeu.common.groups.*;
public class tastcase1{
    @Test(groups = BVT)
    public void test1() {
        Assert.assertEquals("hello", "hello");
    }
这样是实现了规范的分组管理。dependsOnMethods = {"test2","test1"}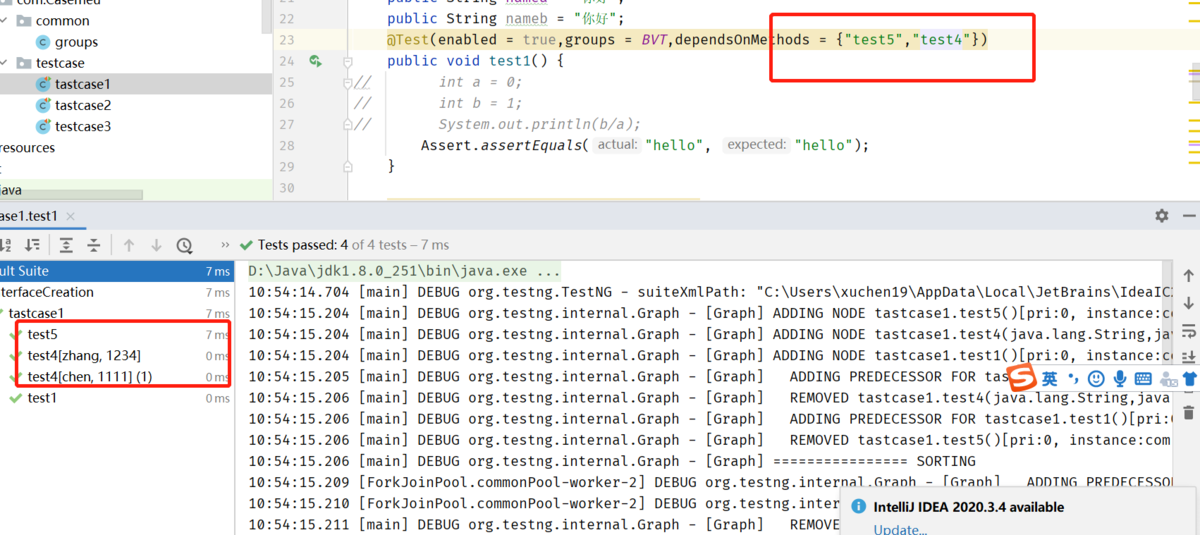
(6)Parameters使用xml进行参数化:
首先配置代码中参数化内容
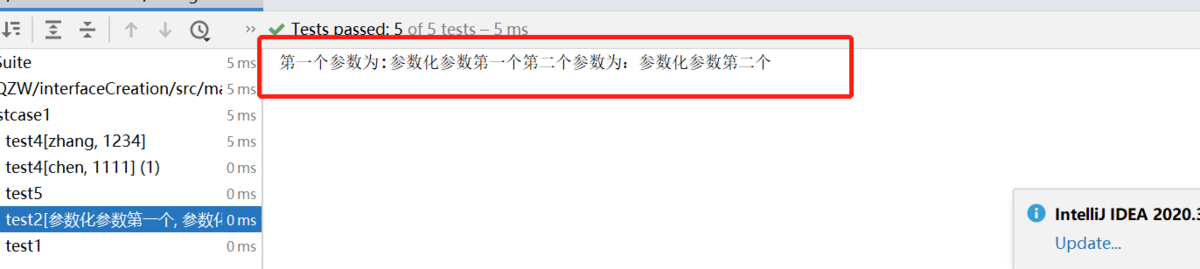
 @Test(groups = BVT)
 @Parameters({"p1","p2"})
 public void test2(String p1,String p2) {
        System.out.printf("第一个参数为:"+p1+"第二个参数为:"+p2);
        Assert.assertEquals(namea, "你好", "名称相同");
    }
然后配置xml中参数,放入test标签下一级:
 1 <?xml version="1.0" encoding="UTF-8"?>
 2 <!DOCTYPE suite SYSTEM "http://testng.org/testng-1.0.dtd">
 3 <suite name="All Test Suite">
 4     <test verbose="2" preserve-order="true" name="D:/interfaceCreation/src/main/java">
 5         <parameter name="p1" value="参数化参数第一个"></parameter>
 6         <parameter name="p2" value="参数化参数第二个"></parameter>
 7         <groups>
 8             <run>
 9                 <include name= "BVT"/>
10             </run>
11         </groups>
12         <classes>
13             <class name="com.Casemeu.testcase.tastcase1">
14             </class>
15         </classes>
16     </test>
17 </suite>
接着执行这个xml就可以了,如图已经把两个参数都传入用例中了:
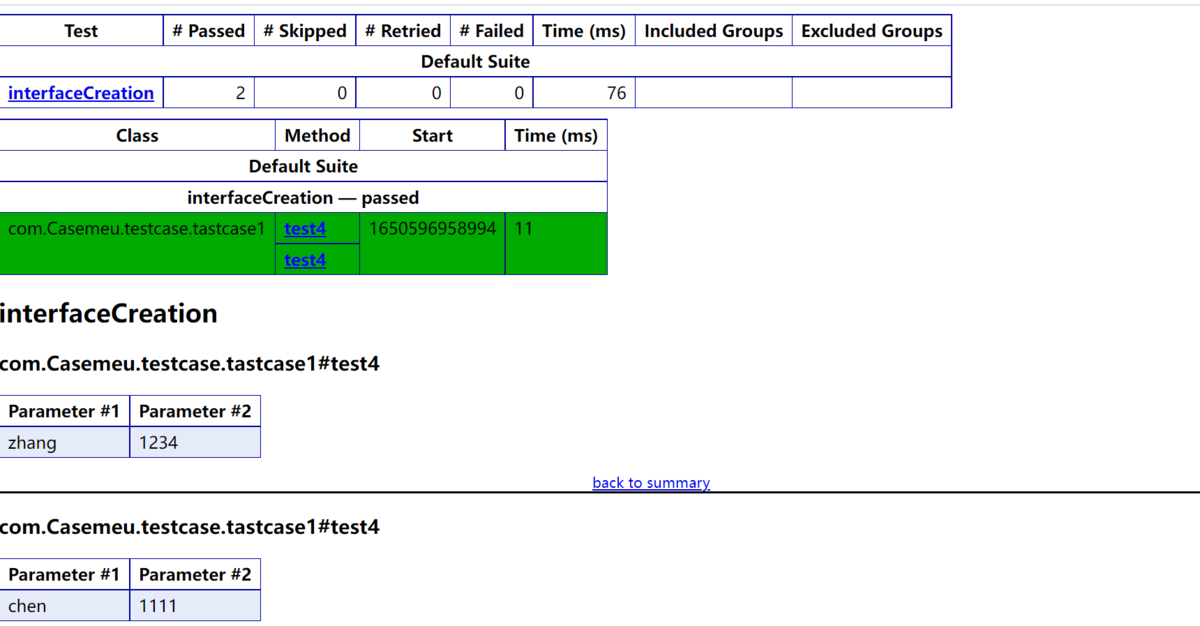
(7)@DataProvider 传递较复杂的参数,进行参数化:
首先新建一个传递参数的方法
@DataProvider(name = "account')
public Object[][] account(){
          return new Obhect[][]{
                    {"zhang","12345"},
                    {"chen","11111"}
       };
}
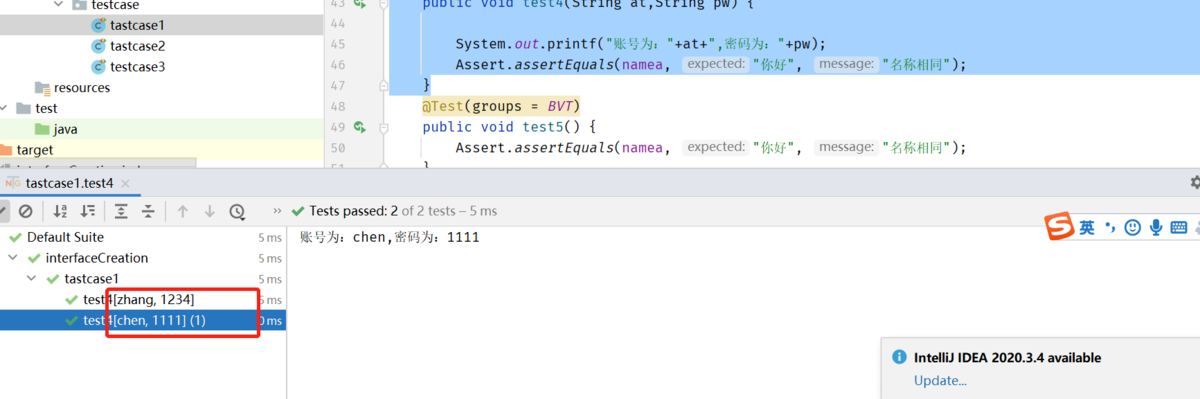
然后,在测试用例中使用这个参数:
1     @Test(groups = BVT,dataProvider = "account")
2     public void test21(String at,String pw) {
3         System.out.printf("账号为:"+at+",密码为:"+pw);
4         Assert.assertEquals("你好", "你好", "名称相同");
5     }
然后运行这个用例,可以看到这两个参数都传入到用例中:
6.测试报告的生成:
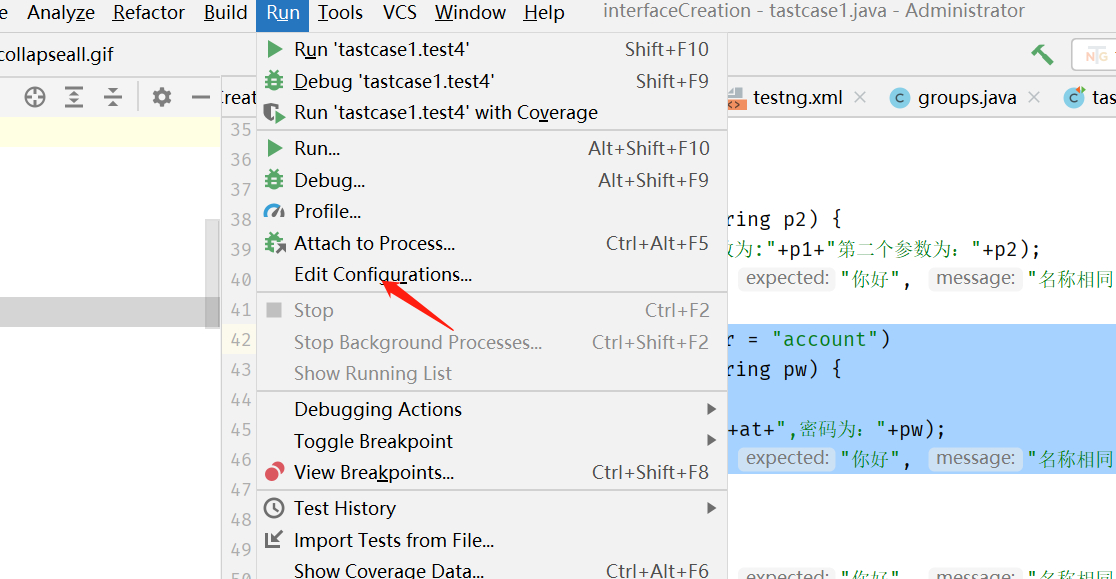
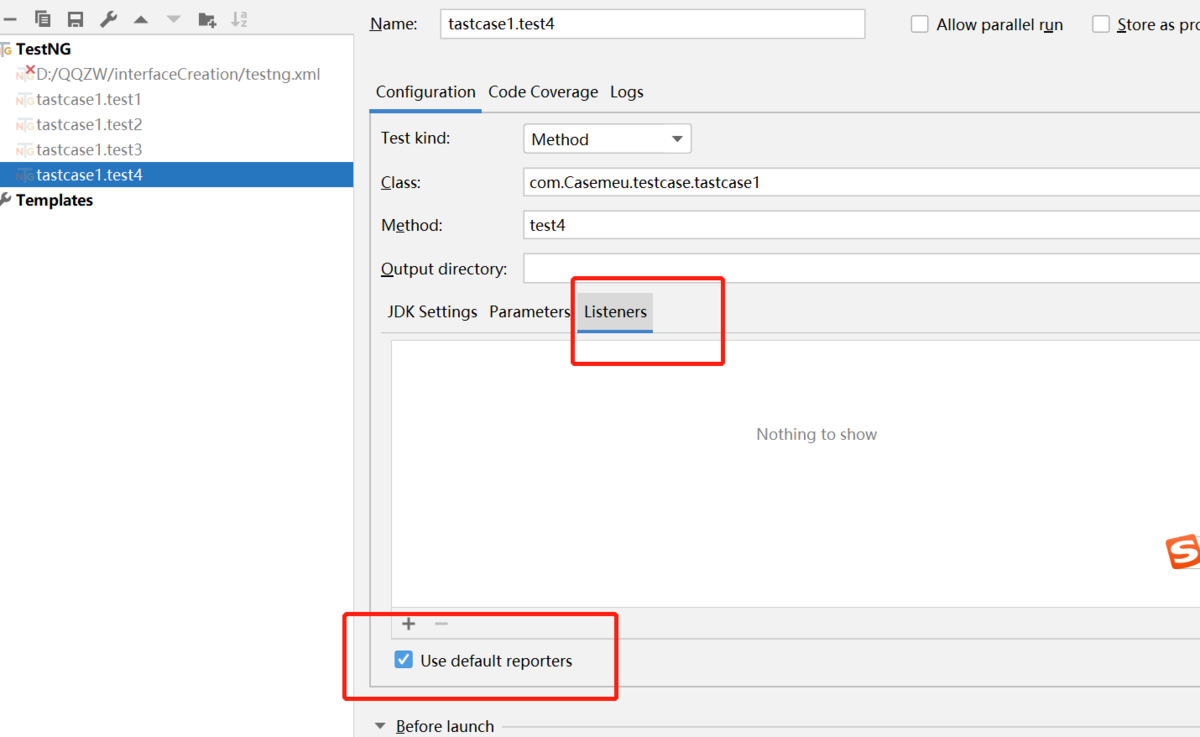
(1)idea中找到run - Edit Configurations - (右边框中)listeners - use default reproters(勾选)
(2)这个时候运行代码就可以看到测试报告的文件
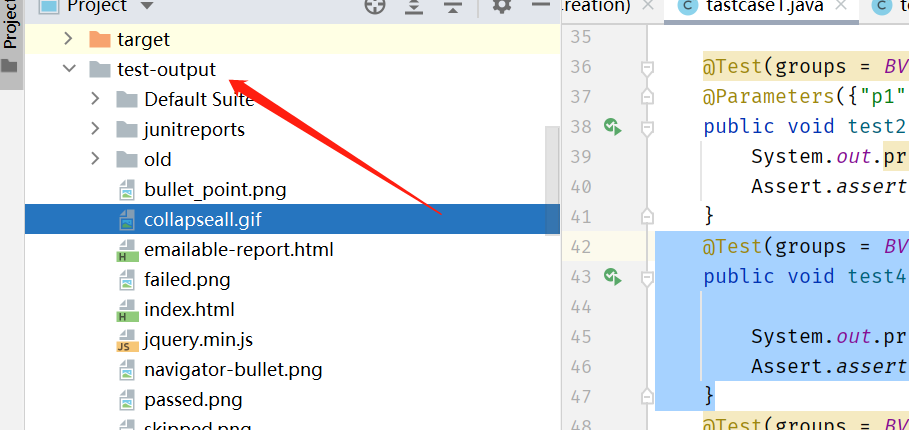
(3) index.html 汇总的测试报告 /emailable-report.html 详细的测试报告
7.功能小计
测试注释 @Test
套件测试 标签
在套件中的所有测试运行之前运行 @BeforeSuite
在套件中的所有测试运行之后运行 @AfterSuite
测试之前运行 @BeforeTest
测试之后运行 @AfterTest
分组测试 @Test的group参数
在调用属于任何这些组的第一个测试方法之前运行 @BeforeGroups
在调用属于任何这些组的第一个测试方法之后运行 @AfterGroups
在调用当前类的第一个测试方法之前运行 @BeforeClass
在调用当前类的第一个测试方法之后运行 @AfterClass
在每个测试方法之前运行 @BeforeMethod
在每个测试方法之后运行 @AfterMethod
预期的异常 @Test(expectedExceptions = ArithmeticException.class)
超时测试 @Test(timeout=1000)
参数化测试 @Parameters或DataProvider
依赖测试 @Test的dependsOnMethods参数
参考:
作者:陈芝麻烂谷子的事
链接:https://www.jianshu.com/p/f087e9051726

 浙公网安备 33010602011771号