mongodb-的副本集
复制的重要性不再多说,其主要就是提供数据保护,数据高可用和灾难恢复。
复制是跨多个mongodb服务器分布和维护的方法。mongodb可以把数据从一个节点复制到其他节点并在修改时进行同步。
mongodb的复制有两种方式: 副本集复制和主从架构复制。这两种方法类似,主节点接收所有的写请求,然后所有的从节点读取,并且异步同步所有的数据。
主从复制和副本集使用了相同的复制机制,但是副本集额外增加了自动化灾备机制,如果主节点宕机,无论什么原因,其中一个从节点会自动提升为主节点。除此之外副本集还提供了其他改进,比如更易于恢复和更复杂地部署网络拓扑。线上环境几乎全都是使用的副本集,因此这里只会有关于副本集的介绍。
下面会实际搭建一个最基本的副本集,然后会说明副本集的原理?
【MongoDB的启动必须从配置文件启动,不要用命令行】
第一步:配置文件中指定副本集的名称
#在三台服务器的配置文件中均要有如下设置
replication:
    oplogSizeMB: 20       #指定oplog的日志大小,注意这里大小只是为了测试
    replSetName: lianxi   #指定副本集的名称,在一个副本集中名称要保持一致
第二步:配置文件启动MongoDB服务器:
[root@test1 ~]# cd /usr/local/mongodb/bin
[root@test1 bin]# ./mongod -f ../conf/mongod.conf
about to fork child process, waiting until server is ready for connections.
forked process: 2247
child process started successfully, parent exiting
[root@test1 bin]#
第三步:配置副本集
#选中其中一台MongoDB服务器作为primary.
[root@test2 bin]# ./mongo        #进入shell交互界面
MongoDB shell version v3.4.2
connecting to: mongodb://127.0.0.1:27017
MongoDB server version: 3.4.2
Server has startup warnings:
2018-11-06T13:13:43.676+0800 I STORAGE  [initandlisten]
2018-11-06T13:13:43.676+0800 I STORAGE  [initandlisten] ** WARNING: Using the XFS filesystem is strongly recommended with the WiredTiger storage engine
2018-11-06T13:13:43.676+0800 I STORAGE  [initandlisten] **          See http://dochub.mongodb.org/core/prodnotes-filesystem
2018-11-06T13:13:43.809+0800 I CONTROL  [initandlisten]
2018-11-06T13:13:43.809+0800 I CONTROL  [initandlisten] ** WARNING: Access control is not enabled for the database.
2018-11-06T13:13:43.809+0800 I CONTROL  [initandlisten] **          Read and write access to data and configuration is unrestricted.
2018-11-06T13:13:43.809+0800 I CONTROL  [initandlisten] ** WARNING: You are running this process as the root user, which is not recommended.
2018-11-06T13:13:43.809+0800 I CONTROL  [initandlisten]
> rs.initiate()                      #初始化操作
{
    "info2" : "no configuration specified. Using a default configuration for the set",
    "me" : "test2:27017",
    "ok" : 1
}
lianxi:SECONDARY>     #初始化成功之后,提示会变为SECONDARY
lianxi:PRIMARY>         #敲下回车,会变为PRIMARY
#初始化成功之后,添加副本集成员
lianxi:PRIMARY> rs.add("10.0.102.214:27017")   #添加从节点
{ "ok" : 1 }

#添加仲裁节点
lianxi:PRIMARY> rs.addArb("10.0.102.220:27017")
{ "ok" : 1 }
若上面的步骤没有报错,说明副本集搭建成功。
说一个这里搭建遇见的一个问题:


> rs.initiate()
{
    "info2" : "no configuration specified. Using a default configuration for the set",
    "me" : "test3:27017",
    "ok" : 1
}                      #初始化成功
test_repl:SECONDARY> rs.add("10.0.102.181:27017")   #添加节点成功【但是日志会在等一会之后报错】
{ "ok" : 1 }
test_repl:PRIMARY> rs.addArb("10.0.102.204:27017")   #若不查看日志直接添加仲裁节点,会报如下错误!
2018-11-05T10:33:12.753+0800 E QUERY    [thread1] Error: error doing query: failed: network error while attempting to run command 'count' on host '127.0.0.1:27017'  :
DB.prototype.runCommand@src/mongo/shell/db.js:132:1
DB.prototype.runReadCommand@src/mongo/shell/db.js:109:16
DBQuery.prototype.count@src/mongo/shell/query.js:380:15
DBCollection.prototype.count@src/mongo/shell/collection.js:1700:12
rs.add@src/mongo/shell/utils.js:1213:1
rs.addArb@src/mongo/shell/utils.js:1253:12
@(shell):1:1
2018-11-05T10:33:12.756+0800 I NETWORK  [thread1] trying reconnect to 127.0.0.1:27017 (127.0.0.1) failed
2018-11-05T10:33:12.757+0800 I NETWORK  [thread1] reconnect 127.0.0.1:27017 (127.0.0.1) ok

test_repl:SECONDARY>                              #这里的提示变为SECONDARY


这个问题查了好久,后来在日志文件中发现是第一步添加节点成功,日志就报错了意识是主节点连接不上从节点,但是在命令行指定host参数是可以连接的,于是就各种纠结!
最后无意中看了/etc/hosts文件,发现是hosts文件的域名解析指向错误。好吧,就是这里的问题!但是费了好长时间!
这个副本集中含有一个主节点用来写入数据,一个从节点,和一个仲裁节点,整个结构如下:
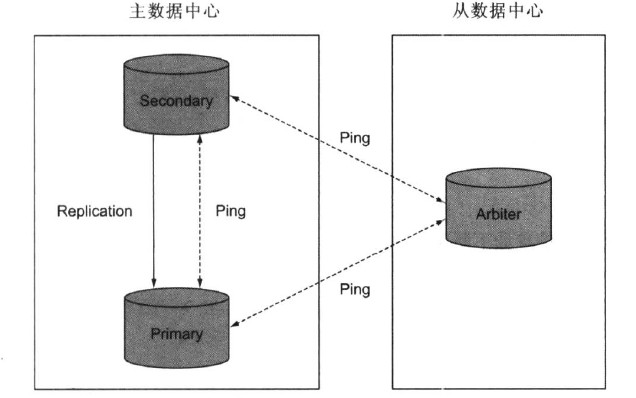
这是MongoDB副本集的最小的节点数量,一旦主宕机,根据选举原则(一个服务器一票)从服务器会被提升为主服务器继续提供服务。MongoDB副本集为了防止出现脑裂的情况,副本集的个数应该为奇数。
测试副本集:
查看当前副本集的状态,可以使用如下命令:
rs.status()members数组中有三个成员,分别表示这主节点,从节点,和仲裁节点。
#在主上面写入数据
lianxi:PRIMARY> use mydb
switched to db mydb
lianxi:PRIMARY> db.cityinfo.insert({name: "HongKong", country: "CHINA"})
WriteResult({ "nInserted" : 1 })
lianxi:PRIMARY>

#从上面查看数据
lianxi:SECONDARY> show dbs;     #从上面需要执行slaveOK命令才能查看数据
2018-11-06T14:06:47.696+0800 E QUERY    [thread1] Error: listDatabases failed:{
    "ok" : 0,
    "errmsg" : "not master and slaveOk=false",
    "code" : 13435,
    "codeName" : "NotMasterNoSlaveOk"
} :
_getErrorWithCode@src/mongo/shell/utils.js:25:13
Mongo.prototype.getDBs@src/mongo/shell/mongo.js:62:1
shellHelper.show@src/mongo/shell/utils.js:755:19
shellHelper@src/mongo/shell/utils.js:645:15
@(shellhelp2):1:1
lianxi:SECONDARY> rs.slaveOk()        #执行命令后
lianxi:SECONDARY> show dbs;
admin  0.000GB
local  0.000GB
mydb   0.000GB
lianxi:SECONDARY> use mydb
switched to db mydb
lianxi:SECONDARY> show collections;
cityinfo
lianxi:SECONDARY> db.cityinfo.find().pretty()   #数据已经同步到从上
{
    "_id" : ObjectId("5be12eb19efff2d99afed619"),
    "name" : "HongKong",
    "country" : "CHINA"
}
lianxi:SECONDARY>
查看主的状态如下:
lianxi:PRIMARY> db.isMaster()
{
    "hosts" : [
        "test2:27017",
        "10.0.102.214:27017"
    ],
    "arbiters" : [
        "10.0.102.220:27017"
    ],
    "setName" : "lianxi",
    "setVersion" : 3,
    "ismaster" : true,
    "secondary" : false,
    "primary" : "test2:27017",
    "me" : "test2:27017",
    "electionId" : ObjectId("7fffffff0000000000000001"),
    "lastWrite" : {
        "opTime" : {
            "ts" : Timestamp(1541484441, 1),
            "t" : NumberLong(1)
        },
        "lastWriteDate" : ISODate("2018-11-06T06:07:21Z")
    },
    "maxBsonObjectSize" : 16777216,
    "maxMessageSizeBytes" : 48000000,
    "maxWriteBatchSize" : 1000,
    "localTime" : ISODate("2018-11-06T06:07:22.355Z"),
    "maxWireVersion" : 5,
    "minWireVersion" : 0,
    "readOnly" : false,
    "ok" : 1
}
模仿故障转移,我们kill掉主进程,然后观察从服务器是否会变为主服务器。
#kill掉主服务器的进程
[root@test2 conf]# kill `netstat -lntp |grep mongod | awk '{print $NF}' | cut -d "/" -f1`
[root@test2 conf]# netstat -lntp | grep 27017

#查看从服务器
lianxi:SECONDARY>              #敲回车会变为SECONDARY
lianxi:PRIMARY> db.isMaster()
{
    "hosts" : [
        "test2:27017",
        "10.0.102.214:27017"
    ],
    "arbiters" : [
        "10.0.102.220:27017"
    ],
    "setName" : "lianxi",
    "setVersion" : 3,
    "ismaster" : true,
    "secondary" : false,
    "primary" : "10.0.102.214:27017",
    "me" : "10.0.102.214:27017",
    "electionId" : ObjectId("7fffffff0000000000000002"),
    "lastWrite" : {
        "opTime" : {
            "ts" : Timestamp(1541485059, 1),
            "t" : NumberLong(2)
        },
        "lastWriteDate" : ISODate("2018-11-06T06:17:39Z")
    },
    "maxBsonObjectSize" : 16777216,
    "maxMessageSizeBytes" : 48000000,
    "maxWriteBatchSize" : 1000,
    "localTime" : ISODate("2018-11-06T06:17:49.181Z"),
    "maxWireVersion" : 5,
    "minWireVersion" : 0,
    "readOnly" : false,
    "ok" : 1
}

#查看仲裁节点的日志

2018-11-06T14:15:28.293+0800 I -        [conn2] end connection 10.0.102.204:18284 (2 connections now open)      #这个时间点kill掉了主服务器
2018-11-06T14:15:29.515+0800 I ASIO     [ReplicationExecutor] dropping unhealthy pooled connection to test2:27017
2018-11-06T14:15:29.515+0800 I ASIO     [ReplicationExecutor] after drop, pool was empty, going to spawn some connections
2018-11-06T14:15:29.515+0800 I ASIO     [NetworkInterfaceASIO-Replication-0] Connecting to test2:27017
2018-11-06T14:15:29.515+0800 I ASIO     [NetworkInterfaceASIO-Replication-0] Failed to connect to test2:27017 - HostUnreachable: Connection refused
2018-11-06T14:15:29.515+0800 I REPL     [ReplicationExecutor] Error in heartbeat request to test2:27017; HostUnreachable: Connection refused
2018-11-06T14:15:29.516+0800 I ASIO     [NetworkInterfaceASIO-Replication-0] Connecting to test2:27017
2018-11-06T14:15:29.516+0800 I ASIO     [NetworkInterfaceASIO-Replication-0] Failed to connect to test2:27017 - HostUnreachable: Connection refused
2018-11-06T14:15:29.516+0800 I REPL     [ReplicationExecutor] Error in heartbeat request to test2:27017; HostUnreachable: Connection refused
2018-11-06T14:15:34.517+0800 I ASIO     [NetworkInterfaceASIO-Replication-0] Connecting to test2:27017
2018-11-06T14:15:34.517+0800 I ASIO     [NetworkInterfaceASIO-Replication-0] Failed to connect to test2:27017 - HostUnreachable: Connection refused
2018-11-06T14:15:34.518+0800 I REPL     [ReplicationExecutor] Error in heartbeat request to test2:27017; HostUnreachable: Connection refused
2018-11-06T14:15:34.518+0800 I ASIO     [NetworkInterfaceASIO-Replication-0] Connecting to test2:27017
2018-11-06T14:15:34.518+0800 I ASIO     [NetworkInterfaceASIO-Replication-0] Failed to connect to test2:27017 - HostUnreachable: Connection refused
2018-11-06T14:15:34.518+0800 I REPL     [ReplicationExecutor] Error in heartbeat request to test2:27017; HostUnreachable: Connection refused
2018-11-06T14:15:34.519+0800 I ASIO     [NetworkInterfaceASIO-Replication-0] Connecting to test2:27017
2018-11-06T14:15:34.519+0800 I ASIO     [NetworkInterfaceASIO-Replication-0] Failed to connect to test2:27017 - HostUnreachable: Connection refused
2018-11-06T14:15:34.519+0800 I REPL     [ReplicationExecutor] Error in heartbeat request to test2:27017; HostUnreachable: Connection refused
#终止连接10S之后,会切换从未主
2018-11-06T14:15:39.008+0800 I NETWORK  [thread1] connection accepted from 10.0.102.214:41150 #5 (2 connections now open)
2018-11-06T14:15:39.008+0800 I NETWORK  [conn5] received client metadata from 10.0.102.214:41150 conn5: { driver: { name: "NetworkInterfaceASIO-Replication", version: "3.4.2" }, os: { type: "Linux", name: "CentOS release 6.6 (Final)", architecture: "x86_64", version: "Kernel 2.6.32-504.el6.x86_64" } }
2018-11-06T14:15:39.420+0800 I REPL     [ReplicationExecutor] Member 10.0.102.214:27017 is now in state PRIMARY

#切换之后仲裁节点还是会去尝试连接原来的主节点。
2018-11-06T14:15:39.519+0800 I ASIO     [NetworkInterfaceASIO-Replication-0] Connecting to test2:27017
2018-11-06T14:15:39.520+0800 I ASIO     [NetworkInterfaceASIO-Replication-0] Failed to connect to test2:27017 - HostUnreachable: Connection refused
2018-11-06T14:15:39.520+0800 I REPL     [ReplicationExecutor] Error in heartbeat request to test2:27017; HostUnreachable: Connection refused
2018-11-06T14:15:39.520+0800 I ASIO     [NetworkInterfaceASIO-Replication-0] Connecting to test2:27017
2018-11-06T14:15:39.521+0800 I ASIO     [NetworkInterfaceASIO-Replication-0] Failed to connect to test2:27017 - HostUnreachable: Connection refused
2018-11-06T14:15:39.521+0800 I REPL     [ReplicationExecutor] Error in heartbeat request to test2:27017; HostUnreachable: Connection refused
2018-11-06T14:15:39.521+0800 I ASIO     [NetworkInterfaceASIO-Replication-0] Connecting to test2:27017

#这是副本集已经变为一个主节点,一个仲裁节点,查看副本集的状态。
lianxi:PRIMARY> rs.status()
{
    "set" : "lianxi",
    "date" : ISODate("2018-11-06T06:25:06.254Z"),
    "myState" : 1,
    "term" : NumberLong(2),
    "heartbeatIntervalMillis" : NumberLong(2000),
    "optimes" : {
        "lastCommittedOpTime" : {
            "ts" : Timestamp(1541484741, 1),
            "t" : NumberLong(1)
        },
        "appliedOpTime" : {
            "ts" : Timestamp(1541485499, 1),
            "t" : NumberLong(2)
        },
        "durableOpTime" : {
            "ts" : Timestamp(1541485499, 1),
            "t" : NumberLong(2)
        }
    },
    "members" : [
        {
            "_id" : 0,
            "name" : "test2:27017",
            "health" : 0,        #状态为0,处于不健康的状态
            "state" : 8,
            "stateStr" : "(not reachable/healthy)",
            "uptime" : 0,
            "optime" : {
                "ts" : Timestamp(0, 0),
                "t" : NumberLong(-1)
            },
            "optimeDurable" : {
                "ts" : Timestamp(0, 0),
                "t" : NumberLong(-1)
            },
            "optimeDate" : ISODate("1970-01-01T00:00:00Z"),
            "optimeDurableDate" : ISODate("1970-01-01T00:00:00Z"),
            "lastHeartbeat" : ISODate("2018-11-06T06:25:06.134Z"),
            "lastHeartbeatRecv" : ISODate("2018-11-06T06:15:27.891Z"),
            "pingMs" : NumberLong(0),
            "lastHeartbeatMessage" : "Connection refused",
            "configVersion" : -1
        },
        {
            "_id" : 1,
            "name" : "10.0.102.214:27017",
            "health" : 1,
            "state" : 1,
            "stateStr" : "PRIMARY",
            "uptime" : 3668,
            "optime" : {
                "ts" : Timestamp(1541485499, 1),
                "t" : NumberLong(2)
            },
            "optimeDate" : ISODate("2018-11-06T06:24:59Z"),
            "electionTime" : Timestamp(1541484939, 1),
            "electionDate" : ISODate("2018-11-06T06:15:39Z"),
            "configVersion" : 3,
            "self" : true
        },
        {
            "_id" : 2,
            "name" : "10.0.102.220:27017",
            "health" : 1,
            "state" : 7,
            "stateStr" : "ARBITER",
            "uptime" : 3631,
            "lastHeartbeat" : ISODate("2018-11-06T06:25:05.689Z"),
            "lastHeartbeatRecv" : ISODate("2018-11-06T06:25:04.998Z"),
            "pingMs" : NumberLong(0),
            "configVersion" : 3
        }
    ],
    "ok" : 1
}
我们在新的主节点写入数据,然后恢复原来的主节点,查看副本集会怎样变化!
#在新的副本集写入数据
lianxi:PRIMARY> use mydb;
switched to db mydb
lianxi:PRIMARY> db.cityinfo.insert({name: "ShangHai", country: "CHINA"})
WriteResult({ "nInserted" : 1 })
lianxi:PRIMARY> db.cityinfo.find().pretty()
{
    "_id" : ObjectId("5be12eb19efff2d99afed619"),
    "name" : "HongKong",
    "country" : "CHINA"
}
{
    "_id" : ObjectId("5be13451190311a6e9fa421e"),
    "name" : "ShangHai",
    "country" : "CHINA"
}

#然后启动原来的主服务
[root@test2 bin]# ./mongod -f ../conf/mongod.conf                   #启动
about to fork child process, waiting until server is ready for connections.
forked process: 10395
child process started successfully, parent exiting
[root@test2 bin]# ./mongo
MongoDB shell version v3.4.2
connecting to: mongodb://127.0.0.1:27017
MongoDB server version: 3.4.2
lianxi:SECONDARY> use mydb;
switched to db mydb
lianxi:SECONDARY> show tables;
2018-11-06T14:28:05.575+0800 E QUERY    [thread1] Error: listCollections failed: {
    "ok" : 0,
    "errmsg" : "not master and slaveOk=false",
    "code" : 13435,
    "codeName" : "NotMasterNoSlaveOk"
} :
_getErrorWithCode@src/mongo/shell/utils.js:25:13
DB.prototype._getCollectionInfosCommand@src/mongo/shell/db.js:805:1
DB.prototype.getCollectionInfos@src/mongo/shell/db.js:817:19
DB.prototype.getCollectionNames@src/mongo/shell/db.js:828:16
shellHelper.show@src/mongo/shell/utils.js:748:9
shellHelper@src/mongo/shell/utils.js:645:15
@(shellhelp2):1:1
lianxi:SECONDARY> rs.slaveOk()
lianxi:SECONDARY> db.cityinfo.find().pretty()
{
    "_id" : ObjectId("5be12eb19efff2d99afed619"),
    "name" : "HongKong",
    "country" : "CHINA"
}
{
    "_id" : ObjectId("5be13451190311a6e9fa421e"),         #写入的数据已经同步过来了!
    "name" : "ShangHai",
    "country" : "CHINA"
}
lianxi:SECONDARY>
若我们想在原来的主恢复正常之后,副本集中自动的从主(原来的从)切换回来。这个时候可以设置每个副本集的权重,只要设置原来的主的权重大于原来从的权重即可!
lianxi:PRIMARY> cfg = rs.config()
lianxi:PRIMARY> cfg.members[0]
{
    "_id" : 0,
    "host" : "test2:27017",
    "arbiterOnly" : false,
    "buildIndexes" : true,
    "hidden" : false,
    "priority" : 1,                        #权重为1
    "tags" : {

    },
    "slaveDelay" : NumberLong(0),
    "votes" : 1
}
lianxi:PRIMARY> cfg.members[0].priority = 2  #设置权重为2

#重新加载配置
lianxi:PRIMARY> rs.reconfig(cfg)
{ "ok" : 1 }
lianxi:PRIMARY>     #点击回车
2018-11-06T14:51:04.701+0800 I NETWORK  [thread1] trying reconnect to 127.0.0.1:27017 (127.0.0.1) failed
2018-11-06T14:51:04.702+0800 I NETWORK  [thread1] reconnect 127.0.0.1:27017 (127.0.0.1) ok
lianxi:SECONDARY>   #已经切换,

#查看仲裁节点的日志记录
2018-11-06T14:50:53.166+0800 I NETWORK  [thread1] connection accepted from 10.0.102.214:42415 #8 (3 connections now open)
2018-11-06T14:50:53.166+0800 I -        [conn8] end connection 10.0.102.214:42415 (3 connections now open)
2018-11-06T14:50:53.170+0800 I REPL     [ReplicationExecutor] New replica set config in use: { _id: "lianxi", version: 4, protocolVersion: 1, members: [ { _id: 0, host: "test2:27017", arbiterOnly: false, buildIndexes: true, hidden: false, priority: 2.0, tags: {}, slaveDelay: 0, votes: 1 }, { _id: 1, host: "10.0.102.214:27017", arbiterOnly: false, buildIndexes: true, hidden: false, priority: 1.0, tags: {}, slaveDelay: 0, votes: 1 }, { _id: 2, host: "10.0.102.220:27017", arbiterOnly: true, buildIndexes: true, hidden: false, priority: 1.0, tags: {}, slaveDelay: 0, votes: 1 } ], settings: { chainingAllowed: true, heartbeatIntervalMillis: 2000, heartbeatTimeoutSecs: 10, electionTimeoutMillis: 10000, catchUpTimeoutMillis: 2000, getLastErrorModes: {}, getLastErrorDefaults: { w: 1, wtimeout: 0 }, replicaSetId: ObjectId('5be1232c50f7d2aeca0d5ab3') } }
2018-11-06T14:50:53.170+0800 I REPL     [ReplicationExecutor] This node is 10.0.102.220:27017 in the config
2018-11-06T14:50:53.171+0800 I -        [conn7] end connection 10.0.102.204:18288 (2 connections now open)
2018-11-06T14:50:53.172+0800 I NETWORK  [thread1] connection accepted from 10.0.102.204:18293 #9 (2 connections now open)
2018-11-06T14:50:53.172+0800 I NETWORK  [thread1] connection accepted from 10.0.102.204:18294 #10 (3 connections now open)
2018-11-06T14:50:53.172+0800 I NETWORK  [conn9] received client metadata from 10.0.102.204:18293 conn9: { driver: { name: "NetworkInterfaceASIO-Replication", version: "3.4.2" }, os: { type: "Linux", name: "CentOS release 6.6 (Final)", architecture: "x86_64", version: "Kernel 2.6.32-504.el6.x86_64" } }
2018-11-06T14:50:53.172+0800 I -        [conn10] end connection 10.0.102.204:18294 (3 connections now open)
2018-11-06T14:50:53.173+0800 I -        [conn9] end connection 10.0.102.204:18293 (2 connections now open)
2018-11-06T14:50:53.174+0800 I NETWORK  [thread1] connection accepted from 10.0.102.204:18295 #11 (2 connections now open)
2018-11-06T14:50:53.174+0800 I NETWORK  [conn11] received client metadata from 10.0.102.204:18295 conn11: { driver: { name: "NetworkInterfaceASIO-Replication", version: "3.4.2" }, os: { type: "Linux", name: "CentOS release 6.6 (Final)", architecture: "x86_64", version: "Kernel 2.6.32-504.el6.x86_64" } }
2018-11-06T14:51:03.177+0800 I NETWORK  [thread1] connection accepted from 10.0.102.204:18297 #12 (3 connections now open)
2018-11-06T14:51:03.177+0800 I NETWORK  [conn12] received client metadata from 10.0.102.204:18297 conn12: { driver: { name: "NetworkInterfaceASIO-Replication", version: "3.4.2" }, os: { type: "Linux", name: "CentOS release 6.6 (Final)", architecture: "x86_64", version: "Kernel 2.6.32-504.el6.x86_64" } }
2018-11-06T14:51:08.173+0800 I REPL     [ReplicationExecutor] Member 10.0.102.214:27017 is now in state SECONDARY
2018-11-06T14:51:08.173+0800 I REPL     [ReplicationExecutor] Member test2:27017 is now in state PRIMARY
上面讲述了如何搭建副本集,下面我们来着重说明副本集的工作原理:
副本集依赖两个基本的机制:oplog和heartbeat。oplog允许复制数据,heartbeat监控状态并触发灾备。
mongodb的副本集依赖oplog。oplog是一个固定的集合,它存在于每个复制节点的local数据库中,而且记录了所有的数据变化。
数据写入主节点,同样的操作记录会被写入到oplog日志里面,从节点读取oplog信息,然后开始复制数据,并且把复制的数据信息写入自己的oplog日志里面。(注意和mysq的主从区分)
从节点使用了长轮询的来立即应用从主节点复制的oplog记录。长轮询意味着从节点向主节点发送了长请求。当主节点接受修改时,它会立即响应等待请求。因此,从节点将几乎可以做到实时更新。
每个oplog项目通过bson时间戳来区分,并且所有的从节点使用时间戳来跟踪它们应用的最新项目。
lianxi:PRIMARY> use local
switched to db local
lianxi:PRIMARY> show tables;
me                         #用来实现写关注点
oplog.rs                   #副本集存储oplog日志的集合
replset.election           #副本集的选举信息【不确定】
replset.minvalid           #包含副本集成员的信息
startup_log                #mongodb每次启动信息
system.replset             #副本集的配置文档信息
lianxi:PRIMARY> db.oplog.rs.findOne({op: "i"})          #查看oplog的日志信息
{
    "ts" : Timestamp(1541484209, 2),        #时间戳,时间戳的第二部分表示一个计数器,指定操作op的计数
    "t" : NumberLong(1),                    #【只想说一句,不知道的是不是都没解释,】
    "h" : NumberLong("1380699828208596822"),#
    "v" : 2,
    "op" : "i",
    "ns" : "mydb.cityinfo",                 #指定操作码,可以有“i”,“u”,“d”,“c【表示数据库命令】”,“db【声明当前数据库】”,“n:表示空操作”!
    "o" : {                                 #操作的文档
        "_id" : ObjectId("5be12eb19efff2d99afed619"),
        "name" : "HongKong",
        "country" : "CHINA"
    }
}
lianxi:PRIMARY>
#系统会为每个更新的文档创建oplog记录
在oplog.rs中,mongodb会为每一个更改的文档创建一个oplog日志记录,然后从节点都会复制主节点的oplog。当某个从节点准备更新自己的数据时,它会做3件事:
检查自己当前oplog利最新记录的时间戳,然后轮询主节点的oplog的时间戳,若主节点的时间戳大于自己当前记录的时间戳,就会写入数据,并且把每个操作日志保存到自己的oplog里。
这样的原因是,可以把任何一个已经写入数据的从提升为主,因为每一个主都有一个oplog日志,这样其他的从节点可以复制。
oplog的日志操作是幂等性的!
Oplog日志的大小设置:
oplog是一个固定的集合,因此,在mongodb2.6中不允许创建后再修改其大小。在mongodb3.x里,可以修改oplog的大小。操作步骤是,停止mongodb实例,然后作为单独的节点启动,修改oplog大小,重新启动成员。
没有指定oplog日志大小时,其安装默认参数启动,默认大小因存储引擎不一样而不一样!
| 存储引擎 | 默认oplog大小 | 下限 | 上限 |
| 内存存储引擎 | 5%的物理内存 | 50MB | 50G |
| WiredTiger存储引擎 | 5%的磁盘空间 | 990M | 50G |
| MMAPv1存储引擎 | 5%的磁盘空间 | 990M | 50G |
手动设置日志大小时,可以使用oplogSizeMB参数在配置文件中指定来启动。
心跳监测:
副本集的心跳便于实现选举和灾备。默认情况下,每个副本集成员会每隔2秒ping一次索引供其他成员。这样,系统就可以判断自己的健康状态。当运行rs.status()时,查看每个节点的心跳和状态(1表示健康,0表示无应答)。
每个副本集必须保证一直只有一个节点存在!
副本集的管理
在上面配置副本集的时候使用rs.add(), rs.initiate()这些方法使用的很方便,但是他们隐藏了某些可复制集参数。
#创建配置文档,这个_id字段指向配置的副本集名字,members为副本集的成员
lianxi:PRIMARY> cfg = {_id: "lianxi", members: []}
{ "_id" : "lianxi", "members" : [ ] }
lianxi:PRIMARY> cfg.members.push({_id:0, host: "10.0.102.204:27017"})         #添加成员1
1
lianxi:PRIMARY> cfg.members.push({_id:0, host: "10.0.102.214:27017"})         #添加成员2
2
lianxi:PRIMARY> cfg.members.push({_id:0, host: "10.0.102.220:27017", arbiterOnly: true})  #添加仲裁节点
3
lianxi:PRIMARY> cfg       #查看文档参数
{
    "_id" : "lianxi",
    "members" : [
        {
            "_id" : 0,
            "host" : "10.0.102.204:27017"
        },
        {
            "_id" : 0,
            "host" : "10.0.102.214:27017"
        },
        {
            "_id" : 0,
            "host" : "10.0.102.220:27017",
            "arbiterOnly" : true
        }
    ]
}
lianxi:PRIMARY>rs.initiate(cfg)               #把文档变量作为参数传递给initiate()函数

#虽然每个副本集有50个成员,但是它们只有7个投票成员。
rs.initiate()命令内部简单的封装了replSetInitiate,因此也可以使用如下命令:
db.runCommand({replSetInitiate: cfg})

###修改了配置文档之后,我们需要重新加载配置文档,可以使用命令rs.reconfig(),这个命令同时还封装了replSetReconfig
查看副本集的运行状态
可以通过运行replSetGetStatus命令来查看副本集的运行状态,rs.status()封装了这个命令。
mongodb中副本集成员可能的状态值列表如下:
STARTUP:     表示副本集正在通过ping与其他节点成员写入并共享配置数据。
PRIMARY:     主节点,副本集中只有一个主节点。
SECONDARY:   从节点,只读节点。这个节点如果优先级大于0,并且没有被标记为hidden,故障时变为主节点。
RECOVERING: 此节点现在无法读写。通常在故障转移或者添加新节点后看到此状态、
FATAL:       网络仍在连接,但是此节点对ping没有响应。
UNKNOWN:     没有建立网络连接
ARBITER:   仲裁节点
DOWN:        节点可以访问,但是当前不响应心跳ping消息。
ROLLBACK:    正在回滚。
REMOVED:     该节点曾经是副本集成员,现在已经被删除了!
STARTUP2:   同步的初始状态。

 浙公网安备 33010602011771号