自动化发布ansible以及awx相关(持续更新)
一 本文章只介绍ansible的基础知识以及一些组织架构,如何批量的处理等
首先一套部署发布任务在ansible里面都是以role的形式展现,并在执行命令的时候执行role入口以及主机列表
例如:ansible-playbook -i test_list auto_ingress.yml -e "node=xx role=xxx" -t tags xx --skap-tags=xxx
- -i 指定执行的主机清单
- -e 指定playbook运行参数
- -t 指定运行playbook时候需要使用的标签
- --skip-tags: 指定运行playbook时候需要忽略的标签
二 展示一下我们使用的入口文件
- hosts: "{{ node }}"
  gather_facts: no
become: yes #普通用户执行任务
become_user: root #普通用户执行任务
become_method: sudo #普通用户执行任务
vars:
    ENV_TYPE: "test"
  roles:
    - "{{ role }}"
- vars里面添加变量
-
gather_facts是否需要收集主机信息
三 展示一下工程组织目录

四 对一些常用的模块的使用,直接附上之前使用过的脚本
- name: get logstash
  copy: src=logstash-oss-7.11.1-linux-x86_64.tar.gz  dest=/tmp/logstash-oss-7.11.1-linux-x86_64.tar.gz force=yes mode=755

- name: mkdir logstash_path
  file: path=/home/daho state=directory

- name: unarchive package
  shell: "tar -zvxf logstash-oss-7.11.1-linux-x86_64.tar.gz -C /home/daho/"
  args:
    chdir: /tmp

- name: director exist or not
  stat: path=/etc/logstash-7.11.1
  register: logstash_path

- name: mkdir logstash_path
  file: path=/etc/logstash-7.11.1 state=directory
  when: logstash_path.stat.exists == false

- name: start logstash
  systemd: name=logstash-7.11.1 enabled=yes state=restarted daemon_reload=yes
- name: Make sure we have a {{ user }} group
  group:
    name: "{{ user }}"
    state: present

- name: Allow {{ user }} group to have passwordless sudo
  lineinfile:
    dest: /etc/sudoers
    state: present
    regexp: '^%admin'
    line: '%admin ALL=(ALL) NOPASSWD: ALL'

- name: Create user {{ user }}
  user:
    name: "{{ user }}"
    shell: /bin/bash
    groups: "{{ user }}"
    createhome: yes
    home: /home/{{ user }}
    state: present

- name: create key directory
  action: file path=/home/{{ user }}/.ssh/ state=directory  owner={{ user }} group={{ user }} mode=0700

- name: create key file
  action: file path=/home/{{ user }}/.ssh/authorized_keys state=touch  owner={{ user }} group={{ user }} mode=0600

- name: copy ssh pub
  blockinfile: path=/home/{{ user }}/.ssh/authorized_keys block="{{ lookup('file', './files/frpc/customer.pub') }}"
- name: get vag soft from remote repo to local
  get_url:  url={{ vag_remote_package }} url_username=xxx url_password=xxx dest={{ local_vag_path }}
- name: compress package
  unarchive: src={{ xxx }}/{{ xxx }} dest={{ xx }} mode=0755 copy=no
- name: detele core
  lineinfile: path=/etc/hosts regexp="core$" state=absent

- name: append /etc/hosts
  lineinfile: path=/etc/hosts line="{{ xxxx }} core"
- name: touch dirname
  file: path={{ xxx }} state=directory
四 test_list清单
[pp]
xx  ansible_host=xx ansible_ssh_user=root ansible_ssh_port=22

[k8s]
master ansible_host=xx ansible_ssh_user=root ansible_ssh_password=xxx sn=master
[all:vars]

ansible_ssh_common_args='-o ProxyCommand="ssh -p 22 -W %h:%p -q root@xxx"'
五 ansible的运行优化方式
5.1 开启SSH长连接,具体方法
修改ansible.cfg设置参数
ssh_args = -C -o ControlMaster=auto ControlPersist=5d
ControlPersist=5d
- 开启后,通过ssh连接过的设备会在当前目录 .ansible/cp/目录下生成一个socket文件,通过netstat命令会看到,有ESTABLISHED状态的连接一直与远端保持TCP连接
5.2 开启pipelining
执行流程优化,需要被控制主机/etc/sudoers文件编辑当前ansible ssh用户的配置为requiretty,否则在执行的时候会报错 sudo:sorry,you must have a tty to run sudo
并且在ansible.cfg上面配置参数
pipelining = True
5.3 开启accelerate模式
accelerate在远端服务器上面运行一个守护进程
开启accelerate需要管理与被管理端都需要安装python-keyczar包
[accelerate]
#accelerate_port = 5900
#accelerate_timeout = 30
#accelerate_connect_timeout = 5.0
5.4 关闭facts
配置如下所示
gather_facts: False
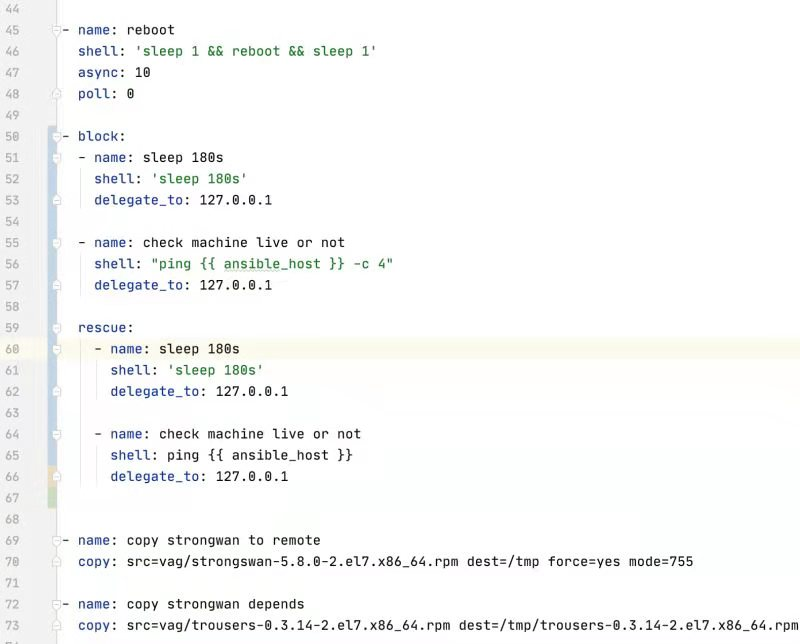
六 ansible的任务需要重启之后继续执行的办法(亲测有效)

七 一个功能
有一种场景,当我们的主机里面具有私钥,但是又不是默认的位置,这时候我们需要在/etc/ansible/ansible.cfg里面添加私钥位置,之后就可以实现免密登录来完成ansible的Task


 浙公网安备 33010602011771号