scrapy架构介绍
| |
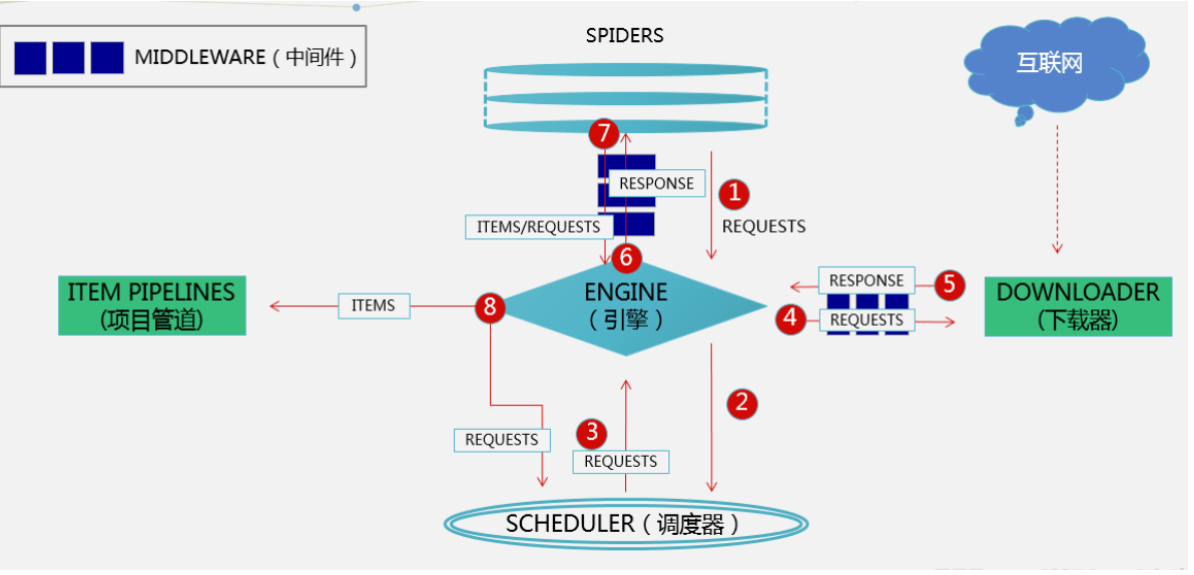
| 引擎负责控制系统所有组件之间的数据流,并在某些动作发生时触发事件。 |
| |
| |
| 用来接受引擎发过来的请求, 压入队列中, 并在引擎再次请求的时候返回. 可以想像成一个URL的优先级队列, 由它来决定下一个要抓取的网址是什么, 同时去除重复的网址 |
| |
| |
| 用于下载网页内容, 并将网页内容返回给EGINE,下载器是建立在twisted这个高效的异步模型上的 |
| |
| |
| SPIDERS是开发人员自定义的类,用来解析responses,并且提取items,或者发送新的请求 |
| |
| |
| 在items被提取后负责处理它们,主要包括清理、验证、持久化(比如存到数据库)等操作 |
| |
| |
| |
| 位于Scrapy引擎和下载器之间,主要用来处理从EGINE传到DOWLOADER的请求request,已经从DOWNLOADER传到EGINE的响应response,你可用该中间件做以下几件事:设置请求头,设置cookie,使用代理,集成selenium |
| |
| |
| 位于EGINE和SPIDERS之间,主要工作是处理SPIDERS的输入(即responses)和输出(即requests) |
scrapy的一些命令
| 安装完成后 会有scrapy的可执行文件 |
| |
| |
| scrapy startproject 项目名字 |
| |
| |
| scrapy genspider 名字 域名 |
| |
| eg:scrapy genspider baidu www.baidu.com |
| |
| |
| |
| 运行爬虫 |
| scrapy crawl 爬虫名字 |
| |
| 想点击绿色箭头运行爬虫 |
| 新建一个run.py,写入,以后右键执行即可 |
| from scrapy.cmdline import execute |
| execute(['scrapy','crawl','cnblogs','--nolog']) |
| |
| |
| 补充:爬虫协议 |
| http://www.cnblogs.com/robots.txt |
scrapy项目目录结构
| firstscrapy |
| firstscrapy |
| spiders |
| __init__.py |
| baidu.py |
| cnblogs.py |
| items.py |
| middlewares.py |
| pipelines.py |
| run.py |
| settings.py |
| scrapy.py |
scrapy解析数据
| 1 response对象有css方法和xpath方法 |
| css 中写css选择器 |
| xpath中写xpath选择 |
| 2 重点1: |
| xpath取文本内容 |
| './/a[contains(@class,"link-title")]/text()' |
| xpath取属性 |
| './/a[contains(@class,"link-title")]/@href' |
| css取文本 |
| 'a.link-title::text' |
| css取属性 |
| 'img.image-scale::attr(src)' |
| 3 重点2: |
| .extract_first() 取一个 |
| .extract() 取所有 |
解析cnblogs
| |
| |
| |
| |
| |
| |
| |
| |
| |
| |
| |
| |
| |
| |
| |
| |
| |
| |
| |
| |
| |
| |
| |
| |
| |
| |
| |
| def parse(self, response): |
| |
| article_list = response.xpath('//*[@id="post_list"]/article') |
| |
| for article in article_list: |
| title = article.xpath('.//div/a/text()').extract_first() |
| author_img = article.xpath('.//div//img/@src').extract_first() |
| author_name = article.xpath('.//footer//span/text()').extract_first() |
| desc_old = article.xpath('.//p/text()').extract() |
| desc = desc_old[0].replace('\n', '').replace(' ', '') |
| if not desc: |
| desc = desc_old[1].replace('\n', '').replace(' ', '') |
| url = article.xpath('.//div/a/@href').extract_first() |
| |
| print(title) |
| print(author_img) |
| print(author_name) |
| print(desc) |
| print(url) |
settings相关配置,提高爬取效率
| scrapy 项目有项目自己的配置文件,还有内置的 |
基础的一些
| |
| BOT_NAME = "firstscrapy" |
| |
| |
| SPIDER_MODULES = ["firstscrapy.spiders"] |
| NEWSPIDER_MODULE = "firstscrapy.spiders" |
| |
| |
| ROBOTSTXT_OBEY = False |
| |
| |
| USER_AGENT = "firstscrapy (+http://www.yourdomain.com)" |
| |
| |
| LOG_LEVEL='ERROR' |
| |
| |
| DEFAULT_REQUEST_HEADERS = { |
| 'Accept': 'text/html,application/xhtml+xml,application/xml;q=0.9,*/*;q=0.8', |
| 'Accept-Language': 'en', |
| } |
| |
| |
| SPIDER_MIDDLEWARES = { |
| 'cnblogs.middlewares.CnblogsSpiderMiddleware': 543, |
| } |
| |
| |
| DOWNLOADER_MIDDLEWARES = { |
| 'cnblogs.middlewares.CnblogsDownloaderMiddleware': 543, |
| } |
| |
| |
| ITEM_PIPELINES = { |
| 'cnblogs.pipelines.CnblogsPipeline': 300, |
| } |
增加爬虫的爬取效率
| |
| 默认scrapy开启的并发线程为32个 可以适当进行增加,在settings配置文件中修改 |
| CONCURRENT_REQUESTS = 100 值为100,并发设置成了为100。 |
| |
| |
| 在运行scrapy时,会有大量日志信息的输出,为了减少CPU的使用率。可以设置log输出信息为INFO和ERROR即可。在配置文件中编写 |
| LOG_LEVEL = 'INFO' |
| |
| |
| 如果不是真的需要cookie,则在scrapy爬取数据时可以禁止cookie从而减少CPU的使用率,提升爬取效率。在配置文件中编写: |
| COOKIES_ENABLED = False |
| |
| |
| 对失败的HTTP进行重新请求(重试)会减慢爬取速度,因此可以禁止重试。在配置文件中编写: |
| RETRY_ENABLED = False |
| |
| |
| 如果对一个非常慢的链接进行爬取,减少下载超时可以让卡住的链接快速被放弃,从而提升效率,在配置文件中进行编写: |
| DOWNLOAD_TIMEOUT = 10 超时时间为10s |
持久化方案
| 方式一:(parse必须有return值,必须是列表套字典形式---》使用命令,可以报错到json格式中,csv中(后缀 excel打开是表格)。。。) |
| |
| 执行 |
| scrapy crawl cnblogs -o cnbogs.json |
| |
| 方式二:我们用的,使用pipline存储--》可以存到多个位置 |
| 第一步:在item.py中写一个类 |
| class FirstscrapyItem(scrapy.Item): |
| title = scrapy.Field() |
| author_img = scrapy.Field() |
| author_name = scrapy.Field() |
| desc = scrapy.Field() |
| url = scrapy.Field() |
| |
| content = scrapy.Field() |
| 第二步:在pipline.py 中写代码,写一个类: |
| class FirstscrapyFilePipeline: |
| def open_spider(self, spider): |
| print('我开了') |
| self.f = open('a.txt', 'w', encoding='utf-8') |
| |
| def close_spider(self, spider): |
| print('我关了') |
| self.f.close() |
| |
| def process_item(self, item, spider): |
| |
| |
| |
| self.f.write(item['title'] + '\n') |
| return item |
| 第三步:配置文件配置 |
| ITEM_PIPELINES = { |
| "firstscrapy.pipelines.FirstscrapyFilePipeline": 300, |
| } |
| 第四步:在解析方法parse中yield item对象 |
| |
| 以上是把爬取的数据插入到txt文件中 |
| 插入到数据库中 需要 mysqldb模块 |
| 1.提前建好数据库和表 |
| 在配置文件中添加以下字段 对应链接数据库 |
| mysql_host='127.0.0.1' |
| mysql_user='' |
| mysql_passwd='' |
| mysql_db='' |
| mysql_tb='' |
| mysql_port=3306 |
| |
| |
| 配置文件中添加往数据库添加数据的配置如: |
| ITEM_PIPELINES = { |
| |
| |
| 'menu.pipelines.MenuPipeline': 300, |
| 'menu.pipelines.MenusqlPipeline': 2, |
| } |
| |
| 在pipline.py中添加以下的代码 保证链接数据库 和添加数据(中间字段和前面写的不一样 修改一致即可) |
| |
| import MySQLdb |
| from .settings import mysql_host,mysql_db,mysql_user,mysql_passwd,mysql_port |
| class MenusqlPipeline(object): |
| def __init__(self): |
| host=mysql_host |
| user=mysql_user |
| passwd=mysql_passwd |
| port=mysql_port |
| db=mysql_db |
| self.connection=MySQLdb.connect(host,user,passwd,db,port,charset='utf8') |
| self.cursor=self.connection.cursor() |
| def process_item(self, item, spider): |
| sql = "insert into cookbook2(name,step,sugar,energy,fat,material1,needtime,img,level,material2) values(%s,%s,%s,%s,%s,%s,%s,%s,%s,%s)" |
| |
| params=list() |
| params.append(item['name']) |
| params.append(item['step']) |
| params.append(item['sugar']) |
| params.append(item['energy']) |
| params.append(item['fat']) |
| params.append(item['material1']) |
| params.append(item['needtime']) |
| params.append(item['material2']) |
| params.append(item['img']) |
| params.append(item['level']) |
| self.cursor.execute(sql,tuple(params)) |
| self.connection.commit() |
| return item |
| def __del__(self): |
| self.cursor.close() |
| self.connection.close() |
| |
| 启动爬虫,查看数据库数据插入是否正常 |
| |
| https://blog.csdn.net/L_Shaker/article/details/118891300 该博客可以借鉴 |
全站爬取cnblogs文章
request和response对象传递参数 解析下一页并继续爬取
| def parse(self, response): |
| |
| article_list = response.xpath('//*[@id="post_list"]/article') |
| |
| |
| for article in article_list: |
| item = FirstscrapyItem() |
| title = article.xpath('.//div/a/text()').extract_first() |
| item['title'] = title |
| author_img = article.xpath('.//div//img/@src').extract_first() |
| item['author_img'] = author_img |
| author_name = article.xpath('.//footer//span/text()').extract_first() |
| item['author_name'] = author_name |
| desc_old = article.xpath('.//p/text()').extract() |
| desc = desc_old[0].replace('\n', '').replace(' ', '') |
| if not desc: |
| desc = desc_old[1].replace('\n', '').replace(' ', '') |
| item['desc'] = desc |
| url = article.xpath('.//div/a/@href').extract_first() |
| item['url'] = url |
| |
| |
| yield Request(url=url, callback=self.parser_detail,meta={'item':item}) |
| |
| next = 'https://www.cnblogs.com' + response.css('div.pager>a:last-child::attr(href)').extract_first() |
| print(next) |
| yield Request(url=next, callback=self.parse) |
| |
| def parser_detail(self, response): |
| |
| |
| content = response.css('#cnblogs_post_body').extract_first() |
| |
| |
| item = response.meta.get('item') |
| if content: |
| item['content'] = content |
| else: |
| item['content'] = '没查到' |
| yield item |


【推荐】国内首个AI IDE,深度理解中文开发场景,立即下载体验Trae
【推荐】编程新体验,更懂你的AI,立即体验豆包MarsCode编程助手
【推荐】抖音旗下AI助手豆包,你的智能百科全书,全免费不限次数
【推荐】轻量又高性能的 SSH 工具 IShell:AI 加持,快人一步
· Manus重磅发布:全球首款通用AI代理技术深度解析与实战指南
· 被坑几百块钱后,我竟然真的恢复了删除的微信聊天记录!
· 没有Manus邀请码?试试免邀请码的MGX或者开源的OpenManus吧
· 【自荐】一款简洁、开源的在线白板工具 Drawnix
· 园子的第一款AI主题卫衣上架——"HELLO! HOW CAN I ASSIST YOU TODAY