

3D目标检测 | BEVDet系列源码解读
前言 本文介绍了BEVDet实现过程中的代码注释,希望能帮助大家更好地理解如何从论文原理到mmdet3d上代码实现BEVDet。
本文转载自自动驾驶之心
作者丨小书童
欢迎关注公众号CV技术指南,专注于计算机视觉的技术总结、最新技术跟踪、经典论文解读、CV招聘信息。
1、前言
BEVDet 开源有一段时间,我们陆续更新了很多feature,比如支持旷世的BEVDepth,支持FP16等等,后面也会持续更新更多和部署相关的feature。
最近也接收到大量使用者对代码的实现的提问,核心在于对BEVDet实现过程中的数据处理变换表示理解困难。借此机会,我写了这个blog和更新一波代码注释,希望能帮助大家更好地理解如何从论文原理到mmdet3d上代码实现BEVDet。
这个blog主要从大局和关键点上看数据是怎么处理,其他细节就不过多解释了~
2、背景
在此之前,有必要介绍一些必要的背景铺垫一下,然后逐渐过度到BEVDet系列相关内容。
2.1、nuScenes
1、坐标系定义
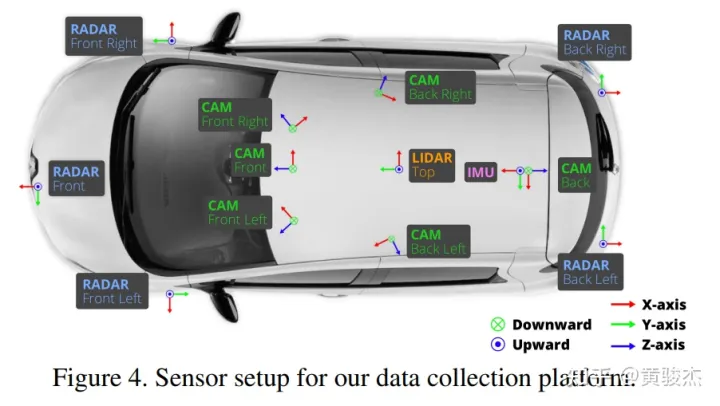
关于BEVDet最重要的是相关坐标系的定义,如下图所示,lidar是朝自车右边为x方向,朝自车前方为y方向,这个和直觉优点差异,需要注意和牢记。这关系到我们下载得到的原始nuScenes数据(点云以及标注的目标)都是定义在这个坐标系下的。
2、原始数据
主页里有关于数据存储的格式以及如何读取相关数据的tutorial,可以仔细学习下。
这里我们掠过,因为后面可以直接看MMDetection3D中数据预处理。
2.2、MMDetection3D
1、nuScenes到mmdet3d的转换
mmdet3d将原始的nuScenes进行转换,使得各个数据集之间保持统一的格式,这个是离线完成的
这里最重要的一点是,「BEVDet所使用的mmdet3d版本」,处理后的数据在坐标系定义方面和原始的nuScenes保持一致。如果使用新版的mmdet3d处理的数据,就有可能出现mAOE特别差的情况,因为新版的mmdet3d处理后的数据在坐标系定义方面和原始的nuScenes不一致。所以要注意使用BEVDet代码进行nuScenes到mmdet3d的转换。
2、nuScenes预处理
在训练过程中,mmdet3d在nuScenes数据集类中,通过定义get_data_info()函数对数据进行一些初步的定制化的预处理,并用一些预定义的类(如LiDARInstance3DBoxes)进行封装。
3、BEVDet Data Processing Pipeline
原始的数据在训练测试过程中,经过Data Processing Pipeline进行数据增广(imageview augmentation 和BEV augmentation) 以及一些必要的数据准备(图片读取、获取LSS-viewtransformer相关变换矩阵等)
为更具一般性和全面地介绍,我们以BEVDepth4D训练过程的数据处理流程为例,该流程包含如下subprocesses,其中图像空间的增广是在LoadMultiViewImageFromFiles_BEVDet中完成的,而BEV空间的增广是在GlobalRotScaleTrans 和 RandomFlip3D中完成的:
train_pipeline = [
    # load multiview images, perform image view data augmentation, and prepare
    # transformation for lss view transformer
    dict(type='LoadMultiViewImageFromFiles_BEVDet', is_train=True, data_config=data_config,
         sequential=True, aligned=True, trans_only=False),
    # load points clouds
    dict(
        type='LoadPointsFromFile',
        coord_type='LIDAR',
        load_dim=5,
        use_dim=5,
        file_client_args=file_client_args),
    # prepare 3D object detection annotations
    dict(type='LoadAnnotations3D', with_bbox_3d=True, with_label_3d=True),
    # BEV augmentations
    dict(
        type='GlobalRotScaleTrans',
        rot_range=[-0.3925, 0.3925],
        scale_ratio_range=[0.95, 1.05],
        translation_std=[0, 0, 0],
        update_img2lidar=True),
    dict(
        type='RandomFlip3D',
        sync_2d=False,
        flip_ratio_bev_horizontal=0.5,
        flip_ratio_bev_vertical=0.5,
        update_img2lidar=True),
    # Prepare depth supervision for bevdepth with the point clouds
    dict(type='PointToMultiViewDepth', grid_config=grid_config),
    dict(type='ObjectRangeFilter', point_cloud_range=point_cloud_range),
    dict(type='ObjectNameFilter', classes=class_names),
    dict(type='DefaultFormatBundle3D', class_names=class_names),
    dict(type='Collect3D', keys=['img_inputs', 'gt_bboxes_3d', 'gt_labels_3d'],
         meta_keys=('filename', 'ori_shape', 'img_shape', 'lidar2img',
                            'depth2img', 'cam2img', 'pad_shape',
                            'scale_factor', 'flip', 'pcd_horizontal_flip',
                            'pcd_vertical_flip', 'box_mode_3d', 'box_type_3d',
                            'img_norm_cfg', 'pcd_trans', 'sample_idx',
                            'pcd_scale_factor', 'pcd_rotation', 'pts_filename',
                            'transformation_3d_flow', 'img_info'))
3.1、LoadMultiViewImageFromFiles_BEVDet
对于每个摄像头,我们
-
读取图片
-
执行图像空间的数据增广
-
生成lss view transformer相关变换的矩阵
-
对于时序的bevdet4d额外读取相邻帧的图像,执行和当前帧完全一样的图像空间的数据增广策略(同样的策略和幅度),也生成lss view transformer相关变换的矩阵,这里区别于当前帧记录的是当前帧的相机坐标系到当前帧的lidar坐标系的变换(currcam2currlidar),对于相邻帧,我们「记录相邻帧相机坐标系到当前帧lidar坐标系的变换」(adjcam2currlidar)
def get_inputs(self,results, flip=None, scale=None):
    imgs = []
    rots = []
    trans = []
    intrins = []
    post_rots = []
    post_trans = []
    cams = self.choose_cams()
    for cam in cams:
        cam_data = results['img_info'][cam]
        filename = cam_data['data_path']
        # 读取图片
        img = Image.open(filename)
        # lss view transformer相关变换的矩阵
        post_rot = torch.eye(2) # 图像空间数据增广产生的旋转矩阵
        post_tran = torch.zeros(2) # 图像空间数据增广产生的平移
        intrin = torch.Tensor(cam_data['cam_intrinsic']) # 相机内参,用于图像空间到相机坐标系的变换
        rot = torch.Tensor(cam_data['sensor2lidar_rotation']) # 相机坐标系到lidar坐标系的旋转变换
        tran = torch.Tensor(cam_data['sensor2lidar_translation']) # 相机坐标系到lidar坐标系的平移变换

        # augmentation (resize, crop, horizontal flip, rotate)
        resize, resize_dims, crop, flip, rotate = self.sample_augmentation(H=img.height,
                                                                           W=img.width,
                                                                           flip=flip,
                                                                           scale=scale)
        # 图像空间 augmentation (resize, crop, horizontal flip, rotate),增广过程中同步更新post_rot,post_tran
        img, post_rot2, post_tran2 = self.img_transform(img, post_rot, post_tran,
                                                        resize=resize,
                                                        resize_dims=resize_dims,
                                                        crop=crop,
                                                        flip=flip,
                                                        rotate=rotate)

        # for convenience, make augmentation matrices 3x3
        post_tran = torch.zeros(3)
        post_rot = torch.eye(3)
        post_tran[:2] = post_tran2
        post_rot[:2, :2] = post_rot2

        imgs.append(self.normalize_img(img))

        if self.sequential:
            # 读取相邻帧的图片,执行相同的图像空间的数据增广
            filename_adjacent = results['adjacent']['cams'][cam]['data_path']
            img_adjacent = Image.open(filename_adjacent)
            img_adjacent = self.img_transform_core(img_adjacent,
                                                   resize_dims=resize_dims,
                                                   crop=crop,
                                                   flip=flip,
                                                   rotate=rotate)
            imgs.append(self.normalize_img(img_adjacent))
        intrins.append(intrin)
        rots.append(rot)
        trans.append(tran)
        post_rots.append(post_rot)
        post_trans.append(post_tran)

    if self.sequential:
        # 对于相邻帧,因为相机内参和图像空间的增广不变,post_trans/post_rots/intrins复用当前帧的
        # 对于相机到lidar变换,我们记录相邻帧相机坐标系到当前帧lidar坐标系的变换
        # adjcam2currlidar=adjlidar2currlidar @ adjcam2adjliar = adjlidar2currlidar @ currcam2currlidar
        post_trans.extend(post_trans)
        post_rots.extend(post_rots)
        intrins.extend(intrins)
        egocurr2global = np.eye(4, dtype=np.float32)
        egocurr2global[:3,:3] = Quaternion(results['curr']['ego2global_rotation']).rotation_matrix
        egocurr2global[:3,3] = results['curr']['ego2global_translation']

        egoadj2global = np.eye(4, dtype=np.float32)
        egoadj2global[:3,:3] = Quaternion(results['adjacent']['ego2global_rotation']).rotation_matrix
        egoadj2global[:3,3] = results['adjacent']['ego2global_translation']

        lidar2ego = np.eye(4, dtype=np.float32)
        lidar2ego[:3, :3] = Quaternion(results['curr']['lidar2ego_rotation']).rotation_matrix
        lidar2ego[:3, 3] = results['curr']['lidar2ego_translation']

        lidaradj2lidarcurr = np.linalg.inv(lidar2ego) @ np.linalg.inv(egocurr2global) \
                             @ egoadj2global @ lidar2ego
        trans_new = []
        rots_new =[]
        for tran,rot in zip(trans, rots):
            mat = np.eye(4, dtype=np.float32)
            mat[:3,:3] = rot
            mat[:3,3] = tran
            mat = lidaradj2lidarcurr @ mat
            rots_new.append(torch.from_numpy(mat[:3,:3]))
            trans_new.append(torch.from_numpy(mat[:3,3]))
        rots.extend(rots_new)
        trans.extend(trans_new)
3.2、GlobalRotScaleTrans&RandomFlip3D
在执行一般的三维空间的增广同时,我们同时更新相机坐标系到lidar坐标系的变换,使得在lss view transformer 转换得到的特征和增广后的target保持空间一致性。以RandomFlip3D为例:
def update_transform(self, input_dict):
        # aug 前 cam2liar的变换
        transform = torch.zeros((input_dict['img_inputs'][1].shape[0],4,4)).float()
        transform[:,:3,:3] = input_dict['img_inputs'][1]
        transform[:,:3,-1] = input_dict['img_inputs'][2]
        transform[:, -1, -1] = 1.0
        # aug 引起的变换
        aug_transform = torch.eye(4).float()
        if input_dict['pcd_horizontal_flip']:
            aug_transform[1,1] = -1
        if input_dict['pcd_vertical_flip']:
            aug_transform[0,0] = -1
        aug_transform = aug_transform.view(1,4,4)
        new_transform = aug_transform.matmul(transform) # 左乘 得到aug 后 cam2liar的变换
        input_dict['img_inputs'][1][...] = new_transform[:,:3,:3]
        input_dict['img_inputs'][2][...] = new_transform[:,:3,-1]
4、BEVDet Inference
BEVDet 推理实现中,数据处理相关的最核心的是LSS View Transformer的相关变换和BEVDet4D中的特征对齐。
4.1、LSS View Transformer
在lss的view transformer中,首先在图像空间按照一定的规律预定义了视锥点,视锥点的坐标分别是(x,y,d),其中x和y是图像空间以像素为单位度量的坐标,d是深度以米为单位度量,预定义了D种深度值,那么对于每个图像就有DHW个点,注意H和W是特征分辨率而非图像分辨率,但是x和y却是定义在图像空间而非特征空间
def create_frustum(self):
        # make grid in image plane
        ogfH, ogfW = self.data_config['input_size']
        fH, fW = ogfH // self.downsample, ogfW // self.downsample
        ds = torch.arange(*self.grid_config['dbound'], dtype=torch.float).view(-1, 1, 1).expand(-1, fH, fW)
        D, _, _ = ds.shape
        xs = torch.linspace(0, ogfW - 1, fW, dtype=torch.float).view(1, 1, fW).expand(D, fH, fW)
        ys = torch.linspace(0, ogfH - 1, fH, dtype=torch.float).view(1, fH, 1).expand(D, fH, fW)

        # D x H x W x 3
        frustum = torch.stack((xs, ys, ds), -1)
        return nn.Parameter(frustum, requires_grad=False)
接着这些点会根据上面记录的lss相关的变换 post_trans/pos_rots/intrinsics/rots/trans 转换为lidar坐标系下的坐标
def get_geometry(self, rots, trans, intrins, post_rots, post_trans):
        """Determine the (x,y,z) locations (in the ego frame)
        of the points in the point cloud.
        Returns B x N x D x H/downsample x W/downsample x 3
        """
        B, N, _ = trans.shape

        # 执行图像空间增广的逆变换
        # B x N x D x H x W x 3
        points = self.frustum - post_trans.view(B, N, 1, 1, 1, 3)
        points = torch.inverse(post_rots).view(B, N, 1, 1, 1, 3, 3).matmul(points.unsqueeze(-1))

        # 图像空间到lidar坐标系
        points = torch.cat((points[:, :, :, :, :, :2] * points[:, :, :, :, :, 2:3],
                            points[:, :, :, :, :, 2:3]
                            ), 5)
        combine = rots.matmul(torch.inverse(intrins))
        points = combine.view(B, N, 1, 1, 1, 3, 3).matmul(points).squeeze(-1)
        points += trans.view(B, N, 1, 1, 1, 3)
        return points
最后用voxel pooling根据这些点生成bev空间的特征。
4.2、Feature Alignment
Feature alignment的目的在于获得定义在「当前lidar坐标系」下的相邻帧的特征。如果使用BEVDetSequential类,使用上述的adjcam2currlidar变换去做lss的view transformation生成相邻帧的bev特征,因此得到的bev特征就是定义在currlidar坐标系下,可以和当前帧进行直接的concat,但这样会改变lss view transformation 的输入,使得加速的前提不成立。为了加速,我们使用BEVDetSequentialES类,在view transformation 中保持cam2lidar的变换不变,转而对view transformer 生成的bev特征进行align。
@force_fp32()
    def shift_feature(self, input, trans, rots):
        n, c, h, w = input.shape
        _,v,_ =trans[0].shape

        # generate grid
        xs = torch.linspace(0, w - 1, w, dtype=input.dtype, device=input.device).view(1, w).expand(h, w)
        ys = torch.linspace(0, h - 1, h, dtype=input.dtype, device=input.device).view(h, 1).expand(h, w)
        grid = torch.stack((xs, ys, torch.ones_like(xs)), -1).view(1, h, w, 3).expand(n, h, w, 3).view(n,h,w,3,1)
        grid = grid

        # get transformation from current lidar frame to adjacent lidar frame
        # transformation from current camera frame to current lidar frame
        c02l0 = torch.zeros((n,v,4,4),dtype=grid.dtype).to(grid)
        c02l0[:,:,:3,:3] = rots[0]
        c02l0[:,:,:3,3] = trans[0]
        c02l0[:,:,3,3] = 1

        # transformation from adjacent camera frame to current lidar frame
        c12l0 = torch.zeros((n,v,4,4),dtype=grid.dtype).to(grid)
        c12l0[:,:,:3,:3] = rots[1]
        c12l0[:,:,:3,3] = trans[1]
        c12l0[:,:,3,3] =1

        # transformation from current lidar frame to adjacent lidar frame
        l02l1 = c02l0.matmul(torch.inverse(c12l0))[:,0,:,:].view(n,1,1,4,4)
        '''
          c02l0 * inv(c12l0)
        = c02l0 * inv(l12l0 * c12l1)
        = c02l0 * inv(c12l1) * inv(l12l0)
        = l02l1 # c02l0==c12l1
        '''

        # 因为只做BEV平面的align,因此把第三维去掉
        l02l1 = l02l1[:,:,:,[True,True,False,True],:][:,:,:,:,[True,True,False,True]]

        # feat2bev 是特征空间和BEV空间(lidar坐标系)之间的变换,特征空间和lidar坐标系下的bev空间是不同的
        feat2bev = torch.zeros((3,3),dtype=grid.dtype).to(grid)
        feat2bev[0, 0] = self.img_view_transformer.dx[0]
        feat2bev[1, 1] = self.img_view_transformer.dx[1]
        feat2bev[0, 2] = self.img_view_transformer.bx[0] - self.img_view_transformer.dx[0] / 2.
        feat2bev[1, 2] = self.img_view_transformer.bx[1] - self.img_view_transformer.dx[1] / 2.
        feat2bev[2, 2] = 1
        feat2bev = feat2bev.view(1,3,3)
        tf = torch.inverse(feat2bev).matmul(l02l1).matmul(feat2bev)

        # transform and normalize, normalize是因为grid_sample要求要把绝对的坐标normalize到【-1,1】的区间内
        grid = tf.matmul(grid)
        normalize_factor = torch.tensor([w - 1.0, h - 1.0], dtype=input.dtype, device=input.device)
        grid = grid[:,:,:,:2,0] / normalize_factor.view(1, 1, 1, 2) * 2.0 - 1.0
        output = F.grid_sample(input, grid.to(input.dtype), align_corners=True, mode=self.interpolation_mode)
        return output
本文仅做学术分享,如有侵权,请联系删文。
欢迎关注公众号CV技术指南,专注于计算机视觉的技术总结、最新技术跟踪、经典论文解读、CV招聘信息。
QQ交流群:444129970。群内有大佬负责解答大家的日常学习、科研、代码问题。
模型部署交流群:732145323。用于计算机视觉方面的模型部署、高性能计算、优化加速、技术学习等方面的交流。
其它文章


【推荐】国内首个AI IDE,深度理解中文开发场景,立即下载体验Trae
【推荐】编程新体验,更懂你的AI,立即体验豆包MarsCode编程助手
【推荐】抖音旗下AI助手豆包,你的智能百科全书,全免费不限次数
【推荐】轻量又高性能的 SSH 工具 IShell:AI 加持,快人一步
· 阿里最新开源QwQ-32B,效果媲美deepseek-r1满血版,部署成本又又又降低了!
· AI编程工具终极对决:字节Trae VS Cursor,谁才是开发者新宠?
· 开源Multi-agent AI智能体框架aevatar.ai,欢迎大家贡献代码
· Manus重磅发布:全球首款通用AI代理技术深度解析与实战指南
· 被坑几百块钱后,我竟然真的恢复了删除的微信聊天记录!
2021-02-17 CNN可视化技术总结(四)--可视化工具与项目