二十三种设计模式[4] - 原型模式(Prototype Pattern)
前言
原型,创建型模式中的一种。《设计模式 - 可复用的面向对象软件》一书中将之描述为“ 用原型实例指定创建对象的种类,并且通过拷贝这些原型创建新的对象 ”。
通常,我们使用构造函数来实例化一个对象,而在原型模式中,对同一个类只进行一次实例化操作并将其缓存,之后再需要这个类的新实例时,则通过克隆这个缓存的对象来生成新的实例。这个缓存的对象就是这个类的“ 原型 ”。
深 / 浅克隆
原型模式就是对克隆技术的一种应用,所以在了解原型模式之前,我们应该对克隆有个深刻的认识(如果您已经了解克隆,可跳过本段)。
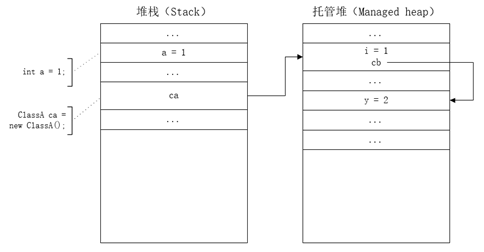
首先我们知道值类型和引用类型在内存的分配机制上是有区别的。一个引用类型的实例会在托管堆上分配一块空间用来保存这个实例,同时会在堆栈上分配一块空间用来保存指向这个实例的指针(该实例的引用或该实例在托管堆中的地址)。值类型在作为局部变量时,会被创建在堆栈上,而在作为一个引用类型的成员变量时,它会作为这个类型的实例数据的一部分同该实例的其它字段一同存储在托管堆中。
接下来我们来说克隆。克隆方式可分为两种,分别是深克隆和浅克隆。为方便理解,我们来看一下同一对象在进行赋值、浅克隆和深克隆操作后各个对象在内存中的分配情况。比如,我们有int类型的变量a、b和一个ClassA类型的变量ca,在ClassA类中存在int类型和ClassB类型两个全局变量。如下:
public class ClassA
{
    public int i = 1;
    public ClassB cb = new ClassB();
}

public class ClassB
{
    public int y = 2;
}

static void Main(string[] args)
{
    int a = 1;

    ClassA ca = new ClassA();
}
执行了Main函数后,变量a、b和ca在内存中分配如下:
-
赋值操作
在C#中,值类型的默认克隆方式是深克隆,引用类型的默认克隆方式是浅克隆并且克隆的是该对象的引用。
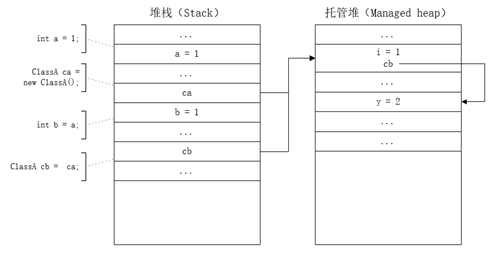
在赋值操作中使用的就是默认的克隆方式。即,如果当前操作的数据是值类型,比如 int b = a,会在堆栈中为变量b分配一块新的地址并将a的值传递给b,所以a和b是相对独立的,修改b的值不会影响到a。如果当前操作的数据是引用类型,比如 ClassA cb = ca,同样也会在堆栈中为变量cb分配一块新的地址,但传递给cb的并不是ca的实例,而是一个指向这个实例的指针(该实例的引用或该实例在托管堆中的地址),所以当对变量cb做出修改时,会影响到ca。具体的内存分配如下:
-
浅克隆
在浅克隆中,需要为ClassA提供一个Clone函数并调用Object提供的MemberwiseClone函数,如下:
public class ClassA
{
    public int i = 1;
    public ClassB cb = new ClassB();

    public ClassA Clone()
    {
        return this.MemberwiseClone() as ClassA;
    }
}
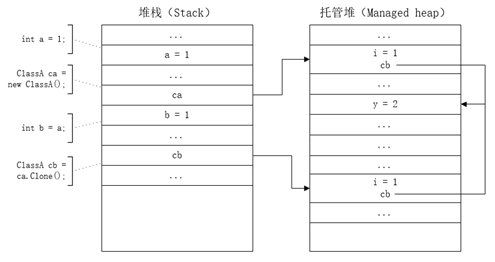
MemberwiseClone函数所执行的就是浅克隆操作。在该函数中会为当前对象创建一个新的对象并分配新的内存空间。之后会将当前对象的所有非静态变量通过赋值操作注入到新的对象中。在.Net Framework 官方API中描述为“ MemberwiseClone方法创建一个新的对象,通过复制操作为当前对象的非静态字段创建一个浅表副本。如果字段是值类型,则执行字段的逐位复制。如果字段是引用类型,则复制它的引用。 因此,原始对象及其克隆引用相同的对象 ”。
所以,在ca执行了Clone函数后,内存分配如下:
-
深克隆
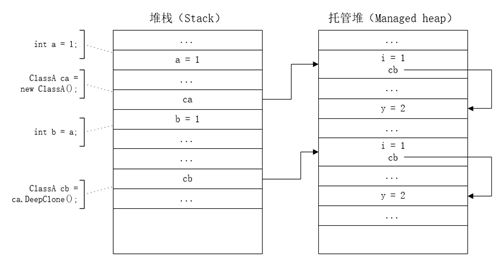
在深克隆中,当操作的对象是引用类型时,复制的不仅仅是这个对象的指针(引用或在托管堆中的地址),也会复制这个对象指向的值。若操作的对象是值类型,则与赋值操作同理。
实现深克隆的方式有序列化和反序列化以及反射两种方式,其中序列化和反序列化又有三种实现方式。实现如下:
1. System.Xml.Serialization.XmlSerializer(序列化的类型中不可包含接口类型字段)
public ClassA DeepClone()
{
    ClassA resultObj;

    using (MemoryStream stream = new MemoryStream())
    {
        XmlSerializer xmlSerializer = new XmlSerializer(typeof(ClassA));
        xmlSerializer.Serialize(stream, this);
        stream.Seek(0, SeekOrigin.Begin);
        resultObj = xmlSerializer.Deserialize(stream) as ClassA;
    }

    return resultObj;
}
2. System.Runtime.Serialization.DataContractSerializer(序列化的类型中不可包含接口类型字段)
public ClassA DeepClone()
{
    ClassA resultObj;

    using (MemoryStream stream = new MemoryStream())
    {
        DataContractSerializer serializer = new DataContractSerializer(typeof(ClassA));
        serializer.WriteObject(stream, this);
        stream.Seek(0, SeekOrigin.Begin);
        resultObj = serializer.ReadObject(stream) as ClassA;
    }

    return resultObj;
}
3. System.Runtime.Serialization.Formatters.Binary.BinaryFormatter(需要序列化的对象必须声明Serializable特性)
public ClassA DeepClone()
{
    ClassA resultObj;

    using (MemoryStream stream = new MemoryStream())
    {
        BinaryFormatter serialize = new BinaryFormatter();
        serialize.Serialize(stream, this);
        stream.Seek(0, SeekOrigin.Begin);
        resultObj = serialize.Deserialize(stream) as ClassA;
    }

    return resultObj;
}
4. 反射(利用反射和递归实现深克隆,需注意循环引用)
public ClassA DeepClone()
{
    return this.DeepCloneWithReflection(this, null, null) as ClassA;
}

private object DeepCloneWithReflection(object obj, Dictionary<int, object> clonedObjDict, Dictionary<int, object> newObjDict)
{
    if (obj == null)
    {
        return null;
    }

    if (clonedObjDict == null)
    {
        clonedObjDict = new Dictionary<int, object>();
    }

    if (newObjDict == null)
    {
        newObjDict = new Dictionary<int, object>();
    }

    Type objType = obj.GetType();

    if (obj is string
        || objType.IsValueType)
    {
        return obj;
    }

    if (objType.IsArray)
    {
        Type elementType = Type.GetType(objType.FullName.Replace("[]", string.Empty));
        Array array = obj as Array;
        Array newArray = Array.CreateInstance(elementType, array.Length);
        for (int i = 0, len = array.Length; i < len; i++)
        {
            newArray.SetValue(this.DeepCloneWithReflection(array.GetValue(i), clonedObjDict, newObjDict), i);
        }

        return Convert.ChangeType(newArray, objType);
    }

    //判断是否存在循环引用
    int clonedObjKey = -1;
    foreach (var clonedObj in clonedObjDict)
    {
        if(object.ReferenceEquals(obj, clonedObj.Value))
        {
            clonedObjKey = clonedObj.Key;
            break;
        }
    }

    if(clonedObjKey > -1)
    {
        return newObjDict[clonedObjKey];
    }

    var newObj = Activator.CreateInstance(objType);
    int newKey = clonedObjDict.Count;
    clonedObjDict.Add(newKey, obj);
    newObjDict.Add(newKey, newObj);

    PropertyInfo[] properties = objType.GetProperties(BindingFlags.Public
                                                        | BindingFlags.NonPublic
                                                        | BindingFlags.Instance
                                                        | BindingFlags.Static);

    foreach (var property in properties)
    {
        object propValue = property.GetValue(obj);
        if(propValue != null)
        {
            property.SetValue(newObj, this.DeepCloneWithReflection(propValue, clonedObjDict, newObjDict));
        }
    }

    return newObj;
}
当我们使用上诉四种深克隆方式的任意一种复制了ClassA的实例后,内存分配如下:
注:序列化和反序列化的三种方式的区别,请参照XmlSerializer, DataContractSerializer 和 BinaryFormatter区别与用法分析
了解了深 / 浅克隆后,再来看看原型模式。
结构
需要角色如下:
- Prototype(抽象原型):声明克隆方法的接口,所有原型类的父类,可以是接口、抽象类和类;
- ConcretePrototype(原型类):实现抽象原型中的克隆方法,并返回自身的克隆对象;
- Client(调用者):原型的使用者;
示例
一般在实例化对象的代价较大时,采用原型模式。例如一个对象在初始化时需要大量的数据支撑或者需要访问数据库时。
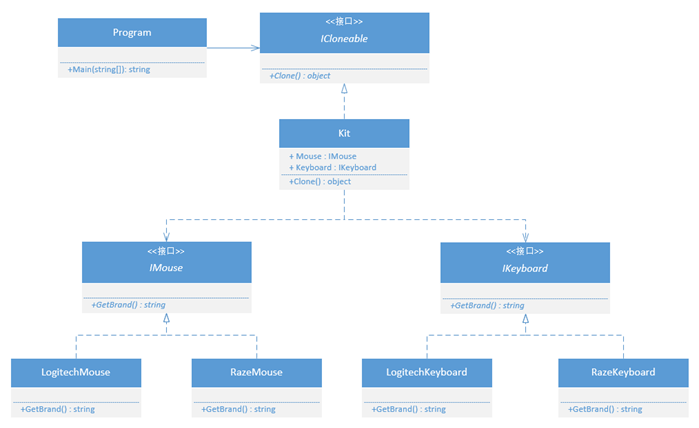
在下面的例子中,会创建一个鼠标套装(Kit)对象,在Kit对象中包含了鼠标(IMouse)和键盘(IKeyboard)对象。通过这个简单的例子看看原型模式的实现方式。
public interface IMouse
{
    string GetBrand();
}

[Serializable]
public class LogitechMouse : IMouse
{
    public string GetBrand()
    {
        return "罗技-Logitech  G903";
    }
}

[Serializable]
public class RazeMouse : IMouse
{
    public string GetBrand()
    {
        return "雷蛇-Raze  蝰蛇";
    }
}

public interface IKeyBoard
{
    string GetBrand();
}

[Serializable]
public class LogitechKeyboard : IKeyBoard
{
    public string GetBrand()
    {
        return "罗技-Logitech  G910 RGB";
    }
}

[Serializable]
public class RazeKeyboard : IKeyBoard
{
    public string GetBrand()
    {
        return "雷蛇-Raze  萨诺狼蛛";
    }
}

[Serializable]
public class Kit : ICloneable
{
    public Kit()
    {
        Thread.Sleep(1000);
    }

    public IMouse Mouse { set; get; } = null;
    public IKeyBoard Keyboard { set; get; } = null;

    public object Clone()
    {
        object resultObj;
        using (MemoryStream stream = new MemoryStream())
        {
            BinaryFormatter serializer = new BinaryFormatter();
            serializer.Serialize(stream, this);
            stream.Seek(0, SeekOrigin.Begin);
            resultObj = serializer.Deserialize(stream);
        }
        return resultObj;
    }
}

class Program
{
    static void Main(string[] args)
    {
        Stopwatch stopwatch = new Stopwatch();
        stopwatch.Start();

        Kit kitA = new Kit();
        kitA.Mouse = new LogitechMouse();
        kitA.Keyboard = new LogitechKeyboard();

        stopwatch.Stop();
        double kitACreateTime = stopwatch.Elapsed.TotalMilliseconds;
        stopwatch.Restart();

        Kit kitB = kitA.Clone() as Kit;
        kitB.Mouse = new RazeMouse();
        kitB.Keyboard = new RazeKeyboard();

        stopwatch.Stop();
        double kitBCreateTime = stopwatch.Elapsed.TotalMilliseconds;

        Console.WriteLine($"kitA实例{Environment.NewLine}-------------------------------------------");
        Console.WriteLine($"创建用时:{kitACreateTime}ms");
        Console.WriteLine($"{Environment.NewLine}kitB实例{Environment.NewLine}-------------------------------------------");
        Console.WriteLine($"kitB实例 创建用时:{kitBCreateTime}ms");
        Console.ReadKey();
    }
}
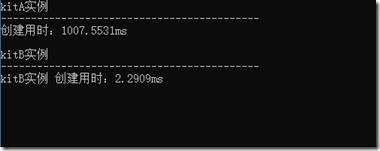
我们在KitA的构造函数中使用Thread.Sleep(1000)来模拟实例化是所需要的时间。在创建了实例kitA之后通过对kitA进行深克隆操作来获得一个全新的Kit实例kitB。通过运行结果可以看出,当我们实例化一个对象的代价较大时,使用深克隆操作是一种效率更高的创建方式。
实例中的Kit类实现了ICloneable接口中的Clone函数,这意味着存在继承Kit类的子类时,子类的Clone操作会调用Kit中的Clone函数。除非在子类中存在Clone的隐藏函数,并在创建子类时使用子类声明(个人不介意通过接口实现Clone操作)。如下:
[Serializable]
public class KitChild : Kit
{
    public new object Clone()
    {
        return this.MemberwiseClone();
    }
}

class Program
{
    static void Main(string[] args)
    {
        Kit kit = new KitChild();
        kit.Clone();//调用的是Kit类中的Clone函数

        KitChild kitChild = new KitChild();
        kitChild.Clone();//调用的是KitChild类中的Clone函数
    }
}
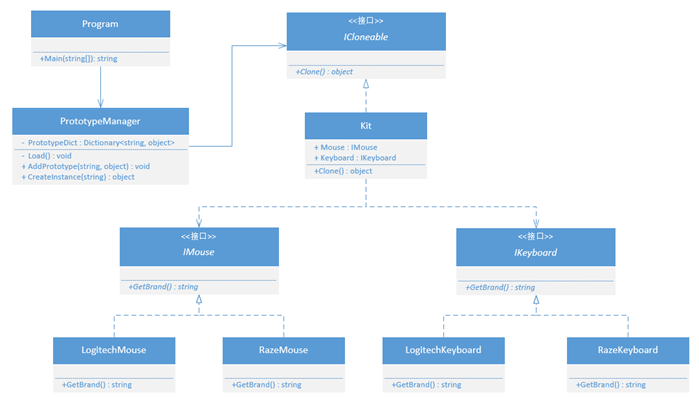
在原型模式中还存在原型管理器角色,用来统一管理所有原型。实现如下:
public class PrototypeManager
{
    private Dictionary<string, object> PrototypeDict = new Dictionary<string, object>();

    public PrototypeManager()
    {
        this.LoadPrototypes();
    }

    private void LoadPrototypes()
    {
        Kit logitechKit = new Kit();
        logitechKit.Mouse = new LogitechMouse();
        logitechKit.Keyboard = new LogitechKeyboard();
        PrototypeDict.Add("LogitechKit", logitechKit);
    }

    public void AddPrototype(string key, object prototype)
    {
        this.PrototypeDict.Add(key, prototype);
    }

    public object CreateInstance(string key)
    {
        object prototypeObj = this.PrototypeDict[key];
        Type prototypeType = prototypeObj.GetType();
        MethodInfo method = prototypeType.GetMethod("Clone");
        return method.Invoke(prototypeObj, null);
    }
}

class Program
{
    static void Main(string[] args)
    {
        Stopwatch stopwatch = new Stopwatch();
        stopwatch.Start();

        //创建原型管理器
        PrototypeManager prototypeManager = new PrototypeManager();

        stopwatch.Stop();
        Console.WriteLine($"Load用时:{stopwatch.Elapsed.TotalMilliseconds}ms") ;
        stopwatch.Restart();

        //创建实例
        Kit kit = prototypeManager.CreateInstance("LogitechKit") as Kit;

        stopwatch.Stop();
        Console.WriteLine($"CreateInstance用时:{stopwatch.Elapsed.TotalMilliseconds}ms");

        //创建原型并添加至原型管理器
        Kit razeKit = new Kit();
        razeKit.Mouse = new RazeMouse();
        razeKit.Keyboard = new RazeKeyboard();
        prototypeManager.AddPrototype("RazeKit", razeKit);

        Console.WriteLine($"当前套装内的鼠标是:{kit.Mouse.GetBrand()}");
        Console.WriteLine($"当前套装内的键盘是:{kit.Keyboard.GetBrand()}");
        Console.ReadKey();
    }
}
在上述示例中并不能保证原型管理器的创建次数,为了保证每个类只存在一个原型,可以搭配单例模式使用。为了提高代码的重用性,我们可以将Clone方法写到一个工具类中,通过泛型来适配所有类型。所以上述示例还有很大的优化空间,这里就不一一叙述了。
总结
原型模式,使用克隆操作对一个实例进行复制来创建一个新的实例。在一个对象的实例化过程代价较大时使用原型模式可简化对象的创建过程,提高实例的创建效率。原型模式的核心就是对象的克隆操作,所以在使用原型模式之前,需要对深 / 浅克隆有一个深刻的认识。
以上,就是我对原型模式的理解,希望对你有所帮助。
示例源码:https://gitee.com/wxingChen/DesignPatternsPractice
系列汇总:https://www.cnblogs.com/wxingchen/p/10031592.html
本文著作权归本人所有,如需转载请标明本文链接(https://www.cnblogs.com/wxingchen/p/10078573.html)


