pytest+yaml+allure接口自动化测试框架
前言
现在是2022年,自动化测试,是目前测试行业一项比较普遍的测试技术了,之前的以UI自动化测试为主,现在的以接口自动化测试为主,无论技术更迭,自动化测试总有他的重量,用机器代替手工工作,是21世纪不断进行的课题。
可是身为测试,难受的是脚本容易写,学几天python,照猫画虎三两天也能写一个不错的脚本。可是想更上一层,去搭建一个测试框架却显得不是那么容易,曾经我也是这样的困难。时光不负有心人,学习了漫长时间终于是现在有了一些开发基础,抽空搞了一个简单版本的接口自动化测试框架。
希望我的框架能给予你一定启发的同时,你也能指出一些我的不足之处,互相学习,我们才能共同进步。
环境搭建
目录文件添加
我们打开vscode新建一个项目,名字就姑且命名为:interface_test_example, 创建好之后,我们就按照这个下面这个目录结构去创建相应的文件内容。
.
├── common                    	——公共方法目录
│   ├── cache.py				——缓存文件
│   ├── exceptions.py			——异常处理
│   ├── __init__.py
│   ├── json.py					——序列化和反序列化
│   ├── regular.py				——正则处理
│   ├── request.py				——请求处理
│   └── result.py				——响应处理
├── conftest.py					——pytest胶水文件
├── environment.properties		——allure配置文件
├── logs						——日志目录
├── main.py						——主运行文件
├── pytest.ini					——pytest配置文件
├── readme.md
├── requirements.txt
├── tests						——测试用例目录
│   └── testcase.yaml
└── utils						——第三方工具文件
    ├── __init__.py
    ├── logger.py				——日志
    ├── readme.md
    └── time.py					——时间处理
当你把上面这些内容创建完成之后我们的项目内容就算整体创建完成了。
python虚拟环境创建
在创建之前我先声明一下我所使用的python版本是3.8.6版本。学习本篇请不要使用3.8版本以下python,某些语法会不支持。
1、创建虚拟环境
python3 -m venv env
2、 安装requirements.txt的依赖包
pip install -r requirements.txt
requirements.txt的具体内容
allure-pytest==2.9.43
allure-python-commons==2.9.43
pytest==6.2.5
pytest-assume==2.4.3
pytest-html==3.1.1
PyYAML==5.4.1
requests==2.26.0
安装完成之后我们的环境就搭建好了。
测试用例管理
excel这种总归是太麻烦了,所以我们需要一个更合适的。挑来选去yaml是最简单方便的,数据能几乎无缝切换。
先来看看我们的用例吧,都写了些什么。打开tests/testcase.yaml文件,输入以下内容。
config: # 测试信息
  baseurl: "https://www.zhixue.com"
  timeout: 30.0
  headers:
    Accept: application/json, text/javascript, */*; q=0.01
    Accept-Encoding: gzip, deflate, br
    Accept-Language: zh-CN,zh;q=0.9
    Connection: keep-alive
    User-Agent: Mozilla/5.0 (Windows NT 10.0; Win64; x64) AppleWebKit/537.36 (KHTML, like Gecko) Chrome/83.0.4103.116 Safari/537.36
    cookies: aliyungf_tc=AQAAANNdlkvZ2QYAIb2Q221oiyiSOfhg; tlsysSessionId=cf0a8657-4a02-4a40-8530-ca54889da838; isJump=true; deviceId=27763EA6-04F9-4269-A2D5-59BA0FB1F154; 6e12c6a9-fda1-41b3-82ec-cc496762788d=webim-visitor-69CJM3RYGHMP79F7XV2M; loginUserName=18291900215
    X-Requested-With: XMLHttpRequest
variable:
  none : none
tests:
  test_login:
    description: "登录"
    method: post
    route: /weakPwdLogin/?from=web_login
    RequestData:
      data:
        loginName: 18291900215
        password: dd636482aca022
        code:
        description: encrypt
    Validate:
      expectcode: 200
      resultcheck: '"result":"success"'
      regularcheck: '[\d]{16}'
    Extract:
      - data
  test_login_verify:
    description: "验证登录"
    method: post
    route: /loginSuccess/
    RequestData:
      data:
        userId: "${data}"
    Validate:
      expectcode: 200
      regularcheck:
      resultcheck: '"result":"success"'
第一部分config内容:主要是一些全局的配置信息,如请求地址、请求头等。
第二部分variable内容:主要是预先设置一些全局变量等等内容。比如可以加入邮箱地址等等。
第三部分tests内容:这个是真正的测试用例部分,通过匹配requests库的输入参数,以简洁明了的写法更好的支持测试。
日志封装
打开utils/logger.py文件,这个utils的意思是一个工具包的意思。在这个里面我们主要存放可以独立运行的工具模块。比如日志文件就是一个可以独立运行的。打开之后我们输入以下的内容:
# -*- coding: utf-8 -*-
__author__ = 'wxhou'
__email__ = '1084502012@qq.com'
"""
日志类
"""
import os
import logging
from logging.handlers import RotatingFileHandler


def init_logger():
    """初始化日志"""
    basedir = os.path.dirname(os.path.dirname(os.path.abspath(__file__)))
    debug_file = os.path.join(basedir, 'logs', 'server.log')

    logger_formatter = logging.Formatter(
        '%(levelname)s %(asctime)s [%(filename)s:%(lineno)s] %(thread)d %(message)s')

    # debug
    logger_debug = logging.getLogger('apitest')
    handler_debug = RotatingFileHandler(debug_file,
                                        encoding='utf-8',
                                        maxBytes=20 * 1024 * 1024,
                                        backupCount=10)
    handler_debug.setFormatter(logger_formatter)
    logger_debug.setLevel(logging.DEBUG)
    logger_debug.addHandler(handler_debug)
    # 在控制台输出
    return logger_debug


logger = init_logger()

if __name__ == '__main__':
    logger.debug("debug")
    logger.info("info")
    logger.warning('warning')
    logger.error("error")
    logger.critical('critical')
下面一些日志输入示例。我们来执行一下。
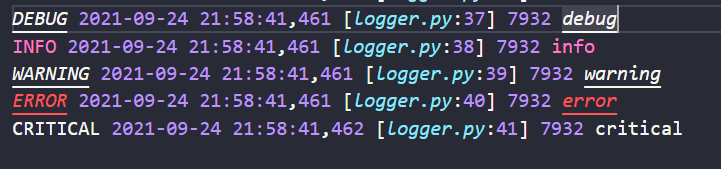
可以看到成功的在日志文件中写入了新的信息。
缓存工具
是的你没看错,我给它起的名字就叫缓存,其实内部组成本质就是一个python字典。而不是你想的redis这种。
打开common/cache.py文件,我们输入以下内容。
# -*- coding: utf-8 -*-
__author__ = 'wxhou'
__email__ = '1084502012@qq.com'
"""
缓存类
"""
from collections import UserDict


class CachePool(UserDict):
    """全局变量池"""

    def get(self, key, default=None):
        return self.data.get(key, default)

    def set(self, key, value = None):
        self.data.setdefault(key, value)

    def has(self, key):
        return key in self.data

    def __len__(self):
        return len(self.data)

    def __bool__(self):
        return bool(self.data)


cache = CachePool()

if __name__ == '__main__':
    cache.set('name', 'wxhou')
    print(len(cache))
    print(cache.get('name'))
我们执行测试一下:

可以看到没有问题。通过这个字典我们把一些临时的信息放在这个里面,因为只是示例项目,用redis显得有些麻烦,采用这种方式更为简便一些。
读取yaml测试用例
使用yaml作为测试用例,我们就需要对文件的内容进行读取,常规来说的应该是通过pyyaml对读取到的内容进行数据解析,然后使用pytest parametrize参数化功能进行数据参数化用例测试。但是完事之后,这样的方式好像不是很优雅,写的代码组织起来比较费劲,于是乎,我在pytest的官方文档中,发现了一套更为一套非常优雅的测试执行方式,他们称之为non-python test的测试模式。
具体内容可以查看官方文档,感兴趣的可以去看看:Working with non-python tests — pytest documentation
# content of conftest.py
import pytest


def pytest_collect_file(parent, path):
    if path.ext == ".yaml" and path.basename.startswith("test"):
        return YamlFile.from_parent(parent, fspath=path)


class YamlFile(pytest.File):
    def collect(self):
        # We need a yaml parser, e.g. PyYAML.
        import yaml

        raw = yaml.safe_load(self.fspath.open())
        for name, spec in sorted(raw.items()):
            yield YamlItem.from_parent(self, name=name, spec=spec)


class YamlItem(pytest.Item):
    def __init__(self, name, parent, spec):
        super().__init__(name, parent)
        self.spec = spec

    def runtest(self):
        for name, value in sorted(self.spec.items()):
            # Some custom test execution (dumb example follows).
            if name != value:
                raise YamlException(self, name, value)

    def repr_failure(self, excinfo):
        """Called when self.runtest() raises an exception."""
        if isinstance(excinfo.value, YamlException):
            return "\n".join(
                [
                    "usecase execution failed",
                    "   spec failed: {1!r}: {2!r}".format(*excinfo.value.args),
                    "   no further details known at this point.",
                ]
            )

    def reportinfo(self):
        return self.fspath, 0, f"usecase: {self.name}"


class YamlException(Exception):
    """Custom exception for error reporting."""
可以看到官方文档中以极其优雅的方式通过yaml文件驱动了两个测试用例。我们也将在此基础上进行扩展衍生。
我们根据官方文档中的示例文件,在这个基础上进行修改,加入我们的内容。
pytest_collect_file
首先我们修改pytest_collect_file函数中的内容,让他支持yaml和yml两种格式的文件内容。因为这两种都可以,官网示例中只有一个。
if path.ext in (".yaml", ".yml") and path.basename.startswith("test"):
    return YamlFile.from_parent(parent, fspath=path)
YamlFile.collect
接下来修改我们的YamlFile.collect方法,这里面就是对读出来的详细内容按照设置的格式进行处理,该存入缓存的放入缓存,该执行测试的时候执行测试。
if not any(k.startswith('test') for k in raw.keys()):
    raise YamlException("{}yaml non test found".format(self.fspath))
通过这个语句我们先判断一下,有没有测试用例,如果没有测试用例我们直接就报错了,不在执行,抛出异常,这个异常需要我们自己封装一下。我们打开common/exceptions.py文件。输入以下内容:
# -*- coding: utf-8 -*-
__author__ = 'wxhou'
__email__ = '1084502012@qq.com'
"""
异常类
"""
from requests.exceptions import RequestException


class YamlException(Exception):
    """Custom exception for error reporting."""

    def __init__(self, value):
        self.value = value

    def __str__(self):
        return "\n".join(
            [
                "usecase execution failed",
                "   spec failed: {}".format(self.value),
                "   For more details, see this the document.",
            ]
        )
这个就是当我们发现yaml文件中没有符合的测试标签内容后抛出的异常类。
然后我们接着先读取全局变量:
if variable := raw.get('variable'):
    for k, v in variable.items():
        cache.set(k, v)
我们把yaml文件中预设的全局变量信息中全部存在我们设置的缓存模块中,这样在测试过程中我们可以随时的去用。
继续读取配置文件。
if config := raw.get('config'):
    for k, v in config.items():
        cache.set(k, v)
然后我们读取常用的测试信息也放入缓存之中,方便运行过程中随时去调用。
最后我们来处理一下。测试用例部分:
if tests := raw.get('tests'):
    for name, spec in tests.items():
        yield YamlTest.from_parent(self,
                                   name=spec.get('description') or name,
                                   spec=spec)
可以看到,在官方文档中使用了sorted函数进行了再次排序。我这里没有是因为再次排序会破坏用例的结构和顺序。最后输出的时候spec.get('description') or name的写法先获取yaml文件中我们设置的中文标识,如果中文标识不存在则继续使用英文标识。其余和官方文档保持一致。
以上就是做出的改动,我们来看看吧:
import yaml
import pytest
from common.cache import cache
from common.exceptions import YamlException


def pytest_collect_file(parent, path):
    if path.ext in (".yaml", ".yml") and path.basename.startswith("test"):
        return YamlFile.from_parent(parent, fspath=path)


class YamlFile(pytest.File):

    def collect(self):
        raw = yaml.safe_load(self.fspath.open(encoding='utf-8'))
        if not any(k.startswith('test') for k in raw.keys()):
            raise YamlException("{}yaml non test found".format(self.fspath))
        if variable := raw.get('variable'):
            for k, v in variable.items():
                cache.set(k, v)
        if config := raw.get('config'):
            for k, v in config.items():
                cache.set(k, v)
        if tests := raw.get('tests'):
            for name, spec in tests.items():
                yield YamlTest.from_parent(self,
                                           name=spec.get(
                                               'description') or name,
                                           spec=spec)
站在巨人的肩膀上才能看得更远。在pytest non-python tests的内容之上做了一些改动,使得读取文件更加贴合我们定义的yaml文件内容。在精简了很多代码的同时我们也达到了预期的效果。
处理request
谈到HTTP请求,我们首先就会想到requests库,这个第三方库,以极其优雅的封装方式和简易的写法,在python界有着重要的地位,在这个接口自动化测试框架中,我们也会使用这个库进行二次封装。让其融入到我们的测试框架中来。
对于这个库我就不做过多的介绍了,之前有一篇文章专门介绍,感兴趣可以点击:python requests由浅入深 - 随风挥手 - 博客园 (cnblogs.com)
执行测试的代码
上一章节已经讲了怎么读取测试用例数据,根据pytest官网的non-python test内容,我们还需要编写一个YamlTest类来执行测试。
继续打开conftest.py文件,在里面加上如下内容:
# +++
from common.request import HttpRequest
from common.exceptions import RequestException

# +++

class YamlTest(pytest.Item):
    def __init__(self, name, parent, spec):
        super(YamlTest, self).__init__(name, parent)
        self.spec = spec
        self.request = HttpRequest(exception=(RequestException, Exception))

    def runtest(self):
        """Some custom test execution (dumb example follows)."""
        self.request.send_request(**self.spec)

    def repr_failure(self, excinfo):
        """Called when self.runtest() raises an exception."""
        logger.critical(excinfo.value)
        logger.critical(excinfo.traceback[-6:-1])

    def reportinfo(self):
        return self.fspath, 0, f"usecase: {self.name}"
通过继承pytest.Item类我们可以使用父类的运行测试的方法来执行测试。
__init__方法
在这个里面我们接收来自yamlfile类中collect方法的yield生成器传给我们的测试数据。
runtest
继承父类的runtest方法我们可以在这个里面执行我们的测试,把接受到的参数传入我们二次封装的HttpRequest类,就可以对我们在yaml文件中添加的接口进行测试了。
repr_failure
如果在运行中发生了用例失败的现象我们可以在这个方法中拦截并打印出相应的报错信息,方便我们排查问题。
reportinfo
通过reportinfo方法重写我们传入的name信息,就是我们在yaml文件中的测试用例名称信息。
这个就是我们通过对YamlTest的改造,组成了一个测试过程。这个类的核心是对requests的二次封装类。
二次封装requests
我们打开common/request.py,我们键入以下内容。
# -*- coding: utf-8 -*-
__author__ = 'wxhou'
__email__ = '1084502012@qq.com'
"""
requests二次封装
"""
import urllib3
from requests import Session, Response
from common.cache import cache
from utils.logger import logger

urllib3.disable_warnings()


class HttpRequest(Session):
    """requests方法二次封装"""

    def __init__(self, *args: t.Union[t.Set, t.List], **kwargs: t.Dict[t.Text, t.Any]):
        super(HttpRequest, self).__init__()
        self.exception = kwargs.get("exception", Exception)

    def send_request(self, **kwargs: t.Dict[t.Text, t.Any]) -> Response:
        """发送请求
        """
        try:
            logger.info("request data: {}".format(kwargs))
            method = kwargs.get('method', 'GET').upper()
            url = cache.get('baseurl') + kwargs.get('route')
            logger.info("Request Url: {}".format(url))
            logger.info("Request Method: {}".format(method))
            logger.info("Request Data: {}".format(kwargs))
            request_data = HttpRequest.mergedict(kwargs.get('RequestData'),
                                                 headers=cache.get('headers'),
                                                 timeout=cache.get('timeout'))
            response = self.dispatch(method, url, **request_data)
            logger.info("Request Result: {}{}".format(response, response.text))
            return response
        except self.exception as e:
            logger.exception(format(e))
            raise e

    def dispatch(self, method, *args, **kwargs):
        """请求分发"""
        handler = getattr(self, method.lower())
        return handler(*args, **kwargs)

    @staticmethod
    def mergedict(args, **kwargs):
        """合并字典"""
        for k, v in args.items():
            if k in kwargs:
                kwargs[k] = {**args[k], **kwargs.pop(k)}
        args.update(kwargs)
        return args
我们通过继承requests库的Session类,添加我们的定制化的一些方法。
send_request方法
我们把YamlTest类中的测试用例数据传入到我们的这个方法中来,然后打印日志记录,并将结果进行返回。
dispatch
在这个方法中我们根据传入的用例请求方法,去反射我们Session类中的相应的请求方法,从而实现get,post等HTTP请求。
mergedict
编写了一个合并字典的方法,用来合并我们定义的请求体或者请求参数,和我们自定义的一些测试配置,比如headers,timeout等。
对于requests的封装暂时就介绍到这里。
处理response
我们已经基本完成了测试框架的前半部分工作,剩下的章节基本都是后半部分内容了。这个章节我们来说一下我们获取到请求的结果之后怎么处理response(响应)。本来计划序列化和反序列化放一个章节的,但是鉴于内容有点少,所以我把4 5章节合并了。
序列化和反序列化
我们打开common/json.py文件。
# -*- coding: utf-8 -*-
__author__ = 'wxhou'
__email__ = '1084502012@qq.com'
"""
序列化和反序列化类
"""
import json


def loads(content):
    """
    反序列化
        json对象 -> python数据类型
    """
    return json.loads(content)


def dumps(content, ensure_ascii=True):
    """
    序列化
        python数据类型 -> json对象
    """
    return json.dumps(content, ensure_ascii=ensure_ascii)


def is_json_str(string):
    """验证是否为json字符串"""
    try:
        json.loads(string)
        return True
    except:
        return False
我们通过自带的json模块,封装两个方法
- loads,这个主要用来把json字符串转换为python对象。
- dumps,主要用来把python对象转换成json格式。
- is_json_str我们可能需要对一个字符串是不是json格式需要做验证,所以我们写一个这样的方法。
正则处理
在开始对response进行处理之前,我们需要封装一下正则方法。
打开common/regular文件,输入以下内容。
# -*- coding: utf-8 -*-
__author__ = 'wxhou'
__email__ = '1084502012@qq.com'
"""
正则相关操作类
"""
import re
from common.json import is_json_str
from utils.logger import logger


def get_var(key, raw_str):
    """获取变量"""
    if is_json_str(raw_str):
        return re.compile(r'\"%s":"(.*?)"' % key).findall(raw_str)[0]
    return re.compile(r'%s' % key).findall(raw_str)[0]
这个的目的就是为了我们能在json数据中,通过名称能够获取到名称所对应的值。例如有以下字符串A
{"username":"admin"}
我们能够通过get_var(username, A),获取到admin的信息。
处理result
当我们把准备工作做好之后我们就可以在result.py。文件中对我们的内容进行处理了。
我们打开common/result.py,输入以下内容:
# -*- coding: utf-8 -*-
__author__ = 'wxhou'
__email__ = '1084502012@qq.com'
"""
response响应处理
"""
import re
import pytest
from common.cache import cache
from common.regular import re, get_var
from utils.logger import logger


def check_results(r, validate):
    """检查运行结果"""
    expectcode = validate.get('expectcode')
    resultcheck = validate.get('resultcheck')
    regularcheck = validate.get('regularcheck')
    if expectcode:
        pytest.assume(expectcode == r.status_code)
    if resultcheck:
        pytest.assume(resultcheck in r.text)
    if regularcheck:
        pytest.assume(re.findall(regularcheck, r.text))
可以看到我封装了检查运行结果的函数,这个里里面我用了一个类库。pytest-assume用过的朋友应该知道这个有什么作用。
官方地址:https://github.com/astraw38/pytest-assume
该插件的主要作用是,在断言失败后继续运行,并且会统计断言的报错情况。能够保证完整的运行,不会因为一个错误而发生整个测试停止的问题。
这个添加好之后我们,接着打开conftest.py文件,在YamlTest类中把我们这个方法集成进去。
from common.result import check_results

	+++

    def runtest(self):
        """Some custom test execution (dumb example follows)."""
        r = self.request.send_request(**self.spec)
        self.response_handle(r, self.spec.get('Validate'))

    def response_handle(self, r, validate):
        """Handling of responses"""
        if validate:
            check_results(r, validate)

    +++
我们在文件中添加以上内容。我们先创建一个response_handle处理方法。然后在runtest执行的时候导入这个方法,通过传入,请求的返回和需要验证的结果,通过check_result方法,我们基本就达到了简单的返回验证。
当然了我们这个只是最简单的,可能还有一些更复杂的,比如对数据的格式验证,和数据的返回层级验证,与数据库中的数据进行对比等验证操作。但是我这个只是一个简单的测试框架,还没有那么重,只是提供一种思路,剩下的实现就要靠你自己了,加油。
接口上下文关联
前面我们已经完成了测试框架的主要功能了,读取用例,执行用例,获取结果。在这个请求中间呢,我们没有解决一个接口测试中很常见的问题,接口上下文参数传递,这个是什么意思呢。
比如我们可以用登录和登录验证这两个接口来讲一下,现在常用的系统都是前后端分离的,认证也是通过JWT的方式来搞定的,那么在登录接口进行登录之后就会生成一个token,我们拿到这个token就可以去其他接口进行鉴权,然后才能得到登录验证接口返回值。
所以我们这一章就解决一下这个请求参数上下文传递。
获取token
先梳理一下思路,我们第一个请求的接口是登录接口,它会给我们返回token值,然后传到下一个接口中。所以我们按照执行顺序,先解决拿到返回值这一步。
在yaml文件中我们定义了一个字段Extract,这个字段就是预设一下我们要拿到哪一个值,你得告诉你的程序要那个他才能执行,在这个项目中我们想拿到的就是data这个。
  test_login:
    description: "登录"
    method: post
    route: /weakPwdLogin/?from=web_login
    RequestData:
      data:
        loginName: 18291900215
        password: dd636482aca022
        code:
        description: encrypt
    Validate:
      expectcode: 200
      resultcheck: '"result":"success"'
      regularcheck: '[\d]{16}'
    Extract:   ---> 注意这一行
      - data
然后我们继续打开common/result.py这个文件,创建一个函数get_result,获取一下请求值。
def get_result(r, extract):
    """获取值"""
    for key in extract:
        value = get_var(key, r.text)
        logger.debug("正则提取结果值:{}={}".format(key, value))
        cache.set(key, value)
        pytest.assume(key in cache)
这个函数的主要工作就是,通过正则表达式获取到结果,然后把他放入到缓存中去。
更新response_handle
创建好之后,我们就需要去我们处理请求得地方把这个函数,给他嵌套进去。
打开conftest.py文件。
from common.result import get_result, check_results

    +++


    def response_handle(self, r: Response, validate: t.Dict, extract: t.List):
        """Handling of responses"""
        if validate:
            check_results(r, validate)
        if extract:
            get_result(r, extract)
好了到这一步,我们的获取token(data)的工作就完成了。
接下来我们要处理的是传入到下一个接口中。
打开YAML测试文件,我们找到测试验证这条用例。我们会发现有一个${data},这是我们定义的一种变量格式。通过识别变量名称,去替换相应的结果。
  test_login_verify:
    description: "验证登录"
    method: post
    route: /loginSuccess/
    RequestData:
      data:
        userId: "${data}"   ---> 这行
    Validate:
      expectcode: 200
      regularcheck:
      resultcheck: '"result":"success"'
进行替换
我们首先得封装两个方法,一个方法让我们可以获取到这个用例里面有哪些我们需要替换的变量,一个方法可以让我们执行这个替换的过程。
打开common/regular.py.
from string import Template
from common.cache import cache

+++

def findalls(string):
    """查找所有"""
    key = re.compile(r"\${(.*?)\}").findall(string)
    res = {k: cache.get(k) for k in key}
    logger.debug("需要替换的变量:{}".format(res))
    return res


def sub_var(keys, string):
    """替换变量"""
    s = Template(string)
    res = s.safe_substitute(keys)
    logger.debug("替换结果:{}".format(res))
    return res
-
findalls
我们通过正则去查找这个用例下有那些变量需要我们去替换。同时把需要替换的变量和变量值,以字典的形式进行存储。
-
sub_var
通过python官方的string模块中的Template方法,我们可以轻松完成替换,因为我们的变量格式和该模块中的保持了一致。
编写好之后,我们打开common/request.py模块。
from common.json import json, loads, dumps

+++

class HttpRequest(Session):
    """requests方法二次封装"""

    def __init__(self, *args, **kwargs):
        super(HttpRequest, self).__init__()
        self.exception = kwargs.get("exception", Exception)

    def send_request(self, **kwargs):
        try:
            +++
    		logger.info("Request Url: {}".format(url))
            logger.info("Request Method: {}".format(method))
            kwargs_str = dumps(kwargs)
            if is_sub := findalls(kwargs_str):
                kwargs = loads(sub_var(is_sub, kwargs_str))
            logger.info("Request Data: {}".format(kwargs))
            request_data = HttpRequest.mergedict(kwargs.get('RequestData'),
                                                 headers=cache.get('headers'),
                                                 timeout=cache.get('timeout'))
            +++
    +++
我们对send_request方法进行改造,在这里我们就用到了我们上一章编写的序列化和反序列化方法。
我们先把请求的dict数据,通过反序列化转换为json字符串。传给findalls方法获取到我们需要替换的变量。然后在调用我们编写的sub_var进行字符串的模板替换,生成新的json字符串,然后在通过序列化方法转换为dict数据,传给requests进行请求,这样我们就实现了,接口的上下文参数传递。是不是非常简单呢。
在完成以上操作后我们可以执行一下看看。
(env) > pytest
================================================================= test session starts =================================================================
platform win32 -- Python 3.8.6, pytest-6.2.5, py-1.10.0, pluggy-1.0.0
rootdir: D:\VScode\Interface_test_example, configfile: pytest.ini
plugins: assume-2.4.3, html-3.1.1, metadata-1.11.0
collecting ...
----------------------------------------------------------------- live log collection -----------------------------------------------------------------
DEBUG 22:33:59 [regular.py:19] 11052 需要替换的变量:{}
DEBUG 22:33:59 [regular.py:27] 11052 替换结果:{"baseurl": "https://www.zhixue.com", "timeout": 30.0, "headers": {"Accept": "application/json, text/javascript, */*; q=0.01", "Accept-Encoding": "gzip, deflate, br", "Accept-Language": "zh-CN,zh;q=0.9", "Connection": "keep-alive", "User-Agent": "Mozilla/5.0 (Windows NT 10.0; Win64; x64) AppleWebKit/537.36 (KHTML, like Gecko) Chrome/83.0.4103.116 Safari/537.36", "cookies": "aliyungf_tc=AQAAANNdlkvZ2QYAIb2Q221oiyiSOfhg; tlsysSessionId=cf0a8657-4a02-4a40-8530-ca54889da838; isJump=true; deviceId=27763EA6-04F9-4269-A2D5-59BA0FB1F154; 6e12c6a9-fda1-41b3-82ec-cc496762788d=webim-visitor-69CJM3RYGHMP79F7XV2M; loginUserName=18291900215", "X-Requested-With": "XMLHttpRequest"}}
collected 2 items

tests/testcase.yaml::\u767b\u5f55
-------------------------------------------------------------------- live log call --------------------------------------------------------------------
INFO 22:33:59 [request.py:51] 11052 request data: {'description': '登录', 'method': 'post', 'route': '/weakPwdLogin/?from=web_login', 'RequestData': {'data': {'loginName': 18291900215, 'password': 'dd636482aca022', 'code': None, 'description': 'encrypt'}}, 'Validate': {'expectcode': 200, 'resultcheck':
'"result":"success"', 'regularcheck': '[\\d]{16}'}, 'Extract': ['data']}
INFO 22:33:59 [request.py:54] 11052 Request Url: https://www.zhixue.com/weakPwdLogin/?from=web_login
INFO 22:33:59 [request.py:55] 11052 Request Method: POST
DEBUG 22:33:59 [regular.py:19] 11052 需要替换的变量:{}
INFO 22:33:59 [request.py:59] 11052 Request Data: {'description': '登录', 'method': 'post', 'route': '/weakPwdLogin/?from=web_login', 'RequestData': {'data': {'loginName': 18291900215, 'password': 'dd636482aca022', 'code': None, 'description': 'encrypt'}}, 'Validate': {'expectcode': 200, 'resultcheck':
'"result":"success"', 'regularcheck': '[\\d]{16}'}, 'Extract': ['data']}
INFO 22:34:00 [request.py:73] 11052 Request Result: <Response [200]>{"data":"1500000100070008427","result":"success"}
DEBUG 22:34:01 [result.py:21] 11052 正则提取结果值:data=1500000100070008427
INFO 22:34:01 [request.py:51] 11052 request data: {'description': '验证登录', 'method': 'post', 'route': '/loginSuccess/', 'RequestData': {'data': {'userId': '${data}'}}, 'Validate': {'expectcode': 200, 'regularcheck': None, 'resultcheck': '"result":"success"'}}
INFO 22:34:01 [request.py:54] 11052 Request Url: https://www.zhixue.com/loginSuccess/
INFO 22:34:01 [request.py:55] 11052 Request Method: POST
DEBUG 22:34:01 [regular.py:19] 11052 需要替换的变量:{'data': '1500000100070008427'}
DEBUG 22:34:01 [regular.py:27] 11052 替换结果:{"description": "\u9a8c\u8bc1\u767b\u5f55", "method": "post", "route": "/loginSuccess/", "RequestData": {"data": {"userId": "1500000100070008427"}}, "Validate": {"expectcode": 200, "regularcheck": null, "resultcheck": "\"result\":\"success\""}}
INFO 22:34:01 [request.py:59] 11052 Request Data: {'description': '验证登录', 'method': 'post', 'route': '/loginSuccess/', 'RequestData': {'data': {'userId': '1500000100070008427'}}, 'Validate': {'expectcode': 200, 'regularcheck': None, 'resultcheck': '"result":"success"'}}
INFO 22:34:01 [request.py:73] 11052 Request Result: <Response [200]>{"result":"success"}
PASSED                                                                                                                                           [100%]
可以看到执行成功了,经历了这么多我们才算创建了一个简单的接口自动化测试框架。
allure配置
allure的安装这里就不在说了,之前有一篇文章是已经说过了,
pytest使用allure
配置allure信息
安装好之后,我们先打开common/request.py文件,在里面做一下修改。
import allure

+++

    def send_request(self, **kwargs: t.Dict[t.Text, t.Any]) -> Response:
            response = self.dispatch(method, url, **request_data)
            description_html = f"""
            <font color=red>请求方法:</font>{method}<br/>
            <font color=red>请求地址:</font>{url}<br/>
            <font color=red>请求头:</font>{str(response.headers)}<br/>
            <font color=red>请求参数:</font>{json.dumps(kwargs, ensure_ascii=False)}<br/>
            <font color=red>响应状态码:</font>{str(response.status_code)}<br/>
            <font color=red>响应时间:</font>{str(response.elapsed.total_seconds())}<br/>
            """
            allure.dynamic.description_html(description_html)
            logger.info("Request Result: {}{}".format(response, response.text))
            return response
在执行请求的时候我们记录一下,该次请求的详情信息。
接着我们打开,common/result.py,更新一下处理结果文件的代码。
import allure

+++


def get_result(r, extract):
    """获取值"""
    for key in extract:
        value = get_var(key, r.text)
        logger.debug("正则提取结果值:{}={}".format(key, value))
        cache.set(key, value)
        pytest.assume(key in cache)
    with allure.step("提取返回结果中的值"):
        for key in extract:
            allure.attach(name="提取%s" % key, body=cache.get(key))


def check_results(r, validate):
    """检查运行结果"""
    expectcode = validate.get('expectcode')
    resultcheck = validate.get('resultcheck')
    regularcheck = validate.get('regularcheck')
    if expectcode:
        with allure.step("校验返回响应码"):
            allure.attach(name='预期响应码', body=str(expectcode))
            allure.attach(name='实际响应码', body=str(r.status_code))
        pytest.assume(expectcode == r.status_code)
    if resultcheck:
        with allure.step("校验响应预期值"):
            allure.attach(name='预期值', body=str(resultcheck))
            allure.attach(name='实际值', body=r.text)
        pytest.assume(resultcheck in r.text)
    if regularcheck:
        with allure.step("正则校验返回结果"):
            allure.attach(name='预期正则', body=regularcheck)
            allure.attach(name='响应值', body=str(
                re.findall(regularcheck, r.text)))
        pytest.assume(re.findall(regularcheck, r.text))
把上面这些工作加好之后,我们在命令行运行一下,带allure报告的cmd
pytest --html=report.html --self-contained-html --alluredir allure-results --clean-alluredir
allure generate allure-results -c -o allure-report
allure open allure-report
查看运行结果:
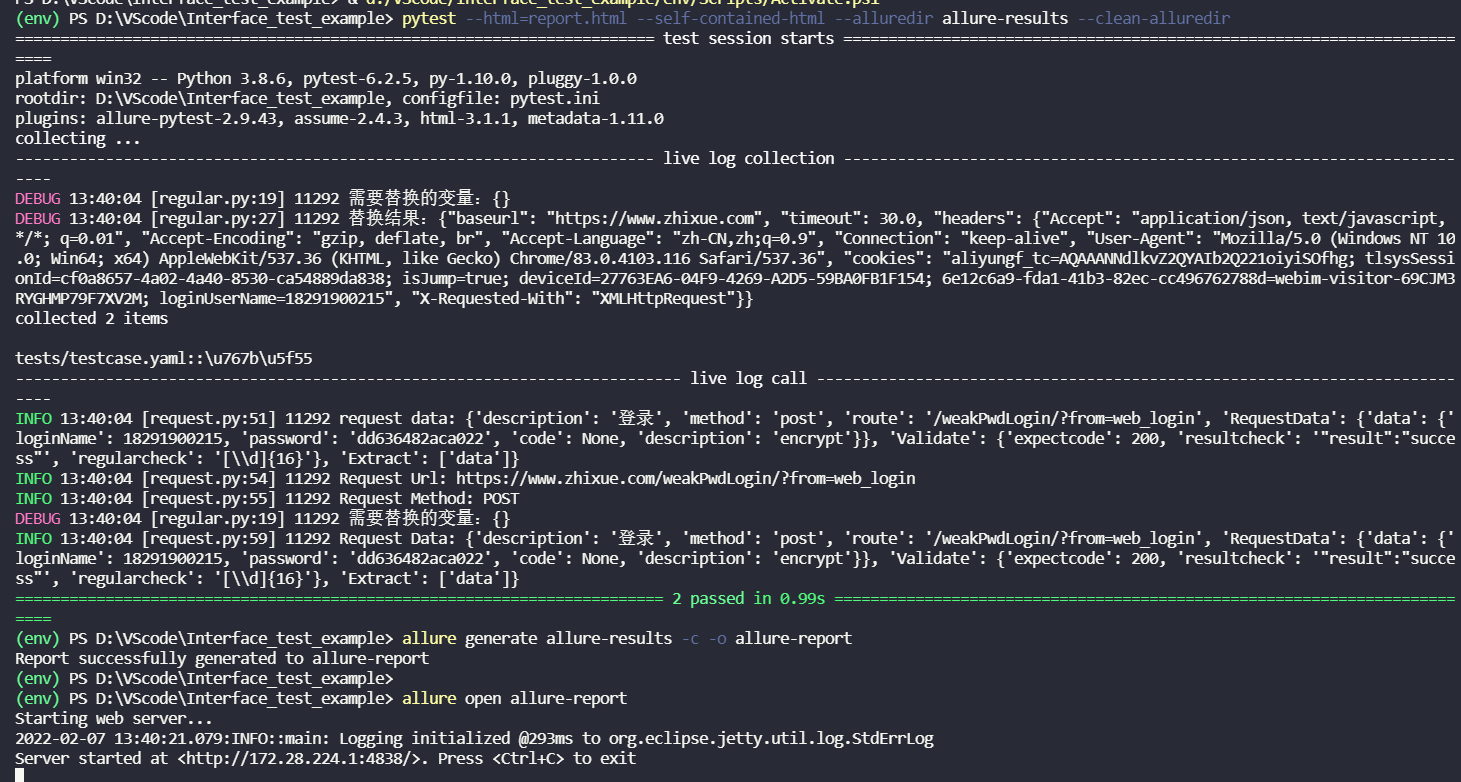
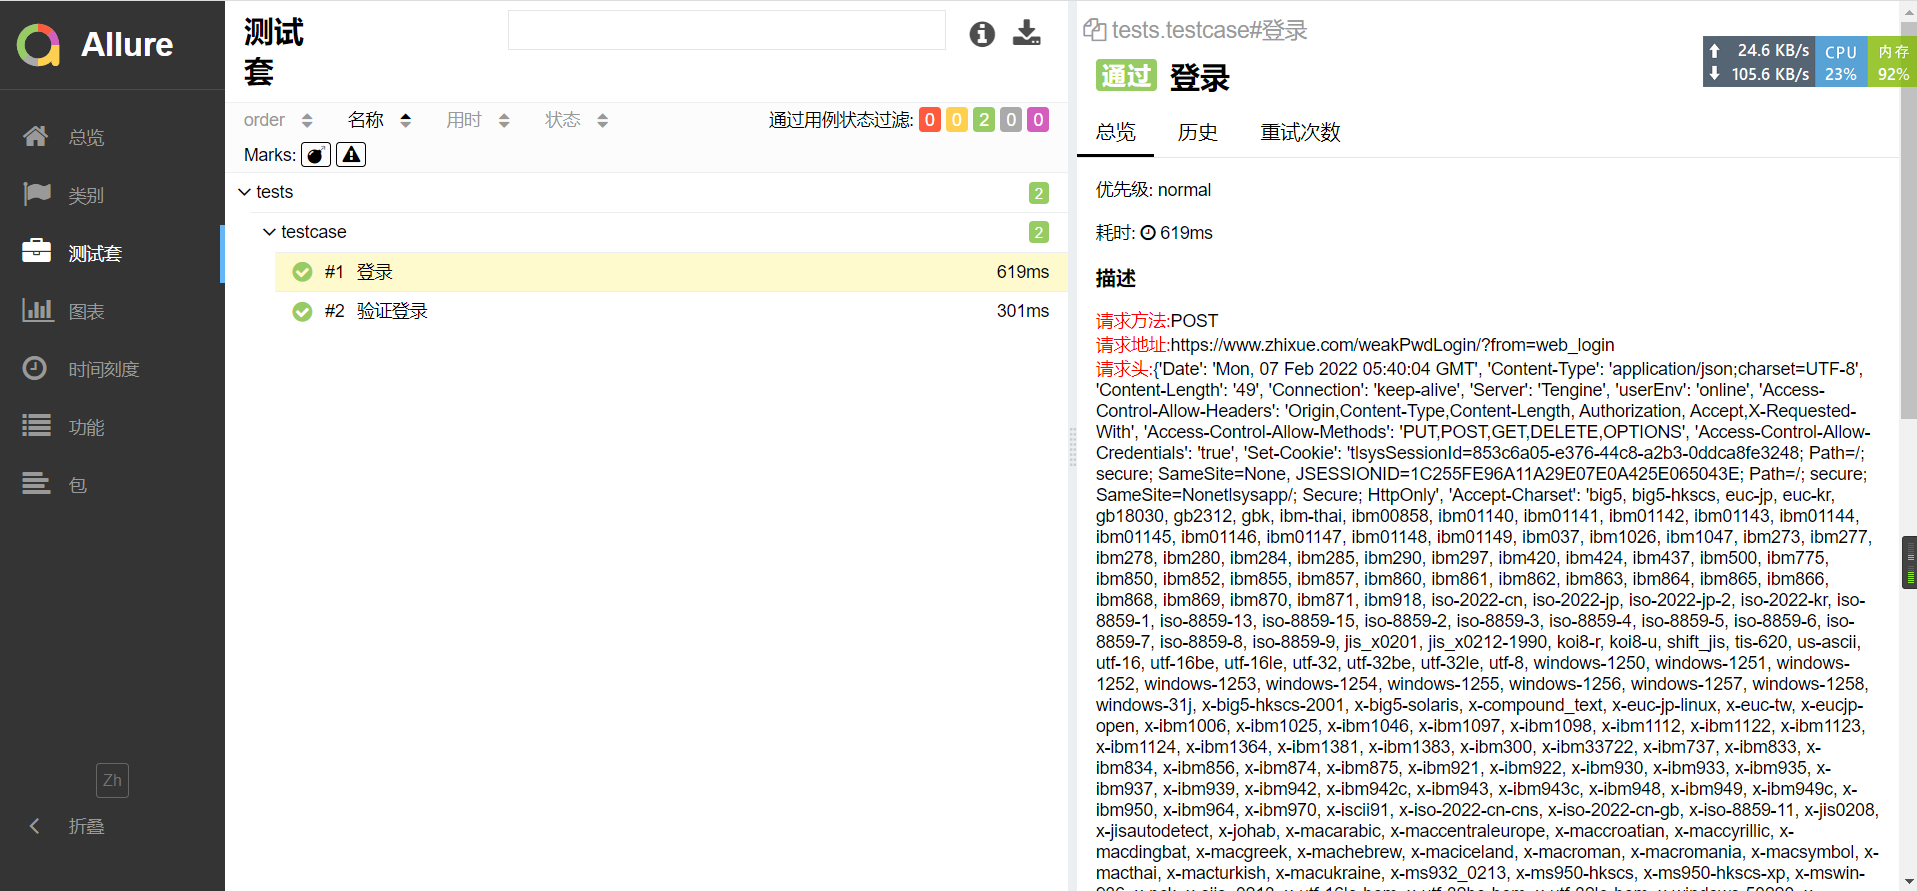
可以看到我们成功的把allure报告集成进来了,是不是很简单又很方便。
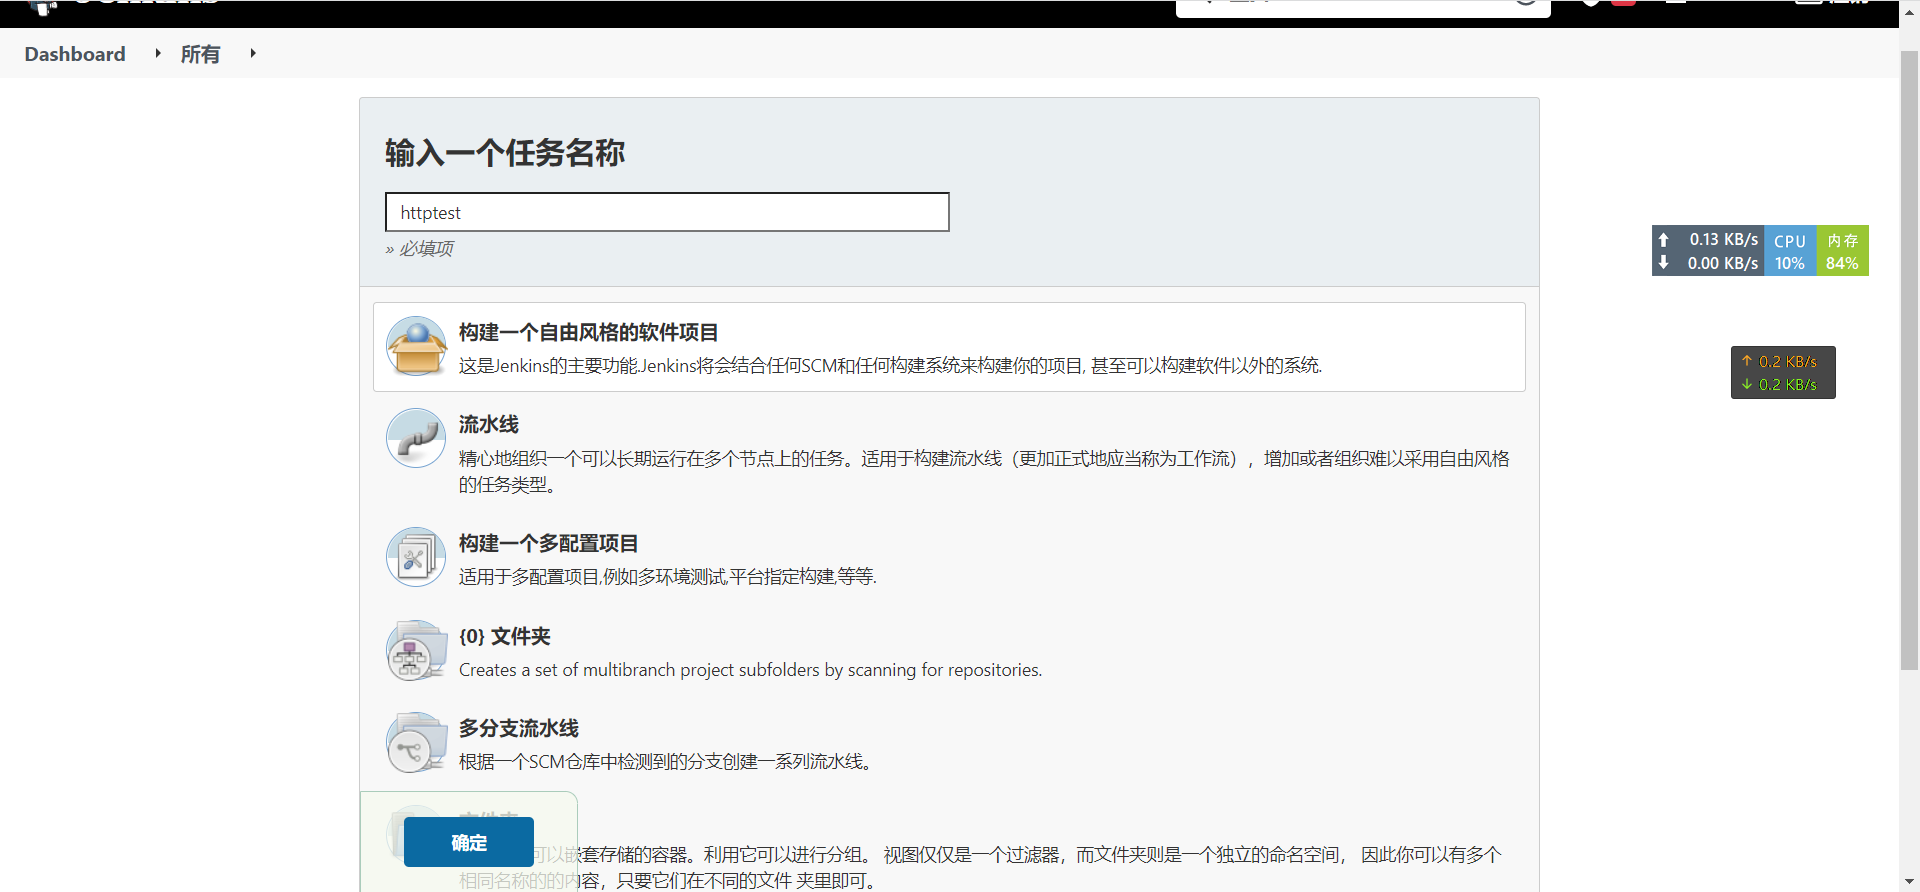
Jenkins集成
安装Jenkins我就不在详细介绍了。
我们直接创建一个任务。
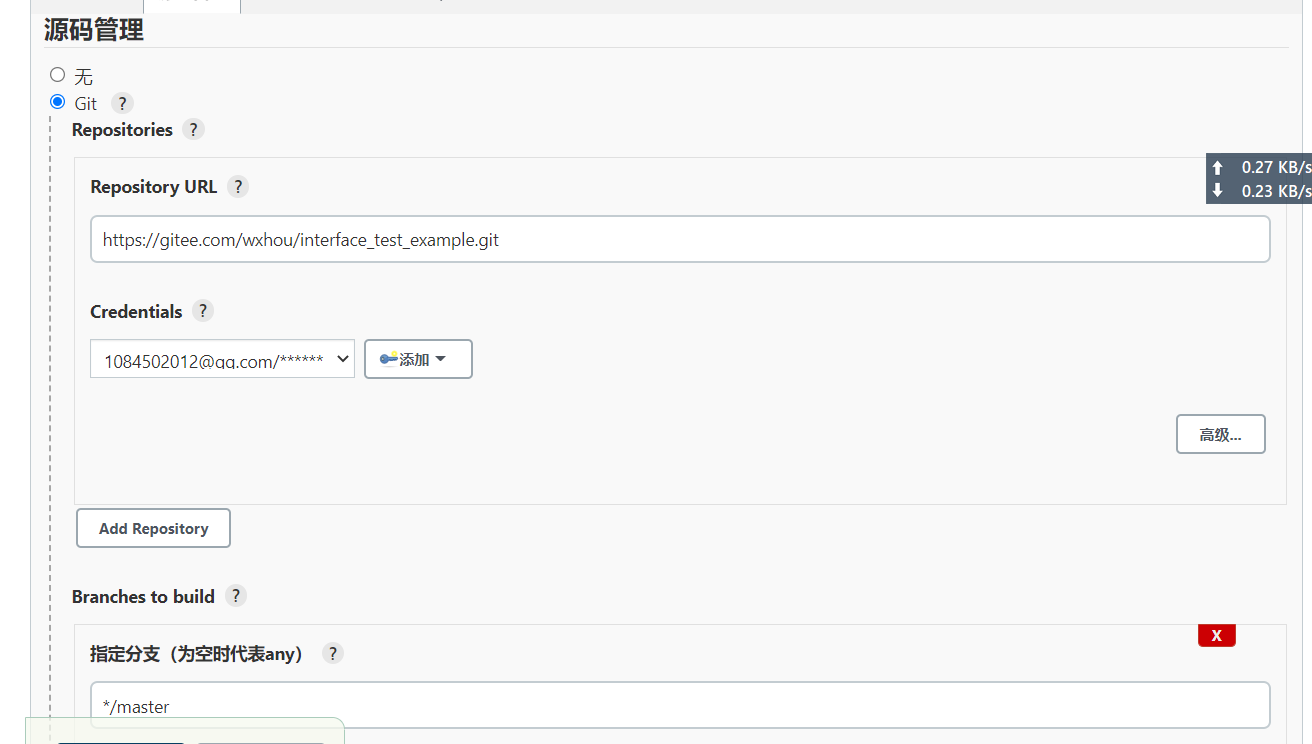
配置git仓库地址
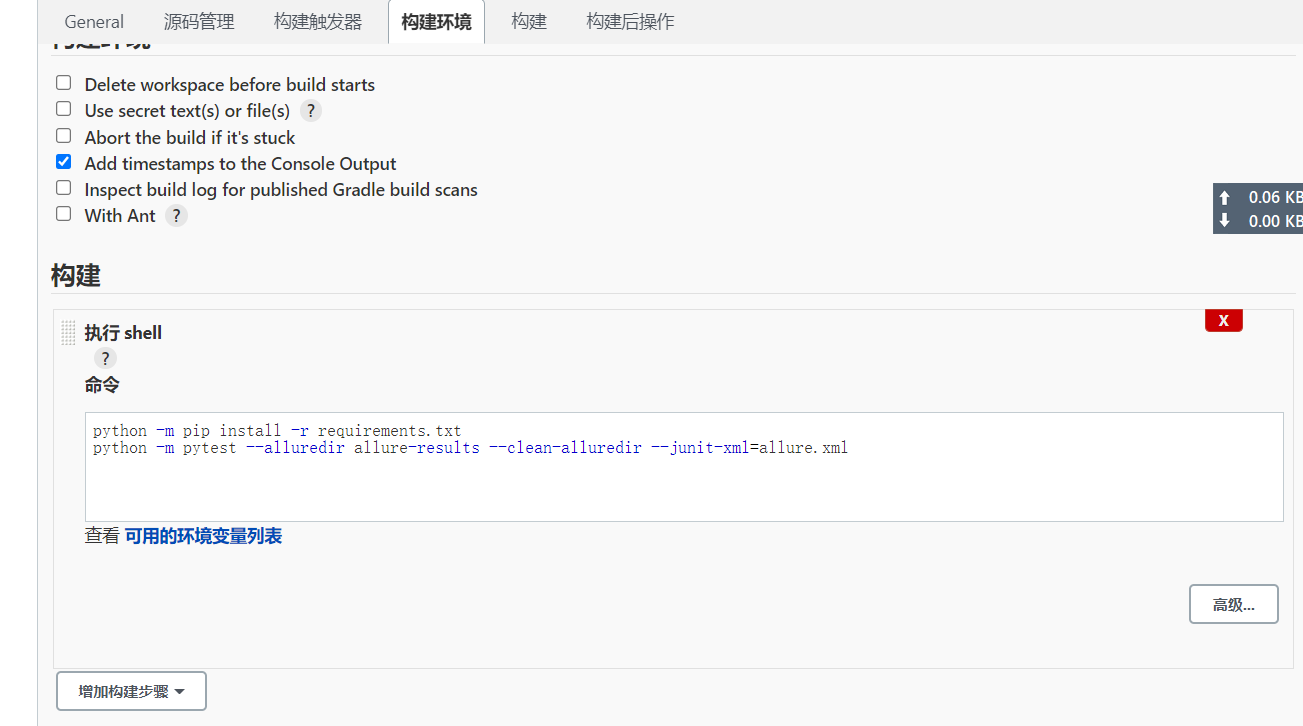
增加构建时的运行命令
构建后的操作

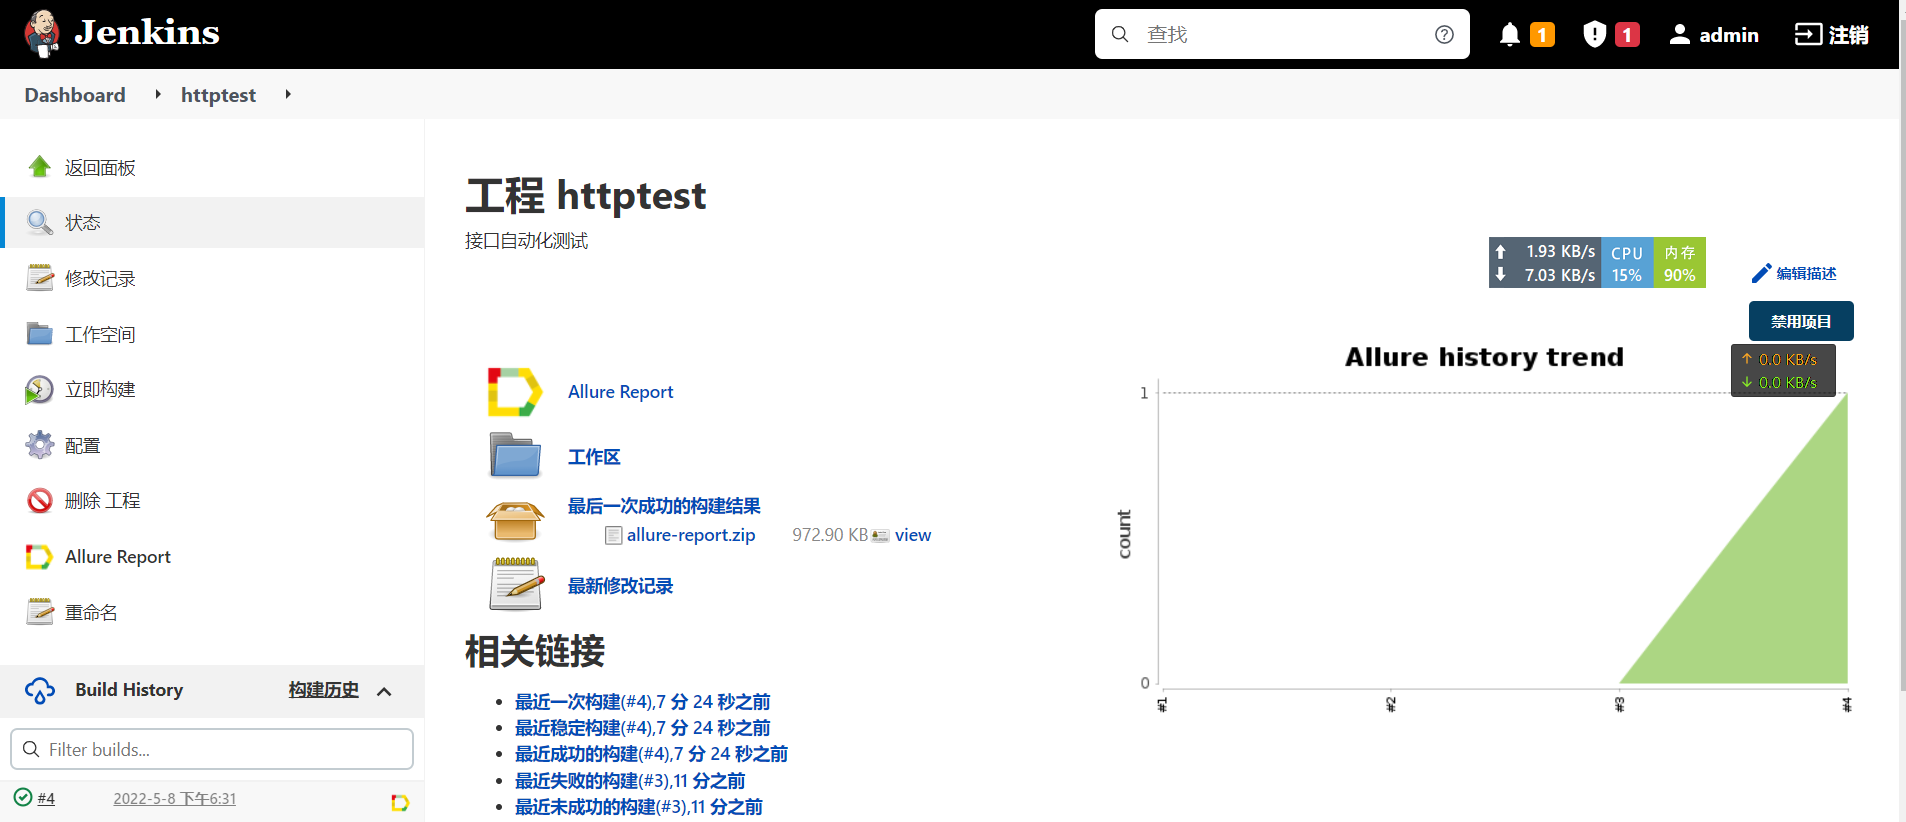
我们执行一下:
发送邮件
发送邮件之前已经说过了,将不再赘述。
原文链接:https://www.cnblogs.com/wxhou/p/13184939.html
开源地址
由于智学网进行了接口调整,所以目前测试用例只有一个了。
到了这里我们的简易版的接口自动化测试框架已经全部完成了。为了方便学习交流,我们此项目的源代码放在了码云。
https://gitee.com/wxhou/interface_test_example
欢迎各位在此交流学习,并留下你的想法。
| 随风挥手 ——土木狗的IT生涯 | 群: 299524235 |

 浙公网安备 33010602011771号