Spring AMQP:RabbitAdmin&&声明
一.pom.xml
spring boot项目


<parent>
    <groupId>org.springframework.boot</groupId>
    <artifactId>spring-boot-starter-parent</artifactId>
    <version>2.3.0.RELEASE</version>
    <relativePath/> <!-- lookup parent from repository -->
</parent>
<groupId>com.wj</groupId>
<artifactId>spring-amqp</artifactId>
<version>0.0.1-SNAPSHOT</version>
<name>spring-amqp</name>
<description>Demo project for Spring Boot</description>

<properties>
    <java.version>1.8</java.version>
</properties>

<dependencies>
    <dependency>
        <groupId>com.rabbitmq</groupId>
        <artifactId>amqp-client</artifactId>
        <version>5.7.3</version>
    </dependency>
    <dependency>
        <groupId>org.springframework.boot</groupId>
        <artifactId>spring-boot-starter-amqp</artifactId>
    </dependency>
    <dependency>
        <groupId>org.springframework.boot</groupId>
        <artifactId>spring-boot-starter</artifactId>
    </dependency>

    <dependency>
        <groupId>org.springframework.boot</groupId>
        <artifactId>spring-boot-starter-test</artifactId>
        <scope>test</scope>
        <exclusions>
            <exclusion>
                <groupId>org.junit.vintage</groupId>
                <artifactId>junit-vintage-engine</artifactId>
            </exclusion>
        </exclusions>
    </dependency>
</dependencies>
二.配置类
1 2 3 4 5 6 7 8 9 10 11 12 13 14 15 16 17 18 19 20 | @Configurationpublic class RabbitMQConfig { @Bean public ConnectionFactory connectionFactory(){ CachingConnectionFactory connectionFactory = new CachingConnectionFactory(); connectionFactory.setAddresses("192.168.10.132:5672"); connectionFactory.setUsername("guest"); connectionFactory.setPassword("guest"); connectionFactory.setVirtualHost("/"); return connectionFactory; } @Bean public RabbitAdmin rabbitAdmin(ConnectionFactory connectionFactory){ RabbitAdmin rabbitAdmin = new RabbitAdmin(connectionFactory); //autoStartup必须要设置为true,否则Spring容器不会加载RabbitAdmin类 rabbitAdmin.setAutoStartup(true); return rabbitAdmin; }} |
三.RabbitAdmin测试
1 2 3 4 5 6 7 8 9 10 11 12 13 14 15 16 17 18 19 20 21 22 23 24 25 26 27 28 29 30 31 | @SpringBootTestclass SpringAmqpApplicationTests { @Autowired private RabbitAdmin rabbitAdmin; @Test public void testAdmin(){ //声明交换机 rabbitAdmin.declareExchange(new DirectExchange("admin.direct",false,false)); //声明队列 rabbitAdmin.declareQueue(new Queue("admin.queue",false)); rabbitAdmin.declareExchange(new DirectExchange("admin.topic",false,false)); rabbitAdmin.declareQueue(new Queue("admin.topic.queue",false)); //队列与交换机绑定 rabbitAdmin.declareBinding( new Binding("admin.queue",//Queue名 Binding.DestinationType.QUEUE,//QUEUE绑定 "admin.direct",//exchange名 "direct", //路由 new HashMap<>()));//参数 //链式编程 rabbitAdmin.declareBinding( BindingBuilder.bind(new Queue("admin.topic.queue",false)) .to(new TopicExchange("admin.topic",false,false)) .with("topic.#") ); //清空队列 rabbitAdmin.purgeQueue("admin.topic.queue",false); }} |
四.声明
使用Spring AMQP可以使用如下方式去声明Exchange、queue。
在配置类中加入Bean的方式。
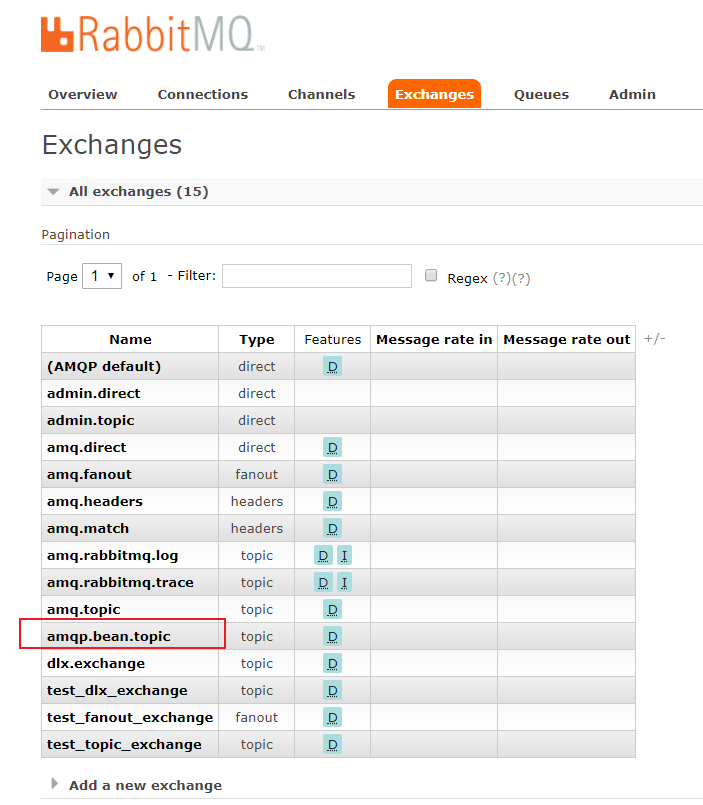
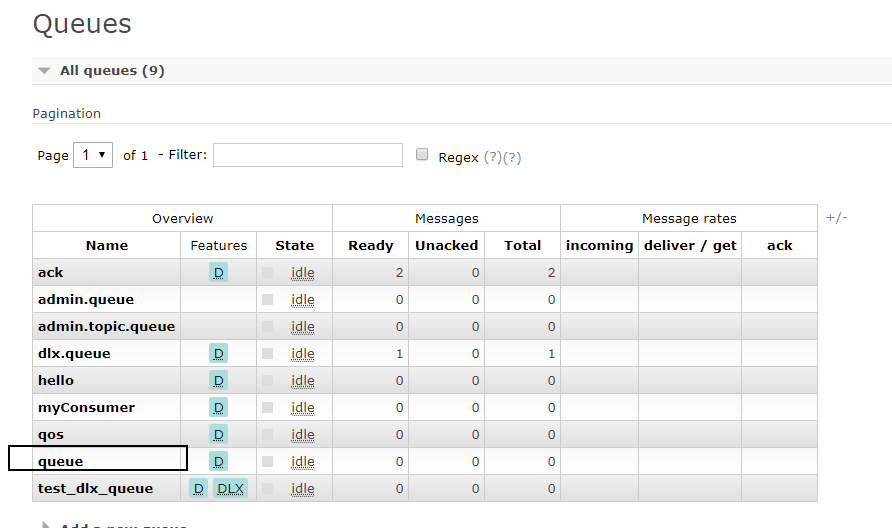
1 2 3 4 5 6 7 8 9 10 11 12 13 14 | @Beanpublic TopicExchange topicExchange(){ return new TopicExchange("amqp.bean.topic",true,false);}@Beanpublic Queue queue(){ return new Queue("queue",true) ;}@Beanpublic Binding binding(){ return BindingBuilder.bind(this.queue()).to(topicExchange()).with("amqp.#");} |
运行springboot test方法,会发现控制台以及将exchange和queue创建完成。


【推荐】国内首个AI IDE,深度理解中文开发场景,立即下载体验Trae
【推荐】编程新体验,更懂你的AI,立即体验豆包MarsCode编程助手
【推荐】抖音旗下AI助手豆包,你的智能百科全书,全免费不限次数
【推荐】轻量又高性能的 SSH 工具 IShell:AI 加持,快人一步
· 开发者必知的日志记录最佳实践
· SQL Server 2025 AI相关能力初探
· Linux系列:如何用 C#调用 C方法造成内存泄露
· AI与.NET技术实操系列(二):开始使用ML.NET
· 记一次.NET内存居高不下排查解决与启示
· Manus重磅发布:全球首款通用AI代理技术深度解析与实战指南
· 被坑几百块钱后,我竟然真的恢复了删除的微信聊天记录!
· 没有Manus邀请码?试试免邀请码的MGX或者开源的OpenManus吧
· 园子的第一款AI主题卫衣上架——"HELLO! HOW CAN I ASSIST YOU TODAY
· 【自荐】一款简洁、开源的在线白板工具 Drawnix