JDK 源码解析 —— 集合(三)哈希表 HashMap
1. 简介
HashMap ,是一种散列表,用于存储 key-value 键值对的数据结构,一般翻译为“哈希表”,提供平均时间复杂度为 O(1) 的、基于 key 级别的 get/put 等操作。
“在前些年,实习或初级工程师的面试,可能最爱问的就是 ArrayList 和 LinkedList 的区别与使用场景”。现在已经改变成,HashMap 的实现原理是什么。😈 相信令大多数胖友头疼不已,有木有噢。
在日常的业务开发中,HashMap 可以说是和 ArrayList 一样常用的集合类,特别是考虑到数据库的性能,又或者服务的拆分后,我们把关联数据的拼接,放到了内存中,这就需要使用到 HashMap 了。
2. 类图
HashMap 实现的接口、继承的抽象类,如下图所示:
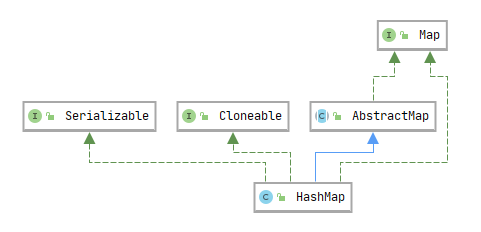
- 实现
java.util.Map接口,并继承java.util.AbstractMap抽像类。 - 实现
java.io.Serializable接口。 - 实现
java.lang.Cloneable接口。
3. 属性
在开始看 HashMap 的具体属性之前,我们先来简单说说 HashMap 的实现原理。
相信很多胖友,在初次看到 HashMap 时,都惊奇于其 O(1) 的 get 操作的时间复杂度。当时在我们已知的数据结构中,只有基于下标访问数组时,才能提供 O(1) get 操作的时间复杂度。
实际上,HashMap 所提供的 O(1) 是平均时间复杂度,大多数情况下保证 O(1) 。其实极端情况下,有可能退化为 O(N) 的时间复杂度噢,这又是为什么呢?
HashMap 其实是在数组的基础上实现的,一个“加强版”的数组。如下图所示:

好像有点不对?!key 并不是一个整数,可以放入指向数组中的指定下标。咳咳咳,我们要 O(1) 的性能!!!所以,hash 就正式登场了,通过 hash(key) 的过程,我们可以将 key 成功的转成一个整数。但是,hash(key) 可能会超过数组的容量,所以我们需要 hash(key) % size 作为下标,放入数组的对应位置。至此,我们是不是已经可以通过 O(1) 的方式,快速的从 HashMap 中进行 get 读取操作了。
注意,一般每个数组的“位置”,比较专业的说法,叫做“槽位”(slot)或者“桶”。因为代码注释里,已经都使用了“位置”,所以我们就暂时不进行修正了。
😈 好像还是不对!?原因有两点:
- 1、
hash(key)计算出来的哈希值,并不能保证唯一; - 2、
hash(key) % size的操作后,即使不同的哈希值,也可能变成相同的结果。
这样,就导致我们常说的“哈希冲突”。那么怎么解决呢?方法有两种:
-
1、开放寻址法
-
2、链表法
在 Java HashMap 中,采用了链表法。如果有看过 Redis Hash 数据结构的胖友,它也是采用了链表法。通过将数组的每个元素对应一个链表,我们将相同的 hash(key) % size 放到对应下标的链表中即可。
当然,put / get 操作需要做下是否等于指定 key 的判断,这个具体我们在源码中分享。
仿佛一切都很美好,但是我们试着来想,如果我们放入的 N 个 key-value 键值对到 HashMap 的情况:
- 1、每个 key 经过
hash(key) % size对应唯一下标,则 get 时间复杂度是 O(1) 。 - 2、k 个 key 经过
hash(key) % size对应唯一下标,那么在 get 这 k 个 key 的时间复杂度是 O(k) 。 - 3、在情况 2 的极端情况下,k 恰好等于 N ,那么是不是就出现我们在上面说的 O(N) 的时间复杂度的情况。
所以,为了解决最差 O(N) 的时间复杂度的情况,我们可以将数组的每个元素对应成其它数据结构,例如说:
1)红黑树;
2)跳表。
它们两者的时间复杂度是 O(logN) ,这样 O(N) 就可以缓解成 O(logN) 的时间复杂度。
-
在 JDK7 的版本中,HashMap 采用“数组 + 链表”的形式实现。
-
在 JDK8 开始的版本,HashMap 采用“数组 + 链表 + 红黑树”的形式实现,在空间和时间复杂度中做取舍。
这一点和 Redis 是相似的,即使是一个数据结构,可能内部采用多种数据结构,混合实现,为了平衡空间和时间复杂度。毕竟,时间不是唯一的因素,我们还需要考虑内存的情况。
如此,HashMap 的整体结构如下图:
这样就结束了么?既然这么问,肯定还有故事,那就是“扩容”。我们是希望 HashMap 尽可能能够达到 O(1) 的时间复杂度,链表法只是我们解决哈希冲突的无奈之举。而在 O(1) 的时间复杂度,基本是“一个萝卜一个坑”,所以在 HashMap 的 key-value 键值对数量达到阀值后,就会进行扩容。
那么阀值是什么,又是怎么计算呢?此时就引入负载因子的概念。我们假设 HashMap 的数组容量为 capacity ,key-value 键值对数量为 size ,负载因子为 loadFactor 。那么,当 capacity / size > loadFactor 时,也就是使用的数组大小到达 loadFactor 比例时,我们就需要进行扩容。如此,我们便可以尽量达到“一个萝卜一个坑”的目的,从而尽可能的 O(1) 的时间复杂度。
哔哔了这么多,重点就是几处:
- 哈希 key
- 哈希冲突的解决
- 扩容
下面,我们来看看 HashMap 的属性。代码如下:
// HashMap.java

/* ---------------- Fields -------------- */

/**
 * 底层存储的数组
 *
 * The table, initialized on first use, and resized as
 * necessary. When allocated, length is always a power of two.
 * (We also tolerate length zero in some operations to allow
 * bootstrapping mechanics that are currently not needed.)
 */
transient Node<K,V>[] table;

/**
 * 调用 `#entrySet()` 方法后的缓存
 *
 * Holds cached entrySet(). Note that AbstractMap fields are used
 * for keySet() and values().
 */
transient Set<Map.Entry<K,V>> entrySet;

/**
 * key-value 的键值对数量
 *
 * The number of key-value mappings contained in this map.
 */
transient int size;

/**
 * HashMap 的修改次数
 *
 * The number of times this HashMap has been structurally modified
 * Structural modifications are those that change the number of mappings in
 * the HashMap or otherwise modify its internal structure (e.g.,
 * rehash).  This field is used to make iterators on Collection-views of
 * the HashMap fail-fast.  (See ConcurrentModificationException).
 */
transient int modCount;

/**
 * 阀值,当 {@link #size} 超过 {@link #threshold} 时,会进行扩容
 *
 * The next size value at which to resize (capacity * load factor).
 *
 * @serial
 */
// (The javadoc description is true upon serialization.
// Additionally, if the table array has not been allocated, this
// field holds the initial array capacity, or zero signifying
// DEFAULT_INITIAL_CAPACITY.)
int threshold;

/**
 * 扩容因子
 *
 * The load factor for the hash table.
 *
 * @serial
 */
final float loadFactor;
- 重点看下
table、size、threshold、loadFactor四个属性。
具体的解释,我们在「4. 构造方法」中来看。这里我们先来看看 table Node 数组。代码如下:
// HashMap.java#Node.java

static class Node<K,V> implements Map.Entry<K,V> {

    /**
     * 哈希值
     */
    final int hash;
    /**
     * KEY 键
     */
    final K key;
    /**
     * VALUE 值
     */
    V value;
    /**
     * 下一个节点
     */
    Node<K,V> next;

    // ... 省略实现方法

}
- 实现了 Map.Entry 接口,该接口定义在
java.util.Map接口中。 hash+key+value属性,定义了 Node 节点的 3 个重要属性。next属性,指向下一个节点。通过它可以实现table数组的每一个位置可以形成链表。
Node 子类如下图:
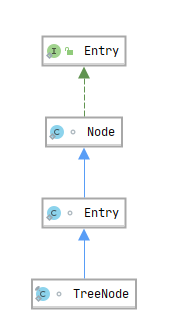
- TreeNode ,定义在 HashMap 中,红黑树节点。通过它可以实现
table数组的每一个位置可以形成红黑树。因为本文不深入红黑树部分,所以我们也就不看 TreeNode 中的具体代码了。
4. 构造方法
HashMap 一共有四个构造方法,我们分别来看看。
① #HashMap()
#HashMap() 构造方法,创建一个初始化容量为 16 的 HashMap 对象。代码如下:
// HashMap.java

/**
 * 默认的初始化容量
 *
 * The default initial capacity - MUST be a power of two.
 */
static final int DEFAULT_INITIAL_CAPACITY = 1 << 4; // aka 16

/**
 * 默认加载因子为 0.75
 *
 * The load factor used when none specified in constructor.
 */
static final float DEFAULT_LOAD_FACTOR = 0.75f;

/**
 * Constructs an empty {@code HashMap} with the default initial capacity
 * (16) and the default load factor (0.75).
 */
public HashMap() {
    this.loadFactor = DEFAULT_LOAD_FACTOR; // all other fields defaulted
}
- 初始化
loadFactor为DEFAULT_LOAD_FACTOR = 0.75。 - 在该构造方法上,我们并没有看到
table数组的初始化。它是延迟初始化,在我们开始往 HashMap 中添加 key-value 键值对时,在#resize()方法中才真正初始化。
② #HashMap(int initialCapacity)
#HashMap(int initialCapacity) 方法,初始化容量为 initialCapacity 的 HashMap 对象。代码如下:
// HashMap.java

public HashMap(int initialCapacity) {
    this(initialCapacity, DEFAULT_LOAD_FACTOR);
}
- 内部调用
#HashMap(int initialCapacity, float loadFactor)构造方法。
③ #HashMap(int initialCapacity, float loadFactor)
#HashMap(int initialCapacity, float loadFactor) 构造方法,初始化容量为 initialCapacity 、加载因子为 loadFactor 的 HashMap 对象。代码如下:
// HashMap.java

/**
 * 最大的容量为 2^30 。
 *
 * The maximum capacity, used if a higher value is implicitly specified
 * by either of the constructors with arguments.
 * MUST be a power of two <= 1<<30.
 */
static final int MAXIMUM_CAPACITY = 1 << 30;

public HashMap(int initialCapacity, float loadFactor) {
    // 校验 initialCapacity 参数
    if (initialCapacity < 0)
        throw new IllegalArgumentException("Illegal initial capacity: " +
                                           initialCapacity);
    // 避免 initialCapacity 超过 MAXIMUM_CAPACITY
    if (initialCapacity > MAXIMUM_CAPACITY)
        initialCapacity = MAXIMUM_CAPACITY;
    // 校验 loadFactor 参数
    if (loadFactor <= 0 || Float.isNaN(loadFactor))
        throw new IllegalArgumentException("Illegal load factor: " +
                                           loadFactor);
    // 设置 loadFactor 属性
    this.loadFactor = loadFactor;
    // <X> 计算 threshold 阀值
    this.threshold = tableSizeFor(initialCapacity);
}
-
我们重点来看
X处,调用#tableSizeFor(int cap)方法,返回大于cap的最小 2 的 N 次方。例如说,cap = 10时返回 16 ,cap = 28时返回 32 。代码如下:// HashMap.java static final int tableSizeFor(int cap) { // 将 cap 从最高位(最左边)第一个为 1 开始的位开始,全部设置为 1 。 int n = -1 >>> Integer.numberOfLeadingZeros(cap - 1); // 因为 n 已经是 0..01..1 的情况,那么 n + 1 就能满足 cap 的最小 2 的 N 次方 // 在 cap 为 0 和 1 的时候,n 会为 -1 ,则此时最小 2 的 N 次方为 2^0 = 1 。 return (n < 0) ? 1 : (n >= MAXIMUM_CAPACITY) ? MAXIMUM_CAPACITY : n + 1; }-
先抛开里面的位计算,单纯看看这 2 行代码的注释。
-
为什么这里的
threshold要返回大于等于initialCapacity的最小 2 的 N 次方呢?在 put 方法中,计算
table数组对应的位置,逻辑是(n - 1) & hash,这个和我们预想的hash % (n - 1)的有差别。这两者在n是 2 的 N 次方情况下是等价的。那么考虑到性能,我们会选择&位操作。这样,就要求数组容量n要尽可能是 2 的 N 次方。而在
#resize()扩容方法中,我们会看到 HashMap 的容量,一直能够保证是 2 的 N 次方。
如此,
#tableSizeFor(int cap)方法,也需要保证返回的是 2 的 N 次方。 -
④ #HashMap(Map m)
#HashMap(Map m) 构造方法,创建 HashMap 对象,并将 c 集合添加到其中。代码如下:
// HashMap.java

public HashMap(Map<? extends K, ? extends V> m) {
    // 设置加载因子
    this.loadFactor = DEFAULT_LOAD_FACTOR;
    // <X> 批量添加到 table 中
    putMapEntries(m, false);
}
-
X处,调用#putMapEntries(Map m, boolean evict)方法,批量添加到table中。代码如下:// HashMap.java final void putMapEntries(Map<? extends K, ? extends V> m, boolean evict) { int s = m.size(); // <1> if (s > 0) { // 如果 table 为空,说明还没初始化,适合在构造方法的情况 if (table == null) { // pre-size // 根据 s 的大小 + loadFactor 负载因子,计算需要最小的 tables 大小 float ft = ((float)s / loadFactor) + 1.0F; // + 1.0F 的目的,是因为下面 (int) 直接取整,避免不够。 int t = ((ft < (float)MAXIMUM_CAPACITY) ? (int)ft : MAXIMUM_CAPACITY); // 如果计算出来的 t 大于阀值,则计算新的阀值 if (t > threshold) threshold = tableSizeFor(t); // 如果 table 非空,说明已经初始化,需要不断扩容到阀值超过 s 的数量,避免扩容 } else { // Because of linked-list bucket constraints, we cannot // expand all at once, but can reduce total resize // effort by repeated doubling now vs later while (s > threshold && table.length < MAXIMUM_CAPACITY) resize(); // 扩容 } // <2> 遍历 m 集合,逐个添加到 HashMap 中。 for (Map.Entry<? extends K, ? extends V> e : m.entrySet()) { K key = e.getKey(); V value = e.getValue(); putVal(hash(key), key, value, false, evict); } } }- 整个过程分成
<1>和<2>的两个步骤。 <1>处,保证table容量足够,分成了table是否为空有不同的处理。可能胖友比较疑惑的是,table为空的情况的处理?因为此时table未初始化,我们只需要保证threshold大于数组大小即可,在 put key-value 键值的时候,在去真正的初始化table就好咧。<2>处,遍历m集合,逐个调用#putVal(hash, key, val, onlyIfAbsent, evict)方法,添加到 HashMap 中。关于这块的逻辑,我们本文的后面再来详细解析。
- 整个过程分成
5. 哈希函数
对于哈希函数来说,有两个方面特别重要:
- 性能足够高。因为基本 HashMap 所有的操作,都需要用到哈希函数。
- 对于计算出来的哈希值足够离散,保证哈希冲突的概率更小。
在 HashMap 中,#hash(Object key) 静态方法,计算 key 的哈希值。代码如下:
// HashMap.java

static final int hash(Object key) {
    int h;
    // h = key.hashCode() 计算哈希值
    // ^ (h >>> 16) 高 16 位与自身进行异或计算,保证计算出来的 hash 更加离散
    return (key == null) ? 0 : (h = key.hashCode()) ^ (h >>> 16);
}
- 高效性:从整个计算过程上来说,
^ (h >>> 16)只有这一块的逻辑,两个位操作,性能肯定是有保障的。那么,如果想要保证哈希函数的高效性,就需要传入的key自身的Object#hashCode()方法的高效即可。 - 离散型:和大多数胖友有一样的疑惑,为什么有
^ (h >>> 16)一段代码呢,总结来说,就是保证“hash 更加离散”。
6. 添加单个元素
#put(K key, V value) 方法,添加单个元素。代码如下:
// HashMap.java

public V put(K key, V value) {
    // hash(key) 计算哈希值
    return putVal(hash(key), key, value, false, true);
}

final V putVal(int hash, K key, V value, boolean onlyIfAbsent,
               boolean evict) {
    Node<K,V>[] tab; // tables 数组
    Node<K,V> p; // 对应位置的 Node 节点
    int n; // 数组大小
    int i; // 对应的 table 的位置
    // <1> 如果 table 未初始化,或者容量为 0 ,则进行扩容
    if ((tab = table) == null || (n = tab.length) == 0)
        n = (tab = resize() /*扩容*/ ).length;
    // <2> 如果对应位置的 Node 节点为空,则直接创建 Node 节点即可。
    if ((p = tab[i = (n - 1) & hash] /*获得对应位置的 Node 节点*/) == null)
        tab[i] = newNode(hash, key, value, null);
    // <3> 如果对应位置的 Node 节点非空,则可能存在哈希冲突
    else {
        Node<K,V> e; // key 在 HashMap 对应的老节点
        K k;
        // <3.1> 如果找到的 p 节点,就是要找的,则则直接使用即可
        if (p.hash == hash && // 判断 hash 值相等
            ((k = p.key) == key || (key != null && key.equals(k)))) // 判断 key 真正相等
            e = p;
        // <3.2> 如果找到的 p 节点,是红黑树 Node 节点,则直接添加到树中
        else if (p instanceof TreeNode)
            e = ((TreeNode<K,V>)p).putTreeVal(this, tab, hash, key, value);
        // <3.3> 如果找到的 p 是 Node 节点,则说明是链表,需要遍历查找
        else {
            // 顺序遍历链表
            for (int binCount = 0; ; ++binCount) {
                // `(e = p.next)`:e 指向下一个节点,因为上面我们已经判断了最开始的 p 节点。
                // 如果已经遍历到链表的尾巴,则说明 key 在 HashMap 中不存在,则需要创建
                if ((e = p.next) == null) {
                    // 创建新的 Node 节点
                    p.next = newNode(hash, key, value, null);
                    // 链表的长度如果数量达到 TREEIFY_THRESHOLD(8)时,则进行树化。
                    if (binCount >= TREEIFY_THRESHOLD - 1) // -1 for 1st
                        treeifyBin(tab, hash);
                    break; // 结束
                }
                // 如果遍历的 e 节点,就是要找的,则则直接使用即可
                if (e.hash == hash &&
                    ((k = e.key) == key || (key != null && key.equals(k))))
                    break; // 结束
                // p 指向下一个节点
                p = e;
            }
        }
        // <4.1> 如果找到了对应的节点
        if (e != null) { // existing mapping for key
            V oldValue = e.value;
            // 修改节点的 value ,如果允许修改
            if (!onlyIfAbsent || oldValue == null)
                e.value = value;
            // 节点被访问的回调
            afterNodeAccess(e);
            // 返回老的值
            return oldValue;
        }
    }
    // <4.2>
    // 增加修改次数
    ++modCount;
    // 如果超过阀值,则进行扩容
    if (++size > threshold)
        resize();
    // 添加节点后的回调
    afterNodeInsertion(evict);
    // 返回 null
    return null;
}
-
有点长,不过逻辑上来说,简单的一笔噢。
-
<1>处,如果table未初始化,或者容量为 0 ,则调用#resize()方法,进行扩容。 -
<2>处,如果对应位置的 Node 节点为空,则直接创建 Node 节点即可。-
i = (n - 1) & hash代码段,计算table所在对应位置的下标。😈 此处,结合我们在#tableSizeFor(int cap)方法,在理解一波。 -
调用
#newNode(int hash, K key, V value, Node next)方法,创建 Node 节点即可。代码如下:// HashMap.java Node<K,V> newNode(int hash, K key, V value, Node<K,V> next) { return new Node<>(hash, key, value, next); }- 这样,一个新的链表就出现了。当然,此处的
next肯定是null。
- 这样,一个新的链表就出现了。当然,此处的
-
-
<3>处,如果对应位置的 Node 节点非空,则可能存在哈希冲突。需要分成 Node 节点是链表(<3.3>),还是红黑树(<3.2>)的情况。 -
<3.1>处,如果找到的p节点,就是要找的,则则直接使用即可。这是一个优化操作,无论 Node 节点是链表还是红黑树。 -
<3.2>处,如果找到的p节点,是红黑树 Node 节点,则调用TreeNode#putTreeVal(HashMap map, Node[] tab, int h, K k, V v)方法,直接添加到树中。这块,咱就先不深入了。 -
<3.3>处,如果找到的p是 Node 节点,则说明是链表,需要遍历查找。其中,binCount >= TREEIFY_THRESHOLD - 1代码段,在链表的长度超过TREEIFY_THRESHOLD = 8的时候,会调用#treeifyBin(Node[] tab, int hash)方法,将链表进行树化。 -
<4>处,根据是否在 HashMap 中已经存在 key 对应的节点,有不同的处理。 -
<4.1>处,如果存在的情况,会有如下处理:- 1)如果满足需要修改节点,则进行修改。
-
2)如果节点被访问时,调用
#afterNodeAccess((Node p)方法,节点被访问的回调。目前这是个一个空方法,用于 HashMap 的子类 LinkedHashMap 需要做的拓展逻辑。- 3)返回老的值。
-
<4.2>处,如果不存在的情况,会有如下处理:- 1)增加修改次数。
-
2)增加 key-value 键值对
size数。并且size如果超过阀值,则调用#resize()方法,进行扩容。- 3)调用
#afterNodeInsertion(boolean evict)方法,添加节点后的回调。目前这是个一个空方法,用于 HashMap 的子类 LinkedHashMap 需要做的拓展逻辑。
- 3)调用
-
4)返回
null,因为老值不存在。
#putIfAbsent(K key, V value) 方法,当 key 不存在的时候,添加 key-value 键值对到其中。代码如下:
// HashMap.java

@Override
public V putIfAbsent(K key, V value) {
    return putVal(hash(key), key, value, true, true);
}
7. 扩容
#resize() 方法,两倍扩容 HashMap 。实际上,我们在「4. 构造方法」中,看到 table 数组并未初始化 ,它是在 #resize() 方法中进行初始化,所以这是该方法的另外一个作用:初始化数组。代码如下:
// HashMap.java

final Node<K,V>[] resize() {
    Node<K,V>[] oldTab = table;
    int oldCap = (oldTab == null) ? 0 : oldTab.length;
    int oldThr = threshold;
    int newCap, newThr = 0;
    // <1> 开始:
    // <1.1> oldCap 大于 0 ,说明 table 非空
    if (oldCap > 0) {
        // <1.1.1> 超过最大容量,则直接设置 threshold 阀值为 Integer.MAX_VALUE ,不再允许扩容
        if (oldCap >= MAXIMUM_CAPACITY) {
            threshold = Integer.MAX_VALUE;
            return oldTab;
        }
        // <1.1.2> newCap = oldCap << 1 ,目的是两倍扩容
        // 如果 oldCap >= DEFAULT_INITIAL_CAPACITY 满足,说明当前容量大于默认值(16),则 2 倍阀值。
        else if ((newCap = oldCap << 1) < MAXIMUM_CAPACITY &&
                 oldCap >= DEFAULT_INITIAL_CAPACITY)
            newThr = oldThr << 1; // double threshold
    }
    // <1.2.1>【非默认构造方法】oldThr 大于 0 ,则使用 oldThr 作为新的容量
    else if (oldThr > 0) // initial capacity was placed in threshold
        newCap = oldThr;
    // <1.2.2>【默认构造方法】oldThr 等于 0 ,则使用 DEFAULT_INITIAL_CAPACITY 作为新的容量,使用 DEFAULT_LOAD_FACTOR * DEFAULT_INITIAL_CAPACITY 作为新的容量
    else {               // zero initial threshold signifies using defaults
        newCap = DEFAULT_INITIAL_CAPACITY;
        newThr = (int)(DEFAULT_LOAD_FACTOR * DEFAULT_INITIAL_CAPACITY);
    }
    // 1.3 如果上述的逻辑,未计算新的阀值,则使用 newCap * loadFactor 作为新的阀值
    if (newThr == 0) {
        float ft = (float)newCap * loadFactor;
        newThr = (newCap < MAXIMUM_CAPACITY && ft < (float)MAXIMUM_CAPACITY ?
                  (int)ft : Integer.MAX_VALUE);
    }
    // <2> 开始:
    // 将 newThr 赋值给 threshold 属性
    threshold = newThr;
    // 创建新的 Node 数组,赋值给 table 属性
    @SuppressWarnings({"rawtypes","unchecked"})
    Node<K,V>[] newTab = (Node<K,V>[])new Node[newCap];
    table = newTab;
    // 如果老的 table 数组非空,则需要进行一波搬运
    if (oldTab != null) {
        for (int j = 0; j < oldCap; ++j) {
            // 获得老的 table 数组第 j 位置的 Node 节点 e
            Node<K,V> e;
            if ((e = oldTab[j]) != null) {
                // 置空老的 table 数组第 j 位置
                oldTab[j] = null;
                // <2.1> 如果 e 节点只有一个元素,直接赋值给新的 table 即可
                if (e.next == null)
                    newTab[e.hash & (newCap - 1)] = e;
                // <2.2> 如果 e 节点是红黑树节点,则通过红黑树分裂处理
                else if (e instanceof TreeNode)
                    ((TreeNode<K,V>)e).split(this, newTab, j, oldCap);
                // <2.3> 如果 e 节点是链表
                else { // preserve order
                    // HashMap 是成倍扩容,这样原来位置的链表的节点们,会被分散到新的 table 的两个位置中去
                    // 通过 e.hash & oldCap 计算,根据结果分到高位、和低位的位置中。
                    // 1. 如果结果为 0 时,则放置到低位
                    // 2. 如果结果非 1 时,则放置到高位
                    Node<K,V> loHead = null, loTail = null;
                    Node<K,V> hiHead = null, hiTail = null;
                    Node<K,V> next;
                    // 这里 do while 的原因是,e 已经非空,所以减少一次判断。细节~
                    do {
                        // next 指向下一个节点
                        next = e.next;
                        // 满足低位
                        if ((e.hash & oldCap) == 0) {
                            if (loTail == null)
                                loHead = e;
                            else
                                loTail.next = e;
                            loTail = e;
                        }
                        // 满足高位
                        else {
                            if (hiTail == null)
                                hiHead = e;
                            else
                                hiTail.next = e;
                            hiTail = e;
                        }
                    } while ((e = next) != null);
                    // 设置低位到新的 newTab 的 j 位置上
                    if (loTail != null) {
                        loTail.next = null;
                        newTab[j] = loHead;
                    }
                    // 设置高位到新的 newTab 的 j + oldCap 位置上
                    if (hiTail != null) {
                        hiTail.next = null;
                        newTab[j + oldCap] = hiHead;
                    }
                }
            }
        }
    }
    return newTab;
}
-
不要怕,仅仅是代码长了点,逻辑很明确,就两步:
1)计算新的容量和扩容阀值,并创建新的
table数组;2)将老的
table复制到新的table数组中。
下面开始,我们进入【第一步】。
-
<1.1>处,oldCap大于 0 ,说明table非空,说明是两倍扩容的骚操作。<1.1.1>处,超过最大容量,则直接设置threshold阀值为Integer.MAX_VALUE,不再允许扩容。- 【重要】
<1.1.2>处,两倍扩容,这个暗搓搓的newCap = oldCap << 1)代码段,😈 差点就看漏了。因为容量是两倍扩容,那么再newCap * loadFactor逻辑,相比直接oldThr << 1慢,所以直接使用oldThr << 1位运算的方案。
-
<1.2.1>和<1.2.2>处,oldCap等于 0 ,说明table为空,说明是初始化的骚操作。<1.2.1>处,oldThr大于 0 ,说明使用的是【非默认构造方法】,则使用oldThr作为新的容量。这里,我们结合#tableSizeFor(int cap)方法,发现 HashMap 容量一定会是 2 的 N 次方。<1.2.2>处,oldThr等于 0 ,说明使用的是【默认构造方法】,则使用DEFAULT_INITIAL_CAPACITY作为新的容量,然后计算新的newThr阀值。
-
<1.3>处,如果上述的逻辑,未计算新的阀值,则使用newCap * loadFactor作为新的阀值。满足该情况的,有<1.2.1>和<1.1.1>的部分情况。
下面开始,我们进入【第二步】。
-
一共分成
<2.1>、<2.2>、<2.3>的三种情况。😈 相信看懂了#put(K key, V value)也是分成三种情况,就很容易明白是为什么了。 -
<2.1>处,如果e节点只有一个元素,直接赋值给新的table即可。这是一个优化操作,无论 Node 节点是链表还是红黑树。 -
<2.2>处,如果e节点是红黑树节点,则通过红黑树分裂处理。 -
<2.3>处,如果e节点是链表,以为 HashMap 是成倍扩容,这样原来位置的链表的节点们,会被分散到新的table的两个位置中去。可能这里对于不熟悉位操作的胖友有点难理解,我们来一步一步看看:为了方便举例,
{}中的数字,记得是二进制表示哈。- 1)我们在选择
hash & (cap - 1)方式,来获得到在table的位置。那么经过计算,hash在cap最高位(最左边)的 1 自然就被抹去了。例如说,11 & (4 - 1) = {1011 & 011} = {11} = 3,而15 & (4 - 1) = {1111 & 011} = {11}= 3。相当于15的1[1]11的[1]被抹去了。 - 2)HashMap 成倍扩容之后,我们在来看看示例。
11 & (7 - 1) = {1011 & 0111} = {11} = 3,而15 & (8 - 1) = {1111 & 0111} = {111}= 7。相当于15的1[1]11的[1]被保留了。 - 3)那么怎么判断这
[1]是否能够在扩容的时候被保留呢,那就使用hash & oldCap是否等于 1 即可得到。既然[1]被保留下来,那么其位置就会j + oldCap,因为[1]的价值就是+ oldCap。 - 🙂 如果不了解的胖友,可以在纸上画一画整个过程。
- 1)我们在选择
在 HashMap 中,暂时未提供缩容的操作。不过我们可以结合 <2.3> 处的逻辑,缩容可以理解将高位的位置的 Node 节点,放回其对应的低位的位置的 Node 节点中。😈 想要继续死磕的胖友,可以去研究下 Redis 的 Hash 数据结构在缩容的处理。
8. 树化
#treeifyBin(Node[] tab, int hash) 方法,将 hash 对应 table 位置的链表,转换成红黑树。代码如下:
// HashMap.java

/**
 * 每个位置链表树化成红黑树,需要的链表最小长度
 *
 * The bin count threshold for using a tree rather than list for a
 * bin.  Bins are converted to trees when adding an element to a
 * bin with at least this many nodes. The value must be greater
 * than 2 and should be at least 8 to mesh with assumptions in
 * tree removal about conversion back to plain bins upon
 * shrinkage.
 */
static final int TREEIFY_THRESHOLD = 8;

/**
 * HashMap 允许树化最小 key-value 键值对数
 *
 * The smallest table capacity for which bins may be treeified.
 * (Otherwise the table is resized if too many nodes in a bin.)
 * Should be at least 4 * TREEIFY_THRESHOLD to avoid conflicts
 * between resizing and treeification thresholds.
 */
static final int MIN_TREEIFY_CAPACITY = 64;

final void treeifyBin(Node<K,V>[] tab, int hash) {
    int n, index; Node<K,V> e;
    // <1> 如果 table 容量小于 MIN_TREEIFY_CAPACITY(64) ,则选择扩容
    if (tab == null || (n = tab.length) < MIN_TREEIFY_CAPACITY)
        resize();
    // <2> 将 hash 对应位置进行树化
    else if ((e = tab[index = (n - 1) & hash]) != null) {
        // 顺序遍历链表,逐个转换成 TreeNode 节点
        TreeNode<K,V> hd = null, tl = null;
        do {
            TreeNode<K,V> p = replacementTreeNode(e, null);
            if (tl == null)
                hd = p;
            else {
                p.prev = tl;
                tl.next = p;
            }
            tl = p;
        } while ((e = e.next) != null);
        // 树化
        if ((tab[index] = hd) != null)
            hd.treeify(tab);
    }
}
-
在「6. 添加单个元素」 中,我们已经看到,每个位置的链表想要树化成红黑树,想要链表长度大于等于
TREEIFY_THRESHOLD = 8。那么可能胖友会疑惑,为什么是 8 呢?我们可以在 HashMap 代码上搜Implementation notes.,其中部分内容就解释了它。// HashMap.java * Because TreeNodes are about twice the size of regular nodes, we * use them only when bins contain enough nodes to warrant use * (see TREEIFY_THRESHOLD). And when they become too small (due to * removal or resizing) they are converted back to plain bins. In * usages with well-distributed user hashCodes, tree bins are * rarely used. Ideally, under random hashCodes, the frequency of * nodes in bins follows a Poisson distribution * (http://en.wikipedia.org/wiki/Poisson_distribution) with a * parameter of about 0.5 on average for the default resizing * threshold of 0.75, although with a large variance because of * resizing granularity. Ignoring variance, the expected * occurrences of list size k are (exp(-0.5) * pow(0.5, k) / * factorial(k)). The first values are: * * 0: 0.60653066 * 1: 0.30326533 * 2: 0.07581633 * 3: 0.01263606 * 4: 0.00157952 * 5: 0.00015795 * 6: 0.00001316 * 7: 0.00000094 * 8: 0.00000006 * more: less than 1 in ten million- 首先,参考 泊松概率函数(Poisson distribution) ,当链表长度到达 8 的概率是 0.00000006 ,不到千万分之一。所以绝大多数情况下,在 hash 算法正常的时,不太会出现链表转红黑树的情况。
- 其次,TreeNode 相比普通的 Node 来说,会有两倍的空间占用。并且在长度比较小的情况下,红黑树的查找性能和链表是差别不大的。例如说,红黑树的
O(logN) = log8 = 3和链表的O(N) = 8只相差 5 。 - 毕竟 HashMap 是 JDK 提供的基础数据结构,必须在空间和时间做抉择。所以,选择链表是空间复杂度优先,选择红黑树是时间复杂度优化。在绝大多数情况下,不会出现需要红黑树的情况。
-
<1>处,如果table容量小于MIN_TREEIFY_CAPACITY = 64时,则调用#resize()方法,进行扩容。一般情况下,该链表可以分裂到两个位置上。😈 当然,极端情况下,解决不了,这时候一般是 hash 算法有问题。 -
<2>处,如果table容量大于等于MIN_TREEIFY_CAPACITY = 64时,则将hash对应位置进行树化。一共有两步,因为和红黑树相关,这里就不拓展开了。
有树化,必然有取消树化。当 HashMap 因为移除 key 时,导致对应 table 位置的红黑树的内部节点数小于等于 UNTREEIFY_THRESHOLD = 6 时,则将红黑树退化成链表。具体在 HashMap.TreeNode#untreeify(HashMap map) 中实现,整列就不拓展开了。代码如下:
// HashMap.java

/**
 * The bin count threshold for untreeifying a (split) bin during a
 * resize operation. Should be less than TREEIFY_THRESHOLD, and at
 * most 6 to mesh with shrinkage detection under removal.
 */
static final int UNTREEIFY_THRESHOLD = 6;
- 暂时没有行明白为什么使用 6 作为取消树化的阀值。暂时的想法,避免后续移除 key 时,红黑树如果内部节点数小于 7 就退化成链表,这样可能导致过于频繁的树化和取消树化。
// HashMap.java

/**
 * Splits nodes in a tree bin into lower and upper tree bins,
 * or untreeifies if now too small. Called only from resize;
 * see above discussion about split bits and indices.
 */
final void split(HashMap<K,V> map, Node<K,V>[] tab, int index, int bit) {
    TreeNode<K,V> b = this;
    // Relink into lo and hi lists, preserving order
    TreeNode<K,V> loHead = null, loTail = null;
    TreeNode<K,V> hiHead = null, hiTail = null;
    int lc = 0, hc = 0;
    for (TreeNode<K,V> e = b, next; e != null; e = next) {
        next = (TreeNode<K,V>)e.next;
        e.next = null;
        if ((e.hash & bit) == 0) {
            if ((e.prev = loTail) == null)
                loHead = e;
            else
                loTail.next = e;
            loTail = e;
            ++lc;
        }
        else {
            if ((e.prev = hiTail) == null)
                hiHead = e;
            else
                hiTail.next = e;
            hiTail = e;
            ++hc;
        }
    }

    if (loHead != null) {
        if (lc <= UNTREEIFY_THRESHOLD)
            tab[index] = loHead.untreeify(map);
        else {
            tab[index] = loHead;
            if (hiHead != null) // (else is already treeified)
                loHead.treeify(tab);
        }
    }
    if (hiHead != null) {
        if (hc <= UNTREEIFY_THRESHOLD)
            tab[index + bit] = hiHead.untreeify(map);
        else {
            tab[index + bit] = hiHead;
            if (loHead != null)
                hiHead.treeify(tab);
        }
    }
}
9. 添加多个元素
#putAll(Map m) 方法,添加多个元素到 HashMap 中。代码如下:
// HashMap.java

public void putAll(Map<? extends K, ? extends V> m) {
    putMapEntries(m, true);
}
- 和
#HashMap(Map m)构造方法一样,都调用#putMapEntries(Map m, boolean evict)方法。
10. 移除单个元素
#remove(Object key) 方法,移除 key 对应的 value ,并返回该 value 。代码如下:
// HashMap.java

public V remove(Object key) {
    Node<K,V> e;
    // hash(key) 求哈希值
    return (e = removeNode(hash(key), key, null, false, true)) == null ?
        null : e.value;
}

final Node<K,V> removeNode(int hash, Object key, Object value,
                           boolean matchValue, boolean movable) {
    Node<K,V>[] tab; // table 数组
    Node<K,V> p; // hash 对应 table 位置的 p 节点
    int n, index;
    // <1> 查找 hash 对应 table 位置的 p 节点
    if ((tab = table) != null && (n = tab.length) > 0 &&
        (p = tab[index = (n - 1) & hash]) != null) {
        Node<K,V> node = null, // 如果找到 key 对应的节点,则赋值给 node
                e;
        K k; V v;
        // <1.1> 如果找到的 p 节点,就是要找的,则则直接使用即可
        if (p.hash == hash &&
            ((k = p.key) == key || (key != null && key.equals(k))))
            node = p;
        else if ((e = p.next) != null) {
            // <1.2> 如果找到的 p 节点,是红黑树 Node 节点,则直接在红黑树中查找
            if (p instanceof TreeNode)
                node = ((TreeNode<K,V>)p).getTreeNode(hash, key);
            // <1.3> 如果找到的 p 是 Node 节点,则说明是链表,需要遍历查找
            else {
                do {
                    // 如果遍历的 e 节点,就是要找的,则则直接使用即可
                    if (e.hash == hash &&
                        ((k = e.key) == key ||
                         (key != null && key.equals(k)))) {
                        node = e;
                        break; // 结束
                    }
                    p = e; // 注意,这里 p 会保存找到节点的前一个节点
                } while ((e = e.next) != null);
            }
        }
        // <2> 如果找到 node 节点,则进行移除
        // 如果有要求匹配 value 的条件,这里会进行一次判断先移除
        if (node != null && (!matchValue || (v = node.value) == value ||
                             (value != null && value.equals(v)))) {
            // <2.1> 如果找到的 node 节点,是红黑树 Node 节点,则直接在红黑树中删除
            if (node instanceof TreeNode)
                ((TreeNode<K,V>)node).removeTreeNode(this, tab, movable);
            // <2.2.1> 如果查找到的是链表的头节点,则直接将 table 对应位置指向 node 的下一个节点,实现删除
            else if (node == p)
                tab[index] = node.next;
            // <2.2.2> 如果查找到的是链表的中间节点,则将 p 指向 node 的下一个节点,实现删除
            else
                p.next = node.next;
            // 增加修改次数
            ++modCount;
            // 减少 HashMap 数量
            --size;
            // 移除 Node 后的回调
            afterNodeRemoval(node);
            // 返回 node
            return node;
        }
    }
    // 查找不到,则返回 null
    return null;
}
- 在 HashMap 中,移除 和添加 key-value 键值对,整个流程是比较接近的。一共分成两步:
<1>处,查找到 key 对应的 Node 节点。<2>处,将查找到的 Node 节点进行移除。
- 整体逻辑比较简单,这里就不哔哔,胖友可以顺着:
- 第一步,
<1.1>、<1.2>、<1.3>三种情况。 - 第二步,
<2.1>、<2.2.1> + <2.2.2>两种情况。
- 第一步,
#remove(Object key, Object value) 方法,移除指定 key-value 的键值对。代码如下:
// HashMap.java

@Override
public boolean remove(Object key, Object value) {
    return removeNode(hash(key), key, value, true, true) != null;
}
- 也是基于
#removeNode(int hash, Object key, Object value, boolean matchValue, boolean movable)方法来实现的,差别在于传入了value和matchValue = true参数。
HashMap 暂时不提供批量移除多个元素的方法。
11. 查找单个元素
#get(Object key) 方法,查找单个元素。代码如下:
// HashMap.java

public V get(Object key) {
    Node<K,V> e;
    // hash(key) 哈希值
    return (e = getNode(hash(key), key)) == null ? null : e.value;
}

final Node<K,V> getNode(int hash, Object key) {
    Node<K,V>[] tab; Node<K,V> first, e; int n; K k;
    // 查找 hash 对应 table 位置的 p 节点
    if ((tab = table) != null && (n = tab.length) > 0 &&
        (first = tab[(n - 1) & hash]) != null) {
        // 如果找到的 first 节点,就是要找的,则则直接使用即可
        if (first.hash == hash && // always check first node
            ((k = first.key) == key || (key != null && key.equals(k))))
            return first;
        if ((e = first.next) != null) {
            // 如果找到的 first 节点,是红黑树 Node 节点,则直接在红黑树中查找
            if (first instanceof TreeNode)
                return ((TreeNode<K,V>)first).getTreeNode(hash, key);
            // 如果找到的 e 是 Node 节点,则说明是链表,需要遍历查找
            do {
                if (e.hash == hash &&
                    ((k = e.key) == key || (key != null && key.equals(k))))
                    return e;
            } while ((e = e.next) != null);
        }
    }
    return null;
}
-
比较简单,
#removeNode(int hash, Object key, Object value, boolean matchValue, boolean movable)的 SE 版。这里 SE 指的是阉割版。咳咳咳。
#containsKey(Object key) 方法,就是基于该方法实现。代码如下:
// HashMap.java

public boolean containsKey(Object key) {
    return getNode(hash(key), key) != null;
}
#containsValue(Object value) 方法,查找指定 value 是否存在。代码如下:
// HashMap.java

public boolean containsValue(Object value) {
    Node<K,V>[] tab; V v;
    if ((tab = table) != null && size > 0) {
        // 遍历 table 数组
        for (Node<K,V> e : tab) {
            // 处理链表或者红黑树节点
            for (; e != null; e = e.next) {
                // 如果值相等,则返回 true
                if ((v = e.value) == value ||
                    (value != null && value.equals(v)))
                    return true;
            }
        }
    }
    // 找不到,返回 false
    return false;
}
#getOrDefault(Object key, V defaultValue) 方法,获得 key 对应的 value 。如果不存在,则返回 defaultValue 默认值。代码如下:
// HashMap.java

@Override
public V getOrDefault(Object key, V defaultValue) {
    Node<K,V> e;
    return (e = getNode(hash(key), key)) == null ? defaultValue : e.value;
}
12. 转换成数组
#keysToArray(T[] a) 方法,转换出 key 数组返回。代码如下:
// HashMap.java

<T> T[] keysToArray(T[] a) {
    Object[] r = a;
    Node<K,V>[] tab;
    int idx = 0;
    if (size > 0 && (tab = table) != null) {
        // 遍历 table 数组
        for (Node<K,V> e : tab) {
            // 遍历链表或红黑树
            for (; e != null; e = e.next) {
                // 逐个设置 key 到 r 数组中
                r[idx++] = e.key;
            }
        }
    }
    // 返回
    return a;
}
-
细心的胖友,可能已经意识到了,如果
a数组的大小不够放下 HashMap 的所有 key 怎么办?答案是可以通过#prepareArray(T[] a)方法来保证。代码如下:// HashMap.java final <T> T[] prepareArray(T[] a) { int size = this.size; // 如果 a 数组小于 HashMap 大小,则创建一个新的数组返回 if (a.length < size) { return (T[]) java.lang.reflect.Array .newInstance(a.getClass().getComponentType(), size); } // 如果 a 数组大于 HashMap 大小,则将 size 位置设置为 null if (a.length > size) { a[size] = null; } return a; }- 当
a数组过小时,会创建一个新的数组返回。 - 当然,一般情况下,我们肯定是不会使用到该方法。😈 至今貌似也没有使用过。
- 当
#valuesToArray(T[] a) 方法,转换出 value 数组返回。代码如下:
// HashMap.java

<T> T[] valuesToArray(T[] a) {
    Object[] r = a;
    Node<K,V>[] tab;
    int idx = 0;
    if (size > 0 && (tab = table) != null) {
        // 遍历 table 数组
        for (Node<K,V> e : tab) {
            // 遍历链表或红黑树
            for (; e != null; e = e.next) {
                // 逐个设置 value 到 r 数组中
                r[idx++] = e.value;
            }
        }
    }
    // 返回
    return a;
}
13. 转换成 Set/Collection
#keySet() 方法,获得 key Set 。代码如下:
// AbstractMap.java
transient Set<K>        keySet;

// HashMap.java
public Set<K> keySet() {
    // 获得 keySet 缓存
    Set<K> ks = keySet;
    // 如果不存在,则进行创建
    if (ks == null) {
        ks = new KeySet();
        keySet = ks;
    }
    return ks;
}
- 创建的 KeySet 类,实现了
java.util.AbstractSet抽像类,是 HashMap 的内部类。比较简单,就不哔哔了。
#values() 方法,获得 value 集合。代码如下:
// AbstractMap.java
transient Collection<V> values;

// HashMap.java
public Collection<V> values() {
    // 获得 vs 缓存
    Collection<V> vs = values;
    // 如果不存在,则进行创建
    if (vs == null) {
        vs = new Values();
        values = vs;
    }
    return vs;
}
- 创建的 Values 类,实现了
java.util.AbstractCollection抽像类,是 HashMap 的内部类。比较简单,就不哔哔了。
#entrySet() 方法,获得 key-value Set 。代码如下:
// HashMap.java

transient Set<Map.Entry<K,V>> entrySet;

public Set<Map.Entry<K,V>> entrySet() {
    Set<Map.Entry<K,V>> es;
    // 获得 entrySet 缓存
    // 如果不存在,则进行创建
    return (es = entrySet) == null ? (entrySet = new EntrySet()) : es;
}
- 创建的 EntrySet 类,实现了
java.util.AbstractSet抽像类,是 HashMap 的内部类。比较简单,就不哔哔了。
艿艿:感觉会被胖友锤死。嘿嘿。
14. 清空
#clear() 方法,清空 HashMap 。代码如下:
// HashMap.java

public void clear() {
    Node<K,V>[] tab;
    // 增加修改次数
    modCount++;
    if ((tab = table) != null && size > 0) {
        // 设置大小为 0
        size = 0;
        // 设置每个位置为 null
        for (int i = 0; i < tab.length; ++i)
            tab[i] = null;
    }
}
15. 序列化
#writeObject(ObjectOutputStream s) 方法,序列化 HashMap 对象。代码如下:
// HashMap.java

@java.io.Serial
private void writeObject(java.io.ObjectOutputStream s)
    throws IOException {
    // 获得 HashMap table 数组大小
    int buckets = capacity();
    // Write out the threshold, loadfactor, and any hidden stuff
    // 写入非静态属性、非 transient 属性
    s.defaultWriteObject();
    // 写入 table 数组大小
    s.writeInt(buckets);
    // 写入 key-value 键值对数量
    s.writeInt(size);
    // 写入具体的 key-value 键值对
    internalWriteEntries(s);
}

final int capacity() { // table 数组大小。封装方法的原因,需要考虑 table 未初始化的情况。
    return (table != null) ? table.length :
        (threshold > 0) ? threshold :
        DEFAULT_INITIAL_CAPACITY;
}

// Called only from writeObject, to ensure compatible ordering.
void internalWriteEntries(java.io.ObjectOutputStream s) throws IOException {
    Node<K,V>[] tab;
    if (size > 0 && (tab = table) != null) {
        // 遍历 table 数组
        for (Node<K,V> e : tab) {
            // 遍历链表或红黑树
            for (; e != null; e = e.next) {
                // 写入 key
                s.writeObject(e.key);
                // 写入 value
                s.writeObject(e.value);
            }
        }
    }
}
- 比较简单,胖友自己瞅瞅即可。
16. 反序列化
#readObject(ObjectInputStream s) 方法,反序列化成 HashMap 对象。代码如下:
// HashMap.java

@java.io.Serial
private void readObject(java.io.ObjectInputStream s)
    throws IOException, ClassNotFoundException {
    // Read in the threshold (ignored), loadfactor, and any hidden stuff
    // 读取非静态属性、非 transient 属性
    s.defaultReadObject();
    // 重新初始化
    reinitialize();
    // 校验 loadFactor 参数
    if (loadFactor <= 0 || Float.isNaN(loadFactor))
        throw new InvalidObjectException("Illegal load factor: " +
                                         loadFactor);
    // 读取 HashMap table 数组大小
    s.readInt();                // Read and ignore number of buckets
    // 读取 key-value 键值对数量 size
    int mappings = s.readInt(); // Read number of mappings (size)
    // 校验 size 参数
    if (mappings < 0)
        throw new InvalidObjectException("Illegal mappings count: " +
                                         mappings);
    else if (mappings > 0) { // (if zero, use defaults)
        // Size the table using given load factor only if within
        // range of 0.25...4.0
        float lf = Math.min(Math.max(0.25f, loadFactor), 4.0f);
        float fc = (float)mappings / lf + 1.0f;
        // 计算容量
        int cap = ((fc < DEFAULT_INITIAL_CAPACITY) ?
                   DEFAULT_INITIAL_CAPACITY :
                   (fc >= MAXIMUM_CAPACITY) ?
                   MAXIMUM_CAPACITY :
                   tableSizeFor((int)fc));
        // 计算 threshold 阀值
        float ft = (float)cap * lf;
        threshold = ((cap < MAXIMUM_CAPACITY && ft < MAXIMUM_CAPACITY) ?
                     (int)ft : Integer.MAX_VALUE);

        // Check Map.Entry[].class since it's the nearest public type to
        // what we're actually creating.
        SharedSecrets.getJavaObjectInputStreamAccess().checkArray(s, Map.Entry[].class, cap); // 不知道作甚,哈哈哈。
        // 创建 table 数组
        @SuppressWarnings({"rawtypes","unchecked"})
        Node<K,V>[] tab = (Node<K,V>[])new Node[cap];
        table = tab;

        // Read the keys and values, and put the mappings in the HashMap
        // 遍历读取 key-value 键值对
        for (int i = 0; i < mappings; i++) {
            // 读取 key
            @SuppressWarnings("unchecked")
            K key = (K) s.readObject();
            // 读取 value
            @SuppressWarnings("unchecked")
            V value = (V) s.readObject();
            // 添加 key-value 键值对
            putVal(hash(key), key, value, false, false);
        }
    }
}

/**
 * Reset to initial default state.  Called by clone and readObject.
 */
void reinitialize() {
    table = null;
    entrySet = null;
    keySet = null;
    values = null;
    modCount = 0;
    threshold = 0;
    size = 0;
}
- 相比序列化的过程,复杂了一丢丢。跟着顺序往下看即可,嘿嘿。
17. 克隆
#clone() 方法,克隆 HashMap 对象。代码如下:
// HashMap.java

@Override
public Object clone() {
    // 克隆 HashMap 对象
    HashMap<K,V> result;
    try {
        result = (HashMap<K,V>)super.clone();
    } catch (CloneNotSupportedException e) {
        // this shouldn't happen, since we are Cloneable
        throw new InternalError(e);
    }
    // 重新初始化
    result.reinitialize();
    // 批量添加 key-value 键值对到其中
    result.putMapEntries(this, false);
    // 返回 result
    return result;
}
- 对于 key-value 键值对是浅拷贝,这点要注意哈。
总结
关于在 JDK8 新增的几个方法,主要如下:
#replace(K key, V oldValue, V newValue)#replace(K key, V value)#computeIfAbsent(K key, Function mappingFunction)#computeIfPresent(K key, BiFunction remappingFunction)#compute(K key, BiFunction remappingFunction)#merge(K key, V value, BiFunction remappingFunction)#forEach(BiConsumer action)#replaceAll(BiFunction function)
下面,我们来对 HashMap 做一个简单的小结:
-
HashMap 是一种散列表的数据结构,底层采用数组 + 链表 + 红黑树来实现存储。
Redis Hash 数据结构,采用数组 + 链表实现。
Redis Zset 数据结构,采用跳表实现。
因为红黑树实现起来相对复杂,我们自己在实现 HashMap 可以考虑采用数组 + 链表 + 跳表来实现存储。
-
HashMap 默认容量为 16(
1 << 4),每次超过阀值时,按照两倍大小进行自动扩容,所以容量总是 2^N 次方。并且,底层的table数组是延迟初始化,在首次添加 key-value 键值对才进行初始化。 -
HashMap 默认加载因子是 0.75 ,如果我们已知 HashMap 的大小,需要正确设置容量和加载因子。
-
HashMap 每个槽位在满足如下两个条件时,可以进行树化成红黑树,避免槽位是链表数据结构时,链表过长,导致查找性能过慢。
- 条件一,HashMap 的
table数组大于等于 64 。 - 条件二,槽位链表长度大于等于 8 时。选择 8 作为阀值的原因是,参考 泊松概率函数(Poisson distribution) ,概率不足千万分之一。
- 在槽位的红黑树的节点数量小于等于 6 时,会退化回链表。
- 条件一,HashMap 的
-
HashMap 的查找和添加 key-value 键值对的平均时间复杂度为 O(1) 。
- 对于槽位是链表的节点,平均时间复杂度为 O(k) 。其中 k 为链表长度。
-
对于槽位是红黑树的节点,平均时间复杂度为 O(logk) 。其中 k 为红黑树节点数量。
OK ,还是在结尾抛个拓展,对于 Redis 的 Hash 和 ZSet 数据结构。

 浙公网安备 33010602011771号