


Spring常用注解以及作用:
 1.@Component在类定义之前添加@Component注解,它会被SpringIoC容器识别,并转为bean。
 2.@Repository对Dao实现类进行注解(特殊的@Component)。
 3.@Service用于对业务逻辑层进行注解(特殊的@Component)。
 4.@Controller用于控制层注解(特殊的@Component)。
 5.@RequestMapping:用于处理请求地址映射,可以作用于类和方法上。
       其属性有:value:定义request请求的映射地址
                 method:定义request地址的请求方式(GET/POST/HEAD/PUT/DELETE/OPTIONS/PATCH)
                 param:定义request请求中必须包含的参数值,一般作用于表单。
                 headers:定义request请求中必须包含某些指定的请求头,如text/html、text/plain等
                 consumes:定义请求提交内容的类型
                 produces:指定返回的内容类型,仅当request请求头中的(Accept)类型中包含该指定类型才返回
 6.@RequestParam:用于获取前台参数,一般作用于表单。
       其属性有:value:参数的名称
                 required:定义传入的该参数是否为必须,默认为true
 7.@RequestBody:用于获取前台参数,一般作用于ajax、json。
 8.@PathVariable:用于接收浏览器地址中QueryString的参数。
       其属性有:value:参数的名称
                 required:轻易传入参数是否为必须
 9.@ResponseBody:作用于方法上,将整个返回结果以某种格式返回,如json或xml。
 10.@CookieValue:用于获取请求的Cookie值。
 11.@ModelAttribute:用于把参数保存到model中,可以注解方法或参数,注解在方法上的时候,该方法将在
                     处理器方法执行之前执行,然后把返回的对象存放在session(前提是要有@SessionAttributes注解)或模型属性,
                     注解在标注方法的时候指定,如果没有指定,则使用返回类型的类名称作为属性名称。
 12.@SessionAttributes:用于使得模型中的数据存储一份到session域中,配合@ModelAttribute使用的时候,
                        会将对应的名称的model值存到session中。
 13.@Autowired:自动注入,如果按照byName来装配,可以结合@Qualifier注解一起使用。
 14.@Resource:此注解和自动注入注解都是做bean的注入时使用。
 15.@RestController:使得当前的Controller层返回的全部都是Json类型的数据。
 16.@Transactional:将类中的方法变为事务。
        其属性有:readOnly=false,意思为不为只读,可以进行增删改查
                   propagation=Propagation.REQUIRED,传播行为
 17.@bean:等同于在spring配置文件中配置的bean....。
18.@Configuration:用于定义配置类,可替换xml配置文件。- 1
- 2
- 3
- 4
- 5
- 6
- 7
- 8
- 9
- 10
- 11
- 12
- 13
- 14
- 15
- 16
- 17
- 18
- 19
- 20
- 21
- 22
- 23
- 24
- 25
- 26
- 27
- 28
- 29
- 30
- 31
- 32
- 33
关于Spring配置文件的一些常见应用:
1.自动装配:

声明默认自动装配的方式。
2.扫描器:

扫描器通过包名进行扫描,进行匹配,然后放入IOC容器中。
3.声明事务:

增加事务的命名空间,增加对事务的支持。
transaction为属性(事务管理器)
4.配置事务管理器:

id值需要和事务的命名空间的transaction-manager的属性值一致。
5.配置数据源:

事务管理器依赖于数据源,需要写在事务管理器的配置里。
6.数据源的具体配置:

需要写在事务管理器的外面。
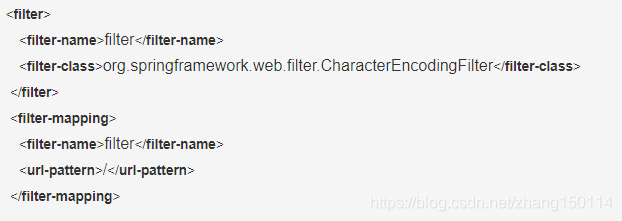
7. web.xml处理中文乱码问题:
8.监听器监听Tomcat,通过监听器让SpringIoCIoC容器初始化一次(只new一个对象):

9.SpringMVC方式处理请求的入口:

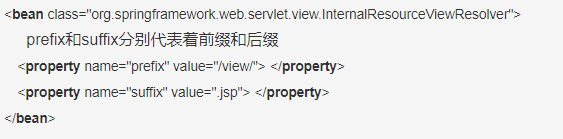
10.配置视图解析器:
11.@RequestMapping注解的value属性的ant风格的请求路径:
abc/*/c 意思是:abc里的任意中的c。
通配符:代表着在的前后中间,可以有多个子目录
- 代表通配符:任意,不限
? 代表任意一个单字符 - 代表任意字符(0或多个)
** 代表任意个目录
12.SpringMVC的REST风格(软件编程风格):
四个常见请求方式:
GET 获取 --》查询
POST 增 --》增加
DELETE 删 --》删除
PUT 改 --》更新
一般普通浏览器只支持get和post,不支持delete和put。
若想要浏览器支持delte和put方式,可以使用filte过滤器,使用过滤器进行拦截并进行处理。
实现过程:
约定1:过滤器对请求进行拦截,
拦截隐藏域hidden,隐藏域的name字段的值必须是_method,
如果满足这两个条件,就对请求进行拦截,
拦截什么?看value值,如果value的值为delete,
过滤器就将请求方式变为delete,
那么,如果value的值为put,
过滤器就将请求方式变为put。
约定2:请求方式之前是post,然后加隐藏域和指定的value值。
delete:
put:
在web.xml中:
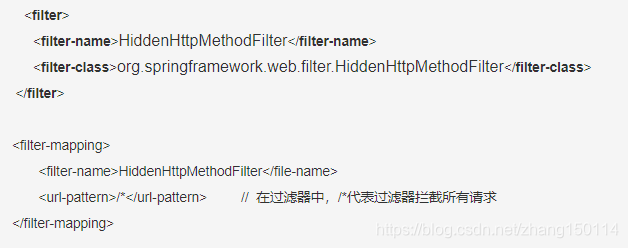
注意:mvc所有请求为 /,过滤器的所有请求为 /*。
13.向页面中带数据的四种方式(放入request域):
1.ModelAndView
2.Model
3.ModelMap
4.Map
例(ModelAndView方式):
@Controller
@RequestMapping(“SpringMVC”)
public class SpringMvcControl{
public ModelAndView testModelAndView(){
ModelAndView modelAndView = new ModelAndView(“success”); //加view
//告诉程序success就是view中的页面,也需要在视图解析器中配置前缀和后缀
Student student = new Student();
student.setId(2);
student.setName(“zs”); //addObject方法将数据放入request作用域中
modelAndView.addObject(“student1”,student); = request.setAttribute(“student”,student); //加model
return modelAndView;
    }

}
例(Model方式):
@Controller
@RequestMapping(“SpringMVC”)
public class SpringMvcControl{
@RequestMapping(value=“testModel”)
public String testModel(Model model){
Student student = new Student();
student.setId(2);
student.setName(“zs”);
model.addAttribute(“student4”,student);
return “success”;
    }

}
例(ModelMap方式):
@Controller
@RequestMapping(“SpringMVC”)
public class SpringMvcControl{
@RequestMapping(value=“testModelMap”)
public String testModelMap(ModelMap modelMap){
Student student = new Student();
student.setId(2);
student.setName(“zs”);
modelMap.put(“student2”,student);
return “success”;
}
}- 1
- 2
- 3
例(Map方式):
@Controller
@RequestMapping(“SpringMVC”)
public class SpringMvcControl{
@RequestMapping(value=“testMap”)
public String testMap(Map<String,Object> map){
Student student = new Student();
student.setId(2);
student.setName(“zs”);
map.put(“student3”,student);
return “success”;
}
}- 1
- 2
- 3
14.向页面中带数据的方式(放入session域):
例(@SessionAttributes方式):
写@SessionAttributes(“student1”,可以放入多个) //数据本身放入了request里,这样写的话,就代表数据也放入了session里
或@SessionAttributes("types=Student.class) //将Student类型的数据全放入session中,是一个数组类型,可以这样写types={Student.class;Address.class}
@Controller
@RequestMapping(“SpringMVC”)
public class SpringMvcControl{
@RequestMapping(value=“testModel”)
public String testModel(Model model){
Student student = new Student();
student.setId(2);
student.setName(“zs”);
model.addAttribute(“student1”,student);
return “success”;
}
}
例(@ModelAttribute方式–经常在更新时使用):
发出更新请求,做一个更新修改,将zs改为ls。
 <form action="SpringMVC/testModelAttribute" method="post">
 id:<input type="text" name="id" />
 name:<input type="text" name="name" />
   <input type="submit" value="修改">
</form>- 1
- 2
- 3
- 4
- 5
@SessionAttributes(“student”)
@Controller
@RequestMapping(“SpringMVC”)
public class SpringMvcControl {
@RequestMapping(value = “testModelAttribute”,method = RequestMethod.POST)
public String testModel(Model model){
Student student = new Student();
student.setName(“ls”);
model.addAttribute(“student”,student);
return “success”;
}
}
15.视图解析器:InternalResourceViewResolver
<mvc:view-controller path="请求路径" view-name="视图页面" />- 1
注:springmvc的mvc:view-controller…标签的优先级比较高,如果在springmvc.xml进行了配置,
就不会去Controller中找@RequestMapping()
经过视图解析器处理,类中返回的jsp页面地址,默认请求方式为请求转发,可以指定。
return “forward:/view/success.jsp”; //请求转发
return “redirect:/view/success.jsp”; //请求重定向
此种方式不会被视图解析器加上前缀(/view/)和后缀(.jsp),所以,需要写上路径。
16.处理静态资源:
何为静态资源?
html css js 图片 视频。。。
也就是不会因为时间、地点等而产生变化,不与用户进行交互。
在springMvc中,如果直接访问静态资源,就会404找不到。
原因:之前将所有的请求,通过通配符"/"进行拦截所有请求,
进而交给SpringMvc的入口DispatcherServlet去处理,
找该请求映射对应的@RequestMapping,也可以是mvc:view-controller…
解决方案:

如果只加第一个配置,程序就只能访问静态资源,不能访问动态资源了。
如果第一个和第二个配置都加了,程序就既可以访问静态资源又可以访问动态资源。
17.类型转换器:
自定义类型转换器:
格式如下:
public class MyConverter implements Converter<S(原来需要转换的,T(需要转换成什么)>{
//该接口有泛型约束
@Override
public Object convert(Object source){
      //如果之前只实现接口,没有进行泛型的约束,那么所实现的convert方法的类型就为Object,
        convert方法的参数也为Object类型。

      // //如果实现了接口并有泛型约束的话,所实现的convert方法的类型就为泛型约束的类型。
        return null;

           }

}- 1
- 2
- 3
- 4
- 5
- 6
- 7
- 8
- 9
真实案例:将String转为Model层的Student。
public class MyConverter implements Converter<String,Student>{
          @Override
     public Student convert(String source){
        String[] studentStrArr = source.split("-");
        Student student = new Student();
        student.setStudentId(Integer.parseInt(studentStrArr[0]));
    student.setStudentName(studentStrArr[1]);
        student.setStudentAge(Integer.parseInt(studentStrArr[2]));
        return student;
           }
}- 1
- 2
- 3
- 4
- 5
- 6
- 7
- 8
- 9
- 10
在Springmvc.xml配置文件中进行配置:
1.将自定义转换器纳入springioc容器

2.将myConverter再纳入SpringMvc提供的转换器bean中

3.将conversionService注册到annotation-driven中

@Controller
@RequestMapping(value=“SpringMVC”)
public class SpringMvcControl{
@RequestMapping(“testConverter”)
public String testConverter(@RequestParam(“studentInfo”) Student student){
   System.out.println(student.getId()+","+student.getName()+","+student.getAge());

   return "success";

}- 1
- 2
- 3
- 4
- 5
}
 <form action="/SpringMVC/testConverter" method="post">
 学生信息:
<input name="studentInfo" type="text" /> //2-zs-23
                  <input type="submit" value="转换" />
</form>- 1
- 2
- 3
- 4
- 5
18.数据格式化:
FormattingConversionServiceFactoryBean 数据格式化的类 包括 ConversionServiceFactoryBean转换器
19.错误消息的处理:
思路:把错误信息放入map中,也就是放入request域中,这样就可以在前端页面来取得错误信息了。
【SpringMvcControl】
@Controller
@RequestMapping(value=“SpringMVC”)
public class SpringMvcControl {
@RequestMapping(value = “testDataTimeFormat”,method = RequestMethod.POST)
public String testDataTimeFormat(Student student, BindingResult result, Map<String,Object> map){
System.out.println(student.getId()+","+student.getName()+","+student.getBirthday());
if(result.getErrorCount()>0){
for (FieldError error: result.getFieldErrors()) {
System.out.println(error.getDefaultMessage());
map.put(“errors”,result.getFieldErrors()); //将错误信息放入request域的errors中
}
}
return “redirect:/view/success.jsp”;
}
}
错误信息的处理:BindingResult必须要跟在校验的student)后,不能夹杂任何的参数,是mvc的要求。
20.数据校验:
@DateTimeFormat
1.JSR303方式
注解 注解的描述
@Null 被注解的元素必须为null
@NotNull 被注解的元素必须不为null
@AssertTrue 被注解的元素必须为true
@AssertFalse 被直接的元素必须为false
@Min(value) 被注解的元素必须是一个数字,其值必须大于或等于value
@Max(value) 被注解的元素必须是一个数字,其值必须小于或等于value
@DecimalMin(value) 被注解的元素必须是一个数字,其值必须大于或等于value
@DecimalMax(value) 被注解的元素必须是一个数字,其值必须小于或等于value
@Size(max,min) 被注解的元素的取值范围必须是介于min和max之间
@Digits(integer,fraction)被注解的元素必须是一个数字,其值必须在可接受的范围内
@Past 被注解的元素必须是一个过去的日期
@Future 被注解的元素必须是一个将来的日期
@Pattern(value) 被注解的元素必须符合指定的正则表达式
另外:
Hibernate Validator是JSR303的补充扩展
@Email 被注解的元素值必须是合法的电子邮箱地址
@Length 被注解的字符串的长度必须在指定的范围内
@NotEmpty 被注解的字符串必须非空
@Range 被注解的元素必须在合适的范围内
步骤:1.jar包的导入。
2.springmvc.xml中配置。
要实现JSR303 / Hibernate Validator校验(或其它各种校验),
必须实现SpringMvc提供的一个接口,ValidatorFactory。
SpringMvc已经把实现这个接口的实现类做过了,LocalValiDatorFactoryBean。
而 就会自动将ValidatorFactory的
实现类LocalValiDatorFactoryBean写进去,因此可以直接实现数据校验。
一句 即可搞定。
即可搞定。
3.直接使用注解。
21.SpringMVC处理Ajax或Json数据:
Ajax请求SpringMVC,并且返回Json格式的数据:
需要三个jar包:
jackson-annotations.jar
jackson-core.jar
jackson-databin.jar
JQuery形式的Ajax:
$(document.ready(function())){
$("#testJson").click(function(){
//通过ajax请求Springmvc
$.post(
//服务器地址
“SpringMVC/testJson”,
// {“name”:“zs”,“age”:23} 可以带参数
//服务端处理完毕后的回调函数List
function(result){ //此时的result就是students
for(var i=0; i<result.length; i++){
window.alert(result[i].id+"-"+result[i].name+"-"
+result[i].age+"-")
}
});
});
)}

@Controller
@ResponseBody //加完这个注解,在ajax里就可以调Json对象了,
//告诉SpringMvc此时的return 返回的不是一个字符串,不是像return "success"的一个view页面,
//而是一个ajax调用的返回值,将返回的view页面变成一个list数组
@RequestMapping(value=“SpringMVC”)
public class SpringMvcControl{
@RequestMapping("value=“testJson”)
public String testJson(){
//正规应该是Controller–>Service–>Dao,目前没有这些,先模拟
Student stu1 = new Student(1,“zs”,20);
Student stu1 = new Student(2,“ls”,21);
Student stu1 = new Student(3,“ww”,22);
 List<Student> students = new ArrayList<>();
   student.add(stu1);
   student.add(stu2);
   student.add(stu3);

   return "students";

  }
}- 1
- 2
- 3
- 4
- 5
- 6
- 7
- 8
- 9
private int id;
private String name;
private int age;
生成set get方法 和构造方法 和 无参构造
22.SpringMVC实现文件上传:
  使用已经封装好的组件来实现上传步骤:

  1.1.jar包:commons-fileupload.jar和commons-io.jar

  2.配置CommonsMultipartResolver,加入到SpringIoC容器里

//CommonsMultipartResolver用于文件上传
//id值不能乱写,有固定写法multipartResolver,SpringIOC容器在初始化时,会自动寻找一个id为multipartResolver的bean
    如果有,就自动加入IOC容器并生效,如果没有,就不加入,不生效
<bean id="multipartResolver" class="org.springframework.web.multipart.commons.CommonsMultipartResolver">
     //此类中有很多属性,若类源代码中没有,就去父类或者所实现的接口中找
     //比如,可以设置文件上传的默认编码,上传的最大值等等

   <property name="defaultEncoding" value="utf-8"> </property>   //设置属性,文件上传的默认编码
   <property name="maxUploadSize" value="102400">  </property>   //设置属性,文件上传的最大值,单位为byte,若value为-1,就代表上传文件的最大值没有限制
   。。。。。。。。。。。。。。。。。。。。。。。。。。。。。。
</bean>

3.处理的方法- 1
- 2
- 3
- 4
- 5
- 6
- 7
- 8
- 9
- 10
- 11
- 12
- 13
- 14
- 15
- 16
- 17
- 18
- 19
@Controller
@RequestMapping(value=“SpringMVC”)
public class SpringMvcControl throws IOException{
@RequestMapping(value=“testUploadFile”,method=RequestMethod.POST)
//@RequestParam()指定表单中的某个name的值保存到desc属性里,一般操作字符串使用@RequestParam()
public String testUploadFile(@RequestParam(“desc”)String desc,@RequestParam(“file”)MultipartFile file){ //通过参数来收上传的字段
//将前端上传的描述信息进行打印到控制台
System.out.println(“文件描述信息:”+desc); //file文件类型,要使用MultipartFile
//将file上传到服务器的某一个地方
InputStream input = file.getInputStream(); //输入流,不断地往缓存区读
String fileName = file.getOriginalFilename(); //获取用户上传的原始名字
OutputStream out = new FileOutputStream(“d:\”+fileName); //输出保存用户上传的原始文件名
byte[] bs = new byte[1024];
int len = -1;
while((len=input.read(bs) !=-1){
out.write(bs,0,len);
}
out.close();
input.close();
System.out.println(“上传成功!”);
return “success”;
}
}
23.SpringMVC的拦截器:
实现拦截器的步骤:
编写拦截器,实现接口HandlerInterceptor。
该接口中有三个方法:preHandle() 前,拦截请求。
postHandle() 后,拦截响应。
afterCompletion() 完毕,当服务器响应的页面渲染完毕后就触发afterCompletion()。
//渲染就是将jsp中的变量、css、js等全部组装完毕,最终显示出来:渲染。
public class MyInterceptor implements HandlerInterceptor{
  @Override
  public void preHandle(HttpServletRequest request,HttpServletResponse response,ModelAndView modelAndView) throws Exception{
        System.out.println("拦截请求。");
  return true;  //若返回为true,表示拦截后要放行,若返回为false,表示拦截后不放行。
           }

  @Override
  public void postHandle(HttpServletRequest request,HttpServletResponse response,ModelAndView modelAndView) throws Exception{
        System.out.println("拦截响应。");
           }

  @Override
  public void afterCompletion(HttpServletRequest request,HttpServletResponse response,ModelAndView modelAndView) throws Exception{
        System.out.println("视图被渲染完毕。");
           }

}

 <mvc:interceptors>
   <bean class="com.zb.controller.MyInterceptor"> </bean>
</mvc:interceptors>- 1
- 2
- 3
- 4
- 5
- 6
- 7
- 8
- 9
- 10
- 11
- 12
- 13
- 14
- 15
- 16
- 17
- 18
- 19
- 20
- 21
@Controller
@RequestMapping(value=“SpringMVC”)
public class SpringMvcControl{
@RequestMapping(value=“testInterceptor”)
public String testInterceptor(){
System.out.println(“普通处理请求的方法…”);
return “success”;
}
}
<mvc:interceptors>
//配置具体拦截的路径
<mvc:interceptor>
//第一个是指定需要拦截的路径,第二个是指定不拦截的路径,二者取交集。风格为ant。
     <mvc:mapping path="/**" />                                 //拦截根目录里的所有请求。
     <mvc:exclude-mapping path="SpringMVC/testUploadFile" />    //排除文件上传的请求。
 <bean class="com.zb.controller.MyInterceptor"> </bean>
</mvc:interceptor>

</mvc:interceptors>- 1
- 2
- 3
- 4
- 5
- 6
- 7
- 8
- 9
- 10
注意: 如果想要默认 拦截全部请求,就需要把

但如果想要拦截指定的请求,就需要把

如何做拦截器链(多个拦截器)?
先拦截第一个,然后再拦截第二个。
还是先做一个类,实现HandlerInterceptor接口。
然后在springmvc.xml中进行配置。
注意:多个拦截器的话,afterCompletion完毕后渲染只有一个。
24.SpringMVC处理异常:
要在SpringMVC中处理异常,必须实现HandlerExceptionResolver接口。
这个接口有一些实现类,每个实现类都是一种处理异常的方式。
实现类:
1.ExceptionHandleExceptionResolver
这个实现类提供了@ExceptionHandler注解,
并通过该注解处理异常。
@ExceptionHandler({ArithmeticException.class})
public ModelAndView handlerArithmeticException(Exception e){
ModelAndView modelAndView = new ModelAndView(“error”);
System.out.println(e);
modelAndView.addObject(“error”,e);
return modelAndView;
}
可以放入request域里,然后在Jsp页面进行取得。
使用Model、Map、ModelAndView 都可以。
上面是做了一个Controller,在Controller中进行异常的捕捉和处理。
可以专门做一个处理异常的类。
@ControllerAdvice //与@Controller原理一致,被@Controller修饰的类,表明为一个控制器类。
//那么,被@ControllerAdvice修饰的类,就表明为一个处理异常捕获异常的类。
public class MyExceptionHandler{ //用于处理异常的类
@ExceptionHandler({Exception.class})
public ModelAndView handlerArithmeticException(Exception e){
ModelAndView modelAndView = new ModelAndView(“error”);
System.out.println(e+"—该@ControllerAdvice中的异常处理方法,可以处理任何类中的异常");
modelAndView.addObject(“error”,e);
return modelAndView;
}- 1
}
2.ResponseStatusExceptionResolver(异常状态的提示)
比如,如果在浏览器的地址栏中随便输入一个asjkdkjsakdjas.jsp,
那么,在当前的项目中,必然是没有这个页面,所以浏览器会显示
404 Not Found。。 找不到这个资源,
那么,是否可以自定义异常的显示页面?
就是通过ResponseStatusExceptionResolver来做,自定义异常显示页面。
同样ResponseStatusExceptionResolver这个类,也提供了一个注解@ResponseStatus
那么,自定义异常显示页面就是通过@ResponseStatus 注解来实现的。
【MyMyArrayIndexOutofBoundsException】
//自定义一个数组越界异常
//用枚举来实现:HttpStatus.NOT_FOUND就是404,HttpStatus.FPRNODDEM就是403
@ResponseStatus(value=HttpStatus.NOT_FOUND,reason=“对不起,数组越界了!”) //value就是浏览器显示的类似于404,400的状态码,而reason就是浏览器显示的类似于Not Found异常错误描述
public class MyArrayIndexOutofBoundsException extends Exception{ //变成自定义异常
}
【SpringMvcControl】
@Controller
@RequestMapping(“SpringMVC”)
public class SpringMvcControl{
@RequestMapping(“testExceptionHandler”)
public String testExceptionHandler(@RequestParam(“i”) Integer i) throws MyMyArrayIndexOutofBoundsException{
if(i==3){
throw new MyArrayIndexOutofBoundsException();
}
return “success”;
}
}
3.DefaultHandlerExceptionResolver(默认异常处理)
4.SimpleMappingExceptionResolver 通过配置来实现异常的处理
摘自 https://blog.csdn.net/zhang150114/article/details/88946850


· 10年+ .NET Coder 心语,封装的思维:从隐藏、稳定开始理解其本质意义
· .NET Core 中如何实现缓存的预热?
· 从 HTTP 原因短语缺失研究 HTTP/2 和 HTTP/3 的设计差异
· AI与.NET技术实操系列:向量存储与相似性搜索在 .NET 中的实现
· 基于Microsoft.Extensions.AI核心库实现RAG应用
· 阿里巴巴 QwQ-32B真的超越了 DeepSeek R-1吗?
· 10年+ .NET Coder 心语 ── 封装的思维:从隐藏、稳定开始理解其本质意义
· 【译】Visual Studio 中新的强大生产力特性
· 【设计模式】告别冗长if-else语句:使用策略模式优化代码结构
· 字符编码:从基础到乱码解决
2017-02-07 WebService简单教程