
Springboot 常用注解
@SpringBootApplication:
包含 @Configuration、@EnableAutoConfiguration、@ComponentScan
通常用在主类上。
@ComponentScan:
作用是组件扫描和自动装配。相当于 <context:component-scan>,如果扫描到有 @Component @Controller @Service 等等这些注解的类,则把这些类注册为bean。
扫描的范围默认是它所在的包以及子包中所有带有注解的对象(程序启动类所在的目录及其子目录)。
@Configuration:
@Configuration用在类上面,表明这个是个配置类。指出该类是 Bean 配置的信息源,相当于XML中的 <beans></beans>,如下配置文件。
@Configuration 注解类表示这个类可以使用 Spring IoC 容器作为 bean 定义的来源。@Bean 注解告诉 Spring,一个带有 @Bean 的注解方法将返回一个对象,该对象应该被注册为在 Spring 应用程序上下文中的 bean。


1 <?xml version="1.0" encoding="UTF-8"?>
2  <beans xmlns="http://www.springframework.org/schema/beans"
3         xmlns:xsi="http://www.w3.org/2001/XMLSchema-instance"
4         xsi:schemaLocation="http://www.springframework.org/schema/beans http://www.springframework.org/schema/beans/spring-beans.xsd">
5      <!--实例化一个Person对象-->
6      <bean id="userBean" class="com.springboot.com.study.userBean"/>
7  </beans>
@Bean:
相当于XML中的<bean></bean>,放在方法的上面,而不是类,意思是产生一个bean,并交给spring管理。
 1 public class UserBean {
 2
 3     public UserBean() {
 4         System.out.println("UserBean初始化成功!");
 5     }
 6
 7     private int id;
 8
 9     private String userName;
10
11     private String userAccount;
12
13     private String userPwd;
14
15     public int getId() {
16         return id;
17     }
18
19     public void setId(int id) {
20         this.id = id;
21     }
22
23     public String getUserName() {
24         return userName;
25     }
26
27     public void setUserName(String userName) {
28         this.userName = userName;
29     }
30
31     public String getUserAccount() {
32         return userAccount;
33     }
34
35     public void setUserAccount(String userAccount) {
36         this.userAccount = userAccount;
37     }
38
39     public String getUserPwd() {
40         return userPwd;
41     }
42
43     public void setUserPwd(String userPwd) {
44         this.userPwd = userPwd;
45     }
46
47     @Override
48     public String toString() {
49         return "UserBean{" +
50                 "id=" + id +
51                 ", userName='" + userName + '\'' +
52                 ", userAccount='" + userAccount + '\'' +
53                 ", userPwd='" + userPwd + '\'' +
54                 '}';
55     }
56 }
 1 @Configuration
 2 public class BeanConfiguration {
 3
 4     public BeanConfiguration(){
 5         System.out.println("AnnotationConfigApplicationContext 初始化成功!");
 6     }
 7
 8     @Bean
 9     public UserBean getUserBean(){
10         UserBean userBean=new UserBean();
11         userBean.setId(1);
12         userBean.setUserAccount("admin");
13         userBean.setUserName("管理员");
14         userBean.setUserPwd("123");
15         return userBean;
16     }
17
18 }
@SpringBootTest
public class AnnotationTest {

    @Autowired
    private UserBean userBean;

    @Test
    public void beanConfiguration(){
        AnnotationConfigApplicationContext applicationContext =
                new AnnotationConfigApplicationContext(UserBean.class);
        UserBean userBean = (UserBean) applicationContext.getBean("userBean");
        System.out.println(userBean.toString());
    }
}
@EnableAutoConfiguration:
让 Spring Boot 根据应用所声明的依赖来对 Spring 框架进行自动配置,一般加在主类上(也可以不加主类上,能够初始化就行)。
跟踪 @EnableAutoConfiguration ,查看 @Import(AutoConfigurationImportSelector.class) 注解:
@Import:
在应用中,有时没有把某个类注入到IOC容器中,但在运用的时候需要获取该类对应的bean,此时就需要用到@Import注解。可以理解为,只要加了这个注解,这个类就会被 Spring进行管理。
这个注解类似于:
<import resource="classpath*:/spring/***" />
注入Bean实例:
public class DogBean {
    public DogBean() {
        System.out.println("汪汪汪");
    }

    private int id;

    private  String name;

    public int getId() {
        return id;
    }

    public void setId(int id) {
        this.id = id;
    }

    public String getName() {
        return name;
    }

    public void setName(String name) {
        this.name = name;
    }
}


public class CatBean {
    public CatBean() {
        System.out.println("喵喵喵");
    }

    private int id;

    private  String name;

    public int getId() {
        return id;
    }

    public void setId(int id) {
        this.id = id;
    }

    public String getName() {
        return name;
    }

    public void setName(String name) {
        this.name = name;
    }
}
@Configuration
@Import(value = {DogBean.class,CatBean.class})
public class BeanConfiguration2 {

}


@SpringBootTest
public class AnnotationTest {
    @Autowired
    private DogBean dogBean;
    @Autowired
    private CatBean catBean;


}

@PropertySource 和 @ConfigurationProperties @Value
@ConfigurationProperties 注解默认读取主配置文件,springboot 中主配置文件是 application.properties 和 application.yml
@PropertySource 注解指定此配置文件路径。是SpringBoot标注了IOC容器里面的对象。
当IOC容器里的对象初始化完成后,再去扫描@ConfigurationProperties ,根据配置文件内的前缀,把配置信息注入到这个对象内的set 方法。
Bean必须有 Set()方法,否则可以用 @Data() 注解替代 Set()方法
@Value 将外部的值动态注入到Bean中,使用的情况。
配置文件代码:application.properties方式:
configbeans.id=123
configbeans.name=zhangsan
configbeans.arrays=1,2,3
configbeans.lists=jinan,qingdao,weifang
configbeans.maps.name1=zhangsan
configbeans.maps.name2=lisi
configbeans.maps.name3=wangerma
configbeans.sets=shandong,shanxi,bejing,shanghai
configbeans.birthday=2020/03/19 22:22:10
/*
    注入的Bean对象
*/
@Component
@PropertySource("classpath:application.properties")
@ConfigurationProperties(prefix = "configbeans")
public class ConfigInjectBean {
    private Integer id;
    private String name;
    private String[] arrays;
    private List<String> lists;
    private Map<String, String> maps;
    private Set<String> sets;
    private Date birthday;

    public Integer getId() {
        return id;
    }

    public void setId(Integer id) {
        this.id = id;
    }

    public String getName() {
        return name;
    }

    public void setName(String name) {
        this.name = name;
    }

    public String[] getArrays() {
        return arrays;
    }

    public void setArrays(String[] arrays) {
        this.arrays = arrays;
    }

    public List<String> getLists() {
        return lists;
    }

    public void setLists(List<String> lists) {
        this.lists = lists;
    }

    public Map<String, String> getMaps() {
        return maps;
    }

    public void setMaps(Map<String, String> maps) {
        this.maps = maps;
    }

    public Set<String> getSets() {
        return sets;
    }

    public void setSets(Set<String> sets) {
        this.sets = sets;
    }

    public Date getBirthday() {
        return birthday;
    }

    public void setBirthday(Date birthday) {
        this.birthday = birthday;
    }

    @Override
    public String toString() {
        return "ConfigInjectBean{" +
                "id=" + id +
                ", name='" + name + '\'' +
                ", arrays=" + Arrays.toString(arrays) +
                ", lists=" + lists +
                ", maps=" + maps +
                ", sets=" + sets +
                ", birthday=" + birthday +
                '}';
    }
}


@SpringBootTest
public class AnnotationTest {
    /*
        测试方法
    */
    @Test
    public void configInjectBeanPrint(){
        System.out.println(configInjectBean.toString());
    }
}
application.yml 配置方式。
需要注意的是,SpingBoot中 application.properties 优先级比 application.yml 高,所以两个都配置了的话,优先读取application.properties
View Code 上面这种配置文件注入方式必须有get() set() ,还可以通过 @Value 注解注入配置信息,不需要写 get() set()
@Value和 @ConfigurationProperties 区别:前者是主动到IOC容器里寻找值,后者被被动的被IOC容器注入。
configbeans.id=123
configbeans.name=zhangsan
configbeans.arrays=1,2,3
configbeans.lists=jinan,qingdao,weifang
#configbeans.maps.name1=zhangsan
#configbeans.maps.name2=lisi
#configbeans.maps.name3=wangerma
configbeans.maps={key1: 'value1', key2: 'value2'}
configbeans.sets=shandong,shanxi,bejing,shanghai
configbeans.birthday=2020/03/19 22:22:10
/*
    注入的Bean对象
*/
@Component
public class ConfigInjectBean {
    @Value("${configbeans.id}")
    private Integer id;
    @Value("${configbeans.name}")
    private String name;
    @Value("${configbeans.arrays}")
    private String[] arrays;
    @Value("${configbeans.lists}")
    private List<String> lists;
    @Value("#{${configbeans.maps}}")
    private Map<String, String> maps;
    @Value("${configbeans.sets}")
    private Set<String> sets;
    @Value("${configbeans.birthday}")
    private Date birthday;
    @Override
    public String toString() {
        return "ConfigInjectBean{" +
                "id=" + id +
                ", name='" + name + '\'' +
                ", arrays=" + Arrays.toString(arrays) +
                ", lists=" + lists +
                ", maps=" + maps +
                ", sets=" + sets +
                ", birthday=" + birthday +
                '}';
    }
}

@SpringBootTest
public class AnnotationTest {
    /*
        测试方法
    */
    @Test
    public void configInjectBeanPrint(){
        System.out.println(configInjectBean.toString());
    }
}
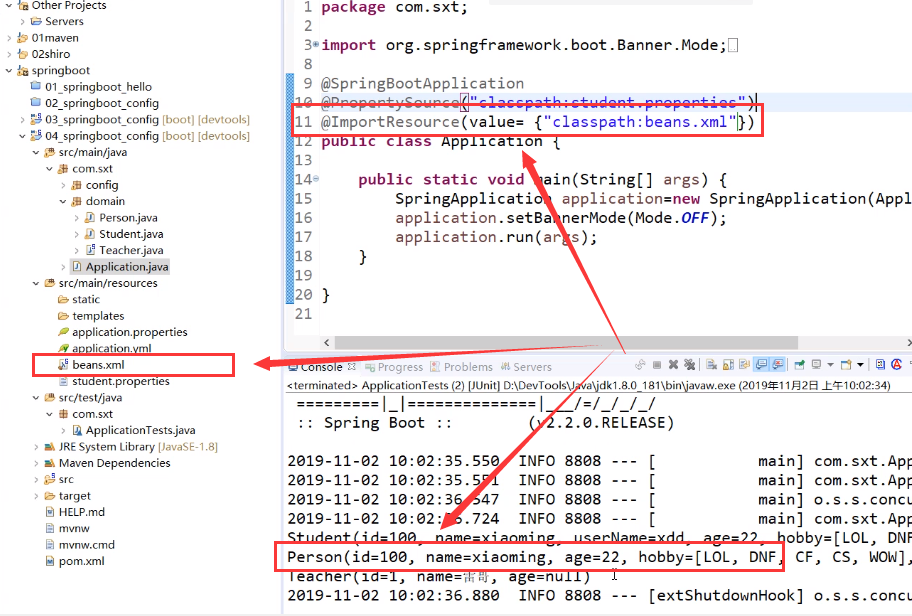
@ImportResource()
SpringBoot不推荐使用xml配置文件,但是实际上SpringBoot是支持XML配置文件的。在实际开发中,用 @ImportResource 来导入一个传统的XML配置文件,将配置文件内对象交由Spring进行管理。
@Inherited
@Inherited 元注解是一个标记注解,
@Inherited阐述了某个被标注的类型是被继承的。 如果一个使用了@Inherited 修饰的annotation类型被用于一个class,则这个annotation将被用于该class的子类。
注意:@Inherited annotation 类型是被标注过的class的子类所继承。类并不从它所实现的接口继承 annotation, 方法并不从它所重载的方法继承annotation。
当 @Inherited annotation 类型标注的annotation的Retention是 RetentionPolicy.RUNTIME,则反射API增强了这种继承性。
如果我们使用 java.lang.reflect 去查询一个@Inherited annotation类型的annotation时,反射代码检查将展开工作: 检查class和其父类,直到发现指定的annotation类型被发现,或者到达类继承结构的顶层。
@Repository:
用于标注数据访问组件,即 DAO组件。
@Service:
用于标注业务层组件。
@RestController:
用于标注控制层组件(如struts中的action),包含 @Controller 和 @ResponseBody。
@ResponseBody:
表示该方法的返回结果直接写入HTTP response body中
一般在异步获取数据时使用,在使用 @RequestMapping 后,返回值通常解析为跳转路径,加上@responsebody 后返回结果不会被解析为跳转路径,而是直接写入HTTP response body中。比如异步获取json数据,加上@Responsebody() 后,会直接返回json数据。
@Component:
泛指组件,当组件不好归类的时候,我们可以使用这个注解进行标注。
@AutoWired:
byType方式。把配置好的Bean拿来用,完成属性、方法的组装,它可以对类成员变量、方法及构造函数进行标注,完成自动装配的工作。
当加上(required=false)时,就算找不到bean也不报错。
@Qualifier:
当有多个同一类型的Bean时,可以用 @Qualifier("name") 来指定。与 @Autowired 配合使用
@Resource(name="name",type="type"):
没有括号内内容的话,默认byName,否则 Type。与 @Autowired 干类似的事。
@Target(ElementType.TYPE)
修饰注解的注解。用来指定注解修饰类的哪个成员。
@Target(ElementType.TYPE)   //接口、类、枚举

@Target(ElementType.FIELD) //字段、枚举的常量

@Target(ElementType.METHOD) //方法

@Target(ElementType.PARAMETER) //方法参数

@Target(ElementType.CONSTRUCTOR)  //构造函数

@Target(ElementType.LOCAL_VARIABLE)//局部变量

@Target(ElementType.ANNOTATION_TYPE)//注解

@Target(ElementType.PACKAGE) ///包
@RequestMapping:
RequestMapping 是一个用来处理请求地址映射的注解,可用于类或方法上。用于类上,表示类中的所有响应请求的方法都是以该地址作为父路径。
该注解有六个属性:
params:指定request中必须包含某些参数值是,才让该方法处理。
headers:指定request中必须包含某些指定的header值,才能让该方法处理请求。
value:指定请求的实际地址,指定的地址可以是URI Template 模式
method:指定请求的method类型, GET、POST、PUT、DELETE等
consumes:指定处理请求的提交内容类型(Content-Type),如application/json,text/html;
produces:指定返回的内容类型,仅当request请求头中的(Accept)类型中包含该指定类型才返回
@RequestParam:
用在方法的参数前面。
@RequestParam String a =request.getParameter("a")。
@PathVariable:
路径变量。参数与大括号里的名字一样要相同。
RequestMapping("user/get/mac/{macAddress}")
public String getByMacAddress(@PathVariable String macAddress){
  //do something;
}
@Profiles
Spring Profiles提供了一种隔离应用程序配置的方式,并让这些配置只能在特定的环境下生效。
任何 @Component 或 @Configuration 都能被 @Profile 标记,从而限制加载它的时机。
@Configuration
@Profile("prod")
public class ProductionConfiguration {
    // ...
}
@ConfigurationProperties
Spring Boot将尝试校验外部的配置,默认使用JSR-303(如果在classpath 路径中)。
你可以轻松的为你的 @ConfigurationProperties 类添加 JSR-303 javax.validation 约束注解:

@Component
@ConfigurationProperties(prefix="connection")
public class ConnectionSettings {
@NotNull
private InetAddress remoteAddress;
// ... getters and setters
}
@JsonFormat(pattern = "yyyy-MM-dd HH:mm:ss",timezone = "GMT+8")
实体向前端返回 Json 时的时间日期格式,timezone 表示为东八区。
public class CompanyModel {
    public String companyCode;
    public String companyName;
    @JsonFormat(pattern = "yyyy-MM-dd HH:mm:ss",timezone = "GMT+8")
    private Date addTime;

    public String getCompanyCode() {
        return companyCode;
    }

    public void setCompanyCode(String companyCode) {
        this.companyCode = companyCode;
    }

    public String getCompanyName() {
        return companyName;
    }

    public void setCompanyName(String companyName) {
        this.companyName = companyName;
    }

    public Date getAddTime() {
        return addTime;
    }

    public void setAddTime(Date addTime) {
        this.addTime = addTime;
    }
}
@DateTimeFormat()
@DateTimeFormat(pattern ="yyyy-MM-dd HH:mm:ss")
和 @JsonFormat()注解相反,@DateTimeFormat()注解是前端往后端接收日期的数据格式。
()

 浙公网安备 33010602011771号