


手把手实践qiankun微前端的开发和部署
文章开始之前,我们先提出几个问题,大家不妨带着问题来学习:
1、什么是微前端?有哪几种常见的解决方案?
2、为什么要是使用微前端,有什么样的场景使用微前端?
3、qiankun方案怎么实现微前端?
什么是微前端?有哪几种常见的解决方案?
说说个人的理解。随着微服务开发模式的兴起,前端开发也提出了微前端的开发模式。主要是为了将复杂的大应用进行解耦,拆分成一个主应用下挂载多个子应用,有那么一点分而治之的思想。就像古代分封诸侯,皇帝如果一个人亲身亲为治理一个国家,大事小事都由皇帝处理的话,一来会把皇帝累死,二来可能精力有限而不能很好治理,于是提出了分封制,皇帝分封诸侯国,诸侯国治理自己封地的事情,定期向皇帝上报。诸侯国与中央的通讯就像子项目与主项目之间的通讯。
目前常见的解决方案有:
- iframe方案
- single-spa方案
- qiankun方案
其中,single-spa方案是早几年提出的方案,qiankun方案是基于single-spa封装的,上手简单,比single-spa更具优势。qiankun是蚂蚁金服开源的一款框架,目前已在蚂蚁内部服务了超过 200+ 线上应用,值得尝试。至于为什么不使用iframe,可以先阅读一下《Why Not Iframe》这篇文章。如果你懒得访问,这里浓缩一下重点:
- url 不同步。浏览器刷新 iframe url 状态丢失、后退前进按钮无法使用。
- UI 不同步,DOM 结构不共享。想象一下屏幕右下角 1/4 的 iframe 里来一个带遮罩层的弹框,同时我们要求这个弹框要浏览器居中显示,还要浏览器 resize 时自动居中.
- 全局上下文完全隔离,内存变量不共享。iframe 内外系统的通信、数据同步等需求,主应用的 cookie 要透传到根域名都不同的子应用中实现免登效果。
- 慢。每次子应用进入都是一次浏览器上下文重建、资源重新加载的过程。
文中也提到如果不考虑体验问题,iframe 几乎是最完美的微前端解决方案了,其实iframe方案也不是一无是处,我们不能对它抱有偏见。iframe方案是接入成本最廉价的选择,同时也支持通过possMassage实现父子之间的通讯。它也是微前端的一种实现方式,在页面上无弹窗、无全屏等操作的时候,iframe 也是很好用的,加上配置缓存和 cdn 加速,如果是内网访问,也不会很慢。而且,对于陈年已久的Jquery多页面的老项目,qiankun似乎对多页应用没有很好的解决办法。每个页面都去修改,成本很大也很麻烦,但是使用 iframe 嵌入这些老项目就比较方便。与其折腾对接可能还会有很多配置上的问题,还不如用iframe干干净净接入,所以技术方案选择的同时,也要结合项目自身的情况。
当然,已经2020年了,我们没有老项目了,Jquery已经不去讨论了,全部梭哈三大框架。我们都是单页面,所以,qiankun方案再适合不过了。
为什么要是使用微前端,有什么样的场景使用微前端?
如果需要开发这样的项目:
其中有多个模块,每一个模块都可以看成一个应用,每一个应用都是一个完整的项目。
如果不采用微前端,整个项目集中在一起,不但不好分离,还会导致项目越来越大,同时参与的人员也会越来越多,非常不好管理,代码也不好维护。如果有个需求:需要子应用脱离平台独立运行,如果是微前端的方式,不费吹灰之力,子应用可以直接运行。但要是整合在一起,就比较费力。
还有一种场景,开发中的平台项目,突然需要嵌入别的项目。重新开发是不可能的了,不但开发成本过高,还要维护多套代码,所以也只能采用微前端的形式了。(巨无霸的Jquery老项目建议使用iframe的形式)
所以,在以上场景的时候,使用微前端是非常合适的。
qiankun方案怎么实现微前端?
这个是我们文章的重点。我们慢慢探讨。
说在前面:
- qiankun的使用与技术栈无关,同时子应用也是可以自由选择开发的框架,可以自己制定开发规范。
- 本次例子主项目是以vue开发的,子项目一个是vue一个是react。
- qiankun在开发环境下,主项目和全部子项目都会运行起来,如果子项目没有运行起来,当主项目菜单切到该子项目的时候,会打不开。所以在开发环境就会跑起多个服务。
- 部署的时候,主项目和子项目都需要分别打包,通常在主项目创建一个文件夹,子项目都打包后,放在主项目文件夹下面。这样之后跑起一个服务,同时可以使用子项目的路径,独自运行子项目。
------------------------------------------------------------------------------------------------------------------------------------------
一、初始化项目
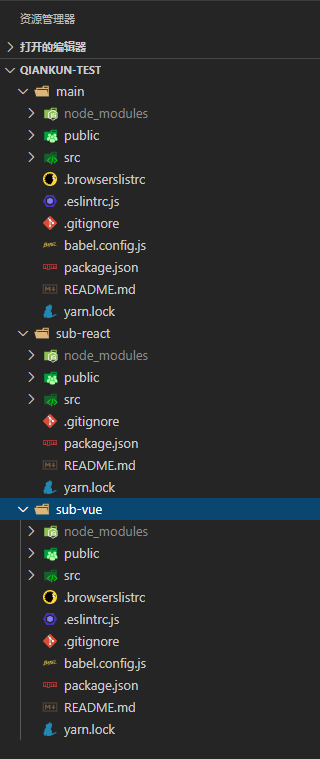
1、创建一个qiankun-test的文件夹,在下面依次创建主项目、vue项目和react项目
vue create main(main项目直接简单创建,不需要vuex和router)
vue create sub-vue(sub-vue带vuex和router)
npx create-react-app sub-react
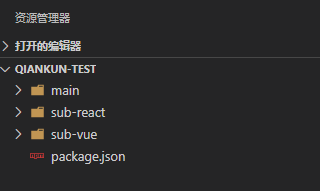
2、给qiankun-test创建package.json文件,方便执行全部安装运行打包等脚本
npm init --yes
3、安装npm-run-all,并修改package.json:
npm i npm-run-all --save-dev

 1 {
 2   "name": "qiankun-test",
 3   "version": "1.0.0",
 4   "description": "",
 5   "main": "index.js",
 6   "scripts": {
 7     "install": "npm-run-all --serial install:*",
 8     "install:main": "cd main && yarn install",
 9     "install:sub-vue": "cd sub-vue && yarn install",
10     "install:sub-react": "cd sub-react && yarn install",
11     "start": "npm-run-all --parallel start:*",
12     "start:sub-react": "cd sub-react && yarn start",
13     "start:sub-vue": "cd sub-vue && yarn serve",
14     "start:main": "cd main && yarn serve",
15     "build": "npm-run-all --serial build:*",
16     "build:main": "cd main && yarn build",
17     "build:sub-vue": "cd sub-vue && yarn build",
18     "build:sub-react": "cd sub-react && yarn build",
19     "test": "echo \"Error: no test specified\" && exit 1"
20   },
21   "keywords": [],
22   "author": "",
23   "license": "ISC",
24   "devDependencies": {
25     "npm-run-all": "^4.1.5"
26   }
27 }
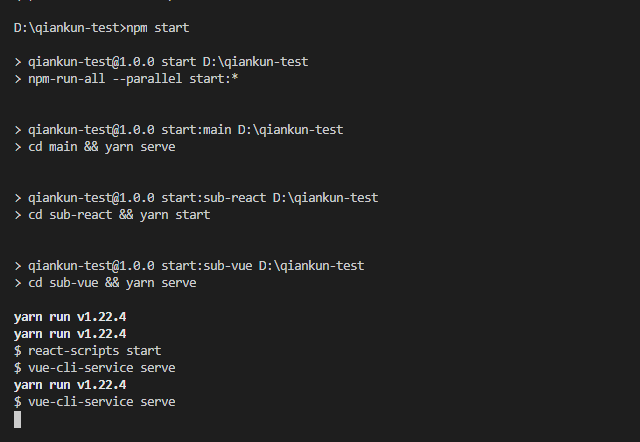
npm-run-all 提供了多种运行多个命令的方式,常用的有以下几个:
--parallel: 并行运行多个命令,例如:npm-run-all --parallel lint build--serial: 多个命令按排列顺序执行,例如:npm-run-all --serial clean lint build:**--continue-on-error: 是否忽略错误,添加此参数npm-run-all会自动退出出错的命令,继续运行正常的--race: 添加此参数之后,只要有一个命令运行出错,那么npm-run-all就会结束掉全部的命
我们在qiankun-test下面执行npm start后,会启动主项目和2个子项目
二、配置主项目
1、子项目的端口号必须固定,不然端口号不同导致匹配不上。
新建2个环境配置文件
.env.development
1 VUE_APP_SUB_VUE=http://localhost:5501
2 VUE_APP_SUB_REACT=http://localhost:5502
.env.production
1 VUE_APP_SUB_VUE=http://localhost:5050/subapp/sub-vue/
2 VUE_APP_SUB_REACT=http://localhost:5050/subapp/sub-react/
我们将开发环境子应用端口固定好,并将生产环境(http://localhost:5050)中的域名和子应用的访问路径写好(后面会新建个subapp文件夹存放打包后的子项目)
2、主项目安装qiankun,子项目不需要
cd main && npm i qiankun --save
同时顺便也固定主项目的端口(可选),修改下主项目的vue.config.js
 1 module.exports = {
 2   devServer: {
 3     port: 5500,
 4   },
 5   chainWebpack: config => {
 6     config.plugin('html')
 7       .tap((args) => {
 8         args[0].title = 'qiankun-test'
 9         return args
10       })
11   }
12 };
3、注册子项目
在main主项目的src下新建micro-app.js:
 1 const microApps = [
 2   {
 3     name: 'sub-vue',
 4     entry: process.env.VUE_APP_SUB_VUE,
 5     activeRule: '/sub-vue'
 6   },
 7   {
 8     name: 'sub-react',
 9     entry: process.env.VUE_APP_SUB_REACT,
10     activeRule: '/sub-react'
11   }
12 ]
13
14 const apps = microApps.map(item => {
15   return {
16     ...item,
17     container: '#subapp-viewport', // 子应用挂载的div
18     props: {
19       routerBase: item.activeRule, // 下发基础路由
20     }
21   }
22 })
23
24 export default apps
- 建议name与子项目的package里的name字段保持一致,保持唯一性
- entry是子项目入口,生产环境和开发环境地址是不一样的,这里使用了我们之前创建的环境文件中的值
- activeRule是子项目在主项目中的路由地址,建议后面也是项目名,统一一下会没那么乱
- container是主项目中的挂载容器id
- routerBase是主项目下发到子项目,可以在子项目中获取的到,这个到时候在子应用的路由中需要用到,用于设置路由的base属性
4、主项目main.js加载qiankun配置并启动
 1 import Vue from 'vue'
 2 import App from './App.vue'
 3 import { registerMicroApps, start, setDefaultMountApp } from 'qiankun'
 4 import microApps from './micro-app'
 5
 6 Vue.config.productionTip = false
 7
 8 new Vue({
 9   render: h => h(App),
10 }).$mount('#app')
11
12 const config = {
13   beforeLoad: [
14       app => {
15           console.log("%c before load",
16           'background:#0f0 ; padding: 1px; border-radius: 3px;  color: #fff',
17           app);
18       }
19   ], // 挂载前回调
20   beforeMount: [
21       app => {
22           console.log("%c before mount",
23           'background:#f1f ; padding: 1px; border-radius: 3px;  color: #fff',
24           app);
25       }
26   ], // 挂载后回调
27   afterUnmount: [
28       app => {
29           console.log("%c after unload",
30           'background:#a7a ; padding: 1px; border-radius: 3px;  color: #fff',
31           app);
32       }
33   ] // 卸载后回调
34 }
35
36 registerMicroApps(microApps, config)
37 setDefaultMountApp(microApps[0].activeRoule) // 默认打开第一个子项目
38 start()
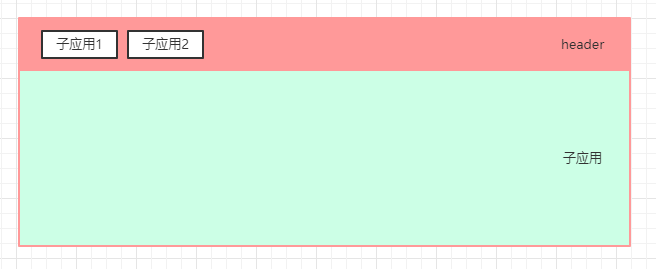
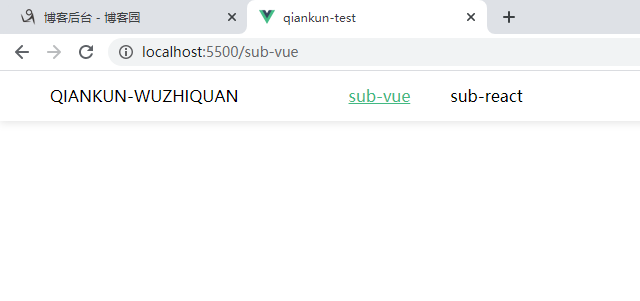
5、主项目公共菜单切换部分和容器部分
修改App.vue
 1 <template>
 2   <div id="app">
 3     <div class="layout-header">
 4       <div class="logo">QIANKUN-WUZHIQUAN</div>
 5       <ul class="sub-apps">
 6         <li v-for="item in microApps" :class="{active: item.activeRule === current}" :key="item.name" @click="goto(item)">{{ item.name }}</li>
 7       </ul>
 8     </div>
 9     <div id="subapp-viewport"></div>
10   </div>
11 </template>
12
13 <script>
14 import microApps from './micro-app'
15
16 export default {
17   name: 'App',
18   data () {
19     return {
20       microApps,
21       current: '/sub-vue'
22     }
23   },
24   methods: {
25     goto (item) {
26       console.log(item)
27       this.current = item.activeRule
28       history.pushState(null, item.activeRule, item.activeRule) // 没引入路由,所以不能用路由切换
29     },
30   },
31   created() {
32     const path = window.location.pathname
33     if (this.microApps.findIndex(item => item.activeRule === path) >= 0) {
34       this.current = path
35     }
36   },
37 }
38 </script>
39
40 <style>
41 html, body{
42   margin: 0 !important;
43   padding: 0;
44 }
45 .layout-header{
46   height: 50px;
47   width: 100%;
48   box-shadow: 0 2px 8px rgba(0, 0, 0, 0.1);
49   line-height: 50px;
50   position: relative;
51 }
52 .logo {
53   float: left;
54   margin: 0 50px;
55 }
56 .sub-apps {
57   list-style: none;
58   margin: 0;
59   overflow: hidden;
60 }
61 .sub-apps li{
62   list-style: none;
63   padding: 0 20px;
64   cursor: pointer;
65   float: left;
66 }
67 .sub-apps li.active {
68   color: #42b983;
69   text-decoration: underline;
70 }
71 </style>
6、启动主项目看看效果
cd mian && npm run serve
三、修改sub-vue子项目
子应用主要修改3个文件,一个是vue.config.js,一个是main.js,还有router下的index.js
1、vue.config.js
 1 const port = 5501;
 2 const { name } = require('../package.json')
 3 module.exports = {
 4   publicPath: "./",
 5   devServer: {
 6     port,
 7     headers: {
 8       'Access-Control-Allow-Origin': '*'
 9     }
10   },
11   configureWebpack: {
12     output: {
13       // 把子应用打包成 umd 库格式
14       library: `${name}-[name]`,
15       libraryTarget: 'umd',
16       jsonpFunction: `webpackJsonp_${name}`
17     }
18   }
19 };
- qiankun 是通过 fetch 去获取子应用注册时配置的静态资源url,所有静态资源必须是支持跨域的,那就得设置允许源了
- 涉及到子应用名称的,都统一使用package中的name字段,官方也是推荐使用的这个name
- 需要打包成umd格式,是为了让 qiankun 拿到子应用export 的生命周期函数
2、src/router/index.js改为只暴露routes,new Router改到main.js中声明
import Vue from "vue";
import VueRouter from "vue-router";
import Home from "../views/Home.vue";

Vue.use(VueRouter);

const routes = [
  {
    path: "/",
    name: "Home",
    component: Home
  },
  {
    path: "/about",
    name: "About",
    // route level code-splitting
    // this generates a separate chunk (about.[hash].js) for this route
    // which is lazy-loaded when the route is visited.
    component: () =>
      import(/* webpackChunkName: "about" */ "../views/About.vue")
  }
];

export default routes;
3、main.js
 1 import Vue from "vue";
 2 import App from "./App.vue";
 3 import routes from "./router";
 4 import store from "./store";
 5 import VueRouter from "vue-router";
 6
 7 Vue.config.productionTip = false;
 8
 9 let install = null;
10 function render(props = {}) {
11   const { container, routerBase } = props;
12   const router = new VueRouter({
13     base: window.__POWERED_BY_QIANKUN__ ? routerBase : process.env.BASE_URL,
14     mode: "history",
15     routes
16   });
17   install = new Vue({
18     router,
19     store,
20     render: h => h(App)
21   }).$mount(container ? container.querySelector("#app") : "#app");
22 }
23 if (window.__POWERED_BY_QIANKUN__) {
24   // eslint-disable-next-line
25   __webpack_public_path__ = window.__INJECTED_PUBLIC_PATH_BY_QIANKUN__;
26 } else {
27   render();
28 }
29
30 export async function bootstrap() {}
31
32 export async function mount(props) {
33   render(props);
34 }
35 export async function unmount() {
36   install.$destroy();
37   install.$el.innerHTML = ""; // 子项目内存泄露问题
38   install = null;
39 }
- 需要暴露qiankun的生命周期函数
- 注意销毁,防止内存泄漏
- 独立运行:window.__POWERED_BY_QIANKUN__为false,执行render创建vue对象;运行在qiankun: window.__POWERED_BY_QIANKUN__为true,会执行mount周期函数,在这里创建vue对象
- history模式下需要设置路由的base,值是子项目中的activeRule对应的值,在qiankun环境下使用。
4、下面拓展官网对声明周期的解释

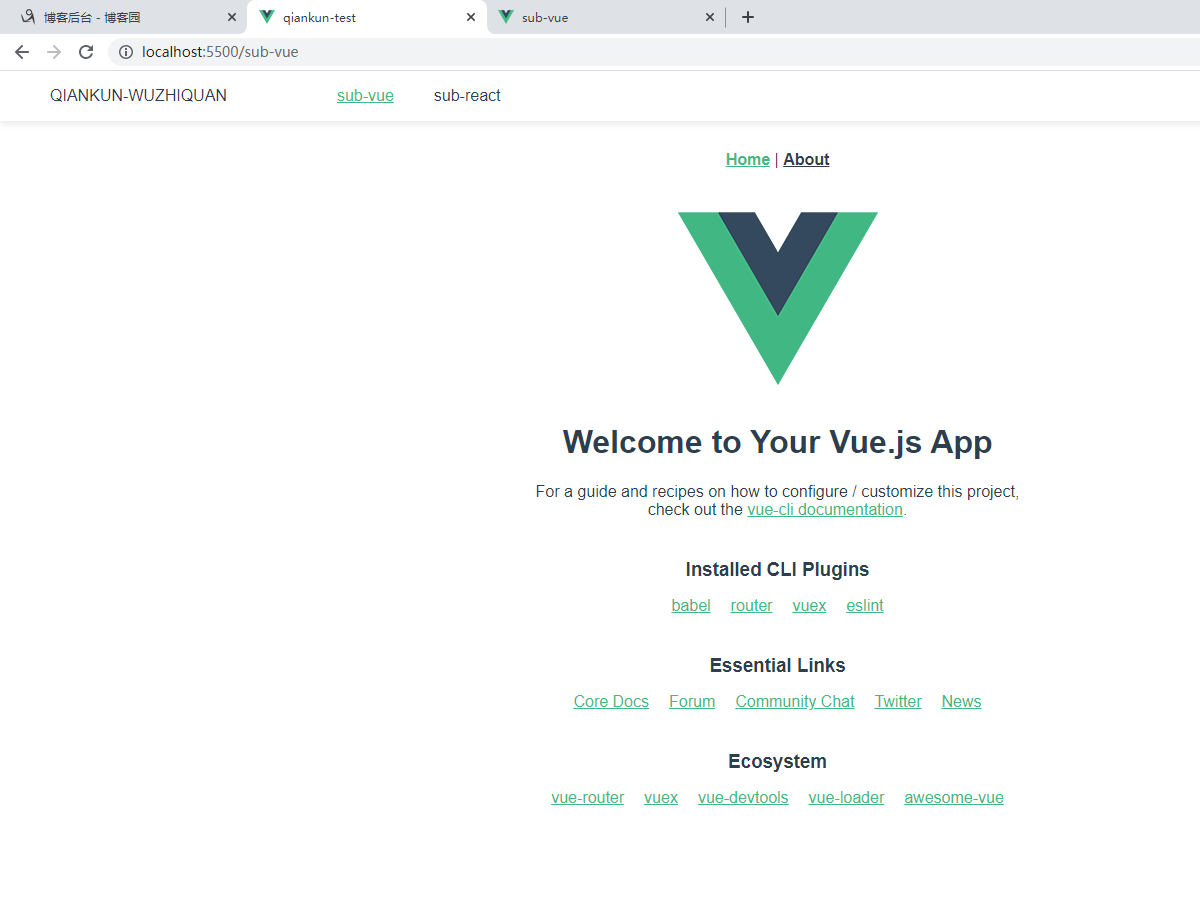
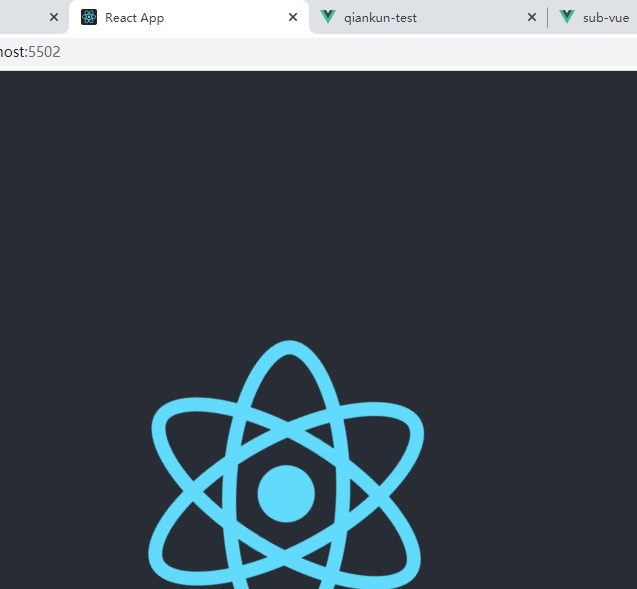
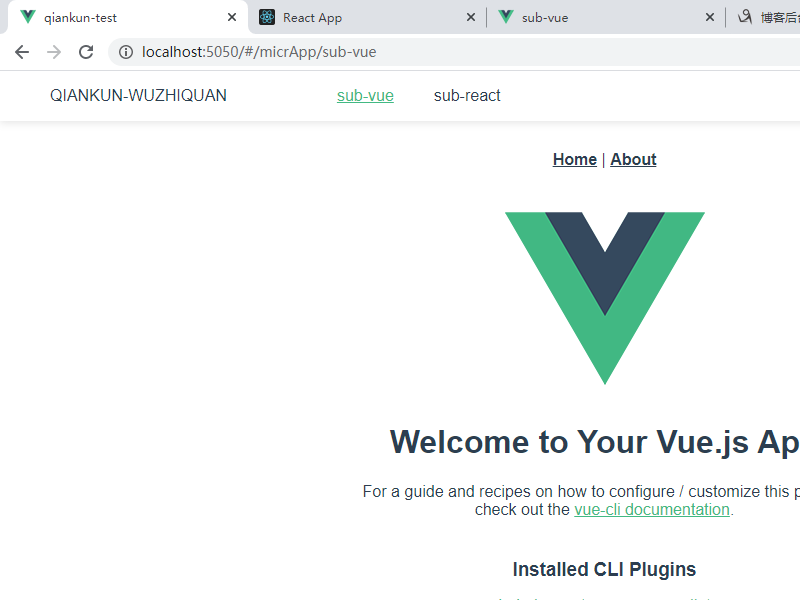
5、对此sub-vue对接完成,运行看看效果:
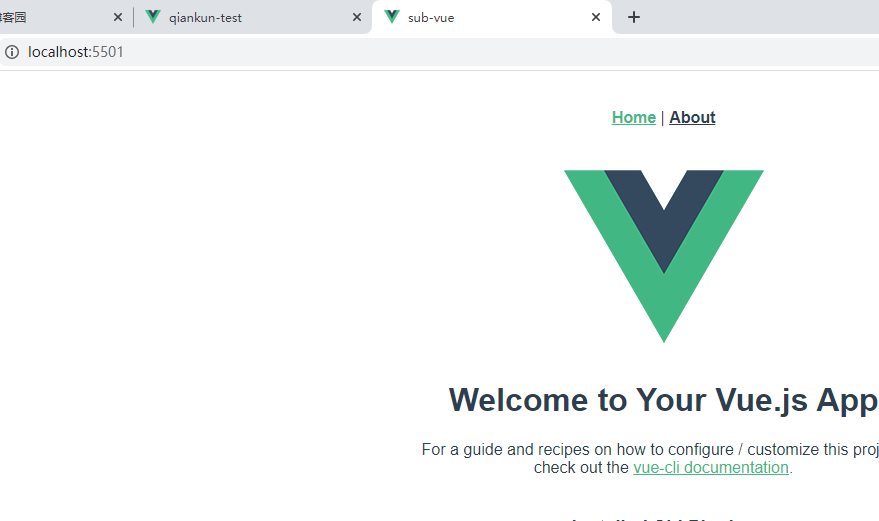
同时,已经可以在主项目中看得到挂载的sub-vue子项目
四、修改sub-recat
1、新增.env文件添加PORT变量,端口号与父应用配置的保持一致
.env.development
1 SKIP_PREFLIGHT_CHECK=true
2 PORT=5502
3 PUBLIC_URL=/
.env.production
1 PUBLIC_URL=/subapp/sub-react
2、为了不eject所有webpack配置,我们用react-app-rewired方案复写webpack就可以了。
npm install react-app-rewired --save-dev
3、使用react-app-rewired运行,修改package.json中的script
"scripts": {
    "start": "react-app-rewired start",
    "build": "react-app-rewired build",
    "test": "react-app-rewired test",
    "eject": "react-scripts eject"
  }
4、在sub-react下创建config-overrides.js文件
config-overrides.js
 1 const { name } = require('./package.json');
 2
 3 module.exports = {
 4   webpack: function override(config, env) {
 5     config.entry = config.entry.filter(
 6       (e) => !e.includes('webpackHotDevClient')
 7     );
 8
 9     config.output.library = `${name}-[name]`;
10     config.output.libraryTarget = 'umd';
11     config.output.jsonpFunction = `webpackJsonp_${name}`;
12     return config;
13   },
14   devServer: (configFunction) => {
15     return function (proxy, allowedHost) {
16       const config = configFunction(proxy, allowedHost);
17       config.open = false;
18       config.hot = false;
19       config.headers = {
20         'Access-Control-Allow-Origin': '*',
21       };
22       // Return your customised Webpack Development Server config.
23       return config;
24     };
25   },
26 };
注意:5-7行为了解决react子应用启动后,主应用第一次渲染后会挂掉的问题,原因是热更新引起的,所以需要在复写react的webpack时禁用掉热重载(加了下面配置禁用后会导致没法热重载,react应用在开发时得手动刷新了),见https://github.com/umijs/qiankun/issues/340
5、在src下面新建public-path.js
public-path.js
1 if (window.__POWERED_BY_QIANKUN__) {
2     // eslint-disable-next-line
3     __webpack_public_path__ = window.__INJECTED_PUBLIC_PATH_BY_QIANKUN__;
4     //__webpack_public_path__ = window.__INJECTED_PUBLIC_PATH_BY_QIANKUN__;
5 }
6、修改src下面的index.js
index.js
 1 import './public-path'
 2 import React from 'react';
 3 import ReactDOM from 'react-dom';
 4 import './index.css';
 5 import App from './App';
 6
 7 function render() {
 8   ReactDOM.render(
 9     <App />,
10     document.getElementById('root')
11   );
12 }
13
14 if (!window.__POWERED_BY_QIANKUN__) {
15   render();
16 }
17 /**
18  * bootstrap 只会在微应用初始化的时候调用一次,下次微应用重新进入时会直接调用 mount 钩子,不会再重复触发 bootstrap。
19  * 通常我们可以在这里做一些全局变量的初始化,比如不会在 unmount 阶段被销毁的应用级别的缓存等。
20  */
21 export async function bootstrap() {
22   console.log('react app bootstraped');
23 }
24 /**
25  * 应用每次进入都会调用 mount 方法,通常我们在这里触发应用的渲染方法
26  */
27 export async function mount(props) {
28   render();
29 }
30 /**
31  * 应用每次 切出/卸载 会调用的方法,通常在这里我们会卸载微应用的应用实例
32  */
33 export async function unmount() {
34   ReactDOM.unmountComponentAtNode(document.getElementById('root'));
35 }
36 /**
37  * 可选生命周期钩子,仅使用 loadMicroApp 方式加载微应用时生效
38  */
39 export async function update(props) {
40   console.log('update props', props);
41 }
7、一切就绪,我们运行一下看看:
但你满满信心以为能跑起来,结果却给你当头一棒,duang报错了!!!
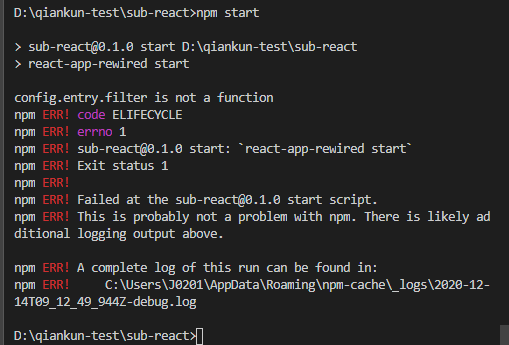
提示:config.entry.filter is not a function
找了半天,感觉应该是版本的问题,将sub-react项目package.json中react相关依赖的版本写成下面的之后,重新安装就可以跑起来了(建议删掉node_modules包后重新yarn install):
注意:修改了版本后App.js 要引入import React from 'react';
在主项目中查看:
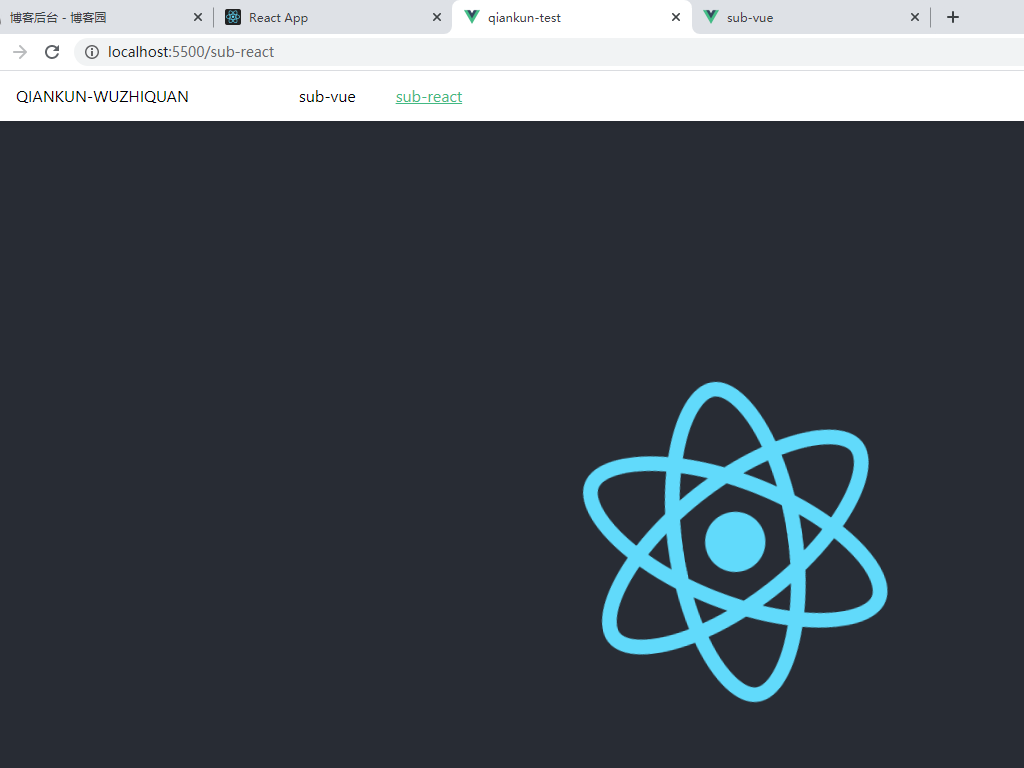
一切都对接完毕,以上是使用的history路由模式。下面介绍一下hash模式的改造
一、sub-vue项目调整
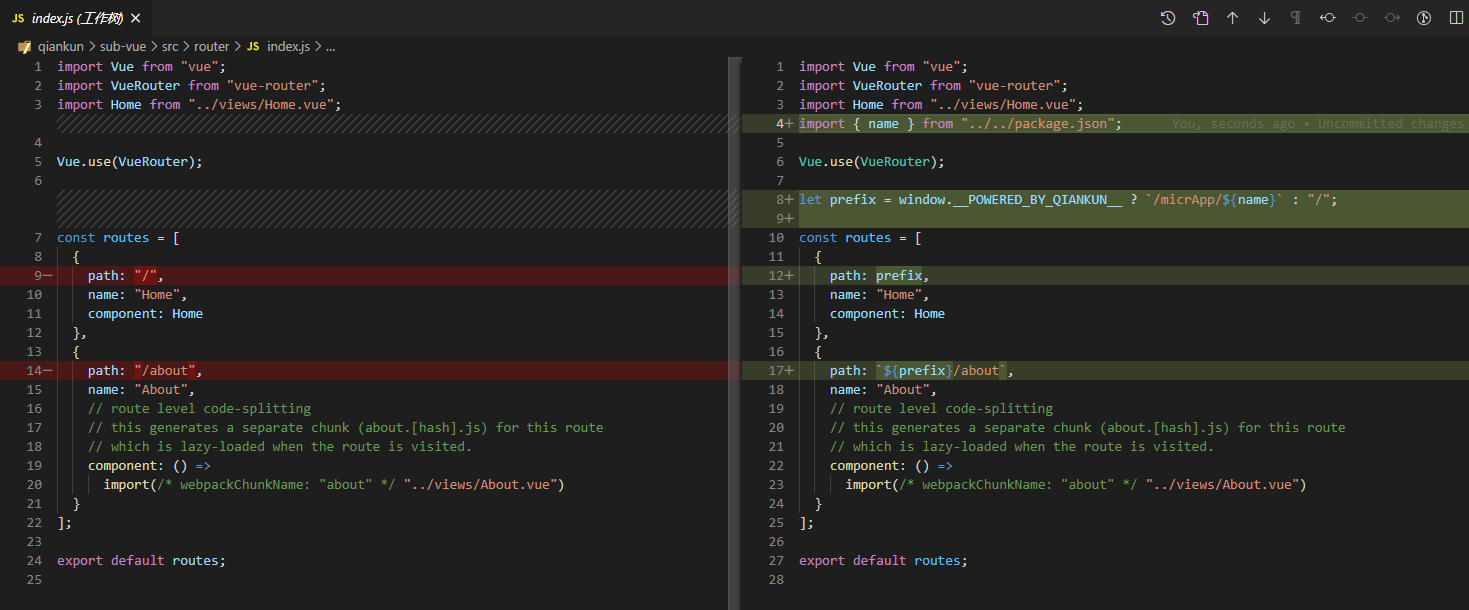
1、修改sub-vue项目路由方式,改为哈希路由,同时增加路由判断,当应用运行在qiankun里时,为所有路由和在路由跳转前为跳转路由path加上micrApp前缀
router/index.js
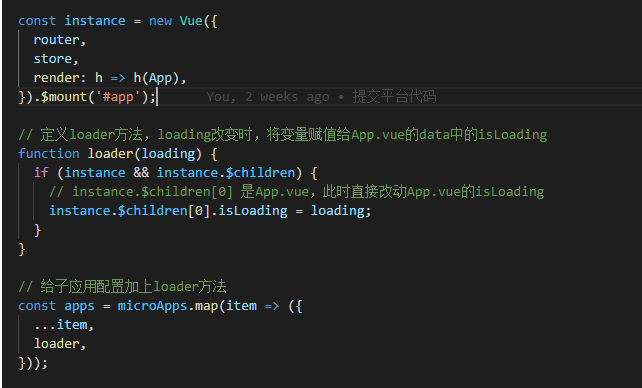
2、sub-vue子项目的main.js增加路由判断
main.js
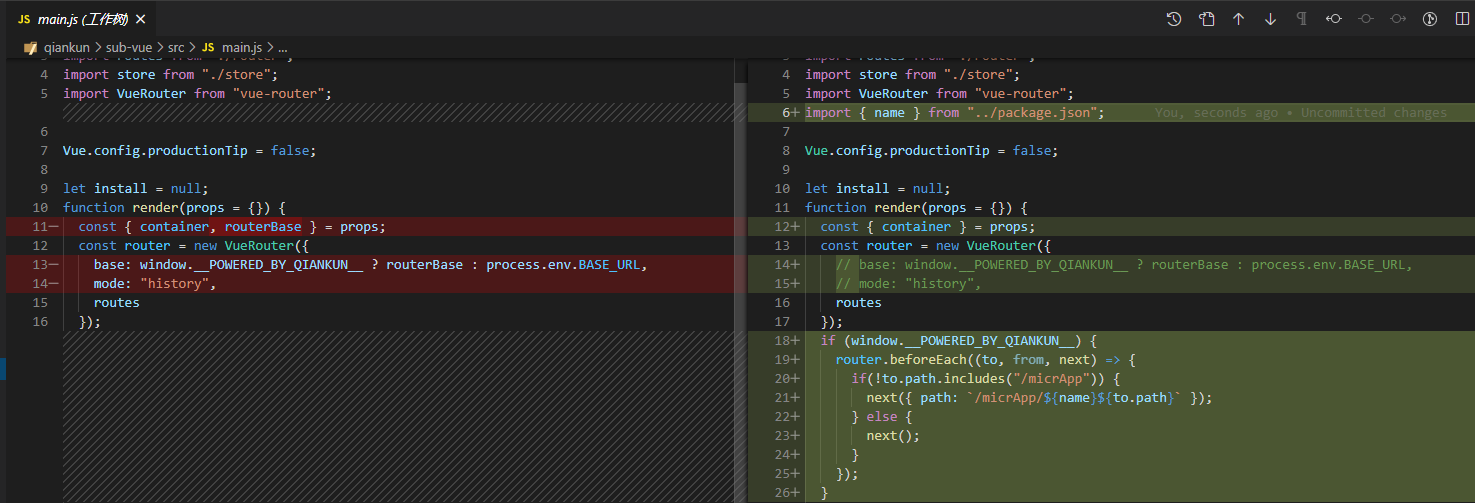
对于主项目和子项目都是hash模式的话,主项目和子项目会共同接管路由,所以需要在子项目的所有路由前加上这个前缀。举个例子:
-
/#/vue/home: 会加载vue子项目的home页面,但是其实,单独访问这个子项目的home页面的完整路由就是/#/vue/home -
/#/react/about: 会加载react子项目的about页面,同样,单独访问这个子项目的about页面的完整路由就是/#/react/about -
/#/about: 会加载主项目的about页面
二、main主项目调整
1、修改主项目注册子项目时的路由匹配规则和增加主应用路由
micro-app.js
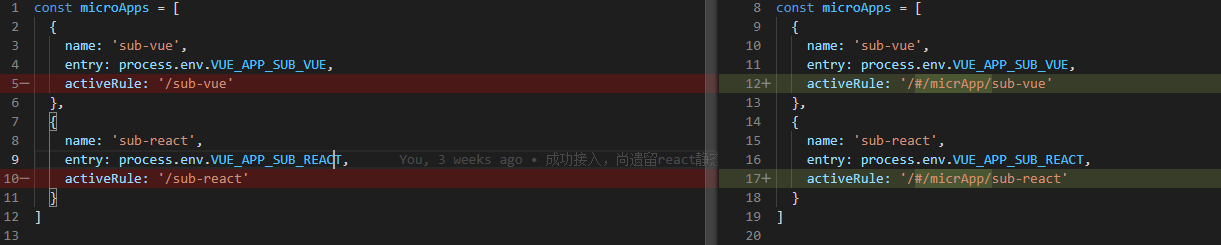
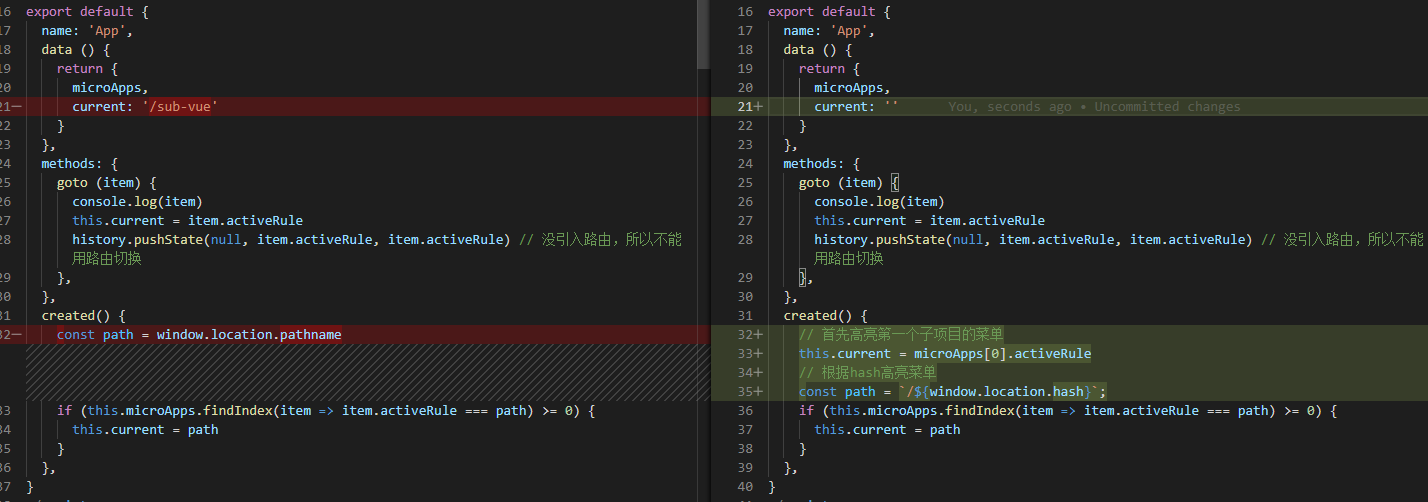
2、修改下App.vue页面的地址匹配规则,history匹配的是pathname,hash匹配hash
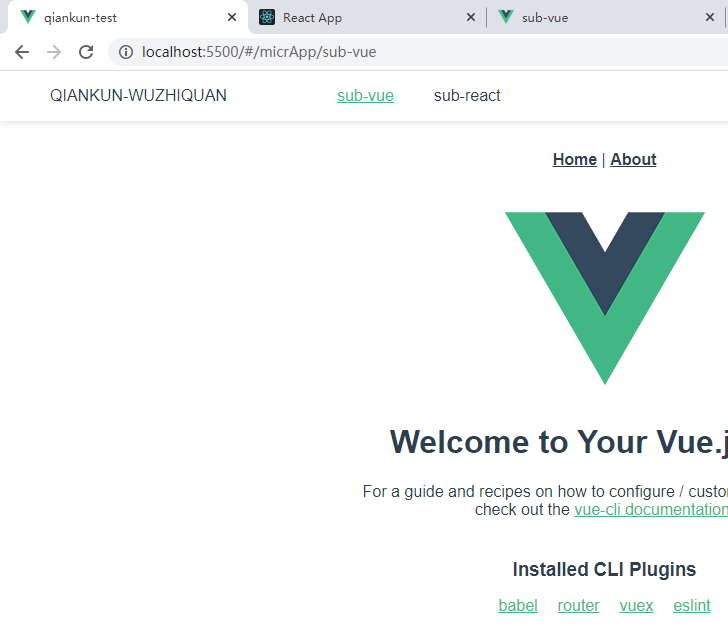
三、回到qiankun-test下面执行npm start全部运行看看效果
项目部署
我们在main项目的.env.production配置了线上地址是http://localhost:5050,子项目存放在subapp文件夹下面,我们分别对main、sub-vue和sub-react进行打包,回到qiankun-test执行npm run build即可
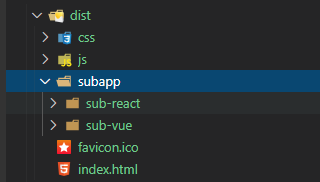
启动一个http://localhost:5050服务,将代码跑起来就好了:
也可以单独运行子应用:
http://localhost:5050/subapp/sub-react/
http://localhost:5050/subapp/sub-vue/#/
qiankun项目优化
一、解决IE11兼容性问题
安装以下
import 'whatwg-fetch';
import 'custom-event-polyfill';
import 'core-js/stable/promise';
import 'core-js/stable/symbol';
import 'core-js/stable/string/starts-with';
import 'core-js/web/url';
二、引入nprogress,子项目加载的时候,有进度条
主项目的main.js
主项目的App.vue

时间有限,没能接着讲下父子应用间的通讯,完整代码在我的github
地址:https://github.com/wuzhiquan/qiankun
simple-hash分支是hash模式
simple-history分支是history模式
complete是完整的代码,包括了父子间的状态通讯
感谢大家的star!


【推荐】国内首个AI IDE,深度理解中文开发场景,立即下载体验Trae
【推荐】编程新体验,更懂你的AI,立即体验豆包MarsCode编程助手
【推荐】抖音旗下AI助手豆包,你的智能百科全书,全免费不限次数
【推荐】轻量又高性能的 SSH 工具 IShell:AI 加持,快人一步
· Linux系列:如何用heaptrack跟踪.NET程序的非托管内存泄露
· 开发者必知的日志记录最佳实践
· SQL Server 2025 AI相关能力初探
· Linux系列:如何用 C#调用 C方法造成内存泄露
· AI与.NET技术实操系列(二):开始使用ML.NET
· 被坑几百块钱后,我竟然真的恢复了删除的微信聊天记录!
· 没有Manus邀请码?试试免邀请码的MGX或者开源的OpenManus吧
· 【自荐】一款简洁、开源的在线白板工具 Drawnix
· 园子的第一款AI主题卫衣上架——"HELLO! HOW CAN I ASSIST YOU TODAY
· Docker 太简单,K8s 太复杂?w7panel 让容器管理更轻松!