


import sys
import time

from threading import Thread

from PyQt5.QtWidgets import QApplication,QMainWindow
from submit import Ui_MainWindow

def click_success():
    t1 = Thread(target=sleep_30s)
    t1.start()
    print('30秒过去了')
    time.sleep(2)

def sleep_30s():
    time.sleep(5)
    print('休息5秒')

def click_print():
    print('启动成功')


if __name__=="__main__":
    app = QApplication(sys.argv)
    MainWindow = QMainWindow()
    ui = Ui_MainWindow()
    ui.setupUi(MainWindow)
    MainWindow.show()
    # 每一个功能一个线程
    ui.pushButton1.clicked.connect(click_success)
    ui.pushButton2.clicked.connect(click_print)
    sys.exit(app.exec_())
<?xml version="1.0" encoding="UTF-8"?>
<ui version="4.0">
 <class>MainWindow</class>
 <widget class="QMainWindow" name="MainWindow">
  <property name="geometry">
   <rect>
    <x>0</x>
    <y>0</y>
    <width>745</width>
    <height>476</height>
   </rect>
  </property>
  <property name="windowTitle">
   <string>MainWindow</string>
  </property>
  <property name="styleSheet">
   <string notr="true"/>
  </property>
  <property name="unifiedTitleAndToolBarOnMac">
   <bool>false</bool>
  </property>
  <widget class="QWidget" name="centralwidget">
   <layout class="QVBoxLayout" name="verticalLayout">
    <item>
     <layout class="QHBoxLayout" name="horizontalLayout">
      <property name="leftMargin">
       <number>0</number>
      </property>
      <property name="rightMargin">
       <number>0</number>
      </property>
      <item>
       <widget class="QDateEdit" name="startDateEdit">
        <property name="sizePolicy">
         <sizepolicy hsizetype="Minimum" vsizetype="Fixed">
          <horstretch>2</horstretch>
          <verstretch>0</verstretch>
         </sizepolicy>
        </property>
        <property name="dateTime">
         <datetime>
          <hour>0</hour>
          <minute>0</minute>
          <second>10</second>
          <year>2019</year>
          <month>1</month>
          <day>1</day>
         </datetime>
        </property>
       </widget>
      </item>
      <item>
       <widget class="QLabel" name="label">
        <property name="sizePolicy">
         <sizepolicy hsizetype="Minimum" vsizetype="Preferred">
          <horstretch>1</horstretch>
          <verstretch>0</verstretch>
         </sizepolicy>
        </property>
        <property name="text">
         <string>--</string>
        </property>
        <property name="alignment">
         <set>Qt::AlignCenter</set>
        </property>
       </widget>
      </item>
      <item>
       <widget class="QDateEdit" name="endDateEdit">
        <property name="sizePolicy">
         <sizepolicy hsizetype="Minimum" vsizetype="Fixed">
          <horstretch>2</horstretch>
          <verstretch>0</verstretch>
         </sizepolicy>
        </property>
        <property name="dateTime">
         <datetime>
          <hour>0</hour>
          <minute>0</minute>
          <second>0</second>
          <year>2019</year>
          <month>1</month>
          <day>14</day>
         </datetime>
        </property>
       </widget>
      </item>
     </layout>
    </item>
    <item>
     <layout class="QHBoxLayout" name="horizontalLayout_2">
      <item>
       <widget class="QPushButton" name="crawl">
        <property name="sizePolicy">
         <sizepolicy hsizetype="Minimum" vsizetype="Fixed">
          <horstretch>0</horstretch>
          <verstretch>0</verstretch>
         </sizepolicy>
        </property>
        <property name="text">
         <string>数据爬取</string>
        </property>
        <property name="myclass" stdset="0">
         <string>bar2btn</string>
        </property>
       </widget>
      </item>
      <item>
       <widget class="QPushButton" name="exportToExcel">
        <property name="text">
         <string>导入Excel</string>
        </property>
        <property name="myclass" stdset="0">
         <string>bar2btn</string>
        </property>
       </widget>
      </item>
      <item>
       <widget class="QPushButton" name="exportToDB">
        <property name="text">
         <string>导入数据库</string>
        </property>
        <property name="myclass" stdset="0">
         <string>bar2btn</string>
        </property>
       </widget>
      </item>
      <item>
       <widget class="QPushButton" name="analyze">
        <property name="text">
         <string>分析数据</string>
        </property>
        <property name="myclass" stdset="0">
         <string>bar2btn</string>
        </property>
       </widget>
      </item>
     </layout>
    </item>
    <item>
     <widget class="QTextEdit" name="textBrowser">
      <property name="acceptRichText">
       <bool>true</bool>
      </property>
      <property name="placeholderText">
       <string>你好,白月黑羽</string>
      </property>
     </widget>
    </item>
   </layout>
  </widget>
  <widget class="QMenuBar" name="menubar">
   <property name="geometry">
    <rect>
     <x>0</x>
     <y>0</y>
     <width>745</width>
     <height>23</height>
    </rect>
   </property>
  </widget>
  <widget class="QStatusBar" name="statusbar"/>
 </widget>
 <resources/>
 <connections/>
</ui>
传参
from functools import partial
ui.pushButton.clicked.connect(partial(convert, ui))
将ui文件转化成Python代码
pyuic5 -o xxx.py xxx.ui
在pycharm中配置pyuic5

program:    E:\python\env\python37\Scripts\pyuic5.exe   #pyuic5的路径
arguments:  $FileName$ -o $FileNameWithoutExtension$.py -x  #照填
working directory:    $FileDir$
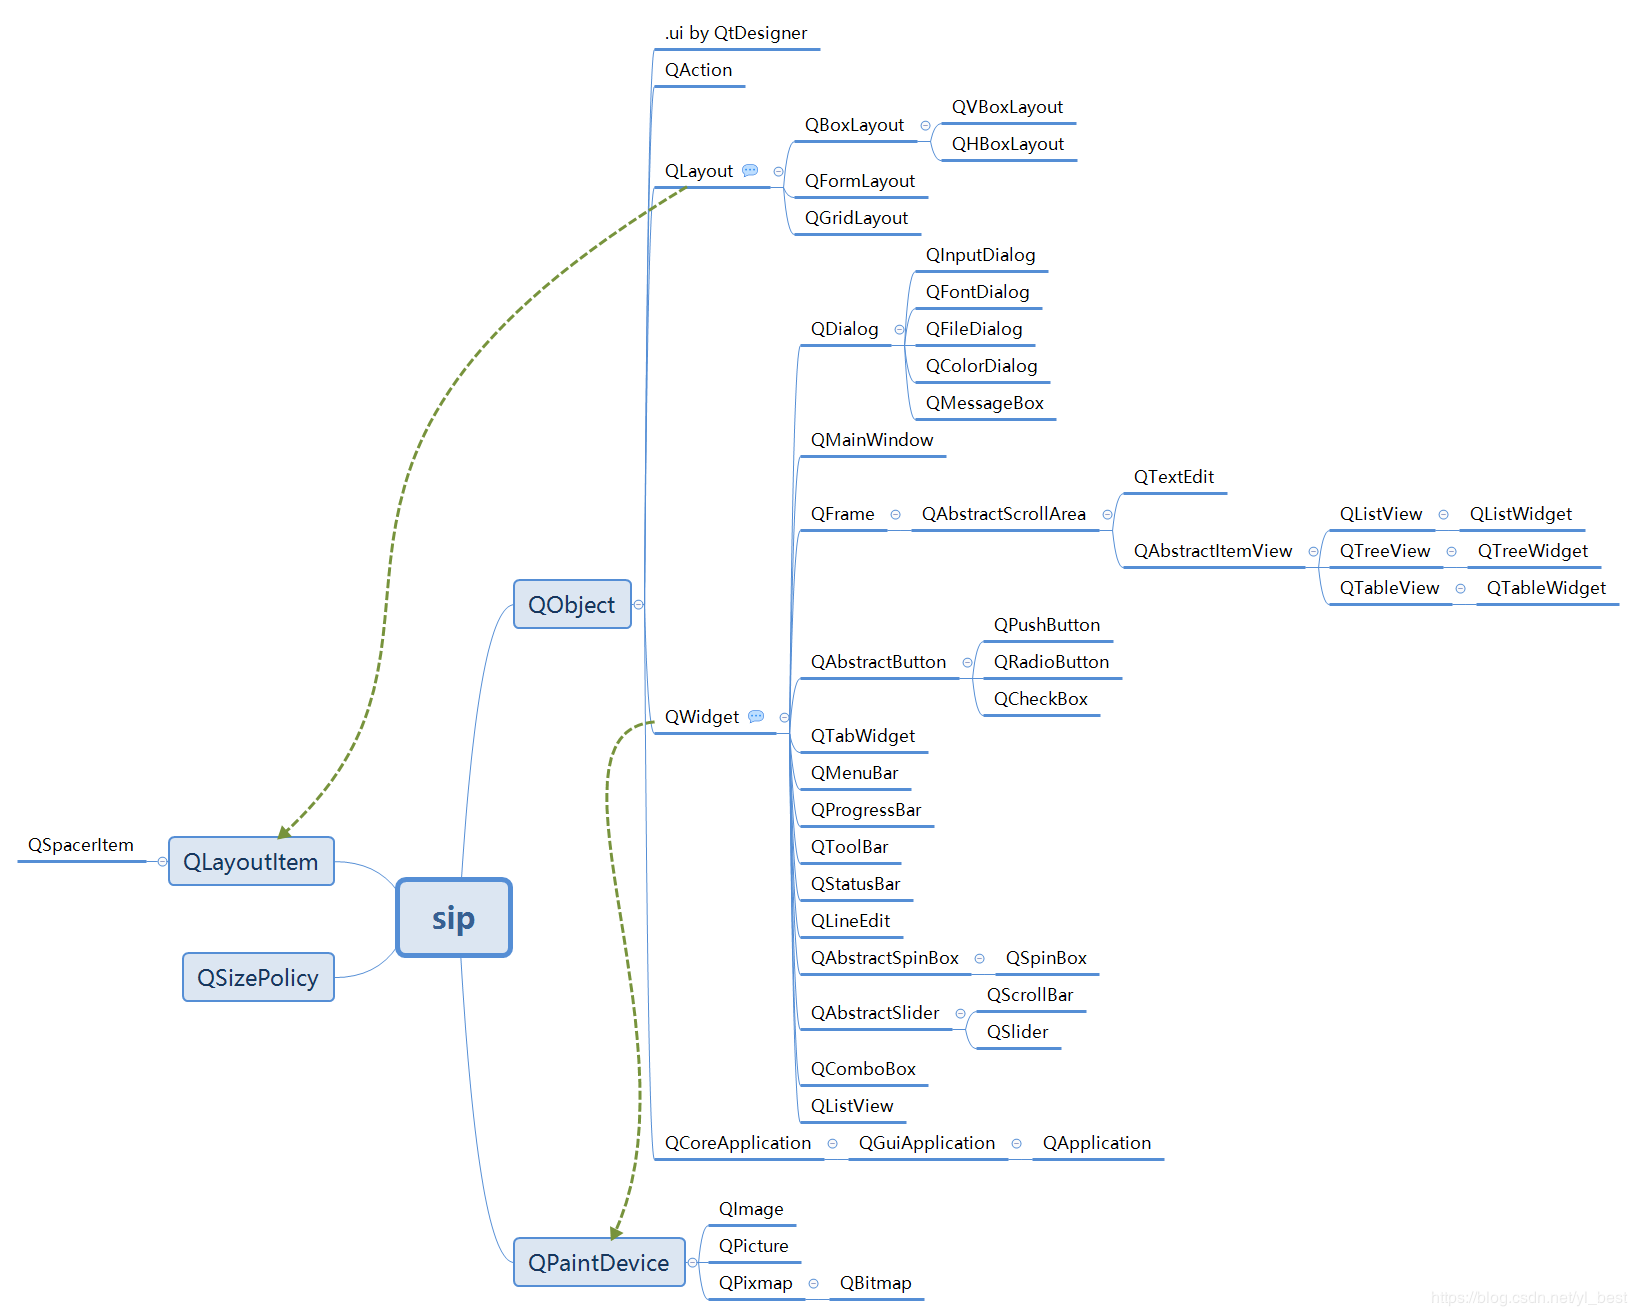
控件介绍和总结


主窗口类型

有三种窗口

QMainWindow

QWiget

QDialog


QMainWindow:可以包含菜单栏,工具栏和标题栏,是

最常见的窗口显示形式。

QDialog:是对话窗口的基类。没有菜单栏,工具栏,状态栏

QWiget:不确定窗口的用途,就用QWidget。

## QT中常用的控价

### 1、Qlabel控件

setAlignment()     设置文本的对齐方式

setIndent()           设置文本的缩进

text()                     获取文本

setBuddy()          设置伙伴关系

setText()              设置文本内容

selectedText()    返回所选择的字符

setWordWrap()  设置是否运行换行

#### QLabel常用的信号

1.当鼠标划过Qlabel控件时触发:linkHovered

2.当鼠标单击Qlabel控件时触发:linkActivated


#### QLabel与伙伴控件


### 2、QLineEdit控件与回显模式

基本功能:输入单行的文本

#### EchoMode(回显模式)

4种回显模式

1、Normal

2、NoEcho

3、Password

4、PasswordEchoOnEdit


#### QLineEdit控件的输入(校验器)

如限制只能输入整数,浮点数或者满足一定条件的字符串

#### 用掩码限制QLineEdit控件的输入

```pyth
用掩码限制QLineEdit控件的输入

A    ASCII字母字符是必须输入的(A-Z、a-z)
a    ASCII字母字符是允许输入的,但不是必需的(A-Z、a-z)
N    ASCII字母字符是必须输入的(A-Z、a-z、0-9)
n    ASII字母字符是允许输入的,但不是必需的(A-Z、a-z、0-9)
X    任何字符都是必须输入的
x    任何字符都是允许输入的,但不是必需的
9    ASCII数字字符是必须输入的(0-9)
0    ASCII数字字符是允许输入的,但不是必需的(0-9)
D    ASCII数字字符是必须输入的(1-9)
d    ASCII数字字符是允许输入的,但不是必需的(1-9)
#    ASCI数字字符或加减符号是允许输入的,但不是必需的
H    十六进制格式字符是必须输入的(A-F、a-f、0-9)
h    十六进制格式字符是允许输入的,但不是必需的(A-F、a-f、0-9)
B    二进制格式字符是必须输入的(0,1)
b    二进制格式字符是允许输入的,但不是必需的(0,1)
>    所有的字母字符都大写
<    所有的字母字符都小写
!    关闭大小写转换
\    使用"\"转义上面列出的字符
```

#### QLineEdit综合案例

### 3、QTextEdit控件

QLineEdit控件只支持单行输入,QTextEdit支持多行输入

1.setPlainText() #设置文本

2.setHtml()   #设置html格式

3.toPlainText() #

4.toHtml

### 4、按键控件

1.QPushButton

2.AToolButton

3.QRadioButton

4.QCheckBox

父类都是QAbstractButton
#### 单选控件 QReadioButton
一个布局中只能又一个单选框被选中
方法toggled相当于选中和取消选中。现在QPushButton的toggle的方法类似,按下不会弹起

#### 复选框控件 QCheckBox
三种状态:
1、为选中0
2、半选中1
3、选中2
stateChanged 是状态变化,点击时触发
setTristate 是半选中状态
ischecked() 是查看是否选中:True 、False
ischeckState() 查看选中的状态:0、1、2
setchecked(True) 设置是否选择
setcheckState()  设置选择的状态
#自己编写的QT主界面,使用类的方式 import sys, math from functools import partial import time from PyQt5.QtWidgets import QDesktopWidget, QMainWindow, QApplication,\ QPushButton, QHBoxLayout, QVBoxLayout, QGridLayout,QFormLayout, QWidget, \ QToolTip, QLabel, QLineEdit, QTextEdit, QRadioButton, QCheckBox, QComboBox, \ QSlider, QSpinBox, QDialog, QMessageBox, QFontDialog, QColorDialog, QFileDialog from PyQt5.QtGui import QIcon, QFont, QPalette, QPixmap, QIntValidator,\ QDoubleValidator, QRegExpValidator, QPainter, QColor, QPen from PyQt5.QtCore import Qt, QRect, QRegExp, QDir class Ui_MainWin(QMainWindow): def __init__(self): super().__init__() #设置主窗口的标题 self.setWindowTitle('窗口的标题') #设置窗口的尺寸 self.resize(400, 300) #窗口出现的位置 #1.自定义出现在中心位置 self.center() #2.设置位置为(800,300) # self.move(800,300) #设置状态栏 # self.status_hurdle() #窗口的setWindowIcon方法用于设置窗口的图标和应用程序的图标,在苹果机不可用 #QAplication中的setWindowIcon方法用户设置主窗口的图标和应用程序的图标 self.setWindowIcon(QIcon('images/cartoon1.ico')) #设置按键 # self.button_model() # QLabel控件 # self.qlabel() #QLabel与伙伴控件 # self.qlabel_partner() #QLineEdit回显模式 # self.qline_edit() #QLineEedit校验器 # self.qline_edit_validator() #QlineEedit掩码 # self.qline_edit_mask() #QlineEdit总的应用 # self.qline_edit_demo() #QTextEdit控件的使用 # self.qtext_edit() #QPushButton的综合使用 # self.qpush_button_demo() #单选框 # self.qradio_button() #复选框 # self.qcheck_box() #下拉列表的控件 # self.qcombobox() #滑动控件 # self.qslider_demo() #计数器控件 # self.qspinbox_demo() #对话框,QDialog控件 # self.qdialog_demo() #消息对话框,QMessageBox # self.qmessagebox_demo() #字体对话框 # self.qfontdialog_demo() #颜色对话框 # self.qcolordialog_demo() #文件对话框QFileDialog # self.qfiledialog() #绘制文本 self.text = "Python从菜鸟到高手" #设置窗口在屏幕的中心 def center(self): #获取屏幕坐标系 screen = QDesktopWidget().screenGeometry() #获取窗口的坐标系 size = self.geometry() newLeft = (screen.width()-size.width())/2 newTop = (screen.height()-size.height())/2 self.move(newLeft, newTop) def status_hurdle(self): # 设置状态栏 self.status = self.statusBar() self.status.showMessage('只存在5秒的消息', 5000) #设置按键 def button_model(self): # 设置按键 self.button1 = QPushButton("退出") # 给按键绑定提示信息 QToolTip.setFont(QFont("SanSerif", 12)) self.button1.setToolTip('<b>按下就退出了</b>') # 将信号与槽绑定 self.button1.clicked.connect(self.onClick_Button) # 添加布局 layout = QHBoxLayout(self) layout.addWidget(self.button1) # 总的组件,添加的所有组件全部都要放在这个里面 mainFrame = QWidget() # 把布局添加总的组件内 mainFrame.setLayout(layout) # 最后把总的组件放在整个窗口上 self.setCentralWidget(mainFrame) ''' # 创建按键的第二种方式 self.button2 = QPushButton(mainFrame) self.button2.setText('按键的第二种方式') self.button2.clicked.connect(self.onClick_Button) self.button2.move(25, 52) # 最后把总的组件放在整个窗口上 self.setCentralWidget(mainFrame) ''' # 按键单击事件的方法(自定义槽) def onClick_Button(self): sender = self.sender() print(sender.text() + '按键被按下') app = QApplication.instance() # 退出 app.quit() def qlabel(self): ''' 这个label组件不需要加入总的组件中去,直接可以调用 :return: ''' label1 = QLabel(self) label2 = QLabel(self) label3 = QLabel(self) label4 = QLabel(self) label1.setText("<font color=yellow>这是一个文本标签.</font>") #开启背景颜色 label1.setAutoFillBackground(True) palette = QPalette() #调色板 palette.setColor(QPalette.Window, Qt.blue) #选中蓝色 label1.setPalette(palette) #设置背景颜色 label1.setAlignment(Qt.AlignCenter) #中心对齐 label1.setGeometry(QRect(230, 242, 151, 20)) label2.setText("<a href='#'>欢迎使用Python GUI程序</a>") label2.setGeometry(QRect(210, 210, 151, 20)) label3.setAlignment(Qt.AlignCenter) label3.setToolTip("这是一个图片标签") label3.setPixmap(QPixmap("./images/python.jpg")) label3.setGeometry(QRect(0, 0, 200, 200)) #如果设置为True,用浏览器打开网页,如果设置False,如果调用了槽,就执行槽,二选择一 label4.setOpenExternalLinks(True) label4.setText("<a href='https://www.baidu.com'>百度首页</a>") label4.setAlignment(Qt.AlignRight) label4.setToolTip('这是一个超链接') #加入垂直布局中 vbox = QVBoxLayout() vbox.addWidget(label1) vbox.addWidget(label2) vbox.addWidget(label3) vbox.addWidget(label4) #绑定槽 label2.linkHovered.connect(self.linkHovered) label4.linkActivated.connect(self.linkCilcked) # 加入layout中 self.setLayout(vbox) def linkHovered(self): print('当鼠标滑动过label2标签时,触发事件') def linkCilcked(self): print("当鼠标单击label4标签时,触发事件") #Qlabel与伙伴控件 def qlabel_partner(self): nameLabel = QLabel('&Nmae', self) nameLineEdit = QLineEdit(self) #设置伙伴控件 nameLabel.setBuddy(nameLineEdit) passwordLabel = QLabel('&Password', self) passwordLineEdit = QLineEdit(self) #设置伙伴控件 passwordLabel.setBuddy(passwordLineEdit) btnOK = QPushButton('&OK') btnCancel = QPushButton('&Cancel') #栅格布局 mainLayout = QGridLayout(self) mainLayout.addWidget(nameLabel, 0, 0) mainLayout.addWidget(nameLineEdit, 0, 1, 1, 1) mainLayout.addWidget(passwordLabel, 1, 0) mainLayout.addWidget(passwordLineEdit, 1, 1, 1, 1) mainLayout.addWidget(btnOK, 2, 0, 1, 1) mainLayout.addWidget(btnCancel, 2, 1, 1, 1) mainLayout.setGeometry(QRect(0, 0, 300, 300)) mainFrame = QWidget() # 把布局添加总的组件内 mainFrame.setLayout(mainLayout) # 最后把总的组件放在整个窗口上 self.setCentralWidget(mainFrame) #QLineEdit回显模式 def qline_edit(self): line_edit1 = QLineEdit() line_edit2 = QLineEdit() line_edit3 = QLineEdit() line_edit4 = QLineEdit() #form布局 formLayout = QFormLayout() formLayout.addRow("Normal", line_edit1) formLayout.addRow("NoEcho", line_edit2) formLayout.addRow("Password", line_edit3) formLayout.addRow("PasswordEchoOnEdit", line_edit4) #palcehodertext line_edit1.setPlaceholderText("Normal") line_edit2.setPlaceholderText("NoEcho") line_edit3.setPlaceholderText("Password") line_edit4.setPlaceholderText("PasswordEchoOnEdit") # QLineEdit的四种模式 line_edit1.setEchoMode(QLineEdit.Normal) line_edit2.setEchoMode(QLineEdit.NoEcho) line_edit3.setEchoMode(QLineEdit.Password) line_edit4.setEchoMode(QLineEdit.PasswordEchoOnEdit) #设置出现的位置和大小 formLayout.setGeometry(QRect(0, 0, 300, 300)) mainFrame = QWidget() # 把布局添加总的组件内 mainFrame.setLayout(formLayout) # 最后把总的组件放在整个窗口上 self.setCentralWidget(mainFrame) #QLineEdit校验器 def qline_edit_validator(self): line_edit1 = QLineEdit() line_edit2 = QLineEdit() line_edit3 = QLineEdit() #创建form类表单 formlayout = QFormLayout() formlayout.addRow('整数类型', line_edit1) formlayout.addRow('浮点类型', line_edit2) formlayout.addRow('数字和字母', line_edit3) #palceholderText line_edit1.setPlaceholderText('整型') line_edit2.setPlaceholderText('浮点型') line_edit3.setPlaceholderText('字母和数字') #整数校验器[1,99] intvalidator = QIntValidator(self) intvalidator.setRange(1, 99) #浮点校验器[-360,360],精度,小数点后2位 douleValidator = QDoubleValidator(self) douleValidator.setRange(-360, 360) douleValidator.setNotation(QDoubleValidator.StandardNotation) #设置精度,小数点2位 douleValidator.setDecimals(2) #字符串和数字 reg = QRegExp("[a-zA-Z0-9]+$") validator = QRegExpValidator(self) validator.setRegExp(reg) #设置校验器 line_edit1.setValidator(intvalidator) line_edit2.setValidator(douleValidator) line_edit3.setValidator(validator) mainFrame = QWidget() # 把布局添加总的组件内 mainFrame.setLayout(formlayout) # 最后把总的组件放在整个窗口上 self.setCentralWidget(mainFrame) #QLineEdit掩码 def qline_edit_mask(self): line_edit1 = QLineEdit() line_edit2 = QLineEdit() line_edit3 = QLineEdit() line_edit4 = QLineEdit() #192.168.21.45 line_edit1.setInputMask('0000.0000.000.0000;_') #mask line_edit2.setInputMask('HH:HH:HH:HH;_') #日期 line_edit3.setInputMask('0000-00-00') #字母全部为大写 line_edit4.setInputMask('>AAAA-AAAA-AAAA-AAAA;#') # form布局 formlayout = QFormLayout() formlayout.addRow('IP', line_edit1) formlayout.addRow('MASK', line_edit2) formlayout.addRow('日期', line_edit3) formlayout.addRow('许可证', line_edit4) mainFrame = QWidget() # 把布局添加总的组件内 mainFrame.setLayout(formlayout) # 最后把总的组件放在整个窗口上 self.setCentralWidget(mainFrame) #QLineEdit 综合模式 def qline_edit_demo(self): #校验器 line_edit1 = QLineEdit(self) line_edit1.setValidator(QIntValidator()) line_edit1.setMaxLength(4) #不超过9999 line_edit1.setAlignment(Qt.AlignRight) #有对齐 line_edit1.setFont(QFont('Arial', 20)) #设置字体 #掩码 line_edit2 = QLineEdit(self) line_edit2.setInputMask('99_9999_999999;#') line_edit3 = QLineEdit(self) line_edit3.setValidator(QDoubleValidator(0.99,99.99,2)) line_edit4 = QLineEdit(self) line_edit4.textChanged.connect(self.textChanged) #内容改变的时候触发 line_edit5 = QLineEdit(self) line_edit5.setEchoMode(QLineEdit.Password) line_edit5.editingFinished.connect(self.enterPress) #按下Enter键时触发 line_edit6 = QLineEdit('Hello PyQt5') line_edit6.setReadOnly(True) #设置为只读模式 formlayout = QFormLayout() formlayout.addRow('整数校验', line_edit1) formlayout.addRow('浮点数校验', line_edit2) formlayout.addRow('Input Mask', line_edit3) formlayout.addRow('文本变化', line_edit4) formlayout.addRow('密码', line_edit5) formlayout.addRow('只读', line_edit6) mainFrame = QWidget() # 把布局添加总的组件内 mainFrame.setLayout(formlayout) # 最后把总的组件放在整个窗口上 self.setCentralWidget(mainFrame) def textChanged(self, text): print('输入的内容:' + text) def enterPress(self): print('已输入值') #QTextEdit控件 def qtext_edit(self): self.text_edit1 = QTextEdit(self) button1 = QPushButton('显示文本') button2 = QPushButton('显示HTML') button3 = QPushButton('获取文本') button4 = QPushButton('获取HTML') layout = QVBoxLayout() layout.addWidget(self.text_edit1) layout.addWidget(button1) layout.addWidget(button2) layout.addWidget(button3) layout.addWidget(button4) button1.clicked.connect(self.onclick_buttontext) button2.clicked.connect(self.onclick_buttonhtml) button3.clicked.connect(self.onclick_buttongotext) button4.clicked.connect(self.onclick_buttongohtml) mainFrame = QWidget() # 把布局添加总的组件内 mainFrame.setLayout(layout) # 最后把总的组件放在整个窗口上 self.setCentralWidget(mainFrame) def onclick_buttontext(self): self.text_edit1.setPlainText('Hello World, 世界\n\n') def onclick_buttonhtml(self): self.text_edit1.setHtml('<font color=blue size-5>Hello World, 世界</font>\n\n') def onclick_buttongotext(self): print(self.text_edit1.toPlainText()) def onclick_buttongohtml(self): print(self.text_edit1.toHtml()) #qpushbutton的综合应用 def qpush_button_demo(self): layout = QVBoxLayout() self.button_demo1 = QPushButton('第一个按键') self.button_demo1.setText('First Button1') #第一个按键文本不生效 #下面两个是使按键按下不会弹起和qreadiobutton类似 self.button_demo1.setCheckable(True) self.button_demo1.toggle() #槽带参数的第二种方法 # self.button_demo1.clicked.connect(lambda: self.whichBUtton(self.button_demo1)) #槽带参数的第一种方法 self.button_demo1.clicked.connect(partial(self.whichButton, self.button_demo1)) #按键绑定第二个槽 self.button_demo1.clicked.connect(self.buttonState) layout.addWidget(self.button_demo1) self.button_demo2 = QPushButton('图像按键') self.button_demo2.setIcon(QIcon(QPixmap('images/right3.png'))) self.button_demo2.clicked.connect(lambda: self.whichButton(self.button_demo2)) layout.addWidget(self.button_demo2) self.button_demo3 = QPushButton('不可用按键') #状态为False表示不可点击 self.button_demo3.setEnabled(False) layout.addWidget(self.button_demo3) self.button_demo4 = QPushButton('&MyButton') #单按Enter点击的是默认按键 self.button_demo4.setDefault(True) self.button_demo4.clicked.connect(lambda: self.whichButton(self.button_demo4)) layout.addWidget(self.button_demo4) mainFrame = QWidget() # 把布局添加总的组件内 mainFrame.setLayout(layout) # 最后把总的组件放在整个窗口上 self.setCentralWidget(mainFrame) def whichButton(self, btn): print('被单击的按钮是<' + btn.text() + '>') def buttonState(self): if self.button_demo1.isChecked(): print('按钮1已经被选中') else: print('按钮1未被选中') #单选框,QRadioButton def qradio_button(self): #一个布局中只能又一被选中 layout = QHBoxLayout() radio_button1 = QRadioButton('单选按钮1') radio_button1.setCheckable(True) radio_button1.toggled.connect(self.qradio_buttonstate) layout.addWidget(radio_button1) radio_button2 = QRadioButton('单选按钮2') radio_button2.toggled.connect(self.qradio_buttonstate) layout.addWidget(radio_button2) mainFrame = QWidget() # 把布局添加总的组件内 mainFrame.setLayout(layout) # 最后把总的组件放在整个窗口上 self.setCentralWidget(mainFrame) #单选按钮信号绑定的槽 def qradio_buttonstate(self): #信号的发送者,相当于按键本身 radiobutton = self.sender() if radiobutton.isChecked() == True: print('<' + radiobutton.text() + '> 被选中') else: print('<' + radiobutton.text() + '> 被取消选中状态' ) #复选框 def qcheck_box(self): layout = QHBoxLayout() self.check_box1 = QCheckBox('复选框1') #设置为选中的状态 self.check_box1.setChecked(True) #改变选中状态的时候触发这个方法 self.check_box1.stateChanged.connect(partial(self.check_boxstate, self.check_box1)) layout.addWidget(self.check_box1) self.check_box2 = QCheckBox('复选框2') self.check_box2.stateChanged.connect(partial(self.check_boxstate, self.check_box2)) layout.addWidget(self.check_box2) self.check_box3 = QCheckBox('半选中') self.check_box3.stateChanged.connect(partial(self.check_boxstate, self.check_box3)) #设置复选框状态可以为是半选的状态 self.check_box3.setTristate(True) self.check_box3.setCheckState(Qt.PartiallyChecked) layout.addWidget(self.check_box3) mainFrame = QWidget() # 把布局添加总的组件内 mainFrame.setLayout(layout) # 最后把总的组件放在整个窗口上 self.setCentralWidget(mainFrame) #复选框绑定的槽 def check_boxstate(self, cb): print(cb.text() + ', isChecked= ' + str(cb.isChecked()) + ',checkState=' + str(cb.checkState())) #下拉列表 def qcombobox(self): layout = QVBoxLayout() self.combo_label = QLabel('请选择编程语言') self.combobox = QComboBox() self.combobox.addItem('c++') self.combobox.addItem('python') self.combobox.addItems(['java', 'C', 'Ruby']) #当QComboBox的索引发生变化的时候触发此方法, self.combobox.currentIndexChanged.connect(self.combox_selectionchange) layout.addWidget(self.combo_label) layout.addWidget(self.combobox) mainFrame = QWidget() # 把布局添加总的组件内 mainFrame.setLayout(layout) # 最后把总的组件放在整个窗口上 self.setCentralWidget(mainFrame) #下拉列表的槽 def combox_selectionchange(self, i): self.combo_label.setText(self.combobox.currentText()) #根据文本自动调节大小 self.combo_label.adjustSize() for count in range(self.combobox.count()): #当前索引的文本 print('item ' + str(count) + '=' + self.combobox.itemText(count)) #当前显示的文本 print('current index',i, 'selection changed', self.combobox.currentText()) #滑块控件 def qslider_demo(self): layout = QVBoxLayout() self.slider_label = QLabel('你好 PyQt5') self.slider_label.setAlignment(Qt.AlignHCenter) layout.addWidget(self.slider_label) #滑块水平 self.slider = QSlider(Qt.Horizontal) #设置最小值 self.slider.setMinimum(12) self.slider.setMaximum(48) #步长 self.slider.setSingleStep(3) #设置当前值 self.slider.setValue(18) #设置刻度的位置,刻度在下方 self.slider.setTickPosition(QSlider.TicksBelow) #设置刻度的间隔 self.slider.setTickInterval(6) #设置信号,绑定槽,当滑块的值发生变化时触发 self.slider.valueChanged.connect(self.qlider_valuechange) layout.addWidget(self.slider) #垂直布局 self.slider1 = QSlider(Qt.Vertical) layout.addWidget(self.slider1) # 设置最小值 self.slider1.setMinimum(10) # 设置最大值 self.slider1.setMaximum(60) # 步长 self.slider1.setSingleStep(5) # 设置当前值 self.slider1.setValue(30) # 设置刻度的位置,刻度在下方 self.slider1.setTickPosition(QSlider.TicksLeft) # 设置刻度的间隔 self.slider1.setTickInterval(2) self.slider1.valueChanged.connect(self.qlider_valuechange) self.setLayout(layout) mainFrame = QWidget() # 把布局添加总的组件内 mainFrame.setLayout(layout) # 最后把总的组件放在整个窗口上 self.setCentralWidget(mainFrame) #滑动槽位 def qlider_valuechange(self): #使用sender()来接受信号 print('当前值:%s' % self.sender().value()) value = self.sender().value() self.slider_label.setFont(QFont('Arial', value)) #计数器控件 def qspinbox_demo(self): layout = QVBoxLayout() self.spinbox_label = QLabel('当前值') self.spinbox_label.setAlignment(Qt.AlignCenter) layout.addWidget(self.spinbox_label) self.spinbox = QSpinBox() #设置初始值 self.spinbox.setValue(18) #设置范围 self.spinbox.setRange(10, 38) #设置步调 self.spinbox.setSingleStep(3) #计数器控件的值发生变化时触发此信号 self.spinbox.valueChanged.connect(self.spinbox_valuechange) layout.addWidget(self.spinbox) mainFrame = QWidget() # 把布局添加总的组件内 mainFrame.setLayout(layout) # 最后把总的组件放在整个窗口上 self.setCentralWidget(mainFrame) def spinbox_valuechange(self): self.spinbox_label.setText('当前值:' + str(self.spinbox.value())) # 对话框控件QDialog def qdialog_demo(self): #加self和不加self的区别,加self相当于是把QMina主窗口传入button中, # 后面就不需要在加入到主窗口中,和下面的在dialog中加按键类似 self.dialog_button = QPushButton('弹出对话框', self) self.dialog_button.move(50, 50) self.dialog_button.clicked.connect(self.dialog_showdialog) #对话框QDialog的槽 def dialog_showdialog(self): dialog = QDialog() #这样创建直接按键传到对话框的主控件上,后边不需要再加 button = QPushButton('确定', dialog) button.move(50, 50) #设置对话框的标题 dialog.setWindowTitle('对话框') #设置只有关闭此操作时候才能继续操作其他的控件 dialog.setWindowModality(Qt.ApplicationModal) dialog.exec_() #消息对话框控件QMessageBox def qmessagebox_demo(self): layout = QVBoxLayout() self.messagebox_button1 = QPushButton('关于对话框') self.messagebox_button1.clicked.connect(self.message_show) layout.addWidget(self.messagebox_button1) self.messagebox_button2 = QPushButton('消息对话框') self.messagebox_button2.clicked.connect(self.message_show) layout.addWidget(self.messagebox_button2) self.messagebox_button3 = QPushButton('警告对话框') self.messagebox_button3.clicked.connect(self.message_show) layout.addWidget(self.messagebox_button3) self.messagebox_button4 = QPushButton('错误对话框') self.messagebox_button4.clicked.connect(self.message_show) layout.addWidget(self.messagebox_button4) self.messagebox_button5 = QPushButton('提问对话框') self.messagebox_button5.clicked.connect(self.message_show) layout.addWidget(self.messagebox_button5) mainFrame = QWidget() # 把布局添加总的组件内 mainFrame.setLayout(layout) # 最后把总的组件放在整个窗口上 self.setCentralWidget(mainFrame) def message_show(self): text = self.sender().text() print(text) if text == '关于对话框': QMessageBox.about(self, '关于', '这是一个关于对话框') elif text == '消息对话框': reply = QMessageBox.information(self, '消息', '这是一个消息对话框', QMessageBox.Yes | QMessageBox.No, QMessageBox.Yes) print(reply == QMessageBox.Yes) elif text == '警告对话框': QMessageBox.warning(self, '警告', '这是一个警告对话框', QMessageBox.Yes | QMessageBox.No, QMessageBox.Yes) elif text == '错误对话框': QMessageBox.critical(self, '警告', '这是一个警告对话框', QMessageBox.Yes | QMessageBox.No, QMessageBox.Yes) elif text == '提问对话框': QMessageBox.question(self, '警告', '这是一个警告对话框', QMessageBox.Yes | QMessageBox.No, QMessageBox.Yes) #字体对话框QFontDialog def qfontdialog_demo(self): layout = QVBoxLayout() self.fontdialog_button = QPushButton('选择字体') self.fontdialog_button.clicked.connect(self.fontdialog_getfont) layout.addWidget(self.fontdialog_button) self.fontdialog_label = QLabel('Hello, 测试字体') layout.addWidget(self.fontdialog_label) mainFrame = QWidget() # 把布局添加总的组件内 mainFrame.setLayout(layout) # 最后把总的组件放在整个窗口上 self.setCentralWidget(mainFrame) #字体对话框的槽 def fontdialog_getfont(self): font, ok = QFontDialog.getFont() if ok: self.fontdialog_label.setFont(font) #颜色对话框QColorDialog def qcolordialog_demo(self): layout = QVBoxLayout() self.color_button1 = QPushButton('设置颜色') self.color_button1.clicked.connect(self.color_getcolor) layout.addWidget(self.color_button1) self.color_button2 = QPushButton('设置背景色') self.color_button2.clicked.connect(self.color_getbgcolor) layout.addWidget(self.color_button2) self.color_label = QLabel('Hello, 测试颜色的例子') layout.addWidget(self.color_label) mainFrame = QWidget() # 把布局添加总的组件内 mainFrame.setLayout(layout) # 最后把总的组件放在整个窗口上 self.setCentralWidget(mainFrame) #颜色对话框的槽 def color_getcolor(self): color = QColorDialog.getColor() p = QPalette() #调出调色板 #给字体调色 p.setColor(QPalette.WindowText, color) self.color_label.setPalette(p) #背景颜色对话框的槽 def color_getbgcolor(self): color = QColorDialog.getColor() p = QPalette() p.setColor(QPalette.Window, color) #允许设置背景颜色 self.color_label.setAutoFillBackground(True) self.color_label.setPalette(p) #文件对话框QFileDialog def qfiledialog(self): layout = QVBoxLayout() self.file_button1 = QPushButton('加载图片') self.file_button1.clicked.connect(self.loadImage) layout.addWidget(self.file_button1) self.imageLabel = QLabel() layout.addWidget(self.imageLabel) self.file_button2 = QPushButton('加载文本文件') self.file_button2.clicked.connect(self.loadText) layout.addWidget(self.file_button2) self.file_contents = QTextEdit() layout.addWidget(self.file_contents) mainFrame = QWidget() # 把布局添加总的组件内 mainFrame.setLayout(layout) # 最后把总的组件放在整个窗口上 self.setCentralWidget(mainFrame) def loadImage(self): fname, _ = QFileDialog.getOpenFileName(self, '打开文件', '.', '图像文件(*.jpg *.png)') self.imageLabel.setPixmap(QPixmap(fname)) #加载文本有点问题!!!!!! def loadText(self): dialog = QFileDialog() dialog.setFileMode(QFileDialog.AnyFile) dialog.setFilter(QDir.Files) if dialog.exec(): filenames = dialog.selectedFiles() f = open(filenames[0], encoding='utf-8', mode='r') with f: data = f.read() print(data) self.file_contents.setText(data) #绘图QPainter,继承QWdget组件 def paintEvent(self, event): pass # painter = QPainter(self) # painter.begin(self) # painter.setPen(QColor(150, 43, 5)) # painter.setFont(QFont('SimSun', 25)) # # painter.drawText(event.rect(), Qt.AlignCenter, self.text) # painter.end() #绘制正弦曲线,继承QWdget组件 def paintEvent(self, event): pass # painter = QPainter() # painter.begin(self) # painter.setPen(Qt.blue) # size = self.size() # # for i in range(1000): # x = 100 * (-1 + 2.0 * i / 1000) + size.width() / 2.0 # y = -50 * math.sin((x - size.width() / 2.0) * math.pi / 50) + size.height() / 2.0 # painter.drawPoint(x, y) #绘制不同的直线,继承QWiget组件的paintEvent方法 def paintEvent(self, event): painter = QPainter() painter.begin(self) pen = QPen(Qt.red, 3, Qt.SolidLine) painter.setPen(pen) painter.drawLine(20, 40, 250, 40) pen.setStyle(Qt.DashLine) painter.setPen(pen) painter.drawLine(20, 80, 250, 80) pen.setStyle(Qt.DashDotDotLine) painter.setPen(pen) painter.drawLine(20, 120, 250, 120) pen.setStyle(Qt.DotLine) painter.setPen(pen) painter.drawLine(20, 160, 250, 160) pen.setStyle(Qt.DashDotDotLine) painter.setPen(pen) painter.drawLine(20, 200, 250, 200) pen.setStyle(Qt.CustomDashLine) pen.setDashPattern([1, 10, 5, 8]) painter.setPen(pen) painter.drawLine(20, 240, 250, 240) size = self.size() painter.end() if __name__ == '__main__': app = QApplication(sys.argv) # app.setWindowIcon(QIcon('images/cartoon1.ico')) ui = Ui_MainWin() ui.show() sys.exit(app.exec_())
git 地址https://gitee.com/wuzhibin112423/QT5/tree/master
线上文档https://doc.qt.io/qt-5/classes.html
csdn 地址 https://blog.csdn.net/La_vie_est_belle/article/details/82316745
人生苦短,我用cnblog
