

Git & Github
为什么要用版本控制?
假设你在的公司要上线一个新功能,你们开发团队为实现这个新功能,写了大约5000行代码,上线没2天,就发现这个功能用户并不喜欢,你老板让你去掉这个功能,你怎么办?你说简单,直接把5000行代码去掉就行了,但是我的亲,说的简单,你的这个功能写了3周时间,但你还能记得你是新增加了哪5000行代码么?所以你急需要一个工具,能帮你记录每次对代码做了哪些修改,并且可以轻易的把代码回滚到历史上的某个状态。 这个神奇的工具就叫做版本控制。
版本控制工具主要实现2个功能:
版本管理
在开发中,这是刚需,必须允许可以很容易对产品的版本进行任意回滚,版本控制工具实现这个功能的原理简单来讲,就是你每修改一次代码,它就帮你做一次快照
协作开发
一个复杂点的软件,往往不是一个开发人员可以搞定的,公司为加快产品开发速度,会招聘一堆跟你一样的开发人员开发这个产品,拿微信来举例,现在假设3个人一起开发微信,A开发联系人功能,B开发发文字、图片、语音通讯功能,C开发视频通话功能, B和C的功能都是要基于通讯录的,你说简单,直接把A开发的代码copy过来,在它的基础上开发就好了,可以,但是你在他的代码基础上开发了2周后,这期间A没闲着,对通讯录代码作了更新,此时怎么办?你和他的代码不一致了,此时我们知道,你肯定要再把A的新代码拿过来替换掉你手上的旧通讯录功能代码, 现在人少,3个人之间沟通很简单,但想想,如果团队变成30个人呢?来回这样copy代码,很快就乱了, 所以此时亟需一个工具,能确保一直存储最新的代码库,所有人的代码应该和最新的代码库保持一致
常见版本管理工具介绍
1、VSS-- Visual Source Safe
此工具是Microsoft提供的,是使用的相当普遍的工具之一,他可以与VS.net进行无缝集成,成为了独立开发人员和小型开发团队所适合的工具,基本上Window平台上开发的中小型企业,当规模较大后,其性能通常是无法忍受的,对分支与并行开发支持的比较有限。
2、CVS--Concurrent Versions System,
此工具是一个开源工具,与后面提到的SVN是同一个厂家:Collab.Net提供的。
CVS是源于unix的版本控制工具,对于CVS的安装和使用最好对unix的系统有所了解能更容易学习,CVS的服务器管理需要进行各种命令行操作。目前,CVS的客户端有winCVS的图形化界面,服务器端也有CVSNT的版本,易用性正在提高。
此工具是相当著名,使用得相当广泛的版本控制工具之一,使用成熟的“Copy-Modify-Merge"开发模型,可以大大的提高开发效率,适合于项目比较大,产品发布频繁,分支活动频繁的中大型项目。
3、SVN --CollabNet Subversion
此工具是在CVS 的基础上,由CollabNet提供开发的,也是开源工具,应用比较广泛。
他修正cvs的一些局限性,适用范围同cvs,目前有一些基于SVN的第三方工具,如TortoiseSVN,是其客户端程序,使用的也相当广泛。在权限管理,分支合并等方面做的很出色,他可以与Apache集成在一起进行用户认证。
不过在权限管理方面目前还没有个很好用的界面化工具,SVNManger对于已经使用SVN进行配置的项目来说,基本上是无法应用的,但对于从头开始的项目是可以的,功能比较强大,但是搭建svnManger比较麻烦。
是一个跨平台的软件,支持大多数常见的操作系统。作为一个开源的版本控制系统,Subversion 管理着随时间改变的数据。 这些数据放置在一个中央资料档案库中。 这个档案库很像一个普通的文件服务器, 不过它会记住每一次文件的变动。 这样你就可以把档案恢复到旧的版本, 或是浏览文件的变动历史。Subversion 是一个通用的系统, 可用来管理任何类型的文件, 其中包括了程序源码。
4. GIT
因为最初是从Linux起家的,非常依赖文件系统的一些特性,这些在 Linux 下表现的很好,而 Windows 下特别糟糕Git 中文教程
Git是一个开源的分布式版本控制系统,用以有效、高速的处理从很小到非常大的项目版本管理.
Git 是 Linus Torvalds 为了帮助管理 Linux 内核开发而开发的一个开放源码的版本控制软件。
Torvalds 开始着手开发 Git 是为了作为一种过渡方案来替代 BitKeeper,后者之前一直是 Linux 内核开发人员在全球使用的主要源代码工具。开放源码社区中的有些人觉得 BitKeeper 的许可证并不适合开放源码社区的工作,因此 Torvalds 决定着手研究许可证更为灵活的版本控制系统。尽管最初 Git 的开发是为了辅助 Linux 内核开发的过程,但是我们已经发现在很多其他自由软件项目中也使用了 Git。例如 最近就迁移到 Git 上来了,很多 Freedesktop 的项目也迁移到了 Git 上。
5、BitKeeper
是由BitMover公司提供的,BitKeeper自称是“分布式”可扩缩SCM系统。
不是采用C/S结构,而是采用P2P结构来实现的,同样支持变更任务,所有变更集的操作都是原子的,与svn,cvs一致。
github介绍
很多人都知道,Linus在1991年创建了开源的Linux,从此,Linux系统不断发展,已经成为最大的服务器系统软件了。
Linus虽然创建了Linux,但Linux的壮大是靠全世界热心的志愿者参与的,这么多人在世界各地为Linux编写代码,那Linux的代码是如何管理的呢?
事实是,在2002年以前,世界各地的志愿者把源代码文件通过diff的方式发给Linus,然后由Linus本人通过手工方式合并代码!
你也许会想,为什么Linus不把Linux代码放到版本控制系统里呢?不是有CVS、SVN这些免费的版本控制系统吗?因为Linus坚定地反对CVS和SVN,这些集中式的版本控制系统不但速度慢,而且必须联网才能使用。有一些商用的版本控制系统,虽然比CVS、SVN好用,但那是付费的,和Linux的开源精神不符。
不过,到了2002年,Linux系统已经发展了十年了,代码库之大让Linus很难继续通过手工方式管理了,社区的弟兄们也对这种方式表达了强烈不满,于是Linus选择了一个商业的版本控制系统BitKeeper,BitKeeper的东家BitMover公司出于人道主义精神,授权Linux社区免费使用这个版本控制系统。
安定团结的大好局面在2005年就被打破了,原因是Linux社区牛人聚集,不免沾染了一些梁山好汉的江湖习气。开发Samba的Andrew试图破解BitKeeper的协议(这么干的其实也不只他一个),被BitMover公司发现了(监控工作做得不错!),于是BitMover公司怒了,要收回Linux社区的免费使用权。
Linus可以向BitMover公司道个歉,保证以后严格管教弟兄们,嗯,这是不可能的。实际情况是这样的:
Linus花了两周时间自己用C写了一个分布式版本控制系统,这就是Git!一个月之内,Linux系统的源码已经由Git管理了!牛是怎么定义的呢?大家可以体会一下。
Git迅速成为最流行的分布式版本控制系统,尤其是2008年,GitHub网站上线了(github是一个基于git的代码托管平台,付费用户可以建私人仓库,我们一般的免费用户只能使用公共仓库,也就是代码要公开。),它为开源项目免费提供Git存储,无数开源项目开始迁移至GitHub,包括jQuery,PHP,Ruby等等。
历史就是这么偶然,如果不是当年BitMover公司威胁Linux社区,可能现在我们就没有免费而超级好用的Git了。
今天,GitHub已是:
- 一个拥有143万开发者的社区。其中不乏Linux发明者Torvalds这样的顶级黑客,以及Rails创始人DHH这样的年轻极客。
- 这个星球上最流行的开源托管服务。目前已托管431万git项目,不仅越来越多知名开源项目迁入GitHub,比如Ruby on Rails、jQuery、Ruby、Erlang/OTP;近三年流行的开源库往往在GitHub首发,例如:BootStrap、Node.js、CoffeScript等。
- alexa全球排名414的网站。
git安装
官网:https://git-scm.com/downloads
版本库创建
什么是版本库呢?版本库又名仓库,英文名repository,你可以简单理解成一个目录,这个目录里面的所有文件都可以被Git管理起来,每个文件的修改、删除,Git都能跟踪,以便任何时刻都可以追踪历史,或者在将来某个时刻可以“还原”。
所以,创建一个版本库非常简单,首先,选择一个合适的地方,创建一个空目录:
shuais-MBP:~ dandyzhang$ mkdir git_test
shuais-MBP:~ dandyzhang$ cd git_test

shuais-MBP:git_test dandyzhang$ git init
Initialized empty Git repository in /Users/dandyzhang/git_test/.git/
瞬间Git就把仓库建好了,而且告诉你是一个空的仓库(empty Git repository),细心的读者可以发现当前目录下多了一个.git的目录,这个目录是Git来跟踪管理版本库的,没事千万不要手动修改这个目录里面的文件,不然改乱了,就把Git仓库给破坏了。
如果你没有看到.git目录,那是因为这个目录默认是隐藏的,用ls -ah命令就可以看见。
shuais-MBP:git_test dandyzhang$ ls -ah
.    ..    .git
把文件添加到版本库
首先这里再明确一下,所有的版本控制系统,其实只能跟踪文本文件的改动,比如TXT文件,网页,所有的程序代码等等,Git也不例外。版本控制系统可以告诉你每次的改动,比如在第5行加了一个单词“Linux”,在第8行删了一个单词“Windows”。而图片、视频这些二进制文件,虽然也能由版本控制系统管理,但没法跟踪文件的变化,只能把二进制文件每次改动串起来,也就是只知道图片从100KB改成了120KB,但到底改了啥,版本控制系统不知道,也没法知道。
不幸的是,Microsoft的Word格式是二进制格式,因此,版本控制系统是没法跟踪Word文件的改动的,前面我们举的例子只是为了演示,如果要真正使用版本控制系统,就要以纯文本方式编写文件。
因为文本是有编码的,比如中文有常用的GBK编码,日文有Shift_JIS编码,如果没有历史遗留问题,强烈建议使用标准的UTF-8编码,所有语言使用同一种编码,既没有冲突,又被所有平台所支持。
言归正传,现在我们编写一个first_git_file.txt文件,内容如下:
shuais-MBP:git_test dandyzhang$ vim first_git_file.txt

first time using git, hello git!
一定要放到git_trainning目录下(子目录也行),因为这是一个Git仓库,放到其他地方Git再厉害也找不到这个文件。
和把大象放到冰箱需要3步相比,把一个文件放到Git仓库只需要两步。
第一步,用命令git add告诉Git,把文件添加到仓库:
shuais-MBP:git_test dandyzhang$ git add first_git_file.txt
执行上面的命令,没有任何显示,说明添加成功。
这时候我们再创建一个文件readme,不add到仓库
shuais-MBP:git_test dandyzhang$ vim Readme
this is readme file
此时使用status查看状态:
shuais-MBP:git_test dandyzhang$ git status
On branch master

No commits yet

Changes to be committed:
  (use "git rm --cached <file>..." to unstage)

    new file:   first_git_file.txt

Untracked files:
  (use "git add <file>..." to include in what will be committed)

    Readme
add后的文件first_git_file.txt被追踪了,而没有添加进git仓库的则不会追踪,空文件夹也不会显示。
第二步,用命令git commit告诉Git,把文件提交到仓库,即上文被追踪的文件已经被管理:
shuais-MBP:git_test dandyzhang$ git commit
hint: Waiting for your editor to close the file...

# Please enter the commit message for your changes. Lines starting
# with '#' will be ignored, and an empty message aborts the commit.
#
# Committer: 衰 Zzz <dandyzhang@shuais-MBP.lan>
#
# On branch master
#
# Initial commit
#
# Changes to be committed:
#       new file:   first_git_file.txt
#
# Untracked files:
#       Readme
#
~
~
~
~
~
~
~
"~/git_test/.git/COMMIT_EDITMSG" 16L, 321C
这里又进入到vim编辑模式,git在提示你写入文件新建或更改的理由,原因或备注,加入备注在首行:
git first test...
# Please enter the commit message for your changes. Lines starting
# with '#' will be ignored, and an empty message aborts the commit.
#
# Committer: 衰 Zzz <dandyzhang@shuais-MBP.lan>
#
# On branch master
#
# Initial commit
#
# Changes to be committed:
#       new file:   first_git_file.txt
#
# Untracked files:
#       Readme
#
保存:
shuais-MBP:git_test dandyzhang$ git commit
[master (root-commit) 8dfa740] git first test...
 Committer: 衰 Zzz <dandyzhang@shuais-MBP.lan>
Your name and email address were configured automatically based
on your username and hostname. Please check that they are accurate.
You can suppress this message by setting them explicitly. Run the
following command and follow the instructions in your editor to edit
your configuration file:

    git config --global --edit

After doing this, you may fix the identity used for this commit with:

    git commit --amend --reset-author

 1 file changed, 1 insertion(+)
 create mode 100644 first_git_file.txt
此时查看status:
shuais-MBP:git_test dandyzhang$ git status
On branch master
Untracked files:
  (use "git add <file>..." to include in what will be committed)

    Readme

nothing added to commit but untracked files present (use "git add" to track)
发现只有readme存在。
中间红色部分的意思是,你在往git库里提交代码时,你需要告诉git你是谁,这样git就会纪录下来是谁改的代码,其实就是为了日后查询方便,你只需要提供一个名字和邮件地址就可以,这里我的git直接通过主机名自己创建了一个,但你可以通过git config --global --edit修改
简单解释一下git commit命令,-m后面输入的是本次提交的说明,可以输入任意内容,当然最好是有意义的,这样你就能从历史记录里方便地找到改动记录。
嫌麻烦不想输入-m "xxx"行不行?确实有办法可以这么干,但是强烈不建议你这么干,因为输入说明对自己对别人阅读都很重要。
为什么Git添加文件需要add,commit一共两步呢?因为commit可以一次提交很多文件,所以你可以多次add不同的文件,相当于修改了项目的多个地方的代码最后统一commit,比如:
$ git add file1.txt
$ git add file2.txt file3.txt
$ git commit -m "add 3 files."
代码回滚
1、代码修改并提交
我们已经成功地添加并提交了一个first_git_file.txt文件,现在,是时候继续工作了,于是,我们继续修改first_git_file.txt文件,改成如下内容:
shuais-MBP:git_test dandyzhang$ vim first_git_file.txt

first time using git, hello git! update(one)
insert one line here....
现在,运行git status命令看看结果:
shuais-MBP:git_test dandyzhang$ git status
On branch master
Changes not staged for commit:
  (use "git add <file>..." to update what will be committed)
  (use "git checkout -- <file>..." to discard changes in working directory)

    modified:   first_git_file.txt

Untracked files:
  (use "git add <file>..." to include in what will be committed)

    Readme

no changes added to commit (use "git add" and/or "git commit -a")
虽然Git告诉我们first_git_file.txt被修改了,但如果能看看具体修改了什么内容,自然是很好的。比如你休假两周从国外回来,第一天上班时,已经记不清上次怎么修改的readme.txt,所以,需要用git diff这个命令看看:
shuais-MBP:git_test dandyzhang$ git diff first_git_file.txt
diff --git a/first_git_file.txt b/first_git_file.txt
index 5f48045..7581c01 100644
--- a/first_git_file.txt
+++ b/first_git_file.txt
@@ -1 +1,2 @@
-first time using git, hello git!
+first time using git, hello git! update(one)
+insert one line here....
输出中+号绿色显示的就是修改或新增的内容,-号红色显示的就是去掉或被修改的内容
知道了对first_git_file.txt 作了什么修改后,再把它提交到仓库就放心多了,提交修改和提交新文件是一样的两步,第一步是git add:
shuais-MBP:git_test dandyzhang$ git add .  # 代表把当前目录下所有改动的文件都提交到代码库
shuais-MBP:git_test dandyzhang$ git commit -m 'commit changes 2'
[master f31af7b] commit changes 2
 Committer: 衰 Zzz <dandyzhang@shuais-MBP.lan>
Your name and email address were configured automatically based
on your username and hostname. Please check that they are accurate.
You can suppress this message by setting them explicitly. Run the
following command and follow the instructions in your editor to edit
your configuration file:

    git config --global --edit

After doing this, you may fix the identity used for this commit with:

    git commit --amend --reset-author

 2 files changed, 3 insertions(+), 1 deletion(-)
 create mode 100644 Readme
shuais-MBP:git_test dandyzhang$
如果上面的操作,add之后我们插入一个status操作,会得到提示,一个文件被修改另一个未被跟踪。
commit之后再查看status:
shuais-MBP:git_test dandyzhang$ git status
On branch master
nothing to commit, working tree clean
shuais-MBP:git_test dandyzhang$
这时本地文件状态就全部被清空了。Git告诉我们当前没有需要提交的修改,而且,工作目录是干净(working directory clean)的。
此时,再修改下readme:
shuais-MBP:git_test dandyzhang$ vim Readme

this is readme file
insert one line...second times.

shuais-MBP:git_test dandyzhang$ git add .
shuais-MBP:git_test dandyzhang$ git commit -m 'second time modified readme.'
[master f557e4f] second time modified readme.
 Committer: 衰 Zzz <dandyzhang@shuais-MBP.lan>
Your name and email address were configured automatically based
on your username and hostname. Please check that they are accurate.
You can suppress this message by setting them explicitly. Run the
following command and follow the instructions in your editor to edit
your configuration file:

    git config --global --edit

After doing this, you may fix the identity used for this commit with:

    git commit --amend --reset-author

 1 file changed, 1 insertion(+)
代码回滚
上面已经又修改过文件了,有兴趣的话可以多测试几次
像这样,你不断对文件进行修改,然后不断提交修改到版本库里,就好比玩RPG游戏时,每通过一关就会自动把游戏状态存盘,如果某一关没过去,你还可以选择读取前一关的状态。有些时候,在打Boss之前,你会手动存盘,以便万一打Boss失败了,可以从最近的地方重新开始。Git也是一样,每当你觉得文件修改到一定程度的时候,就可以“保存一个快照”,这个快照在Git中被称为commit。一旦你把文件改乱了,或者误删了文件,还可以从最近的一个commit恢复,然后继续工作,而不是把几个月的工作成果全部丢失。
现在,测试过几次之后,大家应该也不会很清晰的记得文件的修改情况和版本明细了。并且在实际工作中,我们脑子里怎么也不可能记得一个几千行的文件每次都改了什么内容,不然要版本控制系统干什么。版本控制系统肯定有某个命令可以告诉我们历史记录,在Git中,我们用git log命令查看:
shuais-MBP:git_test dandyzhang$ git log
commit f557e4fcd45978b358f21b75e87cfe2f80f381b7 (HEAD -> master)
Author: 衰 Zzz <dandyzhang@shuais-MBP.lan>
Date:   Wed Jul 4 22:59:02 2018 +0800

    second time modified readme.

commit f31af7bf79a2b0114eb9d1adcac82b4fa7128a2b
Author: 衰 Zzz <dandyzhang@shuais-MBP.lan>
Date:   Wed Jul 4 22:50:20 2018 +0800

    commit changes 2

commit 8dfa74052ee22ef3f86b51424172df60c23778c6
Author: 衰 Zzz <dandyzhang@shuais-MBP.lan>
Date:   Wed Jul 4 22:27:56 2018 +0800

    git first test...
git log命令显示从最近到最远的提交日志,可以看到日志一共记录了,第一次测试跟两次修改;如果嫌输出信息太多,看得眼花缭乱的,可以试试加上--pretty=oneline参数:
shuais-MBP:git_test dandyzhang$ git log --pretty=oneline
f557e4fcd45978b358f21b75e87cfe2f80f381b7 (HEAD -> master) second time modified readme.
f31af7bf79a2b0114eb9d1adcac82b4fa7128a2b commit changes 2
8dfa74052ee22ef3f86b51424172df60c23778c6 git first test...
需要友情提示的是,你看到的一大串类似3628164...882e1e0的是commit id(版本号),和SVN不一样,Git的commit id不是1,2,3……递增的数字,而是一个SHA1计算出来的一个非常大的数字,用十六进制表示,而且你看到的commit id和我的肯定不一样,以你自己的为准。为什么commit id需要用这么一大串数字表示呢?因为Git是分布式的版本控制系统,后面我们还要研究多人在同一个版本库里工作,如果大家都用1,2,3……作为版本号,那肯定就冲突了。
回滚!!!
好了,现在我们启动时光穿梭机,准备把readme回退到上一个版本,即‘commit changes 2’版本,怎么做呢?
首先,Git必须知道当前版本是哪个版本,在Git中,用HEAD表示当前版本,也就是最新的提交f557e4fcd45978b358f21b75e87cfe2f80f381b7(注意我的提交ID和你的肯定不一样),上一个版本就是HEAD^,上上一个版本就是HEAD^^,当然往上100个版本写100个^比较容易数不过来,所以写成HEAD~100。
小插曲:
写的太忘我,忘记添加global user.mail&user.name参数。目前,以我的测试,如果不设置话,文件是不会回滚的。

为什么设置?
很大程度上,一方面日志里记录了,更新的用户的名字邮箱,如果遇到问题或者不理解的地方,可以及时联系开发者。
所以,别激动,先添加参数,添加好再修改一次文件:
shuais-MBP:git_test dandyzhang$ git config --global user.email 'wuzdandz@163.com'
shuais-MBP:git_test dandyzhang$ git config --global user.name 'dandy zhang'


shuais-MBP:git_test dandyzhang$ vim Readme # 这里就不再费劲记录了,随便加点东西就好了。

shuais-MBP:git_test dandyzhang$ git add .
shuais-MBP:git_test dandyzhang$ git commit  # 忘记加备注了。。。。
[master b958914] update readme third times
 1 file changed, 1 insertion(+)
这时候查看日志:

现在,我们要把当前版本“update readme third times”回退到上一个版本“second time modified readme.”,就可以使用git reset命令:
shuais-MBP:git_test dandyzhang$ git reset --hard HEAD^
HEAD is now at f557e4f second time modified readme.

shuais-MBP:git_test dandyzhang$ vim Readme

this is readme file
insert one line...second times.
完美!
这时候,也许你会重新查看log:
shuais-MBP:git_test dandyzhang$ git log
commit f557e4fcd45978b358f21b75e87cfe2f80f381b7 (HEAD -> master)
Author: 衰 Zzz <dandyzhang@shuais-MBP.lan>
Date:   Wed Jul 4 22:59:02 2018 +0800

    second time modified readme.

commit f31af7bf79a2b0114eb9d1adcac82b4fa7128a2b
Author: 衰 Zzz <dandyzhang@shuais-MBP.lan>
Date:   Wed Jul 4 22:50:20 2018 +0800

    commit changes 2

commit 8dfa74052ee22ef3f86b51424172df60c23778c6
Author: 衰 Zzz <dandyzhang@shuais-MBP.lan>
Date:   Wed Jul 4 22:27:56 2018 +0800

    git first test...
发现最新的一版已经不见了。假如是真的要回滚到对应的版本倒是还好,可是,如果是没注意选错了,就没办法更改了么?
办法其实还是有的,只要上面的命令行窗口还没有被关掉,你就可以顺着往上找啊找啊,找到那个add new content的commit id是b9589146dd0eeb4f6b6eb5347e7cb373a1c55533,于是就可以指定回到未来的某个版本:
shuais-MBP:git_test dandyzhang$ git reset --hard b95891
HEAD is now at b958914 update readme third times
版本号没必要写全,前几位就可以了,Git会自动去找。当然也不能只写前一两位,因为Git可能会找到多个版本号,就无法确定是哪一个了。
这时候再,小心翼翼!!的查看一下readme的内容:
shuais-MBP:git_test dandyzhang$ vim Readme

this is readme file
insert one line...second times.
insert one line...third time.
发现版本真的改回来了。
Git的版本回退速度非常快,因为Git在内部有个指向当前版本的HEAD指针,当你回退版本的时候,Git仅仅是把HEAD从指向update readme third times
现在,你总算是可以回退到了某个版本,开心的一毛,关掉了电脑,第二天早上就后悔了,想恢复到新版本怎么办?找不到新版本的commit id怎么办?
在Git中,总是有后悔药可以吃的。当你用$ git reset --hard HEAD^回退到update again版本时,再想恢复到最新add new content的版本,就必须找到add new contentL的commit id。Git提供了一个命令git reflog用来记录你的每一次命令:
shuais-MBP:git_test dandyzhang$ git reflog
b958914 (HEAD -> master) HEAD@{0}: reset: moving to b95891
f557e4f HEAD@{1}: reset: moving to HEAD^
b958914 (HEAD -> master) HEAD@{2}: commit: update readme third times
f557e4f HEAD@{3}: commit: second time modified readme.
f31af7b HEAD@{4}: commit: commit changes 2
8dfa740 HEAD@{5}: commit (initial): git first test...
这里,就不演示再回滚然后拿最前面的ID,再复原的过程了。记得reflog这个命令的作用即可,git的回滚的意义,在于将指针指向你所需要回到的某一个版本,但并不会删掉其他的版本。
也许你还会问这样一个问题,如果回滚代码到过去,再在过去的代码里修改了一些东西,commit之后,后面的版本还存在么?
就像链表一样,链子断开把新的加了进入?还是相当于时光机一般,我回到过去,修改或杀死了小时候的我,未来的我还在么?
其实这里需要解释一下git的版本存储机制:
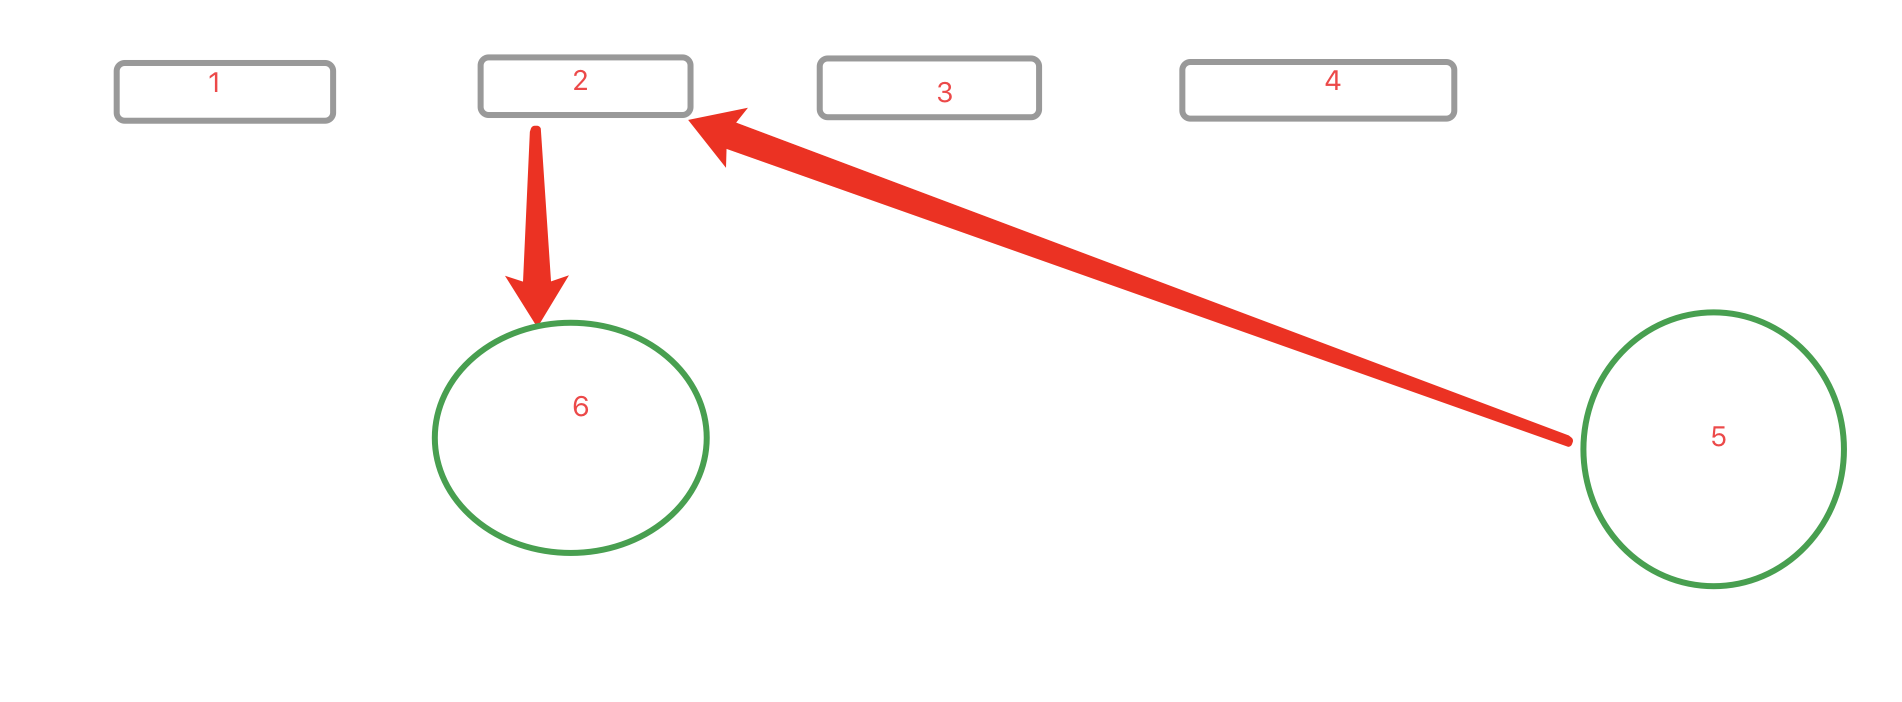
如图,如果回到二的版本阶段,修改了代码,git会重新定义一个版本。说的恐怖一点,这有点类似于你创造了一个平行宇宙。。
工作区和暂存区
Git和其他版本控制系统如SVN的一个不同之处就是有暂存区的概念。
先来看名词解释。
工作区(Working Directory)
就是你在电脑里能看到的目录,比如我的git_test文件夹就是一个工作区:
shuais-MacBook-Pro:~ dandyzhang$ cd git_test/
shuais-MacBook-Pro:git_test dandyzhang$ ls
Readme            first_git_file.txt
版本库(Repository)
工作区有一个隐藏目录.git,这个不算工作区,而是Git的版本库。
Git的版本库里存了很多东西,其中最重要的就是称为stage(或者叫index)的暂存区,还有Git为我们自动创建的第一个分支master,以及指向master的一个指针叫HEAD。
分支和HEAD的概念我们以后再讲。
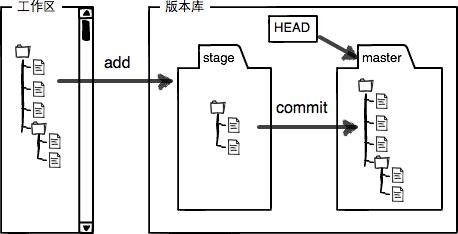
前面讲了我们把文件往Git版本库里添加的时候,是分两步执行的:
第一步是用git add把文件添加进去,实际上就是把文件修改添加到暂存区;
第二步是用git commit提交更改,实际上就是把暂存区的所有内容提交到当前分支。
因为我们创建Git版本库时,Git自动为我们创建了唯一一个master分支,所以,现在,git commit就是往master分支上提交更改。
你可以简单理解为,需要提交的文件修改通通放到暂存区,然后,一次性提交暂存区的所有修改。
之前,我们先创建了一个git_first_file.txt并add&commit,然后进行了修改并add&commit,最后又建了一个新readme并add&commit。
当在工作区添加了一个readme文件,没有加入stage的时候。status查看的时候,很明显git在提示readme是untracked files
此时再将readme add到git的stage,status转成了new file。
现在,暂存区的状态就变成这样了:

备注一下:盗的图,这里readme.txt = first_git_file.txt , LICENSE = readme.md
所以,git add命令实际上就是把要提交的所有修改放到暂存区(Stage),然后,执行git commit就可以一次性把暂存区的所有修改提交到分支。
有点相当于,用鼠标选中了这么多文件,进行commit。
一旦提交后,如果你又没有对工作区做任何修改,那么工作区就是“干净”的:
$ git status
On branch master
nothing to commit, working directory clean
现在版本库变成了这样,暂存区就没有任何内容了:
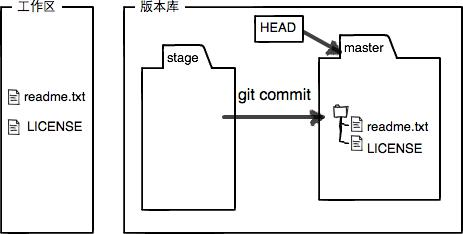
(备注一下,盗的图, 这里readme.txt = first_git_file.txt , LICENSE = readme.md)
暂存区是Git非常重要的概念,弄明白了暂存区,就弄明白了Git的很多操作到底干了什么。
撤销修改
某天,你在做某个boss的很奇怪的需求,各种奇葩,火大的很,直接在readme最后写了句:
shuais-MacBook-Pro:git_test dandyzhang$ vim Readme
this is readme file
insert one line...second times.
insert one line...third time.
fuck IT Director.
在你准备提交前,一杯咖啡起了作用,你猛然发现了有点上头,“fuck IT Director .”可能会让你丢掉绩效奖金
既然错误发现得很及时,就可以很容易地纠正它。你删除了这句话,手动把文件恢复到上一个版本的状态。如果用git status查看一下:
shuais-MacBook-Pro:git_test dandyzhang$ git status
On branch master
Changes not staged for commit:
  (use "git add <file>..." to update what will be committed)
  (use "git checkout -- <file>..." to discard changes in working directory)

    modified:   Readme

no changes added to commit (use "git add" and/or "git commit -a")
你可以发现,Git会告诉你,git checkout -- file可以丢弃工作区的修改:
shuais-MacBook-Pro:git_test dandyzhang$ git checkout -- Readme
shuais-MacBook-Pro:git_test dandyzhang$ vim Readme


this is readme file
insert one line...second times.
insert one line...third time.
你刚才添加的 一行骂老板的话就被撤销了,
命令git checkout -- readme.md意思就是,把readme.md文件在工作区的修改全部撤销,这里有两种情况:
一种是readme.md自修改后还没有被放到暂存区,现在,撤销修改就回到和版本库一模一样的状态;
一种是readme.md已经添加到暂存区后,又作了修改,现在,撤销修改就回到添加到暂存区后的状态。
总之,就是让这个文件回到最近一次git commit或git add时的状态。
git checkout -- file命令中的--很重要,没有--,就变成了“切换到另一个分支”的命令,我们在后面的分支管理中会再次遇到git checkout命令。
现在假定是凌晨3点,你不但写了一些胡话,还git add到暂存区了:
shuais-MacBook-Pro:git_test dandyzhang$ vim Readme
this is readme file
insert one line...second times.
insert one line...third time.
Fuck manager's requirement.
So stupid.

shuais-MacBook-Pro:git_test dandyzhang$ git add Readme
庆幸的是,在commit之前,你发现了这个问题。用git status查看一下,修改只是添加到了暂存区,还没有提交:
shuais-MacBook-Pro:git_test dandyzhang$ git status
On branch master
Changes to be committed:
  (use "git reset HEAD <file>..." to unstage)

    modified:   Readme
Git同样告诉我们,用命令git reset HEAD file可以把暂存区的修改撤销掉(unstage),重新放回工作区:
shuais-MacBook-Pro:git_test dandyzhang$ git reset HEAD Readme
Unstaged changes after reset:
M    Readme
git reset命令既可以回退版本,也可以把暂存区的修改回退到工作区。当我们用HEAD时,表示最新的版本。
再用git status查看一下,现在暂存区是干净的,工作区有修改。
shuais-MacBook-Pro:git_test dandyzhang$ git status
On branch master
Changes not staged for commit:
  (use "git add <file>..." to update what will be committed)
  (use "git checkout -- <file>..." to discard changes in working directory)

    modified:   Readme

no changes added to commit (use "git add" and/or "git commit -a")
还记得如何丢弃工作区的修改吗?
shuais-MacBook-Pro:git_test dandyzhang$ git checkout -- Readme
shuais-MacBook-Pro:git_test dandyzhang$ git status
On branch master
nothing to commit, working tree clean
哈哈,这个世界终于清静了!!
记得千万别commit!!!commit完就已经被git进行版本控制了,再怎么删除也会有记录。除非删除代码库。
em....... 这是个不错的想法。可能你需要收拾下行李,找下一家了。
删除操作
在Git中,删除也是一个修改操作,我们实战一下,先添加一个新文件test.txt到Git并且提交:
shuais-MacBook-Pro:git_test dandyzhang$ vim test.txt

this is a test file.

shuais-MacBook-Pro:git_test dandyzhang$ git add .
shuais-MacBook-Pro:git_test dandyzhang$ git commit -m 'add a new test.txt file'
[master f6afa4f] add a new test.txt file
 1 file changed, 1 insertion(+)
 create mode 100644 test.txt
一般情况下,你通常直接在文件管理器中把没用的文件删了,或者用rm命令删了:
shuais-MacBook-Pro:git_test dandyzhang$ rm test.txt
这个时候,Git知道你删除了文件,因此,工作区和版本库就不一致了,git status命令会立刻告诉你哪些文件被删除了:
shuais-MacBook-Pro:git_test dandyzhang$ git status
On branch master
Changes not staged for commit:
  (use "git add/rm <file>..." to update what will be committed)
  (use "git checkout -- <file>..." to discard changes in working directory)

    deleted:    test.txt

no changes added to commit (use "git add" and/or "git commit -a")
现在你有两个选择,一是确实要从版本库中删除该文件,那就用命令git rm删掉,并且git commit:
shuais-MacBook-Pro:git_test dandyzhang$ git rm test.txt
rm 'test.txt'

shuais-MacBook-Pro:git_test dandyzhang$ git commit -m 'delete test.txt file'
[master b172a52] delete test.txt file
 1 file changed, 1 deletion(-)
 delete mode 100644 test.txt
现在,文件就从版本库中被删除了。
另一种情况是删错了,因为版本库里还有呢,所以可以很轻松地把误删的文件恢复到最新版本:
shuais-MacBook-Pro:git_test dandyzhang$ git checkout -- test.txt
git checkout其实是用版本库里的版本替换工作区的版本,无论工作区是修改还是删除,都可以“一键还原”。
远程仓库
到目前为止,我们已经掌握了如何在Git仓库里对一个文件进行时光穿梭,你再也不用担心文件备份或者丢失的问题了。
可是有用过集中式版本控制系统SVN的童鞋会站出来说,这些功能在SVN里早就有了,没看出Git有什么特别的地方。
没错,如果只是在一个仓库里管理文件历史,Git和SVN真没啥区别。为了保证你现在所学的Git物超所值,将来绝对不会后悔,同时为了打击已经不幸学了SVN的童鞋,本章开始介绍Git的杀手级功能之一(注意是之一,也就是后面还有之二,之三……):远程仓库。
Git是分布式版本控制系统,同一个Git仓库,可以分布到不同的机器上。怎么分布呢?最早,肯定只有一台机器有一个原始版本库,此后,别的机器可以“克隆”这个原始版本库,而且每台机器的版本库其实都是一样的,并没有主次之分。
你肯定会想,至少需要两台机器才能玩远程库不是?但是我只有一台电脑,怎么玩?
其实一台电脑上也是可以克隆多个版本库的,只要不在同一个目录下。不过,现实生活中是不会有人这么傻的在一台电脑上搞几个远程库玩,因为一台电脑上搞几个远程库完全没有意义,而且硬盘挂了会导致所有库都挂掉,所以我也不告诉你在一台电脑上怎么克隆多个仓库。
实际情况往往是这样,找一台电脑充当服务器的角色,每天24小时开机,其他每个人都从这个“服务器”仓库克隆一份到自己的电脑上,并且各自把各自的提交推送到服务器仓库里,也从服务器仓库中拉取别人的提交。
完全可以自己搭建一台运行Git的服务器,不过现阶段,为了学Git先搭个服务器绝对是小题大作。好在这个世界上有个叫GitHub的神奇的网站,从名字就可以看出,这个网站就是提供Git仓库托管服务的,所以,只要注册一个GitHub账号,就可以免费获得Git远程仓库。
在继续阅读后续内容前,请自行注册GitHub账号。由于你的本地Git仓库和GitHub仓库之间的传输是通过SSH加密的,所以,需要一点设置:
第1步:创建SSH Key。在用户主目录下,看看有没有.ssh目录,如果有,再看看这个目录下有没有id_rsa和id_rsa.pub这两个文件,如果已经有了,可直接跳到下一步。如果没有,打开Shell(Windows下打开Git Bash),创建SSH Key:
shuais-MacBook-Pro:~ dandyzhang$ ssh-keygen -t rsa -C 'wuzdandz@163.com'
你需要把邮件地址换成你自己的邮件地址,然后一路回车,使用默认值即可,由于这个Key也不是用于什么机密,所以也无需设置密码。
如果一切顺利的话,可以在用户主目录里找到.ssh目录,里面有id_rsa和id_rsa.pub两个文件,这两个就是SSH Key的秘钥对,id_rsa是私钥,不能泄露出去,id_rsa.pub是公钥,可以放心地告诉任何人。
Generating public/private rsa key pair.
Enter file in which to save the key (/Users/dandyzhang/.ssh/id_rsa):
Enter passphrase (empty for no passphrase):
Enter same passphrase again:
Your identification has been saved in /Users/dandyzhang/.ssh/id_rsa.
Your public key has been saved in /Users/dandyzhang/.ssh/id_rsa.pub.
The key fingerprint is:
SHA256:sNFwTTqMGfE4VInYHtawiA3RVKta8su/zEONeJfvDe4 wuzdandz@163.com
The key's randomart image is:
+---[RSA 2048]----+
|  o+.+B*o+.      |
|   +oo=&o..      |
|  . ooX.*        |
|     ..= .       |
|  . o..oS.       |
|   =. + +        |
|  . .o . ..      |
|   . +.  ..o     |
|    o.=o oE .    |
+----[SHA256]-----+
第2步:登陆GitHub,打开“Account settings”,“SSH Keys”页面:
然后,点“Add SSH Key”,填上任意Title,在Key文本框里粘贴id_rsa.pub文件的内容:
shuais-MacBook-Pro:~ dandyzhang$ ls -ah
.            .gitconfig        Library
..            .idlerc            Movies
.CFUserTextEncoding    .python_history        Music
.DS_Store        .ssh            Pictures
.Trash            .viminfo        Public
.bash_history        .wns            PycharmProjects
.bash_profile        Applications        git_test
.bash_profile.pysave    Desktop            venv
.bash_sessions        Documents
.downloader        Downloads
shuais-MacBook-Pro:~ dandyzhang$ cd .ssh
shuais-MacBook-Pro:.ssh dandyzhang$ ls
id_rsa        id_rsa.pub    known_hosts
shuais-MacBook-Pro:.ssh dandyzhang$ vim id_rsa.pub
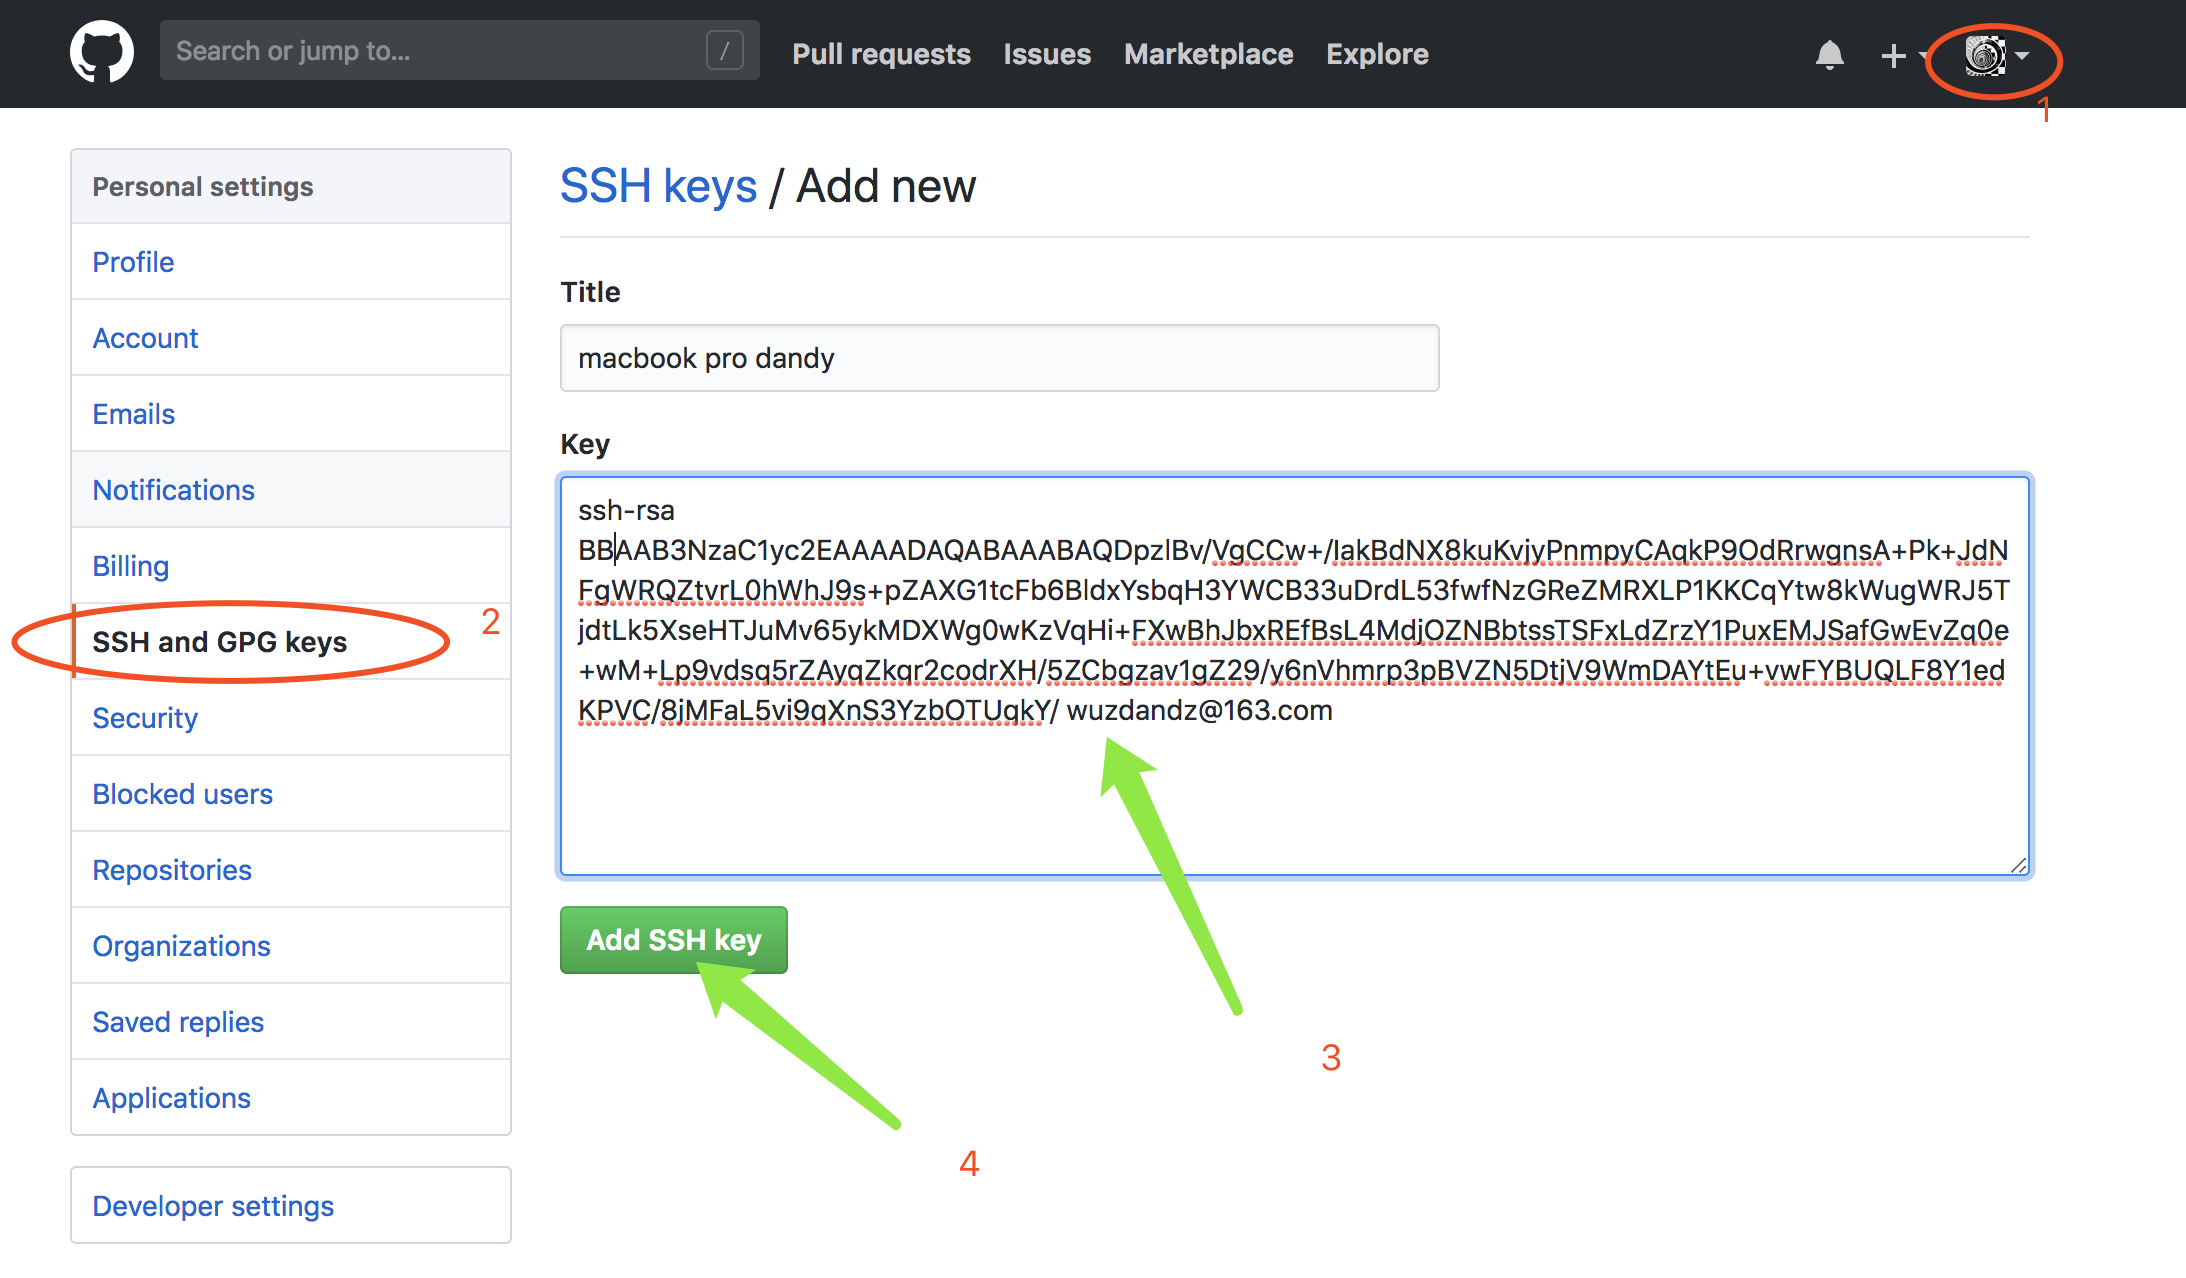
点“Add Key”,你就应该看到已经添加的Key
为什么GitHub需要SSH Key呢?因为GitHub需要识别出你推送的提交确实是你推送的,而不是别人冒充的,而Git支持SSH协议,所以,GitHub只要知道了你的公钥,就可以确认只有你自己才能推送。
当然,GitHub允许你添加多个Key。假定你有若干电脑,你一会儿在公司提交,一会儿在家里提交,只要把每台电脑的Key都添加到GitHub,就可以在每台电脑上往GitHub推送了。
最后友情提示,在GitHub上免费托管的Git仓库,任何人都可以看到喔(但只有你自己才能改)。所以,不要把敏感信息放进去。
如果你不想让别人看到Git库,有两个办法,一个是交点保护费,让GitHub把公开的仓库变成私有的,这样别人就看不见了(不可读更不可写)。另一个办法是自己动手,搭一个Git服务器,因为是你自己的Git服务器,所以别人也是看不见的。这个方法我们后面会讲到的,相当简单,公司内部开发必备。
确保你拥有一个GitHub账号后,我们就即将开始远程仓库的学习。
创建远程仓库
现在的情景是,你已经在本地创建了一个Git仓库后,又想在GitHub创建一个Git仓库,并且让这两个仓库进行远程同步,这样,GitHub上的仓库既可以作为备份,又可以让其他人通过该仓库来协作,真是一举多得。
首先,登陆GitHub,然后,点击start a project:
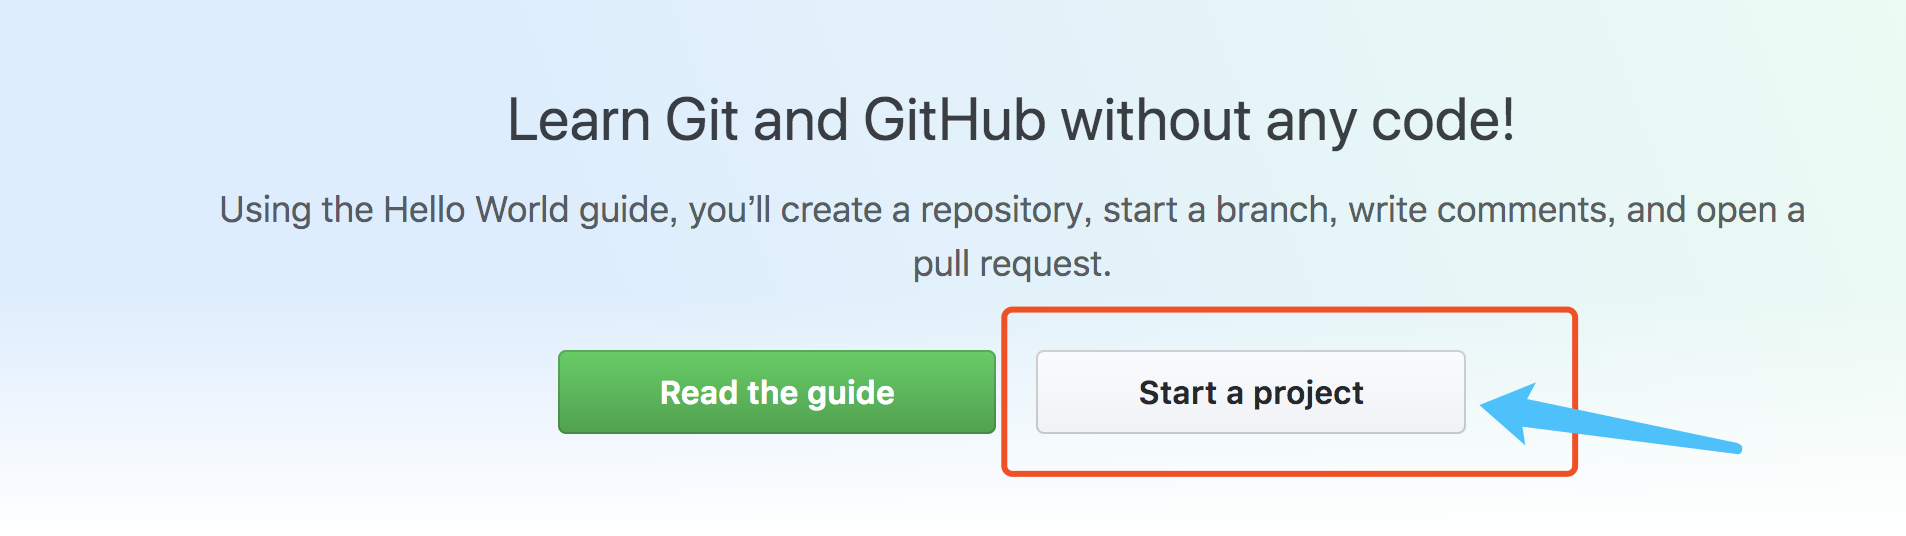

蓝色的箭头代表个人的私密项目,需要付费的。
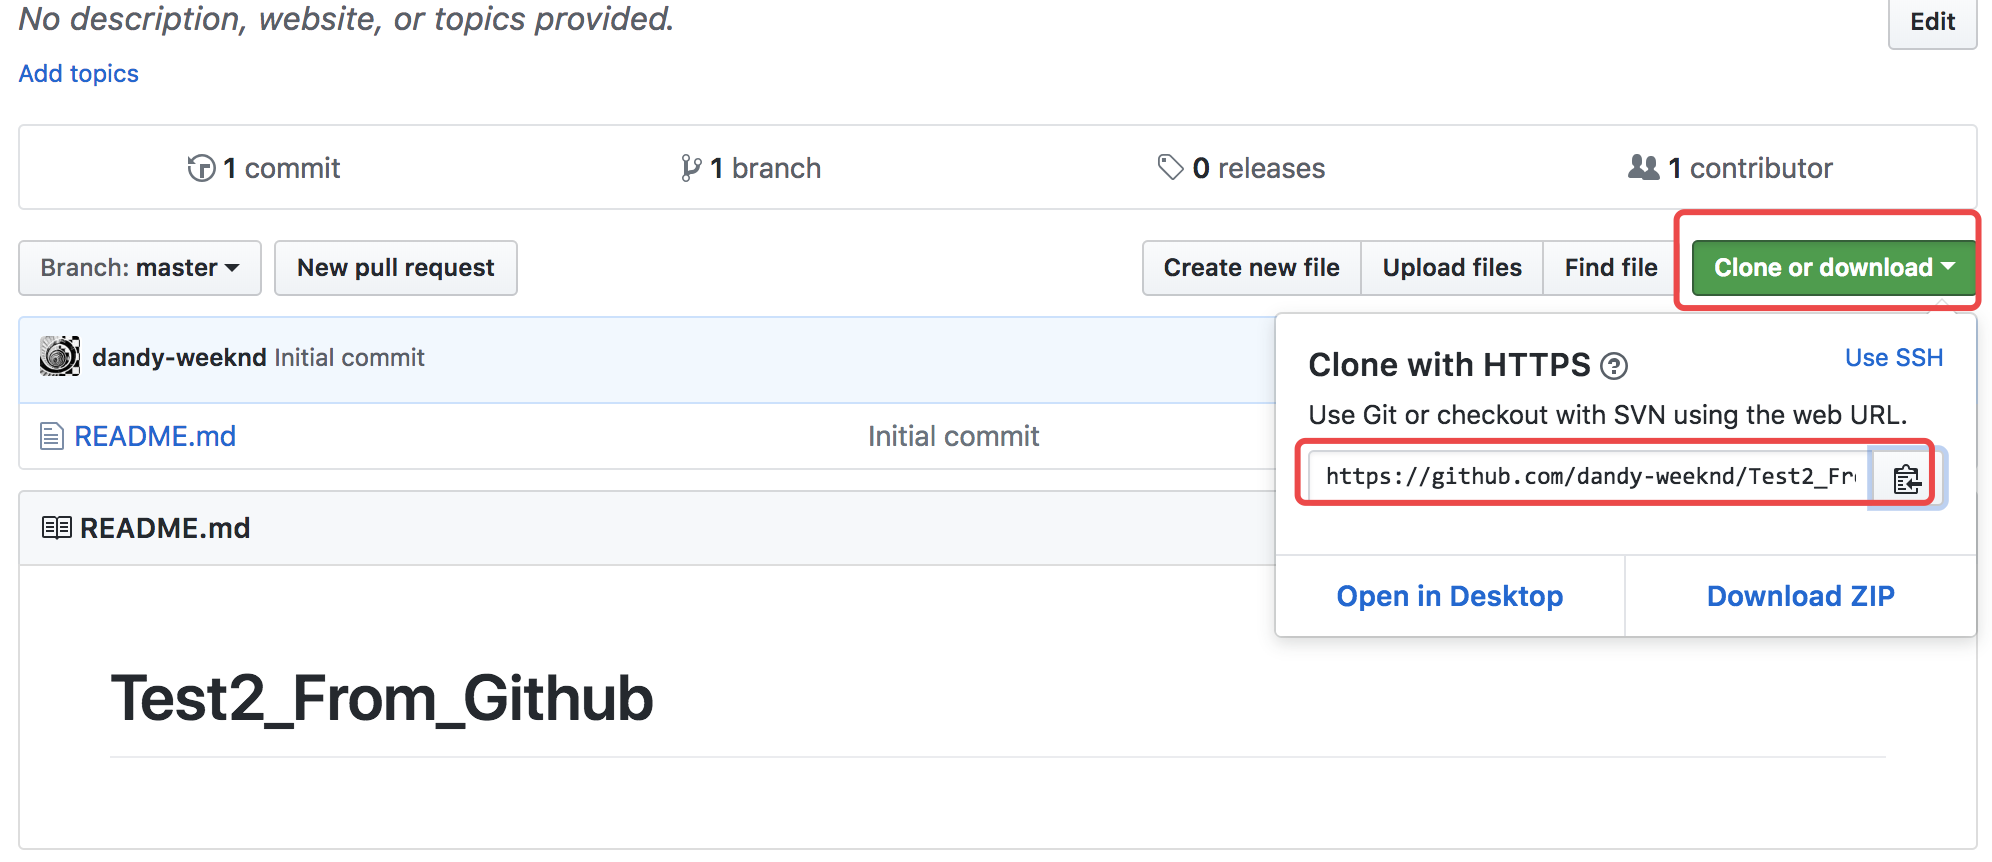
创建好的仓库:

红色框1:通过命令行在本地创建一个repo(代码仓库),并推到这个刚创建的远程仓库上来
红色框2:把已经写好代码的本地仓库推到远程来。
红色框3:从其他的代码仓库导入
蓝色框是用来选择链接方式。这里我们可以选择ssh,因为已经建立了公钥的认证。
目前,在GitHub上的这个Test1仓库还是空的,GitHub告诉我们,可以从这个仓库克隆出新的仓库,也可以把一个已有的本地仓库与之关联,然后,把本地仓库的内容推送到GitHub仓库。
现在,我们根据GitHub的提示,在本地已有的git_trainning仓库下运行命令:
shuais-MacBook-Pro:.ssh dandyzhang$ cd ..
shuais-MacBook-Pro:~ dandyzhang$ cd git_test
shuais-MacBook-Pro:git_test dandyzhang$ ls -af
.            first_git_file.txt    .git
..            Readme
shuais-MacBook-Pro:git_test dandyzhang$ git remote add origin https://github.com/dandy-weeknd/Test1.git
shuais-MacBook-Pro:git_test dandyzhang$ git push -u origin master
fatal: unable to access 'https://github.com/dandy-weeknd/Test1.git/': Could not resolve host: github.com
shuais-MacBook-Pro:git_test dandyzhang$ git push -u origin master
Username for 'https://github.com': wuzdandz@163.com
Password for 'https://wuzdandz@163.com@github.com':
Enumerating objects: 17, done.
Counting objects: 100% (17/17), done.
Delta compression using up to 4 threads.
Compressing objects: 100% (13/13), done.
Writing objects: 100% (17/17), 1.51 KiB | 775.00 KiB/s, done.
Total 17 (delta 3), reused 0 (delta 0)
remote: Resolving deltas: 100% (3/3), done.
To https://github.com/dandy-weeknd/Test1.git
 * [new branch]      master -> master
Branch 'master' set up to track remote branch 'master' from 'origin'.
这里先选用的是HTTPS的方式来提交代码仓库源代码;此时刷新页面;

从现在起,只本地做了提交,就可以通过命令:
git push origin master
直接提交到远程源代码仓库:
shuais-MacBook-Pro:git_test dandyzhang$ vim index.html

<html>
<head></head>
<body>
github first index html !
</body>
</html>

shuais-MacBook-Pro:git_test dandyzhang$ git add .
shuais-MacBook-Pro:git_test dandyzhang$ git commit
[master 325453e] github first text file !
 1 file changed, 6 insertions(+)
 create mode 100644 index.html
shuais-MacBook-Pro:git_test dandyzhang$


shuais-MacBook-Pro:git_test dandyzhang$ git push origin master
Enumerating objects: 4, done.
Counting objects: 100% (4/4), done.
Delta compression using up to 4 threads.
Compressing objects: 100% (3/3), done.
Writing objects: 100% (3/3), 382 bytes | 382.00 KiB/s, done.
Total 3 (delta 0), reused 0 (delta 0)
To https://github.com/dandy-weeknd/Test1.git
   b172a52..325453e  master -> master
刷新一下远程仓库:
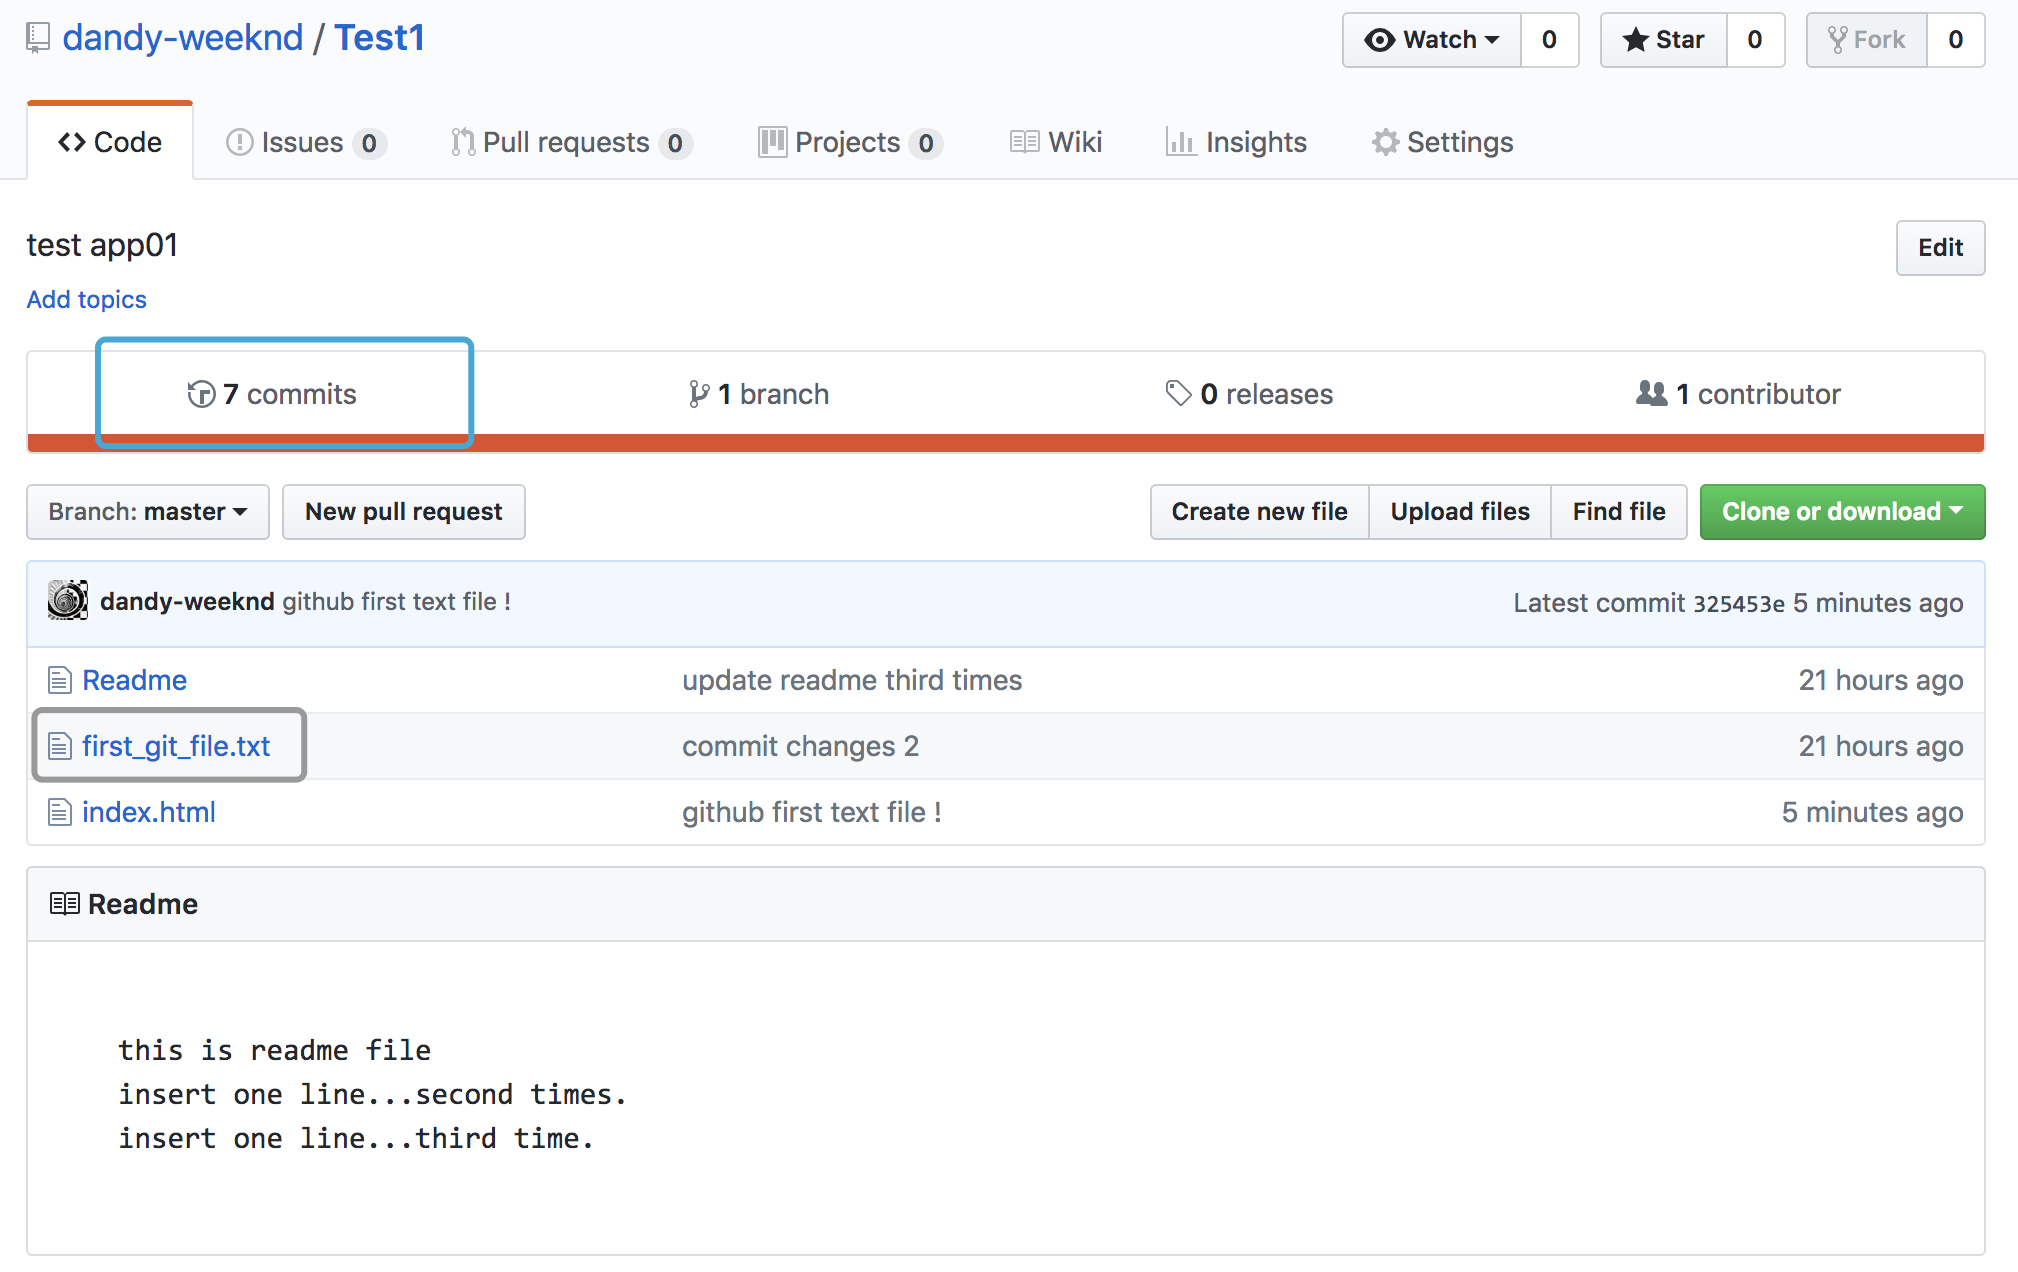
可以看到文件已经更新过来,并且上面有个7commits。点进去看一下:

从远程库克隆
我们讲了先有本地库,后有远程库的时候,如何关联远程库。
现在,假设我们从零开发,那么最好的方式是先创建远程库,然后,从远程库克隆。
首先,登陆GitHub,创建一个新的仓库,名字叫Test2_From_Github:
:
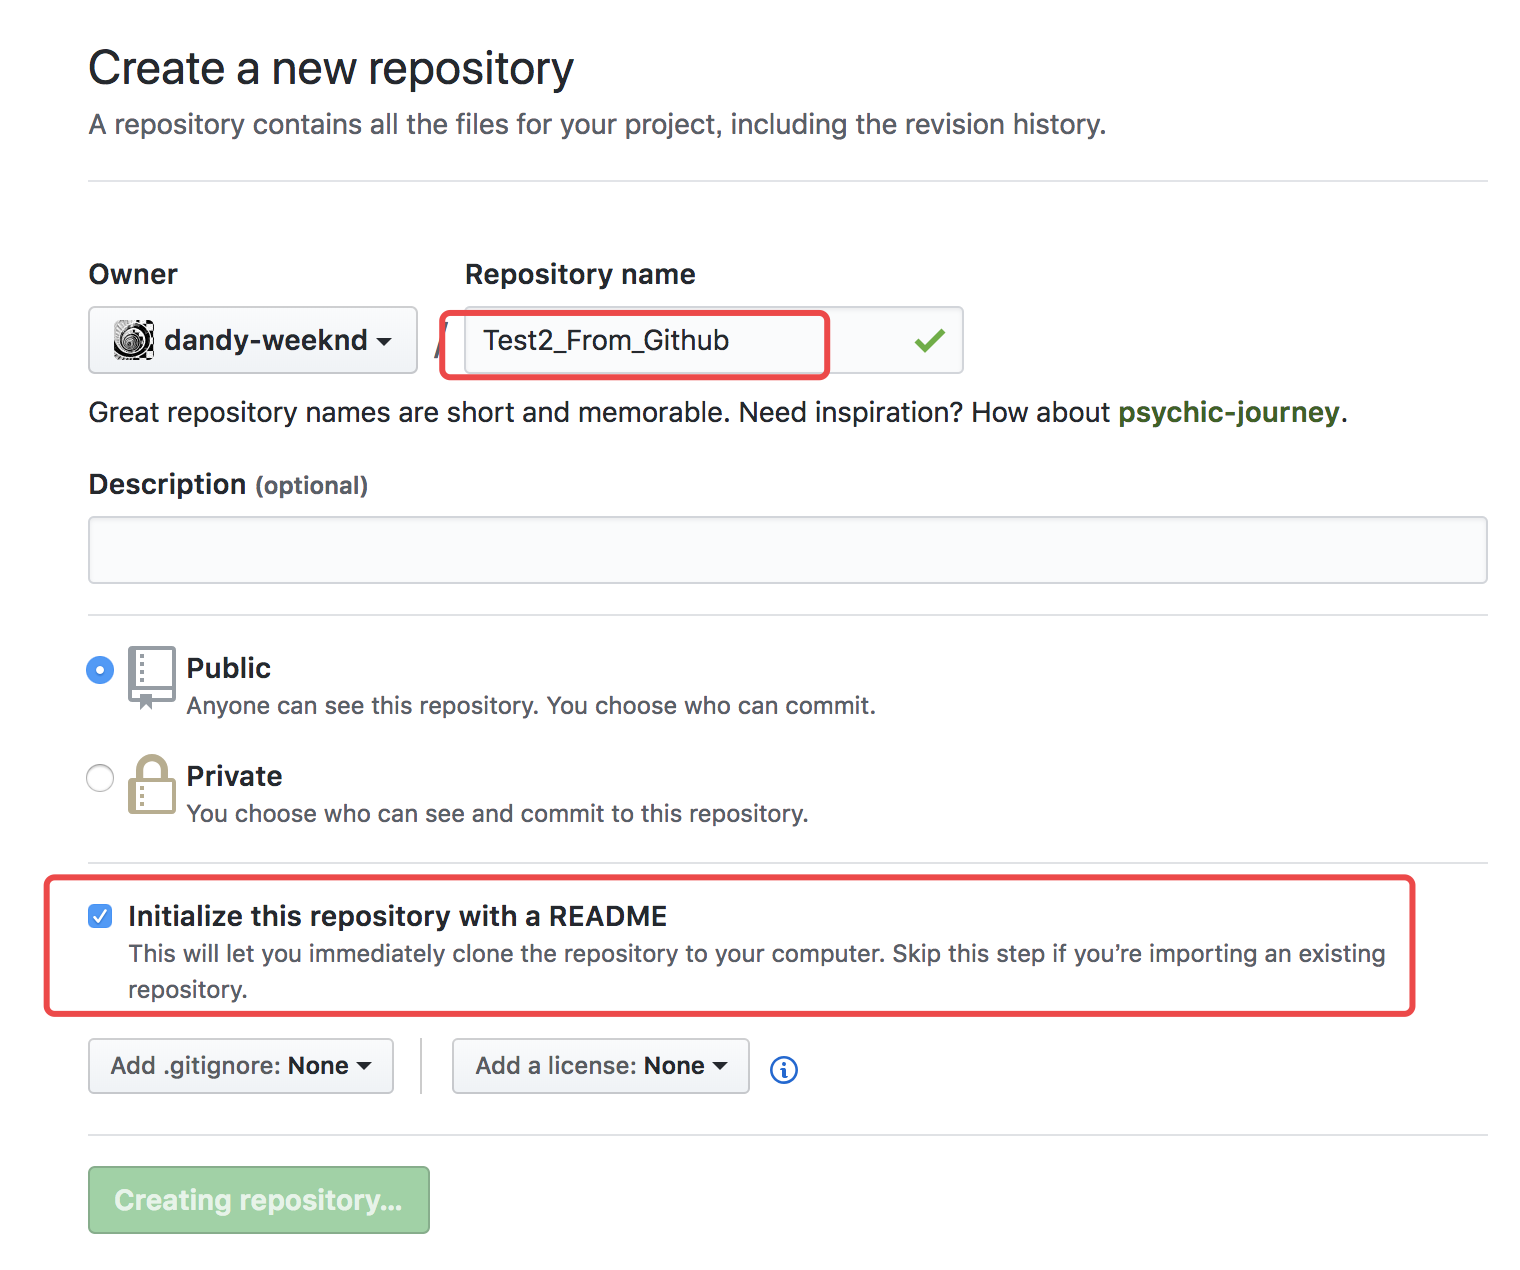
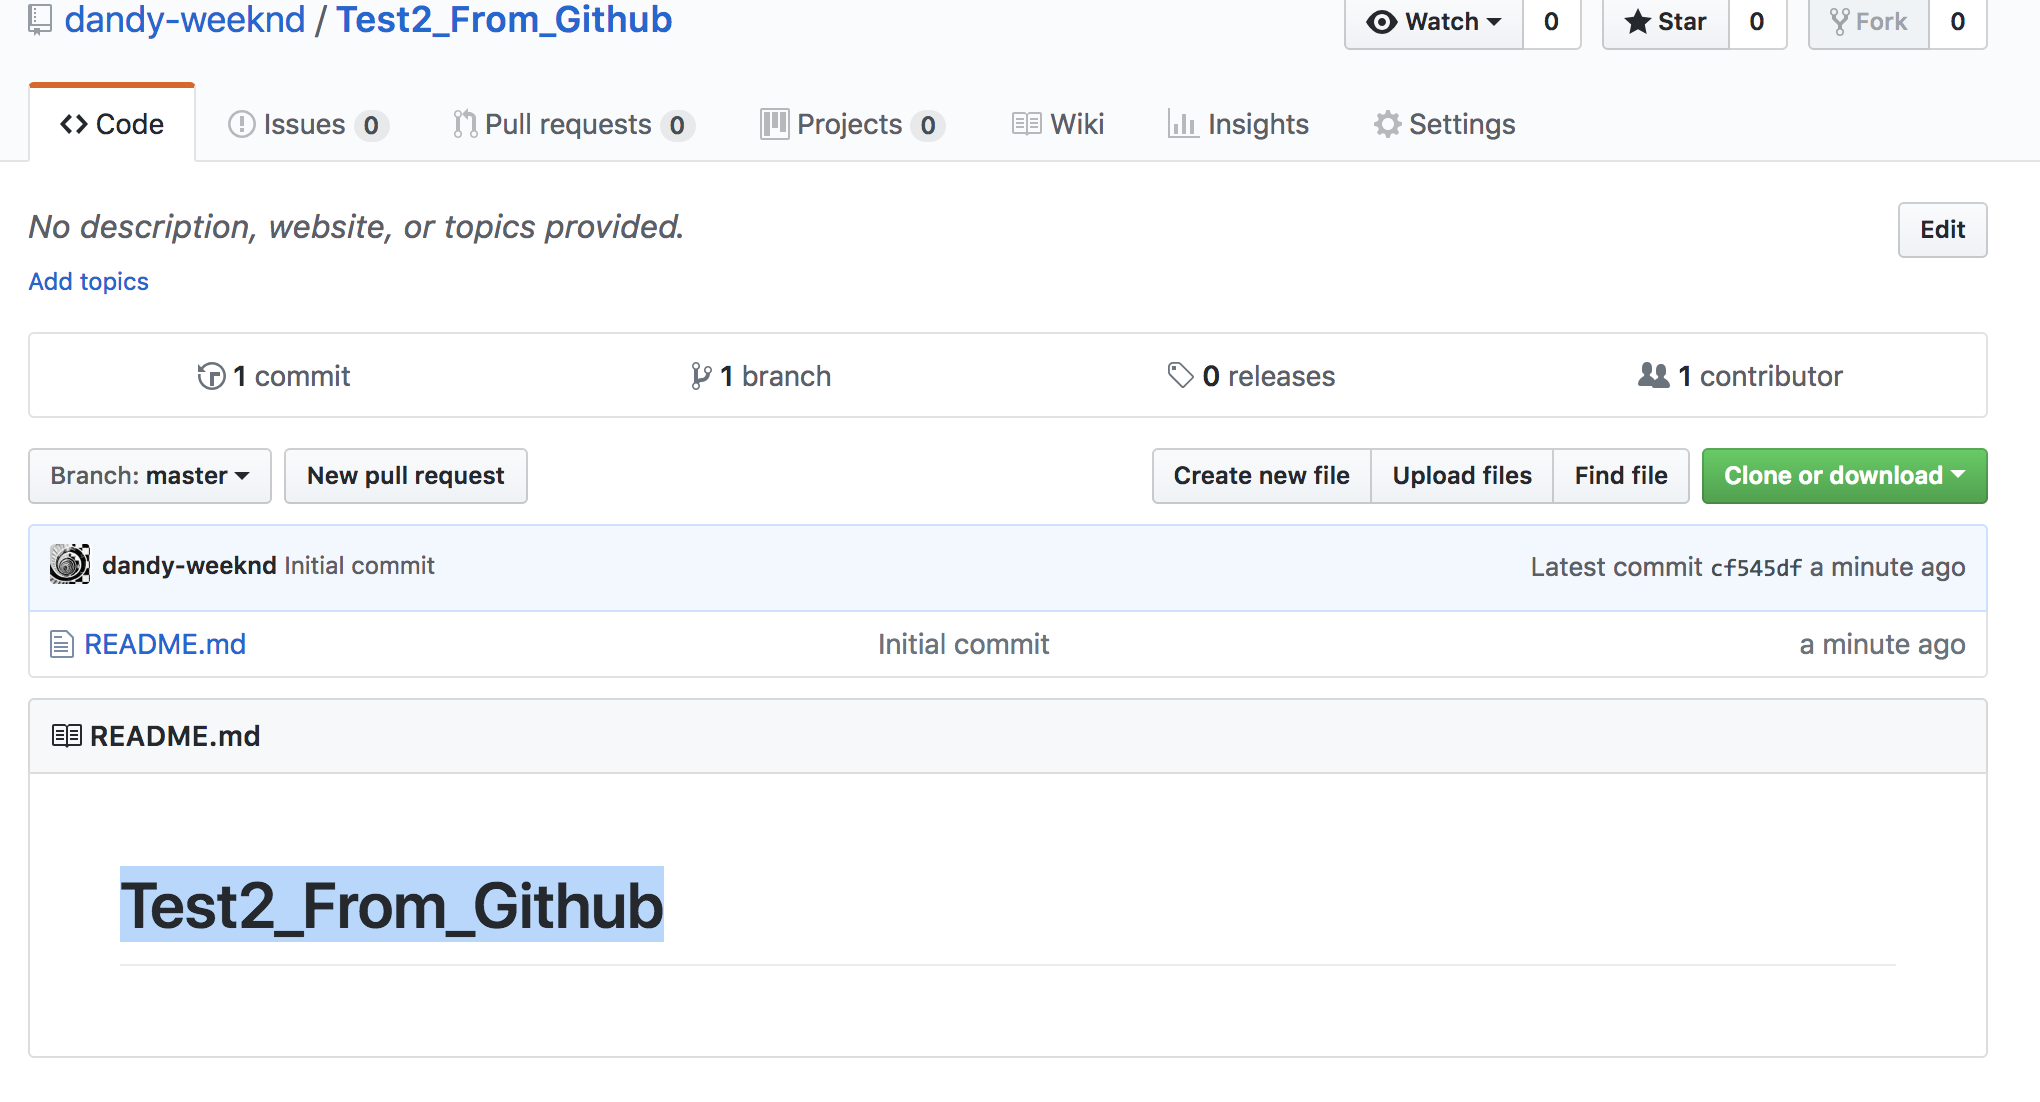
我们勾选Initialize this repository with a README,这样GitHub会自动为我们创建一个README.md文件。创建完毕后,可以看到README.md文件:
现在,远程库已经准备好了,下一步是用命令git clone克隆一个本地库:
在本地找一个你想存放这个远程仓库的目录,然后在本地命令行用git clone 命令来克隆这个远程库:
shuais-MacBook-Pro:~ dandyzhang$ mkdir git_test2
shuais-MacBook-Pro:~ dandyzhang$ cd git_test2

shuais-MacBook-Pro:git_test2 dandyzhang$ git clone https://github.com/dandy-weeknd/Test2_From_Github.git
Cloning into 'Test2_From_Github'...
remote: Counting objects: 3, done.
remote: Total 3 (delta 0), reused 0 (delta 0), pack-reused 0
Unpacking objects: 100% (3/3), done.


shuais-MacBook-Pro:git_test2 dandyzhang$ ls
Test2_From_Github
shuais-MacBook-Pro:git_test2 dandyzhang$ ls -af
.            ..            Test2_From_Github
shuais-MacBook-Pro:git_test2 dandyzhang$ cd Test2_From_Github/
shuais-MacBook-Pro:Test2_From_Github dandyzhang$ ls -af
.        ..        README.md    .git
如果有多个人协作开发,那么每个人各自从远程克隆一份就可以了。
你也许还注意到,GitHub给出的地址不止一个,还可以用https://github.com/triaquae/gitskills.git 这样的地址。实际上,Git支持多种协议,默认的git://使用ssh,但也可以使用https等其他协议。
使用https除了速度慢以外,还有个最大的麻烦是每次推送都必须输入口令,但是在某些只开放http端口的公司内部就无法使用ssh协议而只能用https。
一些小操作
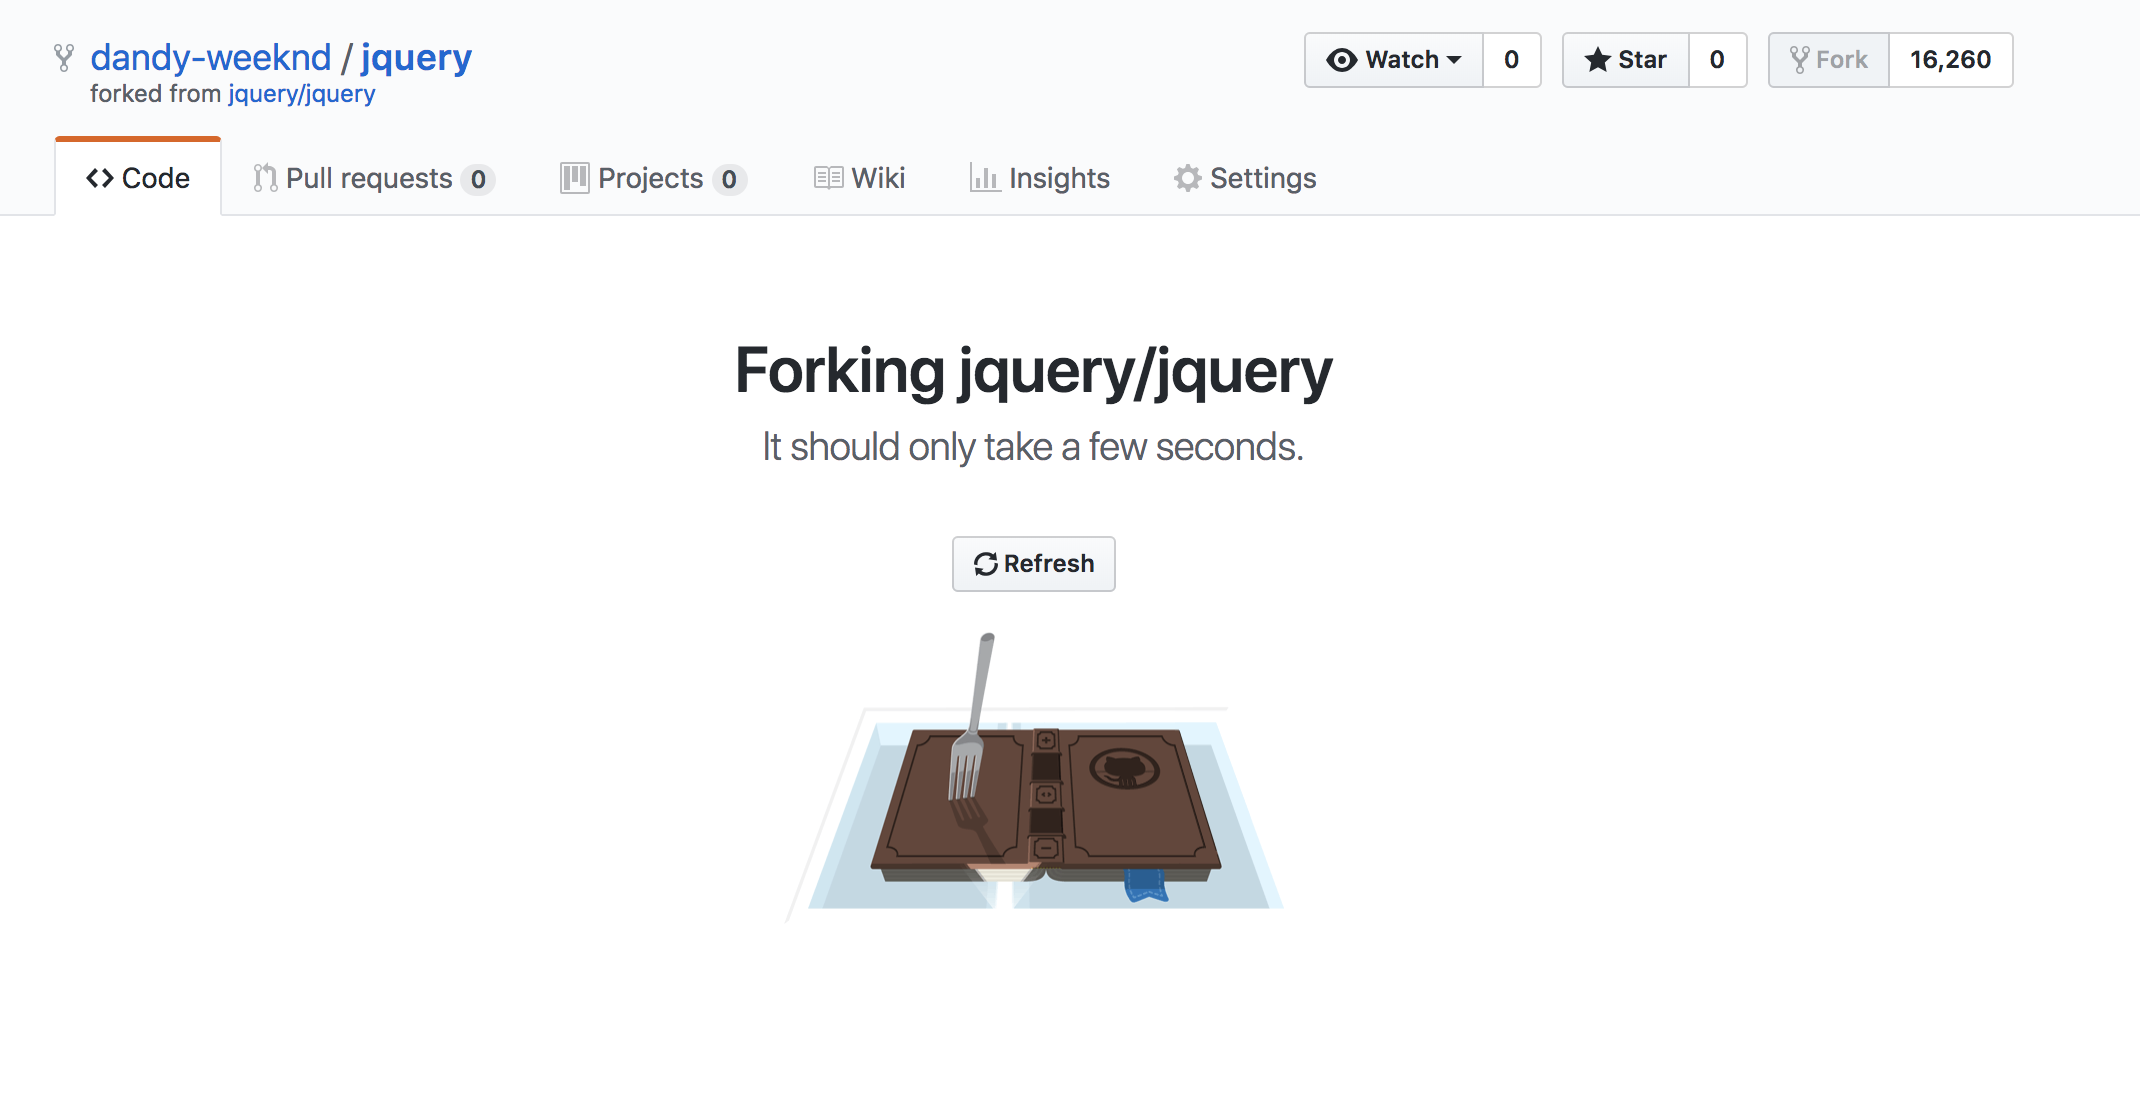
比如,你看到别人的项目代码写的很好,自己又有新的想法,就可以点击fork复制到自己的代码仓库。然后拉取到本地进行更改。
上面我们提到了如何配置ssh,配置好ssh,如何通过ssh连接提交代码到远程代码库呢?
进入到本地代码库,修改隐藏文件夹.ssh下的config文件,把之前提到的蓝框点到ssh,复制连接。
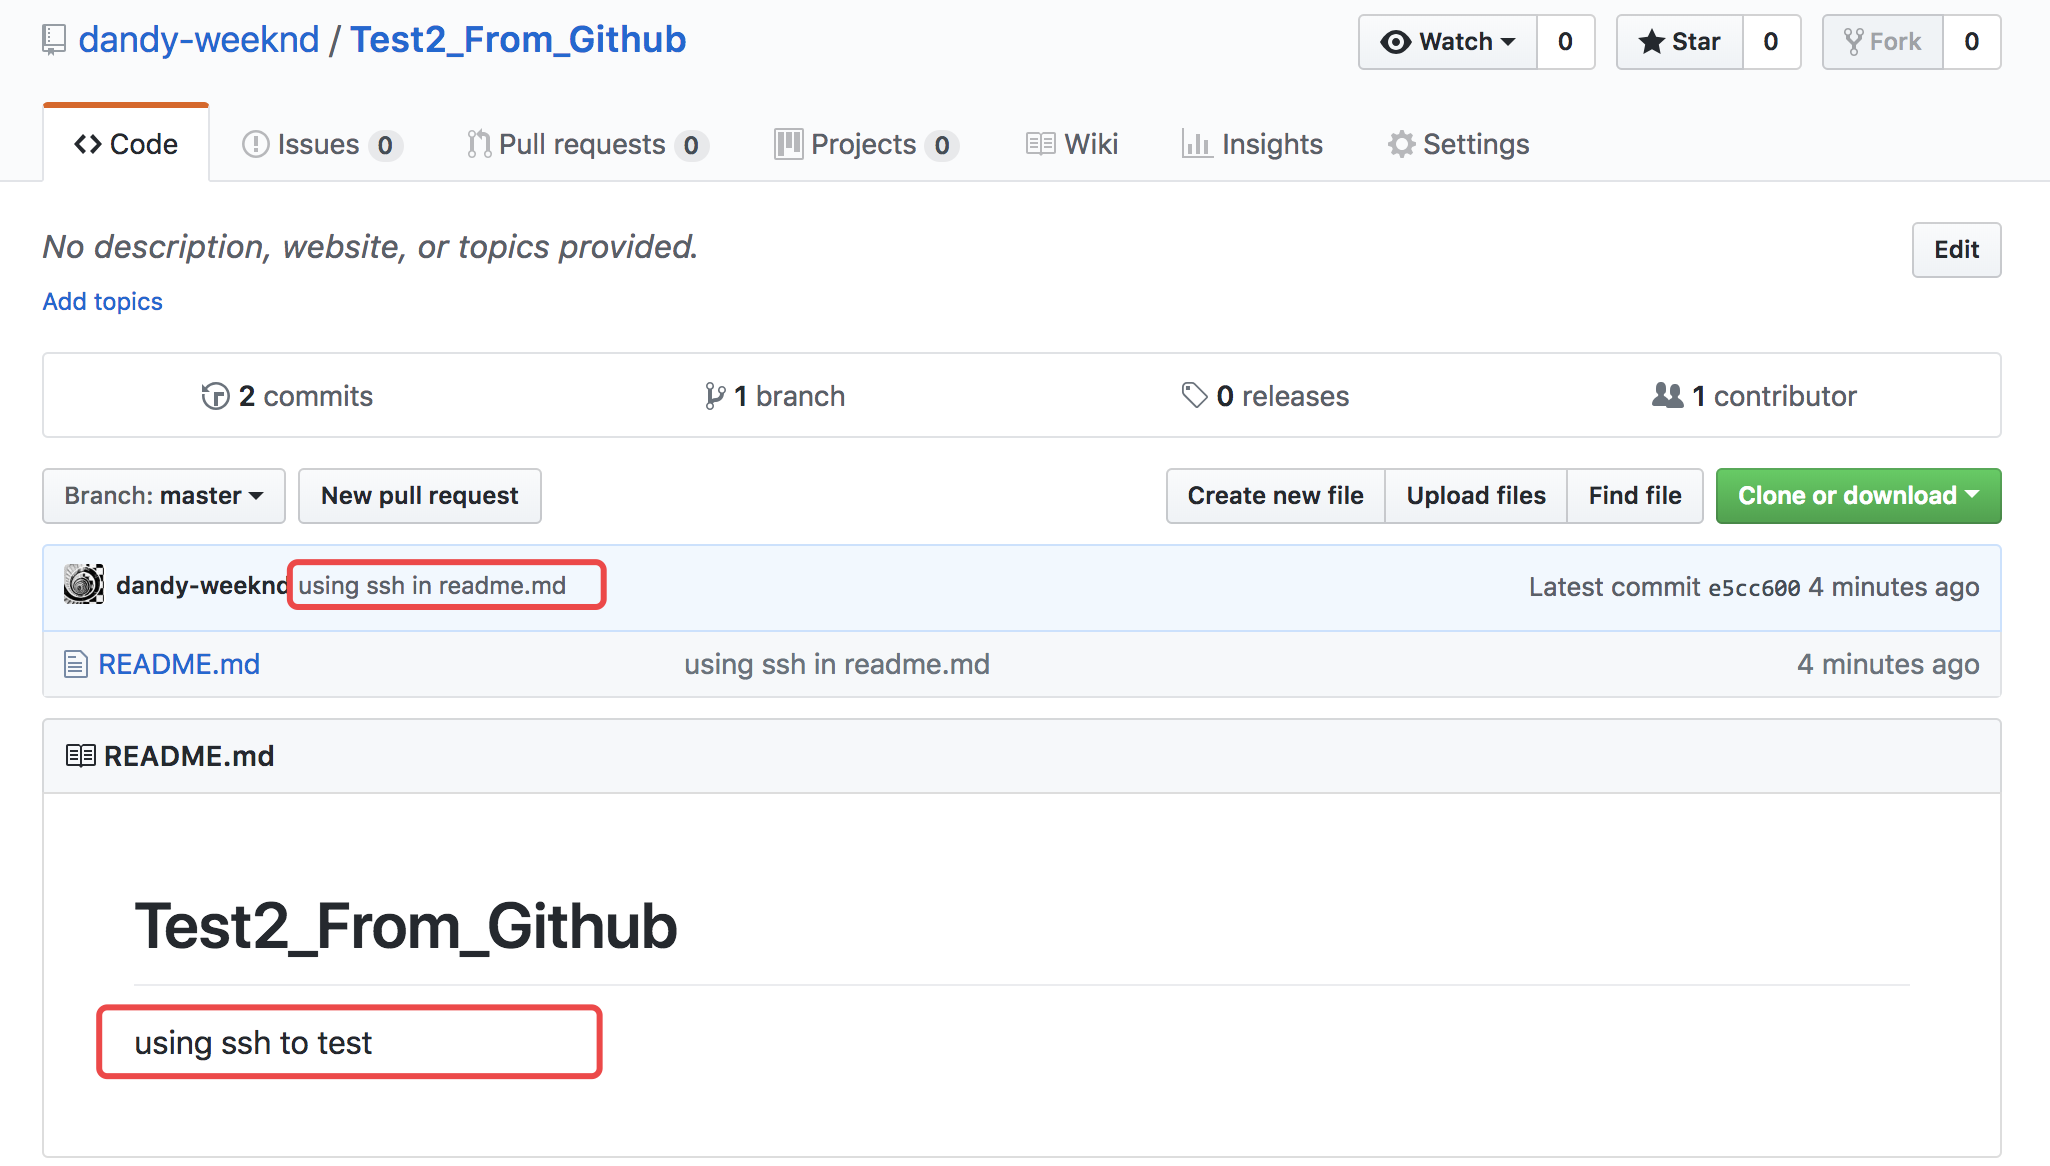
shuais-MacBook-Pro:Test2_From_Github dandyzhang$ vim README.md

# Test2_From_Github
using ssh to test

shuais-MacBook-Pro:Test2_From_Github dandyzhang$ vim .git/config  # 编辑可配置文件,修改提交方式从https到ssh link

[core]
        repositoryformatversion = 0
        filemode = true
        bare = false
        logallrefupdates = true
        ignorecase = true
        precomposeunicode = true
[remote "origin"]
        url = git@github.com:dandy-weeknd/Test2_From_Github.git
        fetch = +refs/heads/*:refs/remotes/origin/*
[branch "master"]
        remote = origin
        merge = refs/heads/master


shuais-MacBook-Pro:Test2_From_Github dandyzhang$ git add .
shuais-MacBook-Pro:Test2_From_Github dandyzhang$ git commit
[master e5cc600] using ssh in readme.md
 1 file changed, 2 insertions(+), 1 deletion(-)
shuais-MacBook-Pro:Test2_From_Github dandyzhang$ git push origin master  # 提交到远程代码库
The authenticity of host 'github.com (52.74.223.119)' can't be established.
RSA key fingerprint is SHA256:nThbg6kXUpJWGl7E1IGOCspRomTxdCARLviKw6E5SY8.
Are you sure you want to continue connecting (yes/no)? y
Please type 'yes' or 'no': yes
Warning: Permanently added 'github.com,52.74.223.119' (RSA) to the list of known hosts.

Enumerating objects: 5, done.
Counting objects: 100% (5/5), done.
Writing objects: 100% (3/3), 287 bytes | 287.00 KiB/s, done.
Total 3 (delta 0), reused 0 (delta 0)
To github.com:dandy-weeknd/Test2_From_Github.git
   cf545df..e5cc600  master -> master
已经上传完成,检查一下。
测试一下协作开发代码合并的问题
既然是协同开发就需要先有个协同者下载代码,这里起一台虚拟机模拟下:
dandy@ubuntu01:~$ git clone https://github.com/dandy-weeknd/Test2_From_Github.git
Cloning into 'Test2_From_Github'...
remote: Counting objects: 6, done.
remote: Compressing objects: 100% (2/2), done.
remote: Total 6 (delta 0), reused 3 (delta 0), pack-reused 0
Unpacking objects: 100% (6/6), done.
Checking connectivity... done.
dandy@ubuntu01:~$ ls
Test2_From_Github
这时候,对源代码进行修改,协作开发。
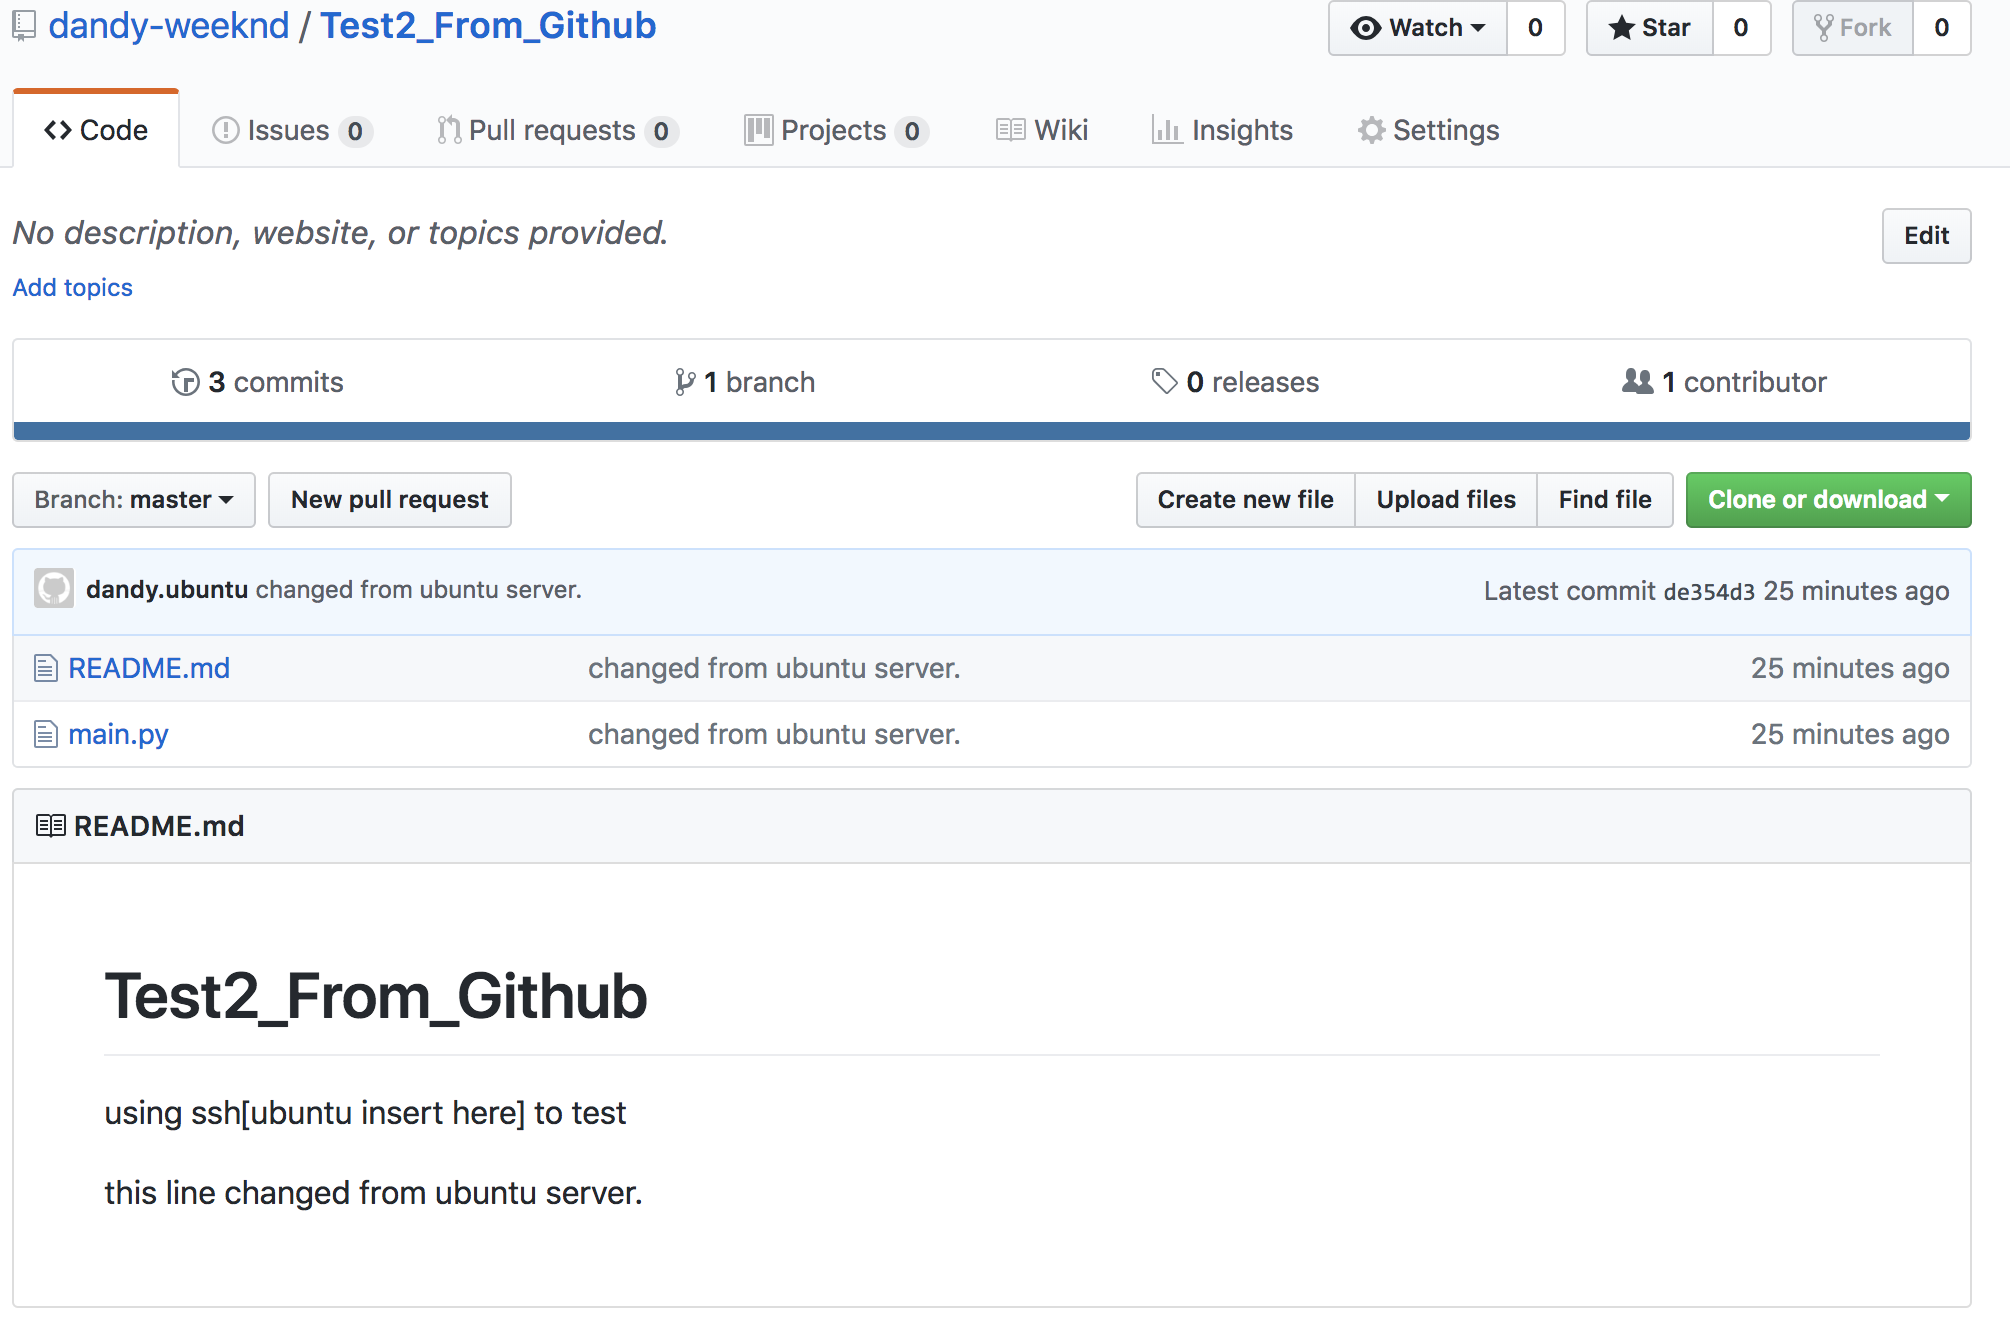
dandy@ubuntu01:~/Test2_From_Github$ vim main.py  # 创建一个新文件

def sayhi(name):
    print('Hi,', name)


dandy@ubuntu01:~/Test2_From_Github$ vim README.md

# Test2_From_Github
using ssh[ubuntu insert here] to test

this line changed from ubuntu server.
修改完进行提交:
git add .
dandy@ubuntu01:~/Test2_From_Github$ git commit -m 'changed from ubuntu server.'

*** Please tell me who you are.

Run

  git config --global user.email "you@example.com"
  git config --global user.name "Your Name"

to set your account's default identity.
Omit --global to set the identity only in this repository.

fatal: unable to auto-detect email address (got 'dandy@ubuntu01.(none)')
dandy@ubuntu01:~/Test2_From_Github$ git config --global user.email "dandy@ubuntu.com"
dandy@ubuntu01:~/Test2_From_Github$ git config --global user.name "dandy.ubuntu"
dandy@ubuntu01:~/Test2_From_Github$ git commit -m 'changed from ubuntu server.'
[master de354d3] changed from ubuntu server.
 2 files changed, 5 insertions(+), 1 deletion(-)
 create mode 100644 main.py
dandy@ubuntu01:~/Test2_From_Github$ git push origin master  # 因为需要账号密码,嫌麻烦,就再建立一个ssh
Username for 'https://github.com':
Password for 'https://github.com':
remote: Anonymous access to dandy-weeknd/Test2_From_Github.git denied.
fatal: Authentication failed for 'https://github.com/dandy-weeknd/Test2_From_Github.git/'
dandy@ubuntu01:~/Test2_From_Github$ vim .git/config  # 修改成ssh连接
dandy@ubuntu01:~/Test2_From_Github$ ls ~/
Test2_From_Github
dandy@ubuntu01:~/Test2_From_Github$ ls ~/.ssh
ls: cannot access '/home/dandy/.ssh': No such file or directory
dandy@ubuntu01:~/Test2_From_Github$ sudo ls ~/.ssh
[sudo] password for dandy:
ls: cannot access '/home/dandy/.ssh': No such file or directory
dandy@ubuntu01:~/Test2_From_Github$ ssh-keygen -t rsa -C "dandy@ubuntu.com"  # 建立秘钥
Generating public/private rsa key pair.
Enter file in which to save the key (/home/dandy/.ssh/id_rsa):
Created directory '/home/dandy/.ssh'.
Enter passphrase (empty for no passphrase):
Enter same passphrase again:
Your identification has been saved in /home/dandy/.ssh/id_rsa.
Your public key has been saved in /home/dandy/.ssh/id_rsa.pub.
The key fingerprint is:
SHA256:4VzEuYG59R9y/CkHR9eNu+yMLV9Cl4tcBMRzR76MdrE dandy@ubuntu.com
The key's randomart image is:
+---[RSA 2048]----+
|         +..oo o+|
|        o.=  oo+=|
|        .o.+ .+++|
|       o.o. o.O.=|
|        S    B+Eo|
|            ooB+o|
|             B+..|
|            o +o |
|             o.  |
+----[SHA256]-----+
dandy@ubuntu01:~/Test2_From_Github$ cd ~/.ssh
dandy@ubuntu01:~/.ssh$ ls
id_rsa  id_rsa.pub
dandy@ubuntu01:~/.ssh$ cd ..
dandy@ubuntu01:~$ vim ~/.ssh/config
dandy@ubuntu01:~$ vim ~/.ssh/id_rsa.pub  # copy公钥
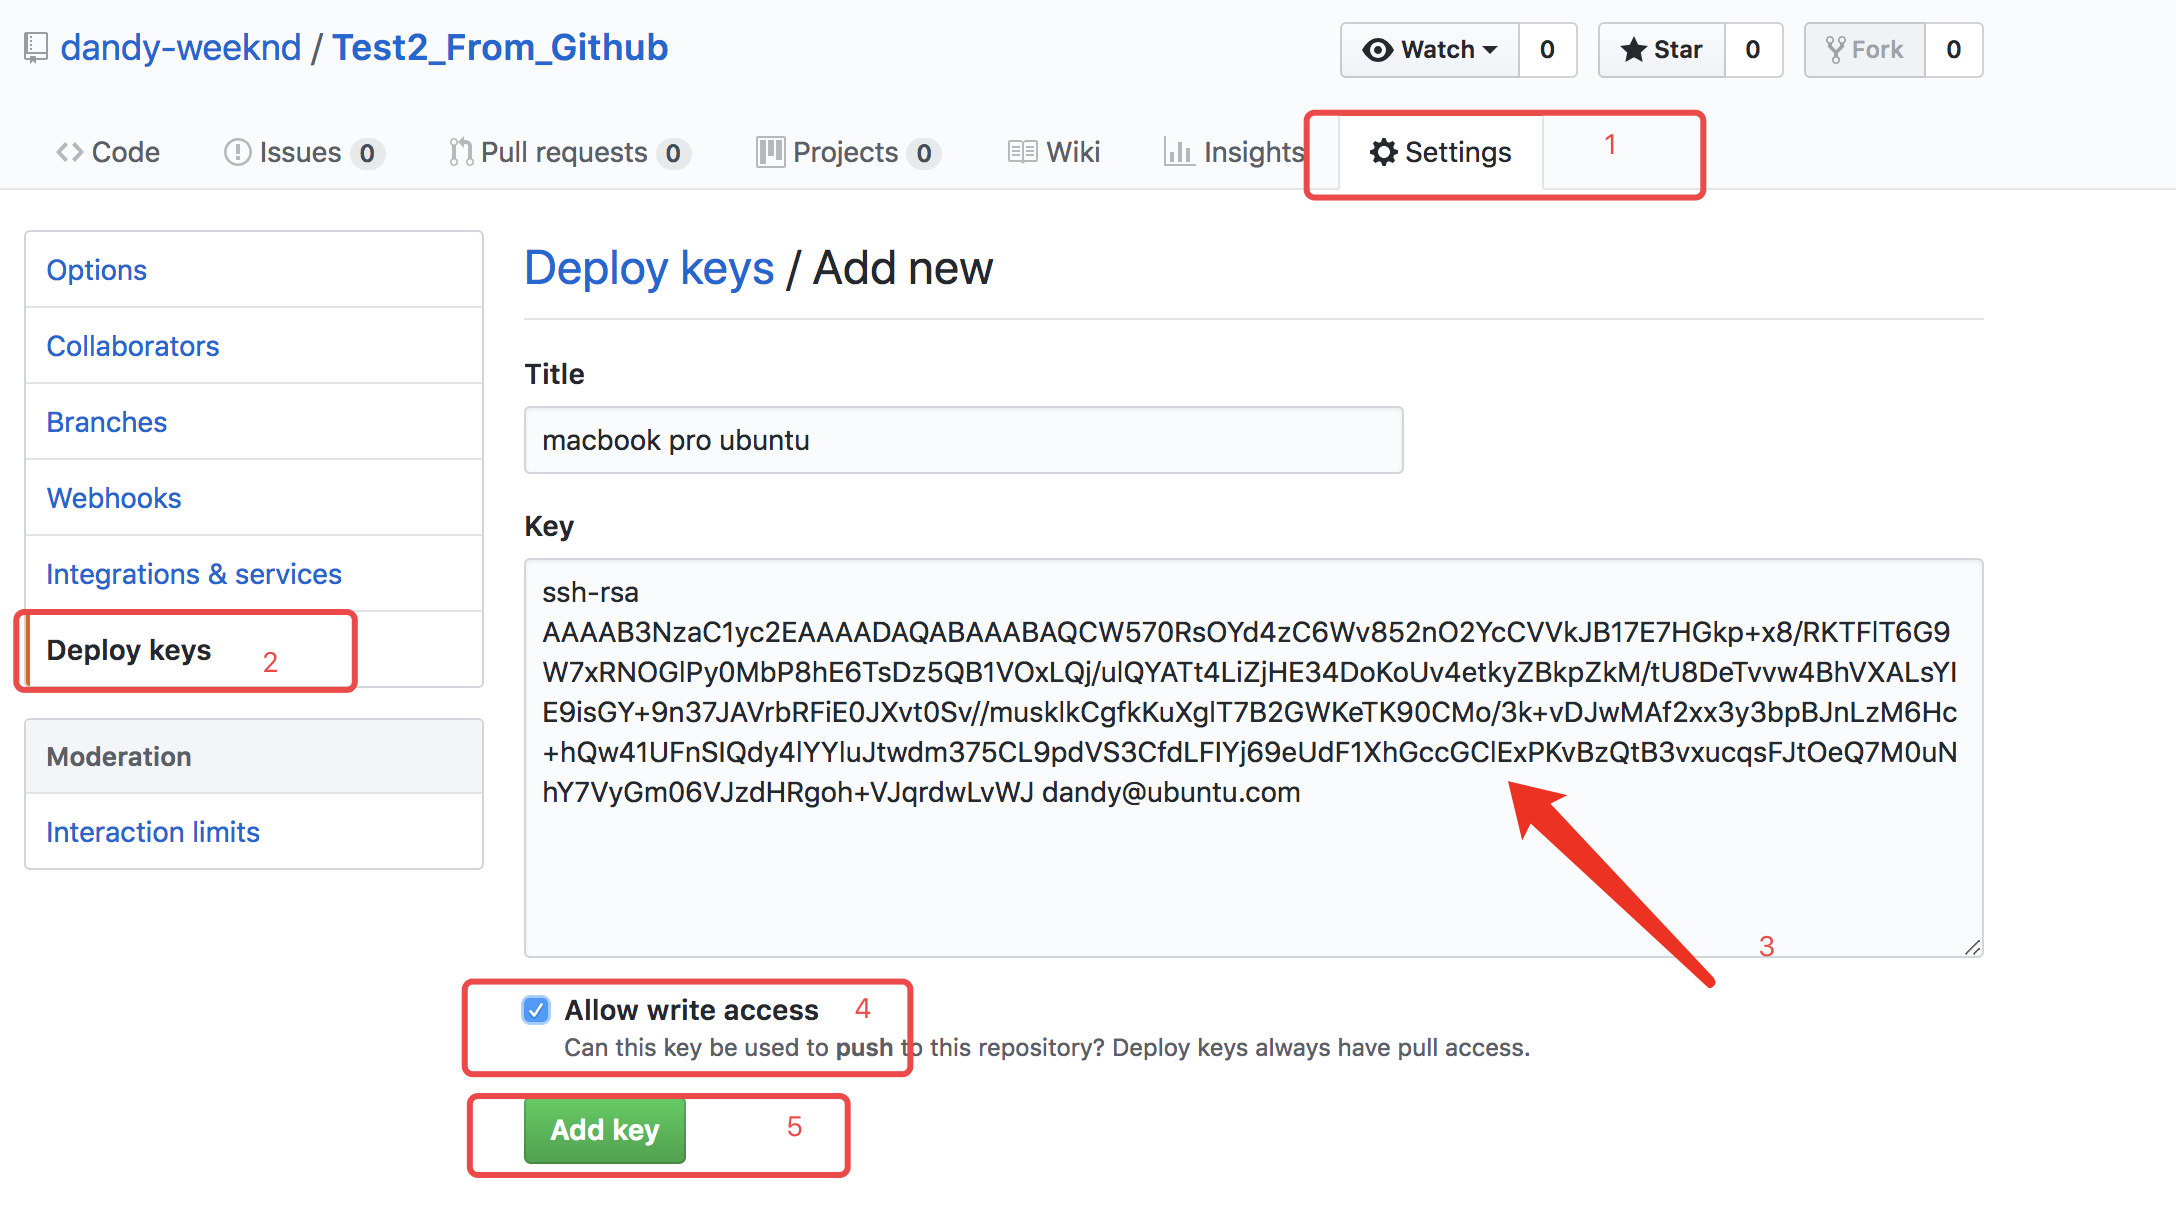
复制出来,注意这一次,不能再像之前那样粘贴在your profile的settings里面了,从作者本身的角度来讲,加入公钥,是为了以后通过电脑上传任何代码到远程代码库都不必输入账号密码,但是作为一个协同者,显然是不能给它这样的权限。所以应该添加到项目代码仓库的settings中;如图中的deploy keys
现在我们重新提交一次虚拟机本地代码库到远程github源代码库
dandy@ubuntu01:~$ ls
Test2_From_Github
dandy@ubuntu01:~$ cd Test2_From_Github/
dandy@ubuntu01:~/Test2_From_Github$ git push origin master
The authenticity of host 'github.com (52.74.223.119)' can't be established.
RSA key fingerprint is SHA256:nThbg6kXUpJWGl7E1IGOCspRomTxdCARLviKw6E5SY8.
Are you sure you want to continue connecting (yes/no)? yes
Warning: Permanently added 'github.com,52.74.223.119' (RSA) to the list of known hosts.
Counting objects: 4, done.
Delta compression using up to 2 threads.
Compressing objects: 100% (3/3), done.
Writing objects: 100% (4/4), 407 bytes | 0 bytes/s, done.
Total 4 (delta 0), reused 0 (delta 0)
To git@github.com:dandy-weeknd/Test2_From_Github.git
   e5cc600..de354d3  master -> master
效果图:
这时,假定做为开发者中的另一个原作者,不知道远程代码库代码已经更新, 还是在本地修改clone的代码:
shuais-MacBook-Pro:Test2_From_Github dandyzhang$ vim README.md   # 修改了readme

# Test2_From_Github
using ssh to test

I am also editing this project, but i forget to check it from github whether it
is the newest or not?

shuais-MacBook-Pro:Test2_From_Github dandyzhang$ vim setting.py  # 新建了一个文件

import os
Base_dir = os.path.join(__file__)
然后提交到github上:
shuais-MacBook-Pro:Test2_From_Github dandyzhang$ git add .
shuais-MacBook-Pro:Test2_From_Github dandyzhang$ git commit -m 'i am editing this project in macbook pro'
[master 084fd50] i am editing this project in macbook pro
 2 files changed, 5 insertions(+)
 create mode 100644 setting.py

shuais-MacBook-Pro:Test2_From_Github dandyzhang$ git push origin master  # 提交到github上
To github.com:dandy-weeknd/Test2_From_Github.git
 ! [rejected]        master -> master (fetch first)
error: failed to push some refs to 'git@github.com:dandy-weeknd/Test2_From_Github.git'
hint: Updates were rejected because the remote contains work that you do
hint: not have locally. This is usually caused by another repository pushing
hint: to the same ref. You may want to first integrate the remote changes
hint: (e.g., 'git pull ...') before pushing again.
hint: See the 'Note about fast-forwards' in 'git push --help' for details.
可以发现,这一次的代码提交被拒绝了,github已经提示:远程包含的工作文件本地不存在,这通常由于另一个代码仓库提交导致,在你提交到github前,需要整合,合并代码。
这里再引入一个新的git命令:
git pull
用来将远程新的代码下载下来,但是有可能把本地修改过的文件覆盖掉。先试一下:
shuais-MacBook-Pro:Test2_From_Github dandyzhang$ git pull
Warning: Permanently added the RSA host key for IP address '13.229.188.59' to the list of known hosts.
remote: Counting objects: 4, done.
remote: Compressing objects: 100% (3/3), done.
remote: Total 4 (delta 0), reused 4 (delta 0), pack-reused 0
Unpacking objects: 100% (4/4), done.
From github.com:dandy-weeknd/Test2_From_Github
   e5cc600..de354d3  master     -> origin/master
Auto-merging README.md
CONFLICT (content): Merge conflict in README.md
Automatic merge failed; fix conflicts and then commit the result.
解释一下上面这段话:开始是计数、压缩、巴拉巴拉。。然后发现有异常就自动合并代码,发现有矛盾问题在readme中,自动合并失败,需要自己解决矛盾并重新提交结果代码。
查看下readme:
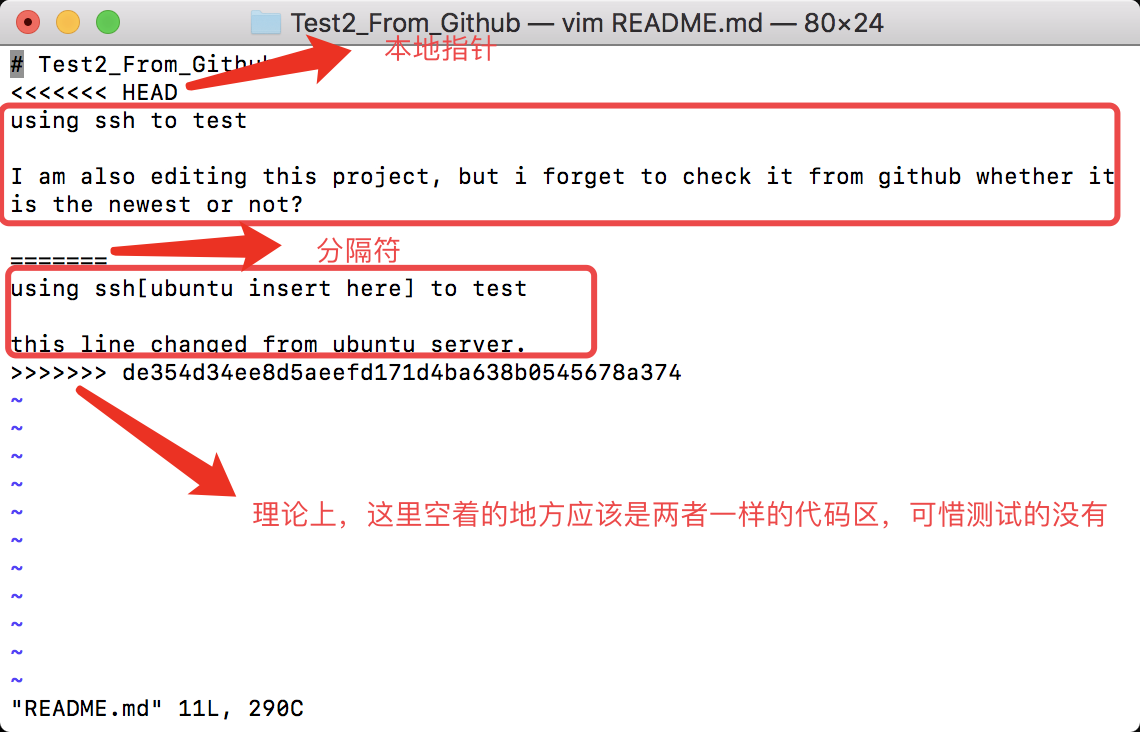
head指向的是本地的文件修改情况、=======分隔符后面github上被修改过的代码,最后>>>>>>>后面的应该是双方都有的代码区。仔细一想,代码肯定是上面的是新的,所以保留下面的代码对其他协作本地git代码库不会产生影响(只需要pull),所以我们修改一下这个readme文件
shuais-MacBook-Pro:Test2_From_Github dandyzhang$ vim README.md

# Test2_From_Github
using ssh to test

I am also editing this project, but i forget to check it from github whether it is the newest or not?

using ssh[ubuntu insert here] to test

this line changed from ubuntu server.
重新再提交一次:
shuais-MacBook-Pro:Test2_From_Github dandyzhang$ git add .
shuais-MacBook-Pro:Test2_From_Github dandyzhang$ git commit -m 'fix two different version code'
[master 775460f] fix two different version code
shuais-MacBook-Pro:Test2_From_Github dandyzhang$ git push origin master
Enumerating objects: 11, done.
Counting objects: 100% (11/11), done.
Delta compression using up to 4 threads.
Compressing objects: 100% (6/6), done.
Writing objects: 100% (7/7), 820 bytes | 410.00 KiB/s, done.
Total 7 (delta 1), reused 0 (delta 0)
remote: Resolving deltas: 100% (1/1), done.
To github.com:dandy-weeknd/Test2_From_Github.git
   de354d3..775460f  master -> master
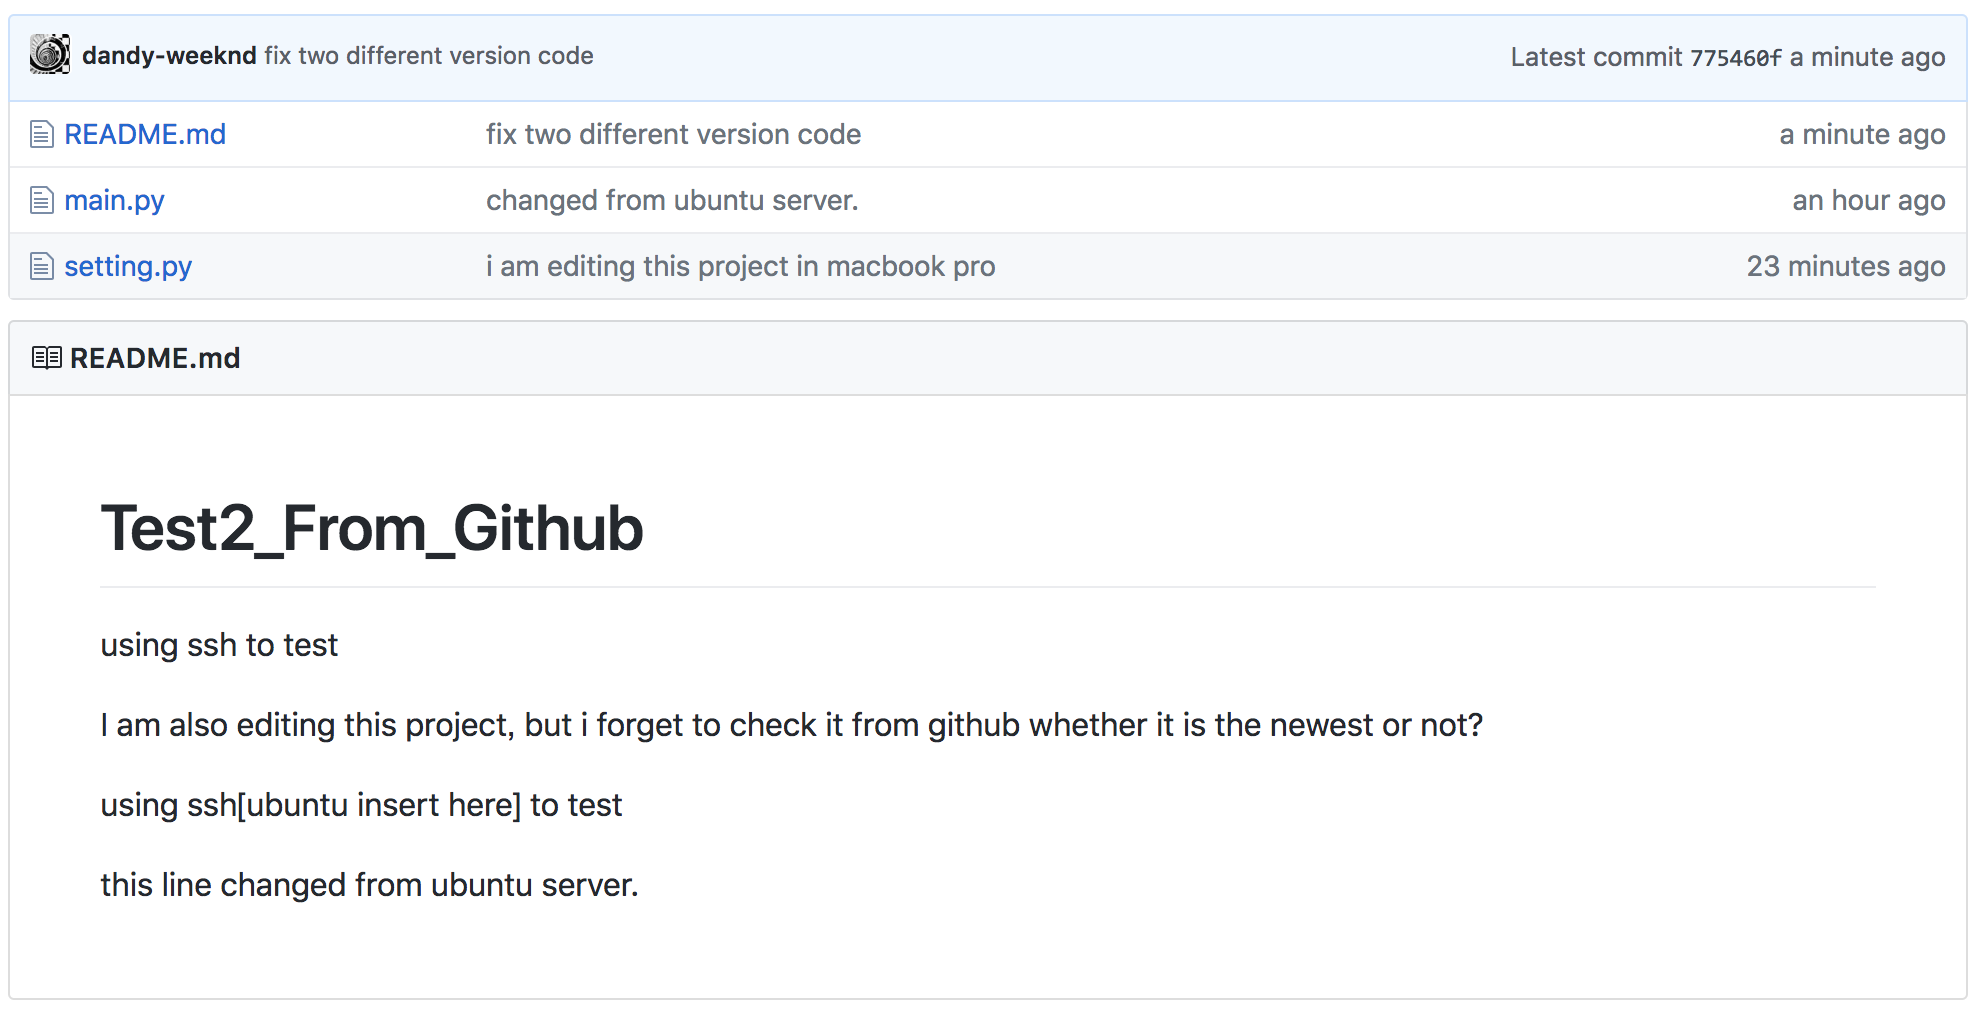
完美解决。
这里诠释的只是git对于版本矛盾的自主解决方案演示,但是在真正的生产环境下,显然不可能会是这样处理的。这方面的问题,之后再做探讨!
分支管理
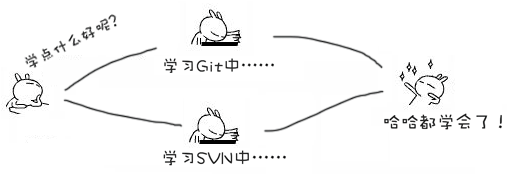
分支就是科幻电影里面的平行宇宙,当你正在电脑前努力学习Git的时候,另一个你正在另一个平行宇宙里努力学习SVN。
如果两个平行宇宙互不干扰,那对现在的你也没啥影响。不过,在某个时间点,两个平行宇宙合并了,结果,你既学会了Git又学会了SVN!
分支在实际中有什么用呢?假设你准备开发一个新功能,但是需要两周才能完成,第一周你写了50%的代码,如果立刻提交,由于代码还没写完,不完整的代码库会导致别人不能干活了。如果等代码全部写完再一次提交,又存在丢失每天进度的巨大风险。
现在有了分支,就不用怕了。你创建了一个属于你自己的分支,别人看不到,还继续在原来的分支上正常工作,而你在自己的分支上干活,想提交就提交,直到开发完毕后,再一次性合并到原来的分支上,这样,既安全,又不影响别人工作。
其他版本控制系统如SVN等都有分支管理,但是用过之后你会发现,这些版本控制系统创建和切换分支比蜗牛还慢,简直让人无法忍受,结果分支功能成了摆设,大家都不去用。
但Git的分支是与众不同的,无论创建、切换和删除分支,Git在1秒钟之内就能完成!无论你的版本库是1个文件还是1万个文件。
1、创建与合并分支
在学习版本回退部分时,你已经知道,每次提交,Git都把它们串成一条时间线,这条时间线就是一个分支。截止到目前,只有一条时间线,在Git里,这个分支叫主分支,即master分支。HEAD严格来说不是指向提交,而是指向master,master才是指向提交的,所以,HEAD指向的就是当前分支。
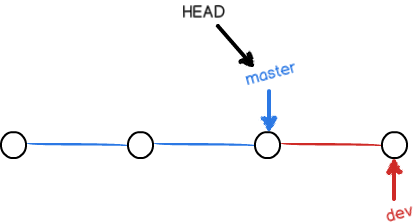
一开始的时候,master分支是一条线,Git用master指向最新的提交,再用HEAD指向master,就能确定当前分支,以及当前分支的提交点:
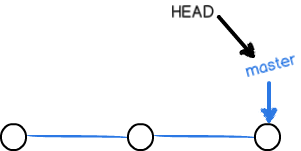
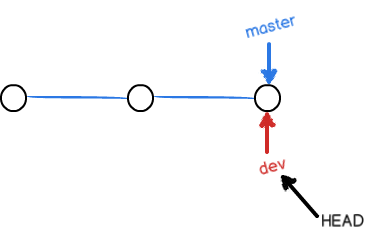
每次提交,master分支都会向前移动一步,这样,随着你不断提交,master分支的线也越来越长, 当我们创建新的分支,例如dev时,Git新建了一个指针叫dev,指向master相同的提交,再把HEAD指向dev,就表示当前分支在dev上:
假如我们在dev上的工作完成了,就可以把dev合并到master上。Git怎么合并呢?最简单的方法,就是直接把master指向dev的当前提交,就完成了合并:
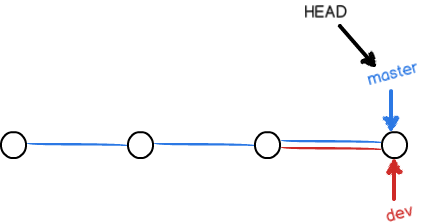
所以Git合并分支也很快!就改改指针,工作区内容也不变!
合并完分支后,甚至可以删除dev分支。删除dev分支就是把dev指针给删掉,删掉后,我们就剩下了一条master分支:
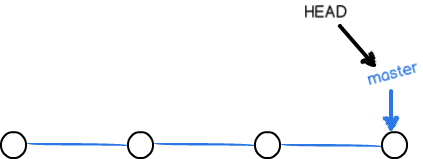
真是太神奇了,你看得出来有些提交是通过分支完成的吗?

上面这张图就诠释了协作开发的分支与合并的大概流程图。
下面开始实战
首先,需要先创建dev分支:
shuais-MacBook-Pro:~ dandyzhang$ ls
Applications    Downloads    Music        PycharmProjects    venv
Desktop        Library        Pictures    git_test
Documents    Movies        Public        git_test2
shuais-MacBook-Pro:~ dandyzhang$ cd git_test2
shuais-MacBook-Pro:git_test2 dandyzhang$ ls
Test2_From_Github
shuais-MacBook-Pro:git_test2 dandyzhang$ cd Test2_From_Github/
shuais-MacBook-Pro:Test2_From_Github dandyzhang$ git checkout -b dev
Switched to a new branch 'dev'
git checkout命令加上-b参数表示创建并切换,相当于以下两条命令:
git branch dev  # 创建branch分支
git checkout dev  # 转换到分支dev上
然后,用git branch命令查看当前分支:
shuais-MacBook-Pro:Test2_From_Github dandyzhang$ git branch
* dev
  master
git branch命令会列出所有分支,当前分支前面会标一个*号。
然后,我们就可以在dev分支上正常提交,比如对readme做个修改,加上一行:
shuais-MacBook-Pro:Test2_From_Github dandyzhang$ ls
README.md    main.py        setting.py
shuais-MacBook-Pro:Test2_From_Github dandyzhang$ vim README.md

# Test2_From_Github
using ssh to test

I am also editing this project, but i forget to check it from github whether it is the newest or not?

using ssh[ubuntu insert here] to [dev add here] test

this line changed from ubuntu server.

here we are using dev to add a new line.
然后提交:
shuais-MacBook-Pro:Test2_From_Github dandyzhang$ git add .
shuais-MacBook-Pro:Test2_From_Github dandyzhang$ git commit -m 'from branch dev'
[dev 524b382] from branch dev
 1 file changed, 4 insertions(+), 1 deletion(-)
先切换回master分支:
shuais-MacBook-Pro:Test2_From_Github dandyzhang$ git checkout master
Switched to branch 'master'
Your branch is up to date with 'origin/master'.
shuais-MacBook-Pro:Test2_From_Github dandyzhang$ git branch
  dev
* master
查看readme文件,刚才添加的内容不见了!
shuais-MacBook-Pro:Test2_From_Github dandyzhang$ vim README.md

# Test2_From_Github
using ssh to test

I am also editing this project, but i forget to check it from github whether it is the newest or not?

using ssh[ubuntu insert here] to test

this line changed from ubuntu server.
因为那个提交是在dev分支上,而master分支此刻的提交点并没有变:
现在,我们把dev分支的工作成果合并到master分支上:
shuais-MacBook-Pro:Test2_From_Github dandyzhang$ git merge dev
Updating 775460f..524b382
Fast-forward
 README.md | 5 ++++-
 1 file changed, 4 insertions(+), 1 deletion(-)
注意一下上面合并代码到master主线的操作,需要先add到stage并commit到分支仓库,然后切换到master主分支,最后merge 分支。git merge命令用于合并指定分支到当前分支。合并后,再查看readme.txt的内容,就可以看到,和dev分支的最新提交是完全一样的。
注意到上面的Fast-forward信息,Git告诉我们,这次合并是“快进模式”,也就是直接把master指向dev的当前提交,所以合并速度非常快。
当然,也不是每次合并都能Fast-forward,我们后面会讲其他方式的合并。
合并完成后,就可以放心地删除dev分支了:
shuais-MacBook-Pro:Test2_From_Github dandyzhang$ git branch -d dev
Deleted branch dev (was 524b382).
删除后,查看branch,就只剩下master分支了:
shuais-MacBook-Pro:Test2_From_Github dandyzhang$ git branch
* master
因为创建、合并和删除分支非常快,所以Git鼓励你使用分支完成某个任务,合并后再删掉分支,这和直接在master分支上工作效果是一样的,但过程更安全。
2、解决冲突
人生不如意之事十之八九,合并分支往往也不是一帆风顺的。
准备新的feature1分支,继续我们的新分支开发:
shuais-MacBook-Pro:Test2_From_Github dandyzhang$ git checkout -b feature1
Switched to a new branch 'feature1'
shuais-MacBook-Pro:Test2_From_Github dandyzhang$ git branch
* feature1
  master
修改readme:
shuais-MacBook-Pro:Test2_From_Github dandyzhang$ vim README.md

# Test2_From_Github
using ssh to test

I am also editing this project, but i forget to check it from github whether it is the newest or not?

using ssh[ubuntu insert here] to [dev add here] test [feature1]

this line changed from ubuntu server.

here we are using dev to add a new line.

another one line insert by feature1.
在feature1分支上提交:
shuais-MacBook-Pro:Test2_From_Github dandyzhang$ git add .
shuais-MacBook-Pro:Test2_From_Github dandyzhang$ git commit -m 'add by feature1'
[feature1 7ba88de] add by feature1
 1 file changed, 2 insertions(+), 1 deletion(-)
切换到master分支:
shuais-MacBook-Pro:Test2_From_Github dandyzhang$ git checkout master
Switched to branch 'master'
Your branch is ahead of 'origin/master' by 1 commit.
  (use "git push" to publish your local commits)
Git自动的提示我们当前master分支比远程的feature1落后一个提交。
在master分支上修改readme文件的最后一行:
shuais-MacBook-Pro:Test2_From_Github dandyzhang$ vim README.md

# Test2_From_Github
using ssh to test

I am also editing this project, but i forget to check it from github whether it is the newest or not?

using ssh[ubuntu insert here] to [dev add here] test

this line changed from ubuntu server.

here we are using dev to add a new line.

add this line from master, do not care whether if exists new branch.
提交:
shuais-MacBook-Pro:Test2_From_Github dandyzhang$ git add .
shuais-MacBook-Pro:Test2_From_Github dandyzhang$ git commit -m 'master update'
[master f3490d7] master update
 1 file changed, 1 insertion(+), 1 deletion(-)
现在,master分支和feature1分支各自都分别有新的提交,变成了这样:
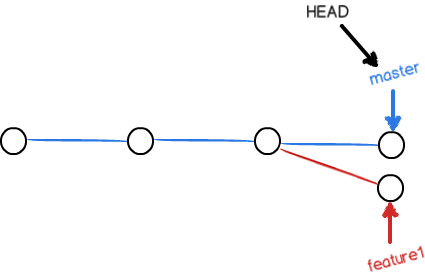
这种情况下,Git无法执行“快速合并”,只能试图把各自的修改合并起来,但这种合并就可能会有冲突,我们试试看:
shuais-MacBook-Pro:Test2_From_Github dandyzhang$ git merge feature1
Auto-merging README.md
CONFLICT (content): Merge conflict in README.md
Automatic merge failed; fix conflicts and then commit the result.
shuais-MacBook-Pro:Test2_From_Github dandyzhang$
不出所料,果然冲突了!Git告诉我们readme文件存在冲突,必须手动解决冲突后再提交。git status也可以告诉我们冲突的文件:
shuais-MacBook-Pro:Test2_From_Github dandyzhang$ git status
On branch master
Your branch is ahead of 'origin/master' by 2 commits.
  (use "git push" to publish your local commits)

You have unmerged paths.
  (fix conflicts and run "git commit")
  (use "git merge --abort" to abort the merge)

Unmerged paths:
  (use "git add <file>..." to mark resolution)

    both modified:   README.md

no changes added to commit (use "git add" and/or "git commit -a")
我们可以直接查看readme.txt的内容:
# Test2_From_Github
using ssh to test

I am also editing this project, but i forget to check it from github whether it is the newest or not?

using ssh[ubuntu insert here] to [dev add here] test [feature1]

this line changed from ubuntu server.

here we are using dev to add a new line.

<<<<<<< HEAD
add this line from master, do not care whether if exists new branch.
=======
another one line insert by feature1.

>>>>>>> feature1
Git用<<<<<<<,=======,>>>>>>>标记出不同分支的内容,我们修改如下后保存:
# Test2_From_Github
using ssh to test

I am also editing this project, but i forget to check it from github whether it is the newest or not?

using ssh[ubuntu insert here] to [dev add here] test [feature1]

this line changed from ubuntu server.

here we are using dev to add a new line.

add this line from master, do not care whether if exists new branch.

another one line insert by feature1.
再提交:
shuais-MacBook-Pro:Test2_From_Github dandyzhang$ git add .
shuais-MacBook-Pro:Test2_From_Github dandyzhang$ git commit -m 'master and feature1 conflict fixed'
[master 0497781] master and feature1 conflict fixed
现在,master分支和feature1分支变成了下图所示:
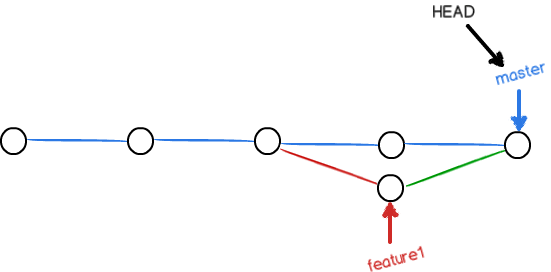
用带参数的git log也可以看到分支的合并情况:
shuais-MacBook-Pro:Test2_From_Github dandyzhang$ git log --graph --pretty=oneline
*   0497781e6ce609ef7a9fa425769a11a5dc7847b9 (HEAD -> master) master and feature1 conflict fixed
|\
| * 7ba88de0e18caca1681ae66db36fa513d8f5a38c (feature1) add by feature1
* | f3490d750855375bd3717b304ba517cebf987f2d master update
|/
* 524b382d29793105eed5c0497fd3eb2587a0e3ba from branch dev
*   775460fa81586121344553f09e9f62b58f5d3200 (origin/master, origin/HEAD) fix two different version code
|\
| * de354d34ee8d5aeefd171d4ba638b0545678a374 changed from ubuntu server.
* | 084fd50f4cdc3255bd26ab1fb8bbee4f020700c6 i am editing this project in macbook pro
|/
* e5cc600986322beb77930cf428ab3b07f72bd7f7 using ssh in readme.md
* cf545dfa993fcc8ecd43f117286f606922b7d0d1 Initial commit
3、分支策略
在实际开发中,我们应该按照几个基本原则进行分支管理:
首先,master分支应该是非常稳定的,也就是仅用来发布新版本,平时不能在上面干活;
那在哪干活呢?干活都在dev分支上,也就是说,dev分支是不稳定的,到某个时候,比如1.0版本发布时,再把dev分支合并到master上,在master分支发布1.0版本;
你和你的小伙伴们每个人都在dev分支上干活,每个人都有自己的分支,时不时地往dev分支上合并就可以了。
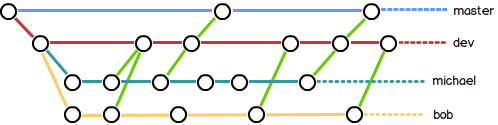
所以,团队合作的分支看起来就像这样:
4、bug分支
软件开发中,bug就像家常便饭一样。有了bug就需要修复,在Git中,由于分支是如此的强大,所以,每个bug都可以通过一个新的临时分支来修复,修复后,合并分支,然后将临时分支删除。
首先,模拟创立一个分支进行开发:
shuais-MacBook-Pro:Test2_From_Github dandyzhang$ git branch
* master

shuais-MacBook-Pro:Test2_From_Github dandyzhang$ git checkout -b dev
Switched to a new branch 'dev'
shuais-MacBook-Pro:Test2_From_Github dandyzhang$ git branch
* dev
  master

shuais-MacBook-Pro:Test2_From_Github dandyzhang$ vim README.md

# Test2_From_Github
using ssh to test

I am also editing this project, but i forget to check it from github whether it is the newest or not?

using ssh[ubuntu insert here] to [dev add here] test [feature1]

this line changed from ubuntu server.

here we are using dev to add a new line.

add this line from master, do not care whether if exists new branch.

another one line insert by feature1.

ignore the lines in front of me, developing the new function now...from new dev
and facing a bug101 need to fix..
当你接到一个修复一个代号101的bug的任务时,很自然地,你想创建一个分支bug101来修复它,但是,等等,当前正在dev上进行的工作还没有提交:
shuais-MacBook-Pro:Test2_From_Github dandyzhang$ git status
On branch dev
Changes not staged for commit:
  (use "git add <file>..." to update what will be committed)
  (use "git checkout -- <file>..." to discard changes in working directory)

    modified:   README.md

no changes added to commit (use "git add" and/or "git commit -a")
并不是你不想提交,而是工作只进行到一半,还没法提交,预计完成还需1天时间。但是,必须在两个小时内修复该bug,怎么办?
幸好,Git还提供了一个stash功能,可以把当前工作现场“储藏”起来,等以后恢复现场后继续工作:
shuais-MacBook-Pro:Test2_From_Github dandyzhang$ git stash
Saved working directory and index state WIP on dev: 0497781 master and feature1 conflict fixed

# 上面使用了stash命令,dev分支里面的文件现在已经被管理了,查询一下dev工作区状态

shuais-MacBook-Pro:Test2_From_Github dandyzhang$ git status
On branch dev
nothing to commit, working tree clean
首先确定要在哪个分支上修复bug,假定需要在master分支上修复,就从master创建临时分支:
shuais-MacBook-Pro:Test2_From_Github dandyzhang$ git checkout master
Switched to branch 'master'
Your branch is up to date with 'origin/master'.

shuais-MacBook-Pro:Test2_From_Github dandyzhang$ git checkout -b bug101
Switched to a new branch 'bug101'
现在需要修复bug,假设bug操作为删除掉readme内容,加上一句hello git stash,然后提交:
shuais-MacBook-Pro:Test2_From_Github dandyzhang$ vim README.md

# Test2_From_Github
hello git stash !

shuais-MacBook-Pro:Test2_From_Github dandyzhang$ git add .
shuais-MacBook-Pro:Test2_From_Github dandyzhang$ git commit -m 'fix bug101'
[bug101 0fda0f9] fix bug101
 1 file changed, 1 insertion(+), 13 deletions(-)
修复完成后,切换到master分支,并完成合并,最后删除bug101分支:
shuais-MacBook-Pro:Test2_From_Github dandyzhang$ git checkout master
Switched to branch 'master'
Your branch is up to date with 'origin/master'.

shuais-MacBook-Pro:Test2_From_Github dandyzhang$ git merge -m "merge fixed bug101 " bug101
Updating 0497781..0fda0f9
Fast-forward (no commit created; -m option ignored)
 README.md | 14 +-------------
 1 file changed, 1 insertion(+), 13 deletions(-)

shuais-MacBook-Pro:Test2_From_Github dandyzhang$ vim README.md

# Test2_From_Github
hello git stash !

shuais-MacBook-Pro:Test2_From_Github dandyzhang$ git branch -d bug101
Deleted branch bug101 (was 0fda0f9).
太棒了,原计划两个小时的bug修复只花了5分钟!现在,是时候接着回到dev分支干活了!
shuais-MacBook-Pro:Test2_From_Github dandyzhang$ git checkout dev
Switched to branch 'dev'
shuais-MacBook-Pro:Test2_From_Github dandyzhang$ git status
On branch dev
nothing to commit, working tree clean
工作区是干净对的,刚才工作的工作现场到哪去了?用git stash list看看:
shuais-MacBook-Pro:Test2_From_Github dandyzhang$ git stash list
stash@{0}: WIP on dev: 0497781 master and feature1 conflict fixed
工作现场还在,Git把stash内容存在某个地方了,但是需要恢复一下,有两个办法:
一是用git stash apply恢复,但是恢复后,stash内容并不删除,你需要用git stash drop来删除;
另一种方式是用git stash pop,恢复的同时把stash内容也删了:(这一点跟python的list里面的pop很相似,删除最后一个index,并返回)
shuais-MacBook-Pro:Test2_From_Github dandyzhang$ git stash pop
On branch dev
Changes not staged for commit:
  (use "git add <file>..." to update what will be committed)
  (use "git checkout -- <file>..." to discard changes in working directory)

    modified:   README.md

no changes added to commit (use "git add" and/or "git commit -a")
Dropped refs/stash@{0} (f43222b3d7f574d3e42baaf83c0378de2ad68f49)
再用git stash list查看,就看不到任何stash内容了.
你可以多次stash,恢复的时候,先用git stash list查看,然后恢复指定的stash,用命令:
$ git stash apply stash@{0}
忽略特殊文件.gitignore
有些时候,你必须把某些文件放到Git工作目录中,但又不能提交它们,比如保存了数据库密码的配置文件啦,等等,每次git status都会显示Untracked files ...,有强迫症的童鞋心里肯定不爽。
好在Git考虑到了大家的感受,这个问题解决起来也很简单,在Git工作区的根目录下创建一个特殊的.gitignore文件,然后把要忽略的文件名填进去,Git就会自动忽略这些文件。
不需要从头写.gitignore文件,GitHub已经为我们准备了各种配置文件,只需要组合一下就可以使用了。所有配置文件可以直接在线浏览:https://github.com/github/gitignore
忽略文件的原则是:
- 忽略操作系统自动生成的文件,比如缩略图等;
- 忽略编译生成的中间文件、可执行文件等,也就是如果一个文件是通过另一个文件自动生成的,那自动生成的文件就没必要放进版本库,比如Java编译产生的
.class文件; - 忽略你自己的带有敏感信息的配置文件,比如存放口令的配置文件。
举个例子:
假设你在Windows下进行Python开发,Windows会自动在有图片的目录下生成隐藏的缩略图文件,如果有自定义目录,目录下就会有Desktop.ini文件,因此你需要忽略Windows自动生成的垃圾文件:
# Windows:
Thumbs.db
ehthumbs.db
Desktop.ini
然后,继续忽略Python编译产生的.pyc、.pyo、dist等文件或目录:
# Python:
*.py[cod]
*.so
*.egg
*.egg-info
dist
build
加上你自己定义的文件,最终得到一个完整的.gitignore文件,内容如下:
# Windows:
Thumbs.db
ehthumbs.db
Desktop.ini

# Python:
*.py[cod]
*.so
*.egg
*.egg-info
dist
build

# My configurations:
db.ini
deploy_key_rsa
最后一步就是把.gitignore也提交到Git,就完成了!当然检验.gitignore的标准是git status命令是不是说working directory clean。
使用Windows的童鞋注意了,如果你在资源管理器里新建一个.gitignore文件,它会非常弱智地提示你必须输入文件名,但是在文本编辑器里“保存”或者“另存为”就可以把文件保存为.gitignore了。
首先根据上面的连接,下载一份python ignorefile。

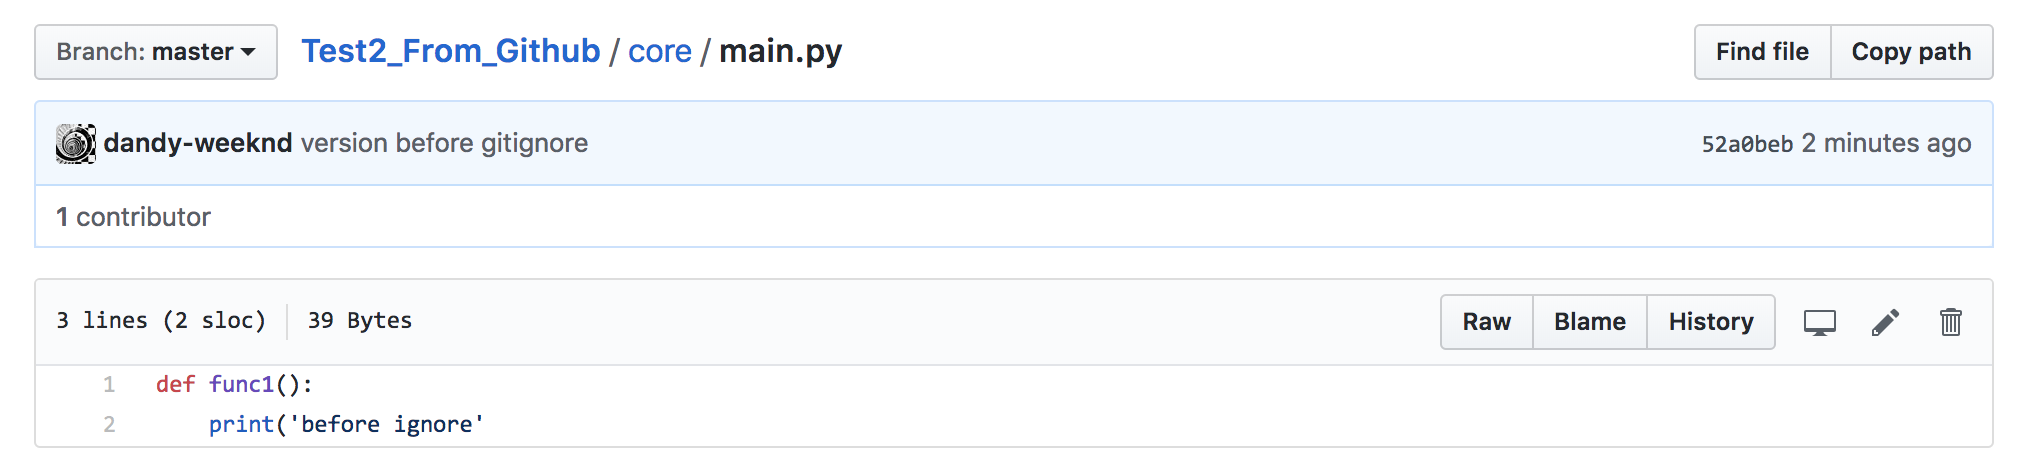
首先,我们先在master分支建立一个文档,放入一个文件:
shuais-MacBook-Pro:Test2_From_Github dandyzhang$ ls
README.md    main.py        setting.py
shuais-MacBook-Pro:Test2_From_Github dandyzhang$ mkdir core
shuais-MacBook-Pro:Test2_From_Github dandyzhang$ ls
README.md    core        main.py        setting.py
shuais-MacBook-Pro:Test2_From_Github dandyzhang$ cd core
shuais-MacBook-Pro:core dandyzhang$ vim main.py

def func1():
    print('before ignore'
shuais-MacBook-Pro:Test2_From_Github dandyzhang$ git add .
shuais-MacBook-Pro:Test2_From_Github dandyzhang$ git commit -m 'version before gitignore'
[master 52a0beb] version before gitignore
 1 file changed, 2 insertions(+)
 create mode 100644 core/main.py
shuais-MacBook-Pro:Test2_From_Github dandyzhang$ git push origin master
Enumerating objects: 9, done.
Counting objects: 100% (9/9), done.
Delta compression using up to 4 threads.
Compressing objects: 100% (4/4), done.
Writing objects: 100% (7/7), 644 bytes | 644.00 KiB/s, done.
Total 7 (delta 1), reused 0 (delta 0)
remote: Resolving deltas: 100% (1/1), done.
To github.com:dandy-weeknd/Test2_From_Github.git
   0497781..52a0beb  master -> master
编辑gitignore 文件:
# Byte-compiled / optimized / DLL files
__pycache__/
*.py[cod]
*$py.class

# C extensions
*.so

# Distribution / packaging
.Python
build/
develop-eggs/
dist/
downloads/
eggs/
.eggs/
lib/
lib64/
parts/
sdist/
var/
wheels/
*.egg-info/
.installed.cfg
*.egg
MANIFEST

# PyInstaller
#  Usually these files are written by a python script from a template
#  before PyInstaller builds the exe, so as to inject date/other infos into it.
*.manifest
*.spec

# Installer logs
pip-log.txt
pip-delete-this-directory.txt

# Unit test / coverage reports
htmlcov/
.tox/
.coverage
.coverage.*
.cache
nosetests.xml
coverage.xml
*.cover
.hypothesis/
.pytest_cache/

# Translations
*.mo
*.pot

# Django stuff:
*.log
local_settings.py
db.sqlite3

# Flask stuff:
instance/
.webassets-cache

# Scrapy stuff:
.scrapy

# Sphinx documentation
docs/_build/

# PyBuilder
target/

# Jupyter Notebook
.ipynb_checkpoints

# pyenv
.python-version

# celery beat schedule file
celerybeat-schedule

# SageMath parsed files
*.sage.py

# Environments
.env
.venv
env/
venv/
ENV/
env.bak/
venv.bak/

# Spyder project settings
.spyderproject
.spyproject

# Rope project settings
.ropeproject

# mkdocs documentation
/site

# mypy
.mypy_cache/
在最后加上一行:core/来测试一下忽略core文件夹

此时,再次编辑core下面的文件
1、修改main.py
def func1():
    print('before ignore'

def func2():
    print('after ignore add this function')
2、在core下面创建新文件core.py
shuais-MacBook-Pro:core dandyzhang$ vim core.py

# new file after add gitignore file.
3、提交测试
shuais-MacBook-Pro:core dandyzhang$ git add .
shuais-MacBook-Pro:core dandyzhang$ git commit -m 'add gitignore'
[master 1c9eba3] add gitignore
 1 file changed, 3 insertions(+)
shuais-MacBook-Pro:core dandyzhang$ git status
On branch master
Your branch is ahead of 'origin/master' by 1 commit.
  (use "git push" to publish your local commits)

Untracked files:
  (use "git add <file>..." to include in what will be committed)

    ../.gitignore

nothing added to commit but untracked files present (use "git add" to track)
shuais-MacBook-Pro:core dandyzhang$ git push origin master
Enumerating objects: 7, done.
Counting objects: 100% (7/7), done.
Delta compression using up to 4 threads.
Compressing objects: 100% (3/3), done.
Writing objects: 100% (4/4), 450 bytes | 450.00 KiB/s, done.
Total 4 (delta 0), reused 0 (delta 0)
To github.com:dandy-weeknd/Test2_From_Github.git
   52a0beb..1c9eba3  master -> master
4、结果

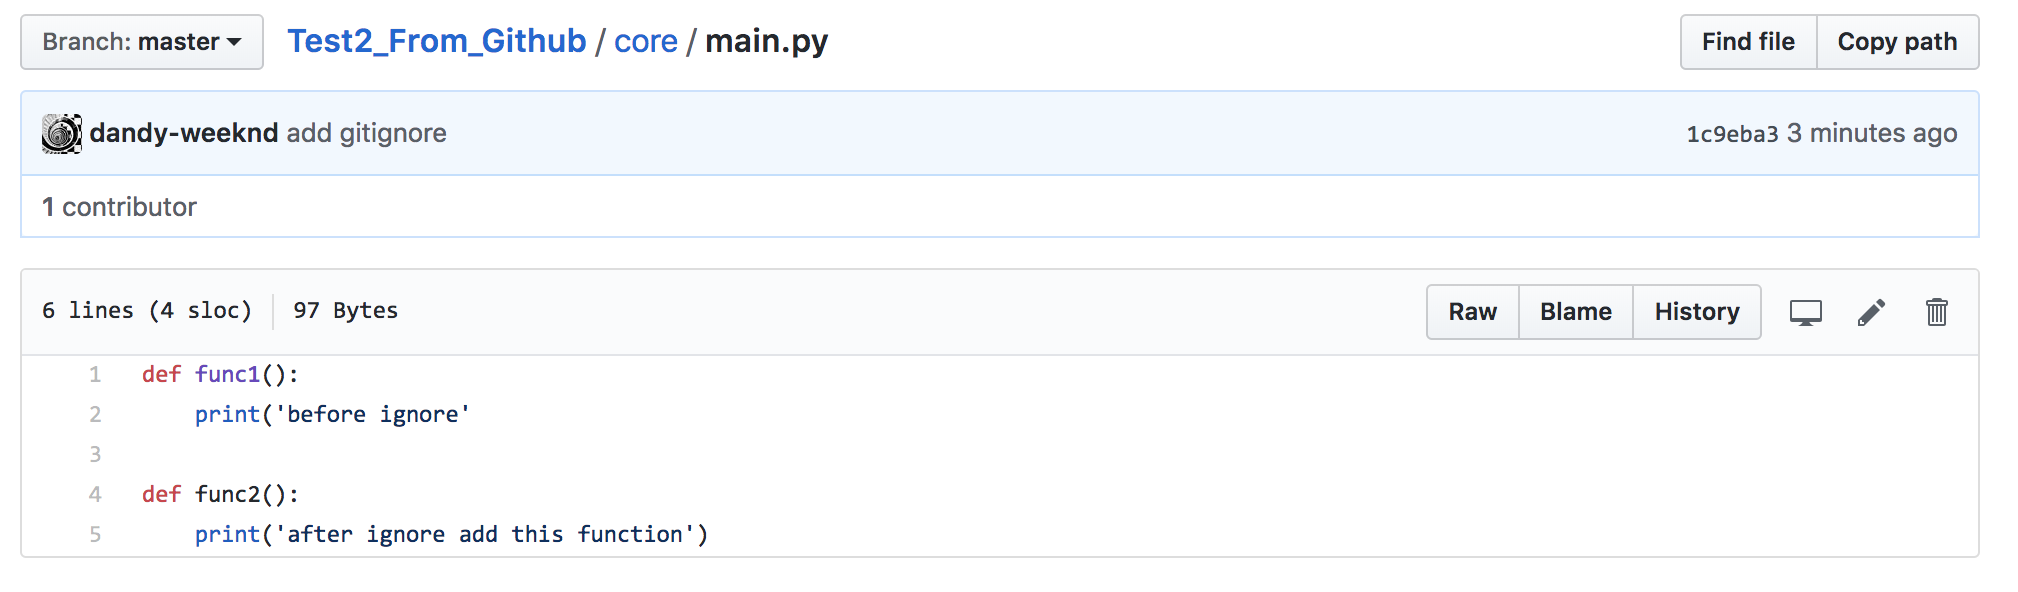
可以得出结论,之于gitignore文件定义之前加入的文件还是会被git继续追踪,而在gitignore文件定义之后加入的都不会被追踪。
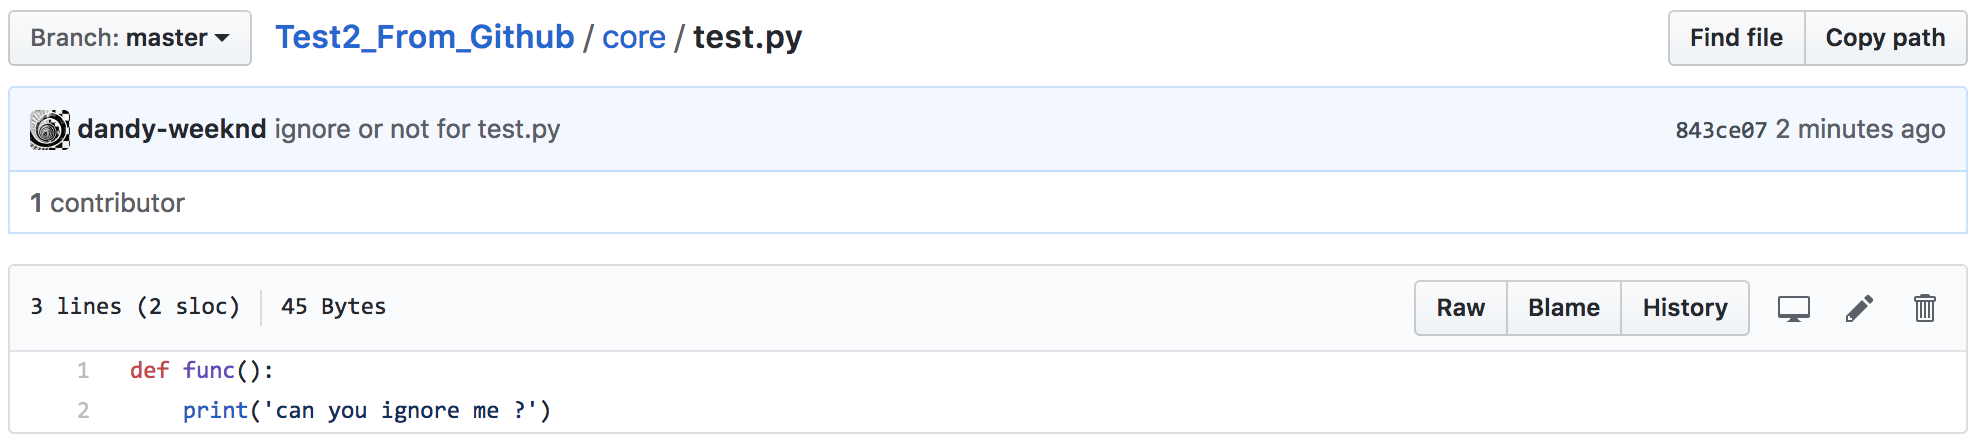
假设存在这样一种情况呢?某个文件夹下,确实要屏蔽或忽视,但是仅有一个文件特殊,需要强制将它加入到Git中。
shuais-MacBook-Pro:core dandyzhang$ vim test.py

def func():
    print('can you ignore me ?')

shuais-MacBook-Pro:core dandyzhang$ git add -f test.py
shuais-MacBook-Pro:core dandyzhang$ git commit -m 'ignore or not for test.py'
[master 843ce07] ignore or not for test.py
 1 file changed, 2 insertions(+)
 create mode 100644 core/test.py

shuais-MacBook-Pro:core dandyzhang$ git push origin master
Enumerating objects: 6, done.
Counting objects: 100% (6/6), done.
Delta compression using up to 4 threads.
Compressing objects: 100% (3/3), done.
Writing objects: 100% (4/4), 465 bytes | 465.00 KiB/s, done.
Total 4 (delta 0), reused 0 (delta 0)
To github.com:dandy-weeknd/Test2_From_Github.git
   1c9eba3..843ce07  master -> master
有没有点小激动:

或者你发现,可能是.gitignore写得有问题,需要找出来到底哪个规则写错了,可以用git check-ignore命令检查:
shuais-MacBook-Pro:core dandyzhang$ git check-ignore -v core/test.py
.gitignore:106:core/    core/test.py
Git会告诉我们,.gitignore的第106行规则忽略了该文件,于是我们就可以知道应该修订哪个规则。
小结
-
忽略某些文件时,需要编写
.gitignore; -
.gitignore文件本身要放到版本库里,并且可以对.gitignore做版本管理!
多人协作
当你从远程仓库克隆时,实际上Git自动把本地的master分支和远程的master分支对应起来了,并且,远程仓库的默认名称是origin。
要查看远程库的信息,用git remote:
shuais-MacBook-Pro:core dandyzhang$ git remote
origin
或者,用git remote -v显示更详细的信息:
shuais-MacBook-Pro:core dandyzhang$ git remote -v
origin    git@github.com:dandy-weeknd/Test2_From_Github.git (fetch)
origin    git@github.com:dandy-weeknd/Test2_From_Github.git (push)
上面显示了可以抓取和推送的origin的地址。如果没有推送权限,就看不到push的地址。
1 、推送分支
推送分支,就是把该分支上的所有本地提交推送到远程库。推送时,要指定本地分支,这样,Git就会把该分支推送到远程库对应的远程分支上:
git push origin master
如果要推送其他分支,比如dev,就改成:
git push origin dev
但是,并不是一定要把本地分支往远程推送,那么,哪些分支需要推送,哪些不需要呢?
-
master分支是主分支,因此要时刻与远程同步; -
dev分支是开发分支,团队所有成员都需要在上面工作,所以也需要与远程同步; -
bug分支只用于在本地修复bug,就没必要推到远程了,除非老板要看看你每周到底修复了几个bug;
-
feature分支是否推到远程,取决于你是否和你的小伙伴合作在上面开发。
总之,就是在Git中,分支完全可以在本地自己藏着玩,是否推送,视你的心情而定!
2 、抓取分支
多人协作时,大家都会往master和dev分支上推送各自的修改。
现在,模拟一个你的小伙伴,可以在另一台电脑(注意要把SSH Key添加到GitHub)或者同一台电脑的另一个目录下克隆:
dandy@ubuntu01:~/git_test$ git clone git@github.com:dandy-weeknd/Test2_From_Github.git
Cloning into 'Test2_From_Github'...
Warning: Permanently added the RSA host key for IP address '13.250.177.223' to the list of known hosts.
remote: Counting objects: 44, done.
remote: Compressing objects: 100% (27/27), done.
remote: Total 44 (delta 8), reused 39 (delta 6), pack-reused 0
Receiving objects: 100% (44/44), 4.54 KiB | 0 bytes/s, done.
Resolving deltas: 100% (8/8), done.
Checking connectivity... done.
当你的小伙伴从远程库clone时,默认情况下,你的小伙伴只能看到本地的master分支。不信可以用git branch命令看看:
dandy@ubuntu01:~/git_test$ cd Test2_From_Github/
dandy@ubuntu01:~/git_test/Test2_From_Github$ git branch
* master
现在,你的小伙伴要在dev分支上开发,就必须创建远程origin的dev分支到本地,于是他用这个命令创建本地dev分支:
dandy@ubuntu01:~/git_test/Test2_From_Github$ git checkout -b dev origin/dev
Branch dev set up to track remote branch dev from origin.
Switched to a new branch 'dev'
现在,他就可以在dev上继续修改,然后,时不时地把dev分支push到远程:
dandy@ubuntu01:~/git_test/Test2_From_Github$ vim README.md

# Test2_From_Github
hello git stash !
....origin/dev
dandy@ubuntu01:~/git_test/Test2_From_Github$ git add .
dandy@ubuntu01:~/git_test/Test2_From_Github$ git commit -m 'dev change'
[dev 6cb1d87] dev change
 1 file changed, 1 insertion(+), 1 deletion(-)
dandy@ubuntu01:~/git_test/Test2_From_Github$ git branch
* dev
  master
dandy@ubuntu01:~/git_test/Test2_From_Github$ git push origin dev
Warning: Permanently added the RSA host key for IP address '13.229.188.59' to the list of known hosts.
Counting objects: 3, done.
Delta compression using up to 2 threads.
Compressing objects: 100% (3/3), done.
Writing objects: 100% (3/3), 383 bytes | 0 bytes/s, done.
Total 3 (delta 0), reused 0 (delta 0)
To git@github.com:dandy-weeknd/Test2_From_Github.git
 * [new branch]      dev -> dev
查看:

你的小伙伴已经向origin/dev分支推送了他的提交,而碰巧你也对同样的文件作了修改,并试图推送:
shuais-MacBook-Pro:Test2_From_Github dandyzhang$ vim README.md

# Test2_From_Github
hello git stash !
from another client git to modified this file. in dev branch
shuais-MacBook-Pro:Test2_From_Github dandyzhang$ vim README.md
shuais-MacBook-Pro:Test2_From_Github dandyzhang$ git add .
shuais-MacBook-Pro:Test2_From_Github dandyzhang$ git commit -m 'modified readme later'
[dev 780d33e] modified readme later
 1 file changed, 1 insertion(+)
shuais-MacBook-Pro:Test2_From_Github dandyzhang$ git push origin dev
To github.com:dandy-weeknd/Test2_From_Github.git
 ! [rejected]        dev -> dev (fetch first)
error: failed to push some refs to 'git@github.com:dandy-weeknd/Test2_From_Github.git'
hint: Updates were rejected because the remote contains work that you do
hint: not have locally. This is usually caused by another repository pushing
hint: to the same ref. You may want to first integrate the remote changes
hint: (e.g., 'git pull ...') before pushing again.
hint: See the 'Note about fast-forwards' in 'git push --help' for details.
推送失败,因为你的小伙伴的最新提交和你试图推送的提交有冲突,解决办法也很简单,Git已经提示我们,先用git pull把最新的提交从origin/dev抓下来,然后,在本地合并,解决冲突,再推
shuais-MacBook-Pro:Test2_From_Github dandyzhang$ git pull
remote: Counting objects: 3, done.
remote: Compressing objects: 100% (3/3), done.
remote: Total 3 (delta 0), reused 3 (delta 0), pack-reused 0
Unpacking objects: 100% (3/3), done.
From github.com:dandy-weeknd/Test2_From_Github
   8767de7..a4de972  dev        -> origin/dev
There is no tracking information for the current branch.
Please specify which branch you want to merge with.
See git-pull(1) for details.

    git pull <remote> <branch>

If you wish to set tracking information for this branch you can do so with:

    git branch --set-upstream-to=origin/<branch> dev
git pull也失败了,原因是没有指定本地dev分支与远程origin/dev分支的链接,根据提示,设置dev和origin/dev的链接:
shuais-MacBook-Pro:Test2_From_Github dandyzhang$  git branch --set-upstream-to=origin/dev dev
Branch 'dev' set up to track remote branch 'dev' from 'origin'.
再pull:
shuais-MacBook-Pro:Test2_From_Github dandyzhang$ git pull
Auto-merging README.md
CONFLICT (content): Merge conflict in README.md
Automatic merge failed; fix conflicts and then commit the result.
这回git pull成功,但是合并有冲突,需要手动解决,解决的方法和分支管理中的解决冲突完全一样。解决后,提交,再push:
shuais-MacBook-Pro:Test2_From_Github dandyzhang$ vim README.md
shuais-MacBook-Pro:Test2_From_Github dandyzhang$ git add .
shuais-MacBook-Pro:Test2_From_Github dandyzhang$ git commit -m 'fix two person code'
[dev 9c4e39b] fix two person code
shuais-MacBook-Pro:Test2_From_Github dandyzhang$ git push origin dev
Enumerating objects: 10, done.
Counting objects: 100% (10/10), done.
Delta compression using up to 4 threads.
Compressing objects: 100% (6/6), done.
Writing objects: 100% (6/6), 782 bytes | 391.00 KiB/s, done.
Total 6 (delta 1), reused 0 (delta 0)
remote: Resolving deltas: 100% (1/1), done.
To github.com:dandy-weeknd/Test2_From_Github.git
   a4de972..9c4e39b  dev -> dev
结果图:

因此,多人协作的工作模式通常是这样:
-
首先,可以试图用
git push origin branch-name推送自己的修改; -
如果推送失败,则因为远程分支比你的本地更新,需要先用
git pull试图合并; -
如果合并有冲突,则解决冲突,并在本地提交;
-
没有冲突或者解决掉冲突后,再用
git push origin branch-name推送就能成功!
如果git pull提示“no tracking information”,则说明本地分支和远程分支的链接关系没有创建,用命令git branch --set-upstream branch-name origin/branch-name。
这就是多人协作的工作模式,一旦熟悉了,就非常简单。
github使用
我们一直用GitHub作为免费的远程仓库,如果是个人的开源项目,放到GitHub上是完全没有问题的。其实GitHub还是一个开源协作社区,通过GitHub,既可以让别人参与你的开源项目,也可以参与别人的开源项目。
在GitHub出现以前,开源项目开源容易,但让广大人民群众参与进来比较困难,因为要参与,就要提交代码,而给每个想提交代码的群众都开一个账号那是不现实的,因此,群众也仅限于报个bug,即使能改掉bug,也只能把diff文件用邮件发过去,很不方便。
但是在GitHub上,利用Git极其强大的克隆和分支功能,广大人民群众真正可以第一次自由参与各种开源项目了。
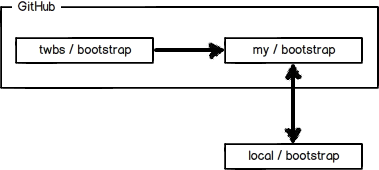
如何参与一个开源项目呢?比如人气极高的bootstrap项目,这是一个非常强大的CSS框架,你可以访问它的项目主页https://github.com/twbs/bootstrap,点“Fork”就在自己的账号下克隆了一个bootstrap仓库,然后,从自己的账号下clone:
git clone git@github.com:michaelliao/bootstrap.git
一定要从自己的账号下clone仓库,这样你才能推送修改。如果从bootstrap的作者的仓库地址git@github.com:twbs/bootstrap.git克隆,因为没有权限,你将不能推送修改。
Bootstrap的官方仓库twbs/bootstrap、你在GitHub上克隆的仓库my/bootstrap,以及你自己克隆到本地电脑的仓库,他们的关系就像下图显示的那样:
如果你想修复bootstrap的一个bug,或者新增一个功能,立刻就可以开始干活,干完后,往自己的仓库推送。
如果你希望bootstrap的官方库能接受你的修改,你就可以在GitHub上发起一个pull request。当然,对方是否接受你的pull request就不一定了。
如果没有能力修改的话,可以自己测试。上传代码到github仓库,另一个账号区区fork,修改再提交。
小结
-
在GitHub上,可以任意Fork开源仓库;
-
自己拥有Fork后的仓库的读写权限;
-
可以推送pull request给官方仓库来贡献代码。
参考:http://www.cnblogs.com/alex3714/articles/5930846.html
