
关于dlib人脸对比,人脸识别
-
人脸检测
-
人脸特征点提取
-
人脸对比,等于两张人脸对比,识别
封装的所有识别函数,直接看下面调用就好了。
1 2 3 4 5 6 7 8 9 10 11 12 13 14 15 16 17 18 19 20 21 22 23 24 25 26 27 28 29 30 31 32 33 34 35 36 37 38 39 40 41 42 43 44 45 46 47 48 49 50 51 52 53 54 55 56 57 58 59 60 61 62 63 64 | # coding:utf-8'''本本次封装,我主要是做两张人脸对比。就只人脸识别部分,简单应用。# 调用注意事项,因为模型底层是外国人写的。所以路径图片名字千万别使用中文,这样它直接找不到 好像是OpenCV的问题吧,一直没有解决。中文他会乱码。真的坑。'''import dlibimport cv2import globimport numpy as npclass face_recognition: ''' 模型路径 predictor_path = "./face_model/shape_predictor_68_face_landmarks.dat" face_rec_model_path = "./face_model/dlib_face_recognition_resnet_model_v1.dat" # 调用注意事项,因为模型底层是外国人写的。所以路径图片名字千万别使用中文,这样它直接找不到 好像是OpenCV的问题吧,一直没有解决。中文他会乱码。真的坑。 ''' def __init__(self,predictor_path,face_rec_model_path): self.predictor_path = predictor_path self.face_rec_model_path = face_rec_model_path self.detector = dlib.get_frontal_face_detector() self.shape_predictor = dlib.shape_predictor(self.predictor_path) self.face_rec_model = dlib.face_recognition_model_v1(self.face_rec_model_path) def face_detection(self,url_img_1,url_img_2): img_path_list = [url_img_1,url_img_2] dist = [] for img_path in img_path_list: img = cv2.imread(img_path) # 转换rgb顺序的颜色。 b, g, r = cv2.split(img) img2 = cv2.merge([r, g, b]) # 检测人脸 faces = self.detector(img, 1) if len(faces): for index, face in enumerate(faces): # # 提取68个特征点 shape = self.shape_predictor(img2, face) # 计算人脸的128维的向量 face_descriptor = self.face_rec_model.compute_face_descriptor(img2, shape) dist.append(list(face_descriptor)) else: pass return dist # 欧式距离 def dist_o(self,dist_1,dist_2): dis = np.sqrt(sum((np.array(dist_1)-np.array(dist_2))**2)) return dis def score(self,url_img_1,url_img_2): url_img_1 = glob.glob(url_img_1)[0] url_img_2 = glob.glob(url_img_2)[0] data = self.face_detection(url_img_1,url_img_2) goal = self.dist_o(data[0],data[1]) # 判断结果,如果goal小于0.6的话是同一个人,否则不是。我所用的是欧式距离判别 return 1-goal |
调用封装识别函数进行,判别
1 2 3 4 5 6 7 8 9 10 | # 调用 模型下载地址:http://dlib.net/files/predictor_path = "./face_model/shape_predictor_68_face_landmarks.dat"face_rec_model_path = "./face_model/dlib_face_recognition_resnet_model_v1.dat"face_ = face_recognition(predictor_path,face_rec_model_path)# img_1 = './faces/User.1.4.jpg'# img_2 = './faces/User.1.46.jpg'img_1 = './faces/fan.jpg'img_2 = './faces/fan_2.jpg'goal = face_.score(img_1,img_2)print(goal) |
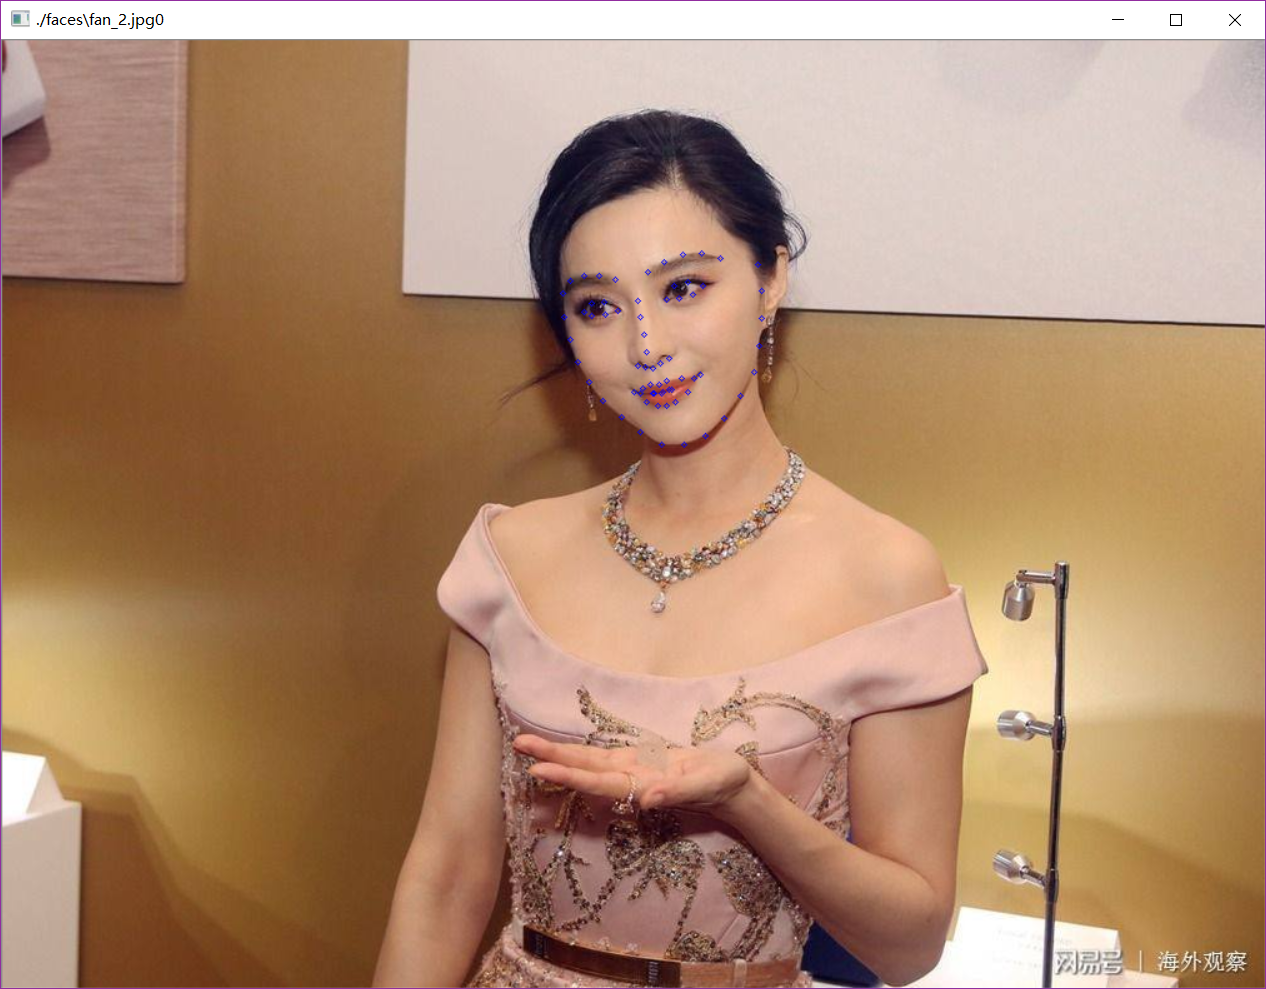

这两张图片的距离为0.32左右,但是只要距离小于0.6就属于同一个人,所以对比结果还是比较好的。
自动化学习。


【推荐】国内首个AI IDE,深度理解中文开发场景,立即下载体验Trae
【推荐】编程新体验,更懂你的AI,立即体验豆包MarsCode编程助手
【推荐】抖音旗下AI助手豆包,你的智能百科全书,全免费不限次数
【推荐】轻量又高性能的 SSH 工具 IShell:AI 加持,快人一步
· .NET Core 中如何实现缓存的预热?
· 从 HTTP 原因短语缺失研究 HTTP/2 和 HTTP/3 的设计差异
· AI与.NET技术实操系列:向量存储与相似性搜索在 .NET 中的实现
· 基于Microsoft.Extensions.AI核心库实现RAG应用
· Linux系列:如何用heaptrack跟踪.NET程序的非托管内存泄露
· TypeScript + Deepseek 打造卜卦网站:技术与玄学的结合
· Manus的开源复刻OpenManus初探
· 三行代码完成国际化适配,妙~啊~
· .NET Core 中如何实现缓存的预热?
· 如何调用 DeepSeek 的自然语言处理 API 接口并集成到在线客服系统