javacript中的mvc设计模式
以下内容为原创翻译,翻译不对的地方还请原谅,凑合着看吧。
原文网址是:
来源:http://www.alexatnet.com/articles/model-view-controller-mvc-javascript
这篇文章主要讲述了 js中的 mvc 设计模式。
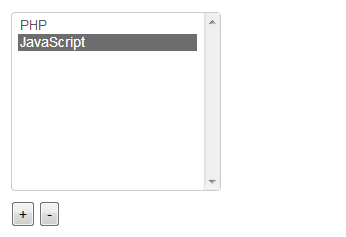
实现目标截图:

我之所以喜欢javascript是因为它可以称之为世界上最灵活的语言。通过javascript,开发者可以通过面向对象或者面向过程的方式创建应用程序。它可以支持任何我所知道的程序设计风格以及程序技术。我曾经见识过面向过程,面向对象以及面向方面的程序片段。开发者甚至可以使用函数式编程技术来创建应用程序
我写这篇文章的目的是通过一个简单的javascript组件让你知道mvc有多么强大。这个组件式一个可编辑条目的listBox:使用者可以选择一条数据,也可以移除数据抑或是增加新数据到列表中。组件将包含三个类,遵循mvc规则
我希望这篇文章对你来说有用。如果你能按照我的例子动手做一遍并将它转化成你需要的那是最好不过了。你可以通过:动手,动脑,编辑器以及网络浏览器(如谷歌浏览器)来创建以及跑通你的javascript程序。
下面,我将在代码中使用MVC设计模式,但是需要先描述下。正如你所知道的,模式的名字是基于它主要的内容划分的:Model层将存放应用数据;View层主要将Model层数据以合适的形式展现出来;Controller主要用来更新Model。维基百科中定义了传统的MVC结构如下:
- Model - The domain-specific representation of the information on which the application operates. The model is another name for the domain layer. Domain logic adds meaning to raw data (e.g., calculating if today is the user's birthday, or the totals, taxes and shipping charges for shopping cart items).
- View - Renders the model into a form suitable for interaction, typically a user interface element. MVC is often seen in web applications, where the view is the HTML page and the code which gathers dynamic data for the page.
- Controller - Processes and responds to events, typically user actions, and invokes changes on the model and perhaps the view.
组件的数据是一个list列表,条目可以被选中以及删除。因此Model的设计很简单-数据存储在一个数组属性和一个已经选择的属性当中。代码如下:
/**


 * The Model. Model stores items and notifies
 * observers about changes.
 */
function ListModel(items) {
    this._items = items;
    this._selectedIndex = -1;

    this.itemAdded = new Event(this);
    this.itemRemoved = new Event(this);
    this.selectedIndexChanged = new Event(this);
}

ListModel.prototype = {
    getItems : function () {
        return [].concat(this._items);
    },

    addItem : function (item) {
        this._items.push(item);
        this.itemAdded.notify({ item : item });
    },

    removeItemAt : function (index) {
        var item;

        item = this._items[index];
        this._items.splice(index, 1);
        this.itemRemoved.notify({ item : item });
        if (index === this._selectedIndex) {
            this.setSelectedIndex(-1);
        }
    },

    getSelectedIndex : function () {
        return this._selectedIndex;
    },

    setSelectedIndex : function (index) {
        var previousIndex;

        previousIndex = this._selectedIndex;
        this._selectedIndex = index;
        this.selectedIndexChanged.notify({ previous : previousIndex });
    }
};
事件是一个简单的类,主要用来实现观察者模式:
function Event(sender) {
    this._sender = sender;
    this._listeners = [];
}

Event.prototype = {
    attach : function (listener) {
        this._listeners.push(listener);
    },
    notify : function (args) {
        var index;

        for (index = 0; index < this._listeners.length; index += 1) {
            this._listeners[index](this._sender, args);
        }
    }
};
View类需要定义可交互的控件。有很多界面都可以完成这个任务,但是我更喜欢简单一点的。我想把items放入一个listbox控件中,底下有两个按钮,分别是:+ 用来增加 -用来删除,另外listbox控件本身支持选中item。
A View class is tightly bound with a Controller class, which "... handles the input event from the user interface, often via a registered handler or callback" (from wikipedia.org).
下面是View类和Controller类:
/**
 * The View. View presents the model and provides
 * the UI events. The controller is attached to these
 * events to handle the user interraction.
 */
function ListView(model, elements) {
    this._model = model;
    this._elements = elements;

    this.listModified = new Event(this);
    this.addButtonClicked = new Event(this);
    this.delButtonClicked = new Event(this);

    var _this = this;

    // attach model listeners
    this._model.itemAdded.attach(function () {
        _this.rebuildList();
    });
    this._model.itemRemoved.attach(function () {
        _this.rebuildList();
    });

    // attach listeners to HTML controls
    this._elements.list.change(function (e) {
        _this.listModified.notify({ index : e.target.selectedIndex });
    });
    this._elements.addButton.click(function () {
        _this.addButtonClicked.notify();
    });
    this._elements.delButton.click(function () {
        _this.delButtonClicked.notify();
    });
}

ListView.prototype = {
    show : function () {
        this.rebuildList();
    },

    rebuildList : function () {
        var list, items, key;

        list = this._elements.list;
        list.html('');

        items = this._model.getItems();
        for (key in items) {
            if (items.hasOwnProperty(key)) {
                list.append($('<option>' + items[key] + '</option>'));
            }
        }
        this._model.setSelectedIndex(-1);
    }
};

/**
 * The Controller. Controller responds to user actions and
 * invokes changes on the model.
 */
function ListController(model, view) {
    this._model = model;
    this._view = view;

    var _this = this;

    this._view.listModified.attach(function (sender, args) {
        _this.updateSelected(args.index);
    });

    this._view.addButtonClicked.attach(function () {
        _this.addItem();
    });

    this._view.delButtonClicked.attach(function () {
        _this.delItem();
    });
}

ListController.prototype = {
    addItem : function () {
        var item = window.prompt('Add item:', '');
        if (item) {
            this._model.addItem(item);
        }
    },

    delItem : function () {
        var index;

        index = this._model.getSelectedIndex();
        if (index !== -1) {
            this._model.removeItemAt(this._model.getSelectedIndex());
        }
    },

    updateSelected : function (index) {
        this._model.setSelectedIndex(index);
    }
};
当然,mvc类都需要实例化。你可以通过以下代码实例化:
$(function () {
    var model = new ListModel(['PHP', 'JavaScript']),
        view = new ListView(model, {
            'list' : $('#list'),
            'addButton' : $('#plusBtn'),
            'delButton' : $('#minusBtn')
        }),
        controller = new ListController(model, view);

    view.show();
});
html部分:(引入jquery就能运行了)<select id="list" size="10" style="width: 15em"></select><br/>
<button id="plusBtn"> + </button>
<button id="minusBtn"> - </button>


【推荐】国内首个AI IDE,深度理解中文开发场景,立即下载体验Trae
【推荐】编程新体验,更懂你的AI,立即体验豆包MarsCode编程助手
【推荐】抖音旗下AI助手豆包,你的智能百科全书,全免费不限次数
【推荐】轻量又高性能的 SSH 工具 IShell:AI 加持,快人一步
· 如何编写易于单元测试的代码
· 10年+ .NET Coder 心语,封装的思维:从隐藏、稳定开始理解其本质意义
· .NET Core 中如何实现缓存的预热?
· 从 HTTP 原因短语缺失研究 HTTP/2 和 HTTP/3 的设计差异
· AI与.NET技术实操系列:向量存储与相似性搜索在 .NET 中的实现
· 地球OL攻略 —— 某应届生求职总结
· 周边上新:园子的第一款马克杯温暖上架
· Open-Sora 2.0 重磅开源!
· .NET周刊【3月第1期 2025-03-02】
· [AI/GPT/综述] AI Agent的设计模式综述