
pytest库
pytest官网文档地址:https://docs.pytest.org/en/latest/contents.html
pytest使用手册:https://learning-pytest.readthedocs.io/zh/latest/
安装pip3 install pytest
1.pytest基本使用
1.1 pytest测试搜索
1.1.1 测试搜索
pytest搜索测试文件和测试用例的过程称为测试搜索。只要遵守pytest的命名规则,pytest就能自动搜索所有待执行的测试用例。主要的命名规则:
测试文件应当命名为test_<someting>.py或者<someting)_test.py
测试函数、测试类方法应当命名为test_<something>
测试类应当命名为Test<something>
运行pytest时可以指定目录和文件。如果不指定,pytest会搜索当前目录及其子目录中以test_开头或以_test结尾的测试函数。
1.1.2 小结
1. 命名规则
(1)模块名必须以test_开头或者_test结尾
(2)测试类必须以Test开头,并且不能有ini方法
(3)测试方法必须以test开头
2. pytest用例运行规则
- >1 pytest将在当前目录及其子目录中运行所有格式为test_*.py或者*_test.py文件
- >2.测试方法/函数默认必须是test开头
- >3.测试类必须是Test
- > 4.【扩展】Python测试发现约定
            a.如果未指定任何参数,则收集从testpaths (如果已配置)或当前目录开始。 另外,命令行参数可以在目录,文件名或节点ID的任何组合中使用。
            b.递归到目录,除非它们匹配norecursedirs
            c.在这些目录中,搜索test_*.py或*_test.py
            d.从这些文件中,收集测试项目
               在类之外拥有test前缀的测试函数或方法
               在拥有Test前缀中的测试类(不含__init__方法)中的拥有test前缀的测试函数或方法
            e.可自定义测试发现规则
               pytest也可以发现使用标准的unittest.TestCase子类技术的测试用例(完全兼容unittest 的原因)
3. pytest插件插件下载地址:https://docs.pytest.org/en/latest/reference/plugin_list.html
1.2 命令行模式运行 pytest
1.2.1 pytest命令行详解
使用方法:pytest [options] [file_or_dir] [file_or_dir] [...]
常用命令行选项:
- --collect-only 选项可以展示在给定的配置下哪些测试用例会被运行。
- -k 选项允许你使用测试用例的部分字符串指定希望运行的测试用例。如果某测试名是唯一的,或者多个测试名的前缀或者后缀相同,那么可以使用表达式来快速定位运行指定的测试用例,假设希望选择test_case1()和test_case2()来运行,可以使用命令pytest -k "case1 or case2"。又如pytest -v -k _raises 用来运行所有名字包含_raises的测试。
- -m 选项用于标记测试并分组,以便快速选中并运行。当需要同时运行一组测试用例时,我们可以预先使用@pytest.mark.标记名 这样的装饰器来做标记,以下例子使用标记名run_these标记分组,然后使用命令行pytest -v -m run_these,这样有相同标记run_these的测试用例便可以一起运行。


import pytest
@pytest.mark.run_these:
def test_case1():
    pass
@pytest.mark.run_these:
def test_case2():
    pass
使用-m选项可以用表达式指定多个标记名。使用-m "mark1 and mark2"可以同时选中带有这两个标记的所有测试用例。使用-m "mark1 and not mark2"则会选中带有mark1的测试用例,而过滤掉带有mark2的测试用例。使用-m "mark1 or mark2"则选中带有mark1或者mark2的所有测试用例。
- -x 开启此选项,一旦遇到测试失败,就会全局停止。
- --maxfail=num 当出现num个测试用例失败就停止运行。
- -s 表示输出调试信息,包括print打印信息。-s等价于--capture=no。信息捕获的方法还有--capture=fd和--capture=sys。使用--capture=sys时,sys.stdout/stderr将被输出至内存;使用--capture=fd时,若文件描述符(file descriptor)为1或2,这会被输出至临时文件中。
- --lf(--last-failed) 仅运行上一次失败的用例。
- --ff(failed-first) 该选项会运行全部的用例,但是上一次失败的用例先运行,与--last-failed选择作用基本相同,不同的是-ff会运行完剩余的测试用例。
- -v(--verbose) 输出的信息会更详细。最明显的区别就是文件中的每个测试用例都占一行,测试的名字和结果都会显示出来,而不仅仅是一个点或者字符。
- -q 该选项的作用与-v/--verbose相反,它会简化输出信息。
- -l(showlocals) 使用该选项,失败测试用例由于被堆栈追踪,局部变量及其值都会显示出来。
- -tb=style 该选项决定捕捉到失败时输出信息的显示方式。style的常用类型有long、short、line、no。--tb=long输出最为详尽的回溯信息;--tb=short模式仅输出assert的一行以及系统判定内容(不显示上下文);--tb=line模式只使用一行输出显示所有的错误信息;--tb=no模式直接屏蔽全部回溯信息;--tb=auto是默认值,如果有多个测试用例失败,仅打印第一个和最后一个用例的回溯信息(格式与long模式的一致);-tb=native,只输出python标准库的回溯信息,不显示额外的信息。
- --version 可以显示当前的pytest版本及安装目录
- -h(--help)展示原生pytest的用法,还能展示新加的插件的选项和用法。
- -n 支持多线程或者分布式运行测试用例,需要先安装插件pytest-xdist方可使用。如:pytest -vs ./testcase/test_login.py -n 2
- --reruns NUM 设置此项,失败用例重跑NUM次,需要安装插件pytest-rerunfailures
- --html ./report/report.html 生成html测试报告。
- -r chars show extra test summary info as specified by chars: (f)ailed, (E)rror, (s)kipped, (x)failed,(X)passed, (p)assed, (P)assed with output, (a)ll except passed (p/P)。
1.2.2 命令行运行测试子集
运行单个目录下的所有测试用例,以目录作为pytest的参数即可 pytest -v tests/func --tb=no
运行单个文件里的全部测试,以路径名加文件名作为pytest参数即可 pytest -v tests/func/test_add.py
运行单个测试函数,只需要在文件名后面添加::符号和函数名 pytest -v tests/func/test_add.py::test_add_returns_valid
运行单个测试类,可以在文件名后面加上::符号和类名 pytest -v tests/func/test_api_exceptions.py::TestUpdate
运行单个测试类中的测试方法,文件名::类名::方法名 pytest -v tests/func/test_api_exceptions.py::TestUpdate::test_case_01
1.3 主函数运行pytest
import  pytest

def test_01():
    print("this is {} testcase".format(__name__))

if __name__=='__main__':
    pytest.main()
main中可使用的参数有:
-v 输出调试信息。如打印信息 例:pytest.main([‘-v’,‘testcase/test_one.py’,‘testcase/test_two.py’])
-s 输出更详细的信息,如:文件名、用例名 例:pytest.main([‘-vs’,‘testcase/test_one.py’,‘testcase/test_two.py’])
-n 多线程或分布式运行测试用例
-x 只要有一个用例执行失败,就停止执行测试 例:pytest.main([‘-vsx’,‘testcase/test_one.py’])
-maxfail 出现N个测试用例失败,就停止测试 例:pytest.main([‘-vs’,‘-x=2’,‘testcase/test_one.py’]
–html=report.html 生成测试报告 例:pytest.main([‘-vs’,‘–html=./report.html’,‘testcase/test_one.py’])
-m 通过标记表达式执行
-k 根据测试用例的部分字符串指定测试用例,可以使用and,or
主函数运行示例:
(1)多进程运行用例 (安装插件:pytest-xdist)
pytest.main(['test_many.py'])
将测试执行发送给多个CPU: pytest.main(['-n', '2', 'test_many.py'])
使用与计算机具有CPU内核一样多的进程: pytest.main(['-n','auto', 'test_many.py'])
(2)重新运行失败用例 (安装插件:pytest-rerunfailures)
1.重新运行所有测试失败,指定测试的最大次数: pytest.main(['--reruns', '5', 'test_rerun.py'])
2.在每次重跑之间,增加一个延迟等待时间: pytest.main(['--reruns', '3', '--reruns-delay', '2', 'test_rerun.py'])
1.4 pytest配置文件
pytest.ini:pytest的主要配置文件,可以改变pytest的默认行为,其中有很多可配置的选择。
conftest.py:是本地的插件库,其中的hook函数和fixture将作用于该文件所在的目录以及所有的子目录。
1.4.1 pytest.ini配置项详解
pytest.ini全局配置文件,是pytest单元测试框架的核心配置文件。可以使用pytest --help 查看pytest.ini的所有设置项,如下:
[pytest] ini-options in the first pytest.ini|tox.ini|setup.cfg file found:

  markers (linelist):   markers for test functions
  empty_parameter_set_mark (string):
                        default marker for empty parametersets
  norecursedirs (args): directory patterns to avoid for recursion
  testpaths (args):     directories to search for tests when no files or directories are given in the command line.
  filterwarnings (linelist):
                        Each line specifies a pattern for warnings.filterwarnings. Processed after -W/--pythonwarnings.
  usefixtures (args):   list of default fixtures to be used with this project
  python_files (args):  glob-style file patterns for Python test module discovery
  python_classes (args):
                        prefixes or glob names for Python test class discovery
  python_functions (args):
                        prefixes or glob names for Python test function and method discovery
  disable_test_id_escaping_and_forfeit_all_rights_to_community_support (bool):
                        disable string escape non-ascii characters, might cause unwanted side effects(use at your own
                        risk)
  console_output_style (string):
                        console output: "classic", or with additional progress information ("progress" (percentage) |
                        "count").
  xfail_strict (bool):  default for the strict parameter of xfail markers when not given explicitly (default: False)
  enable_assertion_pass_hook (bool):
                        Enables the pytest_assertion_pass hook.Make sure to delete any previously generated pyc cache
                        files.
  junit_suite_name (string):
                        Test suite name for JUnit report
  junit_logging (string):
                        Write captured log messages to JUnit report: one of no|log|system-out|system-err|out-err|all
  junit_log_passing_tests (bool):
                        Capture log information for passing tests to JUnit report:
  junit_duration_report (string):
                        Duration time to report: one of total|call
  junit_family (string):
                        Emit XML for schema: one of legacy|xunit1|xunit2
  doctest_optionflags (args):
                        option flags for doctests
  doctest_encoding (string):
                        encoding used for doctest files
  cache_dir (string):   cache directory path.
  log_level (string):   default value for --log-level
  log_format (string):  default value for --log-format
  log_date_format (string):
                        default value for --log-date-format
  log_cli (bool):       enable log display during test run (also known as "live logging").
  log_cli_level (string):
                        default value for --log-cli-level
  log_cli_format (string):
                        default value for --log-cli-format
  log_cli_date_format (string):
                        default value for --log-cli-date-format
  log_file (string):    default value for --log-file
  log_file_level (string):
                        default value for --log-file-level
  log_file_format (string):
                        default value for --log-file-format
  log_file_date_format (string):
                        default value for --log-file-date-format
  log_auto_indent (string):
                        default value for --log-auto-indent
  pythonpath (paths):   Add paths to sys.path
  faulthandler_timeout (string):
                        Dump the traceback of all threads if a test takes more than TIMEOUT seconds to finish.
  addopts (args):       extra command line options
  minversion (string):  minimally required pytest version
  required_plugins (args):
                        plugins that must be present for pytest to run
1.作用:pytest.ini 可以改变 pytest 的默认行为
2.位置:一般放在项目的根目录(即当前项目的顶级文件夹下)
3.命名:pytest.ini,不能使用任何中文符号,包括汉字、空格、引号、冒号等等
4.新建配置文件,点击鼠标右键(New->File->pytest.ini)
5.编码格式:GBK或者ANSI,可以使用notepad++修改编码格式
6.运行的规则:不管是主函数模式运行,命令行模式运行,都会去读取这个全局配置文件。
7.格式一般是固定的,如下,建议将中文删掉:
[pytest]
;命令行参数,用空格进行分隔
addopts = -vs

;注册 mark 标记
markers =
    demo : marks tests as demo
    smoke: marks tests as smoke
    uat : marks tests as uat
    test : marks tests as test

minversion = 5.0

;测试用例的路径,可自己配置,
;../pytestproject为上一层的pytestproject文件夹
;./testcase为pytest.ini当前目录下的同级文件夹
testpaths =./testcase

;模块名的规则,配置测试搜索的模块文件名称
python_files = test*.py

;类名的规则,配置测试搜索的测试类名
python_classes = Test*

;方法名的规则,配置测试搜索的测试函数名
python_functions = test
pytest.ini常用配置项详解
(1)addopts:addopts参数可以更改默认的命令行选项;这个参数在我们需要在命令行中输入大一堆指令来执行测试用例时会用到,当你需要用到某些选项,又不想重复输入,这时候可以使用addopts设置。常用的addopts设置项:
-s:表示输出调试信息,用于显示测试函数中print()打印的信息

-v:未加前只打印模块名,加v后打印类名、模块名、方法名,显示更详细的信息

-q:表示只显示整体测试结果

-vs:这两个参数可以一起使用

-n:支持多线程或者分布式运行测试用例(前提需安装:pytest-xdist插件)

–html:生成html的测试报告(前提需安装:pytest-html插件) 如:pytest -vs --html ./reports/result.html
--reruns num: 用例失败后重跑,跑几次(前提需安装:pytest-rerunfailures插件) 如:pytest -vs --reruns=2

-x:表示只要出现一个用例失败报错则停止执行,如:pytest -vs -x

–maxfail:表示出现几个用例失败报错,则终止测试,如:pytest -vs --maxfail=2
-k:模糊匹配,运行测试用例名称中包含某个字符串的测试用例: 如: pytest -vs -k “ao or userPage”

--tb=short 简化堆栈回溯信息,只保留文件和行数

--strict 禁止使用未在配置文件中注册的标记

--rsxX pytest报告所有测试用例被跳过、预计失败、预计失败但实际通过的原因
(2)makers: 我们可以在测试用例上输入@pytest.mark.login来对用例进行标记,但有时手误可能输入成@pytest.mark.loggin;这不会引起程序错误,它会以为你新加了一个标记:loggin。为了避免这种拼写错误,避免遗漏执行测试用例。可以在ini文件中,对所有用到的标记做注册,这样程序中添加未注册的标记时就会报错。
#标记方式如下,冒号后面是对标记的说明
markers =
    demo : marks tests as demo
    smoke: marks tests as smoke
    uat : marks tests as uat
    test : marks tests as test
    login:marks login cases as test
标记注册好后,可以通过pytest --markers来查看。没有注册的标记不会出现在--makers列表里。如果使用了--stict选项,遇到拼写错误的标记或者未注册的标记就会报错。
通过标记表达式执行示例:
pytest.main(['-m', 'slow'])
            示例
               1.pytest.ini (源代码)
                  [pytest]
                        markers =
                            smoke: mark tests as smoke
                            slow
                            happy
                            serial
               2.test_assert.py (源代码)
                  import pytest

                        @pytest.mark.slow
                        def test_kkk_01():
                            print('kkk')
                            assert 1==1

                        @pytest.mark.happy
                        def test_zzz_04():
                            print('kkk')
                            assert 1==1

                        if __name__ == '__main__':
                            # 通过标记表达式执行
                            pytest.main(['-m', 'slow'])
                            # pytest.main(['-m', 'happy'])
                            # pytest.main(['-m', 'not happy'])
此外还可以在conftest.py文件当中,通过hock注册makers标签:
def pytest_configure(config):
    config.addinivalue_line("markers", "smoke:标记只运行冒烟用例")
    config.addinivalue_line("markers", "demo:标记只运行示例用例")
(3)minversion: 该选项指定运行测试用例的pytest的最低版本。
[pytest]
minversion = 5.0
(4) norecursedirs:pytest在收集测试用例的时候,会递归遍历当前目录下的所有子目录,当我们需要某些目录下的用例不要执行时,就可以通过设置norecursedirs参数来实现这个功能。可配置多个目录,目录之间空格隔开
[pytest]
norecursedirs = .* src *.egg dist build
#目录之间空格隔开
(5)testpaths:testpaths是一系列相对于根目录的路径,用于限定测试用例的搜索范围。只有在pytest未指定文件目录参数或测试用例标识符时,该选项才会启用。
如有如下目录结构:
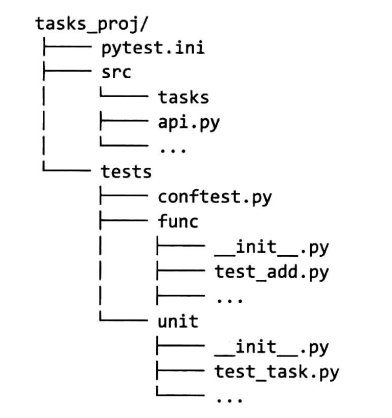
可以这样指定测试目录:
[pytest]
testpaths = tests
(6)python_classes、python_fileses、python_functions:更改搜索规则
pytest根据一定的规则搜索并运行测试。标准的测试搜索规则如下:
- 从一个或多个目录开始查找。你可以在命令行指定文件名或目录名。如果未指定,则使用当前目录。
- 在该目录和所有子目录下递归查找测试模块
- 测试模块是指文件名为test_*.py或者*_test.py的文件
- 在测试模块中查找以test_开头的函数名
- 查找以Test开头的类。其中,首先筛选掉包含__init__函数的类,再查找类中以test_开头的类方法
以上是标准的测试搜索测试,我们可以更改它们。
[pytest]
python_classes = *Test Test* *suite


#######
#这个设置允许我们像下面这样给类取类名:
class DeleteSuite():
    def test_delete1():
        ....
    def test_delete_2():
        ....


[pytest]
python_files = test_* *_test check_*

python_functions = test_* check_*
(7)xfail_strict:设置xfail_strict = true将会使那些被标记为@pytest.mark.xfail但实际通过的测试用例也被报告为失败。
1.4.2 conftest.py
- conftest.py文件是单独存放的一个夹具配置文件,名称不能更改
- 其中的hook函数和fixture将作用于该文件所在的目录以及所有的子目录。
1.5 pytest 常用功能
1.5.1 跳过测试
要跳过某个测试,只需要简单地在测试函数上方添加@pytest.mark.skip()装饰器即可。
可以给要跳过的测试添加条件和理由
@pytest.mark.skip(reson="skip reason")#添加理由
@pytest.mark.skipif(条件表达式,reason="skip reason")#添加条件
1.5.2 标记预期会失败的测试
@pytest.mark.xfail() 你可以使用 xfail 标记以指示预期测试失败。运行结果x代表XFAIL意味着预期失败,实际运行用例也失败;大写X代表XPASS,意味着预期失败,但实际运行成功。

@pytest.mark.xfail
def test_function():
...

此测试将运行,但失败时不会报告回溯。相反,终端报告会将其列在“预期失败”中 (XFAIL)或“意外通过” (XPASS 部分)。
如果测试只在特定条件下失败,则可以将该条件作为第一个参数通过:

#reason 参数:
@pytest.mark.xfail(reason="known parser issue")
def test_function():
...

#raises 参数
如果要更具体地说明测试失败的原因,可以在 raises 参数说明。
@pytest.mark.xfail(raises="known parser issue")
def test_function():
...
如果测试失败,则报告为常规失败,除非 raises .

#run参数
如果测试应标记为xfail并报告为xfail,但不应执行,则使用 run参数,且设置为False
@pytest.mark.xfail(run=False)
def test_function():
...
这对于Xfailing测试特别有用,这些测试会使解释器崩溃,应该稍后进行调查。

#stirct参数
XFAIL 和 XPASS 默认情况下不要让测试套件失败。当设置strict=True,这将使XPASS(意外通过)的测试的结果让测试套件失败。
@pytest.mark.xfail(strict=True)
def test_function():
1.5.3 批量参数化测试用例
可以使用@pytest.mark.parametrize(argnames,argvalues)装饰器达到批量传递参数的目的。
@pytest.mark. parametrize的基本使用方法: parametrize(argnames, argvalues, indirect=False, ids=None, scope=None)
参数说明:
argnames:必传,参数名,以逗号分隔的字符串,表示一个或多个参数名称,或参数字符串的列表/元组
argvalues:必传,参数值,若argnames有多个,可以套用元组的列表展示,元组内数值与参数名一一对应
例1:
# content of test_add.py
#coding = 'utf-8'
import pytest

def add(a,b):
    return a+b

@pytest.mark.parametrize("a, b, expected", [(2, 3, 5),(-1, 1, 0),(0, 0, 0),(100, -100, 0),])
def test_add(a, b, expected):
    assert add(a, b) == expected

#这里, @parametrize decorator定义了4个不同的 (a,b,expected) 使 test_eval 函数将依次运行4次。


例2:
要获取多个参数化参数的所有组合,可以如下使用:
import pytest
@pytest.mark.parametrize("x", [0, 1])
@pytest.mark.parametrize("y", [2, 3])
def test_foo(x, y):
pass
这将在参数设置为 x=0/y=2 , x=1/y=2 , x=0/y=3 和 x=1/y=3 的情况下按照修饰符的顺序排出参数运行测试。
此外可以给测试类加上parametrize()装饰器,这种情况下,该数据集会被传递给该类的所有类方法。
# test_parametrize.py

@pytest.mark.parametrize('user, passwd',
                         [('jack', 'abcdefgh'),
                          ('tom', 'a123456a')])
def test_passwd_md5(user, passwd):
    db = {
        'jack': 'e8dc4081b13434b45189a720b77b6818',
        'tom': '1702a132e769a623c1adb78353fc9503'
    }

    import hashlib

    assert hashlib.md5(passwd.encode()).hexdigest() == db[user]
如果觉得每组测试的默认参数显示不清晰,我们可以使用 pytest.param 的 id 参数进行自定义。
# test_parametrize.py

@pytest.mark.parametrize('user, passwd',
                         [pytest.param('jack', 'abcdefgh', id='User<Jack>'),
                          pytest.param('tom', 'a123456a', id='User<Tom>')])
def test_passwd_md5_id(user, passwd):
    db = {
        'jack': 'e8dc4081b13434b45189a720b77b6818',
        'tom': '1702a132e769a623c1adb78353fc9503'
    }

    import hashlib

    assert hashlib.md5(passwd.encode()).hexdigest() == db[user]
#运行结果
$ pytest -v tests/test-function/test_parametrize.py::test_passwd_md5_id
============================= test session starts =============================
platform win32 -- Python 3.6.4, pytest-3.6.1, py-1.5.2, pluggy-0.6.0 -- c:\anaconda3\python.exe
cachedir: .pytest_cache
rootdir: F:\self-repo\learning-pytest, inifile:
collected 2 items

tests/test-function/test_parametrize.py::test_passwd_md5_id[User<Jack>] PASSED [ 50%]
tests/test-function/test_parametrize.py::test_passwd_md5_id[User<Tom>] PASSED [100%]

========================== 2 passed in 0.07 seconds ===========================
1.5.4 fixture夹具
fixture属于pytest中的一个方法。fixture可以用作测试用例的前置和后置操作,其中fixture命令规范没有像setup和teardown固定格式,可以随意命名。控制fixture的前置和后置操作是通过yield关键字进行来区分的,代码在yield前面的属于前置操作,代码在yield后面的属于后置操作。并且fixture也没有强烈的要求必须要前后置同时存在,可以只存在前置也可以只存在后置。fixture如果有后置内容,无论遇到什么问题,都会进行执行后置的代码。
(1)fixture基本使用
通过装饰器@pytest.fixture()可以使某个函数变成fixture。哪条用例需要用到对应的前置和后置操作的时,直接将fixture的名称通过传参的形式放到用例中,便能进行相对应的前后置操作。
import pytest
@pytest.fixture()
def login():
    print('登录操作')
    yield
    print('退出登录')
class Test_Login():
    def test_01(self, login):
        print('需要用到登录!')
    def test_02(self):
        print('不需要登录!')
    def test_03(self, login):
        print('这里需要用到登录!')
if __name__ == '__main__':
    pytest.main(['-vs'])

#运行结果
#######################################
....
mathfunc.py::Test_Login::test_01 登录操作
需要用到登录!
PASSED退出登录

mathfunc.py::Test_Login::test_02 不需要登录!
PASSED
mathfunc.py::Test_Login::test_03 登录操作
这里需要用到登录!
PASSED退出登录

....
##########################################
(2)多个fixture同时使用
fixture不仅仅能单个使用,还能一起使用。使用的执行顺序取决于你传入的顺序决定,意思就是,先传的先执行。
import pytest
@pytest.fixture()
def login():
    print('登录操作')
    yield
    print('退出登录!')
@pytest.fixture()
def log():
    print('打开日志功能!')
    yield
    print('关闭日志功能!')

class Test_Login():
    def test_01(self, login, log):
        print('需要用到登录!')
    def test_02(self):
        print('不需要登录!')
    def test_03(self, log, login):
        print('这里需要用到登录!')
if __name__ == '__main__':
    pytest.main(['-vs'])

#运行结果
###########################################
.....
mathfunc.py::Test_Login::test_01 登录操作
打开日志功能!
需要用到登录!
PASSED关闭日志功能!
退出登录!

mathfunc.py::Test_Login::test_02 不需要登录!
PASSED
mathfunc.py::Test_Login::test_03 打开日志功能!
登录操作
这里需要用到登录!
PASSED退出登录!
关闭日志功能!
.....
#############################################
(3)fixture相互调用
fixture还可以进行其他fixture的调用操作。调用方法:直接将被调用fixture的函数名放到调用的fixture当做参数传入。
import pytest
@pytest.fixture()
def login():
    print('\n登录操作')
    yield
    print('\n退出登录!')

@pytest.fixture()
def log(login):
    print('\n打开日志功能!')
    yield
    print('\n关闭日志功能!')

class Test_Login():
    def test_01(self, log):
        print('\n需要用到登录!')
    def test_02(self):
        print('\n不需要登录!')
    def test_03(self, log):
        print('\n这里需要用到登录!')
if __name__ == '__main__':
    pytest.main(['-vs'])

#运行结果
##############################################
.....
mathfunc.py::Test_Login::test_01
登录操作

打开日志功能!

需要用到登录!
PASSED
关闭日志功能!

退出登录!

mathfunc.py::Test_Login::test_02
不需要登录!
PASSED
mathfunc.py::Test_Login::test_03
登录操作

打开日志功能!

这里需要用到登录!
PASSED
关闭日志功能!

退出登录!
.......

######################################
(4)fixture参数详解
fixture共有5个参数,分别是name,scope,params,autouse,ids。
name参数:
name参数表示可以对fixture的名称进行重命名。
import pytest
@pytest.fixture(name='anjing')
def login():
    print('\n登录操作')
    yield
    print('\n退出登录!')
class Test_Login():
    def test_01(self, anjing):
        print('---用例01---')
    def test_02(self):
        print('---用例02---')
    def test_03(self, anjing):
        print('---用例03---')
if __name__ == '__main__':
    pytest.main(['-vs'])
执行后发现,通过参数name更改过的名字可以直接进行调用。注意:通过name重命名后,继续使用以前的名字调用会报错。
scope参数:
fixture中的参数scope是用于控制fixture的作用范围。 _Scope = Literal["session", "package", "module", "class", "function"],其中scope默认参数为function,表示应用于单个测试函数中。session:主要应用于会话级别的fixture。module:主要应用于模块级别的fixture。class:主要应用于class中,表示每个前置和后置都会执行一次。package:主要应用于每个包下的fixture。
import pytest
@pytest.fixture(scope='session')
def fix_session():
    print('\n这是属于session')
    yield
    print('\nsession')
@pytest.fixture(scope='class')
def fix_class():
    print('\n这是属于class')
    yield
    print('\nsession')
@pytest.fixture(scope='module')
def fix_module():
    print('\n这是属于module')
    yield
    print('\nmodule')
@pytest.fixture(scope='function')
def fix_function():
    print('\n这是属于function')
    yield
    print('\nfunction')
class Test_01:
    def test_01(self, fix_function, fix_class,fix_module,fix_session):
        print('----用例01---')
if __name__ == '__main__':
    pytest.main(['-vs'])
通过执行会发现他们的执行顺序在不同的fixture作用范围内的执行顺序是不同的。执行顺序:session>>module>>class>>function。
总结:
在定义固件时,通过 scope 参数声明作用域,可选项有:
function: 函数级,每个测试函数都会执行一次固件;class: 类级别,每个测试类执行一次,所有方法都可以使用;module: 模块级,每个模块执行一次,模块内函数和方法都可使用;session: 会话级,一次测试只执行一次,所有被找到的函数和方法都可用。
autouse参数:
autouse表示在fixture中用于控制fixture作用范围内的是否全部执行。默认为False,当设置为True的时候表示该fixture在当前作用范围内,全部执行。
import pytest
@pytest.fixture(autouse=True)
def login():
    print('\n登录操作')
    yield
    print('\n退出登录!')
class Test_Login():
    def test_01(self):
        print('---用例01---')
    def test_02(self):
        print('---用例02---')
    def test_03(self):
        print('---用例03---')
if __name__ == '__main__':
    pytest.main(['-vs'])

#运行结果
#####################
mathfunc.py::Test_Login::test_01
登录操作
---用例01---
PASSED
退出登录!

mathfunc.py::Test_Login::test_02
登录操作
---用例02---
PASSED
退出登录!

mathfunc.py::Test_Login::test_03
登录操作
---用例03---
PASSED
退出登录!
######################
通过执行结果可以查看到我们当前的用例模块全部都调用了login。
params参数:
params表示fixture的参数化功能。这里会有一个request参数,主要用来接收fixture的返回结果。并通过request.param返回结果内容。
#coding = 'utf-8'
import pytest
data = ['anjing', 'test', 'admin']

@pytest.fixture(params=data, ids=['user=anjing','user=test','user=admin'])
def login(request):
    print('登录功能')
    yield request.param
    print('退出登录')

class Test_01:
    def test_01(self, login):
        print('---用例01---')
        print('登录的用户名:%s' % login)
    def test_02(self):
        print('---用例02---')

if __name__ == '__main__':
    pytest.main(['-vs'])

#运行结果
#################

mathfunc.py::Test_01::test_01[user=anjing] 登录功能
---用例01---
登录的用户名:anjing
PASSED退出登录

mathfunc.py::Test_01::test_01[user=test] 登录功能
---用例01---
登录的用户名:test
PASSED退出登录

mathfunc.py::Test_01::test_01[user=admin] 登录功能
---用例01---
登录的用户名:admin
PASSED退出登录

mathfunc.py::Test_01::test_02 ---用例02---
PASSED
############################
通过执行结果可以看到,我们的test_01一共执行了3次,每次都是不同的参数,参数也是通过login进行接收的。
ids参数:
ids表示在fixture对参数化的内容进行加上标识,比如让别人知道这个传入的参数是什么意思。用于什么样的测试用例。默认是传参数内容:
#coding = 'utf-8'
import pytest
data = ['anjing', 'test', 'admin']

@pytest.fixture(params=data, ids=['user=anjing','user=test','user=admin'])
def login(request):
    print('登录功能')
    yield request.param
    print('退出登录')

class Test_01:
    def test_01(self, login):
        print('---用例01---')
        print('登录的用户名:%s' % login)
    def test_02(self):
        print('---用例02---')

if __name__ == '__main__':
    pytest.main(['-vs'])

#运行结果
#################

mathfunc.py::Test_01::test_01[user=anjing] 登录功能
---用例01---
登录的用户名:anjing
PASSED退出登录

mathfunc.py::Test_01::test_01[user=test] 登录功能
---用例01---
登录的用户名:test
PASSED退出登录

mathfunc.py::Test_01::test_01[user=admin] 登录功能
---用例01---
登录的用户名:admin
PASSED退出登录

mathfunc.py::Test_01::test_02 ---用例02---
PASSED
############################
执行结果可以看到在每条用例的后面都会有对应的参数详解。
1.5.5 使用--setup-show回溯fixture的执行过程
使用命令pytest --setup-show test.py 可以回溯fixture的执行过程
#coding = 'utf-8'

import pytest

@pytest.fixture(scope='function')
def func_scope():
    pass


@pytest.fixture(scope='module')
def mod_scope():
    pass


@pytest.fixture(scope='session')
def sess_scope():
    pass


@pytest.fixture(scope='class')
def class_scope():
    pass


def test_multi_scope(sess_scope, mod_scope, func_scope):
    pass

#运行结果
E:\2022-5-16\pytest_study\testcase>pytest -vs --setup-show mathfunc.py
================================================================================ test session starts =================================================================================
platform win32 -- Python 3.6.2, pytest-7.0.1, pluggy-1.0.0 -- e:\soft\python3.6\python3.exe
cachedir: .pytest_cache
rootdir: E:\2022-5-16\pytest_study\testcase
plugins: allure-pytest-2.13.2
collected 1 item

mathfunc.py::test_multi_scope
SETUP    S sess_scope
    SETUP    M mod_scope
        SETUP    F func_scope
        mathfunc.py::test_multi_scope (fixtures used: func_scope, mod_scope, sess_scope)PASSED
        TEARDOWN F func_scope
    TEARDOWN M mod_scope
TEARDOWN S sess_scope
1.5.6 对类使用作用域:pytest.mark.usefixtures
目前为止用到fixture的测试,都是在测试函数的参数列表中指定fixture,实际上,也可以用@pytest.mark.usefixtures("fixture1","fixture2")标记测试函数或类。使用usefixtures,需要在参数列表中指定一个或多个fixture字符串,这对测试函数来讲意义不大,但非常适合测试类。
#coding = 'utf-8'

import pytest

@pytest.fixture(scope='class')
def class_scope():
    pass


# test_scope.py

@pytest.mark.usefixtures('class_scope')
class TestClassScope:
    def test_1(self):
        pass

    def test_2(self):
        pass
#运行结果
platform win32 -- Python 3.6.2, pytest-7.0.1, pluggy-1.0.0 -- e:\soft\python3.6\python3.exe
cachedir: .pytest_cache
rootdir: E:\2022-5-16\pytest_study\testcase
plugins: allure-pytest-2.13.2
collected 2 items

mathfunc.py::TestClassScope::test_1
      SETUP    C class_scope
        mathfunc.py::TestClassScope::test_1 (fixtures used: class_scope)PASSED
mathfunc.py::TestClassScope::test_2
        mathfunc.py::TestClassScope::test_2 (fixtures used: class_scope)PASSED
      TEARDOWN C class_scope
1.6 pytest 内置fixture
pytest内置了一些常用的fiture,下面介绍一些常用的内置fixture用法。
1.6.1 临时文件和目录管理 tmpdir & tmpdir_factory
内置的tmpdir和tmpdir_factory负责在测试开始运行前创建临时文件目录,并在测试结束后删除。当我们希望测试时使用的是临时数据,并且数据在测试结束后会销毁,便可以使用tmpdir和tmpdir_factory来创建和删除临时目录。tmpdir的作用是函数级别,tmpdir_factory的作用范围是会话级别。
使用 tmpdir.mkdir() 创建目临时录,tmpdir.join() 创建临时文件(或者使用创建的目录)。
def test_tmpdir(tmpdir):
    a_dir = tmpdir.mkdir('mytmpdir')
    a_file = a_dir.join('tmpfile.txt')

    a_file.write('hello, pytest!')

    assert a_file.read() == 'hello, pytest!'
tmpdir_factory 可以在所有作用域使用,包括 function, class, module, session
@pytest.fixture(scope='module')
def my_tmpdir_factory(tmpdir_factory):
    a_dir = tmpdir_factory.mktemp('mytmpdir')
    a_file = a_dir.join('tmpfile.txt')

    a_file.write('hello, pytest!')

    return a_file
1.6.2 pytestconfig读取参数和配置文件
内置的pytestconfig可以通过命令行参数、选项、配置文件、插件、运行目录等方式来控制pytest。使用 pytestconfig,可以很方便的读取命令行参数和配置文件。
下面示例演示命令行参数解析:首先在 conftest.py 中使用函数 pytest_addoption (特定的 hook function ):
# conftest.py

def pytest_addoption(parser):
    parser.addoption('--host', action='store',
                     help='host of db')
    parser.addoption('--port', action='store', default='8888',
                     help='port of db')
然后就可以在测试函数中通过 pytestconfig 获取命令行参数:
# test_config.py

def test_option1(pytestconfig):
    print('host: %s' % pytestconfig.getoption('host'))
    print('port: %s' % pytestconfig.getoption('port'))
pytestconfig 其实是 request.config 的快捷方式,所以也可以自定义固件实现命令行参数读取
# conftest.py

def pytest_addoption(parser):
    parser.addoption('--host', action='store',
                     help='host of db')
    parser.addoption('--port', action='store', default='8888',
                     help='port of db')


@pytest.fixture
def config(request):
    return request.config


# test_config.py

def test_option2(config):
    print('host: %s' % config.getoption('host'))
    print('port: %s' % config.getoption('port'))
1.6.3 cathe
pytest 运行完用例之后会生成一个 .pytest_cache 的缓存文件夹,用于记录用例的ids和上一次失败的用例。方便我们在运行用例的时候加--lf 和 --ff 参数,快速运行上一次失败的用例。
cathe参数说明:
--lf 也可以使用 --last-failed 仅运行上一次失败的用例
--ff 也可以使用 --failed-first 运行全部的用例,但是上一次失败的用例先运行
--nf 也可以使用 --new-first 根据文件插件的时间,新的测试用例会先运行
--cache-show=[CACHESHOW] 显示.pytest_cache文件内容,不会收集用例也不会测试用例,选项参数: glob (默认: ‘*’)
--cache-clear 测试之前先清空.pytest_cache文件
运行下面代码:
#coding = 'utf-8'

import os


def test_01():
    a = "hello"
    b = "hello"
    assert a == b


def test_02():
    a = "hello"
    b = "hello world"
    assert a == b


def test_03():
    a = "hello"
    b = "hello world"
    assert a in b


def test_04():
    a = "hello"
    b = "hello world"
    assert a not in b


if __name__ == '__main__':
    os.system('pytest -s -v mathfunc.py --tb=line')
运行结束后,生成的cathe文件如下:
#lastfailed 文件记录上一次运行失败的用例
{
“test_57.py::test_02”: true,
“test_57.py::test_04”: true
}
#nodeids 文件记录所有用例的节点
[
“test_57.py::test_01”,
“test_57.py::test_02”,
“test_57.py::test_03”,
“test_57.py::test_04”
]
可以使用pytest --cache-show查看cache,如下:
-------------------------------------------------------------------------------- cache values for '*' --------------------------------------------------------------------------------
cache\lastfailed contains:
  {'mathfunc.py::test_02': True, 'mathfunc.py::test_04': True}
cache\nodeids contains:
  ['mathfunc.py::test_01',
   'mathfunc.py::test_02',
   'mathfunc.py::test_03',
   'mathfunc.py::test_04']
cache\stepwise contains:
  []
使用cache写入或读取pytest的缓存
cache 是一个可以在测试会话之间保持状态的缓存对象,cache 提供了两个方法读取写入缓存:
(1)cache.set(key, value):写入缓存;
key 参数:缓存存储的路径,是相对于缓存文件 .pytest_cache/v/ 的相对路径,如无此路径会自动创建;
value 参数:缓存的值;
注意:此方法写入缓存是实时写入的,测试未结束之前缓存文件未显示,但是缓存是已经被写入的;
(2)cache.get(key, default):返回给定键的缓存值,如果尚未缓存任何值或无法读取该值,则返回指定的默认值;
key 参数:缓存存储的路径,也是相对于缓存文件 .pytest_cache/v/ 的相对路径;
default 参数:获取不到缓存值时的默认值;
使用场景1:当前置操作生成一个id值,在用例中获取这个id
import pytest

@pytest.fixture()
def create_id(cache):
    """取值生成一个id"""
    id = "User_id"
    cache.set("id", id)
    yield id

def test_1(cache, create_id):
    # 方式1:cache获取
    get_id = cache.get("id", None)
    print("获取到的id: {}".format(get_id))
    # 方式2:直接通过create_id 获取返回值
    print("create_id fixture return: {}".format(create_id))

if __name__ == '__main__':
    pytest.main(["-vs"])
使用场景2:执行用例后生成一个sp_id,后置操作需要清理数据
import pytest

@pytest.fixture()
def delete_sp(cache):
    """后置处理"""
    yield
    # 先获取用例执行后得到的sp_id
    sp_id = cache.get("sp_id", None)
    print("后置处理得到值: {}".format(sp_id))

def test_2(cache, delete_sp):
    # 执行用例后生成sp_id
    sp_id = "user_id"
    cache.set("sp_id", sp_id)

if __name__ == '__main__':
    pytest.main(["-vs"])
使用场景3:把用例当步骤去执行,执行a用例得到id参数,后面的用例需要前面得到的值,用cache也可以实现
#coding = 'utf-8'

import pytest

def test_1(cache):
    x = "yoyo_123"
    cache.set("id", x)
    print("case 1 create id : {}".format(x))

def test_2(cache):
    a = cache.get("id", None)
    print("case2 get id: {}".format(a))
实际应用:利用缓存统计测试用例执行时间
#coding = 'utf-8'
import pytest
import datetime

# 利用缓存统计用例执行时间
def add(a,b):
    return a+b

@pytest.fixture(autouse=True)
def my_cache(request, cache):
    # 获取当前用例名称
    nodeid = request.node.nodeid.split(':')[-1]
    # 缓存存储路径
    cache_path = f'case_time/{nodeid}'
    # 用例开始时间
    start_time = datetime.datetime.now()
    yield
    # 用例结束时间
    end_time = datetime.datetime.now()
    # 计算执行时间
    total_time = (end_time - start_time).total_seconds()
    # 写入缓存
    cache.set(cache_path, total_time)
    # 获取并打印写入缓存
    time = cache.get(cache_path, None)
    print('写入后获取时间:', time)

@pytest.mark.parametrize("a, b, expected", [(2, 3, 5),(-1, 1, 0),(0, 0, 0),(100, -100, 0),])
def test_add(a, b, expected):
    assert add(a, b) == expected
#运行结果
================================================================================ test session starts =================================================================================
platform win32 -- Python 3.6.2, pytest-7.0.1, pluggy-1.0.0 -- e:\soft\python3.6\python3.exe
cachedir: .pytest_cache
rootdir: E:\2022-5-16\pytest_study\testcase
plugins: allure-pytest-2.13.2
collected 4 items

mathfunc.py::test_add[2-3-5] PASSED写入后获取时间: 0.000997

mathfunc.py::test_add[-1-1-0] PASSED写入后获取时间: 0.000979

mathfunc.py::test_add[0-0-0] PASSED写入后获取时间: 0.001022

mathfunc.py::test_add[100--100-0] PASSED写入后获取时间: 0.001986


================================================================================= 4 passed in 0.11s ==================================================================================
1.6.4 capsys
pytest 内置的capsys有两个功能:允许使用代码读取stdout和stderr,可以临时禁止抓取日志输出。
capsys 用于捕获 stdout 和 stderr 的内容,并临时关闭系统输出。
# test_capsys.py

def ping(output):
    print('Pong...', file=output)


def test_stdout(capsys):
    ping(sys.stdout)
    out, err = capsys.readouterr()
    assert out == 'Pong...\n'
    assert err == ''


def test_stderr(capsys):
    ping(sys.stderr)
    out, err = capsys.readouterr()
    assert out == ''
    assert err == 'Pong...\n'
pytest通常会抓取测试用例及被测试代码的输出。仅当全部测试会话运行结束后,抓取到的输出才会随着失败的测试显示出来。-s参数可以关闭这个功能,-s 等价于--capture=no,表示关闭输出捕获,该参数使测试仍在运行期间就把输出直接发送到stdout。通常这很方便,但是有时候你可能又需要其中的部分信息,此时可以使用capsys,capsys.disabled()可以临时让输出绕过默认的输出捕获机制。
#coding = 'utf-8'
import pytest
import datetime

def test_normal():
    print("\nnormal print")


def test_fail():
    print("\nprint in failing test")
    assert False

# 另一种总是包括输出的方法是使用 capsys.disabled()
def test_disabled(capsys):
    with capsys.disabled():
        print("\ncapsys disabled print")
不管有没有捕获输出,capsys.disabled()内的打印内容都会显示。
1.6.5 动态修改类或模块
monkey patch 可以在运行期间对类或模块进行动态修改。在测试中,monkey pacth常用于替换被测试代码的部分运行环境,或者将输入依赖或者输出依赖替换成更容易测试的对象或者函数。pytest 内置的monkeypacth允许你在单一测试环境里做这些事情。测试结束后,无论结果是通过还是失败,代码都会复原(所有的修改都会撤销)。
Pytest 内置 monkeypatch 提供的函数有:
setattr(target, name, value, raising=True),设置属性;delattr(target, name, raising=True),删除属性;setitem(dic, name, value),字典添加元素;delitem(dic, name, raising=True),字典删除元素;setenv(name, value, prepend=None),设置环境变量;delenv(name, raising=True),删除环境变量;syspath_prepend(path),添加系统路径;chdir(path),切换目录。
其中 raising 用于通知 pytest 在元素不存在时是否抛出异常;prepend 如果设置,环境变量将变为 value+prepend+<old value> 。
下面使用保存配置文件示例说明 monkeypatch 的作用和使用。
假设我们需要切换某个服务到国内科大源以加速,有以下脚本用于修改配置文件 .conf.json:
# test_monkeypatch.py

def dump_config(config):
    path = os.path.expanduser('~/.conf.json')
    with open(path, 'w', encoding='utf-8') as wr:
        json.dump(config, wr, indent=4)


def test_config():
    dump_config(config)
    path = os.path.expanduser('~/.conf.json')
    expected = json.load(open(path, 'r', encoding='utf-8'))
    assert expected == config
似乎测试正常执行完全没有问题,但如果我们的家目录下恰好有这个配置文件并且维护了许多配置,运行测试将会覆盖原有配置,这太可怕了!
所以我们需要修改测试,最好能在临时目录里完成。但程序已经写死了文件路径,怎么办?
这种在运行时控制程序的功能就需要 monkeypatch 来实现,下面在测试过程中修改了环境变量:
# test_monkeypatch.py

def test_config_monkeypatch(tmpdir, monkeypatch):
    monkeypatch.setenv('HOME', tmpdir.mkdir('home'))

    dump_config(config)
    path = os.path.expanduser('~/.conf.json')
    expected = json.load(open(path, 'r', encoding='utf-8'))
    assert expected == config
现在测试会来临时目录中执行,但环境变量可能对系统有依赖,所以更好的解决方法能自己控制路径中 ~ 的替换,这次通过改变 os.path.expanduser 的行为来实现:
# test_monkeypatch.py

def test_config_monkeypatch2(tmpdir, monkeypatch):
    fake_home = tmpdir.mkdir('home')
    monkeypatch.setattr(os.path, 'expanduser',
                        lambda x: x.replace('~', str(fake_home)))
    dump_config(config)
    path = os.path.expanduser('~/.conf.json')
    expected = json.load(open(path, 'r', encoding='utf-8'))
    assert expected == config
2. pytest 与其他工具的搭配使用
2.1 pdb调试失败的测试用例
pdb是Python标准库里的调试模块。在pytest里,你可以使用--pdb选项测试失败时开启调试。pdb提示符出现后,表明可以使用pdb的交互调试功能。查看错误时,有以下常用命令:
- p/print expr:输出expr的值
- pp expr:美化输出expr的值
- l/list:列出错误并显示错误之前和之后的5行代码
- l/list begin,end:列出错误,并通过行号指定需要显示的代码区域
- a/args :打印当前函数的参数列表(断点发生在帮助函数中会很实用)
- u/up:移动到堆栈的上一层
- d/down:移动到堆栈的下一层
- q/quir:退出当前调试会话
>>>未完待续

 浙公网安备 33010602011771号