

springboot学习笔记:2、搞定json参数
《springboot学习笔记:2、搞定json参数》三步搞定
注:
- 需要先学习《springboot学习笔记:1、helloworld》;
- 本文章采用的trick是:通过fastjson搞定json。
Spring boot处理json参数的三个步骤:
一、添加fastjson的依赖到pom.xml中
<dependency>
<groupId>com.alibaba</groupId>
<artifactId>fastjson</artifactId>
<version>1.2.47</version></dependency>
二、创建controller类:
package impl;
import org.springframework.stereotype.Controller;
import org.springframework.web.bind.annotation.GetMapping;
import org.springframework.web.bind.annotation.RequestMapping;
import org.springframework.web.bind.annotation.ResponseBody;
import org.springframework.web.bind.annotation.RestController;
import java.util.ArrayList;
import java.util.Date;
import java.util.List;
@RestController
public class SpringbootHelloJson {
@GetMapping("/query")
public List<Users> query(){
List<Users> list = new ArrayList<Users>();
for (int i=0;i < 10;i++){
Users user = new Users();
user.setId(i);
user.setName("zhangsan--"+i);
user.setAddress("sz---"+i);
user.setDate(new Date());
list.add(user);
}
return list;
}
}
三、创建配置类
package impl;
import com.alibaba.fastjson.support.config.FastJsonConfig;
import com.alibaba.fastjson.support.spring.FastJsonHttpMessageConverter;
import org.springframework.context.annotation.Bean;
import org.springframework.context.annotation.Configuration;
@Configuration
public class SpringbootWebMvcConfig {
@Bean
FastJsonHttpMessageConverter fastJsonHttpMessageConverter(){
FastJsonHttpMessageConverter converter = new FastJsonHttpMessageConverter();
FastJsonConfig config = new FastJsonConfig();
config.setDateFormat("yyyy/MM/dd");
converter.setFastJsonConfig(config);
return converter;
}
}
四、然后启动、验证即可。
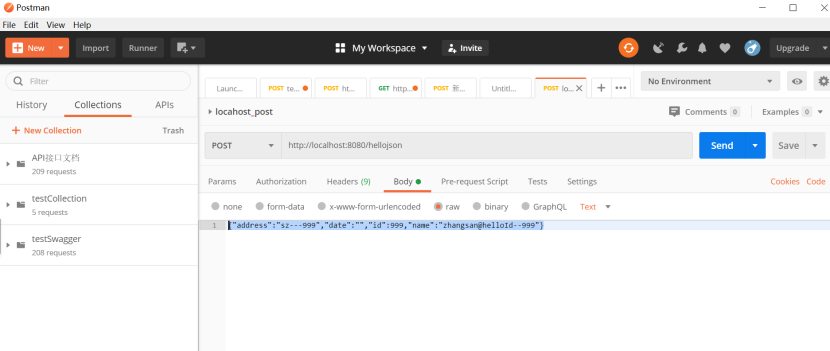
使用Postman测试json的post, 请求报文、如下图所示:
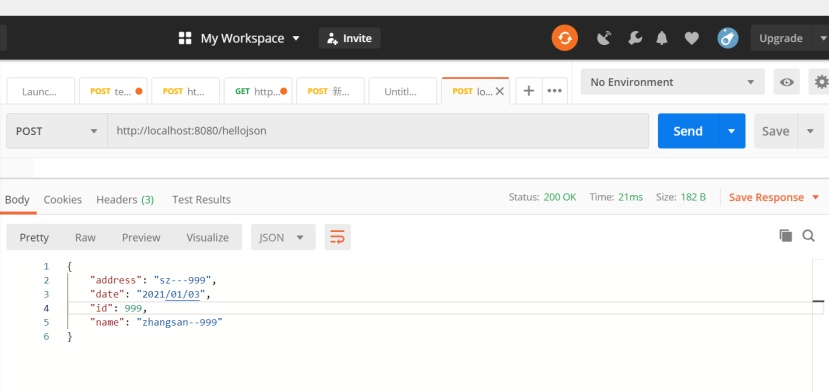
返回结果,如下图:
五、附:完整代码、以及关键技术点注释,详情如下:
package impl;
import org.springframework.stereotype.Controller;
import org.springframework.web.bind.annotation.*;
import java.util.ArrayList;
import java.util.Date;
import java.util.List;
@RestController
public class SpringbootHelloJson {
@GetMapping("/queryUsers")
public List<Users> queryUsers(){
List<Users> list = new ArrayList<Users>();
for (int i=0;i < 10;i++){
Users user = new Users();
user.setId(i);
user.setName("zhangsan--"+i);
user.setAddress("sz---"+i);
user.setDate(new Date());
list.add(user);
}
return list;
}
@RequestMapping(value="/queryUser/{id}",method= RequestMethod.GET)
public Users queryUser(@PathVariable("id") Integer id){
Users user = new Users();
user.setId(id);
user.setName("zhangsan--"+id);
user.setAddress("sz---"+id);
user.setDate(new Date());
return user;
}
//@PathVariable:一般我们使用URI template样式映射使用,即url/{param}这种形式,也就是一般我们使用的GET,DELETE,PUT方法会使用到的,我们可以获取URL后所跟的参数。
@RequestMapping(value="/hellos/{id}/{name}",method= RequestMethod.GET)
public String sayHello(@PathVariable("id") Integer id, @PathVariable("name") String name){
return "id:"+id+" name:"+name;
}
/**
当Ajax以application/x-www-form-urlencoded格式上传即使用JSON对象,后台只能使用@RequestParam 或者Servlet获取参数。
当Ajax以application/json格式上传即使用JSON字符串,后台可以使用@RquestBody或者@RequestParam获取。
*/
@PostMapping(path = "/userDemo1")
public void demo1(@RequestBody Users person) {
System.out.println(person.toString());
}
@RequestMapping(value="/userDemo2",method= RequestMethod.GET)
public String sayHello(@RequestParam Integer id){
return "id:"+id;
}
/*
当后端接收完前端的数据,响应一般也是返回json数据给前端,此时只需要在后端控制器Contoller类加上@ResponseBody即可。
@Controller 与 @ResponseBody 结合使用返回json数据给前端,我们还可以使用@RestController替换他们,从而使代码更加的精简
* */
}
