

BFD基本配置
BFD与静态路由联动
静态路由联动原理
- 静态路由自身没有检测机制,当网络发生故障的时候,需要管理员介入。BFD与静态路由联动特性可为公网静态路由绑定BFD会话,利用BFD会话来检测静态路由所在链路的状态。
- BFD与静态路由联动可为每条静态路由绑定一个BFD会话,当这条静态路由上绑定的BFD会话检测到链路故障(由Up转为Down)后,BFD会将故障上报路由管理系统,由路由管理模块将这条路由设置为“非激活”状态(此条路由不可用,从IP路由表中删除)。当这条静态路由上绑定的BFD会话成功建立或者从故障状态恢复后(由Down转为Up),BFD会上报路由管理模块,由路由管理模块将这条路由设置为“激活”状态(此路由可用,加入IP路由表)。
典型配置1
拓扑图如下:
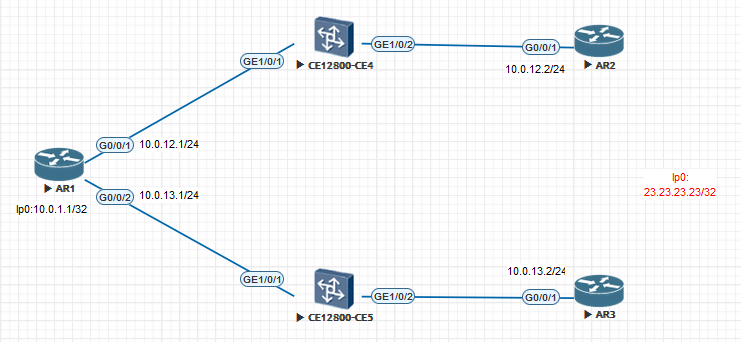
目标:BFD与静态路由联动实现浮动路由。
场景:R1到23.23.23.23/32网络可通过R2到达,也可通过R3到达(交换机作为二层转发)。R2作为主用R3作为备用。R1到R2、R3之间由于不是直连链路,因此接口状态不会影响到静态路由的有效性,此时使用BFD进行检测,当检测失效时,使用备份静态路由进行数据转发。
配置步骤
- 基本IP编址
- BFD配置
- BFD与静态路由联动配置
- 验证
1.基本IP编址

[R1]interface GigabitEthernet 0/0/1
[R1-GigabitEthernet0/0/1]ip add 10.0.12.1 24
[R1-GigabitEthernet0/0/1]q
[R1]interface GigabitEthernet 0/0/2
[R1-GigabitEthernet0/0/2]ip add 10.0.13.1 24
[R1-GigabitEthernet0/0/2]q
[R1]interface LoopBack 0
[R1-LoopBack0]ip add 10.0.1.1 32
[R1-LoopBack0]q

[R2]interface GigabitEthernet 0/0/1
[R2-GigabitEthernet0/0/1]ip add 10.0.12.2 24
[R2-GigabitEthernet0/0/1]q
[R2]interface LoopBack 0
[R2-LoopBack0]ip add 23.23.23.23 32
[R2-LoopBack0]q

[R3]interface GigabitEthernet 0/0/1
[R3-GigabitEthernet0/0/1]ip add 10.0.13.2 24
[R3-GigabitEthernet0/0/1]q
[R3]interface LoopBack 0
[R3-LoopBack0]ip add 23.23.23.23 32
[R3-LoopBack0]q
2.BFD配置
#在主用路径上启用BFD,检测R1到R2接口。
[R1]bfd  //全局启用BFD
[R1-bfd]q
[R1]bfd 1 bind peer-ip 10.0.12.2 source-ip 10.0.12.1 auto //配置BFD会话
[R1-bfd-session-1]commit
[R1-bfd-session-1]q

[R2]bfd
[R2-bfd]q
[R2]bfd 1 bind peer-ip 10.0.12.1 source-ip 10.0.12.2 auto
[R2-bfd-session-1]commit
[R2-bfd-session-1]q
#查看BFD会话信息
[R1]display bfd session all
--------------------------------------------------------------------------------
Local Remote     PeerIpAddr      State     Type         InterfaceName
--------------------------------------------------------------------------------
8192  8192       10.0.12.2       Up        S_AUTO_PEER        -
--------------------------------------------------------------------------------
     Total UP/DOWN Session Number : 1/0

[R2]display bfd session all
--------------------------------------------------------------------------------
Local Remote     PeerIpAddr      State     Type         InterfaceName
--------------------------------------------------------------------------------
8192  8192       10.0.12.1       Up        S_AUTO_PEER        -
--------------------------------------------------------------------------------
     Total UP/DOWN Session Number : 1/0
3.BFD与静态路由联动配置
#在R2和R3上配置去往R1环回的静态路由
[R2]ip route-static 10.0.0.0 8 10.0.12.1

[R3]ip route-static 10.0.0.0 8 10.0.13.1

[R2]display ip routing-table
Route Flags: R - relay, D - download to fib, T - to vpn-instance
------------------------------------------------------------------------------
Routing Tables: Public
         Destinations : 9        Routes : 9

Destination/Mask    Proto   Pre  Cost      Flags NextHop         Interface

       10.0.0.0/8   Static  60   0          RD   10.0.12.1       GigabitEthernet0/0/1

[R3]display ip routing-table
Route Flags: R - relay, D - download to fib, T - to vpn-instance
------------------------------------------------------------------------------
Routing Tables: Public
         Destinations : 9        Routes : 9

Destination/Mask    Proto   Pre  Cost      Flags NextHop         Interface

       10.0.0.0/8   Static  60   0          RD   10.0.13.1       GigabitEthernet0/0/1
#在R1上配置静态路由并联动BFD
[R1]ip route-static 0.0.0.0 0.0.0.0 10.0.12.2 track bfd-session 1  //默认主路由与bfd联动
[R1]ip route-static 0.0.0.0 0.0.0.0 10.0.13.2 preference 100  //备用路由调整优先级(静态路由默认60)
#查看路由表
[R1]display ip routing-table
Route Flags: R - relay, D - download to fib, T - to vpn-instance
------------------------------------------------------------------------------
Routing Tables: Public
         Destinations : 12       Routes : 12

Destination/Mask    Proto   Pre  Cost      Flags NextHop         Interface

        0.0.0.0/0   Static  60   0          RD   10.0.12.2       GigabitEthernet0/0/1
//正常情况下主用路由加入转发表

[R1]display ip routing-table 0.0.0.0 0 verbose
Route Flags: R - relay, D - download to fib, T - to vpn-instance
------------------------------------------------------------------------------
Routing Table : Public
Summary Count : 2

Destination: 0.0.0.0/0
     Protocol: Static           Process ID: 0
   Preference: 60                     Cost: 0
      NextHop: 10.0.12.2         Neighbour: 0.0.0.0
        State: Active Adv Relied       Age: 00h04m53s
          Tag: 0                  Priority: medium
        Label: NULL                QoSInfo: 0x0
   IndirectID: 0x80000001
 RelayNextHop: 0.0.0.0           Interface: GigabitEthernet0/0/1
     TunnelID: 0x0                   Flags: RD

Destination: 0.0.0.0/0
     Protocol: Static           Process ID: 0
   Preference: 100                    Cost: 0
      NextHop: 10.0.13.2         Neighbour: 0.0.0.0
        State: Inactive Adv Relied     Age: 00h04m32s
          Tag: 0                  Priority: medium
        Label: NULL                QoSInfo: 0x0
   IndirectID: 0x80000002
 RelayNextHop: 0.0.0.0           Interface: GigabitEthernet0/0/2
     TunnelID: 0x0                   Flags: R
//备用路由此时为不活跃状态(不加表)
注意:如果不配置BFD检测的话,在R1上是没有任何机制可以判断静态路由是否有效的,因此BFD在这种场景非常重要。
4.配置验证
在R2上关闭连接至R1的端口,模拟主用路径故障。
#关闭R2端口
[R2]interface GigabitEthernet 0/0/1
[R2-GigabitEthernet0/0/1]shutdown
#R1到目的网络有短暂丢包(切换备用线路)
<R1>ping -c 100 23.23.23.23
  PING 23.23.23.23: 56  data bytes, press CTRL_C to break
    Reply from 23.23.23.23: bytes=56 Sequence=1 ttl=255 time=2 ms
    Reply from 23.23.23.23: bytes=56 Sequence=2 ttl=255 time=2 ms
    Reply from 23.23.23.23: bytes=56 Sequence=3 ttl=255 time=1 ms
    Reply from 23.23.23.23: bytes=56 Sequence=4 ttl=255 time=2 ms
    Reply from 23.23.23.23: bytes=56 Sequence=5 ttl=255 time=2 ms
    Reply from 23.23.23.23: bytes=56 Sequence=6 ttl=255 time=4 ms
    Reply from 23.23.23.23: bytes=56 Sequence=7 ttl=255 time=1 ms
    Request time out
    Request time out
    Reply from 23.23.23.23: bytes=56 Sequence=10 ttl=255 time=1 ms
    Reply from 23.23.23.23: bytes=56 Sequence=11 ttl=255 time=8 ms
    Reply from 23.23.23.23: bytes=56 Sequence=12 ttl=255 time=1 ms
#BFD状态down
<R1>display bfd session all
--------------------------------------------------------------------------------
Local Remote     PeerIpAddr      State     Type         InterfaceName
--------------------------------------------------------------------------------
8192  0          10.0.12.2       Down      S_AUTO_PEER        -
--------------------------------------------------------------------------------
     Total UP/DOWN Session Number : 0/1
#R1路由表(此时备用路由被加入路由转发表)
<R1>display ip routing-table
Route Flags: R - relay, D - download to fib, T - to vpn-instance
------------------------------------------------------------------------------
Routing Tables: Public
         Destinations : 12       Routes : 12

Destination/Mask    Proto   Pre  Cost      Flags NextHop         Interface

        0.0.0.0/0   Static  100  0          RD   10.0.13.2       GigabitEthernet0/0/2
#R1默认路由信息(主用路由状态成为invalid,备用为active)
<R1>display ip routing-table 0.0.0.0 0 verbose
Route Flags: R - relay, D - download to fib, T - to vpn-instance
------------------------------------------------------------------------------
Routing Table : Public
Summary Count : 2

Destination: 0.0.0.0/0
     Protocol: Static           Process ID: 0
   Preference: 60                     Cost: 0
      NextHop: 10.0.12.2         Neighbour: 0.0.0.0
        State: Invalid Adv Relied      Age: 00h27m53s
          Tag: 0                  Priority: medium
        Label: NULL                QoSInfo: 0x0
   IndirectID: 0x80000001
 RelayNextHop: 0.0.0.0           Interface: GigabitEthernet0/0/1
     TunnelID: 0x0                   Flags: R

Destination: 0.0.0.0/0
     Protocol: Static           Process ID: 0
   Preference: 100                    Cost: 0
      NextHop: 10.0.13.2         Neighbour: 0.0.0.0
        State: Active Adv Relied       Age: 00h27m32s
          Tag: 0                  Priority: medium
        Label: NULL                QoSInfo: 0x0
   IndirectID: 0x80000002
 RelayNextHop: 0.0.0.0           Interface: GigabitEthernet0/0/2
     TunnelID: 0x0                   Flags: RD
BFD与OSPF联动
典型配置1
拓扑如图所示:

场景:两台路由器通过交换机互联,并将各自的接口运行于OSPF区域0,由于不是接口直接相连,若其中一台的接口Down,另一台不会立即感知,需要等待4倍的Hello时间来删除邻居,在这段时间内,数据转发都会处于非正常状态。在这种场景下,可以通过BFD检测来加快OSPF的收敛速度。
目标:通过BFD检测来加快OSPF的收敛速度。
配置步骤:
- IP编址基本配置
- OSPF配置
- BFD会话配置
- 配置验证
1.IP编址基本配置
[R1]interface LoopBack 0
[R1-LoopBack0]ip add 10.0.1.1 32
[R1-LoopBack0]q
[R1]interface GigabitEthernet 0/0/1
[R1-GigabitEthernet0/0/1]ip add 10.1.12.1 24
[R1-GigabitEthernet0/0/1]q

[R2]interface LoopBack 0
[R2-LoopBack0]ip add 10.0.2.2 32
[R2-LoopBack0]q
[R2]interface GigabitEthernet 0/0/1
[R2-GigabitEthernet0/0/1]ip add 10.1.12.2 24
[R2-GigabitEthernet0/0/1]q
2.OSPF配置
[R1]ospf 1 router-id 10.0.1.1
[R1-ospf-1]area 0
[R1-ospf-1-area-0.0.0.0]network 10.0.1.1 0.0.0.0
[R1-ospf-1-area-0.0.0.0]network 10.1.12.0 0.0.0.255
[R1-ospf-1-area-0.0.0.0]q
[R1-ospf-1]q

[R2]ospf 1 router-id 10.0.2.2
[R2-ospf-1]area 0
[R2-ospf-1-area-0.0.0.0]network 10.0.2.2 0.0.0.0
[R2-ospf-1-area-0.0.0.0]network 10.1.12.0 0.0.0.255
[R2-ospf-1-area-0.0.0.0]q
[R2-ospf-1]q
3.BFD会话配置
#配置BFD会话
[R1]bfd  //全局开启BFD
[R1-bfd]q
[R1]ospf 1
[R1-ospf-1]bfd all-interfaces enable  //OSPF进程下使能BFD联动
[R1-ospf-1]q

[R2]bfd
[R2-bfd]q
[R2]ospf 1
[R2-ospf-1]bfd all-interfaces enable
[R2-ospf-1]q
#查看BFD session状态
<R1>display bfd session all
--------------------------------------------------------------------------------
Local Remote     PeerIpAddr      State     Type         InterfaceName
--------------------------------------------------------------------------------
8192  8192       10.1.12.2       Up        D_IP_IF      GigabitEthernet0/0/1
--------------------------------------------------------------------------------
     Total UP/DOWN Session Number : 1/0

<R2>display bfd session all
--------------------------------------------------------------------------------
Local Remote     PeerIpAddr      State     Type         InterfaceName
--------------------------------------------------------------------------------
8192  8192       10.1.12.1       Up        D_IP_IF      GigabitEthernet0/0/1
--------------------------------------------------------------------------------
     Total UP/DOWN Session Number : 1/0
4.配置验证
#在R1上开启debug,观察debug日志。
<R1>
Dec 12 2024 00:22:47+00:00 R1 %%01BFD/4/STACHG_TODWN(l)[2]:BFD session changed to Down. (SlotNumber=0, Discriminator=8192, Diagnostic=DetectDown, Applications=OSPF, ProcessPST=False, BindInterfaceName=GigabitEthernet0/0/1, InterfacePhysicalState=Up, InterfaceProtocolState=Up)
<R1>
Dec 12 2024 00:22:47+00:00 R1 %%01OSPF/3/NBR_CHG_DOWN(l)[3]:Neighbor event:neighbor state changed to Down. (ProcessId=1, NeighborAddress=10.1.12.2, NeighborEvent=KillNbr, NeighborPreviousState=Init, NeighborCurrentState=Down)
<R1>
Dec 12 2024 00:22:47+00:00 R1 %%01OSPF/3/NBR_DOWN_REASON(l)[4]:Neighbor state leaves full or changed to Down. (ProcessId=1, NeighborRouterId=10.0.2.2, NeighborAreaId=0, NeighborInterface=GigabitEthernet0/0/1, NeighborDownImmediate reason=Neighbor Down Due to Kill Neighbor, NeighborDownPrimeReason=BFD Session Down, NeighborChangeTime=2024-12-12 00:22:47)
#在R2上shutdown端口,模拟链路故障。
[R2]interface GigabitEthernet 0/0/1
[R2-GigabitEthernet0/0/1]shutdown
BFD与VRRP联动
典型配置1
拓扑图如下
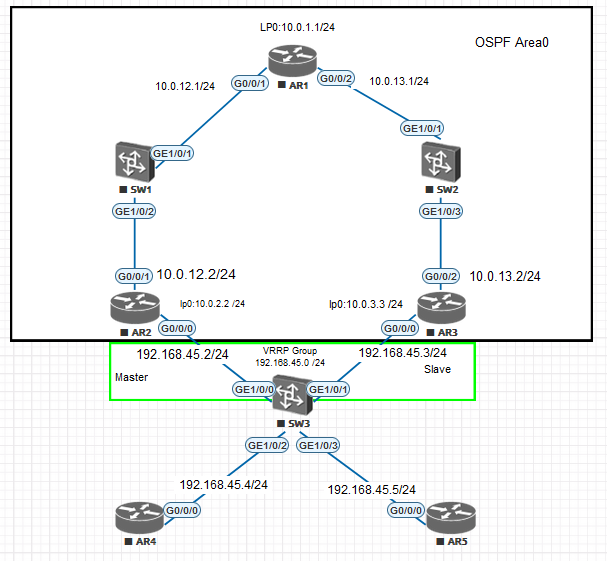
场景
R1通过两台交换机S1、S2和R2、R3互连,R2和R3运行VRRP作为局域网内R4和R5的网关,R2工作在VRRP MASTER模式,R3工作在BACKUP模式。为了避免R2的非直连上行链路Down后,上行流量依旧从R2转发形成路由黑洞的问题,配置BFD联动VRRP,当R1和R2互联接口Down掉,立即降低R2的VRRP优先级,由R3作为MASTER转发上行流量。
配置步骤:
1.基本IP编址
2.OSPF与静态路由配置
3.VRRP配置
4.配置BFD联动
5.测试
1.基本IP编址
[R1]interface LoopBack 0
[R1-LoopBack0]ip add 10.0.1.1 24
[R1-LoopBack0]q
[R1]interface GigabitEthernet 0/0/1
[R1-GigabitEthernet0/0/1]ip add 10.0.12.1 24
[R1-GigabitEthernet0/0/1]q
[R1]interface GigabitEthernet 0/0/2
[R1-GigabitEthernet0/0/2]ip add 10.0.13.1 24
[R1-GigabitEthernet0/0/2]q

[R2]interface LoopBack 0
[R2-LoopBack0]ip add 10.0.2.2 24
[R2-LoopBack0]q
[R2]interface GigabitEthernet 0/0/1
[R2-GigabitEthernet0/0/1]ip add 10.0.12.2 24
[R2-GigabitEthernet0/0/1]q
[R2]interface GigabitEthernet 0/0/0
[R2-GigabitEthernet0/0/0]ip add 192.168.45.2 24
[R2-GigabitEthernet0/0/0]q

[R3]interface LoopBack 0
[R3-LoopBack0]ip add 10.0.3.3 24
[R3-LoopBack0]q
[R3]interface GigabitEthernet 0/0/2
[R3-GigabitEthernet0/0/2]ip add 10.0.13.2 24
[R3-GigabitEthernet0/0/2]q
[R3]interface GigabitEthernet 0/0/0
[R3-GigabitEthernet0/0/0]ip add 192.168.45.3 24
[R3-GigabitEthernet0/0/0]q

[R4]interface GigabitEthernet 0/0/0
[R4-GigabitEthernet0/0/0]ip add 192.168.45.4 24
[R4-GigabitEthernet0/0/0]q

[R5]interface GigabitEthernet 0/0/0
[R5-GigabitEthernet0/0/0]ip add 192.168.45.5 24
[R5-GigabitEthernet0/0/0]q
[~SW1]vlan 12
[*SW1-vlan12]q
[*SW1]interface GE 1/0/1
[*SW1-GE1/0/1]port link-type access
[*SW1-GE1/0/1]port default vlan 12
[*SW1-GE1/0/1]q
[*SW1]interface GE 1/0/2
[*SW1-GE1/0/2]p l a
[*SW1-GE1/0/2]p d v 12
[*SW1-GE1/0/2]q
[*SW1]comm
[~SW1]

[~SW2]vlan 13
[*SW2-vlan13]q
[*SW2]interface GE 1/0/1
[*SW2-GE1/0/1]port link-type access
[*SW2-GE1/0/1]port default vlan 13
[*SW2-GE1/0/1]q
[*SW2]interface GE 1/0/3
[*SW2-GE1/0/3]p l a
[*SW2-GE1/0/3]p d v 13
[*SW2-GE1/0/3]q
[*SW2]comm
[~SW2]
2.OSPF与静态路由配置
[R1]ospf 1
[R1-ospf-1]area 0
[R1-ospf-1-area-0.0.0.0]network 10.0.1.0 0.0.0.255
[R1-ospf-1-area-0.0.0.0]network 10.0.12.0 0.0.0.255
[R1-ospf-1-area-0.0.0.0]network 10.0.13.0 0.0.0.255
[R1-ospf-1-area-0.0.0.0]q
[R1-ospf-1]q

[R2]ospf 1
[R2-ospf-1]area 0
[R2-ospf-1-area-0.0.0.0]network 10.0.2.0 0.0.0.255
[R2-ospf-1-area-0.0.0.0]network 10.0.12.0 0.0.0.255
[R2-ospf-1-area-0.0.0.0]network 192.168.45.0 0.0.0.255
[R2-ospf-1-area-0.0.0.0]q
[R2-ospf-1]silent-interface GigabitEthernet 0/0/0  //配置静默接口,该接口只宣告网段不建立邻居

[R3]ospf 1
[R3-ospf-1]area 0
[R3-ospf-1-area-0.0.0.0]network 10.0.3.0 0.0.0.255
[R3-ospf-1-area-0.0.0.0]network 10.0.13.0 0.0.0.255
[R3-ospf-1-area-0.0.0.0]network 192.168.45.0 0.0.0.255
[R3-ospf-1-area-0.0.0.0]q
[R3-ospf-1]silent-interface GigabitEthernet 0/0/0  //配置静默接口,该接口只宣告网段不建立邻居
#修改接口开销,使下行流量的选路以R2为主。
[R1]interface GigabitEthernet 0/0/1
[R1-GigabitEthernet0/0/1]ospf cost 90
[R1-GigabitEthernet0/0/1]q
[R1]interface GigabitEthernet 0/0/2
[R1-GigabitEthernet0/0/2]ospf cost 100
[R1-GigabitEthernet0/0/2]q

[R2]interface GigabitEthernet 0/0/1
[R2-GigabitEthernet0/0/1]ospf cost 90
[R2-GigabitEthernet0/0/1]q

[R3]interface GigabitEthernet 0/0/2
[R3-GigabitEthernet0/0/2]ospf cost 100
[R3-GigabitEthernet0/0/2]q
3.VRRP配置
#在R2、R3的下行接口配置VRRP。
[R2]interface GigabitEthernet 0/0/0
[R2-GigabitEthernet0/0/0]vrrp vrid 45 virtual-ip 192.168.45.1
[R2-GigabitEthernet0/0/0]vrrp vrid 45 priority 150  //华为设备默认优先级为100
[R2-GigabitEthernet0/0/0]q

[R3]interface GigabitEthernet 0/0/0
[R3-GigabitEthernet0/0/0]vrrp vrid 45 virtual-ip 192.168.45.1
[R3-GigabitEthernet0/0/0]q
#在R4和R5上配置默认路由指向VRRP地址
[R4]ip route-static 0.0.0.0 0 192.168.45.1

[R5]ip route-static 0.0.0.0 0 192.168.45.1
4.配置BFD联动
#在R1和R2上启用BFD,配置联动VRRP,如果BFD检测失效,立即降低优先级。
[R1]bfd
[R1-bfd]q
[R1]bfd 1 bind peer-ip 192.168.45.2 source-ip 10.0.12.1 auto
[R1-bfd-session-1]commit
[R1-bfd-session-1]q

[R2]bfd
[R2-bfd]q
[R2]bfd 1 bind peer-ip 10.0.12.1 source-ip 192.168.45.2 auto
[R2-bfd-session-1]com
[R2-bfd-session-1]q
[R2]interface GigabitEthernet 0/0/0
[R2-GigabitEthernet0/0/0]vrrp vrid 45 track bfd-session session-name 1 reduced 60  //检测到BFD失效时,降低接口VRRP优先级
5.测试
#当前VRRP状态
[R2]display vrrp
  GigabitEthernet0/0/0 | Virtual Router 45
    State : Master   //主用模式
    Virtual IP : 192.168.45.1
    Master IP : 192.168.45.2
    PriorityRun : 150   //当前运行优先级150
    PriorityConfig : 150
    MasterPriority : 150
    Preempt : YES   Delay Time : 0 s
    TimerRun : 1 s
    TimerConfig : 1 s
    Auth type : NONE
    Virtual MAC : 0000-5e00-012d
    Check TTL : YES
    Config type : normal-vrrp
    Backup-forward : disabled
    Track BFD : 1  Priority reduced : 60   //BFD失效时降低优先级
    BFD-session state : UP
    Create time : 2024-12-26 00:26:22
    Last change time : 2024-12-26 00:26:25
#模拟BFD失效
[R4]ping -c 100 10.0.1.1

[R1]interface GigabitEthernet 0/0/1
[R1-GigabitEthernet0/0/1]shutdown
#在R4上查看ping的结果
<R4>ping -c 100 10.0.1.1
  PING 10.0.1.1: 56  data bytes, press CTRL_C to break
    Reply from 10.0.1.1: bytes=56 Sequence=1 ttl=254 time=3 ms
    Reply from 10.0.1.1: bytes=56 Sequence=2 ttl=254 time=4 ms
    Reply from 10.0.1.1: bytes=56 Sequence=3 ttl=254 time=4 ms
    Reply from 10.0.1.1: bytes=56 Sequence=6 ttl=254 time=3 ms
    Reply from 10.0.1.1: bytes=56 Sequence=37 ttl=254 time=6 ms
    Request time out
    Request time out
    Reply from 10.0.1.1: bytes=56 Sequence=40 ttl=254 time=4 ms
    Reply from 10.0.1.1: bytes=56 Sequence=41 ttl=254 time=2 ms
    Reply from 10.0.1.1: bytes=56 Sequence=42 ttl=254 time=3 ms
<R2>display vrrp
  GigabitEthernet0/0/0 | Virtual Router 45
    State : Backup
    Virtual IP : 192.168.45.1
    Master IP : 192.168.45.3
    PriorityRun : 90
    PriorityConfig : 150
    MasterPriority : 100
    Preempt : YES   Delay Time : 0 s
    TimerRun : 1 s
    TimerConfig : 1 s
    Auth type : NONE
    Virtual MAC : 0000-5e00-012d
    Check TTL : YES
    Config type : normal-vrrp
    Backup-forward : disabled
    Track BFD : 1  Priority reduced : 60
    BFD-session state : DOWN
    Create time : 2024-12-26 00:26:22
    Last change time : 2024-12-26 01:24:37


【推荐】国内首个AI IDE,深度理解中文开发场景,立即下载体验Trae
【推荐】编程新体验,更懂你的AI,立即体验豆包MarsCode编程助手
【推荐】抖音旗下AI助手豆包,你的智能百科全书,全免费不限次数
【推荐】轻量又高性能的 SSH 工具 IShell:AI 加持,快人一步
· 无需6万激活码!GitHub神秘组织3小时极速复刻Manus,手把手教你使用OpenManus搭建本
· C#/.NET/.NET Core优秀项目和框架2025年2月简报
· Manus爆火,是硬核还是营销?
· 一文读懂知识蒸馏
· 终于写完轮子一部分:tcp代理 了,记录一下