动静分离和资源分离
一、动静分离
1.单台机器动静分离
1. 动静分离,通过中间件将动静分离和静态请求进行分离;
2. 通过中间件将动态请求和静态请求分离,可以建上不必要的请求消耗,同事能减少请求的延时。
3. 动静分离只有好处:动静分离后,即使动态服务不可用,但静态资源不会受到影响。
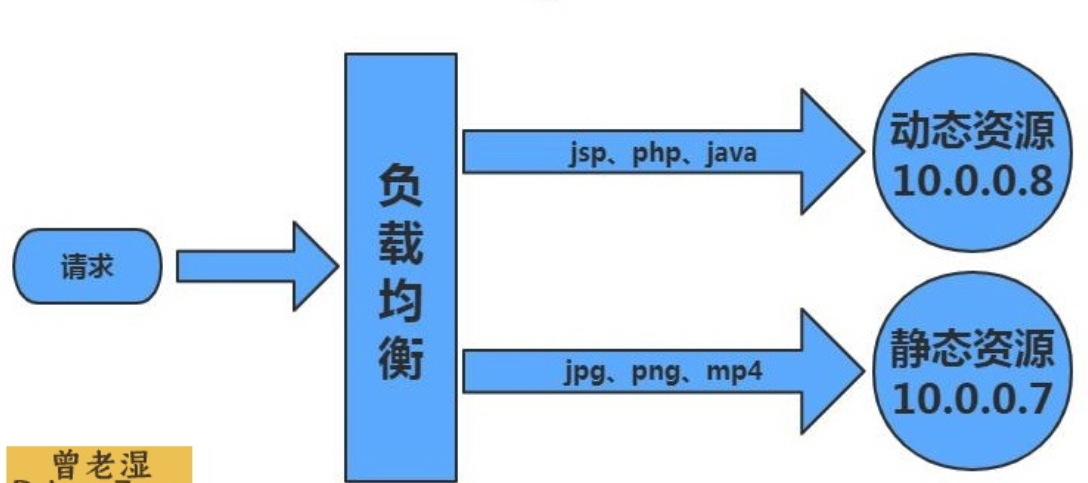
4. 通过中间件将动态请求和静态请求分离,逻辑图如下:

[root@web01 ~]# cat /etc/nginx/conf.d/linux.wp.com.conf
server {
    listen 80;
    server_name linux.wp.com;

    location / {
        root /code/wordpress;
        index index.php;
    }

    location ~* \.(jpg|png|gif)$ {
        root /code/wordpress/wp-content;   #挂载静态文件
    }

    location ~* \.php$ {
        fastcgi_pass 127.0.0.1:9000;
        fastcgi_param SCRIPT_FILENAME /code/wordpress/$fastcgi_script_name;
        include fastcgi_params;
    }
}
2.多台服务器实现动静分离
1)准备环境
| 主机    | 作用    | 服务   | IP       |
| lb01   | 负载均衡 | nginx  | 10.0.0.4 |
| web01  | 静态资源 | nginx  | 10.0.0.7 |
| web02  | 动态资源 | tomcat | 10.0.0.8 |
2)配置web01的静态资源
1.配置nginx
[root@web01 ~]# vim /etc/nginx/conf.d/linux.dj.com.conf
server {
    listen 80;
    server_name linux.dj.com;

    location ~* \.(jpg|png|mp4|gif)$ {
        root /code/picture;
    }
}
[root@web01 ~]# systemctl restart nginx

2.上传静态资源
[root@web01 ~]# mkdir /code/picture
[root@web01 ~]# cd /code/picture/
[root@web01 picture]# rz 1.jpg
[root@web01 picture]# ll
total 1756
-rw-r--r--. 1 root root  156617 Dec  7 08:54 1.jpg
-rw-r--r--. 1 root root   47542 Dec  7 08:54 2.jpg
-rw-r--r--. 1 root root 1586108 Dec  7 08:54 3.jpg

3.测试静态资源
    1)配置hosts
    10.0.0.7 linux.dj.com

    2)请求静态资源
    http://linux.dj.com/1.jpg
3)配置web02的动态资源
1.安装tomcat
[root@web02 ~]# yum install -y tomcat

2.配置动态资源
[root@web02 ~]# cd /usr/share/tomcat/webapps
[root@web02 webapps]# mkdir ROOT
[root@web02 webapps]# vim ROOT/java_test.jsp
<%@ page language="java" import="java.util.*" pageEncoding="utf-8"%>
<HTML>
    <HEAD>
        <TITLE>测试动态资源</TITLE>
    </HEAD>
    <BODY>
        <%
            Random rand = new Random();
            out.println("<h1>随机数:<h1>");
            out.println(rand.nextInt(99)+100);
        %>
    </BODY>
</HTML>

3.启动方式
[root@web02 ~]# systemctl start tomcat

4.访问测试动态页面
    1)配置hosts
    10.0.0.8 linux.dj.com

    2)访问
    http://linux.dj.com:8080/java_test.jsp
4)配置负载均衡
1.配置
[root@lb01 ~]# vim /etc/nginx/conf.d/linux.dj.com.conf
upstream dt {
    server 10.0.0.8:8080;
}

upstream jt {
    server 10.0.0.7;
}

server {
    listen 80;
    server_name linux.dj.com;

    location / {
        root /code/dj;
        index index.html;
    }

    location ~* \.(jpg|png|gif)$ {
        proxy_pass http://jt;
        include proxy_params;
    }

    location ~* \.(php|jsp)$ {
        proxy_pass http://dt;
        include proxy_params;
    }
}

2.重启
[root@lb01 ~]# systemctl restart nginx

3.访问测试
    1)配置hosts
    10.0.0.4 linux.dj.com

    2)访问
    http://linux.dj.com/java_test.jsp
    http://linux.dj.com/1.jpg
5)整合静态资源和动态资源
1.创建站点目录
[root@lb01 ~]# mkdir /code/dj -p

2.编辑html文件
[root@lb01 ~]# vim /code/dj/index.html
<html lang="en">
<head>
        <meta charset="UTF-8" />
        <title>测试ajax和跨域访问</title>
        <script src="http://libs.baidu.com/jquery/2.1.4/jquery.min.js"></script>
</head>
<script type="text/javascript">
$(document).ready(function(){
        $.ajax({
        type: "GET",
        url: "http://linux.dj.com/java_test.jsp",
        success: function(data){
                $("#get_data").html(data)
        },
        error: function() {
                alert("哎呦喂,失败了,回去检查你服务去~");
        }
        });
});
</script>
        <body>
                <h1>测试动静分离</h1>
                <img src="http://linux.dj.com/1.jpg">
                <div id="get_data"></div>
        </body>
</html>

3.授权
[root@lb01 ~]# chown -R www.www /code/

4.访问域名测试
结论:静态资源出现问题不影响动态资源,动态资源出问题不影响静态资源
二、nginx资源分离
1.准备环境
| 主机   | IP                   | 功能        |
| lb01  | 10.0.0.4,172.16.1.4   | 负载均衡    |
| web01 | 172.16.1.7            | Android页面 |
| web02 | 172.16.1.8            | iPhone页面  |
| web03 | 172.16.1.9            | PC端页面    |
2.配置web01服务器
1)配置nginx
[root@web01 ~]# vim /etc/nginx/conf.d/linux.sj.com.conf
server {
    listen 80;
    server_name linux.sj.com;
    charset utf8;

    location / {
        root /code/android;
        index index.html;
    }
}

[root@web01 ~]# systemctl restart nginx
2)创建站点目录
[root@web01 ~]# mkdir /code/android
[root@web01 ~]# echo "我是android" >> /code/android/index.html
[root@web01 ~]# chown -R www.www /code/android/
3)访问测试
1.配置hosts
10.0.0.7 linux.sj.com
3.配置web02服务器
1)配置nginx
[root@web02 ~]# vim /etc/nginx/conf.d/linux.sj.com.conf
server {
    listen 80;
    server_name linux.sj.com;
    charset utf8;

    location / {
        root /code/iphone;
        index index.html;
    }
}
2)创建站点文件
[root@web02 ~]# mkdir /code/iphone
[root@web02 ~]# echo "我是Iphone" >> /code/iphone/index.html
[root@web02 ~]# chown -R www.www /code/iphone/
3)访问测试
1.配置hosts
10.0.0.8 linux.sj.com
4.配置web03服务器
1)配置nginx
[root@web03 ~]# vim /etc/nginx/conf.d/linux.sj.com.conf
server {
    listen 80;
    server_name linux.sj.com;
    charset utf8;

    location / {
        root /code/pc;
        index index.html;
    }
}
[root@web02 ~]# systemctl restart nginx
2)创建站点文件
[root@web03 ~]# mkdir /code/pc -p
[root@web03 ~]# echo "我是pc端" >> /code/pc/index.html
[root@web03 ~]# chown -R www.www /code/
3)访问测试
1.配置hosts
10.0.0.9 linux.sj.com
5.配置负载均衡
1.配置nginx
[root@lb01 ~]# vim /etc/nginx/conf.d/linux.sj.com.conf
upstream android {
    server 10.0.0.7;
}

upstream iphone {
    server 10.0.0.8;
}

upstream pc {
    server 10.0.0.9;
}

server {
    listen 80;
    server_name linux.sj.com;

    location / {
        if ($http_user_agent ~* "Android") { #判断如果是安卓端
            proxy_pass http://android;       #代理到android虚拟主机池
        }
        if ($http_user_agent ~* "iPhone") {    #判断如果是苹果端
            proxy_pass http://iphone;       #代理到iphone虚拟主机池
        }
        if ($http_user_agent ~* "WOW64") {    #判断如果是IE浏览器
            return 403;                    #直接返回403
        }
        proxy_pass http://pc;               #如果没有匹配到以上内容,默认都代理到pc虚拟主机池
        include proxy_params;
    }
}
2.重启访问
1.重启
[root@lb01 ~]# nginx -t
nginx: the configuration file /etc/nginx/nginx.conf syntax is ok
nginx: configuration file /etc/nginx/nginx.conf test is successful
[root@lb01 ~]# systemctl restart nginx

2.配置hosts
10.0.0.4 linux.sj.com

3.访问
