NGINX负载均衡健康检查和会话保持
一、NGINX负载均衡健康检查
# 在Nginx官方模块提供的模块中,没有对负载均衡后端节点的健康检查模块,但可以使用第三方模块。
nginx_upstream_check_module来检测后端服务的健康状态。
1.1、安装依赖
[root@lb02 ~]# yum install -y gcc glibc gcc-c++ pcre-devel openssl-devel patch autoconf pcre make automake wget httpd-tools gd gd-devel perl-devel perl-ExtUtils-Embed
1.2、下载第三方模块
[root@lb02 ~]# wget https://nginx.org/download/nginx-1.20.1.tar.gz
[root@lb02 ~]# wget https://github.com/yaoweibin/nginx_upstream_check_module/archive/refs/heads/master.zip
1.3、解压及安装
[root@lb02 ~]# tar -xf nginx-1.20.1.tar.gz
[root@lb02 ~]# unzip master.zip
1.4、进入nginx目录,打补丁(nginx的版本是1.20补丁就选择1.20的,p1代表在nginx目录,p0是不在nginx目录)
[root@lb02 ~]# cd nginx-1.20.1
[root@lb02 nginx-1.20.1]# patch -p1 <../nginx_upstream_check_module-master/check_1.20.1+.patch

[root@lb02 nginx-1.20.1]# ./configure --prefix=/usr/share/nginx --sbin-path=/usr/sbin/nginx --modules-path=/usr/lib64/nginx/modules --conf-path=/etc/nginx/nginx.conf --error-log-path=/var/log/nginx/error.log --http-log-path=/var/log/nginx/access.log --http-client-body-temp-path=/var/lib/nginx/tmp/client_body --http-proxy-temp-path=/var/lib/nginx/tmp/proxy --http-fastcgi-temp-path=/var/lib/nginx/tmp/fastcgi --http-uwsgi-temp-path=/var/lib/nginx/tmp/uwsgi --http-scgi-temp-path=/var/lib/nginx/tmp/scgi --pid-path=/run/nginx.pid --lock-path=/run/lock/subsys/nginx --user=nginx --group=nginx --with-compat --with-debug  --with-http_addition_module --with-http_auth_request_module --with-http_dav_module --with-http_degradation_module --with-http_flv_module --with-http_gunzip_module --with-http_gzip_static_module --with-http_image_filter_module=dynamic --with-http_mp4_module --with-http_perl_module=dynamic --with-http_random_index_module --with-http_realip_module --with-http_secure_link_module --with-http_slice_module --with-http_ssl_module --with-http_stub_status_module --with-http_sub_module --with-http_v2_module --with-http_xslt_module=dynamic --with-mail=dynamic --with-mail_ssl_module --with-pcre --with-pcre-jit --with-stream=dynamic --with-stream_ssl_module --with-stream_ssl_preread_module --with-threads --add-module=/root/nginx_upstream_check_module-master

[root@lb02 nginx-1.20.1]# make && make install
配置源码安装的nginx(加入systemctl管理)
1.5、创建用户
[root@lb02 nginx-1.20.1]# groupadd www -g 666
[root@lb02 nginx-1.20.1]# useradd www -u 666 -g 666 -M -r -s /sbin/nologin
1.6、修改nginx.conf文件
[root@lb02 nginx-1.20.1]# vim /etc/nginx/nginx.conf
user  www;
worker_processes  auto;
#error_log  logs/error.log;
#error_log  logs/error.log  notice;
error_log  /var/log/nginx/error.log  info;
pid        /run/nginx.pid;
events {
    worker_connections  1024;
}
http {
    include       mime.types;
    default_type  application/octet-stream;

    log_format  main  '$remote_addr - $remote_user [$time_local] "$request" '
                      '$status $body_bytes_sent "$http_referer" '
                      '"$http_user_agent" "$http_x_forwarded_for"';

    access_log  /var/log/nginx/access.log  main;

    sendfile        on;
    #tcp_nopush     on;

    #keepalive_timeout  0;
    keepalive_timeout  65;
    #gzip  on;
    include /etc/nginx/conf.d/*.conf;
}
1.7、创建目录并授权
[root@lb02 nginx-1.20.1]# mkdir /etc/nginx/conf.d
[root@lb02 nginx-1.20.1]# mkdir -p /var/lib/nginx/tmp/client_body
[root@lb02 nginx-1.20.1]# chown -R www.www /var/lib/nginx
1.8、编写NGINX配置文件
[root@lb02 nginx-1.20.1]# vim /usr/lib/systemd/system/nginx.service
[Unit]
Description=The nginx HTTP and reverse proxy server
After=network-online.target remote-fs.target nss-lookup.target
Wants=network-online.target

[Service]
Type=forking
PIDFile=/run/nginx.pid
ExecStartPre=/usr/bin/rm -f /run/nginx.pid
ExecStartPre=/usr/sbin/nginx -t
ExecStart=/usr/sbin/nginx
ExecReload=/usr/sbin/nginx -s reload
KillSignal=SIGQUIT
TimeoutStopSec=5
KillMode=process
PrivateTmp=true

[Install]
WantedBy=multi-user.target
1.9、编写lb02.conf文件
[root@lb02 nginx-1.20.1]# vim /etc/nginx/conf.d/lb02.conf
upstream web {
	server 172.16.1.7;
	server 172.16.1.8;
	server 172.16.1.9;
	check interval=3000 rise=2 fall=3 timeout=1000 type=tcp;
    #interval  检测间隔时间,单位为毫秒
    #rise      表示请求2次正常,标记此后端的状态为up
    #fall      表示请求3次失败,标记此后端的状态为down
    #type      类型为tcp
    #timeout   超时时间,单位为毫秒
}
server {
	listen 80;
	server_name _;
	location / {
		proxy_pass http://web;
	}
	location = /status {
		check_status;
	}
}
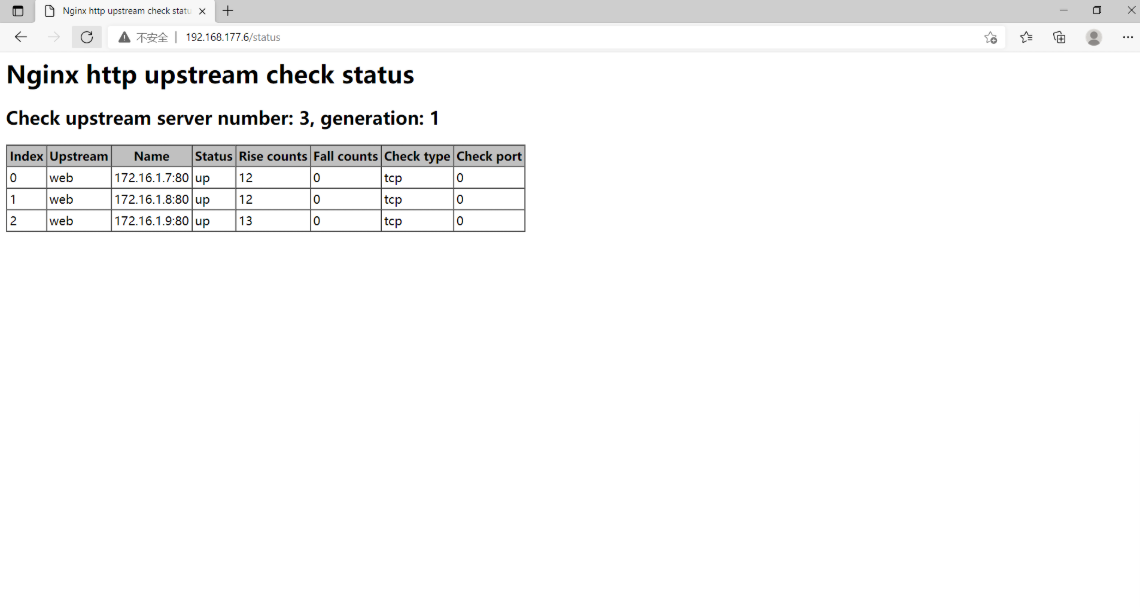
1.10、测试
浏览器访问192.168.214.6/status
二、NGINX负载均衡会话保持
2.1、什么是会话保持
我们在访问网站的时候,进行登陆以后,服务器上回生成一个session,然后服务器会携带着session_id返回给浏览器记录一个cookie值,当第二次访问时,cookie会来服务器上与session进行对比,如果对比成功,则不需要重新登录

在使用负载均衡的时候会遇到会话保持的问题,可通过如下方式进行解决。
1.使用nginx的ip_hash,根据客户端的IP,将请求分配到对应的IP上
2.基于服务端的session会话共享(NFS,MySQL,memcache,redis,file)
2.session共享的方法
1.把多台后端服务器session文件目录挂载到NFS同一目录
2.通过程序将session存储到mysql数据库
3.通过程序将session存储到redis缓存
1.配置Nginx
[root@web01 conf.d]# cat php.conf
server {
    listen 80;
    server_name php.drz.com;
    root /code/phpMyAdmin-4.8.4-all-languages;

    location / {
        index index.php index.html;
    }

    location ~ \.php$ {
        fastcgi_pass 127.0.0.1:9000;
        fastcgi_param SCRIPT_FILENAME $document_root$fastcgi_script_name;
        include fastcgi_params;
    }
}
[root@web01 conf.d]# systemctl restart nginx
2.安装phpmyadmin (web01和web02上都装)
[root@web01 conf.d]# cd /code
[root@web01 code]# wget https://files.phpmyadmin.net/phpMyAdmin/4.8.4/phpMyAdmin-4.8.4-all-languages.zip
[root@web01 code]# unzip phpMyAdmin-4.8.4-all-languages.zip
3.配置phpmyadmin连接远程的数据库
[root@web01 code]# cd phpMyAdmin-4.8.4-all-languages/
[root@web01 phpMyAdmin-4.8.4-all-languages]# cp config.sample.inc.php config.inc.php
[root@web01 phpMyAdmin-4.8.4-all-languages]# vim config.inc.php
/* Server parameters */
$cfg['Servers'][$i]['host'] = '172.16.1.51';
4.配置授权
[root@web01 conf.d]# chown -R www.www /var/lib/php/
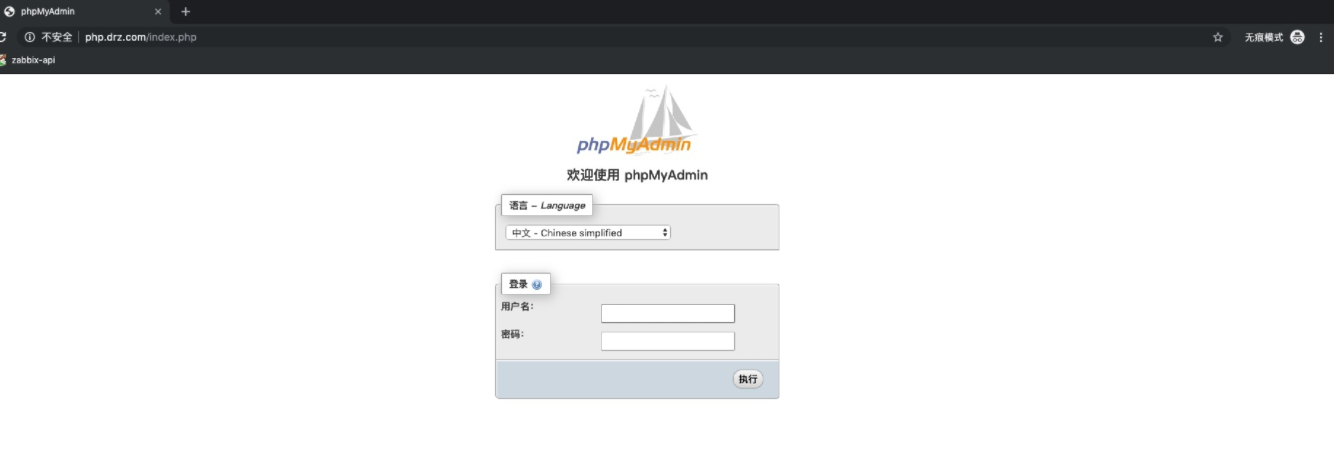
使用浏览器访问页面,获取cookie信息
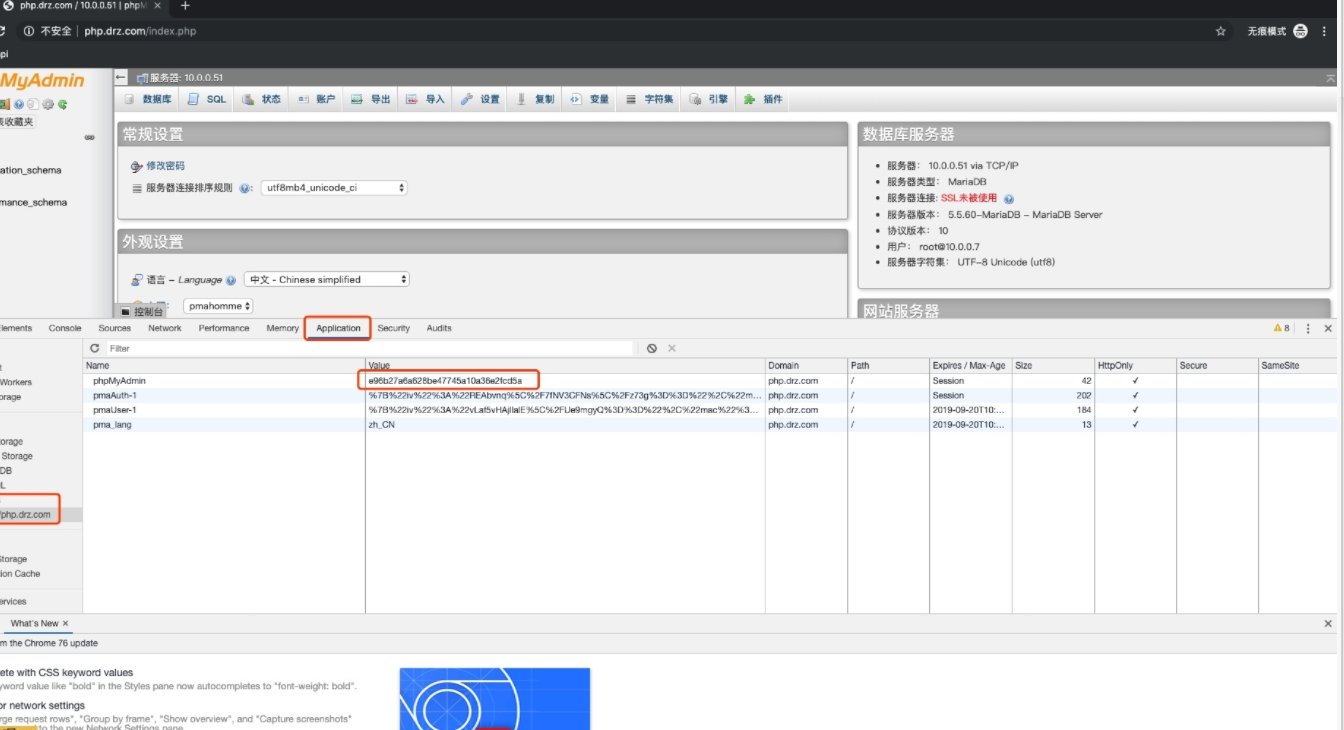
[root@web01 phpMyAdmin-4.8.4-all-languages]# ll /var/lib/php/session/
总用量 4
-rw-------. 1 www www 2424 8月  21 18:41 sess_e96b27a6a628be47745a10a36e2fcd5a

5.将web01上配置好的phpmyadmin以及nginx的配置文件推送到web02主机上
[root@web01 code]# scp -rp  phpMyAdmin-4.8.4-all-languages root@172.16.1.8:/code/
[root@web01 code]# scp /etc/nginx/conf.d/php.conf  root@172.16.1.8:/etc/nginx/conf.d/
6.在web02上重载Nginx服务
[root@web02 code]# systemctl restart nginx
7.授权
[root@web02 code]# chown -R www.www /var/lib/php/
8.接入负载均衡
[root@lb01 conf.d]# vim proxy_php.com.conf
upstream php {
        server 172.16.1.7:80;
        server 172.16.1.8:80;
}
server {
        listen 80;
        server_name php.drz.com;
        location / {
                proxy_pass http://php;
                include proxy_params;
        }
}

[root@lb01 conf.d]# nginx -t
nginx: the configuration file /etc/nginx/nginx.conf syntax is ok
nginx: configuration file /etc/nginx/nginx.conf test is successful
[root@lb01 conf.d]# systemctl restart nginx
使用负载均衡的轮询功能之后,会发现,如果将session保存在本地文件的话,永远都登录不上去。drz.com
方式一:
使用redis解决会话登录问题
1.安装redis内存数据库
[root@db01 ~]# yum install redis -y
2.配置redis监听在172.16.1.0网段上
[root@db01 ~]# sed -i '/^bind/c bind 127.0.0.1 172.16.1.51' /etc/redis.conf
3.启动redis
[root@db01 ~]# systemctl start redis
[root@db01 ~]# systemctl enable redis
4.php配置session连接redis
#1.修改/etc/php.ini文件
[root@web ~]# vim /etc/php.ini
session.save_handler = redis
session.save_path = "tcp://172.16.1.51:6379"
;session.save_path = "tcp://172.16.1.51:6379?auth=123" #如果redis存在密码,则使用该方式
session.auto_start = 1

#2.注释php-fpm.d/www.conf里面的两条内容,否则session内容会一直写入/var/lib/php/session目录中
;php_value[session.save_handler] = files
;php_value[session.save_path]    = /var/lib/php/session
5.重启php-fpm
[root@web01 code]# systemctl restart php-fpm
6.将web01上配置好的文件推送到web02
[root@web01 code]# scp /etc/php.ini root@172.16.1.8:/etc/php.ini
[root@web01 code]# scp /etc/php-fpm.d/www.conf root@172.16.1.8:/etc/php-fpm.d/www.conf
7.上web02上重启php-fpm
[root@web02 code]# systemctl restart php-fpm
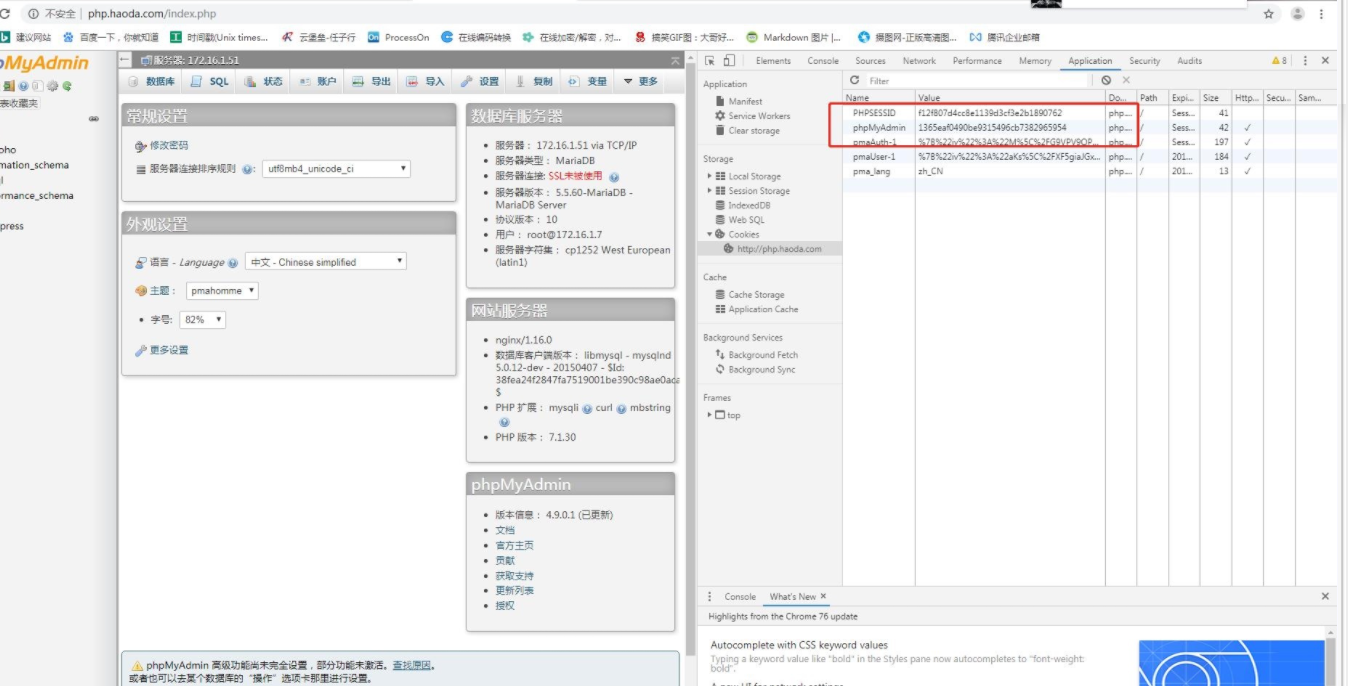
8.redis查看数据
[root@db01 redis]# redis-cli
127.0.0.1:6379> keys *
1) "PHPREDIS_SESSION:1365eaf0490be9315496cb7382965954"
方式二:
使用nfs作为session共享存储
增加session的挂载点
    [root@nfs wordpress]# vim /etc/exports
    /data/session
    172.16.1.0/24(rw,sync,all_squash,anonuid=666,anongid=666)

    [root@nfs wordpress]# mkdir /data/session
    [root@nfs wordpress]# chown -R www.www /data/session/
    [root@nfs wordpress]# systemctl resatrt nfs-server rpcbind

在三台web节点上挂载
    mkdir -p /var/lib/php/session
    chown -R /var/lib/php/
    mount -t nfs 172.16.1.31:/data/session /var/lib/php/session
