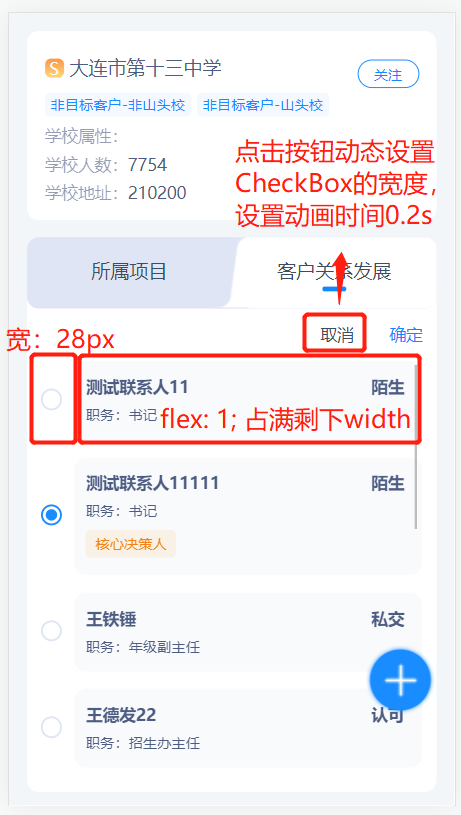
vue过渡动画的2种方式(vue动画标签、css3过渡属性)(标记核心决策人)

方式一:使用transition标签包裹需要过渡动画的标签
            <transition name="checkbox">
              <van-checkbox v-model='item.flag' v-show="isSign">
                <template #icon="props">
                  <div :class="props.checked ? 'activeIcon' : 'inactiveIcon'"><span></span></div>
                </template>
              </van-checkbox>
            </transition>
对应样式:
        .checkbox-enter-active,
        .checkbox-leave-active {
          transition: width 0.2s linear;
        }
        .checkbox-enter,
        .checkbox-leave-to {
          width: 0;
        }
        .checkbox-enter-to,
        .checkbox-leave {
          width: 28px;
        }
方式二:(简便)
            <van-checkbox v-model='item.flag' v-show='isSign'>
              <template #icon="props">
                <div :class="props.checked ? 'activeIcon' : 'inactiveIcon'"><span></span></div>
              </template>
            </van-checkbox>
替换为
            <van-checkbox v-model='item.flag' :style="{width:isSign?'28px':'0px',transition:'width 0.2s linear'}">
              <template #icon="props">
                <div :class="props.checked ? 'activeIcon' : 'inactiveIcon'"><span></span></div>
              </template>
            </van-checkbox>
只需要这样简单的样式,就可以为width变化添加上动画。
对于这种简单动画,这两种方式效果一样,方式二更简单一点,方式一用于更复杂的动画呈现。
vant中CheckBox自定义图标:
官网:
<van-checkbox v-model="checked">
  自定义图标
  <template #icon="props">
    <img class="img-icon" :src="props.checked ? activeIcon : inactiveIcon" />
  </template>
</van-checkbox>
export default {
  data() {
    return {
      checked: true,
      activeIcon: 'https://img01.yzcdn.cn/vant/user-active.png',
      inactiveIcon: 'https://img01.yzcdn.cn/vant/user-inactive.png',
    };
  },
};
  .img-icon {
    height: 20px;
  }
效果:

自定义的样式:
            <van-checkbox v-model='checked'>
              自定义图标
              <template #icon="props">
                <div :class="props.checked ? 'activeIcon' : 'inactiveIcon'"><span></span></div>
              </template>
            </van-checkbox>
        // 选中和未选中样式-start
        .activeIcon {
          width: 18px;
          height: 18px;
          border: 2px solid #198cff;
          border-radius: 50%;
          box-sizing: border-box;
          display: flex;
          align-items: center;
          justify-content: center;
          > span {
            display: block;
            width: 10px;
            height: 10px;
            background: #198cff;
            border-radius: 50%;
          }
        }
        .inactiveIcon {
          width: 18px;
          height: 18px;
          border: 2px solid #e0e5f5;
          border-radius: 50%;
          box-sizing: border-box;
        }
        // 选中和未选中样式-end
效果:


【推荐】国内首个AI IDE,深度理解中文开发场景,立即下载体验Trae
【推荐】编程新体验,更懂你的AI,立即体验豆包MarsCode编程助手
【推荐】抖音旗下AI助手豆包,你的智能百科全书,全免费不限次数
【推荐】轻量又高性能的 SSH 工具 IShell:AI 加持,快人一步
· 10年+ .NET Coder 心语,封装的思维:从隐藏、稳定开始理解其本质意义
· .NET Core 中如何实现缓存的预热?
· 从 HTTP 原因短语缺失研究 HTTP/2 和 HTTP/3 的设计差异
· AI与.NET技术实操系列:向量存储与相似性搜索在 .NET 中的实现
· 基于Microsoft.Extensions.AI核心库实现RAG应用
· 10年+ .NET Coder 心语 ── 封装的思维:从隐藏、稳定开始理解其本质意义
· 【设计模式】告别冗长if-else语句:使用策略模式优化代码结构
· 提示词工程——AI应用必不可少的技术
· 字符编码:从基础到乱码解决
· 地球OL攻略 —— 某应届生求职总结