webpack06----自定义babel-loader、tapable、compiler的hooks使用、compilation的使用、自定义copy-webpack-plugin插件、自定义webpack
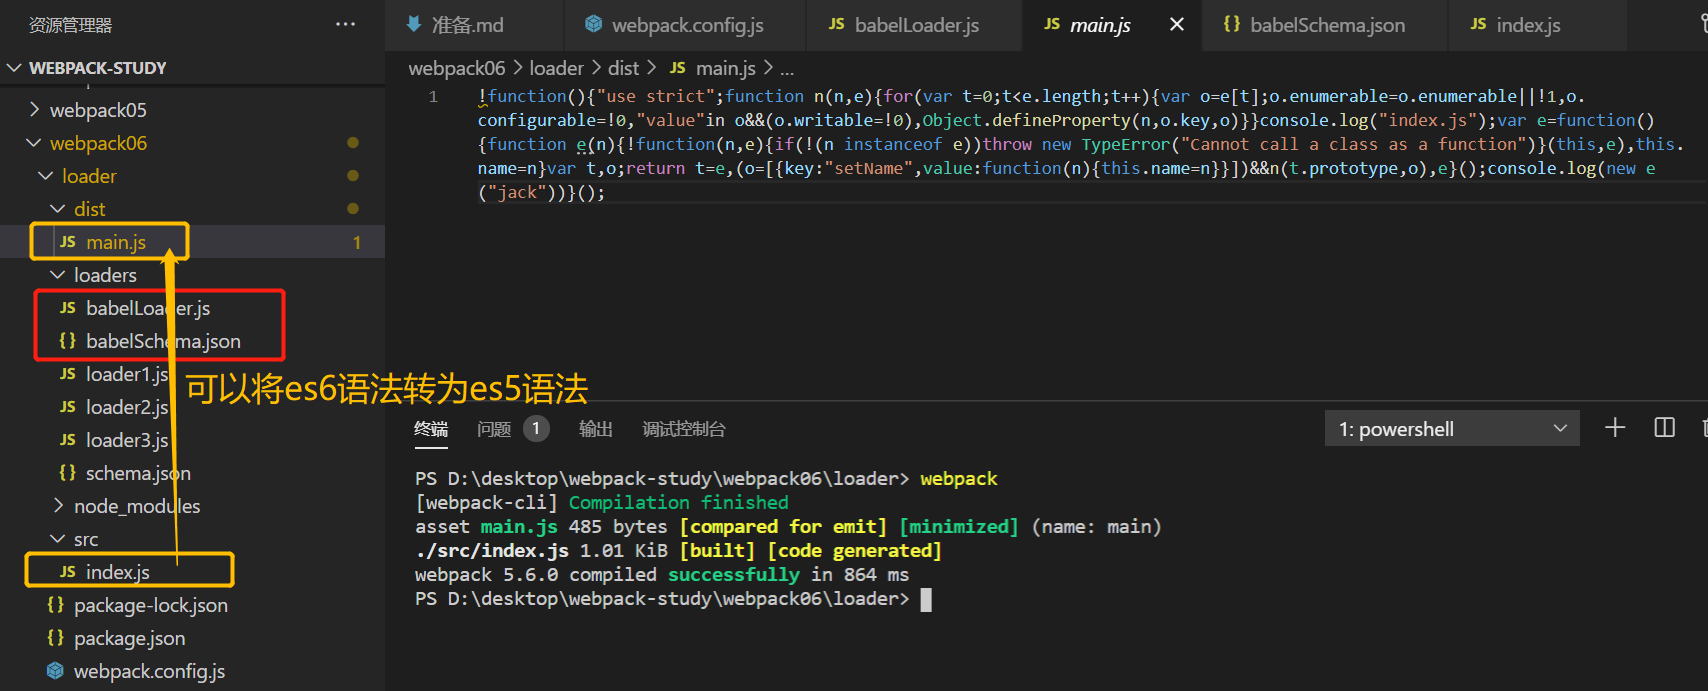
自定义babel-loader:
1、babelSchema.json:----提供校验loader中options的规则:属性名为presets,它的类型是array,"additionalProperties": true 表示可以追加其他属性
{
  "type": "object",
  "properties": {
    "presets": {
      "type": "array"
    }
  },
  "additionalProperties": true
}
2、babelLoader.js:
const { getOptions } = require('loader-utils') // getOptions()获取loader中的options参数----loader-utils库需要下载
const { validate } = require('schema-utils') // validate()验证loader中的options是否符合规范
const babel = require('@babel/core')
const util = require('util')

const babelSchema = require('./babelSchema.json') // 校验options的规则

const transform = util.promisify(babel.transform) // promisify()将普通的异步函数转换为基于promise的异步方法,babel.transform用来编译代码的方法

module.exports = function (content, map, meta) {
  const options = getOptions(this) || {} // 获取options
  validate(babelSchema, options, { name: 'Babel Loader' }) // 校验options是否合法
  const callback = this.async() // 创建异步
  transform(content, options) // 使用babel编译
    .then(({ code, map }) => {
      callback(null, code, map, meta)
    })
    .catch((e) => {
      callback(e)
    })
}
3、webpack.config.js:
const path = require('path')

module.exports = {
  // webpack5默认有entry和output的配置,这里不用写了
  module: {
    rules: [
      {
        test: /\.js$/,
        // loader: path.resolve(__dirname, 'loaders', 'loader1')
        // loader: 'loader1' // 配置loader解析规则后可以简写
        // use: ['loader1', 'loader2', 'loader3'] // 多个loader用use:执行到loader1时,先执行它的pitch方法;执行loader2时,先执行它的pitch方法;执行loader3时,先执行它的pitch方法。执行完pitch后,从下到上,从又到左执行loader。如果某个loader需要提前做一些处理,可以在pitch中处理
        // use: [
        //   'loader1',
        //   'loader2',
        //   {
        //     loader: 'loader3',
        //     options: { name: '孙艺珍', age:12 } // 如果想要追加属性,schema.json中设置 "additionalProperties": true
        //   }
        // ]
        loader: 'babelLoader',
        options: {
          presets: ['@babel/preset-env'] // presets对应babelSchema.json中定义的属性名
        }
      }
    ]
  },
  // 配置loader解析规则
  resolveLoader: {
    modules: ['node_modules', path.resolve(__dirname, 'loaders')] // 先去node_modules中找,找不到去loaders目录中找
  }
}

tapable:
1、下载插件:npm i tapable -D
2、tapable.js:
const {
  SyncHook,
  SyncBailHook,
  AsyncParallelHook,
  AsyncSeriesHook
} = require('tapable')

class Lesson {
  constructor() {
    // 初始化hooks容器
    this.hooks = {
      // go: new SyncHook(['address']) // 同步钩子(hook),任务会依次执行
      go: new SyncBailHook(['address']), // 一旦有返回值就会退出
      // leave: new AsyncParallelHook(['name', 'age']), // 异步并行钩子:先输出0618再输出0518
      leave: new AsyncSeriesHook(['name', 'age']) // 异步串行(同步)钩子:先输出0518再输出0618
    }
  }
  // 往hooks容器中注册事件,添加回调函数
  tap() {
    this.hooks.go.tap('class0318', (address) => {
      console.log('class0318', address)
      return 100 // SyncBailHook一旦return后有值就会退出
    })
    this.hooks.go.tap('class0418', (address) => {
      console.log('class0418', address)
    })
    this.hooks.leave.tapAsync('class0518', (name, age, cb) => {
      setTimeout(() => {
        console.log('class0518', name, age)
        cb()
      }, 1000)
    })
    this.hooks.leave.tapPromise('class0618', (name, age) => {
      return new Promise((resolve) => {
        setTimeout(() => {
          console.log('class0618', name, age)
          resolve()
        }, 999)
      })
    })
  }
  start() {
    this.hooks.go.call('c318') // 触发hooks。将hooks容器中的hook都触发
    this.hooks.leave.callAsync('孙艺珍', 20, () => {
      console.log('end....') // 回调函数 表示所有leave容器中的钩子都触发完了才会执行
    })
  }
}

let l = new Lesson()
l.tap()
l.start()

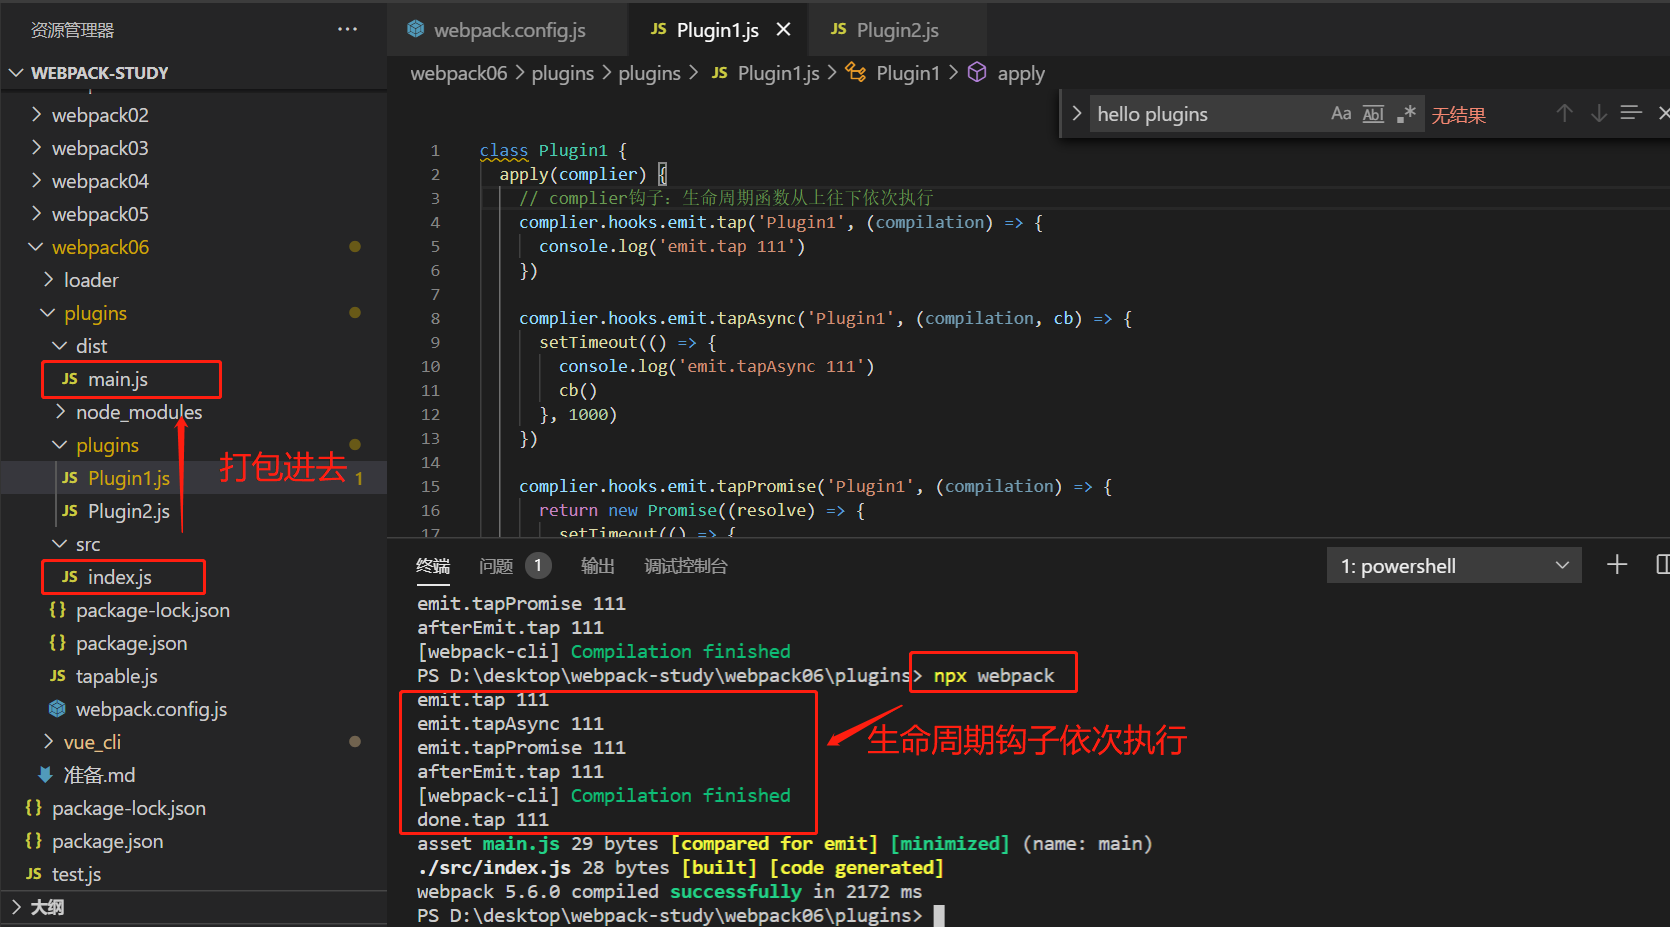
compiler的hooks使用:
1、新建plugins/Plugin1.js:
class Plugin1 {
  apply(complier) {
    // complier钩子:生命周期函数从上往下依次执行
    complier.hooks.emit.tap('Plugin1', (compilation) => {
      console.log('emit.tap 111')
    })

    complier.hooks.emit.tapAsync('Plugin1', (compilation, cb) => {
      setTimeout(() => {
        console.log('emit.tapAsync 111')
        cb()
      }, 1000)
    })

    complier.hooks.emit.tapPromise('Plugin1', (compilation) => {
      return new Promise((resolve) => {
        setTimeout(() => {
          console.log('emit.tapPromise 111')
          resolve()
        }, 1000)
      })
    })

    complier.hooks.afterEmit.tap('Plugin1', (compilation) => {
      console.log('afterEmit.tap 111')
    })

    complier.hooks.done.tap('Plugin1', (stats) => {
      console.log('done.tap 111')
    })
  }
}

module.exports = Plugin1
2、webpack.config.js:
const Plugin1 = require('./plugins/Plugin1')

module.exports = {
  plugins: [new Plugin1()]
}

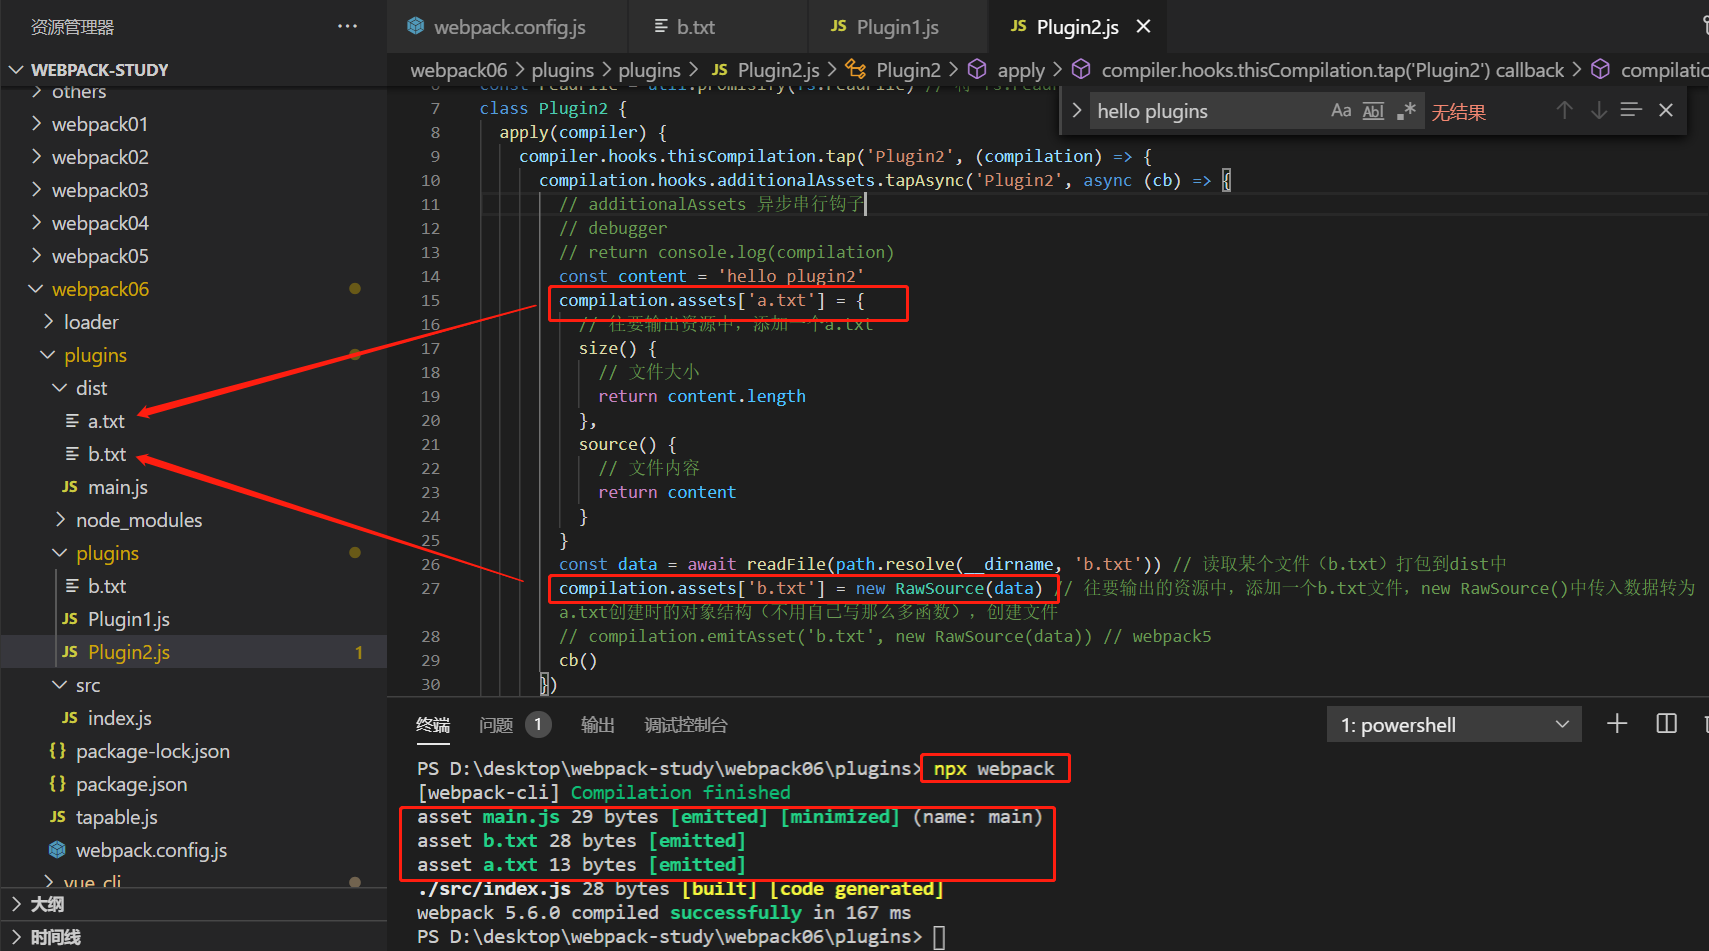
compilation的使用:
1、Plugin2.js:
const fs = require('fs') // fs.readFile()读取文件
const util = require('util') // 利用util.promisify将异步代码转为promise异步
const path = require('path') // 处理路径
const webpack = require('webpack')
const { RawSource } = webpack.sources // 可以创建一个基于webpack风格的文件类型
const readFile = util.promisify(fs.readFile) // 将 fs.readFile 方法转为基于promise风格的异步方法
class Plugin2 {
  apply(compiler) {
    compiler.hooks.thisCompilation.tap('Plugin2', (compilation) => {
      compilation.hooks.additionalAssets.tapAsync('Plugin2', async (cb) => {
        // additionalAssets 异步串行钩子
        // debugger
        // return console.log(compilation)
        const content = 'hello plugin2'
        compilation.assets['a.txt'] = {
          // 往要输出资源中,添加一个a.txt
          size() {
            // 文件大小
            return content.length
          },
          source() {
            // 文件内容
            return content
          }
        }
        const data = await readFile(path.resolve(__dirname, 'b.txt')) // 读取某个文件(b.txt)打包到dist中
        compilation.assets['b.txt'] = new RawSource(data) // 往要输出的资源中,添加一个b.txt文件,new RawSource()中传入数据转为a.txt创建时的对象结构(不用自己写那么多函数),创建文件
        // compilation.emitAsset('b.txt', new RawSource(data)) // webpack5
        cb()
      })
    })
  }
}

module.exports = Plugin2
2、webpack.config.js:
const Plugin2 = require('./plugins/Plugin2')

module.exports = {
  plugins: [new Plugin2()]
}

自定义copy-webpack-plugin插件:
1、下载插件:npm i globby schema-utils -D
2、schema.json:
{
  "type": "object",
  "properties": {
    "from": { "type": "string" },
    "to": { "type": "string" },
    "ignore": { "type": "array" }
  },
  "additionalProperties": false
}
3、CopyWebpackPlugin.js
const path = require('path')
const fs = require('fs')
const { promisify } = require('util')
const { validate } = require('schema-utils') // 校验插件,需要下载
const globby = require('globby') // 用于匹配文件列表,需要下载
const schema = require('./schema.json')
const { Compilation } = require('webpack')
const webpack = require('webpack')
const readFile = promisify(fs.readFile)
const { RawSource } = webpack.sources
class CopyWebpackPlugin {
  constructor(options = {}) {
    validate(schema, options, {
      name: 'CopyWebpackPlugin'
    })
    this.options = options
  }
  apply(compiler) {
    // 初始化compilation
    compiler.hooks.thisCompilation.tap('CopyWebpackPlugin', (compilation) => {
      // 添加资源的hooks
      compilation.hooks.additionalAssets.tapAsync(
        'CopyWebpackPlugin',
        async (cb) => {
          const { from, ignore } = this.options // 将from中的资源复制到to中,输出出去
          const to = this.options.to ? this.options.to : '.' // to的默认值是 . 表示当前目录
          const context = compiler.options.context // context就是webpack配置,运行指令的目录  context和process.cmd()一样
          const adsoluteFrom = path.isAbsolute(from)
            ? from
            : path.resolve(context, from) // 将输入路径编程绝对路径
          const paths = await globby(adsoluteFrom, { ignore }) // 1、过滤掉ignore的文件夹    globby(要处理的文件夹,options)
          console.log(paths)
          // 2、读取paths中的所有资源
          const files = await Promise.all(
            paths.map(async (absolutePath) => {
              const data = await readFile(absolutePath) // 读取文件
              const relativePath = path.basename(absolutePath) // basename得到最后的文件名称
              const filename = path.join(to, relativePath) // 和to属性结合,没有to----reset.css;有to----css/reset.css
              return {
                data, // 文件数据
                filename // 文件名称
              }
            })
          )
          // 3、生成webpack格式的资源
          const assets = files.map((file) => {
            const source = new RawSource(file.data)
            return {
              source,
              filename: file.filename
            }
          })
          // 4、添加compilation中,输出出去
          assets.forEach((asset) => {
            compilation.emitAsset(asset.filename, asset.source)
          })
          cb()
        }
      )
    })
  }
}

module.exports = CopyWebpackPlugin
4、webpack.config.js
// const Plugin1 = require('./plugins/Plugin1')
// const Plugin2 = require('./plugins/Plugin2')
const path = require('path')
// const CopyWebpackPlugin = require('copy-webpack-plugin')
const CopyWebpackPlugin = require('./plugins/CopyWebpackPlugin')

module.exports = {
  plugins: [
    // new Plugin1()
    // new Plugin2()
    new CopyWebpackPlugin({
      // patterns: [{ from: 'public', to: 'css' }]
      // from: path.resolve(__dirname,'./public'),
      from: './public',
      to: 'css',
      ignore: ['index.html']
    })
  ]
}
自定义webpack:
D:\desktop\webpack-study\webpack06\04myWebpack
x


【推荐】国内首个AI IDE,深度理解中文开发场景,立即下载体验Trae
【推荐】编程新体验,更懂你的AI,立即体验豆包MarsCode编程助手
【推荐】抖音旗下AI助手豆包,你的智能百科全书,全免费不限次数
【推荐】轻量又高性能的 SSH 工具 IShell:AI 加持,快人一步
· 10年+ .NET Coder 心语,封装的思维:从隐藏、稳定开始理解其本质意义
· .NET Core 中如何实现缓存的预热?
· 从 HTTP 原因短语缺失研究 HTTP/2 和 HTTP/3 的设计差异
· AI与.NET技术实操系列:向量存储与相似性搜索在 .NET 中的实现
· 基于Microsoft.Extensions.AI核心库实现RAG应用
· 10年+ .NET Coder 心语 ── 封装的思维:从隐藏、稳定开始理解其本质意义
· 【设计模式】告别冗长if-else语句:使用策略模式优化代码结构
· 提示词工程——AI应用必不可少的技术
· 字符编码:从基础到乱码解决
· 地球OL攻略 —— 某应届生求职总结