MyBatis笔记
1、简介
1.1、什么是 MyBatis?
-
MyBatis 是一款优秀的持久层框架
-
它支持自定义 SQL、存储过程以及高级映射。
-
MyBatis 免除了几乎所有的 JDBC 代码以及设置参数和获取结果集的工作。
-
MyBatis 可以通过简单的 XML 或注解来配置和映射原始类型、接口和 Java POJO(Plain Old Java Objects,普通老式 Java 对象)为数据库中的记录。
-
MyBatis本是apache的一个开源项目iBatis,2010年这个项目由apache software foundation迁移到了google code,并且改名为MyBatis。
-
2013年11月迁移到Github。
如何获得mybatis?
-
maven仓库
<!-- https://mvnrepository.com/artifact/org.mybatis/mybatis -->
<dependency>
<groupId>org.mybatis</groupId>
<artifactId>mybatis</artifactId>
<version>3.5.2</version>
</dependency>
-
1.2、持久化
数据持久化
-
持久化就是将程序的数据在持久状态和顺时状态转化的过程
-
内存:断电即失
-
数据库(JDBC)、io文件持久化
-
生活:冷藏、罐头
为什么需要持久化?
-
有一些对象,不能丢掉
-
内存太贵了
-
1.3、持久层
-
Dao层、Service层、controller层
-
完成持久化的代码块
-
层界限十分明显
-
1.4、为什么需要MyBatis
-
帮助程序员将数据存入数据库
-
方便
-
传统的JDBC代码太复杂了。简化。框架。自动化。
-
不用MyBatis也可以,更容易上手。技术没有高低之分。
-
优点
-
简单易学:本身就很小且简单。没有任何第三方依赖,最简单安装只要两个jar文件+配置几个sql映射文件。易于学习,易于使用。通过文档和源代码,可以比较完全的掌握它的设计思路和实现。
-
灵活:mybatis不会对应用程序或者数据库的现有设计强加任何影响。 sql写在xml里,便于统一管理和优化。通过sql语句可以满足操作数据库的所有需求。
-
解除sql与程序代码的耦合:通过提供DAO层,将业务逻辑和数据访问逻辑分离,使系统的设计更清晰,更易维护,更易单元测试。sql和代码的分离,提高了可维护性。
-
提供映射标签,支持对象与数据库的orm字段关系映射。
-
提供对象关系映射标签,支持对象关系组建维护。
-
提供xml标签,支持编写动态sql。
-
最重要得到一点:使用的人多!
2、第一个Mybais程序
思路:搭建环境->导入mybatis-->编写代码-->测试
2.1、搭建环境
搭建数据库
create database mybatis;
use mybatis;
create table user(
    id int not null primary key auto_increment,
    name varchar(30) default null,
    pwd varchar(30) default null
);
 insert into user values (null,"zhangsan","123456");
 insert into user values (null,"lisi","123456");
 insert into user values (null,"wangwu","123456");
 insert into user values (null,"yueyunpeng","123456");
新建项目
-
新建一个普通的maven项目
-
删除src目录
-
导入Maven依赖
<!--导入依赖-->
<dependencies>
<!--mysql依赖-->
<dependency>
<groupId>mysql</groupId>
<artifactId>mysql-connector-java</artifactId>
<version>5.1.47</version>
</dependency>
<!--mybatis-->
<dependency>
<groupId>org.mybatis</groupId>
<artifactId>mybatis</artifactId>
<version>3.5.2</version>
</dependency>
<!--junit-->
<dependency>
<groupId>junit</groupId>
<artifactId>junit</artifactId>
<version>4.12</version>
<scope>test</scope>
</dependency>
</dependencies>
2.2、创建一个模块
编写mybatis核心配置文件
<configuration>
<environments default="development">
<environment id="development">
<transactionManager type="JDBC"/><!--事务管理-->
<dataSource type="POOLED">
<property name="driver" value="com.mysql.jdbc.Driver"/>
<property name="url" value="jdbc:mysql://localhost:3306/mybatis?useSSL=true&userUnicode=true&characterEncoding=UTF-8"/>
<property name="username" value="root"/>
<property name="password" value="root"/>
</dataSource>
</environment>
</environments>
<mappers>
<mapper resource="org/mybatis/example/BlogMapper.xml"/>
</mappers>
</configuration>
2、编写mybatis工具类
public class MybatisUtils {
public static SqlSessionFactory sqlSessionFactory = null;
static {
try {
//使用mybatis第一步 获取sqlSessionFactory对象
String resource = "mybatis-config.xml";
InputStream inputStream = Resources.getResourceAsStream(resource);
sqlSessionFactory = new SqlSessionFactoryBuilder().build(inputStream);
} catch (IOException e) {
e.printStackTrace();
}
}
//既然有了 SqlSessionFactory,
// 顾名思义,我们可以从中获得 SqlSession 的实例。
// SqlSession 提供了在数据库执行 SQL 命令所需的所有方法。
// 你可以通过 SqlSession 实例来直接执行已映射的 SQL 语句。
public static SqlSession getSqlSeesion() {
return sqlSessionFactory.openSession();
}
}
2.3、编写代码
-
实体类
package com.qiang.pojo;
public class User {
private Integer id;
private String name;
private String pwd;
public User() {
}
public User(Integer id, String name, String pwd) {
this.id = id;
this.name = name;
this.pwd = pwd;
}
public Integer getId() {
return id;
}
public void setId(Integer id) {
this.id = id;
}
public String getName() {
return name;
}
public void setName(String name) {
this.name = name;
}
public String getPwd() {
return pwd;
}
public void setPwd(String pwd) {
this.pwd = pwd;
}
-
Dao接口
package com.qiang.dao;
import com.qiang.pojo.User;
import java.util.List;
public interface UserDao {
List<User> getUserList();
}
-
接口实现类-由原来的的UserDao转变一个Mapper配置文件
2.4、测试
可能会遇见的问题:
-
配置文件没有注册
-
绑定接口错误
-
方法名不对
-
返回类型不对
-
Maven导出资源问题
-
public class UserDaoTest {
3、CRUD
1|、namespace
namespace中的包名要和接口的包名一致!
2、select
选择,查询语句
-
id:就是对应的namespace中的方法名;
-
resultType:SQL语句执行的返回值!
-
parameterType:参数类型
1、编写接口
//获取全部用户
    List<User> getUserList();
2、编写对应的mapper中的sql语句
 <select id="getUserList" resultType="com.qiang.pojo.User">
        select * from mybatis.user
    </select>
3、测试
    @Test
    public void test() {
        SqlSession sqlSeesion = null;
        try {
            //1、获取SqlSession对象
            sqlSeesion = MybatisUtils.getSqlSeesion();
            //2、执行sql
            //3、方式一:getMapper
            UserMapper mapper = sqlSeesion.getMapper(UserMapper.class);
            List<User> userList = mapper.getUserList();
            // User list = mapper.gerUserById(1);
            //方式二:
            // List<User> userList = 			sqlSeesion.selectList("com.qiang.dao.UserDao.getList");
            //System.out.println(list);
            for (User user : userList) {
                System.out.println(user);
            }
        } finally {
            sqlSeesion.close();
        }

    }
3、delete
-
编写接口
//删除用户 int deleteUser(int id); -
编写对应的mapper中的sql语句
<delete id="deleteUser" parameterType="int"> delete from mybatis.user where id = #{id} </delete> -
测试
  @Test
    public void test4() {
        SqlSession sqlSeesion = null;
        try {
            sqlSeesion = MybatisUtils.getSqlSeesion();
            UserMapper mapper = sqlSeesion.getMapper(UserMapper.class);
            User user = new User(1, "wuqiang", "123456");
            int i = mapper.deleteUser(3);
            sqlSeesion.commit();
            System.out.println(i > 0 ? "删除成功" : "删除失败");
        } finally {
            sqlSeesion.close();
        }
    }
4、update
-
编写接口
  //修改用户
int updateUser(User user); -
编写对应的mapper中的sql语句
 <update id="updateUser" parameterType="com.qiang.pojo.User">
        update mybatis.user set name = #{name},pwd = #{pwd} where id = #{id}
</update> -
测试
5、insert
-
编写接口
//增加用户 int addUser(User user); -
编写对应的mapper中的sql语句
<insert id="addUser" parameterType="com.qiang.pojo.User" > insert into mybatis.user (id,name,pwd) values(#{id},#{name},#{pwd}) </insert> -
测试
  @Test
    public void test2() {
        SqlSession sqlSeesion = null;
        try {
            sqlSeesion = MybatisUtils.getSqlSeesion();
            UserMapper mapper = sqlSeesion.getMapper(UserMapper.class);
            User user = new User(null, "aaa", "11111");
            int i = mapper.addUser(user);
            sqlSeesion.commit();
            System.out.println(i > 0 ? "添加成功" : "添加失败");
        } finally {
            sqlSeesion.close();
        }
    }
注意点:
-
增删改需要提交事务
6、分析错误
-
标签不要匹配错
-
resource绑定mapper,需要使用路径
-
程序配置文件必须符合规范!
7、万能Map
假设我们得实体类,或者数据库中的表,字段或者参数过多,我们应当考虑使用map!
-
编写接口
//万能map int addUser2(Map<String,Object> map); -
编写对应的mapper中的sql语句
<insert id="addUser2" parameterType="map"> insert into mybatis.user (id,name,pwd) values(#{userId},#{userNamae},#{userPassword}) </insert> -
测试
@Test
    public void  test5(){
        SqlSession sqlSeesion = MybatisUtils.getSqlSeesion();
        UserMapper mapper = sqlSeesion.getMapper(UserMapper.class);
        HashMap<String, Object> map = new HashMap<String, Object>();
        map.put("userId",null);
        map.put("userNamae","zhangsan");
        map.put("userPassword","123456");
        int i = mapper.addUser2(map);

        sqlSeesion.commit();
        sqlSeesion.close();
    }
map传递参数,直接在SQL中取出key即可!【parameterType="map"】
对象传递参数,直接在sql中取对象的属性即可!【parameterType="Object"】
只有一个基本类型参数的情况下,可以直接在SQL中取到。
多个参数用map,或注解
8、模糊查询
-
java代码执行的时候,传递通配符
List<User> a = mapper.getUserLike("%a%"); -
在sql拼接中使用通配符
select * from user where name like "%"#{value}"%"
-
4、配置解析
1、核心配置文件
-
mybatis-config.xm
-
Mybatis的配置文件包含了会深深影响Mybatis行为的设置和属性信息。
configuration(配置)
properties(属性)
settings(设置)
typeAliases(类型别名)
typeHandlers( )
objectFactory(对象工厂)
plugins(插件)
environments(环境配置)
environment(环境变量)
transactionManager(事务管理器)
dataSource(数据源)
databaseIdProvider(数据库厂商标识)
mappers(映射器)
2、环境配置(environments)
MyBatis 可以配置成适应多种环境,
不过要记住:尽管可以配置多个环境,但每个 SqlSessionFactory 实例只能选择一种环境。
学会使用配置多套运行环境
mybatis的默认事务管理器就是JDBC,连接池:POOLED
3、属性(properties)
我们可以通过properties属性来实现引用配置文件
这些属性可以在外部进行配置,并可以进行动态替换。你既可以在典型的 Java 属性文件中配置这些属性,也可以在 properties 元素的子元素中设置。例如: 这些属性可以在外部进行配置,并可以进行动态替换。你既可以在典型的 Java 属性文件中配置这些属性,也可以在 properties 元素的子元素中设置。例如:【druid.properties】
编写一个配置文件
druid.properties
#key=value
driverClassName=com.mysql.jdbc.Driver
url=jdbc:mysql://localhost:3306/mybatis?useSSL=false&userUnicode=true&characterEncoding=UTF-8
#url=jdbc:mysql://localhost:3306/itheima
username=root
password=root
#initial connection Size
initialSize=10
#min idle connecton size
minIdle=5
#max active connection size
maxActive=20
#max wait time (5000 mil seconds)   最大等待时间
maxWait=5000
在核心配置文件中引入
 <properties resource="druid.properties"/>
  <environments default="development">
-
可以直接引入外部文件
-
可以在其中增加一些属性配置
-
如果两个文件有同一个字段,优先使用外部配置文件的!
-
4、类型别名(typeAliases)
-
类型别名可为 Java 类型设置一个缩写名字。
-
它仅用于 XML 配置,意在降低冗余的全限定类名书写
<!--可以给实体类起别名-->
    <typeAliases>
        <typeAlias type="com.qiang.pojo.User" alias="User"/>
    </typeAliases>
也可以指定一个包名,MyBatis 会在包名下面搜索需要的 Java Bean 比如:
扫描实体类的包,他默认别名就为这个类的类名,首字母小写
 <typeAliases>
        <package name="com.qiang.pojo"/>
    </typeAliases>
在实体类比较少的情况下,建议使用第一种方式
如果实体类非常多,建议使用第二种。
第一种可以DIY,第二种则不行(相对来说,可以在实体类上加注解起)
优先级:类型别名>注解别名>包别名
5、设置(settings)
这是 MyBatis 中极为重要的调整设置,它们会改变 MyBatis 的运行时行为
| 设置名 | 描述 | 有效值 | 默认值 |
|---|---|---|---|
| cacheEnabled | 全局性地开启或关闭所有映射器配置文件中已配置的任何缓存。 | true | false | true |
| lazyLoadingEnabled | 延迟加载的全局开关。当开启时,所有关联对象都会延迟加载。 特定关联关系中可通过设置 fetchType 属性来覆盖该项的开关状态。 |
true | false | false |
| logImpl | 指定 MyBatis 所用日志的具体实现,未指定时将自动查找。 | SLF4J | LOG4J(deprecated since 3.5.9) |
6、其他配置
-
-
mybatis Plus
-
通用mapper
7、映射器(mappers)
MapperRegistry:注册绑定我们得Mapper文件
方式一:
<!--每一个Mapper.xml都需要在Mybatis核心配置文件中注册!-->
	<mappers>
        <mapper resource="com/qiang/dao/UserMapper.xml"/>
    </mappers>
方式二:使用class文件注册绑定
<!--每一个Mapper.xml都需要在Mybatis核心配置文件中注册!-->
	<mappers>
        <mapper class="com/qiang/dao/UserMapper"/>
    </mappers>
注意点:
-
接口必须和他的Mapper文件必须同名
-
接口必须和他的Mapper文件必须在同一个包下!
方式三:使用扫描包进行注册绑定
<!--每一个Mapper.xml都需要在Mybatis核心配置文件中注册!-->
	<mappers>
        <package class="com/qiang/dao"/>
    </mappers>
注意点:
-
接口必须和他的Mapper文件必须同名
-
接口必须和他的Mapper文件必须在同一个包下!
8、生命周期
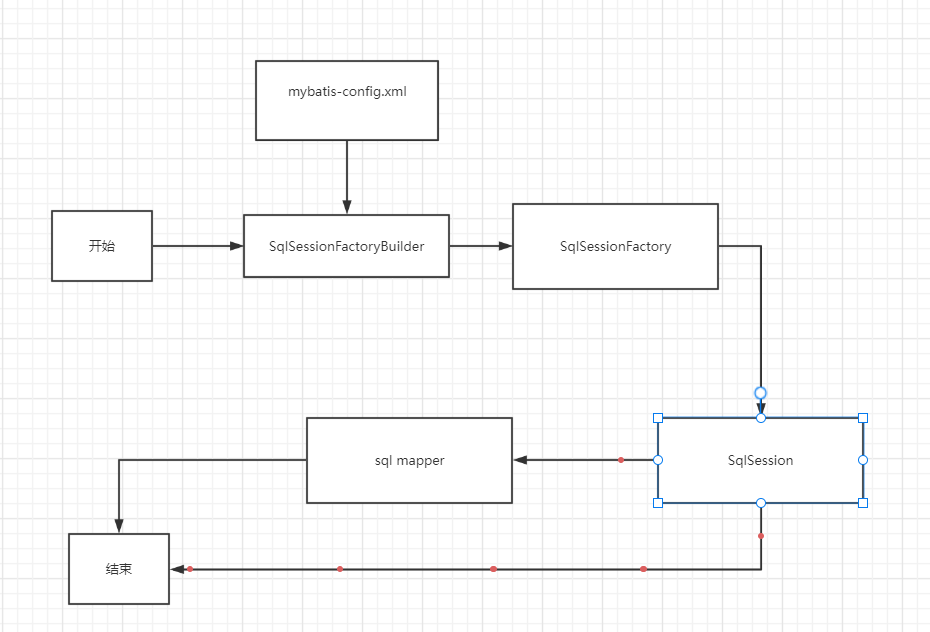
生命周期、类别是至关重要的,因为错误的使用会导致非常严重的并发问题。
SqlSessionFactoryBuilder
-
一旦创建了SqlSessionFactory就不需要它了
-
局部变量
SqlSessionFactory
-
说白了就可以想象成:数据库连接池
-
SqlSessionFactory 一旦被创建就应该在应用的运行期间一直存在 , 没有任何理由丢弃它或重新创建另一个实例
-
因此 SqlSessionFactory 的最佳作用域是应用作用域
-
最简单的就是使用单例模式或者静态单例模式。
SqlSession
-
连接到连接池的一个请求!
-
SqlSession 的实例不是线程安全的,因此是不能被共享的,所以它的最佳的作用域是请求或方法作用域。
-
用完之后需要赶紧关闭,否则资源被占用!

这里的每一个mapper代码,就代表一个具体的业务!
5、解决属性名和字段名不一致的问题
1、问题
数据库中的字段与实体对应pojo字段不一样
解决方式一:起别名
<select id="getUserList" resultType="user">
         select id,name,pwd as password from mybatis.user
 </select>
2、resultMap
结果集映射
id name pwd
id name  password
<!--结果集映射-->
    <resultMap id="UserMap" type="User">
<!-- column:数据库映射字段   property:实体类属性  -->
        <result column="pwd" property="password"/>
    </resultMap>
-
resultMap元素是MyBatis中最强大的元素
-
ResultMap的设计思想是,对于简单的语句根本不需要配置显式
的结果集映射,而对于复杂一点的语句只需要描述他们的关系就行了
6、日志
1、面象接口编程
- 大家之前都学过面向对象编程,也学习过接口,但在真正的开发中,很多时候我们会选择面向接口编程 - 根本原因:解耦,可拓展,提高复用,分层开发中,上层不用管具体的实现,大家都遵守共同的标准,使得开发变得更容易,规范性更好 - 在一个面向对象的系统中,系统的各种功能是由许许多多的不同对象协作完成的。在这种情况下,各个对象内部是如何实现自己的,对系统设计人员来讲就不那么重要了; - 而各个对象之前的协作关系则成为系统设计的关键,小到不同类之间的通信,大到各模块之间的交互,在系统设计之初都是要着重考虑的,这也是系统设计的主要工作内容,面向接口编程就是指按照这种思想来编程。关于接口的理解
- 接口从更深层次的理解,应是定义(规范,约束)与实现(名实分离)的分离。
- 接口的本身反映了系统设计人员对系统的抽象理解。
- 接口应有两类:
- 第一类是对一个个体的抽象,它可对应为一个抽象体(abstract class); - 第二类是对一个个体某一方面的抽象,即形成一个抽象面(interface);
- 一个体有可能有多个抽象面,抽象体与抽象面是有区别的
三个面向区别
- 面向对象是指,我们考虑问题时,以对象为单位,考虑它的属性及方法 - 面向过程是指,我们考虑问题时,以一个具体的流程(事务过程)为单位,考虑它的实现。 - 接口设计与非接口设计是针对复用技术而言的,与面向对象(过程)不是一个问题,更多的体现就是对系统整体的架构
6.1、日志工厂
如果一个数据库操作,出现了异常,我们需要拍错。日志就是最好的助手!
曾经:sout、debug
现在日志工厂
-
SLF4J
-
LOG4J(deprecated since 3.5.9) 【掌握】
-
LOG4J2
-
JDK_LOGGING
-
COMMONS_LOGGING
-
STDOUT_LOGGING 【掌握】
-
NO_LOGGING
在Mybatis中具体使用使用哪一个日志实现,在设置中设定
STDOUT_LOGGING 标准日志输出
    <settings>
<!--        标准的日志工厂实现-->
        <setting name="logImpl" value="STDOUT_LOGGING"/>
    </settings>
Logging initialized using 'class org.apache.ibatis.logging.stdout.StdOutImpl' adapter.
Class not found: org.jboss.vfs.VFS
JBoss 6 VFS API is not available in this environment.
Class not found: org.jboss.vfs.VirtualFile
VFS implementation org.apache.ibatis.io.JBoss6VFS is not valid in this environment.
Using VFS adapter org.apache.ibatis.io.DefaultVFS
Find JAR URL: file:/F:/code/mybatis/mybatis-03/target/classes/com/qiang/pojo
Not a JAR: file:/F:/code/mybatis/mybatis-03/target/classes/com/qiang/pojo
Reader entry: User.class
Listing file:/F:/code/mybatis/mybatis-03/target/classes/com/qiang/pojo
Find JAR URL: file:/F:/code/mybatis/mybatis-03/target/classes/com/qiang/pojo/User.class
Not a JAR: file:/F:/code/mybatis/mybatis-03/target/classes/com/qiang/pojo/User.class
Reader entry: ����   1 <
Checking to see if class com.qiang.pojo.User matches criteria [is assignable to Object]
PooledDataSource forcefully closed/removed all connections.
PooledDataSource forcefully closed/removed all connections.
PooledDataSource forcefully closed/removed all connections.
PooledDataSource forcefully closed/removed all connections.