Unity事件处理机制与NGUI事件机制
1 Unity原生
1.1 GUI
void OnGUI(){
if(GUI.Button(Rect position, string text)){
    //点击后立即执行
}
1.1 Input
每个手指触控是通过Input.touches数据结构描述的:
-
fingerId 手指索引The unique index for a touch. 触摸的唯一索引。
-
position 位置The screen position of the touch. 触摸屏幕的位置。
-
deltaPosition 增量位置The screen position change since the last frame.
自最后一帧改变的屏幕位置。 -
deltaTime 增量时间Amount of time that has passed since the last state change.
从最后状态改变到现在经过的时间 -
tapCount 点击数The iPhone/iPad screen is able to distinguish quick finger taps by the user. This counter will let you know how many times the user has tapped the screen without moving a finger to the sides. Android devices do not count number of taps, this field is always 1.
iPhone/iPad屏幕能够识别用过的快速点击, 这个计数器让你知道用户点击屏幕多少次,而不是移动手指。android设备不对点击计数,这个方法总是返回1 -
phase 相位(状态)Describes so called "phase" or the state of the touch. It can help you determine if the touch just began, if user moved the finger or if he just lifted the finger.
描述触摸的状态,可以帮助开发者确定用户是否刚开始触摸,是否用户移动手指,是否用户刚刚抬起手指。
Phase can be one of the following:
相位(状态)可能是下列之一:
-
Began 开始A finger just touched the screen. 手指刚刚触摸屏幕
-
Moved 移动A finger moved on the screen. 手指在屏幕上移动
-
Stationary 静止A finger is touching the screen but hasn't moved since the last frame.
手指触摸屏幕,但是自最后一帧没有移动 -
Ended 结束A finger was lifted from the screen. This is the final phase of a touch.
手指从屏幕上抬起,这是触控的最后状态。 -
Canceled 取消The system cancelled tracking for the touch, as when (for example) the user puts the device to her face or more than five touches happened simultaneously. This is the final phase of a touch.
系统取消了触控跟踪,如,用户将设备放在了脸上或超过同时超过5个触摸点。这是触控的最后状态。
-
下面的例子,只要用户在屏幕上点击,将射出一条光线:
var particle : GameObject;
function Update () {
    for (var touch : Touch in Input.touches) {
        if (touch.phase == TouchPhase.Began) {
            // Construct a ray from the current touch coordinates
            //从当前的触摸坐标建一条光线
            var ray = Camera.main.ScreenPointToRay (touch.position);
            if (Physics.Raycast (ray)) {
                // Create a particle if hit
                //如果触摸就创建一个例子
                Instantiate (particle, transform.position, transform.rotation);
            }
        }
    }
}
2 NGUI事件机制
UICamera主要负责监听,分发所有此Camera渲染的GameObject。
事件源:鼠标,触屏,键盘和手柄
事件包括:悬停,按下/抬起,选中/取消选中,点击,双击,拖拽,释放,文本输入,tips显示,滚轮滑动,键盘输入。
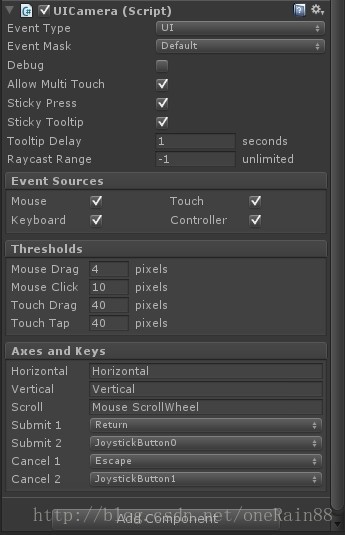
EventType:包括3D UI,3D world,2D UI,3D World用于区分UICamera处理UI事件的对象是UI空间还是3D物体。
EventMask:可以过滤到一些不需要接受UI事件的对象。
EventSource:只处理指定事件源,如touch
Thresholds:是指事件误差的范围。
2.1 NGUI事件注册
2.1.1 直接监听事件
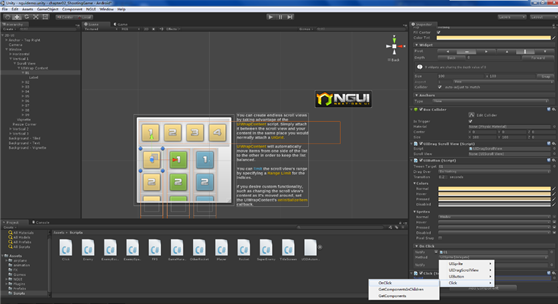
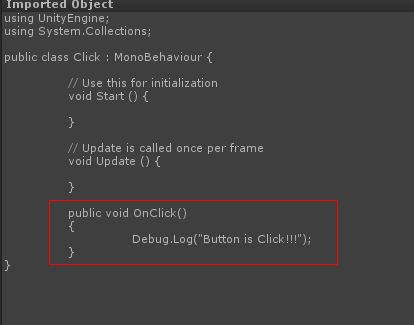
直接将MonoBehaviour的脚本上的方法绑定至Notifiy上面。这种方法不够灵活,不推荐。
2.1.2 使用SendMessage
过期方式,不建议使用。
2.1.3 UIListener注册
在需要接收事件的gameobject上附加Event Listener。添加component->NGUI->Internal->Event Listener。
在任何一个脚本或者类中即可得到按钮的点击事件、把如下代码放在任意类中或者脚本中。
void Awake ()
    {
                //获取需要监听的按钮对象
    GameObject button = GameObject.Find("UI Root (2D)/Camera/Anchor/Panel/LoadUI/MainCommon/Button");
                //设置这个按钮的监听,指向本类的ButtonClick方法中。
    UIEventListener.Get(button).onClick = ButtonClick;
    }

        //计算按钮的点击事件
    void ButtonClick(GameObject button)
    {
        Debug.Log("GameObject " + button.name);
    }
3 NGUI事件相关源码分析
3.1 事件注册
UIEventListener.Get(gameObject).onClick = ButtonClick;
//1、获取GameObject对应的UIEventListener的组件
static public UIEventListener Get (GameObject go)
    {
        UIEventListener listener = go.GetComponent<UIEventListener>();
        if (listener == null) listener = go.AddComponent<UIEventListener>();
        return listener;
    }
//2、注册事件委托

public class UIEventListener : MonoBehaviour
{
    public delegate void VoidDelegate (GameObject go);
        public VoidDelegate onClick;
        void OnClick (){ if (onClick != null) onClick(gameObject); }
}
3.1.1 观察者模式和事件/委托机制
观察者模式定义了一种一对多的依赖关系,让多个观察者对象同时监听某一个主题对象,这个主题对象在状态发生变化时,会通知所有的观察者对象,使他们能够执行自己的相关行为。
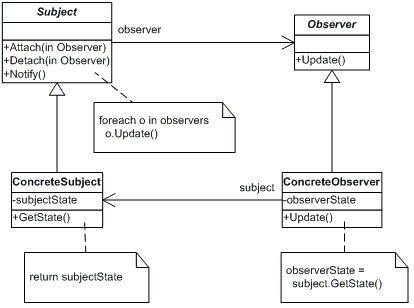
可以看出,在观察者模式的结构图有以下角色:
- 抽象主题角色(Subject):抽象主题把所有观察者对象的引用保存在一个列表中,并提供增加和删除观察者对象的操作,抽象主题角色又叫做抽象被观察者角色,一般由抽象类或接口实现。
- 抽象观察者角色(Observer):为所有具体观察者定义一个接口,在得到主题通知时更新自己,一般由抽象类或接口实现。
- 具体主题角色(ConcreteSubject):实现抽象主题接口,具体主题角色又叫做具体被观察者角色。
- 具体观察者角色(ConcreteObserver):实现抽象观察者角色所要求的接口,以便使自身状态与主题的状态相协调。
3.1.1.1 委托
1、委托定义
在C#中定义一个委托非常简单,只要包含关键词delegate,其他的与普通方法一致。
public delegate void GreetingDelegate(string name);
委托是一个类,它定义了方法的类型,使得可以将方法当作另一个方法的参数来进行传递,这种将方法动态地赋给参数的做法,可以避免在程序中大量使用If-Else(Switch)语句,同时使得程序具有更好的可扩展性。(与Java中的接口非常相似)。
2、方法绑定委托
上面的绑定onclick即是一个方法绑定。
UIEventListener.Get(gameObject).onClick = ButtonClick;
委托方法可以绑定多个方法,调用时会一次调用绑定的方法。
UIEventListener.Get(gameObject).onClick += ButtonClick2;
委托还可以通过-=的方式解除绑定。
注意:第一次绑定必须用赋值=,如果使用+=将会发生编译错误。
3.2 UICamera事件分发
3.2.1 初始化设置
设置fallThrough为摄像机节点的UI Root节点或者摄像机节点或者当前本身gameobject。
3.2.2 update获取事件源
Unity提供了Input接口,能够从触屏中获取各类输入事件。Update的时候查看事件输入情况,并通过ProcessTouches处理触屏事件。
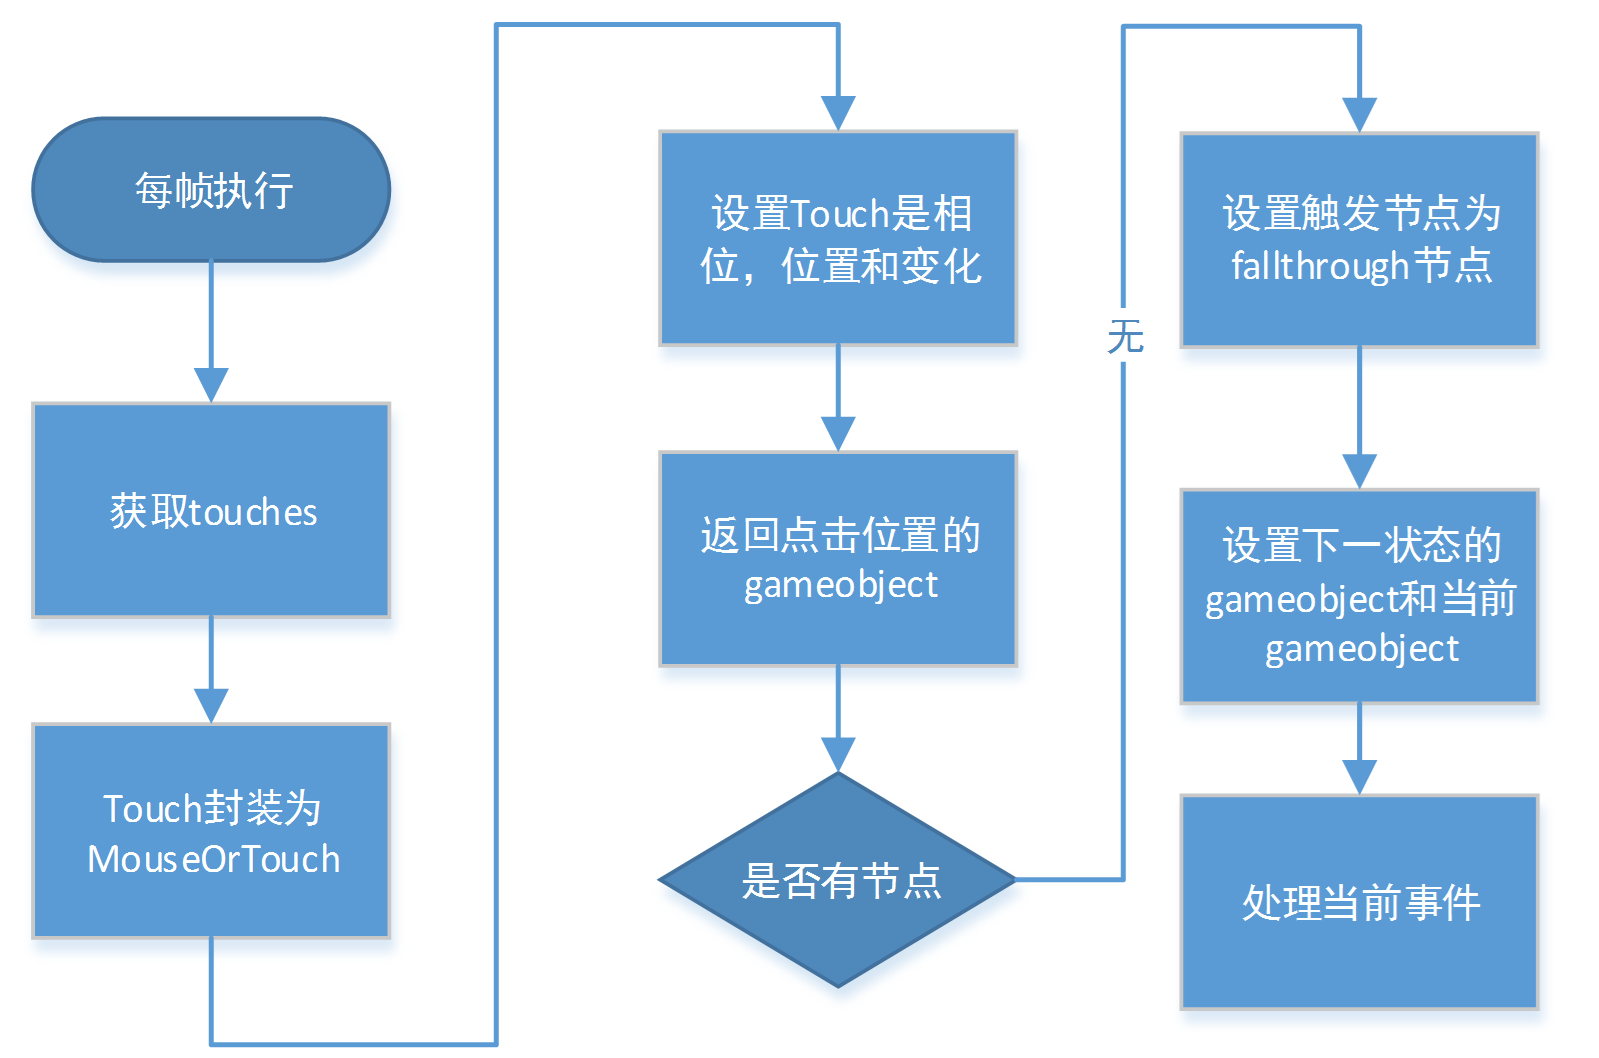
ProcessTouches函数
public void ProcessTouches ()
    {
        currentScheme = ControlScheme.Touch;

        for (int i = 0; i < Input.touchCount; ++i)
        {
            Touch touch = Input.GetTouch(i);


            currentTouchID = allowMultiTouch ? touch.fingerId : 1;
            //根据TouchID获取touch事件,如果是begin的则创建新对象加入缓存
            currentTouch = GetTouch(currentTouchID);

            //设置当前输入的相位
            bool pressed = (touch.phase == TouchPhase.Began) || currentTouch.touchBegan;
            bool unpressed = (touch.phase == TouchPhase.Canceled) || (touch.phase == TouchPhase.Ended);
            currentTouch.touchBegan = false;

            // Although input.deltaPosition can be used, calculating it manually is safer (just in case)
            //如果不是开始按下,就需要计算与上一次的偏移情况
            currentTouch.delta = pressed ? Vector2.zero : touch.position - currentTouch.pos;
            currentTouch.pos = touch.position;

            // Raycast into the screen
            //通过射线获取可以点击的gameobject
            if (!Raycast(currentTouch.pos)) hoveredObject = fallThrough;
            if (hoveredObject == null) hoveredObject = mGenericHandler;
            currentTouch.last = currentTouch.current;
            currentTouch.current = hoveredObject;
            lastTouchPosition = currentTouch.pos;

            // We don't want to update the last camera while there is a touch happening
            if (pressed) currentTouch.pressedCam = currentCamera;
            else if (currentTouch.pressed != null) currentCamera = currentTouch.pressedCam;

            // Double-tap support
            //ios的多次点击,则需要设置时间戳
            if (touch.tapCount > 1) currentTouch.clickTime = RealTime.time;

            // Process the events from this touch
            ProcessTouch(pressed, unpressed);

            // If the touch has ended, remove it from the list
            if (unpressed) RemoveTouch(currentTouchID);
            currentTouch.last = null;
            currentTouch = null;

            // Don't consider other touches
            if (!allowMultiTouch) break;
        }

        if (Input.touchCount == 0)
        {
            if (useMouse) ProcessMouse();
#if UNITY_EDITOR
            else ProcessFakeTouches();
#endif
        }
    }
这里需要重点介绍Raycast(Vector3 inpos)和ProcessTouch()。
3.2.2.1 Raycast
list中缓存这当前场景中,所有的摄像机,并按照深度来排序。
主要处理World_3D、UI_3D、World_2D和UI_2D4种不同类型的。
static public bool Raycast (Vector3 inPos)
    {
        for (int i = 0; i < list.size; ++i)
        {
            UICamera cam = list.buffer[i];

            // Skip inactive scripts
            //没有激活的,全部跳过
            if (!cam.enabled || !NGUITools.GetActive(cam.gameObject)) continue;

            // Convert to view space
            currentCamera = cam.cachedCamera;
            Vector3 pos = currentCamera.ScreenToViewportPoint(inPos);//找到屏幕坐标
            if (float.IsNaN(pos.x) || float.IsNaN(pos.y)) continue;

            // If it's outside the camera's viewport, do nothing
            if (pos.x < 0f || pos.x > 1f || pos.y < 0f || pos.y > 1f) continue;

            // Cast a ray into the screen
            Ray ray = currentCamera.ScreenPointToRay(inPos);

            // Raycast into the screen
            //UI层和事件层都OK的
            int mask = currentCamera.cullingMask & (int)cam.eventReceiverMask;
            float dist = (cam.rangeDistance > 0f) ? cam.rangeDistance : currentCamera.farClipPlane - currentCamera.nearClipPlane;

            if (cam.eventType == EventType.World_3D)
            {
                if (Physics.Raycast(ray, out lastHit, dist, mask))
                {
                    lastWorldPosition = lastHit.point;
                    hoveredObject = lastHit.collider.gameObject;
                    //如果父节点上有刚体,则返回
                    Rigidbody rb = FindRootRigidbody(hoveredObject.transform);
                    if (rb != null) hoveredObject = rb.gameObject;
                    return true;
                }
                continue;
            }
            else if (cam.eventType == EventType.UI_3D)
            {

                RaycastHit[] hits = Physics.RaycastAll(ray, dist, mask);

                if (hits.Length > 1)
                {
                    //碰到多个colider
                    for (int b = 0; b < hits.Length; ++b)
                    {
                        GameObject go = hits[b].collider.gameObject;
                        UIWidget w = go.GetComponent<UIWidget>();

                        //根据UIWidget或者UIRect来判断,落点是不是在节点里面
                        if (w != null)
                        {
                            if (!w.isVisible) continue;
                            if (w.hitCheck != null && !w.hitCheck(hits[b].point)) continue;
                        }
                        else
                        {
                            UIRect rect = NGUITools.FindInParents<UIRect>(go);
                            if (rect != null && rect.finalAlpha < 0.001f) continue;
                        }

                        //计算射线的深度
                        mHit.depth = NGUITools.CalculateRaycastDepth(go);

                        if (mHit.depth != int.MaxValue)
                        {
                            mHit.hit = hits[b];
                            mHit.point = hits[b].point;
                            mHit.go = hits[b].collider.gameObject;
                            mHits.Add(mHit);
                        }
                    }

                    //根据深度排序
                    mHits.Sort(delegate(DepthEntry r1, DepthEntry r2) { return r2.depth.CompareTo(r1.depth); });

                    for (int b = 0; b < mHits.size; ++b)
                    {
#if UNITY_FLASH
                        if (IsVisible(mHits.buffer[b]))
#else
                        //最上层且可见的,为返回的节点
                        if (IsVisible(ref mHits.buffer[b]))
#endif
                        {
                            lastHit = mHits[b].hit;
                            hoveredObject = mHits[b].go;
                            lastWorldPosition = mHits[b].point;
                            mHits.Clear();
                            return true;
                        }
                    }
                    mHits.Clear();
                }
                else if (hits.Length == 1)
                {
                    GameObject go = hits[0].collider.gameObject;
                    UIWidget w = go.GetComponent<UIWidget>();

                    if (w != null)
                    {
                        if (!w.isVisible) continue;
                        if (w.hitCheck != null && !w.hitCheck(hits[0].point)) continue;
                    }
                    else
                    {
                        UIRect rect = NGUITools.FindInParents<UIRect>(go);
                        if (rect != null && rect.finalAlpha < 0.001f) continue;
                    }

                    if (IsVisible(hits[0].point, hits[0].collider.gameObject))
                    {
                        lastHit = hits[0];
                        lastWorldPosition = hits[0].point;
                        hoveredObject = lastHit.collider.gameObject;
                        return true;
                    }
                }
                continue;
            }
            else if (cam.eventType == EventType.World_2D)
            {
                //用Plane射线获取
                if (m2DPlane.Raycast(ray, out dist))
                {
                    Vector3 point = ray.GetPoint(dist);
                    Collider2D c2d = Physics2D.OverlapPoint(point, mask);

                    if (c2d)
                    {
                        lastWorldPosition = point;
                        hoveredObject = c2d.gameObject;

                        Rigidbody2D rb = FindRootRigidbody2D(hoveredObject.transform);
                        if (rb != null) hoveredObject = rb.gameObject;
                        return true;
                    }
                }
                continue;
            }
            else if (cam.eventType == EventType.UI_2D)
            {
                if (m2DPlane.Raycast(ray, out dist))
                {
                    lastWorldPosition = ray.GetPoint(dist);
                    Collider2D[] hits = Physics2D.OverlapPointAll(lastWorldPosition, mask);

                    if (hits.Length > 1)
                    {
                        for (int b = 0; b < hits.Length; ++b)
                        {
                            GameObject go = hits[b].gameObject;
                            UIWidget w = go.GetComponent<UIWidget>();

                            if (w != null)
                            {
                                if (!w.isVisible) continue;
                                if (w.hitCheck != null && !w.hitCheck(lastWorldPosition)) continue;
                            }
                            else
                            {
                                UIRect rect = NGUITools.FindInParents<UIRect>(go);
                                if (rect != null && rect.finalAlpha < 0.001f) continue;
                            }

                            mHit.depth = NGUITools.CalculateRaycastDepth(go);

                            if (mHit.depth != int.MaxValue)
                            {
                                mHit.go = go;
                                mHit.point = lastWorldPosition;
                                mHits.Add(mHit);
                            }
                        }

                        mHits.Sort(delegate(DepthEntry r1, DepthEntry r2) { return r2.depth.CompareTo(r1.depth); });

                        for (int b = 0; b < mHits.size; ++b)
                        {
#if UNITY_FLASH
                            if (IsVisible(mHits.buffer[b]))
#else
                            if (IsVisible(ref mHits.buffer[b]))
#endif
                            {
                                hoveredObject = mHits[b].go;
                                mHits.Clear();
                                return true;
                            }
                        }
                        mHits.Clear();
                    }
                    else if (hits.Length == 1)
                    {
                        GameObject go = hits[0].gameObject;
                        UIWidget w = go.GetComponent<UIWidget>();

                        if (w != null)
                        {
                            if (!w.isVisible) continue;
                            if (w.hitCheck != null && !w.hitCheck(lastWorldPosition)) continue;
                        }
                        else
                        {
                            UIRect rect = NGUITools.FindInParents<UIRect>(go);
                            if (rect != null && rect.finalAlpha < 0.001f) continue;
                        }

                        if (IsVisible(lastWorldPosition, go))
                        {
                            hoveredObject = go;
                            return true;
                        }
                    }
                }
                continue;
            }
        }
        return false;
    }
3.2.2.2 ProcessTouch
ProcessTouch根据阀值,判断需要通知的事件类型。直接调用RasyCast返回的GameObject上UIEventListen注册的事件。
通过直接执行事件委托(onClick),或者SendMessage给返回的GameObject上的相关事件委托。
4 Unity知识
4.1 Camera
游戏界面中所显示的内容是摄像机照射到得场景部分。摄像机可以设置自身的位置、照射方向、照射的面积(类似于显示中照射广度)和照射的图层(只看到自己想看到的层次)。
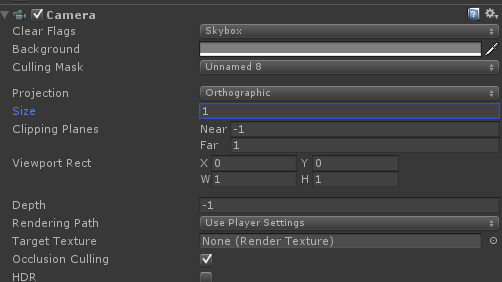
Clear Flags:背景内容,默认为Skybox
Background:Clear Flag没设置,将显示纯色
Culling Mask:用于选择是否显示某些层,默认为“EveryThing”
Projection:摄像机类型,透视和正交。正交适合2D,没有距离感。
Clipping Planes:开始摄像的最近点和最远点
Viewport Rect:设置显示区域。多摄像机可以设置不同的区域,来进行分屏显示。
Depth:深度大的会,画在小的上面。
Rendering Path:渲染方式。
4.2 Colider
Colider是所有碰撞器的基类,包括BoxColider,SphereColider,CapsuleColider,MeshColider,PhysicMaterial,Rigidbody。
4.2.1 RigidBody刚体
刚体可以附加物理属性如物体质量、摩擦力和碰撞系数。
Mass:质量
Drag:阻力
Angular Drag:旋转阻力,越大旋转减慢越快
Use Gravity:是否用重力
Is Kinematic:是否受物理的影响
Collision Detection:碰撞检测
Constraints:冻结,某个方向上的物理效果
4.2.1.1 碰撞
通过sendMessage调用改方法
OnCollisionEnter(Collision collision):开始时,立刻调用
OnCollisionStay(Collision collision):碰撞中,每帧调用
OnCollisionExit(Collision collision):结束时调用
4.2.2 碰撞器
BoxColider(盒子碰撞器),SphereColider(球体碰撞器),CapsuleColider(胶囊碰撞器),MeshColider(自定义模型自身网格决定),WheelMaterial(车轮碰撞器)。
碰撞器之间可以添加物理材质,用于设定物理碰撞后的效果。如反弹。
4.2.3 射线
射线是3D世界中一个点向一个方向发射的一条无终点的线。在发射的轨迹中,一旦与其他模型发生碰撞,它将停止发射(也可以是All)。
创建一个射线首先要知道射线的起点和终点在3D世界中的坐标。Ray即为起点和终点的封装。ScreenPointToRay,是由摄像机当前位置向鼠标位置发射的射线。
5 参考文献
http://game.ceeger.com/Manual/Input.html


