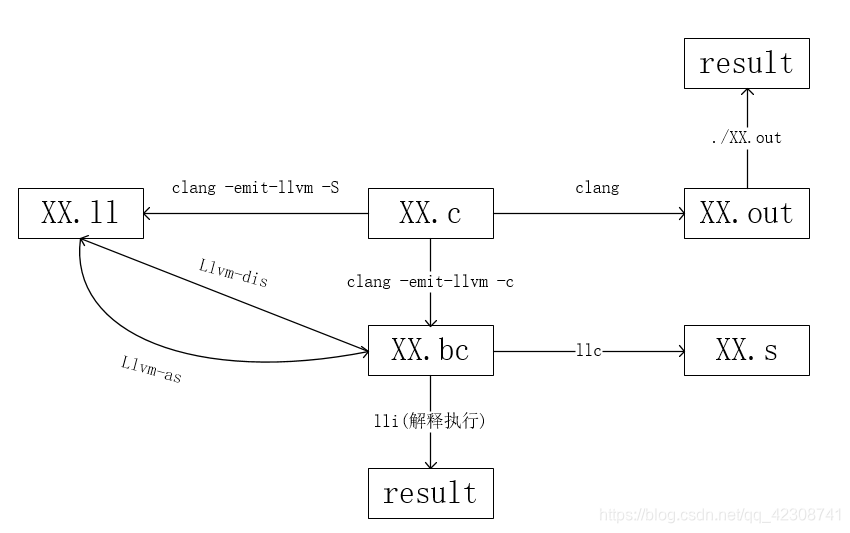
LLVM工具链格式转换compiler示例
LLVM工具链格式转换compiler示例
参考文献链接
https://blog.csdn.net/qq_42308741/article/details/116230359
https://blog.csdn.net/universsky2015/article/details/120558996
https://zhuanlan.zhihu.com/p/568138364
https://releases.llvm.org/3.4.2/docs/GettingStartedVS.html
LLVM有许多种格式,如下所示:
- xx.c (源代码)
- xx.ll (LLVM字节码的文本表示)
- xx.s (机器汇编码表示的汇编文件)
- xx.bc (LLVM字节码的二进制形式)
- xx.out (可执行的二进制文件)


1. Hello World
完整的编译器一般分为前端,优化,后端。LLVM框架中的前端一般使用clang实现,负责词法分析、语法分析和语义分析,将源代码转换为IR。
首先创建一个hello world
#include<stdio.h>
}
2. 使用clang编译源文件
2.1 直接编译为可执行文件
将该c文件编译为本地可执行文件
clang hello.c -o hello2.2 编译为LLVM bitcode文件
将该c文件转换为LLVM bitcode文件
clang -O3 -emit-llvm hello.c -c -o hello.bc此时我们获取了两个输出文件,一个为本地可执行文件格式的hello,另一个为bitcode格式的hello.bc,这两个文件的执行方式不同,如下所示
./hellolli hello.bc我对比了一下,感觉直接执行bitcode确实要慢一些,这对应了上一篇博文中提到的lli直接执行bitcode时,表现为一个解释器的介绍。
3. 查看LLVM bitcode文件
查看LLVM反汇编代码
llvm-dis < hello.bc | less
4. 将bitcode转换为本地汇编文件
将bitcode格式文件编译为本地汇编文件
llc hello.bc -o hello.s
5. 使用gcc将汇编转换为本地可执行程序
使用gcc将生成的汇编文件转换为本地程序
gcc hello.s -o hello.native这里出现了第一个问题如下
root@chipyard:~/cgra_test/llvm_test/src# gcc ./hello.s -o hello.native/usr/bin/ld: /tmp/ccVbFIjM.o: relocation R_X86_64_32 against `.rodata.str1.1' can not be used when making a PIE object; recompile with -fPIC/usr/bin/ld: final link failed: Nonrepresentable section on outputcollect2: error: ld returned 1 exit status需要修改上面的汇编命令为
gcc -no-pie hello.s -o hello.native llvm
官方文档
https://llvm.org/docs/GettingStarted.html#cross-compiling-llvm
Example with clang
First, create a simple C file, name it ‘hello.c’:
#include <stdio.h>
int main() {
printf("hello world\n");
return 0;
}
Next, compile the C file into a native executable:
% clang hello.c -o hello
Note
Clang works just like GCC by default. The standard -S and -c arguments work as usual (producing a native .s or .o file, respectively).
Next, compile the C file into an LLVM bitcode file:
% clang -O3 -emit-llvm hello.c -c -o hello.bc
The -emit-llvm option can be used with the -S or -c options to emit an LLVM .ll or .bc file (respectively) for the code. This allows you to use the standard LLVM tools on the bitcode file.
Run the program in both forms. To run the program, use:
% ./hello
and
% lli hello.bc
The second examples shows how to invoke the LLVM JIT, lli.
https://llvm.org/docs/GettingStarted.html#cross-compiling-llvm
Use the llvm-dis utility to take a look at the LLVM assembly code:
% llvm-dis < hello.bc | less
Compile the program to native assembly using the LLC code generator:
% llc hello.bc -o hello.s
Assemble the native assembly language file into a program:
% /opt/SUNWspro/bin/cc -xarch=v9 hello.s -o hello.native # On Solaris
% gcc hello.s -o hello.native # On others
改成:
% gcc -no-pie hello.s -o hello.native # On others
Execute the native code program:
% ./hello.native
Note that using clang to compile directly to native code (i.e. when the -emit-llvm option is not present) does steps 6/7/8 for you.
参考资料
"Relocation R_X86_64_32 Against `.Rodata' Can Not Be Used When Making A PIE Object; Recompile With -Fpie - Oontinue - 博客园". http://Cnblogs.Com, 2022, https://www.cnblogs.com/Maker-Liu/p/16592611.html. Accessed 26 Sept 2022.
"Getting Started With The LLVM System — LLVM 16.0.0Git Documentation". http://Llvm.Org, 2022, https://llvm.org/docs/GettingStarted.html#general-layout. Accessed 26 Sept 2022.
参考文献链接
https://blog.csdn.net/qq_42308741/article/details/116230359
https://blog.csdn.net/universsky2015/article/details/120558996
https://zhuanlan.zhihu.com/p/568138364
https://releases.llvm.org/3.4.2/docs/GettingStartedVS.html


【推荐】国内首个AI IDE,深度理解中文开发场景,立即下载体验Trae
【推荐】编程新体验,更懂你的AI,立即体验豆包MarsCode编程助手
【推荐】抖音旗下AI助手豆包,你的智能百科全书,全免费不限次数
【推荐】轻量又高性能的 SSH 工具 IShell:AI 加持,快人一步
· 全程不用写代码,我用AI程序员写了一个飞机大战
· DeepSeek 开源周回顾「GitHub 热点速览」
· 记一次.NET内存居高不下排查解决与启示
· MongoDB 8.0这个新功能碉堡了,比商业数据库还牛
· .NET10 - 预览版1新功能体验(一)
2020-12-02 Docker Context基本原理
2020-12-02 Docker Buildx插件
2020-12-02 Docker App应用
2020-12-02 Nvidia TensorRT开源软件