resin服务之三---独立resin的配置
独立resin的配置
|
关掉httpd服务: [root@data-1-1 ~]# killall httpd [root@data-1-1 ~]# lsof -i :80 ------>httpd服务的80端口已经停掉!
配置resin主配置文件修改如下内容: 90 <http address="*" port="80"/> 104 <http address="*" port="80"/>
启动服务: [root@data-1-1 ~]# killall java [root@data-1-1 ~]# /application/resin/bin/httpd.sh -server peng start Resin/3.1.13 started -server 'peng' for watchdog at 127.0.0.1:6921 [root@data-1-1 ~]# /application/resin/bin/httpd.sh -server peng01 start Resin/3.1.13 started -server 'peng01' for watchdog at 127.0.0.1:6922
查看的80端口是resin开通的: [root@data-1-1 ~]# lsof -i :80 COMMAND PID USER FD TYPE DEVICE SIZE/OFF NODE NAME java 27876 root 73u IPv6 2885724 0t0 TCP *:http (LISTEN) |
测试(此时是resin独立做web服务)
|
[root@data-1-1 ~]# curl http://www.peng.cc/test.jsp 99+1=100 [root@data-1-1 ~]# curl http://blog.peng.cc/test.jsp 99+1=100 [root@data-1-1 ~]# curl http://blog.peng.org/test.jsp 1+1=2 [root@data-1-1 ~]# curl http://www.peng.org/test.jsp 1+1=2 |
为resin配置别名功能
实现Apache前端多个域名对应后端一个或多个resin的域名。
|
265 <!--Create first virtual hosts at 20160112.--> 266 <host id="www.peng.org" root-directory="/application/resin/webapps"> 267 <host-alias>blog.peng.org</host-alias> <host-alias>bbs.peng.org</host-alias> |
为resin配置错误页面优雅显示
|
282 <error-page error-code='404' location='/tips/404.html'/> |
提示:以上配置在每个对应的resin host里都要配置。
演示过程如下:
|
[root@data-1-1 ~]# cd /application/resin/webapps/peng/ [root@data-1-1 peng]# mkdir tips [root@data-1-1 peng]# echo 'this is 404 error page!' >>tips/404.html [root@data-1-1 peng]# cat tips/404.html this is 404 error page! 提示:错误页面配置内容的根目录是resin站点的根目录,例如:/application/resin/webapps/peng
访问一个不存在的页面,客户端访问发现已经进行了404错误页面跳转了: [root@data-1-1 peng]# curl http://www.peng.org/b.jsp this is 404 error page! 提示:Windows客户端谷歌支持,IE和搜狗测试支持的不是很好。 |
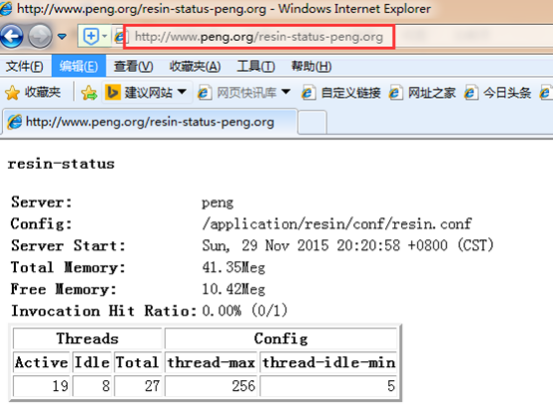
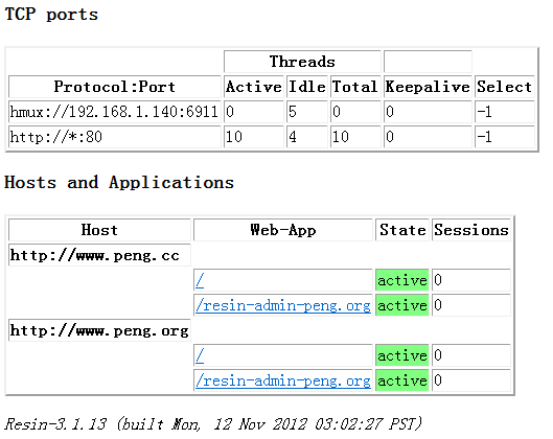
为resin配置状态信息显示页面
|
278 <servlet-mapping servlet-class='com.caucho.servlets.ResinStatusServlet'> 279 <url-pattern>/resin-status-peng.org</url-pattern> 280 <init enable="read"/> 281 </servlet-mapping> |
浏览器输入如下地址,查看显示结果:
http://www.peng.org/resin-status-peng.org


独立resin web服务与整合企业里如何选用?
Apache+resin
1)resin下的8080和8081端口要不要开启?
解答:看业务需求!
Apache+resin ==》提供服务
Resin+http80(内置web服务器)==》提供服务
2)如果开启了,实现了哪些功能?
解答:resin独立提供web服务。
3)关闭了,又有什么好处呢?
解答:Apache和resin一起工作,轻松,动静分离。
为resin配置管理页面
|
285 <web-app id="/resin-admin-peng.org" root-directory="${resin.home}/php/admin"> 286 <character-encoding>utf8</character-encoding> 287 <prologue> 288 <resin:set var="resin_admin_external" value="true"/> 289 <resin:set var="resin_admin_insecure" value="true"/> 290 </prologue> 291 <security-constraint> 292 <web-resource-collection> 293 <url-pattern>/*</url-pattern> 294 </web-resource-collection> 295 </security-constraint> 296 </web-app> |
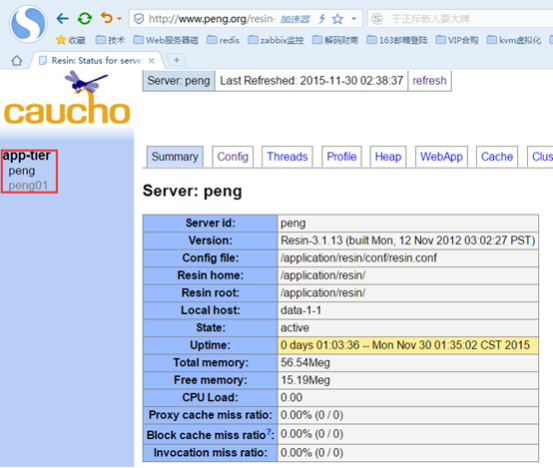
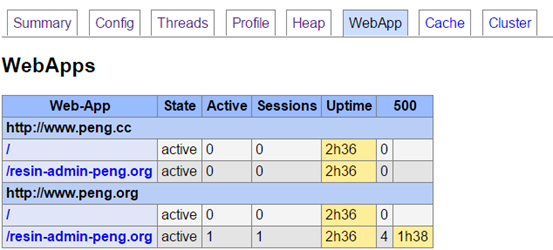
操作演示如下:
浏览器上输入地址:http://www.peng.org/resin-admin-peng.org/
出现如下界面:

在标红的地方输入用户名:peng 密码:redhat
出现如下内容:
The digest for user peng in realm resin is Ji1p9d0+6tX5O0iEGgnPMQ==
The following can now be set in the resin.conf file to enable administration functionality.
<resin xmlns="http://caucho.com">
<management path="admin">
<user name="peng" password="Ji1p9d0+6tX5O0iEGgnPMQ=="/>
...
</management>
...
</resin>
By default, access to the administration application is limited to the localhost. The default behaviour can be changed in the resin.conf file. To enable access to clients other than localhost:
<resin:set var="resin_admin_external" value="true"/>
Once the file has been updated, you can continue to the administration area.
When prompted, use the username and password you provided.
修改resin.conf配置文件(增加标黄的内容):
|
21 <management path="${resin.root}/admin"> 22 <user name="peng" password="Ji1p9d0+6tX5O0iEGgnPMQ==" disable="false"/> 23 24 <resin:if test="${resin.professional}"> 25 <deploy-service/> 26 <jmx-service/> 27 <log-service/> 28 <xa-log-service/> 29 </resin:if> 30 </management> |
重启服务:
|
[root@data-1-1 ~]# killall java [root@data-1-1 ~]# /application/resin/bin/httpd.sh -server peng start Resin/3.1.13 started -server 'peng' for watchdog at 127.0.0.1:6921 [root@data-1-1 ~]# /application/resin/bin/httpd.sh -server peng01 start Resin/3.1.13 started -server 'peng01' for watchdog at 127.0.0.1:6922 |
在浏览器界面填入相关信息点击提交:


