学习openstack(六)
VIII openstack(1)
传统的数据中心面临的问题:成本、效率(要快)、管理方面(物理机、云主机);
云计算:对运维需求总体量是减少了,尤其是硬件工程师,对运维的技术要求提高了;
云计算是个概念,指资源的使用模式;
云计算特点:必须通过网络使用;弹性计算(按需付费,现公有云已支持按s、m、h计费);对用户是透明的(用户不考虑后端的具体实现);
云计算分类:私有云、公有云(amazon是老大、aliyun、tingyun、tencentyun)、混合云;
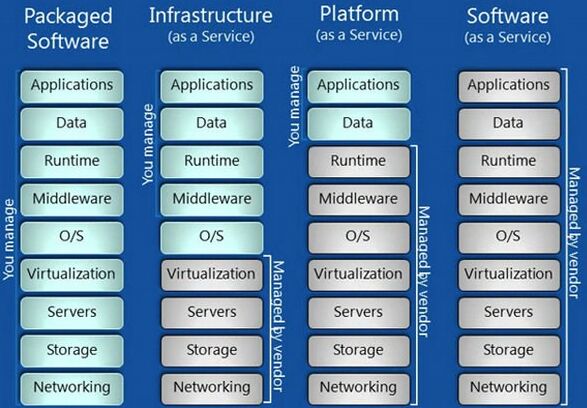
云计算分层:Iaas(infrastructure as a service)、Paas(platform as a service)、SaaS(software as a service);
注:
IaaS(也叫Hardware-as-a-Service,早期如果你想在办公室或者公司的网站上运行一些企业应用,你需要去买服务器,或者别的高昂的硬件来控制本地应用,让你的业务运行起来,现在有了IaaS,你可以将硬件外包到别的地方去,IaaS公司会提供场外服务器,存储和网络硬件,你可以租用,节省了维护成本和办公场地,公司可以在任何时候利用这些硬件来运行其应用;一些大的IaaS公司包括Amazon、Microsoft、VMWare、Rackspace、Red Hat,这些公司都有自己的专长,比如Amazon和微软给你提供的不只是IaaS,他们还会将其计算能力出租给你来host你的网站);
PaaS(有时也叫中间件,公司所有的开发都可以在这一层进行,节省了时间和资源,PaaS为公司在网上提供各种开发和分发应用的解决方案,比如虚拟服务器和操作系统,这节省了你在硬件上的费用,也让分散的工作室之间的合作变得更加容易,网页应用管理,应用设计,应用虚拟主机,存储,安全以及应用开发协作工具等;一些大的PaaS提供者有Google App Engine、Microsoft Azure、Force.com、Heroku、Engine Yard、AppFog、Mendix、Standing Cloud);
SaaS(这一层和我们的生活密切相关,我们大多时候是通过网页浏览器来接入,任何一个远程服务器上的应用都可以通过网络来运行,这就是SaaS,它是一种通过Internet提供软件的模式,厂商将应用软件统一部署在自己的服务器上,客户可以根据自己实际需求,通过互联网向厂商定购所需的应用软件服务,按定购的服务多少和时间长短向厂商支付费用,并通过互联网获得厂商提供的服务,用户不用再购买软件,而改用向提供商租用基于Web的软件,来管理企业经营活动,且无需对软件进行维护,服务提供商会全权管理和维护软件,软件厂商在向客户提供互联网应用的同时,也提供软件的离线操作和本地数据存储,让用户随时随地都可以使用其定购的软件和服务,对于许多小型企业来说,SaaS是采用先进技术的最好途径,它消除了企业购买、构建和维护基础设施和应用程序的需要,你消费的服务完全是从网页如Netflix、MOG、Google Apps、Box.net、Dropbox或者苹果的iCloud那里进入这些分类,尽管这些网页服务是用作商务和娱乐或者两者都有,但这也算是云技术的一部分;一些用作商务的SaaS应用包括Citrix的GoToMeeting、Cisco的WebEx、Salesforce的CRM、ADP、Workday、SuccessFactors);
注:百科中的云计算:
背景(云计算是继1980年代大型计算机到客户端-服务器的大转变之后的又一种巨变;云计算(Cloud Computing)是分布式计算(Distributed Computing)、并行计算(Parallel Computing)、效用计算(Utility Computing)、网络存储(Network Storage Technologies)、虚拟化(Virtualization)、负载均衡(LoadBalance)、热备份冗余(High Available)等传统计算机和网络技术发展融合的产物);云计算(cloud computing)是基于互联网的相关服务的增加、使用和交付模式,通常涉及通过互联网来提供动态易扩展且经常是虚拟化的资源(Cloud computing is a style of computing in which dynamically scalable and often virtualized resources are provided as a service over the Internet.);
美国国家标准与技术研究院(NIST)定义:云计算是一种按使用量付费的模式,这种模式提供可用的、便捷的、按需的网络访问,进入可配置的计算资源共享池(资源包括网络,服务器,存储,应用软件,服务),这些资源能够被快速提供,只需投入很少的管理工作,或与服务供应商进行很少的交互。XenSystem,以及在国外已经非常成熟的Intel和IBM,各种“云计算”的应用服务范围正日渐扩大,影响力也无可估量;
Cloud computing is a model for enabling ubiquitous, convenient, on-demand network access to a shared pool of configurable computing resources (e.g., networks, servers, storage,applications, and services) that can be rapidly provisioned and released with minimal management effort or service provider interaction.
云计算用到了虚拟化技术(提高了资源利用率、便捷性和可管理性更强);
虚拟化(完全虚拟化FV、半虚拟化PV);
KVM(kernel-based virtual machine,结构简单,包括两部分(设备驱动/dev/kvm;针对模拟PC硬件的用户空间组件),KVM只支持FV,需要CPU中硬件虚拟化的支持,只可在有硬件虚拟化的CPU上运行,即具有VT功能的intel cpu和具有amd-v功能的amd cpu);
KVM虚拟化特性(嵌入到Linux正式kernel(提高兼容性);代码级资源调用(提高性能);虚拟机就是一个进程(内存易于管理);直接支持numa技术(提高扩展性);redhat已收购,更好的服务支持及商业保障;保持开源发展模式);
[root@server1 ~]# egrep --color 'vmx|svm'/proc/cpuinfo #(intel-vt关键字为vmx,amd-v关键字svm)
http://www.openstack.org/
openstack的诞生(nova、swift,a way for the rest of the world to compete with Amazon);
openstack的使命(to produce the ubiquitous open source cloud computing platform that will meet the needs of public and private clouds regardless of size,by being simple to implement and massively scalable);
openstack发展过程(austin(2010.10);bexar(2011.2);cactus(2011.4);diablo(2011.10);essex(2012.4);folsom(2012.9);grizzly(2013.4);havana(2013.10);icehouse(2014.4);juno(2014.10);kilo(2015.4);liberty;mitaka;newton);
注:从havana版本开始网络管理由quantum更名为neutron;openstack每隔6个月发布一次新版
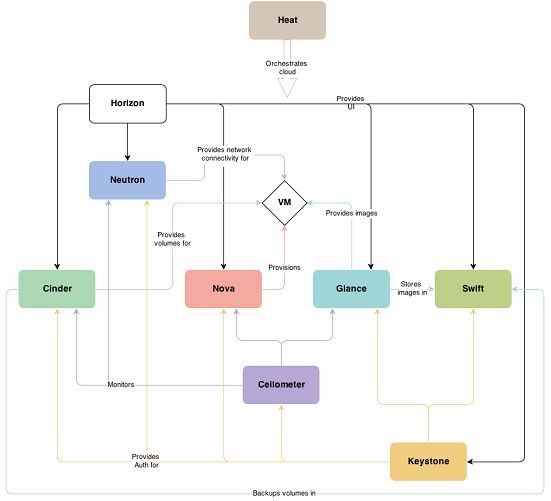
icehouse included components组件:nova、neutron、cinder、glance、swift、horizon、keystone、ceilometer、heat、trove:
|
服务名称 |
项目名称 |
描述 |
|
Dashboard |
Horizon |
基于openstack api接口使用django开发的web管理界面 |
|
Compute |
Nava |
通过虚拟化技术提供计算资源池 |
|
Networking |
Neutron |
实现了虚拟机的网络资源管理 |
|
Storage: |
||
|
Object storage |
Swift |
对象存储,适用于一次写入多次读取 |
|
Block storage |
Cinder |
块存储,提供存储资源池 |
|
Shared services: |
||
|
Identity service |
Keystone |
认证管理 |
|
Image service |
Glance |
提供虚拟镜像的注册和存储管理 |
|
Telemetry |
Ceilometer |
提供监控和数据采集、计量服务 |
|
High-level services: |
||
|
Orchestration |
Heat |
自动化部署 |
|
Database service |
Trove |
提供数据库应用服务 |
openstack三大核心组件:nova(coumpute service计算服务);neutron(networking service网络服务);cinder(block storage块存储);
其它组件:keystone(identity service认证服务);horizon(dashboard仪表板,web界面);glance(image service镜像服务);
基础服务:MySQL;rabbitmq(组件间通信的交通枢杻);
language:python(68%);XML(16%);javascript(5%);other(11%);
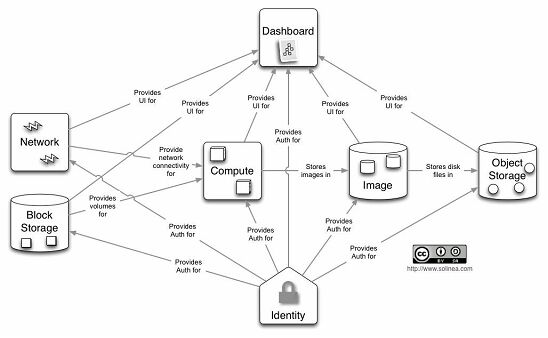
openstack概念架构:
openstack概念图:
SOA,service oriented architecture面向服务的体系结构,是一个组件模型,它将应用程序的不同功能单元(称为服务)通过这些服务之间定义良好的接口和契约联系起来,接口是采用中立的方式进行定义的,它应该独立于实现服务的硬件平台、操作系统和编程语言,这使得构建在各种这样的系统中的服务可以以一种统一和通用的方式进行交互;SOA,它可以根据需求通过网络对松散耦合的粗粒度应用组件进行分布式部署、组合和使用,服务层是SOA的基础,可以直接被应用调用,从而有效控制系统中与软件代理交互的人为依赖性;SOA是一种粗粒度、松耦合服务架构,服务之间通过简单、精确定义接口进行通讯,不涉及底层编程接口和通讯模型,SOA可以看作是B/S模型、XML(标准通用标记语言的子集)/WebService技术之后的自然延伸;SOA将能够帮助软件工程师们站在一个新的高度理解企业级架构中的各种组件的开发、部署形式,它将帮助企业系统架构者以更迅速、更可靠、更具重用性架构整个业务系统,较之以往,以SOA架构的系统能够更加从容地面对业务的急剧变化;
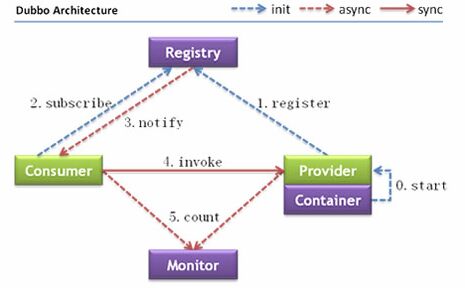
DUBBO是一个分布式服务框架,致力于提供高性能和透明化的RPC远程服务调用方案,是阿里巴巴SOA服务化治理方案的核心框架,每天为2,000+个服务提供3,000,000,000+次访问量支持,并被广泛应用于阿里巴巴集团的各成员站点;
Provider: 暴露服务的服务提供方。
Consumer: 调用远程服务的服务消费方。
Registry: 服务注册与发现的注册中心。
Monitor: 统计服务的调用次调和调用时间的监控中心。
Container: 服务运行容器。
0. 服务容器负责启动,加载,运行服务提供者。
1. 服务提供者在启动时,向注册中心注册自己提供的服务。
2. 服务消费者在启动时,向注册中心订阅自己所需的服务。
3. 注册中心返回服务提供者地址列表给消费者,如果有变更,注册中心将基于长连接推送变更数据给消费者。
4. 服务消费者,从提供者地址列表中,基于软负载均衡算法,选一台提供者进行调用,如果调用失败,再选另一台调用。
5. 服务消费者和提供者,在内存中累计调用次数和调用时间,定时每分钟发送一次统计数据到监控中心。
(1)keystone;(2)glance;(3)nova;(4)neutron
注:keystone和glance都是共享服务;
(1)
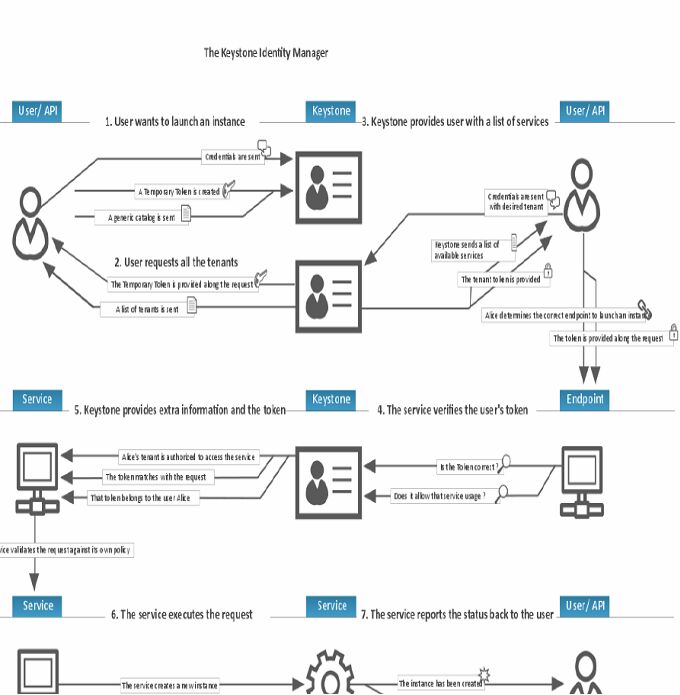
openstack验证服务identity service(keystone:用户认证;服务目录):
要将openstack的所有组件注册到keystone服务上,keystone可以追踪每一个组件并在网络中定位该组件服务的位置;
用户认证(用户权限和用户行为跟踪,跟踪用户及其权限):
user(一个人、系统或服务在openstack中的数字表示,已经登录的用户分配令牌环以访问资源,用户可以直接分配给特定的租户,像隶属于每个组;user可被添加到任意一个全局的或租户内的角色中,在全局role中,用户的role权限作用于所有的租户,即可对所有的租户执行role规定的权限;在租户内的role中,用户仅能在当前租户内执行role规定的权限);
tenatnt(租户,一个组织或孤立资源的容器,租户可以组织或隔离认证对象,根据服务运营的要求,一个租户可以映射到客户、账户、组织或项目);
token(令牌,一个用于访问openstack api和资源的字母数字字符串,某个令牌可以随时撤销,也可在一段时间内有效);
role(角色,代表一组用户可访问的资源权限,定制化的包含特定用户权限和特权权限的集合,如nova中的VM,glance中的image);
credential(凭证,用于确认用户身份的数据,如用户名和密码,用户名和api key,认证服务提供的身份验证令牌);
authentication(验证,确认用户身份的过程);
服务目录(提供一个服务目录,包括所有服务项与相关api的endpoint端点):
service(服务,如nova、glance、swift,一个服务可以确认当前用户是否具有访问其资源的权限,但当一个user尝试访问其租户内的service时,它必须知道这个service是否存在及如何访问这个service);
endpoint(端点,可理解为它是一个服务暴露出来的访问点,如果需要访问一个服务,则必须知道它的endpoint,endpoint的每个URL都对应一个服务实例的访问地址,且具有public、private、admin这三种权限,public url可被全局访问,privateurl只能被LAN访问,admin url被从常规的访问中分离);
keystone client(keystone命令行工具,通过该工具可创建用户、角色、服务、端点);
通过admin token连到keystone上,创建用户,创建好用户后就不要再使用admin token了;
使用keystone有两种方式:
类似在CLI下使用mysql,如#mysql -uUSERNAME-pPASSWORD -hIP_ADDR;
在环境变量中设好用户名和密码(keystone的环境变量中设有:用户名、密码、endpoint(keystone的API访问方式)),直接执行命令即可;
(2)
glance镜像服务image service(glance-api、glance-registry、image store):
glance使用户能发现、注册、检索虚拟机镜像(.img文件);它提供了一个REST api接口,使用户可以查询VM image metadata和检索一个实际的镜像文件;不论是简单的文件存储还是openstack对象存储,都可以通过glance服务在不同的位置存储虚拟机镜像;默认上传的VM镜像存储路径为/var/lib/glance/imgaes/;
glance-api(一个用来接受镜像发现、检索和存储的api接口;接受云系统镜像的创建、删除、读取请求;接收RESTapi的请求,功能上类似nova api,都是接收REST api请求,然后通过其它模块glanceregistry和image store来完成诸如镜像的查找、获取、上传、删除等操作;glance api默认port为9292);
glance-registry(用来存储、处理、检索镜像的metadata(元数据包含对象的大小和类型);glanceregistry是一个openstack镜像服务使用的内部服务,不能透露给用户;云系统的镜像注册服务;与DB交互,支持大多数数据库,MySQL orSQLite,DB用于存储镜像的元数据metadata(大小、类型),提供镜像元数据相关的REST接口;glance registry的port为9191;在DB中有两张表,image和image property,image保存镜像格式、大小等信息,image property主要保存镜像的定制化信息);
image store(存储可在本地,也可在分布式存储上;image store是一个存储接口层,通过这个接口,glance可获取镜像,image store支持的存储有amazon'sS3、openstack本身的swift、ceph、sheepdog、glusterfs等;image store是镜像保存与获取的接口,它仅仅是一个接口层,具体的实现要外部的存储支持);
storage repository for image files(镜像文件的存储仓库,支持包括普通FS在内的各种存储类型,包括对象存储、RADOS块设备、http、amazon的S3,但有些存储只支持只读访问);
(3)
nova计算服务compute service(API;compute core;networking forVMs;console interface;image management(EC2 scenario);command-line clients and other interfaces;other components):
早期glance、neutron、cinder都是nova的组件,后拆分成独立的组件;
compute service用于计算主机和管理云计算系统,是IaaS的重要组成部分;主要模块使用python语言实现;
nova compute通过MQ接收并管理VM的生命周期,nova compute通过libvirt管理KVM,通过xenAPI管理xen,通过vCenterAPI管理vmware;
openstack中,计算节点不能随便改主机名,若改动后会被自动识别为新的计算节点,之前的计算节点会被干掉;
API(API包括nova-api service和nova-api-metadata service;nova-api service,接收并响应终端用户计算API调用(终端用户外部调用),支持openstack api、amazon EC2 api和特殊的管理特权API;nova-api-metadataservice,接受从实例元数据发来的请求,该服务通常与nova-network服务在安装多主机模式下运行);
compute core(包括nova-compute service、nova-schedulerservice、nova-conductor module;nova-compute service,一个守护进程,通过虚拟化层API接口创建和终止虚拟机实例,如XenAPI for XenServer/XCP,libvirt for KVM or QEMU,VMwareAPI for VMware;nova-schedulerservice,用于云主机调度,从队列中获取虚拟机实例请求,并计算由哪台计算服务运行该虚拟机;nova-conductor module,计算node访问数据的中间件,协调nova-compute service和DB之间交互数据,避免nova-compute service直接访问云DB,不要将该模块部署在nova-compute运行的node上);
networking for VMs(包括nova-network worker daemon、nova-consoleauth daemon、nova-novncproxy daemon、nova-spicehtml5proxy、nova-cert daemon;nova-networkworker daemon,类似nova-compute service,接受来自队列的网络任务和操作网络,如网卡bridge或改变iptables规则;nova-consoleauth daemon,在控制台代理提供用户授权令牌;nova-novncproxy daemon,提供了一个通过vnc连接来访问运行的虚拟机实例的代理,支持基于browser的novnc客户端;nova-spicehtml5proxy,提供了一个通过spice连接来访问运行的虚拟机实例的代理,支持基于browser的html5客户端;nova-cert deamon,x509证书);
image management(EC2scenario)(包括nova-objectstoredaemon、euca2ools client;nova-objectstore daemon,一个amazon S3的接口,用于将amazon S3的镜像注册到openstack;euca2oolsclient,用于兼容amazon E2接口的命令行工具);
command-line clients andother interfaces(nova client,nova命令行工具);
other components(包括the queue、SQL database;the queue,在进程之间传递消息的中心,通过使用rabbitmq;SQL database,保存云基础设置建立和运行时的状态信息);
openstack-nova-api(nova-api组件实现了RESTful API功能,是外部访问nova的唯一途径;接收外部请求并通过MQ将请求发送给其它服务组件,同时也兼容EC2 API,所以也可用EC2的管理工具对nova进行日常管理);
openstack-nova-scheduler(用于云主机调度;该模块作用,决定VM创建在哪个compute node上;决策一个VM应调度到某物理节点,分两步:filter和计算权值weight;filter scheduler首先得到未经过过滤的主机列表,然后根据过滤属性,选择服务条件的compute node主机;经过主机过滤后,需要对主机进行权值的计算,根据策略选择相应的某一台主机,对于每一个要创建的虚拟主机而言,优先选择剩余资源多的主机node存放VM);
openstack-nova-cert(负责身份认证);
openstack-nova-conductor(计算node访问数据的中间件,协调nova-computeservice和DB之间交互数据,避免nova-compute service直接访问云DB,不要将该模块部署在nova-compute运行的node上)
openstack-nova-console(在控制台代理提供用户授权令牌)
openstack-nova-novncproxy(提供了一个通过vnc连接来访问运行的虚拟机实例的代理,支持基于browser的novnc客户端)
注:应用过程中,会出现找不到有效的主机,看nova-scheduler的日志,是资源不够还是其它原因
(4)
neutron网络组件networking component(openstacknetworking;nova-network networkingservice):
演变(nova-network-->quantum-->neutron);
openstack networking(neutron,支持为每一个实例配置多种网络类型;包含支持虚拟网络的各种插件);
nova-network networkingservice(只能为每一个实例配置单一网络类型;提供基本网络功能);
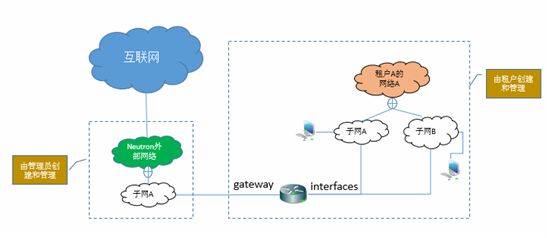
网络(在实际的物理环境下,使用switch把多个计算机连接起来形成了网络,在neutron世界里,网络也是将多个不同的云主机连接起来;neutron网络的目的是,为openstack云更灵活地划分物理网络,在多租户环境下提供给每个租户独立的网络环境,另,neutron提供api来实现这种目标;neutron中网络是一个可以被用户创建的对象,如果要和物理环境下的概念映射的话,这个对象相当于一个巨大的switch,可以拥有无限多个动态可创建和销毁的虚拟端口);
端口(在实际的物理环境下,每个子网或每个网络都有很多端口,端口是用于连接设备进入网络的地方,如switch的端口供计算机连接,在neutron世界里也一样,有类似的功能,云主机的网卡会对应到一个端口上,它是路由器和虚拟机挂接网络的着附点);
路由器(在实际的物理环境下,不同网络或不同逻辑子网间若要通信,需要通过路由器进行路由;neutron中的路由也一样,是一个路由选择和转发部件,用来连接不同的网络或子网,在neutron中可创建和销毁软部件);
子网(在实际物理环境下,在一个网络中可划分多个逻辑子网,子网是由一组IP组成的地址池,不同子网间的通信需要路由器的支持;在neutron世界里一样,neutron中子网隶属于网络);
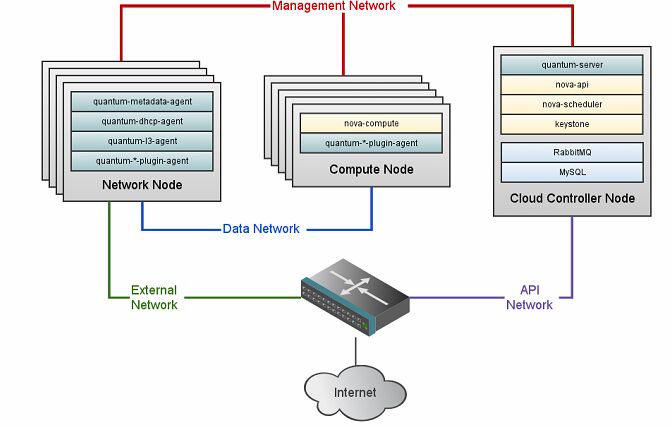
公共网络(向租户提供访问和api调用);
管理网络(云中物理机之间的通信);
存储网络(云中存储的网络,如iSCSI或glusterfs使用);
服务网络(虚拟机内部使用的网络);
neutron网络的一种典型结构:
openstack网络模型:
OpenStack虚拟网络Neutron把部分传统网络管理的功能推到了租户方,租户通过它可以创建一个自己专属的虚拟网络及其子网,创建路由器等等,在虚拟网络功能的帮助下,基础物理网络就可以向外提供额外的网络服务了,比如租户完全可以创建一个属于自己的类似于数据中心网络的虚拟网络;Neutron 提供了比较完善的多租户环境下的虚拟网络模型以及 API;像部署物理网络一样,使用 Neutron 创建虚拟网络时也需要做一些基本的规划和设计
icehouse加入ML2 plugin(module layer2;实现agent间代码共用;使得不同的主机使用不同的网络类型multi-vender-support,使不同的网络类型共存,如linuxbridge和openvswitch和其它;实现不同的网络拓扑,之前要么VLAN,要么GRE,要么FLAT单一平面网络);
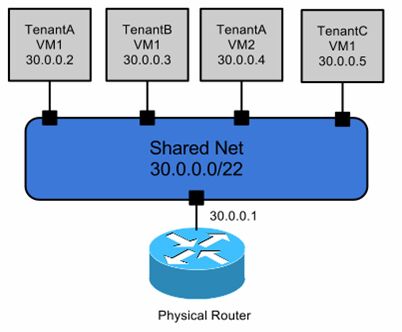
上图,FLAT单一平面网络(物理机和VM在一个网络中;生产中用于255台以下的VM;缺点(存在单一网络瓶颈,缺乏可伸缩性;缺乏合适的多租户隔离)
(5)dashboard仪表板,代号horizon:
theopenstack dashboard(horizon)provides a baseline userinterface for managing openstack services.
horizonnotes:stateless;error handling is delegated toback-end;doesn't support allapi functions;can use memcached ordatabase to store sessions;gets updated vianova-api polling;
horizon是一个允许管理和普通用户管理openstack各种资源和服务的web界面;通过openstack apis使web界面与openstack计算云控制器进行交互;horizon允许自定义;horizon提供了一组核心类库和可重复利用的模板及工具;
安装先决条件:安装openstackcompute(nova)和identity service(keystone);安装python2.6或2.7,必须支持django;browser必须支持HTML5,并启用cookies和javascript功能;
(6)cinder:
nova-volume(nova-volume manages thecreation,attaching and detaching of persistent volumes to compute instances;optional;iSCSI solution which uses LVM;volume can be attached only to 1instance at a time;persistent volumeskeep their state independent of instances;withinsingle openstack deployment different storage providers cannot be used;nova-volume drivers(iSCSI;Xen storage manager;nexenta;netapp;san);
###########################################################################################
VIII openstack(2)
操作openstack icehouse:
准备:
控制节点:linux-node1.example.com(eth0:10.96.20.118;eth1:192.168.10.118);
计算节点:linux-node2.example.com(eth0:10.96.20.119;eth1:192.168.10.119);
两台主机均开启虚拟化功能:IntelVT-x/EPT或AMD-V/RVI
http://mirrors.aliyun.com/repo/Centos-6.repo
http://mirrors.ustc.edu.cn/epel/6/x86_64/epel-release-6-8.noarch.rpm(或http://dl.fedoraproject.org/pub/epel/6/x86_64/epel-release-6-8.noarch.rpm)
https://www.rdoproject.org/repos/rdo-release.rpm
https://repos.fedorapeople.org/repos/openstack/
https://repos.fedorapeople.org/repos/openstack/EOL/ #(openstack yum源位置)
[root@linux-node1 ~]# uname -rm
2.6.32-431.el6.x86_64 x86_64
[root@linux-node1 ~]# cat /etc/redhat-release
Red Hat Enterprise Linux Server release 6.5(Santiago)
#yum -y install yum-plugin-priorities #(防止高优先级软件被低优先级软件覆盖)
#yum -y install openstack-selinux #(openstack可自动管理SELinux)
关闭iptables;关闭selinux;时间同步;
两个node均操作:
[root@linux-node1 ~]# rpm -ivh http://mirrors.ustc.edu.cn/epel/6/x86_64/epel-release-6-8.noarch.rpm
[root@linux-node1 ~]# wget -O /etc/yum.repos.d/CentOS-Base.repo http://mirrors.aliyun.com/repo/Centos-6.repo
[root@linux-node1 ~]# vim /etc/yum.repos.d/CentOS-Base.repo
:%s/$releasever/6/g
[root@linux-node1 ~]# yum clean all
[root@linux-node1 ~]# yum makecache
[root@linux-node1 ~]# yum -y install python-pip gcc gcc-c++ make libtool patch auto-make python-devel libxslt-devel MySQL-python openssl-devel libudev-devel libvirt libvirt-python git wget qemu-kvm gedit python-numdisplay python-eventlet device-mapper bridge-utils libffi-devel libffi
[root@linux-node1 ~]# cd /etc/yum.repos.d
[root@linux-node1 yum.repos.d]# yum install -y https://www.rdoproject.org/repos/rdo-release.rpm
[root@linux-node1 yum.repos.d]# vim rdo-release.repo #(此文件是支持最新版本mitaka,改为icehouse版本的地址)
[openstack-icehouse]
name=OpenStack Icehouse Repository
baseurl=https://repos.fedorapeople.org/repos/openstack/EOL/openstack-icehouse/epel-6/
#baseurl=http://mirror.centos.org/centos/7/cloud/$basearch/openstack-mitaka/
gpgcheck=0
enabled=1
#gpgkey=file:///etc/pki/rpm-gpg/RPM-GPG-KEY-CentOS-SIG-Cloud
[root@linux-node1 yum.repos.d]# yum cleanall
[root@linux-node1 yum.repos.d]# yum makecache
(一)
node1控制节点操作(安装基础软件MySQL、rabbitmq):
生产中MySQL要做集群,除horizon外openstack的其它组件都要连接MySQL,有nova、neutron、cinder、glance、keystone;
除horizon和keystone外,openstack的其它组件都要连接rabbitmq;openstack常用的消息代理软件有:rabbitmq、qpid、zeromq;
[root@linux-node1 ~]# yum -y install mysql-server
[root@linux-node1 ~]# cp /usr/share/mysql/my-large.cnf /etc/my.cnf
cp: overwrite `/etc/my.cnf'? y
[root@linux-node1 ~]# vim /etc/my.cnf #(innodb_file_per_table每表一个表空间,默认是共享表空间;在zabbix中要用独享表空间,数据量很大,若用共享表空间后续优化很困难)
[mysqld]
default-storage-engine=InnoDB
innodb_file_per_table=1
init_connect='SET NAMESutf8'
default-character-set=utf8
default-collation=utf8_general_ci
[root@linux-node1 ~]# service mysqld start
Starting mysqld: [ OK ]
[root@linux-node1 ~]# chkconfig mysqld on
[root@linux-node1 ~]# chkconfig --listmysqld
mysqld 0:off 1:off 2:on 3:on 4:on 5:on 6:off
[root@linux-node1 ~]# netstat -tnulp | grep:3306
tcp 0 0 0.0.0.0:3306 0.0.0.0:* LISTEN 11215/mysqld
[root@linux-node1 ~]# mysqladmin create nova #(分别为要安装的服务授权本地和远程两个账户)
[root@linux-node1 ~]# mysql -e "grant all on nova.* to 'nova'@'localhost' identified by 'nova'"
[root@linux-node1 ~]# mysql -e "grant all on nova.* to 'nova'@'%' identifiedby 'nova'"
[root@linux-node1 ~]# mysqladmin create neutron
[root@linux-node1 ~]# mysql -e "grant all on neutron.* to'neutron'@'localhost' identified by 'neutron'"
[root@linux-node1 ~]# mysql -e "grant all on neutron.* to 'neutron'@'%' identified by 'neutron'"
[root@linux-node1 ~]# mysqladmin create cinder
[root@linux-node1 ~]# mysql -e "grant all on cinder.* to 'cinder'@'localhost' identified by 'cinder'"
[root@linux-node1 ~]# mysql -e "grant all on cinder.* to 'cinder'@'%' identified by 'cinder'"
[root@linux-node1 ~]# mysqladmin create keystone
[root@linux-node1 ~]# mysql -e "grant all on keystone.* to 'keystone'@'localhost' identified by 'keystone'"
[root@linux-node1 ~]# mysql -e "grant all on keystone.* to 'keystone'@'%' identified by 'keystone'"
[root@linux-node1 ~]# mysqladmin create glance
[root@linux-node1 ~]# mysql -e "grant all on glance.* to 'glance'@'localhost' identified by 'glance'"
[root@linux-node1 ~]# mysql -e "grant all on glance.* to 'glance'@'%' identified by 'glance'"
[root@linux-node1 ~]# mysqladmin flush-privileges
[root@linux-node1 ~]# mysql -e 'use mysql;select User,Host from user;'
+----------+-------------------------+
| User | Host |
+----------+-------------------------+
| cinder | % |
| glance | % |
| keystone | % |
| neutron | % |
| nova | % |
| root | 127.0.0.1 |
| | linux-node1.example.com |
| root | linux-node1.example.com |
| | localhost |
| cinder | localhost |
| glance | localhost |
| keystone | localhost |
| neutron | localhost |
| nova | localhost |
| root | localhost |
+----------+-------------------------+
[root@linux-node1 ~]# yum -y install rabbitmq-server
[root@linux-node1 ~]# service rabbitmq-server start
Starting rabbitmq-server: SUCCESS
rabbitmq-server.
[root@linux-node1 ~]# chkconfig rabbitmq-server on
[root@linux-node1 ~]# chkconfig --list rabbitmq-server
rabbitmq-server 0:off 1:off 2:on 3:on 4:on 5:on 6:off
[root@linux-node1 ~]# /usr/lib/rabbitmq/bin/rabbitmq-plugins list
[ ] amqp_client 3.1.5
[ ] cowboy 0.5.0-rmq3.1.5-git4b93c2d
[ ] eldap 3.1.5-gite309de4
[ ] mochiweb 2.7.0-rmq3.1.5-git680dba8
[ ] rabbitmq_amqp1_0 3.1.5
[ ] rabbitmq_auth_backend_ldap 3.1.5
[ ] rabbitmq_auth_mechanism_ssl 3.1.5
[ ] rabbitmq_consistent_hash_exchange 3.1.5
[ ] rabbitmq_federation 3.1.5
[ ] rabbitmq_federation_management 3.1.5
[ ] rabbitmq_jsonrpc 3.1.5
[ ] rabbitmq_jsonrpc_channel 3.1.5
[ ] rabbitmq_jsonrpc_channel_examples 3.1.5
[ ]rabbitmq_management 3.1.5
[ ] rabbitmq_management_agent 3.1.5
[ ] rabbitmq_management_visualiser 3.1.5
[ ] rabbitmq_mqtt 3.1.5
[ ] rabbitmq_shovel 3.1.5
[ ] rabbitmq_shovel_management 3.1.5
[ ] rabbitmq_stomp 3.1.5
[ ] rabbitmq_tracing 3.1.5
[ ] rabbitmq_web_dispatch 3.1.5
[ ] rabbitmq_web_stomp 3.1.5
[ ] rabbitmq_web_stomp_examples 3.1.5
[ ] rfc4627_jsonrpc 3.1.5-git5e67120
[ ] sockjs 0.3.4-rmq3.1.5-git3132eb9
[ ] webmachine 1.10.3-rmq3.1.5-gite9359c7
[root@linux-node1 ~]# /usr/lib/rabbitmq/bin/rabbitmq-plugins enable rabbitmq_management #(启用web管理)
The following plugins have been enabled:
mochiweb
webmachine
rabbitmq_web_dispatch
amqp_client
rabbitmq_management_agent
rabbitmq_management
Plugin configuration has changed. RestartRabbitMQ for changes to take effect.
[root@linux-node1 ~]# service rabbitmq-server restart
Restarting rabbitmq-server: SUCCESS
rabbitmq-server.
[root@linux-node1 ~]# netstat -tnulp | grep:5672
tcp 0 0 :::5672 :::* LISTEN 11760/beam
[root@linux-node1 ~]# netstat -tnulp | grep5672 #(15672和55672用于web界面,若用55672登录会自动跳转至15672)
tcp 0 0 0.0.0.0:15672 0.0.0.0:* LISTEN 11760/beam
tcp 0 0 0.0.0.0:55672 0.0.0.0:* LISTEN 11760/beam
tcp 0 0 :::5672 :::* LISTEN 11760/beam
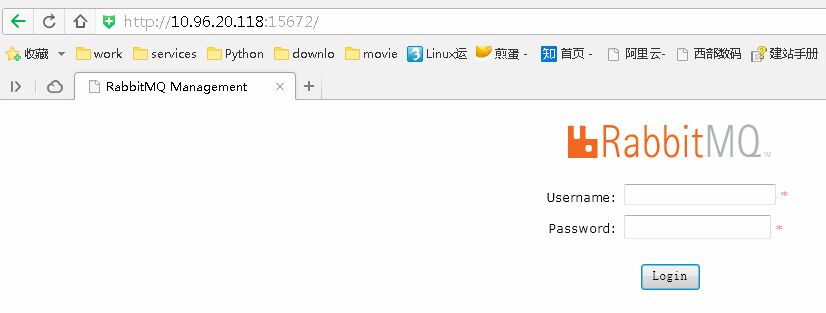
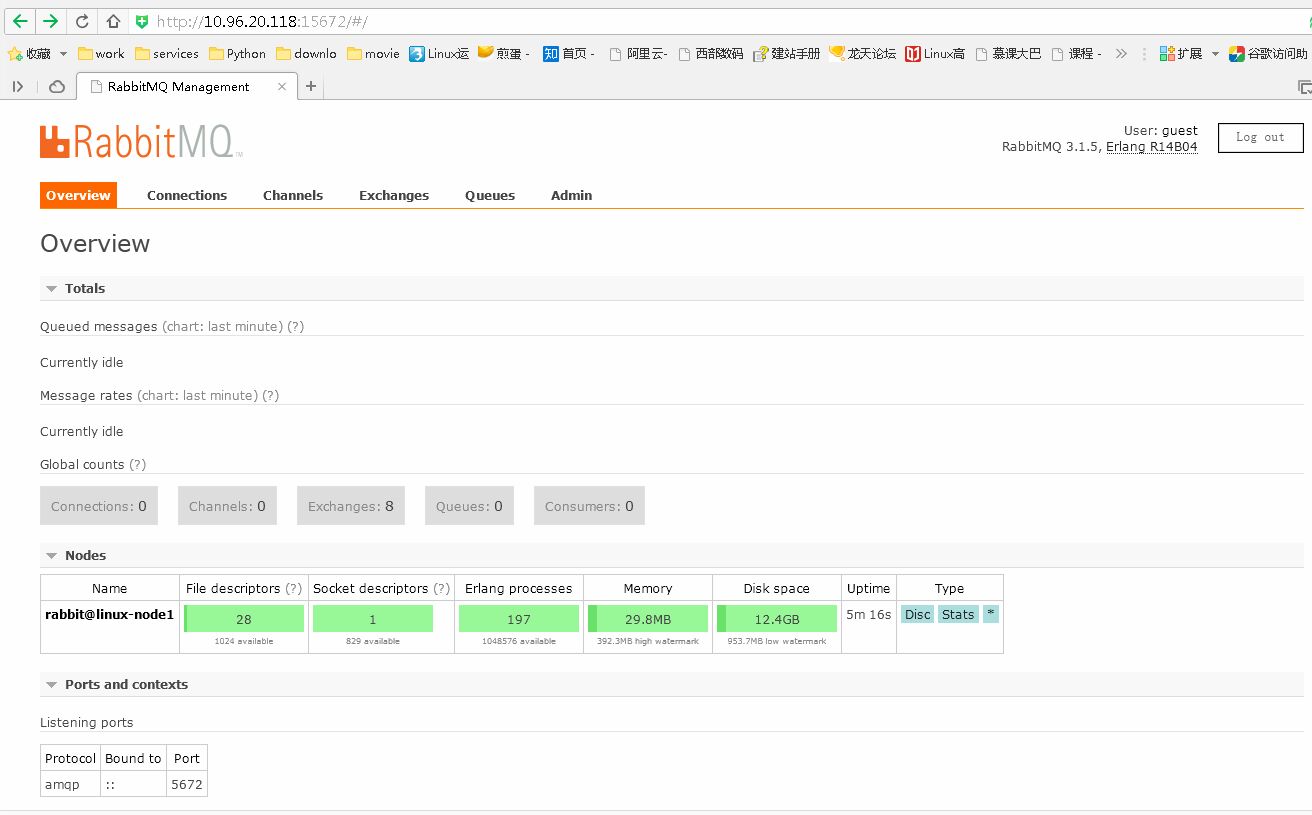
http://10.96.20.118:15672/ #(username、password默认均是guest,可通过#rabbitmqctlchange_password guest NEW_PASSWORD更改密码,如果执行修改,同时要修改rabbitmq的配置文件中的rabbit_password,还有openstack各组件服务配置文件中的默认密码;下方HTTP API用于做监控)
(二)
node1控制节点操作(安装配置keystone):
[root@linux-node1 ~]# yum -y install openstack-keystone python-keystoneclient
[root@linux-node1 ~]# id keystone
uid=163(keystone) gid=163(keystone)groups=163(keystone)
[root@linux-node1 ~]# keystone-manage pki_setup --keystone-user keystone --keystone-group keystone #(常见通用证书的密钥,并限制相关文件的访问权限)
Generating RSA private key, 2048 bit longmodulus
.................................................................................................................+++
.............................................................................................................+++
e is 65537 (0x10001)
Generating RSA private key, 2048 bit longmodulus
...............+++
.....................................................+++
e is 65537 (0x10001)
Using configuration from/etc/keystone/ssl/certs/openssl.conf
Check that the request matches thesignature
Signature ok
The Subject's Distinguished Name is asfollows
countryName :PRINTABLE:'US'
stateOrProvinceName :ASN.1 12:'Unset'
localityName :ASN.1 12:'Unset'
organizationName :ASN.1 12:'Unset'
commonName :ASN.1 12:'www.example.com'
Certificate is to be certified until Sep 2502:29:07 2026 GMT (3650 days)
Write out database with 1 new entries
Data Base Updated
[root@linux-node1 ~]# chown -R keystone:keystone /etc/keystone/ssl/
[root@linux-node1 ~]# chmod -R o-rwx /etc/keystone/ssl/
[root@linux-node1 ~]# vim /etc/keystone/keystone.conf #(admin_token为初始管理令牌,生产中admin_token的值要是随机数,#openssl rand -hex 10;connection配置数据库访问;provider配置UUID提供者;driver配置SQL驱动)
[DEFAULT]
admin_token=ADMIN
debug=true
verbose=true
log_file=/var/log/keystone/keystone.log
[database]
connection=mysql://keystone:keystone@localhost/keystone
[token]
provider=keystone.token.providers.uuid.Provider
driver=keystone.token.backends.sql.Token
[root@linux-node1 ~]# keystone-manage db_sync #(建立keystone的表结构,初始化keystone数据库,是用root同步的数据)
[root@linux-node1 ~]# chown -R keystone:keystone /var/log/keystone/ #(同步数据用的是root,日志文件属主要为keystone,否则启动会报错)
[root@linux-node1 ~]# mysql -ukeystone -pkeystone -e 'use keystone;show tables;'
+-----------------------+
| Tables_in_keystone |
+-----------------------+
| assignment |
| credential |
| domain |
| endpoint |
| group |
| migrate_version |
| policy |
| project |
| region |
| role |
| service |
| token |
| trust |
| trust_role |
| user |
| user_group_membership |
+-----------------------+
[root@linux-node1 ~]# service openstack-keystone start
Starting keystone: [ OK ]
[root@linux-node1 ~]# chkconfig openstack-keystone on
[root@linux-node1 ~]# chkconfig --list openstack-keystone
openstack-keystone 0:off 1:off 2:on 3:on 4:on 5:on 6:off
[root@linux-node1 ~]# netstat -tnlp | egrep '5000|35357' #(35357为keystone的管理port)
tcp 0 0 0.0.0.0:35357 0.0.0.0:* LISTEN 16599/python
tcp 0 0 0.0.0.0:5000 0.0.0.0:* LISTEN 16599/python
[root@linux-node1 ~]# less /var/log/keystone/keystone.log #(public_bind_host为0.0.0.0,admin_bind_host为0.0.0.0,computer_port为8774与nova相关)
[root@linux-node1 ~]# keystone --help
[root@linux-node1 ~]# export OS_SERVICE_TOKEN=ADMIN #(配置初始管理员令牌)
[root@linux-node1 ~]# export OS_SERVICE_ENDPOINT=http://10.96.20.118:35357/v2.0 #(配置端点)
[root@linux-node1 ~]# keystone role-list
+----------------------------------+----------+
| id | name |
+----------------------------------+----------+
| 9fe2ff9ee4384b1894a90878d3e92bab | _member_ |
+----------------------------------+----------+
[root@linux-node1 ~]# keystone tenant-create --name admin --description "Admin Tenant" #(创建admin租户)
+-------------+----------------------------------+
| Property | Value |
+-------------+----------------------------------+
| description | Admin Tenant |
| enabled | True |
| id | d14e4731327047c58a2431e9e2221626 |
| name | admin |
+-------------+----------------------------------+
[root@linux-node1 ~]# keystone user-create --name admin --pass admin --email admin@linux-node1.example.com #(创建admin用户)
+----------+----------------------------------+
| Property | Value |
+----------+----------------------------------+
| email | admin@linux-node1.example.com |
| enabled | True |
| id | 4e907efbf23b42ac8da392d1a201534c|
| name | admin |
| username | admin |
+----------+----------------------------------+
[root@linux-node1 ~]# keystone role-create --name admin #(创建admin角色)
+----------+----------------------------------+
| Property | Value |
+----------+----------------------------------+
| id | f175bdcf962e4ba0a901f9eae1c9b8a1|
| name | admin |
+----------+----------------------------------+
[root@linux-node1 ~]# keystone user-role-add --tenant admin --user admin --role admin #(添加admin用户到admin角色)
[root@linux-node1 ~]# keystone role-create --name _member_
+----------+----------------------------------+
| Property | Value |
+----------+----------------------------------+
| id | 9fe2ff9ee4384b1894a90878d3e92bab |
| name | _member_ |
+----------+----------------------------------+
[root@linux-node1 ~]# keystone user-role-add --tenant admin --user admin --role _member_ #(添加admin租户和用户到_member_角色)
[root@linux-node1 ~]# keystone tenant-create --name demo --description "Demo Tenant" #(创建一个用于演示的demo租户)
+-------------+----------------------------------+
| Property | Value |
+-------------+----------------------------------+
| description | Demo Tenant |
| enabled | True |
| id | 5ca17bf131f3443c81cf8947a6a2da03 |
| name | demo |
+-------------+----------------------------------+
[root@linux-node1 ~]# keystone user-create --name demo --pass demo --email demo@linux-node1.example.com #(创建demo用户)
+----------+----------------------------------+
| Property | Value |
+----------+----------------------------------+
| email | demo@linux-node1.example.com |
| enabled | True |
| id | 97f5bae389c447bbbe43838470d7427d|
| name | demo |
| username | demo |
+----------+----------------------------------+
[root@linux-node1 ~]# keystone user-role-add --tenant demo --user demo --role admin #(添加demo租户和用户到admin角色)
[root@linux-node1 ~]# keystone user-role-add --tenant demo --user demo --role _member_ #(添加demo租户和用户到_member_角色)
[root@linux-node1 ~]# keystone tenant-create --name service --description "Service Tenant" #(openstack服务也需要一个租户,用户、角色和其它服务进行交互,因此此步创建一个service的租户,任何一个openstack服务都要和它关联)
+-------------+----------------------------------+
| Property | Value |
+-------------+----------------------------------+
| description | Service Tenant |
| enabled | True |
| id | 06c47e96dbf7429bbff4f93822222ca9 |
| name | service |
+-------------+----------------------------------+
创建服务实体和api端点:
[root@linux-node1 ~]# keystone service-create --name keystone --type identity --description "OpenStack identity" #(创建服务实体)
+-------------+----------------------------------+
| Property | Value |
+-------------+----------------------------------+
| description | OpenStack identity |
| enabled | True |
| id | 93adbcc42e6145a39ecab110b3eb1942 |
| name | keystone |
| type | identity |
+-------------+----------------------------------+
[root@linux-node1 ~]# keystone endpoint-create --service-id `keystone service-list | awk '/identity/{print $2}'` --publicurl http://10.96.20.118:5000/v2.0 --internalurl http://10.96.20.118:5000/v2.0 --adminurl http://10.96.20.118:35357/v2.0 --region regionOne #(openstack环境中,identity服务-管理目录及服务相关api端点,服务使用这个目录来沟通其它服务,openstack为每个服务提供了三个api端点:admin、internal、public;此步为identity服务创建api端点)
+-------------+----------------------------------+
| Property | Value |
+-------------+----------------------------------+
| adminurl | http://10.96.20.118:35357/v2.0 |
| id |fd14210787ab44d2b61480598b1c1c82 |
| internalurl | http://10.96.20.118:5000/v2.0 |
| publicurl | http://10.96.20.118:5000/v2.0 |
| region | regionOne |
| service_id | 93adbcc42e6145a39ecab110b3eb1942|
+-------------+----------------------------------+
确认以上操作(分别用admin和demo查看令牌、租户列表、用户列表、角色列表):
[root@linux-node1 ~]# keystone --os-tenant-name admin --os-username admin--os-password admin --os-auth-url http://10.96.20.118:35357/v2.0 token-get #(使用admin租户和用户请求认证令牌)
+-----------+----------------------------------+
| Property | Value |
+-----------+----------------------------------+
| expires | 2016-09-27T10:21:46Z |
| id | cca2d1f0f8244d848eea0cad0cda7f04 |
| tenant_id | d14e4731327047c58a2431e9e2221626 |
| user_id | 4e907efbf23b42ac8da392d1a201534c|
+-----------+----------------------------------+
[root@linux-node1 ~]# keystone --os-tenant-name admin --os-username admin --os-password admin --os-auth-url http://10.96.20.118:35357/v2.0 tenant-list #(以admin租户和用户的身份查看租户列表)
+----------------------------------+---------+---------+
| id | name | enabled |
+----------------------------------+---------+---------+
| d14e4731327047c58a2431e9e2221626 | admin | True |
| 5ca17bf131f3443c81cf8947a6a2da03 | demo | True |
| 06c47e96dbf7429bbff4f93822222ca9 | service | True |
+----------------------------------+---------+---------+
[root@linux-node1 ~]# keystone --os-tenant-name admin --os-username admin --os-password admin --os-auth-url http://10.96.20.118:35357/v2.0 user-list #(以admin租户和用户的身份查看用户列表)
+----------------------------------+-------+---------+-------------------------------+
| id | name | enabled | email |
+----------------------------------+-------+---------+-------------------------------+
| 4e907efbf23b42ac8da392d1a201534c | admin | True | admin@linux-node1.example.com |
| 97f5bae389c447bbbe43838470d7427d| demo | True | demo@linux-node1.example.com |
+----------------------------------+-------+---------+-------------------------------+
[root@linux-node1 ~]# keystone --os-tenant-name admin --os-username admin --os-password admin --os-auth-url http://10.96.20.118:35357/v2.0 role-list #(以admin租户和用户的身份查看角色列表)
+----------------------------------+----------+
| id | name |
+----------------------------------+----------+
| 9fe2ff9ee4384b1894a90878d3e92bab | _member_ |
| f175bdcf962e4ba0a901f9eae1c9b8a1| admin |
+----------------------------------+----------+
使用环境变量直接查询相关操作:
[root@linux-node1 ~]# unsetOS_SERVICE_TOKEN OS_SERVICE_ENDPOINT
[root@linux-node1 ~]# vim keystone-admin.sh #(使用环境变量定义,之后用哪个用户查询,source对应文件即可)
exportOS_TENANT_NAME=admin
export OS_USERNAME=admin
export OS_PASSWORD=admin
exportOS_AUTH_URL=http://10.96.20.118:35357/v2.0
[root@linux-node1 ~]# vim keystone-demo.sh
export OS_TENANT_NAME=demo
export OS_USERNAME=demo
export OS_PASSWORD=demo
exportOS_AUTH_URL=http://10.96.20.118:35357/v2.0
[root@linux-node1 ~]# source keystone-admin.sh
[root@linux-node1 ~]# keystone token-get
+-----------+----------------------------------+
| Property | Value |
+-----------+----------------------------------+
| expires | 2016-09-27T10:32:05Z |
| id | 465e30389d2f46a2bea3945bbcff157a |
| tenant_id | d14e4731327047c58a2431e9e2221626 |
| user_id | 4e907efbf23b42ac8da392d1a201534c|
+-----------+----------------------------------+
[root@linux-node1 ~]# keystone role-list
+----------------------------------+----------+
| id | name |
+----------------------------------+----------+
| 9fe2ff9ee4384b1894a90878d3e92bab | _member_ |
| f175bdcf962e4ba0a901f9eae1c9b8a1| admin |
+----------------------------------+----------+
[root@linux-node1 ~]# source keystone-demo.sh
[root@linux-node1 ~]# keystone user-list
+----------------------------------+-------+---------+-------------------------------+
| id | name | enabled | email |
+----------------------------------+-------+---------+-------------------------------+
| 4e907efbf23b42ac8da392d1a201534c | admin | True | admin@linux-node1.example.com |
| 97f5bae389c447bbbe43838470d7427d| demo | True | demo@linux-node1.example.com |
+----------------------------------+-------+---------+-------------------------------+
(三)
node1控制节点操作(配置安装glance):
[root@linux-node1 ~]# yum -y install openstack-glance python-glanceclient python-crypto
[root@linux-node1 ~]# vim /etc/glance/glance-api.conf
[DEFAULT]
verbose=True
debug=true
log_file=/var/log/glance/api.log
# ============ Notification System Options=====================
rabbit_host=10.96.20.118
rabbit_port=5672
rabbit_use_ssl=false
rabbit_userid=guest
rabbit_password=guest
rabbit_virtual_host=/
rabbit_notification_exchange=glance
rabbit_notification_topic=notifications
rabbit_durable_queues=False
[database]
connection=mysql://glance:glance@localhost/glance
[keystone_authtoken]
#auth_host=127.0.0.1
auth_host=10.96.20.118
auth_port=35357
auth_protocol=http
#admin_tenant_name=%SERVICE_TENANT_NAME%
admin_tenant_name=service
#admin_user=%SERVICE_USER%
admin_user=glance
#admin_password=%SERVICE_PASSWORD%
admin_password=glance
[paste_deploy]
flavor=keystone
[root@linux-node1 ~]# vim /etc/glance/glance-registry.conf
[DEFAULT]
verbose=True
debug=true
log_file=/var/log/glance/registry.log
[database]
connection=mysql://glance:glance@localhost/glance
[keystone_authtoken]
#auth_host=127.0.0.1
auth_host=10.96.20.118
auth_port=35357
auth_protocol=http
#admin_tenant_name=%SERVICE_TENANT_NAME%
admin_tenant_name=service
#admin_user=%SERVICE_USER%
admin_user=glance
#admin_password=%SERVICE_PASSWORD%
admin_password=glance
[paste_deploy]
flavor=keystone
[root@linux-node1 ~]# glance-manage db_sync
/usr/lib64/python2.6/site-packages/Crypto/Util/number.py:57:PowmInsecureWarning: Not using mpz_powm_sec. You should rebuild using libgmp >= 5 to avoid timing attackvulnerability.
_warn("Not using mpz_powm_sec. You should rebuild using libgmp >= 5 to avoid timing attackvulnerability.", PowmInsecureWarning)
针对上面的报错,解决:
[root@linux-node1 ~]# yum -y groupinstall "Development tools"
[root@linux-node1 ~]# yum -y install gcclibgcc glibc libffi-devel libxml2-devel libxslt-devel openssl-devel zlib-devel bzip2-devel ncurses-devel python-devel
[root@linux-node1 ~]# wget https://ftp.gnu.org/gnu/gmp/gmp-6.0.0a.tar.bz2
[root@linux-node1 ~]# tar xf gmp-6.0.0a.tar.bz2
[root@linux-node1 ~]# cd gmp-6.0.0
[root@linux-node1 gmp-6.0.0]#./configure
[root@linux-node1 gmp-6.0.0]# make && make install
[root@linux-node1 gmp-6.0.0]# cd
[root@linux-node1 ~]# pip uninstall PyCrypto
[root@linux-node1 ~]# wget https://ftp.dlitz.net/pub/dlitz/crypto/pycrypto/pycrypto-2.6.1.tar.gz
[root@linux-node1 ~]# tar xf pycrypto-2.6.1.tar.gz
[root@linux-node1 ~]# cd pycrypto-2.6.1
[root@linux-node1 pycrypto-2.6.1]# ./configure
[root@linux-node1 pycrypto-2.6.1]# python setup.py install
[root@linux-node1 pycrypto-2.6.1]# cd
[root@linux-node1 ~]# mysql -uglance -pglance -e 'use glance;show tables;'
+------------------+
| Tables_in_glance |
+------------------+
| image_locations |
| image_members |
| image_properties |
| image_tags |
| images |
| migrate_version |
| task_info |
| tasks |
+------------------+
[root@linux-node1 ~]# source keystone-admin.sh
[root@linux-node1 ~]# keystone user-create --name glance --pass glance --email glance@linux-node1.example.com
+----------+----------------------------------+
| Property | Value |
+----------+----------------------------------+
| email | glance@linux-node1.example.com |
| enabled | True |
| id | b3d70ee1067a44f4913f9b6000535b26|
| name | glance |
| username | glance |
+----------+----------------------------------+
[root@linux-node1 ~]# keystone user-role-add --user glance --tenant service --role admin
[root@linux-node1 ~]# keystone service-create --name glance --type image --description "OpenStack image Service"
+-------------+----------------------------------+
| Property | Value |
+-------------+----------------------------------+
| description | OpenStack image Service |
| enabled | True |
| id | 7f2db750a630474b82740dacb55e70b3|
| name | glance |
| type | image |
+-------------+----------------------------------+
[root@linux-node1 ~]# keystone endpoint-create --service-id `keystone service-list | awk '/image/{print $2}'` --publicurl http://10.96.20.118:9292 --internalurl http://10.96.20.118:9292 --adminurl http://10.96.20.118:9292 --region regionOne
+-------------+----------------------------------+
| Property | Value |
+-------------+----------------------------------+
| adminurl | http://10.96.20.118:9292 |
| id | 9815501af47f464db00cfb2eb30c649d |
| internalurl | http://10.96.20.118:9292 |
| publicurl | http://10.96.20.118:9292 |
| region | regionOne |
| service_id | 7f2db750a630474b82740dacb55e70b3 |
+-------------+----------------------------------+
[root@linux-node1 ~]# keystone service-list
+----------------------------------+----------+----------+-------------------------+
| id | name | type | description |
+----------------------------------+----------+----------+-------------------------+
| 7f2db750a630474b82740dacb55e70b3 | glance | image | OpenStack image Service |
| 93adbcc42e6145a39ecab110b3eb1942 | keystone | identity | OpenStack identity |
+----------------------------------+----------+----------+-------------------------+
[root@linux-node1 ~]# keystone endpoint-list
+----------------------------------+-----------+-------------------------------+-------------------------------+--------------------------------+----------------------------------+
| id | region | publicurl | internalurl | adminurl | service_id |
+----------------------------------+-----------+-------------------------------+-------------------------------+--------------------------------+----------------------------------+
| 9815501af47f464db00cfb2eb30c649d | regionOne | http://10.96.20.118:9292 | http://10.96.20.118:9292 | http://10.96.20.118:9292 | 7f2db750a630474b82740dacb55e70b3 |
| fd14210787ab44d2b61480598b1c1c82| regionOne | http://10.96.20.118:5000/v2.0 | http://10.96.20.118:5000/v2.0 |http://10.96.20.118:35357/v2.0 | 93adbcc42e6145a39ecab110b3eb1942 |
+----------------------------------+-----------+-------------------------------+-------------------------------+--------------------------------+----------------------------------+
[root@linux-node1 ~]# id glance
uid=161(glance) gid=161(glance)groups=161(glance)
[root@linux-node1 ~]# chown -R glance:glance /var/log/glance/*
[root@linux-node1 ~]# service openstack-glance-api start
Starting openstack-glance-api: [FAILED]
启动失败,查看日志得知ImportError:/usr/lib64/python2.6/site-packages/Crypto/Cipher/_AES.so: undefined symbol:rpl_malloc,解决办法:
[root@linux-node1 ~]# cd pycrypto-2.6.1
[root@linux-node1pycrypto-2.6.1]# exportac_cv_func_malloc_0_nonnull=yes
[root@linux-node1pycrypto-2.6.1]# easy_install -U PyCrypto
[root@linux-node1 ~]# service openstack-glance-api start
Starting openstack-glance-api: [ OK ]
[root@linux-node1 ~]# service openstack-glance-registry start
Starting openstack-glance-registry: [ OK ]
[root@linux-node1 ~]# chkconfig openstack-glance-api on
[root@linux-node1 ~]# chkconfig openstack-glance-registry on
[root@linux-node1 ~]# chkconfig --list openstack-glance-api
openstack-glance-api 0:off 1:off 2:on 3:on 4:on 5:on 6:off
[root@linux-node1 ~]# chkconfig --list openstack-glance-registry
openstack-glance-registry 0:off 1:off 2:on 3:on 4:on 5:on 6:off
[root@linux-node1 ~]# netstat -tnlp | egrep "9191|9292" #(openstack-glance-api9292;openstack-glance-registry9191)
tcp 0 0 0.0.0.0:9292 0.0.0.0:* LISTEN 50030/python
tcp 0 0 0.0.0.0:9191 0.0.0.0:* LISTEN 50096/python
http://download.cirros-cloud.net/0.3.4/cirros-0.3.4-x86_64-disk.img #(下载镜像文件,cirros是一个小linux镜像,用它来验证镜像服务是否安装成功)
[root@linux-node1 ~]# ll cirros-0.3.4-x86_64-disk.img-h
-rw-r--r--. 1 root root 13M Sep 28 00:58 cirros-0.3.4-x86_64-disk.img
[root@linux-node1 ~]# glance image-create --name "cirros-0.3.4-x86_64" --disk-format qcow2 --container-format bare --is-public True --file /root/cirros-0.3.4-x86_64-disk.img --progress #(--name指定镜像名称;--disk-format镜像的磁盘格式,支持ami|ari|aki|vhd|vmdk|raw|qcow2|vdi|iso;--container-format镜像容器格式,支持ami|ari|aki|bare|ovf;--is-public镜像是否可以被公共访问;--file指定上传文件的位置;--progress显示上传进度)
[=============================>] 100%
+------------------+--------------------------------------+
| Property | Value |
+------------------+--------------------------------------+
| checksum | ee1eca47dc88f4879d8a229cc70a07c6 |
| container_format | bare |
| created_at | 2016-09-28T08:10:19 |
| deleted | False |
| deleted_at |None |
| disk_format | qcow2 |
| id | 22434c1b-f25f-4ee4-bead-dc19c055d763 |
| is_public | True |
| min_disk | 0 |
| min_ram | 0 |
| name | cirros-0.3.4-x86_64 |
| owner | d14e4731327047c58a2431e9e2221626 |
| protected | False |
| size | 13287936 |
| status | active |
| updated_at | 2016-09-28T08:10:19 |
| virtual_size | None |
+------------------+--------------------------------------+
[root@linux-node1 ~]# glance image-list
+--------------------------------------+---------------------+-------------+------------------+----------+--------+
| ID | Name | Disk Format | ContainerFormat | Size | Status |
+--------------------------------------+---------------------+-------------+------------------+----------+--------+
| 22434c1b-f25f-4ee4-bead-dc19c055d763 | cirros-0.3.4-x86_64| qcow2 | bare | 13287936 | active |
+--------------------------------------+---------------------+-------------+------------------+----------+--------+
(四)
node1控制节点操作如下(安装配置nova):
[root@linux-node1 ~]# yum -y install openstack-nova-api openstack-nova-cert openstack-nova-conductor openstack-nova-console openstack-nova-novncproxy openstack-nova-scheduler python-novaclient
[root@linux-node1 ~]# vim /etc/nova/nova.conf
#---------------------file start----------------
[DEFAULT]
rabbit_host=10.96.20.118
rabbit_port=5672
rabbit_use_ssl=false
rabbit_userid=guest
rabbit_password=guest
rpc_backend=rabbit
auth_strategy=keystone
novncproxy_base_url=http://10.96.20.118:6080/vnc_auto.html
vncserver_listen=0.0.0.0
vncserver_proxyclient_address=10.96.20.118
vnc_enabled=true
vnc_keymap=en-us
my_ip=10.96.20.118
glance_host=$my_ip
glance_port=9292
lock_path=/var/lib/nova/tmp
state_path=/var/lib/nova
instances_path=$state_path/instances
compute_driver=libvirt.LibvirtDriver
verbose=true
[keystone_authtoken]
auth_host=10.96.20.118
auth_port=35357
auth_protocol=http
auth_uri=http://10.96.20.118:5000
auth_version=v2.0
admin_user=nova
admin_password=nova
admin_tenant_name=service
[database]
connection=mysql://nova:nova@localhost/nova
#---------------------file end---------------
[root@linux-node1 ~]# nova-manage db sync
[root@linux-node1 ~]# mysql -unova -pnova -hlocalhost -e 'use nova;show tables;'
+--------------------------------------------+
| Tables_in_nova |
+--------------------------------------------+
| agent_builds |
| aggregate_hosts |
| aggregate_metadata |
| aggregates |
| block_device_mapping |
| bw_usage_cache |
| cells |
| certificates |
| compute_nodes |
| console_pools |
| consoles |
| dns_domains |
| fixed_ips |
| floating_ips |
| instance_actions |
| instance_actions_events |
| instance_faults |
| instance_group_member |
| instance_group_metadata |
| instance_group_policy |
| instance_groups |
| instance_id_mappings |
| instance_info_caches |
| instance_metadata |
| instance_system_metadata |
| instance_type_extra_specs |
| instance_type_projects |
| instance_types |
| instances |
| iscsi_targets |
| key_pairs |
| migrate_version |
| migrations |
| networks |
| pci_devices |
| project_user_quotas |
| provider_fw_rules |
| quota_classes |
| quota_usages |
| quotas |
| reservations |
| s3_images |
| security_group_default_rules |
| security_group_instance_association |
| security_group_rules |
| security_groups |
| services |
| shadow_agent_builds |
| shadow_aggregate_hosts |
| shadow_aggregate_metadata |
| shadow_aggregates |
| shadow_block_device_mapping |
| shadow_bw_usage_cache |
| shadow_cells |
| shadow_certificates |
| shadow_compute_nodes |
| shadow_console_pools |
| shadow_consoles |
| shadow_dns_domains |
| shadow_fixed_ips |
| shadow_floating_ips |
| shadow_instance_actions |
| shadow_instance_actions_events |
| shadow_instance_faults |
| shadow_instance_group_member |
| shadow_instance_group_metadata |
| shadow_instance_group_policy |
| shadow_instance_groups |
| shadow_instance_id_mappings |
| shadow_instance_info_caches |
| shadow_instance_metadata |
| shadow_instance_system_metadata |
| shadow_instance_type_extra_specs |
| shadow_instance_type_projects |
| shadow_instance_types |
| shadow_instances |
| shadow_iscsi_targets |
| shadow_key_pairs |
| shadow_migrate_version |
| shadow_migrations |
| shadow_networks |
| shadow_pci_devices |
| shadow_project_user_quotas |
| shadow_provider_fw_rules |
| shadow_quota_classes |
| shadow_quota_usages |
| shadow_quotas |
| shadow_reservations |
| shadow_s3_images |
| shadow_security_group_default_rules |
|shadow_security_group_instance_association |
| shadow_security_group_rules |
| shadow_security_groups |
| shadow_services |
| shadow_snapshot_id_mappings |
| shadow_snapshots |
| shadow_task_log |
| shadow_virtual_interfaces |
| shadow_volume_id_mappings |
| shadow_volume_usage_cache |
| shadow_volumes |
| snapshot_id_mappings |
| snapshots |
| task_log |
| virtual_interfaces |
| volume_id_mappings |
| volume_usage_cache |
| volumes |
+--------------------------------------------+
[root@linux-node1 ~]# source keystone-admin.sh
[root@linux-node1 ~]# keystone user-create --name nova --pass nova --email nova@linux-node1.example.com
+----------+----------------------------------+
| Property | Value |
+----------+----------------------------------+
| email | nova@linux-node1.example.com |
| enabled | True |
| id | f21848326192439fa7482a78a4cf9203 |
| name | nova |
| username | nova |
+----------+----------------------------------+
[root@linux-node1 ~]# keystone user-role-add --user nova --tenant service --role admin
[root@linux-node1 ~]# keystone service-create --name nova --type compute --description "OpenStack Compute"
+-------------+----------------------------------+
| Property | Value |
+-------------+----------------------------------+
| description | OpenStack Compute |
| enabled | True |
| id | 484cf61f5c2b464eb61407b6ef394046|
| name | nova |
| type | compute |
+-------------+----------------------------------+
[root@linux-node1 ~]# keystone endpoint-create --service-id `keystone service-list | awk '/compute/{print $2}'` --publicurl http://10.96.20.118:8774/v2/%\(tenant_id\)s --internalurl http://10.96.20.118:8774/v2/%\(tenant_id\)s --adminurl http://10.96.20.118:8774/v2/%\(tenant_id\)s --region regionOne
+-------------+-------------------------------------------+
| Property | Value |
+-------------+-------------------------------------------+
| adminurl |http://10.96.20.118:8774/v2/%(tenant_id)s |
| id | fab29981641741a3a4ab4767d9868722 |
| internalurl | http://10.96.20.118:8774/v2/%(tenant_id)s|
| publicurl |http://10.96.20.118:8774/v2/%(tenant_id)s |
| region | regionOne |
| service_id | 484cf61f5c2b464eb61407b6ef394046 |
+-------------+-------------------------------------------+
[root@linux-node1 ~]# for i in {api,cert,conductor,consoleauth,novncproxy,scheduler} ; do service openstack-nova-$i start ; done
Starting openstack-nova-api: [ OK ]
Starting openstack-nova-cert: [ OK ]
Starting openstack-nova-conductor: [ OK ]
Starting openstack-nova-consoleauth: [ OK ]
Starting openstack-nova-novncproxy: [ OK ]
Starting openstack-nova-scheduler: [ OK ]
[root@linux-node1 ~]# for i in {api,cert,conductor,consoleauth,novncproxy,scheduler} ; do chkconfig openstack-nova-$i on ; chkconfig
--list openstack-nova-$i; done
openstack-nova-api 0:off 1:off 2:on 3:on 4:on 5:on 6:off
openstack-nova-cert 0:off 1:off 2:on 3:on 4:on 5:on 6:off
openstack-nova-conductor 0:off 1:off 2:on 3:on 4:on 5:on 6:off
openstack-nova-consoleauth 0:off 1:off 2:on 3:on 4:on 5:on 6:off
openstack-nova-novncproxy 0:off 1:off 2:on 3:on 4:on 5:on 6:off
openstack-nova-scheduler 0:off 1:off 2:on 3:on 4:on 5:on 6:off
[root@linux-node1 ~]# nova host-list #(service有4个,cert、consoleauth、conductor、scheduler)
+-------------------------+-------------+----------+
| host_name | service | zone |
+-------------------------+-------------+----------+
| linux-node1.example.com | conductor | internal |
| linux-node1.example.com | consoleauth |internal |
| linux-node1.example.com | cert | internal |
| linux-node1.example.com | scheduler | internal |
+-------------------------+-------------+----------+
[root@linux-node1 ~]# nova service-list
+------------------+-------------------------+----------+---------+-------+----------------------------+-----------------+
| Binary | Host | Zone | Status | State | Updated_at | Disabled Reason |
+------------------+-------------------------+----------+---------+-------+----------------------------+-----------------+
| nova-conductor | linux-node1.example.com | internal |enabled | up | 2016-09-29T08:32:36.000000| - |
| nova-consoleauth |linux-node1.example.com | internal | enabled | up | 2016-09-29T08:32:35.000000| - |
| nova-cert | linux-node1.example.com | internal |enabled | up | 2016-09-29T08:32:37.000000| - |
| nova-scheduler | linux-node1.example.com | internal |enabled | up | 2016-09-29T08:32:29.000000| - |
+------------------+-------------------------+----------+---------+-------+----------------------------+-----------------+
node2在计算节点操作:
[root@linux-node2 ~]# egrep --color 'vmx|svm' /proc/cpuinfo #(若硬件不支持虚拟化virt_type=qemu;若硬件支持虚拟化virt_type=kvm)
flags :fpu vme de pse tsc msr pae mce cx8 apic sep mtrr pge mca cmov pat pse36 clflushdts mmx fxsr sse sse2 ss syscall nx pdpe1gb rdtscp lm constant_tsc uparch_perfmon pebs bts xtopology tsc_reliable nonstop_tsc aperfmperfunfair_spinlock pni pclmulqdq vmx ssse3 fma cx16pcid sse4_1 sse4_2 x2apic movbe popcnt tsc_deadline_timer aes xsave avx f16c rdrand hypervisor lahf_lm abm ida aratxsaveopt pln pts dts tpr_shadow vnmi ept vpid fsgsbase bmi1 avx2 smep bmi2invpcid
[root@linux-node2 ~]# yum -y install openstack-nova-compute python-novaclient libvirt qemu-kvm virt-manager
[root@linux-node2 ~]# scp 10.96.20.118:/etc/nova/nova.conf /etc/nova/ #(从控制节点拷至计算节点)
root@10.96.20.118's password:
nova.conf 100% 97KB 97.1KB/s 00:00
[root@linux-node2 ~]# vim /etc/nova/nova.conf #(使用salt自动部署时,vncserver_proxyclient_address此处用janjia模板)
vncserver_proxyclient_address=10.96.20.119
[root@linux-node2 ~]# service libvirtdstart
Starting libvirtd daemon: libvirtd:relocation error: libvirtd: symbol dm_task_get_info_with_deferred_remove, version Base not defined in file libdevmapper.so.1.02 withlink time reference
[FAILED]
[root@linux-node2 ~]# yum -y install device-mapper
[root@linux-node2 ~]# service libvirtd start
Starting libvirtd daemon: [ OK ]
[root@linux-node2 ~]# service messagebus start
Starting system message bus: [ OK ]
[root@linux-node2 ~]# service openstack-nova-compute start
Starting openstack-nova-compute: [ OK ]
[root@linux-node2 ~]# chkconfig libvirtd on
[root@linux-node2 ~]# chkconfig messagebus on
[root@linux-node2 ~]# chkconfig openstack-nova-compute on
[root@linux-node2 ~]# chkconfig --list libvirtd
libvirtd 0:off 1:off 2:on 3:on 4:on 5:on 6:off
[root@linux-node2 ~]# chkconfig --list messagebus
messagebus 0:off 1:off 2:on 3:on 4:on 5:on 6:off
[root@linux-node2 ~]# chkconfig --list openstack-nova-compute
openstack-nova-compute 0:off 1:off 2:on 3:on 4:on 5:on 6:off
在node1上再次查看:
[root@linux-node1 ~]# source keystone-admin.sh
[root@linux-node1 ~]# nova host-list
+-------------------------+-------------+----------+
| host_name | service | zone |
+-------------------------+-------------+----------+
| linux-node1.example.com | conductor | internal |
| linux-node1.example.com | consoleauth |internal |
| linux-node1.example.com | cert | internal |
| linux-node1.example.com | scheduler | internal |
| linux-node2.example.com| compute | nova |
+-------------------------+-------------+----------+
[root@linux-node1 ~]# nova service-list
+------------------+-------------------------+----------+---------+-------+----------------------------+-----------------+
| Binary | Host | Zone | Status | State | Updated_at | Disabled Reason |
+------------------+-------------------------+----------+---------+-------+----------------------------+-----------------+
| nova-conductor | linux-node1.example.com | internal |enabled | up | 2016-09-29T08:45:06.000000| - |
| nova-consoleauth |linux-node1.example.com | internal | enabled | up | 2016-09-29T08:45:05.000000| - |
| nova-cert | linux-node1.example.com | internal |enabled | up | 2016-09-29T08:45:07.000000| - |
| nova-scheduler | linux-node1.example.com | internal |enabled | up | 2016-09-29T08:45:10.000000| - |
| nova-compute | linux-node2.example.com | nova | enabled | up | 2016-09-29T08:45:07.000000| - |
+------------------+-------------------------+----------+---------+-------+----------------------------+-----------------+
(五)neutron在控制节点和计算节点都要安装
node1控制节点上操作:
[root@linux-node1 ~]# yum -y install openstack-neutron openstack-neutron-ml2 openstack-neutron-linuxbridge python-neutronclient
[root@linux-node1 ~]# vim /etc/neutron/neutron.conf
#-----------------file start----------------
[DEFAULT]
verbose = True
debug = True
state_path = /var/lib/neutron
lock_path = $state_path/lock
core_plugin = ml2
service_plugins = router,firewall,lbaas
api_paste_config =/usr/share/neutron/api-paste.ini
auth_strategy = keystone
rabbit_host = 10.96.20.118
rabbit_password = guest
rabbit_port = 5672
rabbit_userid = guest
rabbit_virtual_host = /
notify_nova_on_port_status_changes = True
notify_nova_on_port_data_changes = True
nova_url = http://10.96.20.118:8774/v2
nova_admin_username = nova
nova_admin_tenant_id = 06c47e96dbf7429bbff4f93822222ca9
nova_admin_password = nova
nova_admin_auth_url =http://10.96.20.118:35357/v2.0
[agent]
root_helper = sudo neutron-rootwrap/etc/neutron/rootwrap.conf
[keystone_authtoken]
# auth_host = 127.0.0.1
auth_host = 10.96.20.118
auth_port = 35357
auth_protocol = http
# admin_tenant_name = %SERVICE_TENANT_NAME%
admin_tenant_name = service
# admin_user = %SERVICE_USER%
admin_user = neutron
# admin_password = %SERVICE_PASSWORD%
admin_password = neutron
[database]
connection =mysql://neutron:neutron@localhost:3306/neutron
[service_providers]
service_provider=LOADBALANCER:Haproxy:neutron.services.loadbalancer.drivers.haproxy.plugin_driver.HaproxyOnHostPluginDriver:default
service_provider=***:openswan:neutron.services.***.service_drivers.ipsec.IPsec***Driver:default
#--------------------file end------------------------
[root@linux-node1 ~]# vim /etc/neutron/plugins/ml2/ml2_conf.ini
[ml2]
type_drivers = flat,vlan,gre,vxlan
tenant_network_types = flat,vlan,gre,vxlan
mechanism_drivers = linuxbridge,openvswitch
[ml2_type_flat]
flat_networks = physnet1
[securitygroup]
enable_security_group = True
[root@linux-node1 ~]# vim /etc/neutron/plugins/linuxbridge/linuxbridge_conf.ini
[vlans]
network_vlan_ranges = physnet1
[linux_bridge]
physical_interface_mappings = physnet1:eth0
[securitygroup]
firewall_driver = neutron.agent.linux.iptables_firewall.IptablesFirewallDriver
enable_security_group = True
[root@linux-node1 ~]# vim /etc/nova/nova.conf #(在nova中配置neutron)
[DEFAULT]
neutron_url=http://10.96.20.118:9696
neutron_admin_username=neutron
neutron_admin_password=neutron
neutron_admin_tenant_id=06c47e96dbf7429bbff4f93822222ca9
neutron_admin_tenant_name=service
neutron_admin_auth_url=http://10.96.20.118:5000/v2.0
neutron_auth_strategy=keystone
network_api_class=nova.network.neutronv2.api.API
linuxnet_interface_driver=nova.network.linux_net.LinuxBridgeInterfaceDriver
security_group_api=neutron
firewall_driver=nova.virt.firewall.NoopFirewallDriver
vif_driver=nova.virt.libvirt.vif.NeutronLinuxBridgeVIFDriver
[root@linux-node1 ~]# for i in {api,conductor,scheduler} ; do service openstack-nova-$i restart ; done
Stopping openstack-nova-api: [ OK ]
Starting openstack-nova-api: [ OK ]
Stopping openstack-nova-conductor: [ OK ]
Starting openstack-nova-conductor: [ OK ]
Stopping openstack-nova-scheduler: [ OK ]
Starting openstack-nova-scheduler: [ OK ]
[root@linux-node1 ~]# keystone user-create --name neutron --pass neutron --email neutron@linux-node1.example.com
+----------+----------------------------------+
| Property | Value |
+----------+----------------------------------+
| email | neutron@linux-node1.example.com |
| enabled | True |
| id | b4ece50c887848b4a1d7ff54c799fd4d|
| name | neutron |
| username | neutron |
+----------+----------------------------------+
[root@linux-node1 ~]# keystone user-role-add --user neutron --tenant service --role admin
[root@linux-node1 ~]# keystone service-create --name neutron --type network --description "OpenStack Networking"
+-------------+----------------------------------+
| Property | Value |
+-------------+----------------------------------+
| description | OpenStack Networking |
| enabled | True |
| id |e967e7b3589647e68e26cabd587ebef4 |
| name | neutron |
| type | network |
+-------------+----------------------------------+
[root@linux-node1 ~]# keystone endpoint-create --service-id `keystone service-list | awk '/network/{print $2}'` --publicurl http://10.96.20.118:9696 --internalurl http://10.96.20.118:9696 --adminurl http://10.96.20.118:9696 --region regionOne
+-------------+----------------------------------+
| Property | Value |
+-------------+----------------------------------+
| adminurl | http://10.96.20.118:9696 |
| id |b16b9392d8344fd5bbe01cc83be954d8 |
| internalurl | http://10.96.20.118:9696 |
| publicurl | http://10.96.20.118:9696 |
| region | regionOne |
| service_id | e967e7b3589647e68e26cabd587ebef4 |
+-------------+----------------------------------+
[root@linux-node1 ~]# keystone service-list
+----------------------------------+----------+----------+-------------------------+
| id | name | type | description |
+----------------------------------+----------+----------+-------------------------+
| 7f2db750a630474b82740dacb55e70b3 | glance | image | OpenStack image Service |
| 93adbcc42e6145a39ecab110b3eb1942 | keystone | identity | OpenStack identity |
| e967e7b3589647e68e26cabd587ebef4 |neutron | network | OpenStack Networking |
| 484cf61f5c2b464eb61407b6ef394046| nova | compute | OpenStack Compute |
+----------------------------------+----------+----------+-------------------------+
[root@linux-node1 ~]# keystone endpoint-list
+----------------------------------+-----------+-------------------------------------------+-------------------------------------------+-------------------------------------------+----------------------------------+
| id | region | publicurl | internalurl | adminurl | service_id |
+----------------------------------+-----------+-------------------------------------------+-------------------------------------------+-------------------------------------------+----------------------------------+
| 9815501af47f464db00cfb2eb30c649d | regionOne | http://10.96.20.118:9292 | http://10.96.20.118:9292 | http://10.96.20.118:9292 | 7f2db750a630474b82740dacb55e70b3|
| b16b9392d8344fd5bbe01cc83be954d8 |regionOne | http://10.96.20.118:9696 | http://10.96.20.118:9696 | http://10.96.20.118:9696 |e967e7b3589647e68e26cabd587ebef4 |
| fab29981641741a3a4ab4767d9868722 | regionOne | http://10.96.20.118:8774/v2/%(tenant_id)s| http://10.96.20.118:8774/v2/%(tenant_id)s |http://10.96.20.118:8774/v2/%(tenant_id)s | 484cf61f5c2b464eb61407b6ef394046|
| fd14210787ab44d2b61480598b1c1c82| regionOne | http://10.96.20.118:5000/v2.0 | http://10.96.20.118:5000/v2.0 | http://10.96.20.118:35357/v2.0 | 93adbcc42e6145a39ecab110b3eb1942|
+----------------------------------+-----------+-------------------------------------------+-------------------------------------------+-------------------------------------------+----------------------------------+
[root@linux-node1 ~]# neutron-server --config-file /etc/neutron/neutron.conf --config-file /etc/neutron/plugins/ml2/ml2_conf.ini --config-file /etc/neutron/plugins/linuxbridge/linuxbridge_conf.ini #(在前台启动)
……
2016-09-29 23:09:37.035 69080 DEBUGneutron.service [-]********************************************************************************log_opt_values /usr/lib/python2.6/site-packages/oslo/config/cfg.py:1955
2016-09-29 23:09:37.035 69080 INFOneutron.service [-] Neutron service started, listeningon 0.0.0.0:9696
2016-09-29 23:09:37.044 69080 INFOneutron.openstack.common.rpc.common [-] Connected to AMQP server on10.96.20.118:5672
2016-09-29 23:09:37.046 69080 INFOneutron.wsgi [-] (69080) wsgi starting up on http://0.0.0.0:9696/
[root@linux-node1 ~]# vim /etc/init.d/neutron-server #(修改脚本配置文件位置,注意config中定义的内容,不能有多余空格)
configs=(
"/etc/neutron/neutron.conf" \
"/etc/neutron/plugins/ml2/ml2_conf.ini" \
"/etc/neutron/plugins/linuxbridge/linuxbridge_conf.ini" \
)
[root@linux-node1 ~]# service neutron-server start #(控制节点启动两个:neutron-server和neutron-linuxbridge-agent;计算节点仅启动neutron-linuxbridge-agent)
Starting neutron: [ OK ]
[root@linux-node1 ~]# service neutron-linuxbridge-agent start
Starting neutron-linuxbridge-agent: [ OK ]
[root@linux-node1 ~]# chkconfig neutron-server on
[root@linux-node1 ~]# chkconfig neutron-linuxbridge-agent on
[root@linux-node1 ~]# chkconfig --list neutron-server
neutron-server 0:off 1:off 2:on 3:on 4:on 5:on 6:off
[root@linux-node1 ~]# chkconfig --list neutron-linuxbridge-agent
neutron-linuxbridge-agent 0:off 1:off 2:on 3:on 4:on 5:on 6:off
[root@linux-node1 ~]# netstat -tnlp | grep:9696
tcp 0 0 0.0.0.0:9696 0.0.0.0:* LISTEN 69154/python
[root@linux-node1 ~]# . keystone-admin.sh
[root@linux-node1 ~]# neutron ext-list #(列出加载的扩展模块,确认成功启动neutron-server)
+-----------------------+-----------------------------------------------+
| alias | name |
+-----------------------+-----------------------------------------------+
| service-type | Neutron Service TypeManagement |
| ext-gw-mode | Neutron L3 Configurable externalgateway mode |
| security-group | security-group |
| l3_agent_scheduler | L3 Agent Scheduler |
| lbaas_agent_scheduler | LoadbalancerAgent Scheduler |
| fwaas | Firewall service |
| binding | Port Binding |
| provider | Provider Network |
| agent | agent |
| quotas | Quota management support |
| dhcp_agent_scheduler | DHCP Agent Scheduler |
| multi-provider | Multi Provider Network |
| external-net | Neutron external network |
| router | Neutron L3 Router |
| allowed-address-pairs | Allowed AddressPairs |
| extra_dhcp_opt | Neutron Extra DHCP opts |
| lbaas | LoadBalancing service |
| extraroute | Neutron Extra Route |
+-----------------------+-----------------------------------------------+
[root@linux-node1 ~]# neutron agent-list #(待计算节点成功启动后,才有)
+--------------------------------------+--------------------+-------------------------+-------+----------------+
| id |agent_type | host | alive | admin_state_up |
+--------------------------------------+--------------------+-------------------------+-------+----------------+
| 1283a47d-4d1b-4403-9d0e-241da803762b | Linux bridgeagent | linux-node1.example.com | :-) |True |
+--------------------------------------+--------------------+-------------------------+-------+----------------+
node2计算节点操作:
[root@linux-node2 ~]# vim /etc/sysctl.conf
net.ipv4.ip_forward = 1
net.ipv4.conf.default.rp_filter= 1
net.ipv4.conf.all.rp_filter= 1
[root@linux-node2 ~]# sysctl -p
[root@linux-node2 ~]# yum -y install openstack-neutron openstack-neutron-ml2 openstack-neutron-linuxbridge python-neutronclient #(与控制节点安装一样)
[root@linux-node2 ~]# scp 10.96.20.118:/etc/neutron/neutron.conf /etc/neutron/
root@10.96.20.118's password:
neutron.conf 100% 18KB 18.1KB/s 00:00
[root@linux-node2 ~]# scp 10.96.20.118:/etc/neutron/plugins/ml2/ml2_conf.ini /etc/neutron/plugins/ml2/
root@10.96.20.118's password:
ml2_conf.ini 100% 2447 2.4KB/s 00:00
[root@linux-node2 ~]# scp 10.96.20.118:/etc/neutron/plugins/linuxbridge/linuxbridge_conf.ini /etc/neutron/plugins/linuxbridge/
root@10.96.20.118's password:
linuxbridge_conf.ini 100%3238 3.2KB/s 00:00
[root@linux-node2 ~]# scp 10.96.20.118:/etc/init.d/neutron-server /etc/init.d/
root@10.96.20.118's password:
neutron-server 100%1861 1.8KB/s 00:00
[root@linux-node2 ~]# scp 10.96.20.118:/etc/init.d/neutron-linuxbridge-agent /etc/init.d/
root@10.96.20.118's password:
neutron-linuxbridge-agent 100%1824 1.8KB/s 00:00
[root@linux-node2 ~]# service neutron-linuxbridge-agent start #(计算节点只启动neutron-linuxbridge-agent)
Starting neutron-linuxbridge-agent: [ OK ]
[root@linux-node2 ~]# chkconfig neutron-linuxbridge-agent on
[root@linux-node2 ~]# chkconfig --listneutron-linuxbridge-agent
neutron-linuxbridge-agent 0:off 1:off 2:on 3:on 4:on 5:on 6:off
[root@linux-node1 ~]# neutron agent-list #(在控制节点上查看)
+--------------------------------------+--------------------+-------------------------+-------+----------------+
| id |agent_type | host | alive | admin_state_up |
+--------------------------------------+--------------------+-------------------------+-------+----------------+
| 1283a47d-4d1b-4403-9d0e-241da803762b | Linuxbridge agent | linux-node1.example.com | :-) | True |
|8d061358-ddfa-4979-bf2e-5d8c1c7a7f65 | Linux bridge agent |linux-node2.example.com | :-) |True |
+--------------------------------------+--------------------+-------------------------+-------+----------------+
(六)配置安装horizon(openstack-dashboard)
在node1控制节点上操作:
[root@linux-node1 ~]# yum -y install openstack-dashboard httpd mod_wsgi memcached python-memcached
[root@linux-node1 ~]# vim /etc/openstack-dashboard/local_settings #(第15行ALLOWED_HOSTS;启用第98-103行CACHES=;第128行OPENSTACK_HOST=)
ALLOWED_HOSTS = ['horizon.example.com','localhost', '10.96.20.118']
CACHES = {
'default': {
'BACKEND' : 'django.core.cache.backends.memcached.MemcachedCache',
'LOCATION' : '127.0.0.1:11211',
}
}
OPENSTACK_HOST = "10.96.20.118"
[root@linux-node1 ~]# scp /etc/nova/nova.conf 10.96.20.119:/etc/nova/
root@10.96.20.119's password:
nova.conf 100% 98KB 97.6KB/s 00:00
在node2计算节点操作如下:
[root@linux-node2 ~]# vim /etc/nova/nova.conf #(在计算节点更改vncserver_proxyclient_address为本地ip)
vncserver_proxyclient_address=10.96.20.119
[root@linux-node2 ~]# ps aux | egrep "nova-compute|neutron-linuxbridge-agent" | grep -v grep
neutron 27827 0.0 2.9 268448 29600 ? S Sep29 0:00 /usr/bin/python /usr/bin/neutron-linuxbridge-agent --log-file/var/log/neutron/linuxbridge-agent.log --config-file/usr/share/neutron/neutron-dist.conf --config-file /etc/neutron/neutron.conf--config-file /etc/neutron/plugins/linuxbridge/linuxbridge_conf.ini
nova 28211 0.9 5.6 1120828 56460 ? Sl 00:12 0:00 /usr/bin/python /usr/bin/nova-compute --logfile/var/log/nova/compute.log
在node1控制节点:
[root@linux-node1 ~]# ps aux | egrep "mysqld|rabbitmq|nova|keystone|glance|neutron" #(确保这些服务正常运行)
……
[root@linux-node1 ~]# . keystone-admin.sh
[root@linux-node1 ~]# nova host-list #(有5个)
+-------------------------+-------------+----------+
| host_name | service | zone |
+-------------------------+-------------+----------+
| linux-node1.example.com | conductor | internal |
| linux-node1.example.com | consoleauth |internal |
| linux-node1.example.com | cert | internal |
| linux-node1.example.com | scheduler | internal |
| linux-node2.example.com | compute | nova |
+-------------------------+-------------+----------+
[root@linux-node1 ~]# neutron agent-list #(有2个)
+--------------------------------------+--------------------+-------------------------+-------+----------------+
| id | agent_type | host | alive | admin_state_up |
+--------------------------------------+--------------------+-------------------------+-------+----------------+
| 1283a47d-4d1b-4403-9d0e-241da803762b | Linux bridgeagent | linux-node1.example.com | :-) |True |
| 8d061358-ddfa-4979-bf2e-5d8c1c7a7f65| Linux bridge agent | linux-node2.example.com | :-) | True |
+--------------------------------------+--------------------+-------------------------+-------+----------------+
[root@linux-node1 ~]# service memcached start
Starting memcached: [ OK ]
[root@linux-node1 ~]# service httpd start
Starting httpd: [ OK ]
[root@linux-node1 ~]# chkconfig memcached on
[root@linux-node1 ~]# chkconfig httpd on
[root@linux-node1 ~]# chkconfig --listmemcached
memcached 0:off 1:off 2:on 3:on 4:on 5:on 6:off
[root@linux-node1 ~]# chkconfig --listhttpd
httpd 0:off 1:off 2:on 3:on 4:on 5:on 6:off
测试:
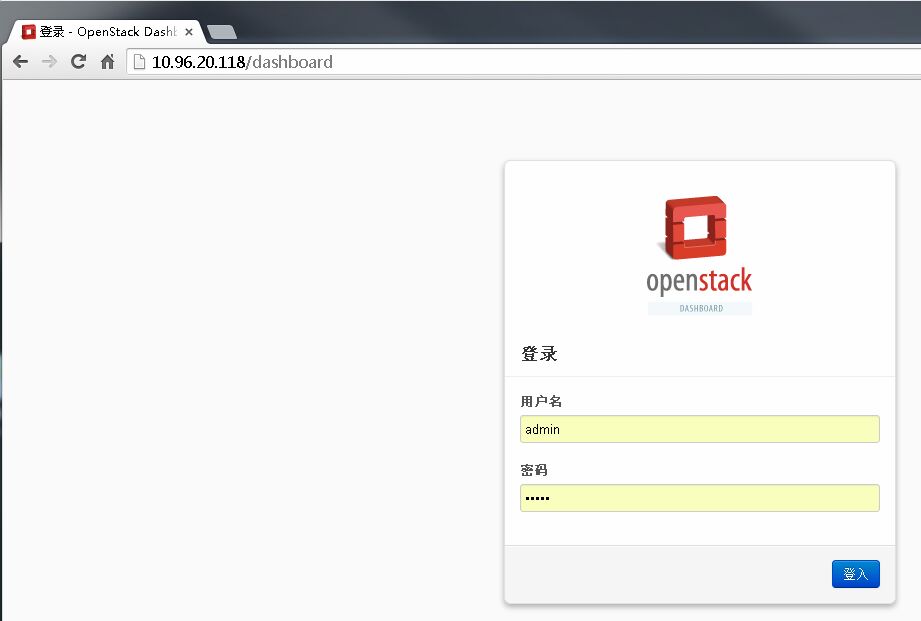
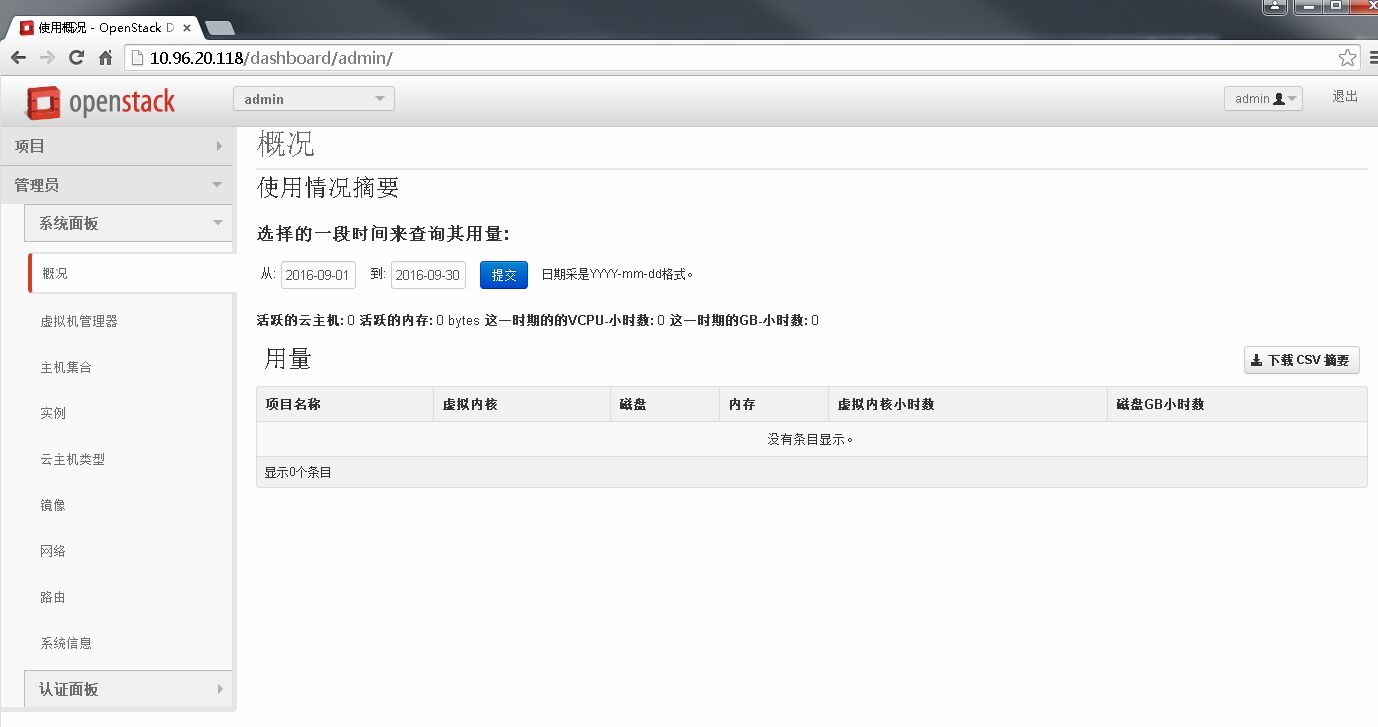
http://10.96.20.118/dashboard,用户名admin密码admin;
在控制节点操作(创建网络):
[root@linux-node1 ~]# . keystone-demo.sh
[root@linux-node1 ~]# keystone tenant-list #(记录demo的id)
+----------------------------------+---------+---------+
| id | name | enabled |
+----------------------------------+---------+---------+
| d14e4731327047c58a2431e9e2221626 | admin | True |
| 5ca17bf131f3443c81cf8947a6a2da03 | demo | True |
| 06c47e96dbf7429bbff4f93822222ca9 | service | True |
+----------------------------------+---------+---------+
[root@linux-node1 ~]# neutron net-create --tenant-id 5ca17bf131f3443c81cf8947a6a2da03 falt_net --shared --provider:network_typeflat --provider:physical_network physnet1 #(为demo创建网络,在CLI下创建网络,在web界面下创建子网)
Created a new network:
+---------------------------+--------------------------------------+
| Field | Value |
+---------------------------+--------------------------------------+
| admin_state_up | True |
| id |e80860ec-1be6-4d11-b8e2-bcb3ea29822b |
| name | falt_net |
| provider:network_type | flat |
| provider:physical_network | physnet1 |
| provider:segmentation_id | |
| shared | True |
| status | ACTIVE |
| subnets | |
| tenant_id | 5ca17bf131f3443c81cf8947a6a2da03 |
+---------------------------+--------------------------------------+
[root@linux-node1 ~]# neutron net-list
+--------------------------------------+----------+---------+
| id | name | subnets |
+--------------------------------------+----------+---------+
| e80860ec-1be6-4d11-b8e2-bcb3ea29822b |falt_net | |
+--------------------------------------+----------+---------+
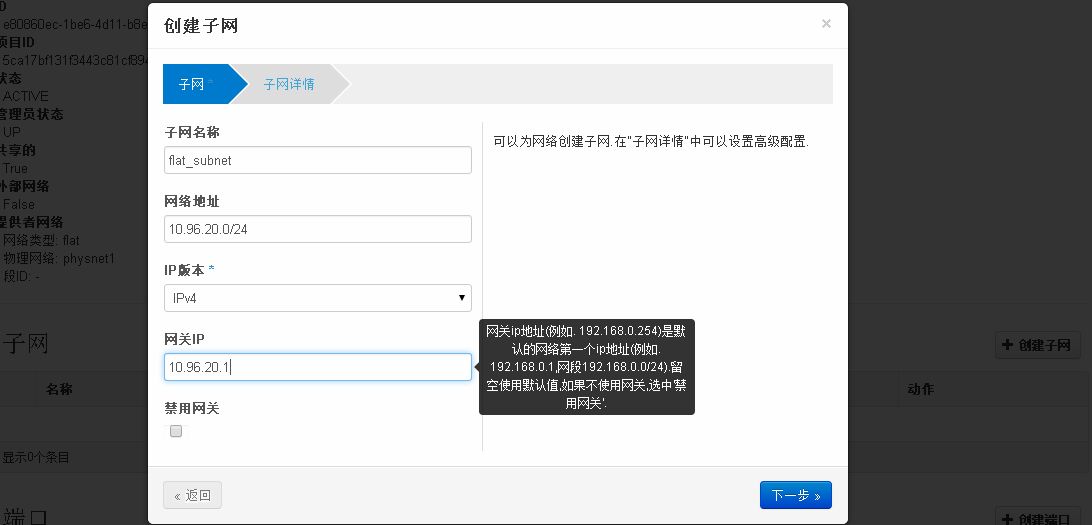
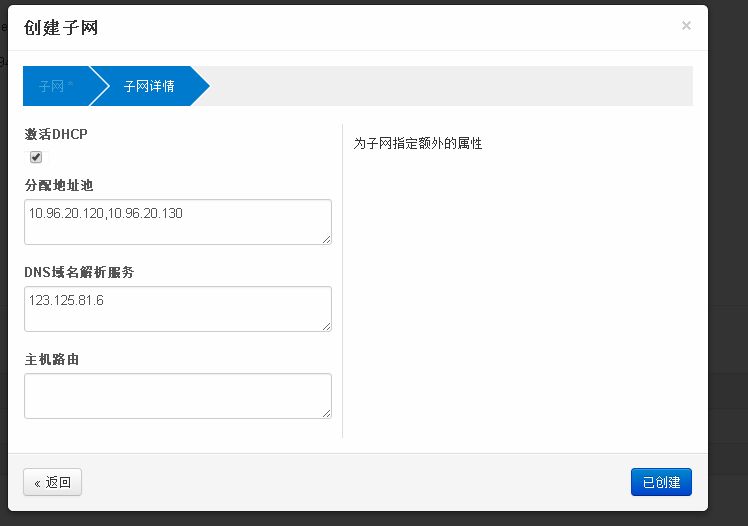
在web界面下创建子网:
管理员-->系统面板-->网络-->点网络名称(flat_net)-->点创建子网,如图:子网名称flat_subnet,网络地址10.96.20.0/24,IP版本IPv4,网关IP10.96.20.1-->下一步-->子网详情:分配地址池10.96.20.120,10.96.20.130;DNS域名解析服务123.125.81.6-->创建
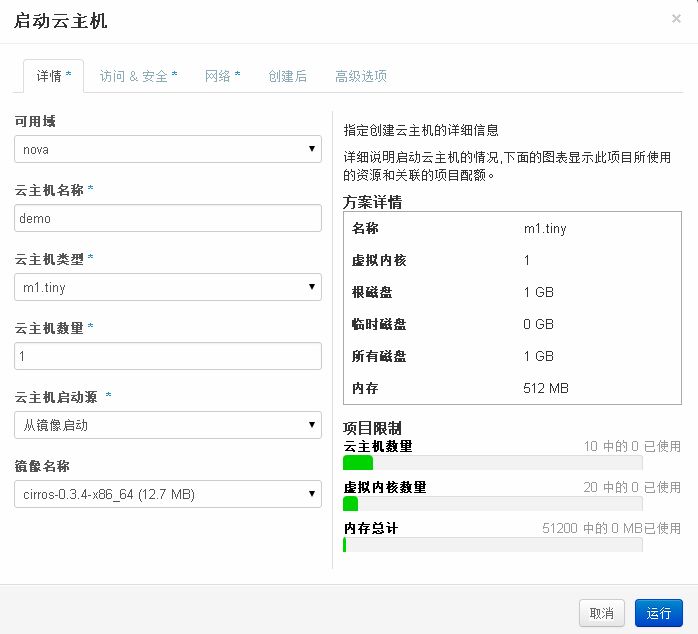
web界面右上角点退出,用demo用户登录:
项目-->Compute-->实例-->启动云主机-->云主机名称demo,云主机类型m1.tiny,云主机启动源从镜像启动,镜像名称cirros-0.3.4-x86_64(12.7MB)-->运行



 浙公网安备 33010602011771号