
WPF WriteableBitmap类直接操作像素点
还是话不多说,直接上码:
1.新建WpfApp应用程序
2.MainWindow.xaml文件代码如下:
<Window x:Class="WpfApp1.MainWindow" xmlns="http://schemas.microsoft.com/winfx/2006/xaml/presentation" xmlns:x="http://schemas.microsoft.com/winfx/2006/xaml" xmlns:d="http://schemas.microsoft.com/expression/blend/2008" xmlns:mc="http://schemas.openxmlformats.org/markup-compatibility/2006" xmlns:local="clr-namespace:WpfApp1" mc:Ignorable="d" Title="MainWindow" Height="450" Width="800"> <Grid> <Grid.RowDefinitions> <RowDefinition Height="*"></RowDefinition> <RowDefinition Height="10*" ></RowDefinition> </Grid.RowDefinitions> <Button Name="button" Grid.Row="0" HorizontalAlignment="Center" Content="generate_bitmap" MinWidth="120" MinHeight="30" Click="Button_Click"></Button> <Grid x:Name="imgGrid" Grid.Row="1"> <Viewbox> <Image x:Name="img" Width="{Binding RelativeSource={RelativeSource Self}, Path=Source.PixelWidth}" Height="{Binding RelativeSource={RelativeSource Self}, Path=Source.PixelHeight}" Source="{Binding CtrlImage, IsAsync=True}" Stretch="None" /> </Viewbox> </Grid> </Grid></Window> |
3.MainWindow.xaml.cs文件代码如下:
using System;using System.Collections.Generic;using System.Globalization;using System.Linq;using System.Text;using System.Windows;using System.Windows.Controls;using System.Windows.Data;using System.Windows.Documents;using System.Windows.Input;using System.Windows.Media;using System.Windows.Media.Imaging;using System.Windows.Navigation;using System.Windows.Shapes;using System.Drawing;using System.Drawing.Drawing2D;namespace WpfApp1{ /// <summary> /// Interaction logic for MainWindow.xaml /// </summary> public partial class MainWindow : Window { public MainWindow() { InitializeComponent(); } public void Button_Click(object sender, RoutedEventArgs e) { WriteableBitmap wb = new WriteableBitmap((int)imgGrid.ActualWidth, (int)imgGrid.ActualHeight, 96, 96, PixelFormats.Pbgra32, null); wb.Lock(); Bitmap backBitmap = new Bitmap((int)imgGrid.ActualWidth, (int)imgGrid.ActualHeight, wb.BackBufferStride, System.Drawing.Imaging.PixelFormat.Format32bppArgb, wb.BackBuffer); Int32Rect rect = new Int32Rect(0, 0, (int)imgGrid.ActualWidth, (int)imgGrid.ActualHeight); byte[] pixels = new byte[(int)imgGrid.ActualWidth * (int)imgGrid.ActualHeight * wb.Format.BitsPerPixel / 8]; Random rand = new Random(); for (int y = 0; y < wb.PixelHeight; y++) { for (int x = 0; x < wb.PixelWidth; x++) { int alpha = 0; int red = 0; int green = 0; int blue = 0; if ((x % 5 == 0) || (y % 7 == 0)) { red = (int)((double)y / wb.PixelHeight * 255); green = rand.Next(100, 255); blue = (int)((double)x / wb.PixelWidth * 255); alpha = 255; } else { red = (int)((double)x / wb.PixelWidth * 255); green = rand.Next(100, 255); blue = (int)((double)y / wb.PixelHeight * 255); alpha = 50; } int pixeloffset = (x + y * wb.PixelWidth) * wb.Format.BitsPerPixel / 8; pixels[pixeloffset] = (byte)blue; pixels[pixeloffset + 1] = (byte)green; pixels[pixeloffset + 2] = (byte)red; pixels[pixeloffset + 3] = (byte)alpha; } int stride = (wb.PixelWidth * wb.Format.BitsPerPixel) / 8; wb.WritePixels(rect, pixels, stride, 0); } wb.Unlock(); backBitmap.Dispose(); backBitmap = null; img.Source = wb; } }} |
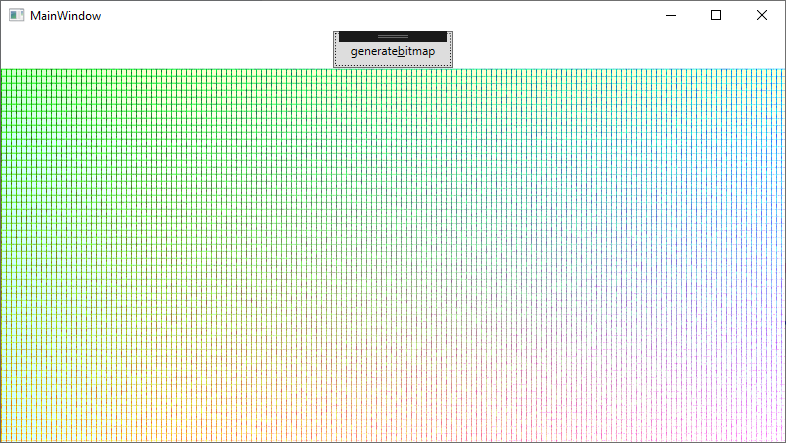
效果如下:
分类:
C#


【推荐】国内首个AI IDE,深度理解中文开发场景,立即下载体验Trae
【推荐】编程新体验,更懂你的AI,立即体验豆包MarsCode编程助手
【推荐】抖音旗下AI助手豆包,你的智能百科全书,全免费不限次数
【推荐】轻量又高性能的 SSH 工具 IShell:AI 加持,快人一步
· TypeScript + Deepseek 打造卜卦网站:技术与玄学的结合
· 阿里巴巴 QwQ-32B真的超越了 DeepSeek R-1吗?
· 【译】Visual Studio 中新的强大生产力特性
· 【设计模式】告别冗长if-else语句:使用策略模式优化代码结构
· 10年+ .NET Coder 心语 ── 封装的思维:从隐藏、稳定开始理解其本质意义