
SpringBoot使用spring data jpa
引言:
在相当长的一段时间内,实现应用程序的数据访问层一直很麻烦。 必须编写太多样板代码来执行简单查询以及执行分页和审计。 Spring Data JPA旨在通过减少实际需要的工作量来显著改善数据访问层的实现。 作为开发人员,您编写repository接口,包括自定义查找器方法,Spring将自动提供实现。
Spring Data JPA旨在通过减少实际需要的工作量来显著改善数据访问层的实现。 作为开发人员,您编写repository接口,包括自定义查找器方法,Spring将自动提供实现。
代码编写:
1.依赖配置:

<?xml version="1.0" encoding="UTF-8"?>
<project xmlns="http://maven.apache.org/POM/4.0.0"
         xmlns:xsi="http://www.w3.org/2001/XMLSchema-instance"
         xsi:schemaLocation="http://maven.apache.org/POM/4.0.0 http://maven.apache.org/xsd/maven-4.0.0.xsd">
    <modelVersion>4.0.0</modelVersion>

    <groupId>com.wf</groupId>
    <artifactId>springbootdemo</artifactId>
    <version>1.0-SNAPSHOT</version>

    <parent>
        <groupId>org.springframework.boot</groupId>
        <artifactId>spring-boot-starter-parent</artifactId>
        <version>2.0.2.RELEASE</version>
    </parent>

    <!-- 添加spring mvc 依赖-->
    <dependencies>
        <dependency>
            <groupId>org.springframework.boot</groupId>
            <artifactId>spring-boot-starter-data-jpa</artifactId>
        </dependency>

        <dependency>
            <groupId>mysql</groupId>
            <artifactId>mysql-connector-java</artifactId>
        </dependency>

        <!--FreeMarker 模板引擎-->
        <dependency>
            <groupId>org.springframework.boot</groupId>
            <artifactId>spring-boot-starter-freemarker</artifactId>
        </dependency>

        <!--整合springboot与mybatis的整合-->
        <dependency>
            <groupId>org.mybatis.spring.boot</groupId>
            <artifactId>mybatis-spring-boot-starter</artifactId>
            <version>1.1.1</version>
        </dependency>

        <!--测试junit-->
        <dependency>
            <groupId>org.springframework.boot</groupId>
            <artifactId>spring-boot-starter-test</artifactId>
            <scope>test</scope>
        </dependency>

        <!--redis缓存-->
        <dependency>
            <groupId>org.springframework.boot</groupId>
            <artifactId>spring-boot-starter-data-redis</artifactId>
        </dependency>

        <dependency>
            <groupId>org.springframework.boot</groupId>
            <artifactId>spring-boot-starter-data-elasticsearch</artifactId>
        </dependency>

        <dependency>
            <groupId>org.springframework.boot</groupId>
            <artifactId>spring-boot-starter-web</artifactId>
        </dependency>

    </dependencies>
        <!--将mapper下的mapper接口与mapper映射文件放在一个mapper包下所需要的依赖-->
    <build>
        <resources>
            <resource>
                <directory>src/main/java</directory>
                <includes>
                    <include>**/*.properties</include>
                    <include>**/*.xml</include>
                </includes>
                <filtering>false</filtering>
            </resource>
            <resource>
                <directory>src/main/resources</directory>
                <includes>
                    <include>**/*.*</include>
                </includes>
                <filtering>false</filtering>
            </resource>
        </resources>
        <plugins>
            <plugin>
                <groupId>org.springframework.boot</groupId>
                <artifactId>spring-boot-maven-plugin</artifactId>
            </plugin>
        </plugins>
    </build>

</project>
2.resources配置application.properties:
#DB Configation
spring.datasource.driver-class-name=com.mysql.jdbc.Driver
spring.datasource.url=jdbc:mysql://localhost:3306/test
spring.datasource.username=root
spring.datasource.password=root

#JPA Configation
spring.jpa.database=MySQL
spring.jpa.generate-ddl=true
spring.jpa.show-sql=true
如果连接不上数据库,那改成这段配置
#DB Configration
spring.datasource.driver-class-name=com.mysql.cj.jdbc.Driver
spring.datasource.url=jdbc:mysql://localhost:3306/数据库名称?useUnicode=true&characterEncoding=utf-8&useSSL=false&serverTimezone = GMT
spring.datasource.username=root
spring.datasource.password=root

#JAPConfigration
spring.jpa.database=MySQL
spring.jpa.show-sql=true
spring.jpa.generate-ddl=true
也可以使用19年初刚出的新技术spring data jpa(是爷爷辈,jpa是父辈,Hibernate是孙子辈--->已差不多被淘汰)

3.设置测试controller:
package com.wf.controller;

import org.springframework.web.bind.annotation.RequestMapping;
import org.springframework.web.bind.annotation.RestController;

import java.util.HashMap;
import java.util.Map;

@RestController
@RequestMapping("/test")
public class TestController {
    @RequestMapping("/hello")
    public Map sayHell0(){
        Map map=new HashMap();
        map.put("json数据01","我爱java");
        return map;
    }
}
效果图: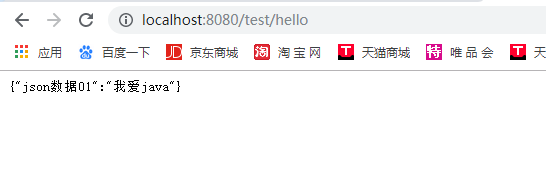
进入正题:
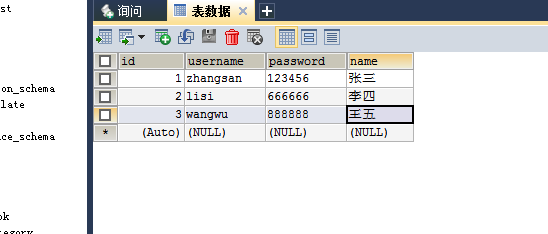
1.创建数据库并添加数据:
2.创建对应的pojo对象:
package com.wf.entity;

import javax.persistence.*;

//标记此类为实体类
@Entity
//标记对应的数据库中的表
@Table(name = "user")
public class User {
    //设置id为主键 自增
    @Id
    @GeneratedValue(strategy = GenerationType.IDENTITY)
   private Integer id;
   private String username;
   private String password;
   private String name;

    public Integer getId() {
        return id;
    }

    public void setId(Integer id) {
        this.id = id;
    }

    public String getUsername() {
        return username;
    }

    public void setUsername(String username) {
        this.username = username;
    }

    public String getPassword() {
        return password;
    }

    public void setPassword(String password) {
        this.password = password;
    }

    public String getName() {
        return name;
    }

    public void setName(String name) {
        this.name = name;
    }

    @Override
    public String toString() {
        return "User{" +
                "id=" + id +
                ", username='" + username + '\'' +
                ", password='" + password + '\'' +
                ", name='" + name + '\'' +
                '}';
    }

    public User(Integer id, String username, String password, String name) {
        this.id = id;
        this.username = username;
        this.password = password;
        this.name = name;
    }

    public User() {
        super();
    }
}
注意:对应的几个注解需要格外配置好
3.创建对应的controller接口:
package com.wf.controller;

import com.wf.dao.UserDao;
import com.wf.entity.User;
import org.springframework.beans.factory.annotation.Autowired;
import org.springframework.web.bind.annotation.GetMapping;
import org.springframework.web.bind.annotation.RequestMapping;
import org.springframework.web.bind.annotation.RestController;

import java.util.List;

@RestController
@RequestMapping("/user")
public class UserController {

    @Autowired
    private UserDao userDao;

    //查询出所有数据
    @RequestMapping("/list")
    public List<User> getUserList(){
        return userDao.findAll();
    }
}
4.对应的dao层:
package com.wf.dao;


import com.xhn.entity.User;
import org.springframework.data.jpa.repository.JpaRepository;

public interface UserDao extends JpaRepository<User,Integer> {

}
代码测试:

本博主对应的json插件为:JSON-handle_0.5.6.crx,可以在网上自行百度

 浙公网安备 33010602011771号