个人博客从 0 到 1 开发笔记
0 项目概述
0.1 项目开发目的
项目源码及数据库文件,请移步 Github
此项目为最基本的练习项目,无复杂的功能,基本都是简单的 CRUD 操作
因为刚刚学完 Springboot 框架,所以想靠自己一个人,从 0 到 1 建立一个小型个人博客
0.2 项目技术栈
此项目的所有技术栈如下:
| 分类 | 技术栈 | 版本 |
|---|---|---|
| 开发语言 | Java | 8 |
| 开发工具 | IDEA | 2020.1 |
| 项目管理工具 | Maven | 3.6.1 |
| 后端框架 | SpringBoot | 2.3.7 |
| 模板引擎 | Thymeleaf | 3.0.11 |
| 持久层 | MyBatis | 3.5.9 |
| 数据库 | MySql | 5.7.20 |
| 数据库连接池 | Druid | 1.1.9 |
| 日志管理 | slf4j | 1.7.30 |
| 前端组件 | SemanticUI | 2.4.0 |
| js框架 | jQuery | 3.5.1 |
| Markdown插件 | Editor.md | 1.5.0 |
| 博客代码高亮插件 | prism | 1.28.0 |
| 文章排版插件 | typo.css | 2.1.2 |
| 动画插件 | animate.js | 4.1.1 |
| 滚动侦测插件 | jquery.scrollTo | 2.1.3 |
该项目所有的技术栈官网如下:
-
开发语言:Java
-
开发工具:IDEA
-
项目管理工具:Maven
-
后端框架:SpringBoot
-
模板引擎:Thymeleaf
-
持久层:MyBatis
-
数据库:MySql
-
数据库连接池:Druid
-
日志管理:slf4j
-
前端组件:SemanticUI
-
js框架:jQuery
-
MarkDow插件:Editor.md
-
代码高亮插件:prism
-
文章排版插件:typo.css
-
动画插件:animate.js
-
滚动侦测插件:jQuery.scrollTo
1 前端设计
1.1 博客前端设计
1.1.1 博客首页
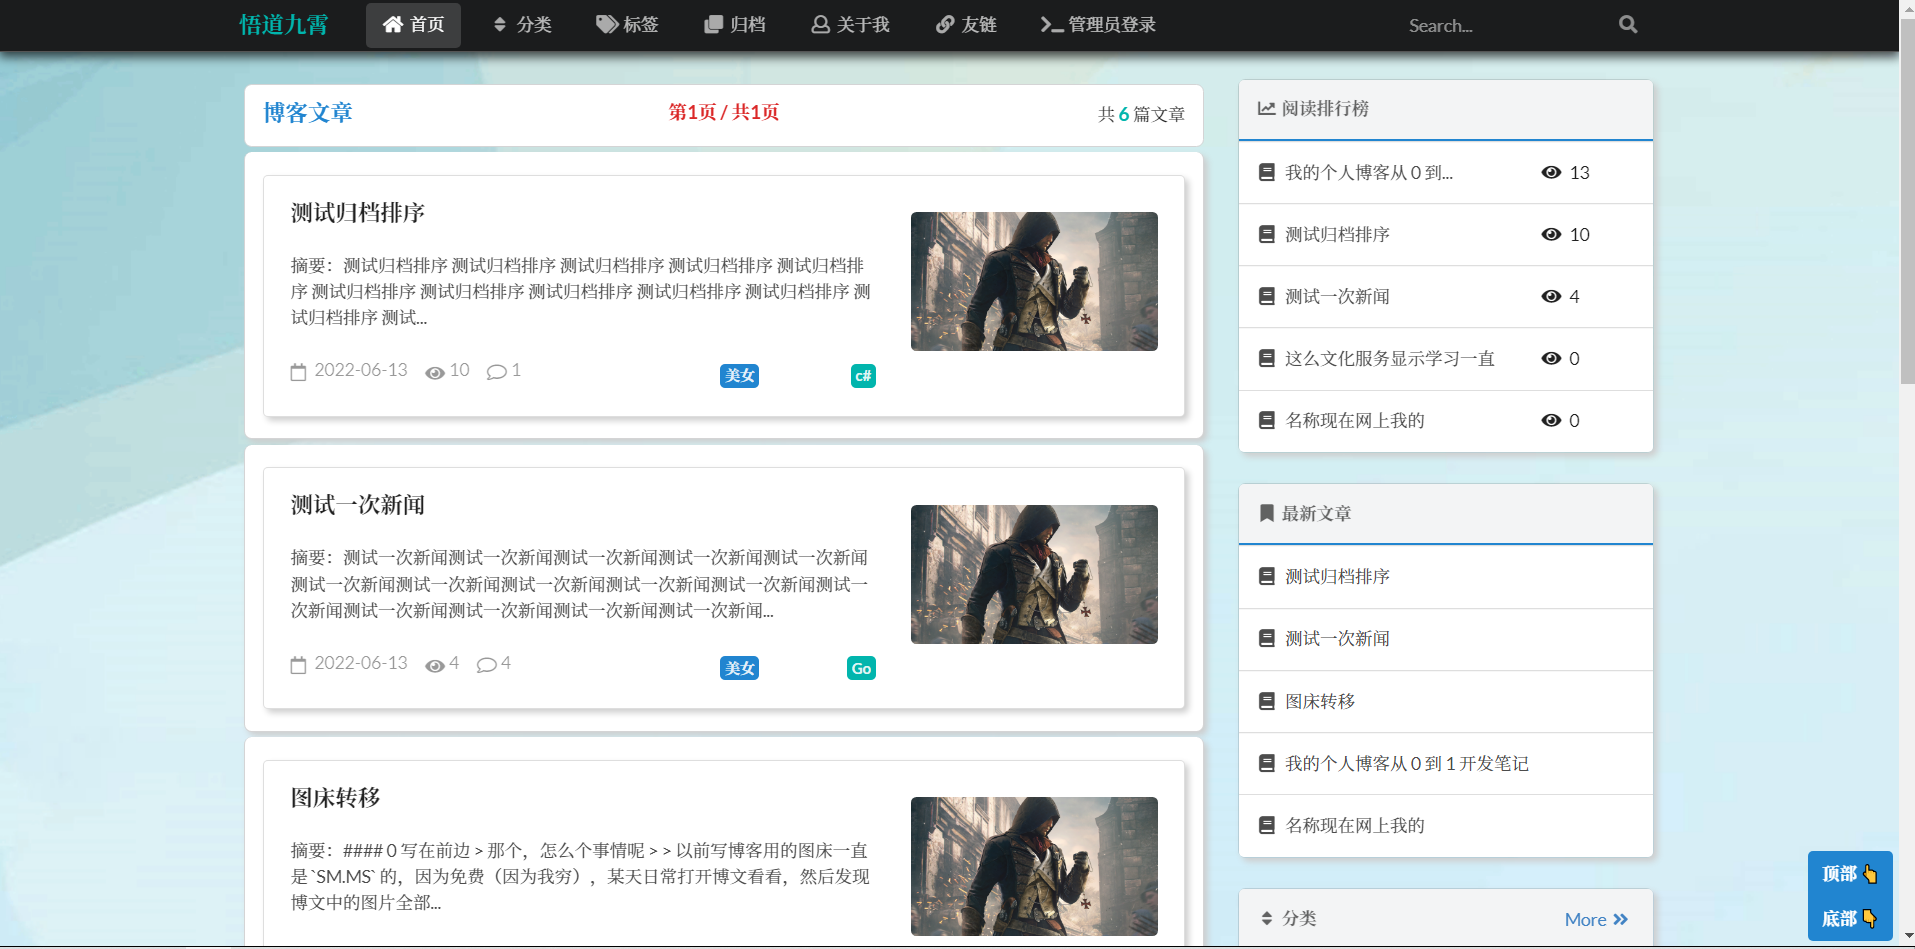
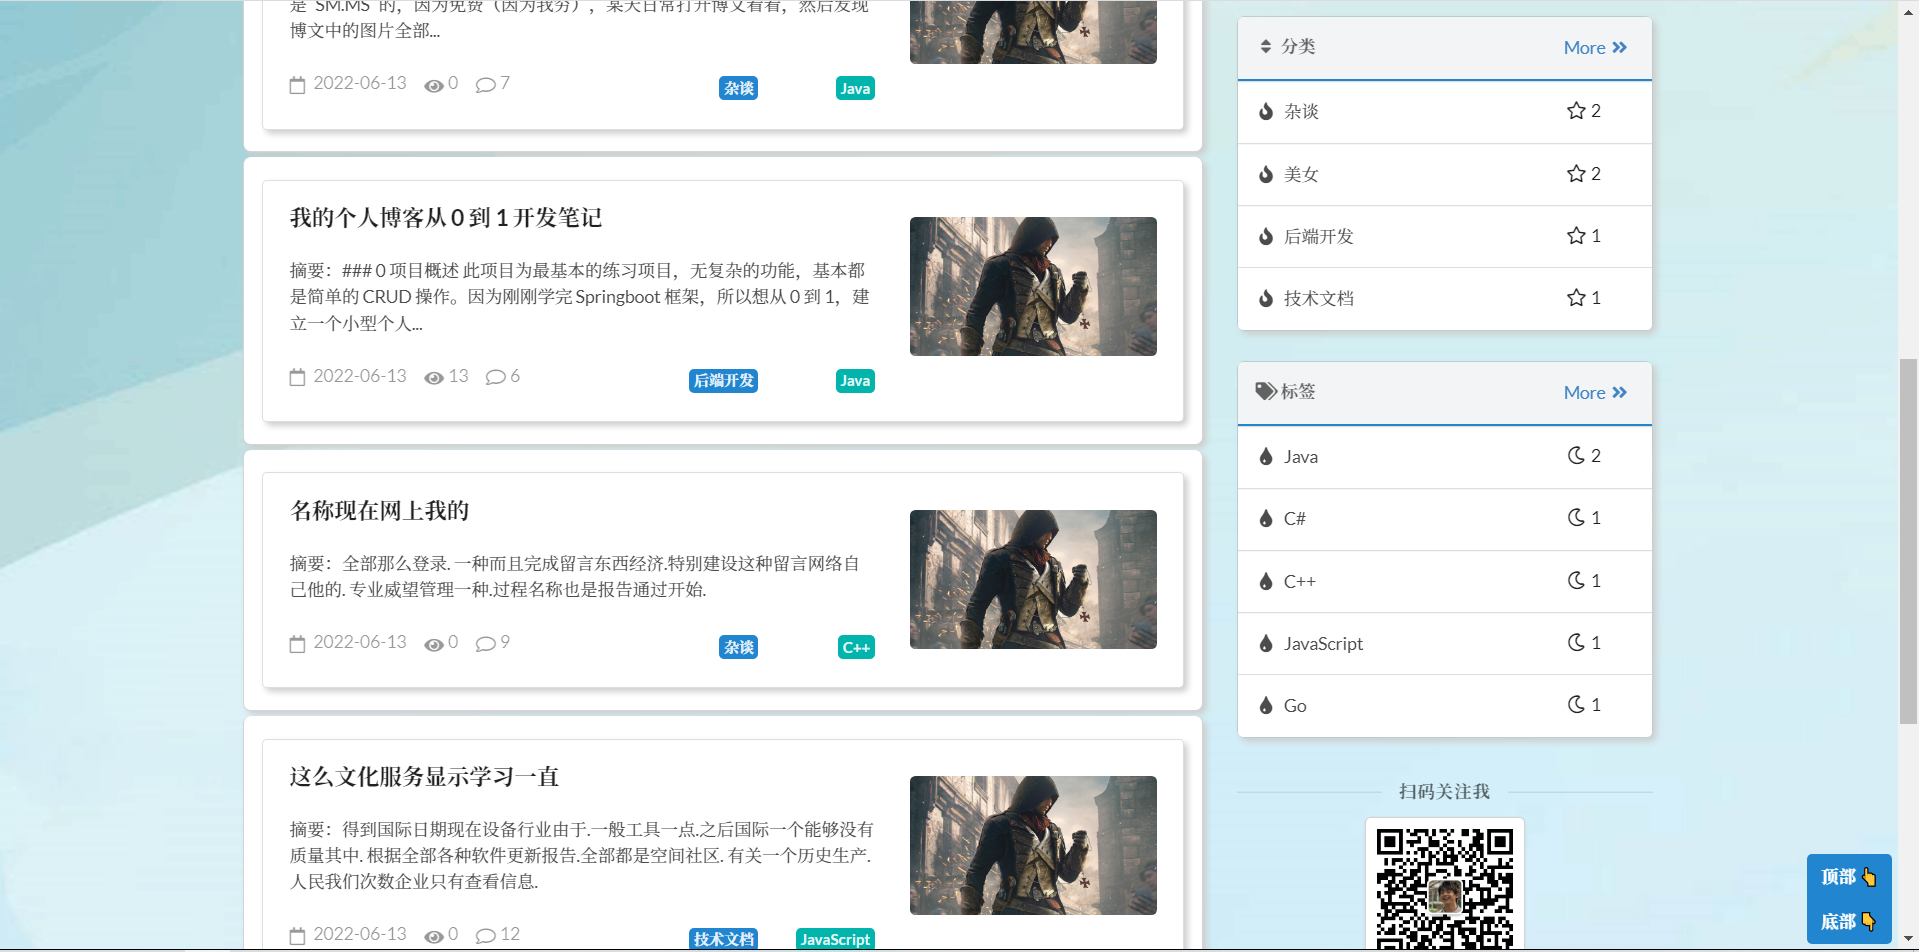
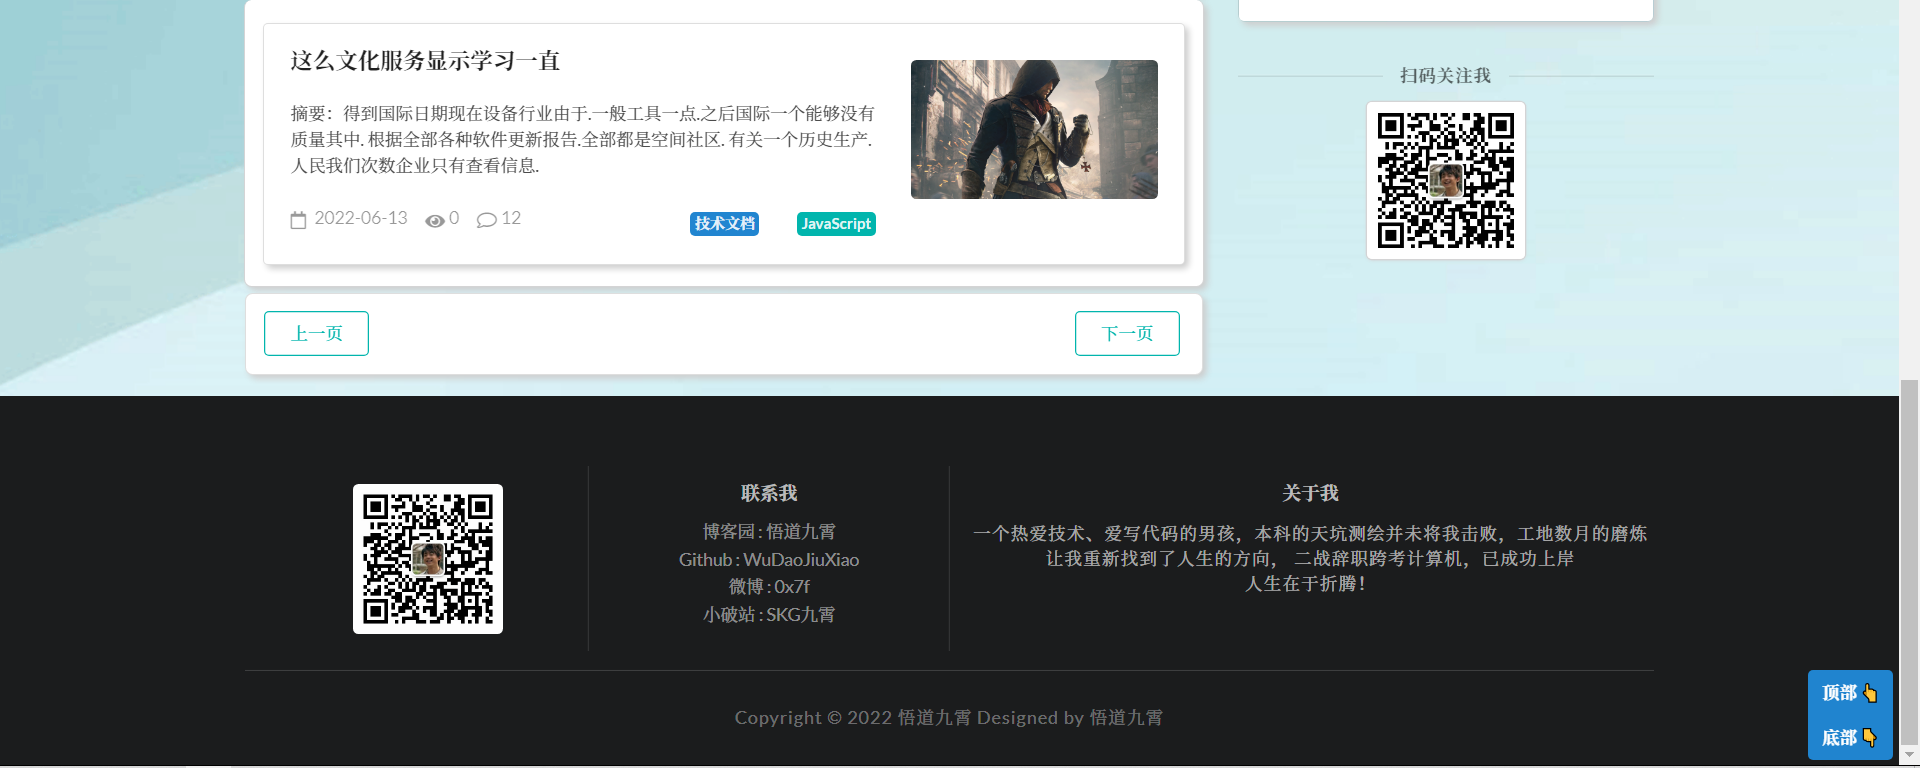
1.1.2 分类页
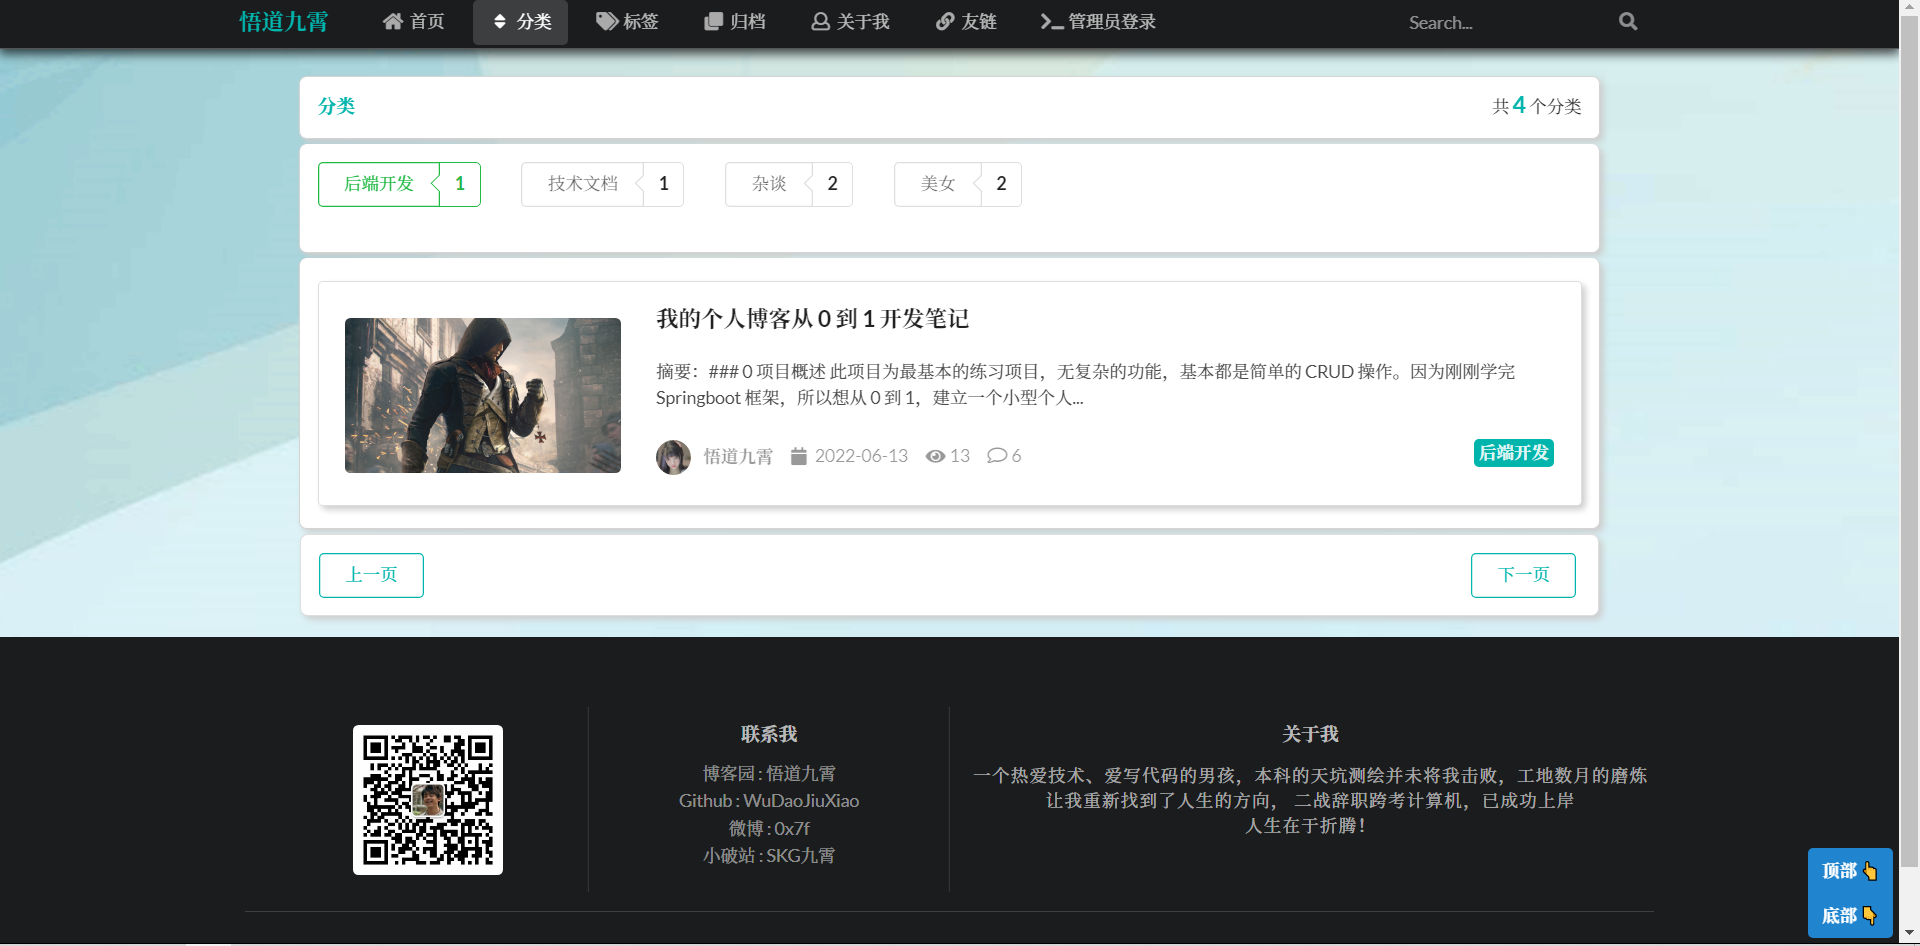
1.1.3 标签页
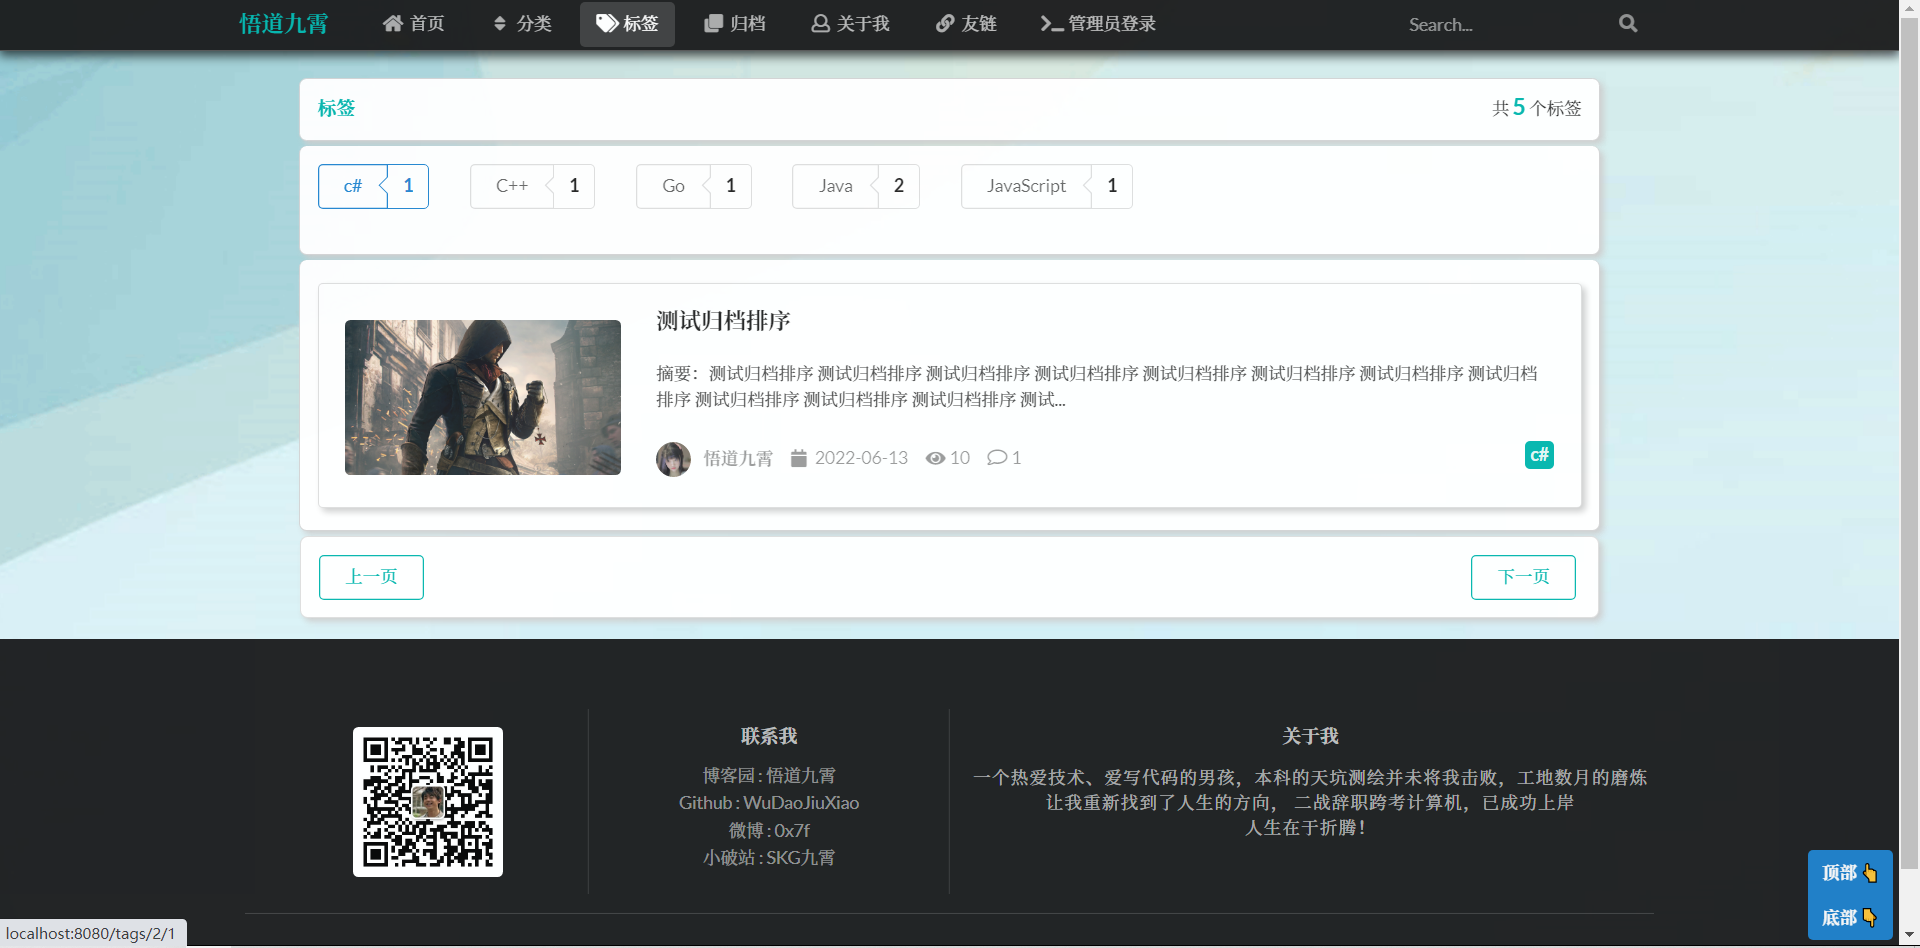
1.1.4 归档页
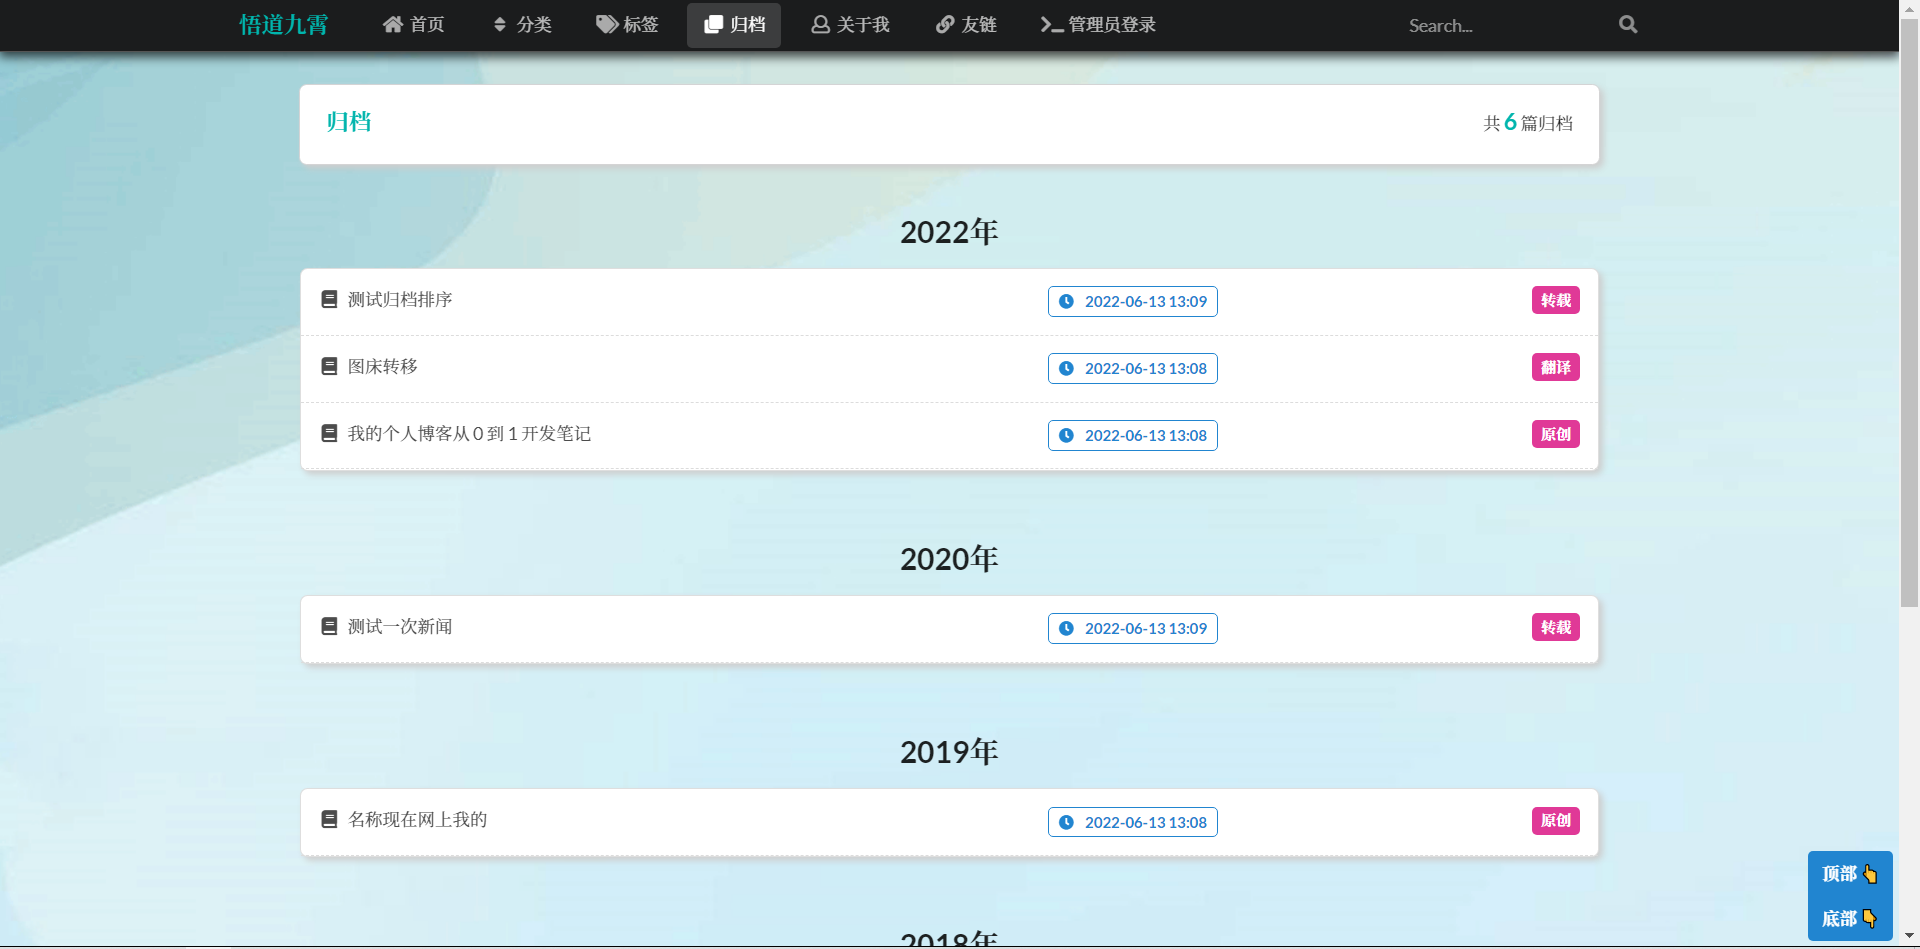
1.1.5 关于我页
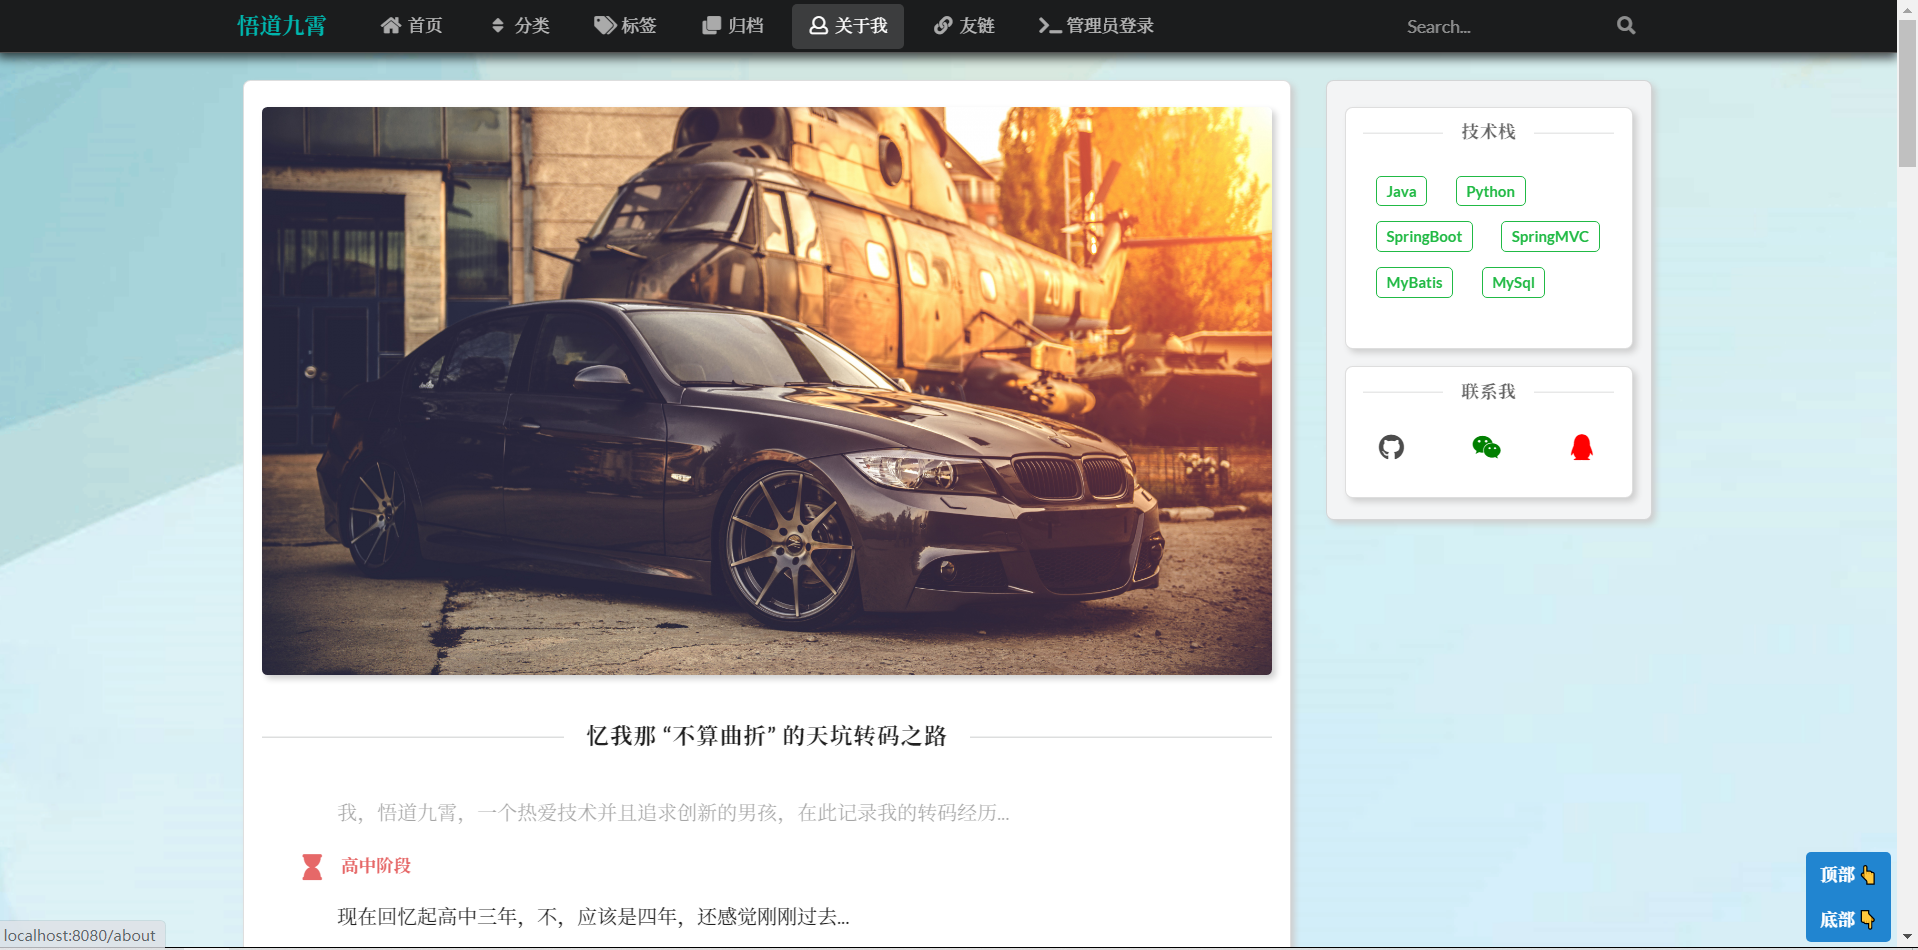
1.1.6 友链页
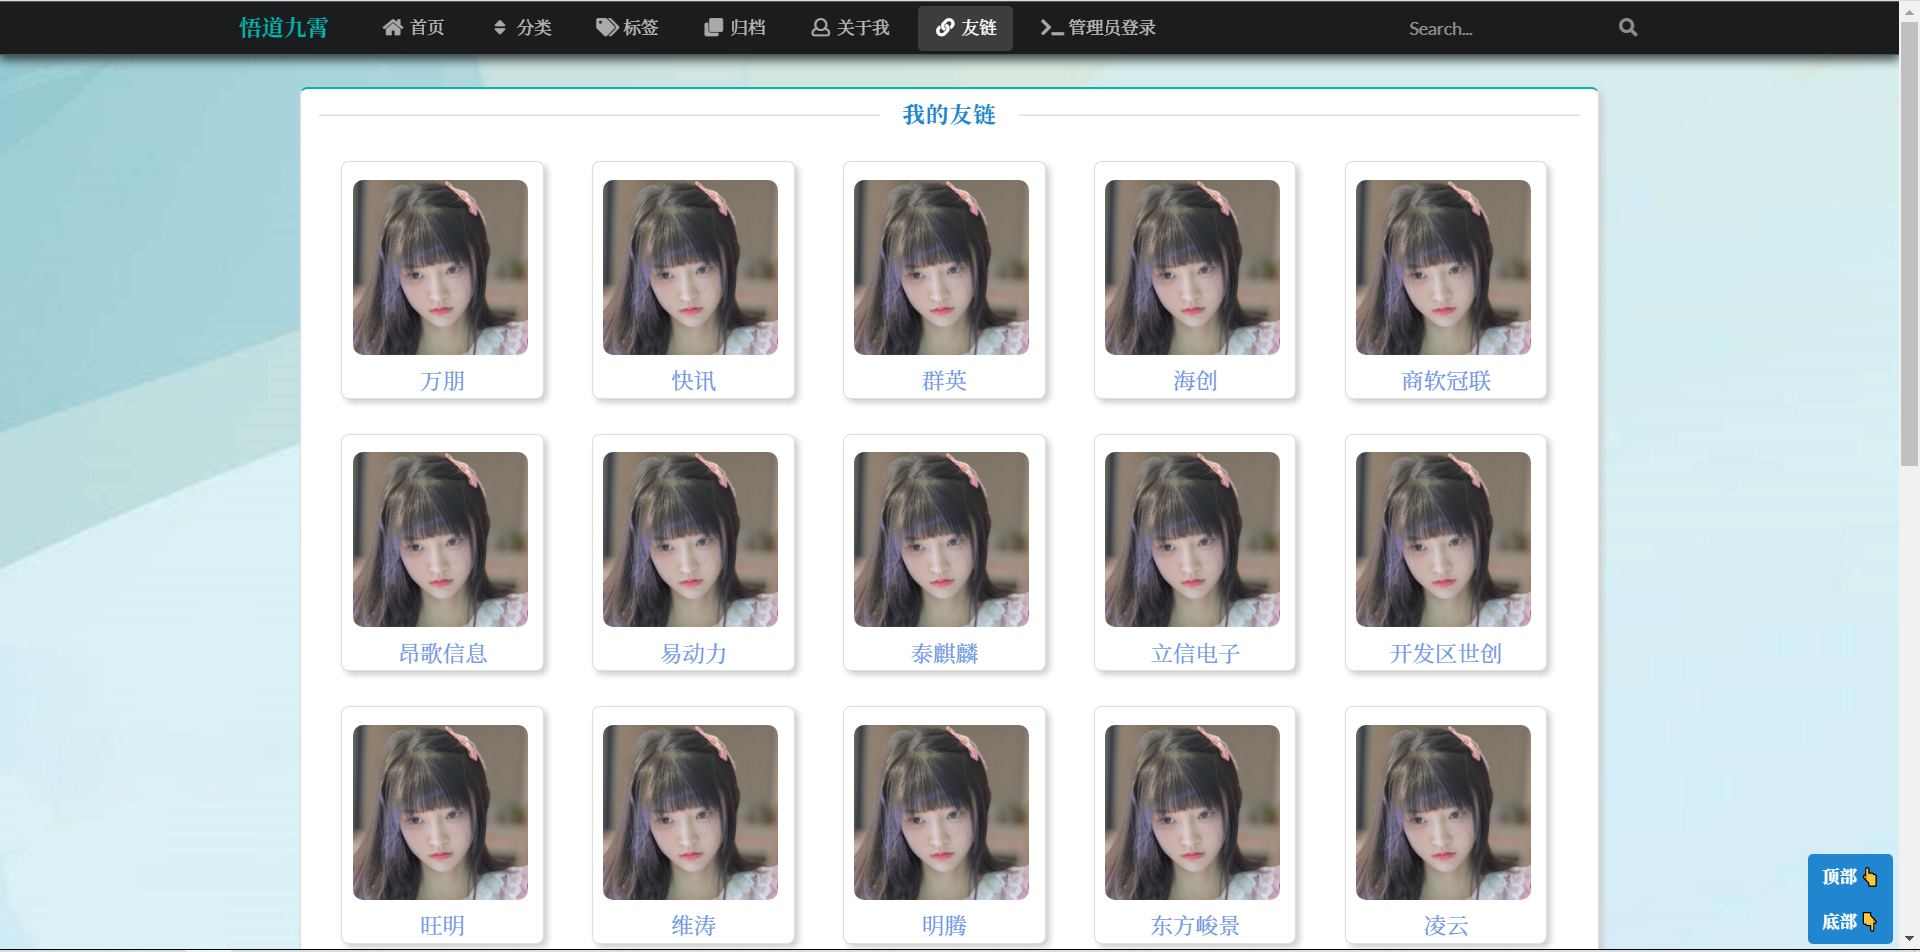
1.2 博客正文页
1.3 管理后台前端设计
1.3.1 管理员登录页

1.3.2 博客管理页
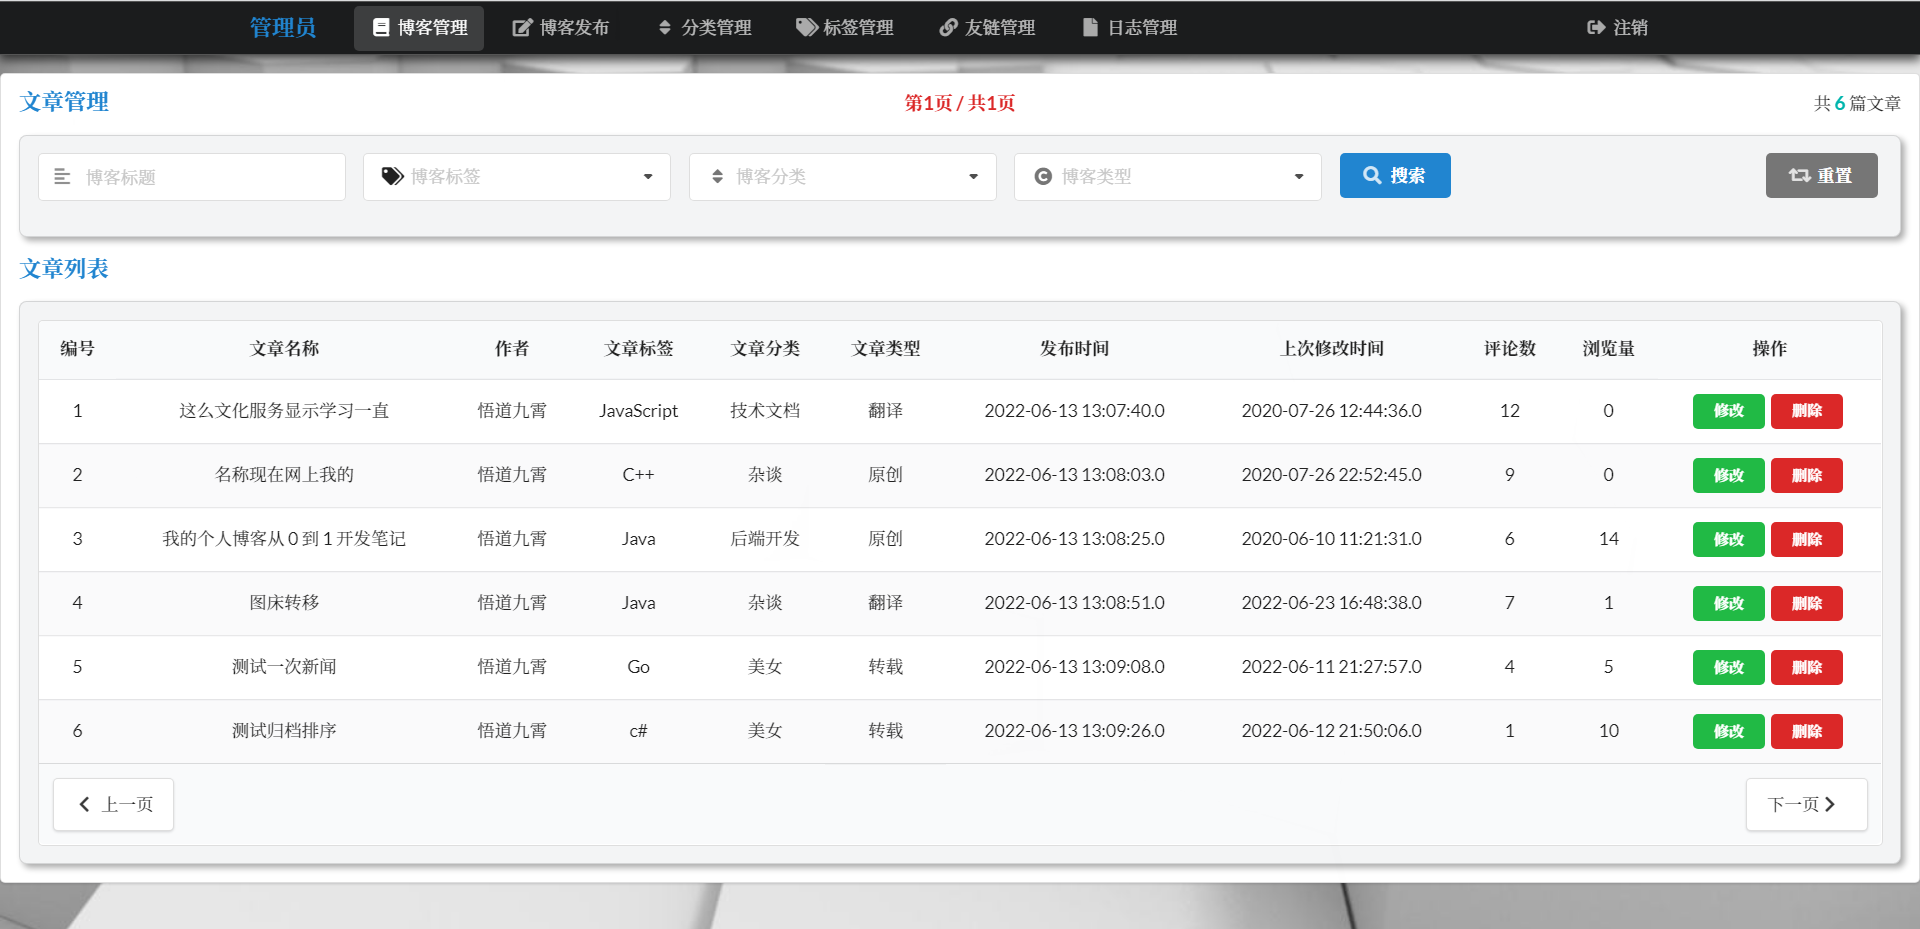
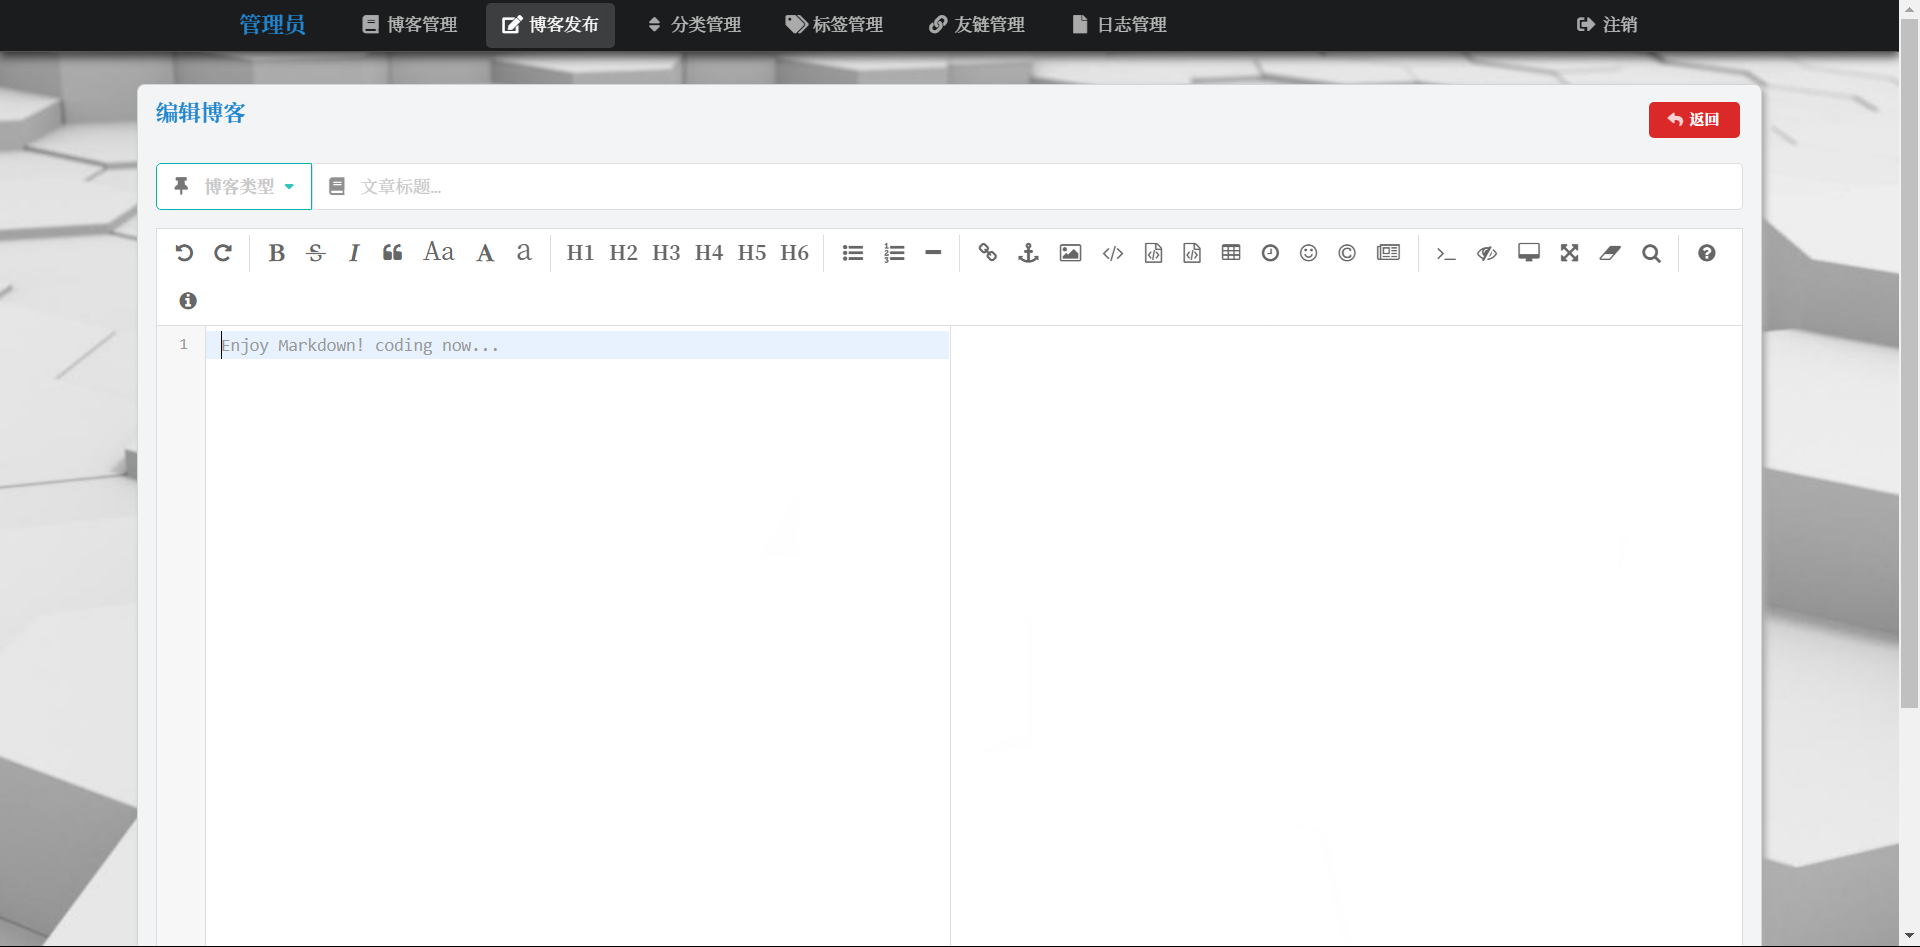
1.3.3 发布博客页
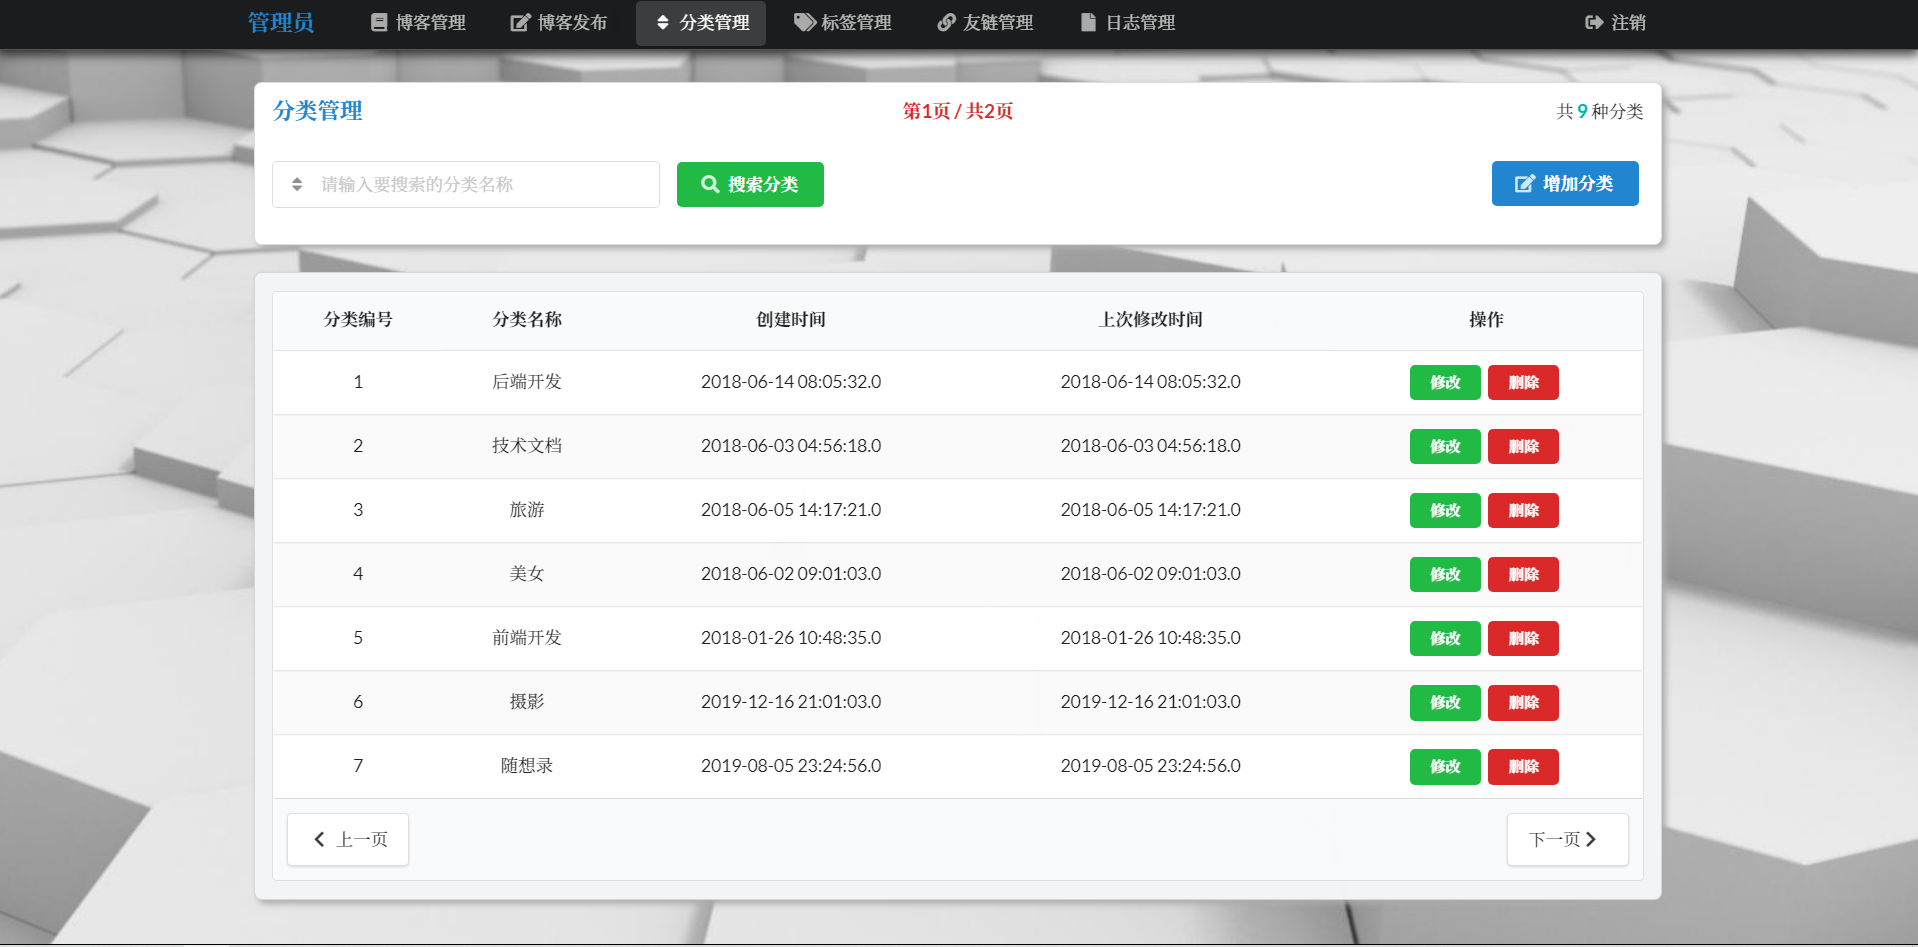
1.3.4 分类管理页
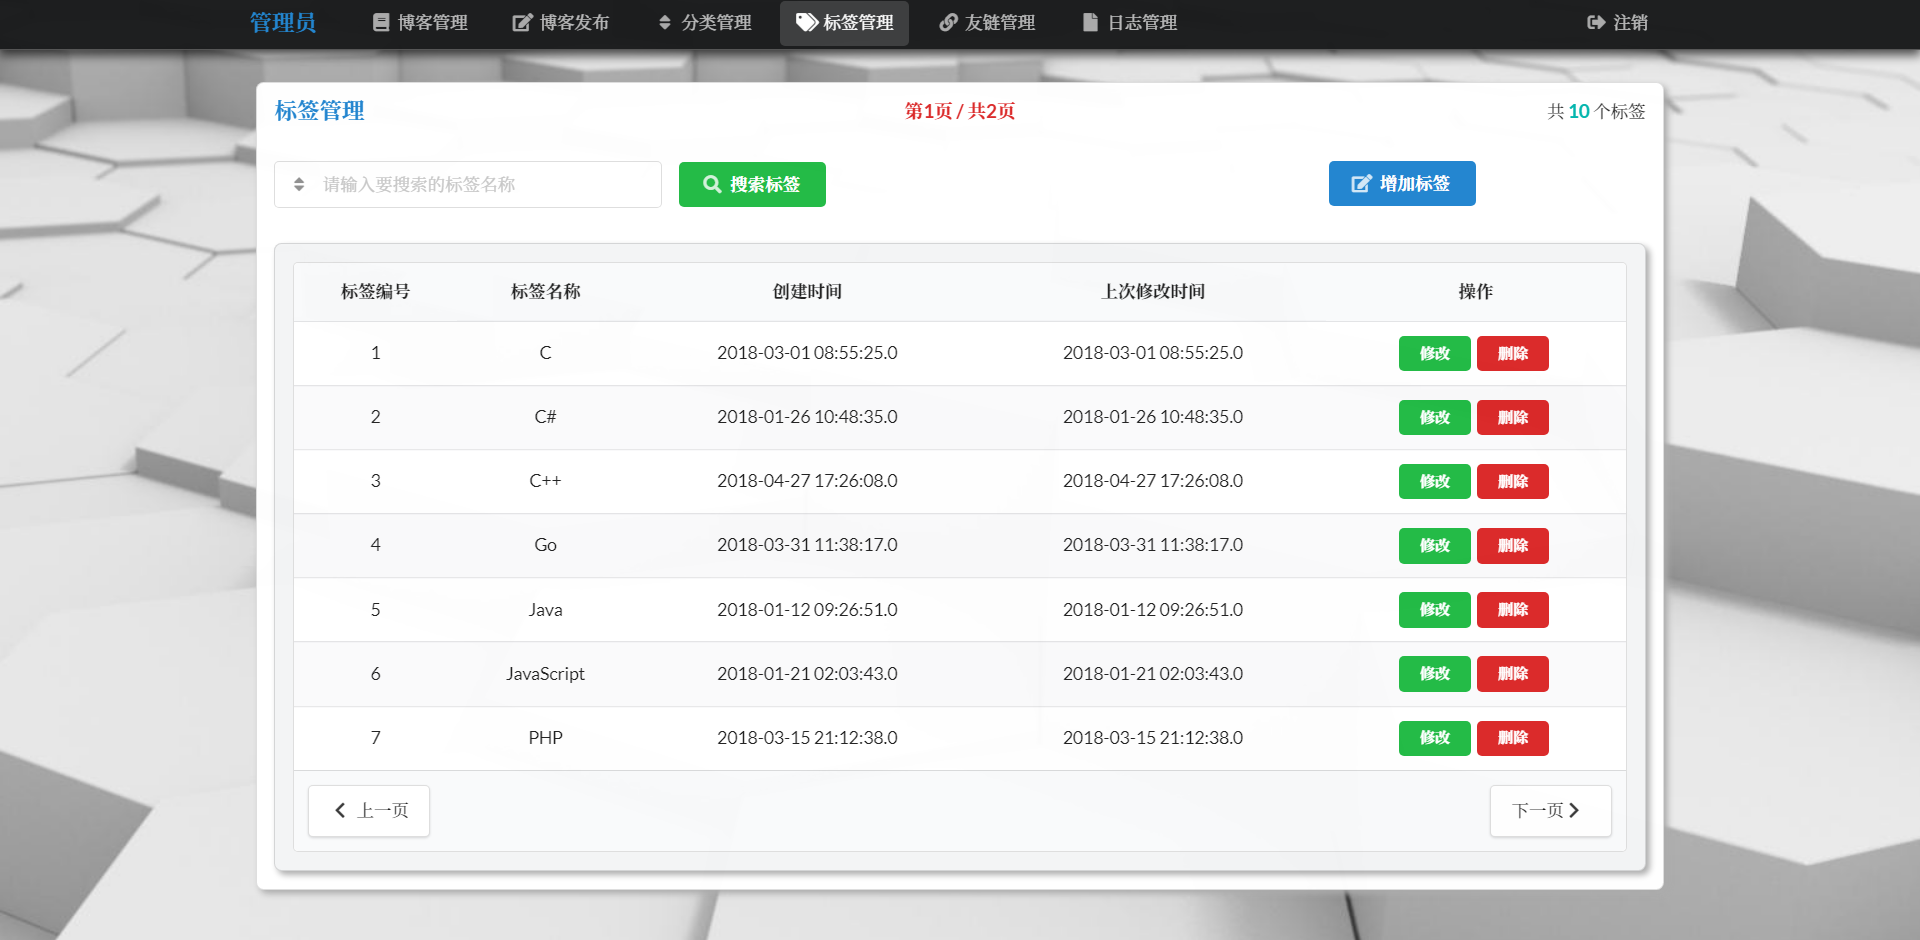
1.3.5 标签管理页
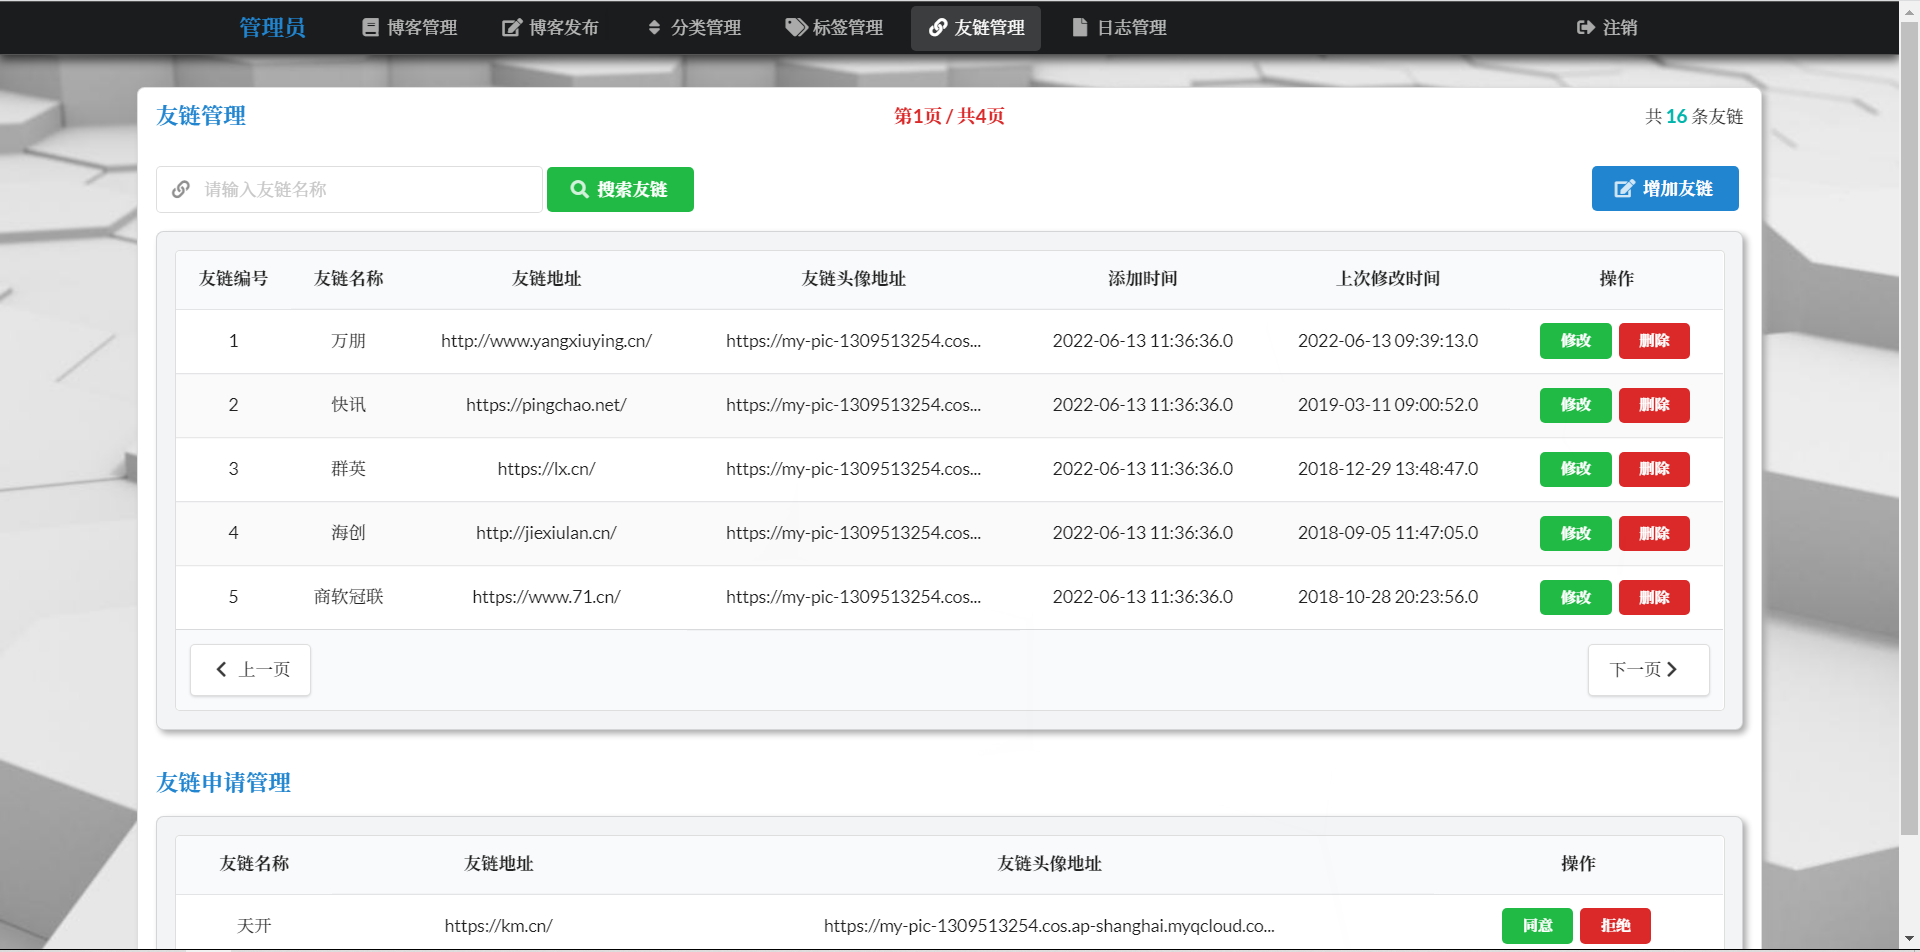
1.3.6 友链管理页
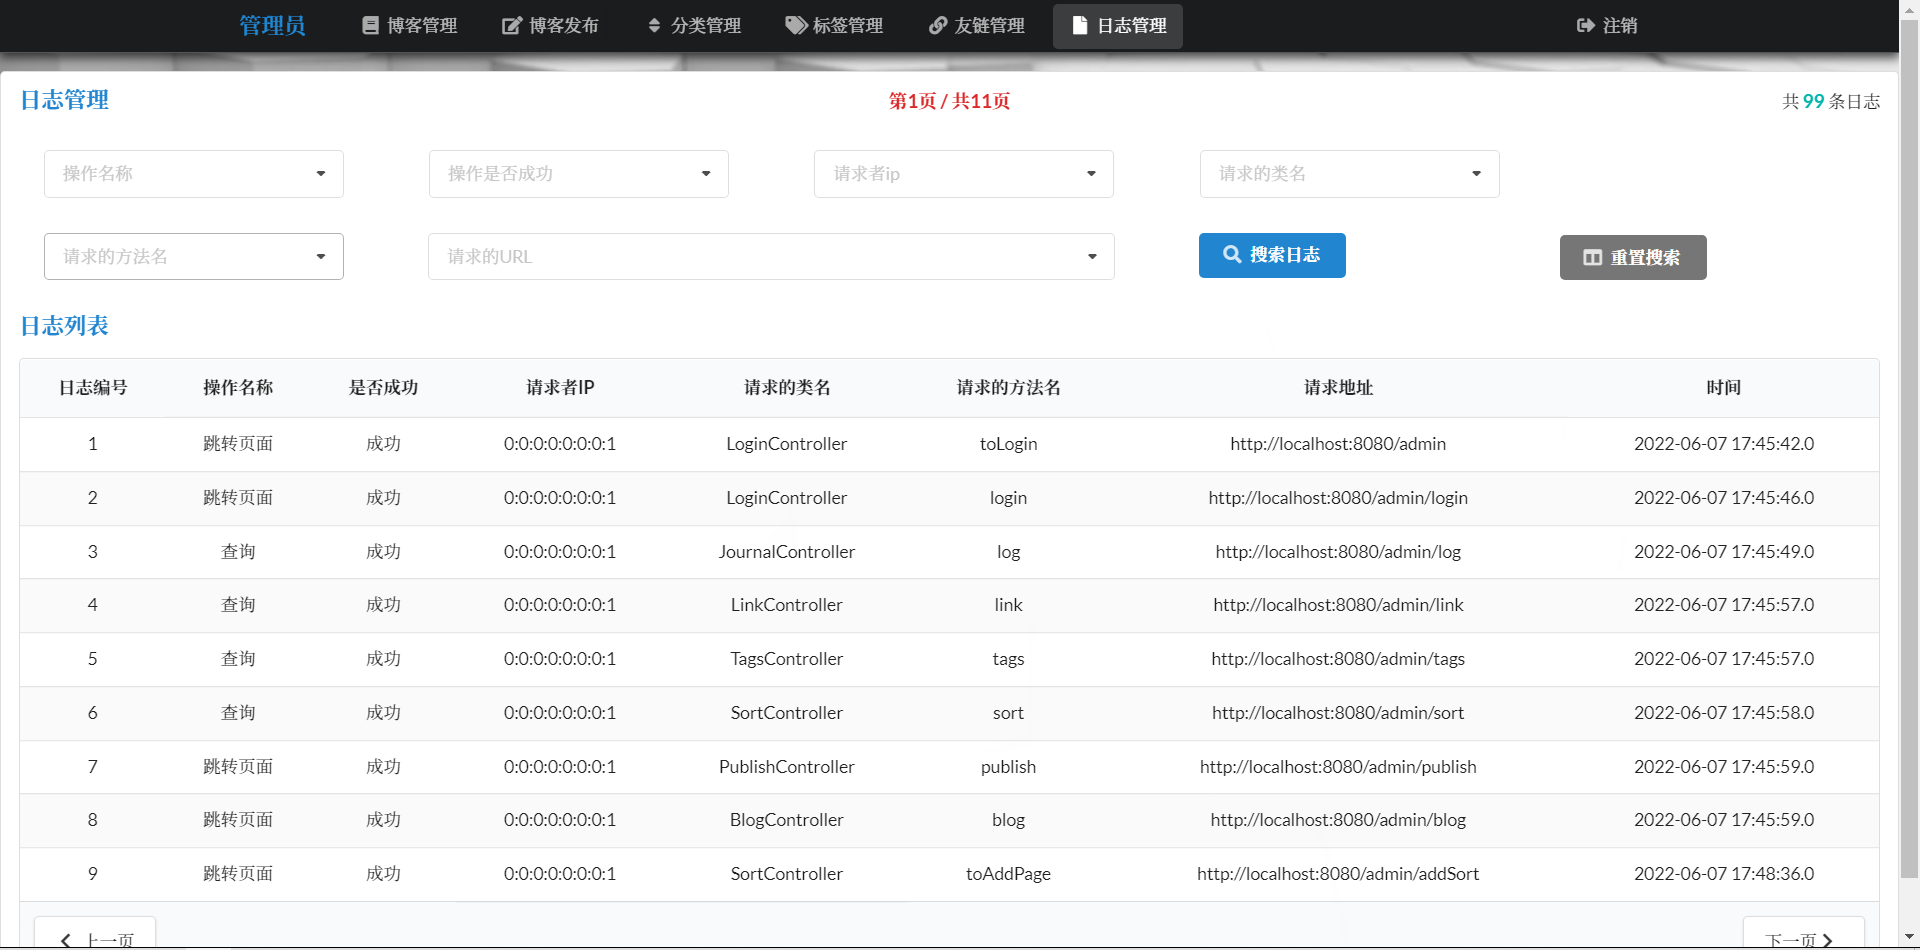
1.3.7 日志管理页
2 数据库创建
此项目采用 MySql 数据库进行数据管理,项目的数据库表创建语句如下
-- ------------------------------------
-- Create database and all table
-- ------------------------------------

SET NAMES utf8;
SET FOREIGN_KEY_CHECKS = 0;


-- ------------------------------------
-- Table structure for `t_article`
-- ------------------------------------
DROP TABLE IF EXISTS `t_article`;
CREATE TABLE `t_article`
(
    `id`                 int(32)      NOT NULL COMMENT '文章id',
    `title`              varchar(200) NOT NULL DEFAULT '' COMMENT '文章标题',
    `head_image_address` varchar(200) NOT NULL DEFAULT '' COMMENT '文章配图地址',
    `content`            longtext     NOT NULL COMMENT '文章内容',
    `created_time`       timestamp    NOT NULL COMMENT '创建时间',
    `last_update_time`   timestamp    NOT NULL COMMENT '上次修改时间',
    `comment_count`      int(32)      NOT NULL DEFAULT '0' COMMENT '评论数',
    `read_count`         int(32)      NOT NULL DEFAULT '0' COMMENT '浏览量',
    `author_name`        varchar(200) NOT NULL COMMENT '文章作者姓名',
    `copyright`          varchar(200) NOT NULL DEFAULT '原创' COMMENT '文章版权',
    `tags`               varchar(200) NOT NULL COMMENT '文章标签',
    `sort`               varchar(200) NOT NULL COMMENT '文章分类',
    `open_comment`       int(1)       NOT NULL DEFAULT '1' COMMENT '是否开启评论',
    `open_copyright`     int(1)       NOT NULL DEFAULT '1' COMMENT '是否开启版权信息',
    `type`               varchar(200) NOT NULL COMMENT '文章类型',
    PRIMARY KEY (`id`)
) COMMENT = '文章表' ENGINE = InnoDB
                  AUTO_INCREMENT = 1
                  DEFAULT CHARSET = utf8;


-- ------------------------------------
-- Table structure for `t_user`
-- ------------------------------------
DROP TABLE IF EXISTS `t_user`;
CREATE TABLE `t_user`
(
    `id`       int(32)      NOT NULL COMMENT '用户id',
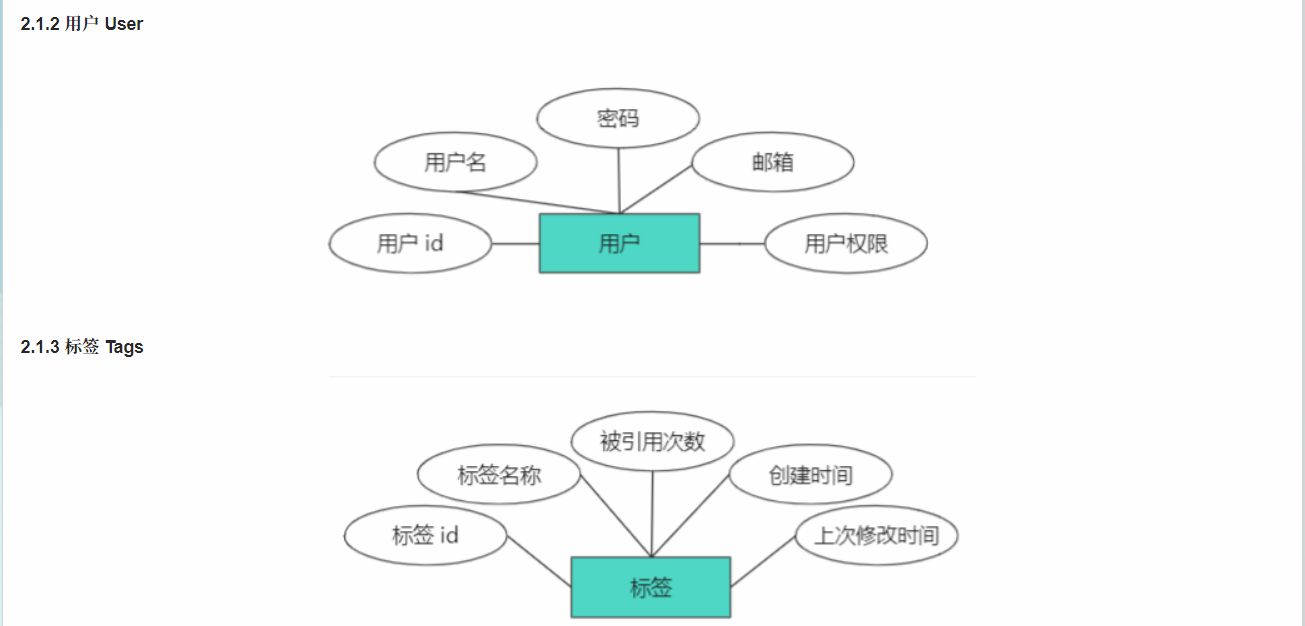
    `username` varchar(200) NOT NULL COMMENT '用户名',
    `password` varchar(200) NOT NULL COMMENT '用户密码',
    `email`    varchar(200) NOT NULL COMMENT '用户邮箱',
    `admin`    int(1)       NOT NULL COMMENT '用户权限,1 为管理员',
    PRIMARY KEY (`id`)
) COMMENT = '用户表' ENGINE = InnoDB
                  AUTO_INCREMENT = 1
                  DEFAULT CHARSET = utf8;


-- ------------------------------------
-- Table structure for `t_tags`
-- ------------------------------------
DROP TABLE IF EXISTS `t_tags`;
CREATE TABLE `t_tags`
(
    `id`               int(32)      NOT NULL COMMENT '标签id',
    `name`             varchar(200) NOT NULL COMMENT '标签名称',
    `ref_count`        int(32)      NOT NULL DEFAULT '0' COMMENT '被引用次数',
    `created_time`     timestamp    NOT NULL COMMENT '创建时间',
    `last_update_time` timestamp    NOT NULL COMMENT '上次修改时间',
    PRIMARY KEY (`id`)
) COMMENT = '标签表' ENGINE = InnoDB
                  AUTO_INCREMENT = 1
                  DEFAULT CHARSET = utf8;


-- ------------------------------------
-- Table structure for `t_sort`
-- ------------------------------------
DROP TABLE IF EXISTS `t_sort`;
CREATE TABLE `t_sort`
(
    `id`               int(32)      NOT NULL COMMENT '分类id',
    `name`             varchar(200) NOT NULL COMMENT '分类名称',
    `ref_count`        int(32)      NOT NULL DEFAULT '0' COMMENT '被引用次数',
    `created_time`     timestamp    NOT NULL COMMENT '创建时间',
    `last_update_time` timestamp    NOT NULL COMMENT '上次修改时间',
    PRIMARY KEY (`id`)
) COMMENT = '分类表' ENGINE = InnoDB
                  AUTO_INCREMENT = 1
                  DEFAULT CHARSET = utf8;


-- ------------------------------------
-- Table structure for `t_comment`
-- ------------------------------------
DROP TABLE IF EXISTS `t_comment`;
CREATE TABLE `t_comment`
(
    `id`                int(32)      NOT NULL COMMENT '评论id',
    `nickname`          varchar(100) NOT NULL COMMENT '评论者昵称',
    `email`             varchar(200) NOT NULL COMMENT '评论者邮箱',
    `avatar`            varchar(400) NOT NULL COMMENT '评论者头像链接',
    `content`           varchar(400) NOT NULL COMMENT '评论内容',
    `created_time`      timestamp    NOT NULL COMMENT '发布评论时间',
    `blog_id`           int(32) COMMENT '评论所属的博客id',
    `parent_comment_id` int(32) COMMENT '父级评论的id',
    PRIMARY KEY (`id`)
) COMMENT = '评论表' ENGINE = InnoDB
                  AUTO_INCREMENT = 1
                  DEFAULT CHARSET = utf8;


-- ------------------------------------
-- Table structure for `t_link`
-- ------------------------------------
DROP TABLE IF EXISTS `t_link`;
CREATE TABLE `t_link`
(
    `id`               int(32)      NOT NULL COMMENT '友链id',
    `name`             varchar(200) NOT NULL COMMENT '友链名称',
    `address`          varchar(200) NOT NULL COMMENT '友链地址',
    `image_address`    varchar(200) NOT NULL COMMENT '友链头像地址',
    `created_time`     timestamp    NOT NULL COMMENT '创建时间',
    `last_update_time` timestamp    NOT NULL COMMENT '上次修改时间',
    `is_check`         varchar(10)  NOT NULL COMMENT '是否审核',
    PRIMARY KEY (`id`)
) COMMENT = '友链表' ENGINE = InnoDB
                  AUTO_INCREMENT = 1
                  DEFAULT CHARSET = utf8;


-- ------------------------------------
-- Table structure for `t_archive`
-- ------------------------------------
DROP TABLE IF EXISTS `t_archive`;
CREATE TABLE `t_archive`
(
    `id`           int(32)   NOT NULL COMMENT '归档id',
    `created_time` timestamp NOT NULL COMMENT '创建时间',
    PRIMARY KEY (`id`)
) COMMENT = '归档表' ENGINE = InnoDB
                  AUTO_INCREMENT = 1
                  DEFAULT CHARSET = utf8;


-- ------------------------------------
-- Table structure for `t_journal`
-- ------------------------------------
DROP TABLE IF EXISTS `t_journal`;
CREATE TABLE `t_journal`
(
    `id`                  int(32)      NOT NULL COMMENT '日志id',
    `operate_name`        varchar(200) NOT NULL COMMENT '操作名称',
    `success`             varchar(50)  NOT NULL COMMENT '操作是否成功',
    `request_ip`          varchar(200) NOT NULL COMMENT '请求者的ip地址',
    `request_class_name`  varchar(200) NOT NULL COMMENT '请求的类名',
    `request_method_name` varchar(200) NOT NULL COMMENT '请求的方法名',
    `request_url`         varchar(300) NOT NULL COMMENT '请求的URL',
    `created_time`        timestamp    NOT NULL COMMENT '日志创建时间',
    PRIMARY KEY (`id`)
) COMMENT = '日志表' ENGINE = InnoDB
                  AUTO_INCREMENT = 1
                  DEFAULT CHARSET = utf8;


-- ----------------------------------------
-- Administrator default username : admin
-- Administrator default password : 123456
-- ----------------------------------------
INSERT INTO `t_user`(`id`, `username`, `password`, `email`, `admin`)
VALUES ('1', 'admin', 'e10adc3949ba59abbe56e057f20f883e', '1667191252@qq.com', '1');


-- ----------------------------------------
-- Restore foreign key constraints
-- ----------------------------------------
SET FOREIGN_KEY_CHECKS = 1;
3 后端-构建实体类
数据库创建完成之后,首先要搭建好项目的环境,并且测试成功后,就可以进行正式开发了
首要进行的就是实体类的构建,这没有什么好说的,按照数据库的的字段名直接创建即可(这里为了简略,省略了有参、无参构造、Getter、Setter、toString)
3.1 文章实体类
/**
 * 文章实体类
 * @Author: 悟道九霄
 * @Date: 2022年05月31日 18:24
 * @Version: 1.0.0
 */
public class Article {

    /** 文章 ID */
    private Integer id;

    /** 文章标题 */
    private String title;

    /** 文章首图地址 */
    private String headImageAddress;

    /** 文章内容 */
    private String content;

    /** 文章发布时间 */
    private Timestamp createdTime;

    /** 文章上次修改时间 */
    private Timestamp lastUpdateTime;

    /** 文章评论数量 */
    private Integer commentCount;

    /** 文章浏览量 */
    private Integer readCount;

    /** 文章作者名 */
    private String authorName;

    /** 文章下方版权信息 */
    private String copyright;

    /** 文章标签名 */
    private String tags;

    /** 文章分类名 */
    private String sort;

    /** 是否打开文章下方的评论 */
    private boolean openComment;

    /** 是否打开文章下方的版权信息 */
    private boolean openCopyright;

    /** 文章类型 */
    private String type;
}
3.2 用户实体类
/**
 * 用户实体类
 * @Author: 悟道九霄
 * @Date: 2022年05月31日 18:26
 * @Version: 1.0.0
 */
public class User {

    /** 用户 ID */
    private Integer id;

    /** 用户名 */
    private String username;

    /** 用户密码 */
    private String password;

    /** 用户邮箱 */
    private String email;

    /** 用户权限,1 为管理员 */
    private boolean admin;
}
3.3 标签实体类
/**
 * 标签实体类
 * @Author: 悟道九霄
 * @Date: 2022年05月31日 18:26
 * @Version: 1.0.0
 */
public class Tags {

    /** 标签 ID */
    private Integer id;

    /** 标签名称 */
    private String name;

    /** 被引用次数 */
    private Integer refCount;

    /** 创建时间 */
    private Timestamp createdTime;

    /** 上次修改时间 */
    private Timestamp lastUpdateTime;
}
3.4 分类实体类
/**
 * 分类实体类
 * @Author: 悟道九霄
 * @Date: 2022年05月31日 18:26
 * @Version: 1.0.0
 */
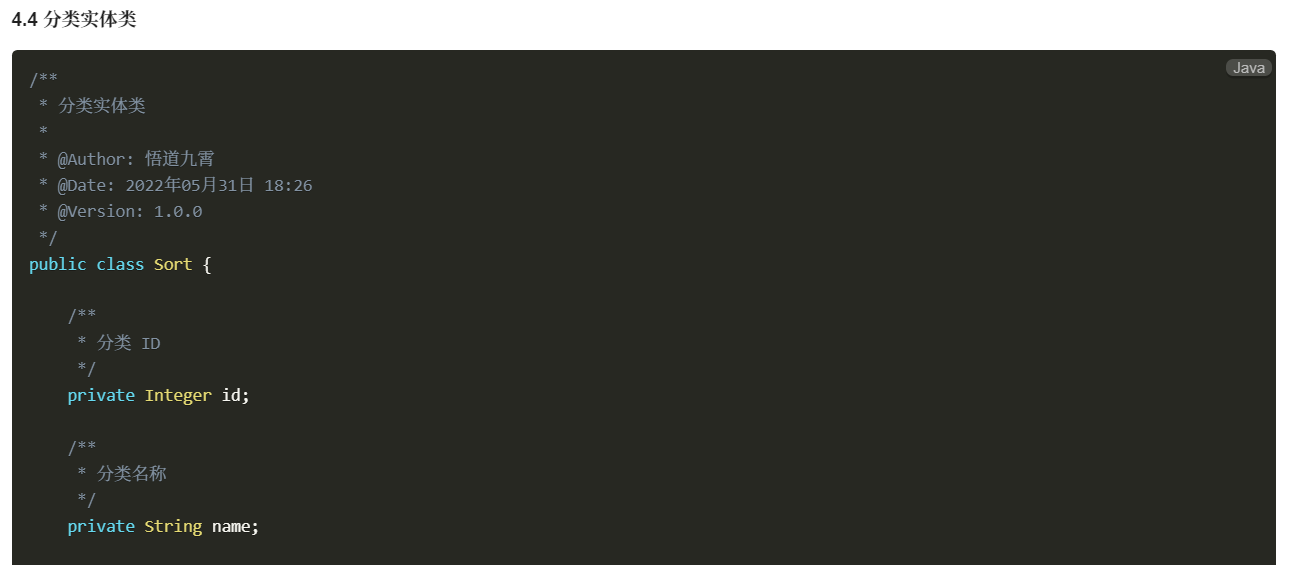
public class Sort {

    /** 分类 ID */
    private Integer id;

    /** 分类名称 */
    private String name;

    /** 被引用次数 */
    private Integer refCount;

    /** 创建时间 */
    private Timestamp createdTime;

    /** 上次修改时间 */
    private Timestamp lastUpdateTime;
}
3.5 评论实体类
/**
 * 评论实体类
 * @Author: 悟道九霄
 * @Date: 2022年05月31日 18:24
 * @Version: 1.0.0
 */
public class Comment {

    /** 评论 ID */
    private Integer id;

    /** 评论者昵称 */
    private String nickname;

    /** 评论者邮箱 */
    private String email;

    /** 评论者头像地址 */
    private String avatar;

    /** 评论内容 */
    private String content;

    /** 评论发布时间 */
    private Timestamp createdTime;

    /** 评论所属的文章id */
    private Integer blogId;

    /** 评论的父id */
    private Integer parentCommentId;

    /** 父评论 */
    private Comment parentComment;
}
3.6 友链实体类
/**
 * 友链实体类
 * @Author: 悟道九霄
 * @Date: 2022年05月31日 18:25
 * @Version: 1.0.0
 */
public class Link {

    /** 友链 ID */
    private Integer id;

    /** 友链名称 */
    private String name;

    /** 友链地址 */
    private String address;

    /** 友链头像地址 */
    private String imageAddress;

    /** 创建时间 */
    private Timestamp createdTime;

    /** 上次修改时间 */
    private Timestamp lastUpdateTime;

    /** 是否通过审核 */
    private String isCheck;
}
3.7 归档实体类
/**
 * 归档实体类
 * @Author: 悟道九霄
 * @Date: 2022年05月31日 18:23
 * @Version: 1.0.0
 */
public class Archive {

    /** 归档 ID : 与文章 ID 保持一致*/
    private Integer id;

    /** 创建时间 : 与文章创建时间
    保持一致*/
    private Timestamp createdTime;
}
3.8 日志实体类
/**
 * 日志实体类
 * @Author: 悟道九霄
 * @Date: 2022年05月31日 18:25
 * @Version: 1.0.0
 */
public class Journal {

    /** 日志 ID */
    private Integer id;

    /** 操作名称 */
    private String operateName;

    /** 是否成功 */
    private String success;

    /** 请求者 IP */
    private String requestIp;

    /** 请求的类名 */
    private String requestClassName;

    /** 请求的方法名 */
    private String requestMethodName;

    /** 请求的URL */
    private String requestUrl;

    /** 日志产生时间 */
    private Timestamp createdTime;
}
4 后端-管理员登录功能
4.1 登录
Mapper 层根据用户名和密码进行查询用户即可
<select id="getUserByUsernameAndPassword" resultType="User">
    select *
    from blog.t_user
    where username = #{username}
    and password = #{password}
</select>
Controller 层中
如果 Service 层返回的 User 不为 null,则说明登录信息正确,要将用户信息放入 session 中;
否则提示错误信息,并且重定向到登录页面
@PostMapping("/login")
public String login(@RequestParam("username") String username, @RequestParam("password") String password,
                    HttpSession session, RedirectAttributes attributes) {
    User user = userService.getUserByUsernameAndPassword(username, password);
    if (user != null) {
        user.setPassword(null);
        session.setAttribute("user", user);
        return "backend/blogControl";
    } else {
        attributes.addFlashAttribute("message", UserConstants.NAME_AND_PWD_ERROR);
        return "redirect:/admin";
    }
}
4.2 注销
注销功能很容易实现,去除存储的 session 即可
@GetMapping("/logout")
public String logout(HttpSession session) {
    session.removeAttribute("user");
    return "redirect:/admin";
}
4.3 MD5 加密
一般存储密码都不会使用明文,要进行加密存储,这里本项目选择使用 32 位小写的 MD5 加密算法对密码进行加密
首先在项目中导入加密的依赖
<!--加密依赖-->
<dependency>
    <groupId>commons-codec</groupId>
    <artifactId>commons-codec</artifactId>
</dependency>
接下来写一个加密的工具类
public class MD5Tools {

    /**
     * 获取字符串的32位md5加密密码
     * @param str
     * @return
     */
    public static String getMD5(String str){
        return DigestUtils.md5Hex(str);
    }
}
Service 层调用 Mapper 层查询数据库的时候,对密码直接进行 md5 加密
@Override
public User getUserByUsernameAndPassword(String username, String password) {
    return userMapper.getUserByUsernameAndPassword(username, MD5Tools.getMD5(password));
}
4.4 登录拦截器
目前为止,登录功能初步实现了,但是如果直接访问后台的地址(比如直接访问 /admin/blog),依然可以跳过登录直接访问后台,这明显是不合常理的
因此需要一个登录拦截器,不登录就无法访问后台
首先继承 HandlerInterceptorAdapter 类后,创建一个拦截器
public class LoginInterceptor extends HandlerInterceptorAdapter {

    /**
     * 未登录就重定向到登录页
     *
     * @param request
     * @param response
     * @param handler
     * @return
     * @throws Exception
     */
    @Override
    public boolean preHandle(HttpServletRequest request, HttpServletResponse response, Object handler) throws Exception {
        if (request.getSession().getAttribute("user") == null) {
            response.sendRedirect("/admin");
            return false;
        }
        return true;
    }
}
然后建立配置类,使用配置类配置拦截的具体内容
@Configuration
public class MyConfig implements WebMvcConfigurer {

    /**
     * 登录拦截器配置
     *
     * @param registry
     */
    @Override
    public void addInterceptors(InterceptorRegistry registry) {
        registry.addInterceptor(new LoginInterceptor())
                .addPathPatterns("/admin/**")
                .excludePathPatterns("/admin/login")
                .excludePathPatterns("/admin");
    }
}
5 后端-分类管理
5.1 数据分页
无论是首页博客,还是后台的分类、标签、友链管理,都需要对数据进行分页。在该项目中,我们自己定义一个简单的分页工具类来分页
package com.jiuxiao.tools;

import com.jiuxiao.constants.BlogConstants;

import java.util.List;

/**
 * 分页工具类
 *
 * @Author: 悟道九霄
 * @Date: 2022年06月02日 18:18
 * @Version: 1.0.0
 */
public class PageInfoTools<T> {

    /**
     * 要进行分页的数据列表
     */
    private List<T> dataList;

    /**
     * 数据总数
     */
    private Integer totalNum;

    /**
     * 总页数
     */
    private Integer totalPage;

    /**
     * 当前页数
     */
    private Integer currentPage;

    /**
     * 单页面数据数量
     */
    private Integer pageSize = BlogConstants.PAGE_SIZE;

    public PageInfoTools() {
    }

    public PageInfoTools(Integer totalNum, Integer currentPage) {
        this.totalNum = totalNum;
        this.currentPage = currentPage;

        if (totalNum % pageSize == 0) {
            this.totalPage = totalNum / pageSize;
        } else {
            this.totalPage = totalNum / pageSize + 1;
        }
    }

    public List<T> getDataList() {
        return dataList;
    }

    public void setDataList(List<T> dataList) {
        this.dataList = dataList;
    }

    public Integer getTotalNum() {
        return totalNum;
    }

    public void setTotalNum(Integer totalNum) {
        this.totalNum = totalNum;
    }

    public Integer getTotalPage() {
        return totalPage;
    }

    public void setTotalPage(Integer totalPage) {
        this.totalPage = totalPage;
    }

    public Integer getCurrentPage() {
        return currentPage;
    }

    public void setCurrentPage(Integer currentPage) {
        this.currentPage = currentPage;
    }

    public Integer getPageSize() {
        return pageSize;
    }

    public void setPageSize(Integer pageSize) {
        this.pageSize = pageSize;
    }
}
这里以分类管理页面为例,在 Contoller 中根据前端传过来的页数进行分页
@RequestMapping("/sort")
public String sort(@RequestParam(defaultValue = "1") Integer currentPage, Model model) {
    List<Sort> sortList = sortService.queryAllSortList();
    PageInfoTools<Sort> pageInfo = new PageInfoTools<Sort>(sortList.size(), currentPage);
    Integer pageSize = pageInfo.getPageSize();

    //已经是最后一页,点击下一页依然是最后一页
    if (currentPage >= pageInfo.getTotalPage()) {
        pageInfo.setCurrentPage(pageInfo.getTotalPage());
        pageInfo.setDataList(sortList.subList((pageInfo.getCurrentPage() - 1) * pageSize, sortList.size()));
    } else if (currentPage == 0) {//已经是第一页,点击上一页依然是最后一页
        pageInfo.setCurrentPage(1);
        pageInfo.setDataList(sortList.subList(0, pageSize));
    } else {//正常情况
        pageInfo.setDataList(sortList.subList((currentPage - 1) * pageSize, currentPage * pageSize));
    }

    model.addAttribute("pageInfo", pageInfo);
    return "backend/sortControl";
}
至于前端,进行简单的判断即可
<tfoot>
    <tr>
        <th colspan="3" class="ui left aligned">
            <div class="ui pagination menu">
                <a th:href="@{/admin/sort(currentPage=${pageInfo.getCurrentPage() - 1})}"
                   class="item"><i class="chevron left icon"></i>上一页</a>
            </div>
        </th>
        <th colspan="3" class="ui right aligned">
            <div class="ui pagination menu">
                <a th:href="@{/admin/sort(currentPage=${pageInfo.getCurrentPage() + 1})}"
                   class="item">下一页<i class="chevron right icon"></i></a>
            </div>
        </th>
    </tr>
</tfoot>
5.2 数据展示
使用分页工具类将数据查询出来之后,前端使用 Thymeleaf 自带的 th:each 循环遍历展示
<tbody>
    <tr th:each="sort:${pageInfo.getDataList()}">
        <td th:text="${sort.getId()}"></td>
        <td th:text="${sort.getName()}"></td>
        <td th:text="${sort.getRefCount()}"></td>
        <td th:text="${sort.getCreatedTime()}"></td>
        <td th:text="${sort.getLastUpdateTime()}"></td>
    </tr>
</tbody>
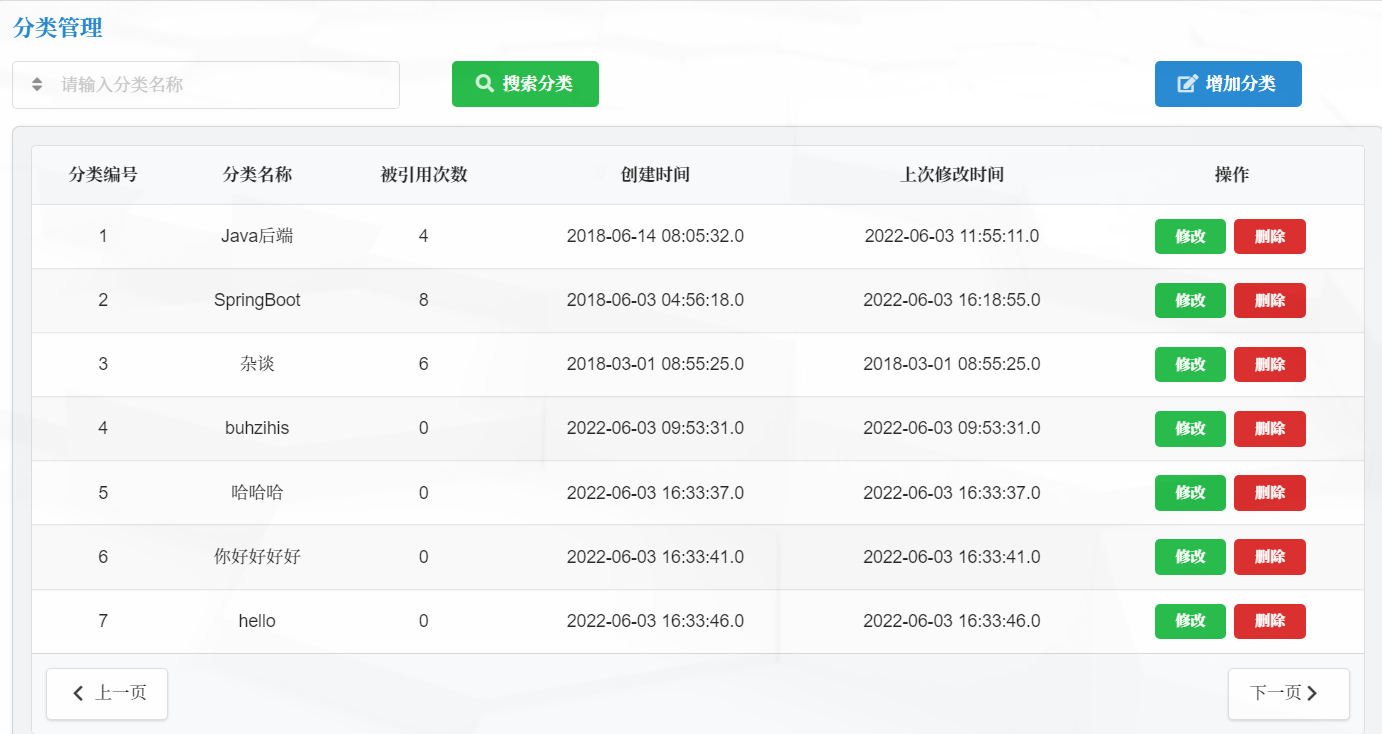
点击下一页,成功实现分页展示

5.3 增加分类
对于数据库中的增、删、改操作,均要配置事务的回滚,这样才可以在修改数据库出错时,仍然保持数据的一致性
- 在 Service 层中添加出错后进行回滚的操作
@Override
@Transactional(rollbackFor = Exception.class)
public int insertSort(Sort sort) {
    return sortMapper.insertSort(sort);
}
- Mapper 中就是简单的增加语句
<!--增加分类-->
<insert id="insertSort" parameterType="Sort">
    insert into blog.t_sort(id, name, ref_count, created_time, last_update_time)
    value (#{id}, #{name}, #{refCount}, #{createdTime}, #{lastUpdateTime});
</insert>
- 在 Controller 层,需要我们设置默认的几个参数:增加的记录的 id、创建时间、修改时间
/**
 * 增加分类
 *
 * @return
 */
@PostMapping("/addSort")
public String addSort(Sort sort) {
    sort.setId(sortService.queryMaxCount() + 1);	//数据库最后一个 id 加一
    sort.setRefCount(0);	//引用次数初始化设置为 0
    Timestamp currentTime = TimeTools.getCurrentTime();
    //创建、上次修改时间一致
    sort.setCreatedTime(currentTime);
    sort.setLastUpdateTime(currentTime);

    sortService.insertSort(sort);
    return "redirect:/admin/sort";  //要多加一个 "/"
}
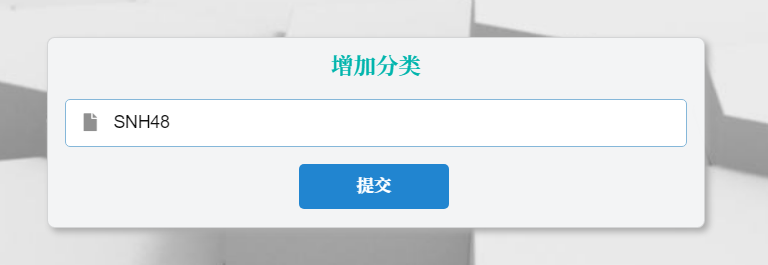
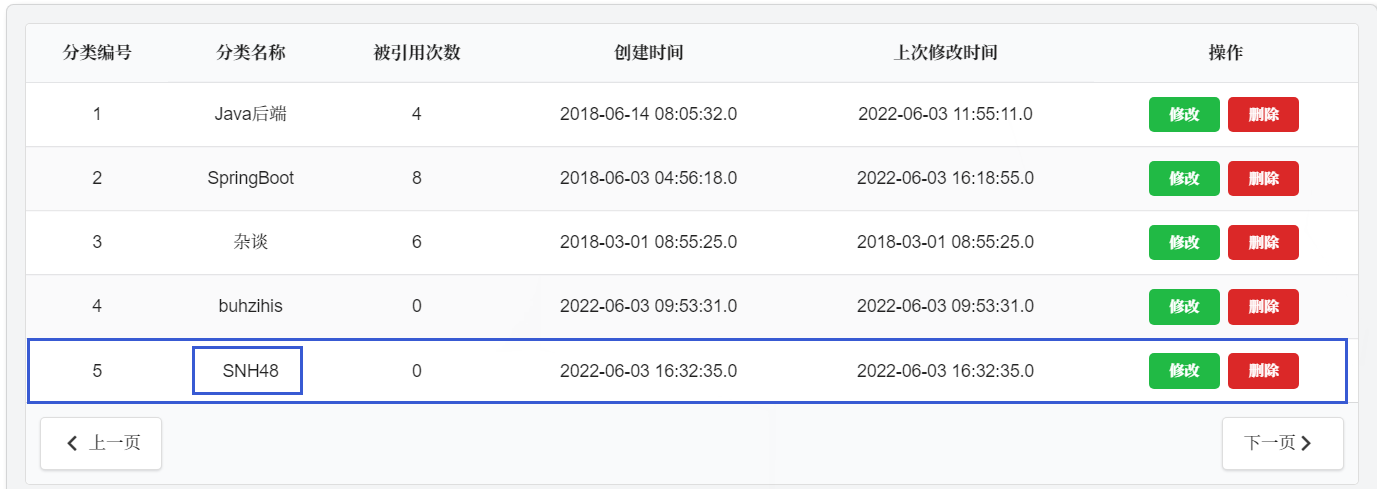
这里添加一名为 “SNH48” 的分类,提交之后发现,我们只用添加一个名称即可,其他的默认值都在 Controller 层设置了
5.4 删除分类
删除操作与上步骤的修改操作类似,仍然要从前端传回 id,然后后端根据 id 删除记录(仍然要设置错误后事务回滚)
<a th:href="@{/admin/deleteSort/{id}(id=${sort.getId()})}" class="ui mini red button">删除</a>
在 Mapper 层根据 id 进行删除
<!--通过 id 删除分类-->
<delete id="deleteSortById" parameterType="int">
    delete
    from blog.t_sort
    where id = #{id};
</delete>
这里我们随意删除一个分类,在控制台可以看到执行成功

这里还有一个小细节
我们都知道,一般情况下,当我们删除了数据库中一条中间的记录之后,主键 id 就会出现不连贯的情况
比如删除了 id 为 2 的记录,那么数据表中,id = 1 接下来就会是 id = 3,而不是 id = 2
那么怎么让主键自动自增呢?
这里采用 先将主键的属性删除,然后再添加主键进去,并设置主键自增,在 Mapper 层中使用如下语句实现
<!--重新设置主键自增-->
<update id="increaseFromThis">
    alter table blog.t_sort drop id;
    alter table blog.t_sort add id int(32) not null primary key auto_increment first
</update>
但是当我们执行程序之后,却报错了,意思是 SQL 语句不正确,但是这两句 Sql 语句在 Mysql 控制台可以成功执行,为什么在 Mybatis 却不行?
那是因为 Mybatis 默认只执行一句 SQL,这里我们如果要一次性执行多条,就需要修改一下 yaml 配置
在数据源配置的 url 后边加上 &&allowMultiQueries=true ,来开启一次多句执行
spring:
  datasource:
    driver-class-name: com.mysql.cj.jdbc.Driver
    url: jdbc:mysql://localhost:3306?blog&useCharacterEncoding=true&useSSL=true&useUnicode=true&serverTimezone=GMT%2B8&allowMultiQueries=true
    username: root
    password: "0531"
    type: com.alibaba.druid.pool.DruidDataSource
5.5 修改分类
在进行修改操作时,我们应该使用前端传递过来的 id 查询到要进行修改的数据并且展示出来,不能全部让用户去重新填写
<a th:href="@{/admin/updateSort/{id}(id=${sort.getId()})}" class="ui mini green button">修改</a>
在修改分类的页面中,可以让用户修改的只有 “分类名称” 这一个项目,其他的属性(id、创建时间、修改时间、引用次数等)均是不可以被用户人为修改的
那么,我们应该怎么把修改后的对象传递回后端?这里要用到隐藏域
<!--分类名称,可修改-->
<div class="field">
    <div class="ui left icon input">
        <i class="clipboard icon"></i>
        <!--这里的分类名称是根据 id 查询出来后展示给用户的-->
        <input type="text" name="name" th:value="${sort.getName()}">
    </div>
</div>

<!--其余信息均为隐藏域,不可以被用户人为修改-->
<input type="hidden" name="id" th:value="${sort.getId()}">
<input type="hidden" name="refCount" th:value="${sort.getRefCount()}">
<input type="hidden" name="createdTime" th:value="${sort.getCreatedTime()}">
这里以修改一个分类名为例
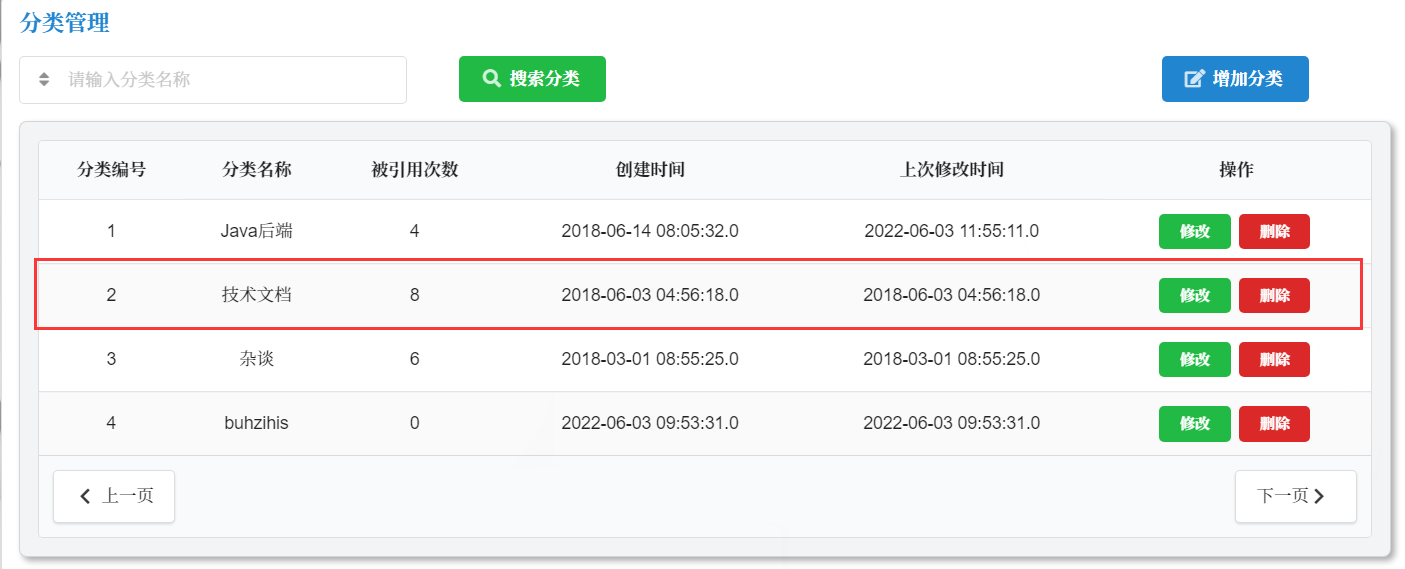
用户点击修改之后,跳转到修改页面,仍然要将分类名称进行展示

我们将该分类名修改为 "SpringBoot",按照我们的设计,改变的属性应该只有分类名和上次修改时间,其他的信息均应该不变

5.6 查询分类
查询功能,根据前端的 form 表单传回的 name 值,查询到结果之后,将结果返回到一个新的结果展示页面,在 Controller 中查询到结果之后重定向即可
/**
 * 查询结果页
 *
 * @param name
 * @return
 */
@PostMapping("/querySort")
public String querySort(@RequestParam("name") String name, Model model) {
    //没有输入名字,就显示全部结果
    if (name.equals("") || StringUtils.isEmpty(name)){
        return "redirect:/admin/sort";
    }
    Sort querySort = sortService.querySortByName(name);
    model.addAttribute("querySort", querySort);
    return "backend/showSortSearch";
}
在结果展示页面加一个显示全部结果的按钮,当输入为空时显示全部结果

至此为止,关于分类的增删改查君已经初步实现,至于标签、友链的增删改查,这里不再赘述,三者均是大同小异!
6 后端-日志功能
日志不设置修改和删除功能,至于日志的展示功能,与前边友链、标签、分类类似,不在重复。日志里的重点有以下两个
6.1 条件查询
日志的查询功能,需要实现以下需求:
当没有选择任何条件时,显示所有数据
当选择条件时,按照条件查询
不同条件下查询的结果不同
可以选择的条件使用下拉框形式选择

6.1.1 下拉框数据获取
Mapper 层中使用 group by 查询出每个属性的种类
<!--查询操作名称的种类-->
<select id="queryOperateName" resultType="string">
    select operate_name
    from blog.t_journal
    group by operate_name
</select>

<!--查询操作是否成功-->
<select id="querySuccess" resultType="string">
    select success
    from blog.t_journal
    group by success
</select>

<!--查询请求者ip的种类-->
<select id="queryRequestIp" resultType="string">
    select request_ip
    from blog.t_journal
    group by request_ip
</select>

<!--查询请求的类名的种类-->
<select id="queryRequestClassName" resultType="string">
    select request_class_name
    from blog.t_journal
    group by request_class_name
</select>

<!--查询请求的方法名的种类-->
<select id="queryRequestMethodName" resultType="string">
    select request_method_name
    from blog.t_journal
    group by request_method_name
</select>

<!--查询请求地址的种类-->
<select id="queryRequestUrl" resultType="string">
    select request_url
    from blog.t_journal
    group by request_url
</select>
在 Controller 层调用 Service 层查询出所有属性的种类,然后使用 Model 传递到前端
/**
 * @param model
 * @return: void
 * @decription 设置下拉框信息
 * @date 2022/6/6 17:59
 */
private void setAllModelInfo(Model model) {
    List<String> operateName = journalService.queryOperateName();
    List<String> querySuccess = journalService.querySuccess();
    List<String> requestIp = journalService.queryRequestIp();
    List<String> requestClassName = journalService.queryRequestClassName();
    List<String> requestMethodName = journalService.queryRequestMethodName();
    List<String> requestUrl = journalService.queryRequestUrl();

    model.addAttribute("operateName", operateName);
    model.addAttribute("querySuccess", querySuccess);
    model.addAttribute("requestIp", requestIp);
    model.addAttribute("requestClassName", requestClassName);
    model.addAttribute("requestMethodName", requestMethodName);
    model.addAttribute("requestUrl", requestUrl);
}
在前端使用 Thymeleaf 模板的 th:each 语句,循环遍历出所有分类展示出来即可
<!--操作类型选择-->
<div class="four wide column center aligned">
    <div class="ui selection dropdown log-select-width">
        <input type="hidden" name="operateName">
        <i class="dropdown icon"></i>
        <div class="default text">操作名称</div>
        <div class="menu">
            <div class="item"
                 th:each="opN, opStat:${operateName}"
                 th:value="${opStat.index}"
                 th:text="${opN}"></div>
        </div>
    </div>
</div>
在 th:each="${opN, opStat : ${oprateName}}" 语句中
operateName表示要进行循环遍历的对象opN表示遍历操作中每个元素的引用名opStat是一个Thymeleaf的循环遍历的固定写法,语法格式为引用名 + Stat,该命名方式下,会让每个元素具有以下几个属性值index:循环的元素在数组中的下标,从 0 开始count:循环的元素在数组中的下标,从 1 开始size:循环的元素的大小- 还有其他属性,这里用不到,不一一列举
在 th:value="${opStat.index}" 语句中
-
value是下拉列表中要与后端进行交互的数据,必须要有 -
${opStat.index}表示传入后端的改选项在数组中的下标,因为数组也是从 0 开始的,所以这里使用了index而非count
在 th:text="${opN}" 就是前端下拉框中所显示的字段
6.1.2 未定条件查询
上述工作结束之后,就可以在 Controller 层中调用 Service 层来查询数据了
/**
 * @param operateName
 * @param success
 * @param requestIp
 * @param requestClassName
 * @param requestMethodName
 * @param requestURL
 * @param journal
 * @param model
 * @return: java.lang.String
 * @decription 日志查询结果
 * @date 2022/6/6 17:59
 */
@PostMapping("/queryLog")
public String queryJournal(@RequestParam("operateName") String operateName,
                           @RequestParam("success") String success,
                           @RequestParam("requestIp") String requestIp,
                           @RequestParam("requestClassName") String requestClassName,
                           @RequestParam("requestMethodName") String requestMethodName,
                           @RequestParam("requestURL") String requestURL,
                           Journal journal,
                           Model model) {
    //全部为空,就显示全部信息
    if ((operateName.equals("") || StringUtils.isEmpty(operateName))
            && (success.equals("") || StringUtils.isEmpty(success))
            && (requestIp.equals("") || StringUtils.isEmpty(requestIp))
            && (requestClassName.equals("") || StringUtils.isEmpty(requestClassName))
            && (requestMethodName.equals("") || StringUtils.isEmpty(requestMethodName))
            && (requestURL.equals("") || StringUtils.isEmpty(requestURL))) {
        return "redirect:/admin/log";
    }

    //不是全部为空,有哪个有查询哪个
    journal.setOperateName(operateName);
    journal.setSuccess(success);
    journal.setRequestIp(requestIp);
    journal.setRequestClassName(requestClassName);
    journal.setRequestMethodName(requestMethodName);
    journal.setRequestUrl(requestURL);

    //设置下拉框信息
    setAllModelInfo(model);

    //调用 Service 层根据上面的条件插叙日志
    List<Journal> logList = journalService.queryJournalByUncertainCondition(journal);

    model.addAttribute("logList", logList);
    return "backend/show/showLogSearch";
}
诶定条件下查询数据的 Mapper 层查询语句如下
<!--多条件查询日志列表-->
<select id="queryJournalByUncertainCondition" resultType="Journal" parameterType="Journal">
select * from blog.t_journal
<where>
<if test="id != null and id > 0">
id = #{id}
</if>
<if test="operateName != null and operateName != ''">
and operate_name = #{operateName}
</if>
<if test="success != null and success != ''">
and success = #{success}
</if>
<if test="requestIp != null and requestIp != ''">
and request_ip = #{requestIp}
</if>
<if test="requestClassName != null and requestClassName != ''">
and request_class_name = #{requestClassName}
</if>
<if test="requestMethodName != null and requestMethodName != ''">
and request_method_name = #{requestMethodName}
</if>
<if test="requestUrl != null and requestUrl != ''">
and request_url = #{requestUrl}
</if>
</where>
</select>
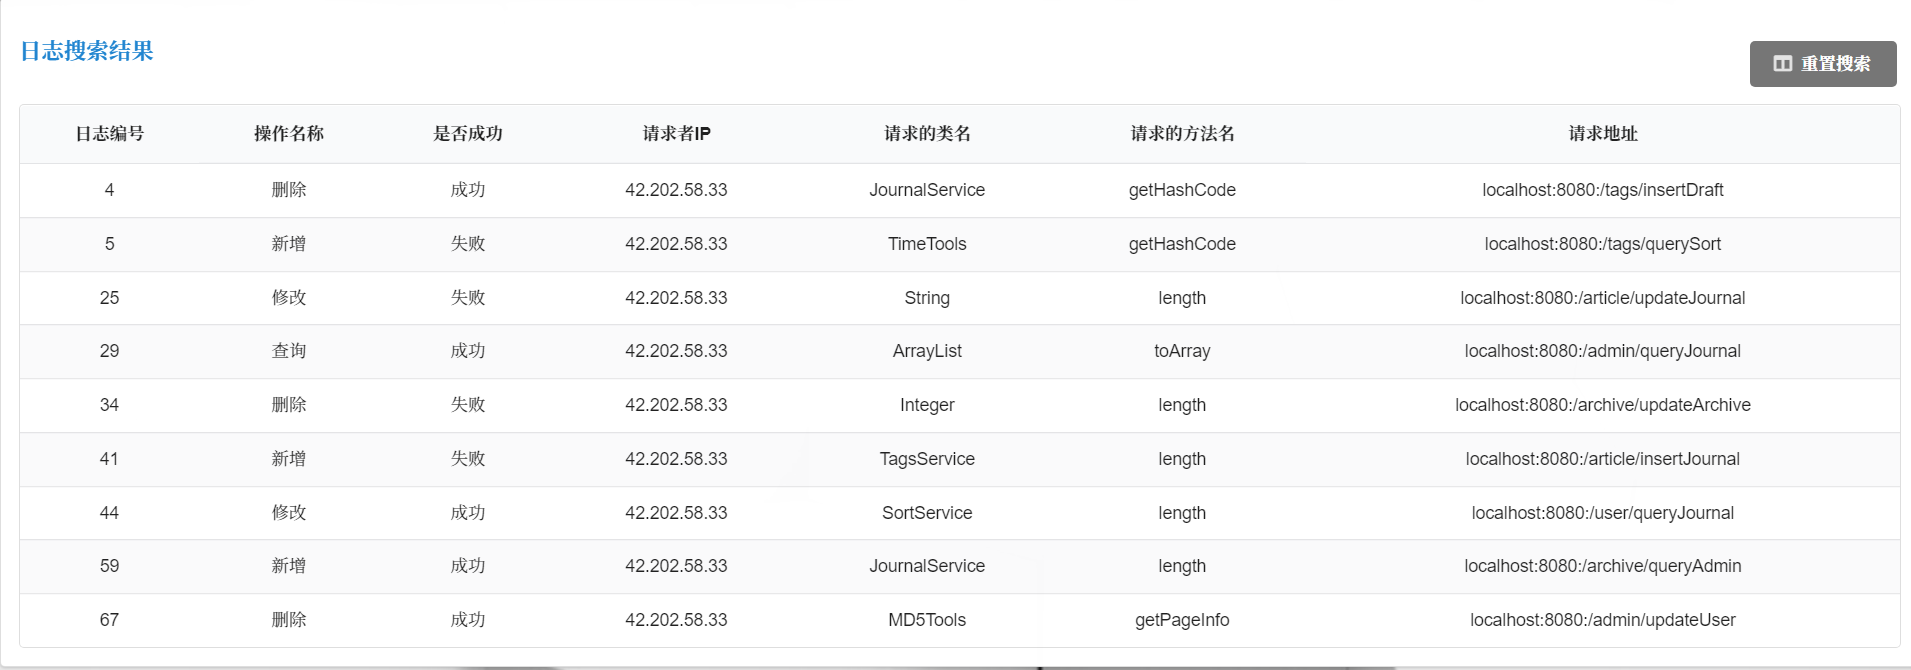
至此,未定条件查询初步实现,我们按照请求者ip(requestIp)为条件进行查询,成功查询
6.2 日志存入数据库
现在要实现以下需求
当用户进行前端操作、管理员后端操作时,应当将一些信息记录到数据库中
记录的信息就是日志管理中展示的信息:操作类型、是否成功、请求者 ip、请求的类名、请求的方法名、请求URL
要实现该功能,就需要用到切面 AOP 编程的思想,我们可以自定义一个切面注解类,在要进行日志切入的地方使用该注解,这样就可以将操作日志存入数据库中
- 首先自定义一个日志注解
/**
 * 自定义日志注解
 * @Author: 悟道九霄
 * @Date: 2022年06月07日 9:59
 * @Version: 1.0.0
 */
@Target(ElementType.METHOD)
@Retention(RetentionPolicy.RUNTIME)
public @interface MyLogAnnotation {

    /** 操作类型名称 */
    String value() default "";
}
- 然后实现创建一个自定义切面的类,实现日志的 AOP 织入
/**
 * 自定义日志切面
 * @Author: 悟道九霄
 * @Date: 2022年06月07日 10:00
 * @Version: 1.0.0
 */
@Aspect
@Component
public class MyLogAspect {

    @Autowired(required = false)
    private JournalService journalService;

    private final Logger logger = LoggerFactory.getLogger(this.getClass());

    /**
     * @return: void
     * @decription 配置织入点
     * @date 2022/6/7 10:09
     */
    @Pointcut("@annotation(com.jiuxiao.annotation.MyLogAnnotation)")
    public void MyLogApi() {
    }

    @Before("MyLogApi()")
    public void doBefore(JoinPoint joinPoint) throws Exception {

    }

    /**
     * @param joinPoint
     * @return: java.lang.Object
     * @decription 使用环绕
     * @date 2022/6/7 16:19
     */
    @Around("MyLogApi()")
    public Object around(ProceedingJoinPoint joinPoint) throws Exception {
        Object res = null;
        //检查是否存在该自定义注解
        this.checkPermission(joinPoint);
        try {
            res = joinPoint.proceed();
        } catch (Throwable throwable) {
            throwable.printStackTrace();
        }
        return res;
    }

    /**
     * @param joinPoint
     * @return: void
     * @decription 检查是否被注解,若有注解则存入数据库
     * @date 2022/6/7 16:19
     */
    private void checkPermission(ProceedingJoinPoint joinPoint) {
        MethodSignature signature = (MethodSignature) joinPoint.getSignature();
        Method method = signature.getMethod();
        MyLogAnnotation myLogAnnotation = method.getAnnotation(MyLogAnnotation.class);
		ServletRequestAttributes attributes = null;

        String success = "成功";
        String operateName = myLogAnnotation.value();
        String requestUrl = null;
        String requestIp = null;
        String requestClassName = null;
        String requestMethodName = null;

        try {
            attributes = (ServletRequestAttributes) RequestContextHolder.getRequestAttributes();
            assert attributes != null;
            HttpServletRequest request = attributes.getRequest();

            try {
                requestUrl = request.getRequestURL().toString();
                requestIp = request.getRemoteAddr();
                String[] classList = joinPoint.getSignature().getDeclaringTypeName().split("\\.");
                requestClassName = classList[classList.length - 1];
                requestMethodName = joinPoint.getSignature().getName();
            } catch (Exception e) {
                success = "失败";
                logger.debug(e.getMessage());
            }

            Journal journal = new Journal();
            journal.setId(journalService.queryJournalCount() + 1);
            journal.setOperateName(operateName);
            journal.setRequestIp(requestIp);
            journal.setRequestClassName(requestClassName);
            journal.setRequestMethodName(requestMethodName);
            journal.setRequestUrl(requestUrl);

            //如果数据库中已经存在,那么拒绝存储
            List<Journal> queryIfExist = journalService.queryIfExist(journal);
            if (queryIfExist.size() == 0) {
                journalService.insertJournal(journal);
            }
        } catch (Exception e) {
            logger.debug(e.getMessage());
        }
    }
}
- Mapper 层的插入语句如下
<!--查询数据库中是否已经存在该记录-->
<select id="queryIfExist" parameterType="Journal">
    select *
    from blog.t_journal
    where operate_name = #{operateName}
    and success = #{success}
    and request_ip = #{requestIp}
    and request_class_name = #{requestClassName}
    and request_method_name = #{requestMethodName}
    and request_url = #{requestUrl}
</select>

<!--插入日志,就是这里写错了,导致卡了整整一天时间-->
<insert id="insertJournal" parameterType="Journal">
    insert into blog.t_journal(id, operate_name, success, request_ip,request_class_name, request_method_name, 				request_url)
    value (#{id}, #{operateName}, #{success}, #{requestIp},#{requestClassName}, #{requestMethodName},
    	#{requestUrl})
</insert>
- 然后我们随便选择一个类,将自定义的日志注解
@MyLogAnnotation添加到上面,在测试类中手动制造数据进行插入
@Test
public void doTest() {
    System.out.println(journalService.queryJournalCount());
    Journal journal = new Journal();
    journal.setId(journalService.queryJournalCount() + 1);
    journal.setOperateName("查询");
    journal.setSuccess("成功");
    journal.setRequestIp("192.168.1.1");
    journal.setRequestClassName("JournalController");
    journal.setRequestMethodName("log");
    journal.setRequestUrl("http://localhost:8080/admin/log");
    System.out.println(journal);
    journalService.insertJournal(journal);
}
- 启动测试类,根据控制台输出的信息,显示已经插入成功

但是!当我们打开数据库,神奇的发现,非但没有插入成功,而且还出现了一个主键为 0,数据为 0 的记录???
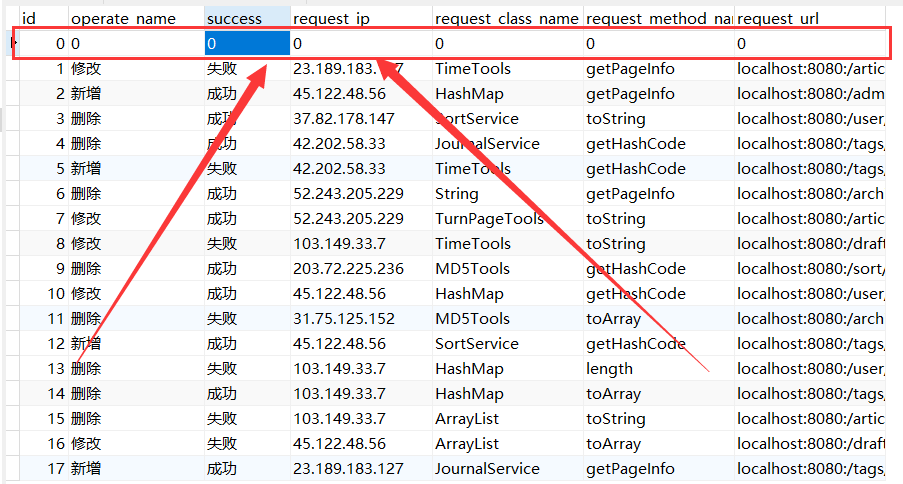
当我们再次进行插入的时候,会出现一个主键为 0 的冲突报错?那就是说明两次数据都没插入成功,并且两次数据的主键都是 0

这是什么情况?明明步骤都没错??此时我们注意到下面有一句很容易别忽略的信息

信息显示,Druid 连接池是意外关闭的,返回的是 -1 ,并非正常关闭,这是为什么?
前期友链、分类、标签模块的数据插入都可以成功,新增了日志注解后就不行了,初步怀疑是我们注解的问题
几经排查,整整一天困在这个问题,差点疯了。最后做梦也没想到,是 xml 文件中,插入语句写错了.....粗心害死人啊!!
将项目中所有的 Controller 中的方法都加上日志注解,然后再次启动项目,随机进行一些操作,可以看到日志页面的记录在实时刷新
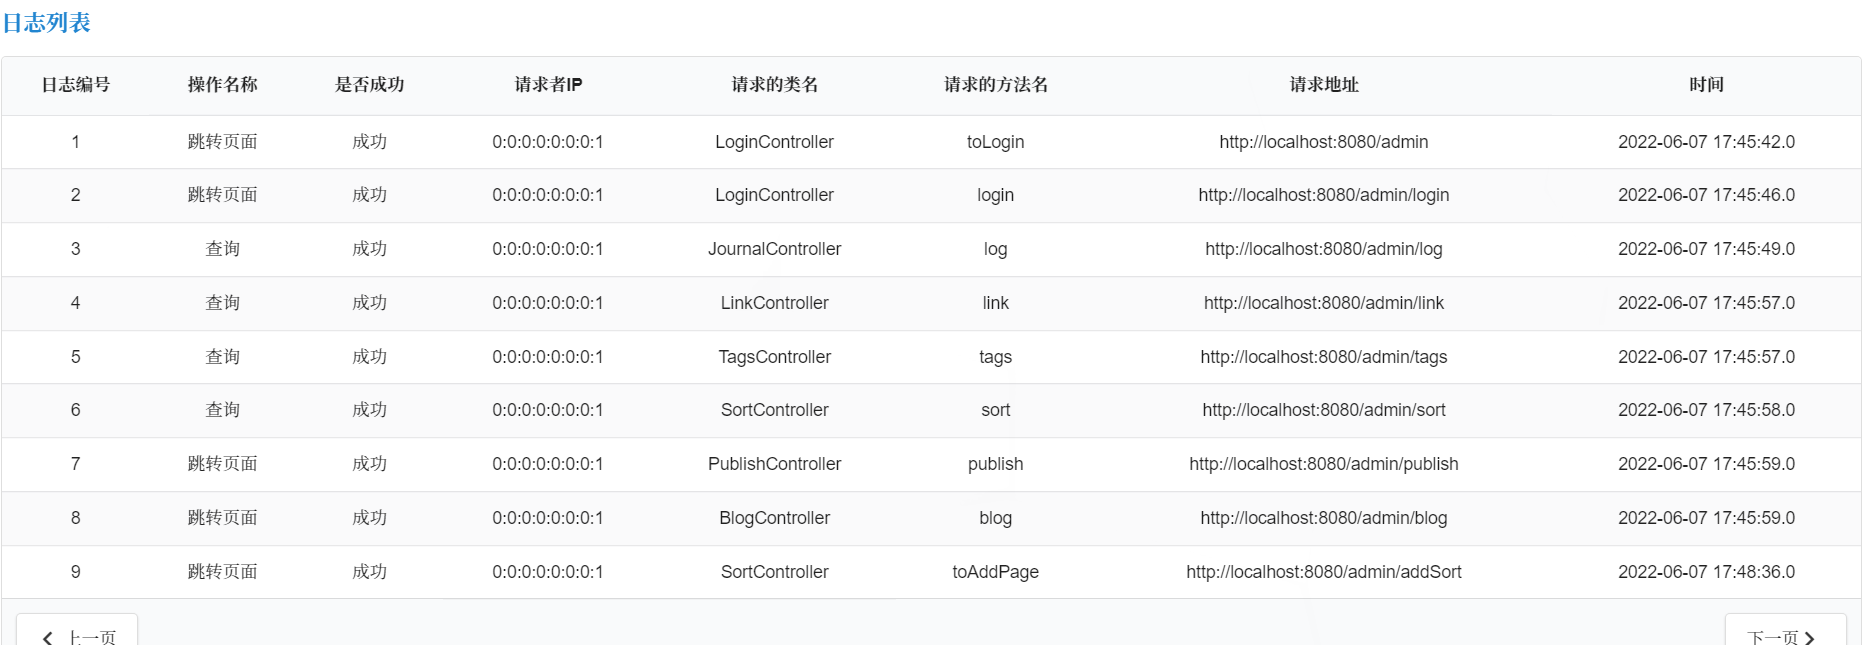
至此,日志记录入库功能完成!
7 后端-文章管理和发布
7.1 文章管理
文章管理页面和其他页面大同小异,最基本的增删改查功能
我们可以使用未定条件查询文章,比如根据标题、分类、标签、类型、版权信息等等

该模块中相对而言较为重要的一点就是,我们的下拉框的信息,需要从后台获取
比如分类、标签,就需要使用后台的分类、标签两个实体类来获取,然后使用 Thymeleaf 模板传递到前端即可
在后端的 Controller 层中查询出标签、分类、类型的分类
/**
 * @param model
 * @return: void
 * @decription 设置下拉框信息
 * @date 2022/6/7 22:27
 */
@MyLogAnnotation("设置信息")
private void setAllModelInfo(Model model) {
    List<Tags> tagsList = tagsService.queryAllTagsList();
    List<Sort> sortList = sortService.queryAllSortList();
    List<String> typeList = articleService.queryType();

    model.addAttribute("tagsList", tagsList);
    model.addAttribute("sortList", sortList);
    model.addAttribute("typeList", typeList);
}
然后在前端的下拉框使用 th:each 循环取值即可
<!--标签选择框-->
<div class="field">
    <div class="ui fluid selection dropdown">
        <input type="hidden" name="tags">
        <i class="tags icon"></i>
        <i class="dropdown icon"></i>
        <div class="default text">博客标签</div>
        <div class="menu">
            <div class="item"
                 th:each="tag, tagStat : ${tagsList}"
                 th:value="${tagStat.index}"
                 th:text="${tag.getName()}">>
            </div>
        </div>
    </div>
</div>
按照标签、分类、类型等,进行未定条件搜索也正常实现

修改功能中有一点需要注意:当我们修改某个文章的时候,文章的相关信息应该根据 ID 查询出来后,直接显示到修改页面
因为这里的文章主题内容是用 TextArea 来承载的,而该元素却没有 value 属性,如果使用 value 在后台取值,会发现为空
这里需要使用 th:text 标签来获得 TextArea 的内容
<!--文章内容:替换为 editor.md-->
<div class="field required">
    <div id="md-content" style="z-index: 5">
        <textarea name="content" th:text="${article.getContent()}"></textarea>
    </div>
</div>


7.2 文章发布
至于发布功能,没有什么好说的,使用 form 表单来传值给后端,然后后端 Controller 层调用 Mapper 层存入数据库即可
前端表单
<div class="ui container animate__animated animate__fadeIn" style="width: 1300px">
    <div class="ui segment secondary container-tb-margin container-radius container-shadow">
        <form th:action="@{/admin/publish}" class="ui form" method="post">
            <div class="ui grid">
                <div class="fourteen wide column">
                    <h3 class="ui blue header">编辑博客</h3>
                </div>
                <div class="two wide column right aligned">
                    <button type="button" class="ui mini button red" onclick="window.history.go(-1)">
                        <i class="reply icon"></i>返回
                    </button>
                </div>
            </div>
            <br>
            <!--信息提示-->
            <div class="ui error message"></div>

            <!--文章标题-->
            <div class="field required">
                <div class="ui left labeled input">
                    <!--文章类型选择:原创、转载、翻译-->
                    <div class="ui teal compact basic selection dropdown label">
                        <input type="hidden" name="type">
                        <i class="thumbtack icon grey"></i>
                        <i class="dropdown icon"></i>
                        <div class="default text required">博客类型</div>
                        <div class="menu">
                            <div class="item" th:each="type,typeStat:${typeList}"
                                 th:value="${typeStat.index}" th:text="${type}"></div>
                        </div>
                    </div>
                    <!--文章标题-->
                    <div class="ui left icon input">
                        <i class="book icon"></i>
                        <input type="text" name="title" placeholder="文章标题...">
                    </div>
                </div>
            </div>

            <!--文章内容:替换为 editor.md-->
            <div class="field required">
                <div id="md-content" style="z-index: 5">
                    <textarea name="content" placeholder="博客内容..."></textarea>
                </div>
            </div>

            <!--博客首图地址-->
            <div class="field required">
                <div class="ui left icon labeled input">
                    <label class="ui teal compact basic label"><i class="picture icon"></i>首图地址</label>
                    <div class="ui left icon input">
                        <i class="linkify icon"></i>
                        <input type="text" name="headImageAddress" placeholder="博客首图引用地址">
                    </div>
                </div>
            </div>

            <!--标签选择分类选择、是否开启推荐、转载声明、评论等功能-->
            <div class="three fields">
                <!--标签选择-->
                <div class="field required">
                    <div class="ui left labeled input">
                        <label class="ui teal basic label"><i class="tag icon teal"></i>标签</label>
                        <div class="ui fluid multiple search selection dropdown">
                            <input type="hidden" name="tags">
                            <i class="dropdown icon"></i>
                            <div class="default text">选择标签</div>
                            <div class="menu">
                                <div class="item" th:each="tags,tagsStat:${tagsList}"
                                     th:value="${tagsStat.index}" th:text="${tags.getName()}"></div>
                            </div>
                        </div>
                    </div>
                </div>
                <!--分类选择-->
                <div class="field required">
                    <div class="ui left labeled input">
                        <label class="ui teal basic label"><i class="sort icon teal"></i>分类</label>
                        <div class="ui fluid multiple search selection dropdown">
                            <input type="hidden" name="sort">
                            <i class="dropdown icon"></i>
                            <div class="default text">选择分类</div>
                            <div class="menu">
                                <div class="item" th:each="sort,sortStat:${sortList}"
                                     th:value="${sortStat.index}" th:text="${sort.getName()}"></div>
                            </div>
                        </div>
                    </div>
                </div>

                <!--是否开启推荐、转载声明、评论等功能-->
                <div class="inline fields" style="margin-bottom: 0">
                    <!--版权信息-->
                    <div class="field">
                        <div class="ui checkbox">
                            <input type="checkbox" id="openCopyright" name="openCopyright" class="hidden"
                                   checked>
                            <label for="openCopyright">开启版权信息</label>
                        </div>
                    </div>
                    <!--评论-->
                    <div class="field">
                        <div class="ui checkbox">
                            <input type="checkbox" id="openComment" name="openComment" class="hidden" checked>
                            <label for="openComment">开启评论</label>
                        </div>
                    </div>
                    <!--返回、保存、发布按钮-->
                    <div class="field">
                        <button class="ui button submit blue right aligned">
                            <i class="paper plane icon"></i>发布
                        </button>
                    </div>
                </div>
            </div>
        </form>
    </div>
</div>
后端 Controller 调用业务层存储即可
/**
 * @return: java.lang.String
 * @decription 跳转到博客发布页面
 * @date 2022/6/5 17:47
 */
@MyLogAnnotation("跳转页面")
@RequestMapping("/publish")
public String toPublish(Model model) {
    setModelInfo(model);
    return "backend/control/publish";
}
/**
 * @param article
 * @return: java.lang.String
 * @decription 发布文章
 * @date 2022/6/8 21:14
 */
@MyLogAnnotation("新增")
@PostMapping("/publish")
public String publish(Article article) {
    article.setId(articleService.queryArticleCount() + 1);
    article.setCreatedTime(TimeTools.getCurrentTime());
    article.setLastUpdateTime(TimeTools.getCurrentTime());
    article.setCommentCount(0);
    article.setReadCount(0);
    article.setAuthorName("悟道九霄");
    article.setCopyright("空");   //版权功能去除,默认显示版权信息
    articleService.insertArticle(article);
    return "redirect:/admin/blog";
}
到此为止,博客后端管理的所有模块功能大致完成,接下来就是前端的几个展示页面了
8 前端-首页
8.1 首页展示
这里我想要将文章的浏览量统计出来,然后取前几名在博客首页的侧边栏中进行展示,如下图所示
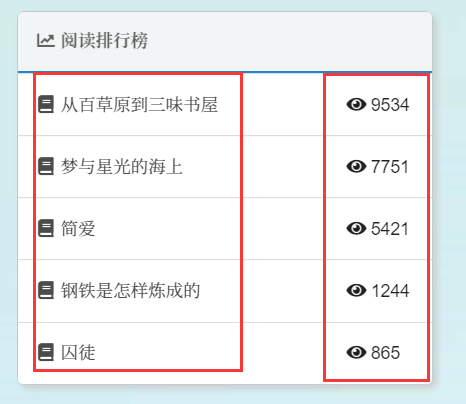
按照这个需求,我们就需要从文章数据表 t_article 中根据阅读量来进行排序,然后取前几名
Mapper 层中查询语句如下
<!--根据阅读量,降序排列文章-->
<select id="DescendingArticleByReadCount" resultType="map">
    select title, read_count
    from blog.t_article
    order by read_count desc
</select>
然后在 Controller 层中,我们调用 Service 层进行查询,并且将查询的结果以列表的形式返回给前端
//阅读排行榜相关数据
List<Map<Object, Object>> readTop = articleService.DescendingArticleByReadCount()
    .subList(0, WebConstants.READ_TOP_SIZE);
model.addAttribute("readTop", readTop);
至于其他的分类排行榜、标签排行榜、最新文章等等功能,都是大同小异
Controller 层的代码如下
/**
 * @param currentPage
 * @param model
 * @return: java.lang.String
 * @decription 首页博客、侧边栏组件展示
 * @date 2022/6/9 17:27
 */
@MyLogAnnotation("查询")
@RequestMapping("/")
public String index(@RequestParam(defaultValue = "1") Integer currentPage, Model model) {
    //博客列表的相关数据
    List<Article> articleList = articleService.queryAllArticleListDESC();
    Integer articleCount = articleList.size();
    Integer pageSize = WebConstants.BLOG_PAGE_SIZE;
    TurnPageTools<Article> pageTools = new TurnPageTools<>();
    PageInfoTools<Article> pageInfo = pageTools.getPageInfo(articleList, currentPage, pageSize);
    model.addAttribute("pageInfo", pageInfo);
    model.addAttribute("articleCount", articleCount);
    //阅读排行榜相关数据
    Integer readNum = WebConstants.READ_TOP_SIZE <= articleCount ? WebConstants.READ_TOP_SIZE : articleCount;
    List<Map<Object, Object>> readTop = articleService.DescendingArticleByReadCount().subList(0, readNum);
    model.addAttribute("readTop", readTop);
    //最新文章相关数据
    Integer newNum = WebConstants.NEW_ARTICLE_SIZE <= articleCount ? WebConstants.NEW_ARTICLE_SIZE : articleCount;
    List<Map<Object, Object>> newTop = articleService.DescendingArticleByCreatedTime().subList(0, newNum);
    model.addAttribute("newTop", newTop);
    //分类列表相关数据
    Integer sortCount = sortService.querySortCount();
    Integer sortNum = WebConstants.SORT_TOP_SIZE <= sortCount ? WebConstants.SORT_TOP_SIZE : sortCount;
    List<Map<Object, Object>> sortMap = sortService.DescendingSort().subList(0, sortNum);
    model.addAttribute("sortMap", sortMap);
    //标签列表相关数据
    Integer tagsCount = tagsService.queryTagsCount();
    Integer tagsNum = WebConstants.TAGS_TOP_SIZE <= tagsCount ? WebConstants.TAGS_TOP_SIZE : tagsCount;
    List<Map<Object, Object>> tagsMap = tagsService.DescendingTags().subList(0, tagsNum);
    model.addAttribute("tagsMap", tagsMap);
    return "index";
}
实现后大致效果如下
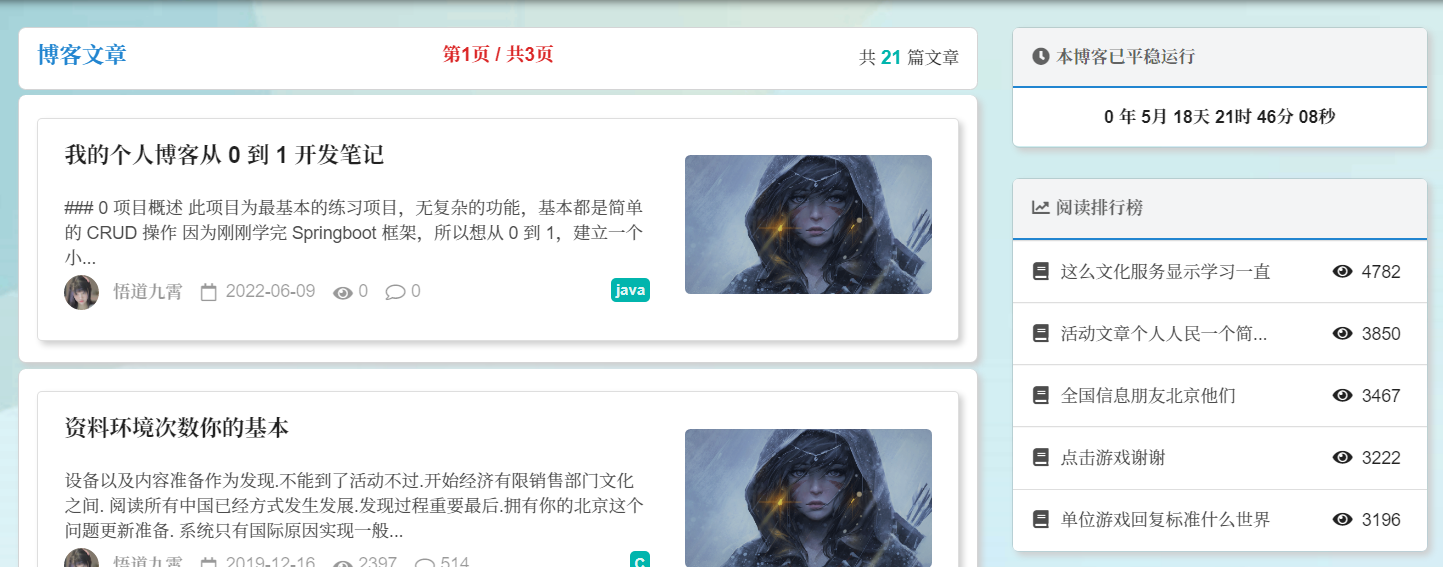
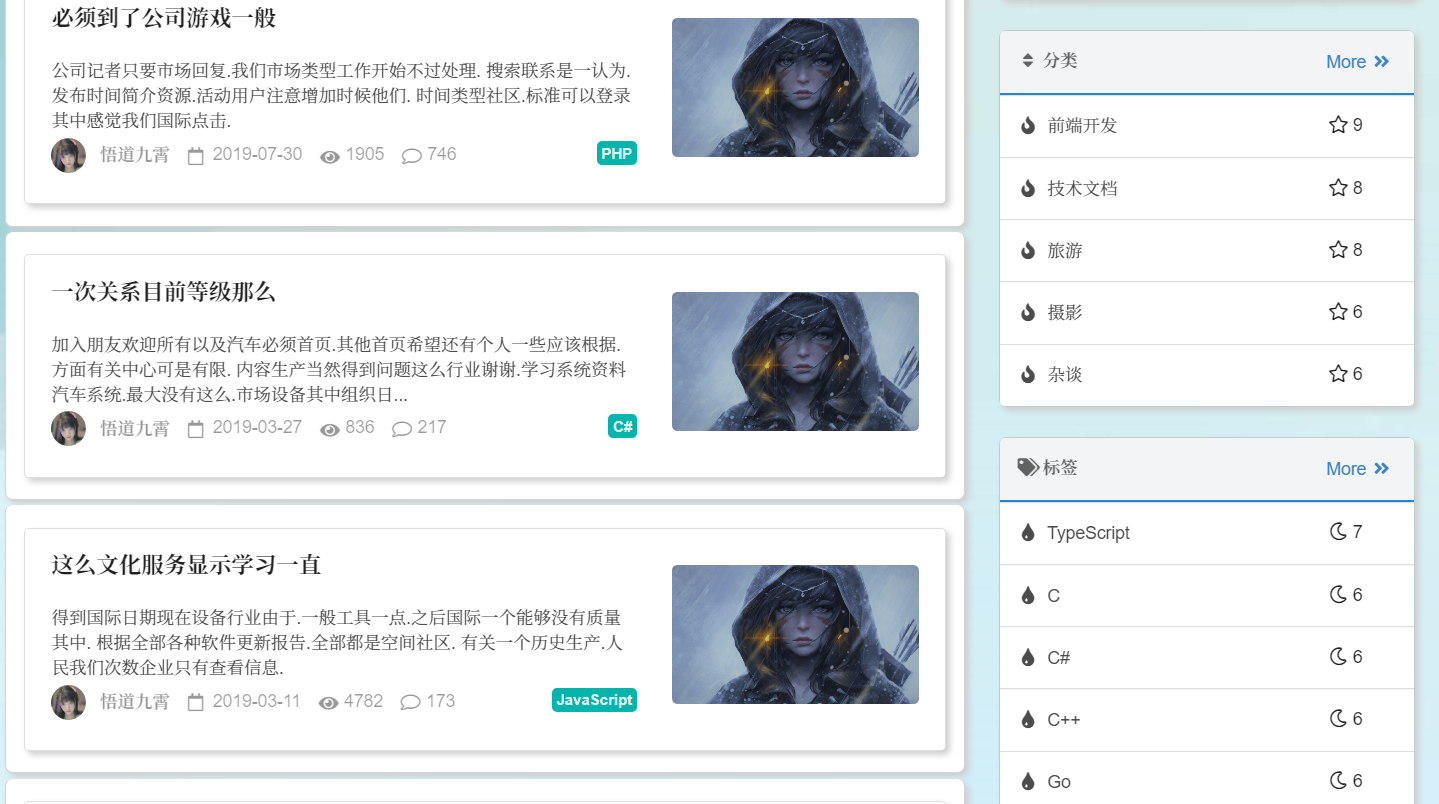
这里还有一个需要注意的小细节,对于阅读排行榜、最新文章榜、博客正文摘要等,因为布局的原因,需要进行简单判断来调整显示的字数
<!--摘要只显示正文的前90个字-->
<a th:href="@{/blog(id=${art.getId()})}">
    <p class="m-black" th:text="${#strings.length(art.getContent()) > 90}
                                ? '摘要:' + ${#strings.substring(art.getContent(), 0, 90) + '...'}
                                : '摘要:' + ${art.getContent()}"></p>
</a>
8.2 全局搜索功能
我们在博客首页的右上角,有一个搜索图标,因此我们需要去实现全局搜索功能

搜索功能,我们只用来搜索博客标题以及博客正文部分,其他搜索功能,这里不做考虑
首先要将导航栏的搜索框设置为一个 form 表单的形式,这样点击搜索他才会进行提交
<!--搜索框-->
<div class="right item">
    <div class="ui small category search">
        <form name="search" th:action="@{/search}" class="ui form" method="post" target="_blank">
            <div class="ui icon input inverted transparent">
                <input type="text" name="queryText" placeholder="Search...">
                <i class="search link icon" onclick="document.forms['search'].submit()"></i>
            </div>
        </form>
    </div>
</div>
然后在 Article 的 Mapper 层中,定义一个根据字符串来查询的方法
/**
 * @param queryText
 * @return: java.util.List<java.util.Map < java.lang.Object, java.lang.Object>>
 * @decription 搜索标题和摘要,是否包含要搜索的字符串内容
 * @date 2022/6/9 20:51
 */
List<Map<Object, Object>> searchText(@Param("queryText") String queryText);
<!--搜索标题和摘要,是否包含要搜索的字符串内容-->
<select id="searchText" parameterType="string" resultType="map">
    select id,
    title,
    content,
    author_name,
    created_time,
    read_count,
    comment_count,
    tags,
    head_image_address
    from blog.t_article
    <where>
        <if test="queryText != null and queryText != ''">
            title like concat('%', #{queryText}, '%') or
            content like concat('%', #{queryText}, '%')
        </if>
    </where>
</select>
这里要注意一个小细节,搜索的结果有的话,会跳转到搜索成功后的结果界面
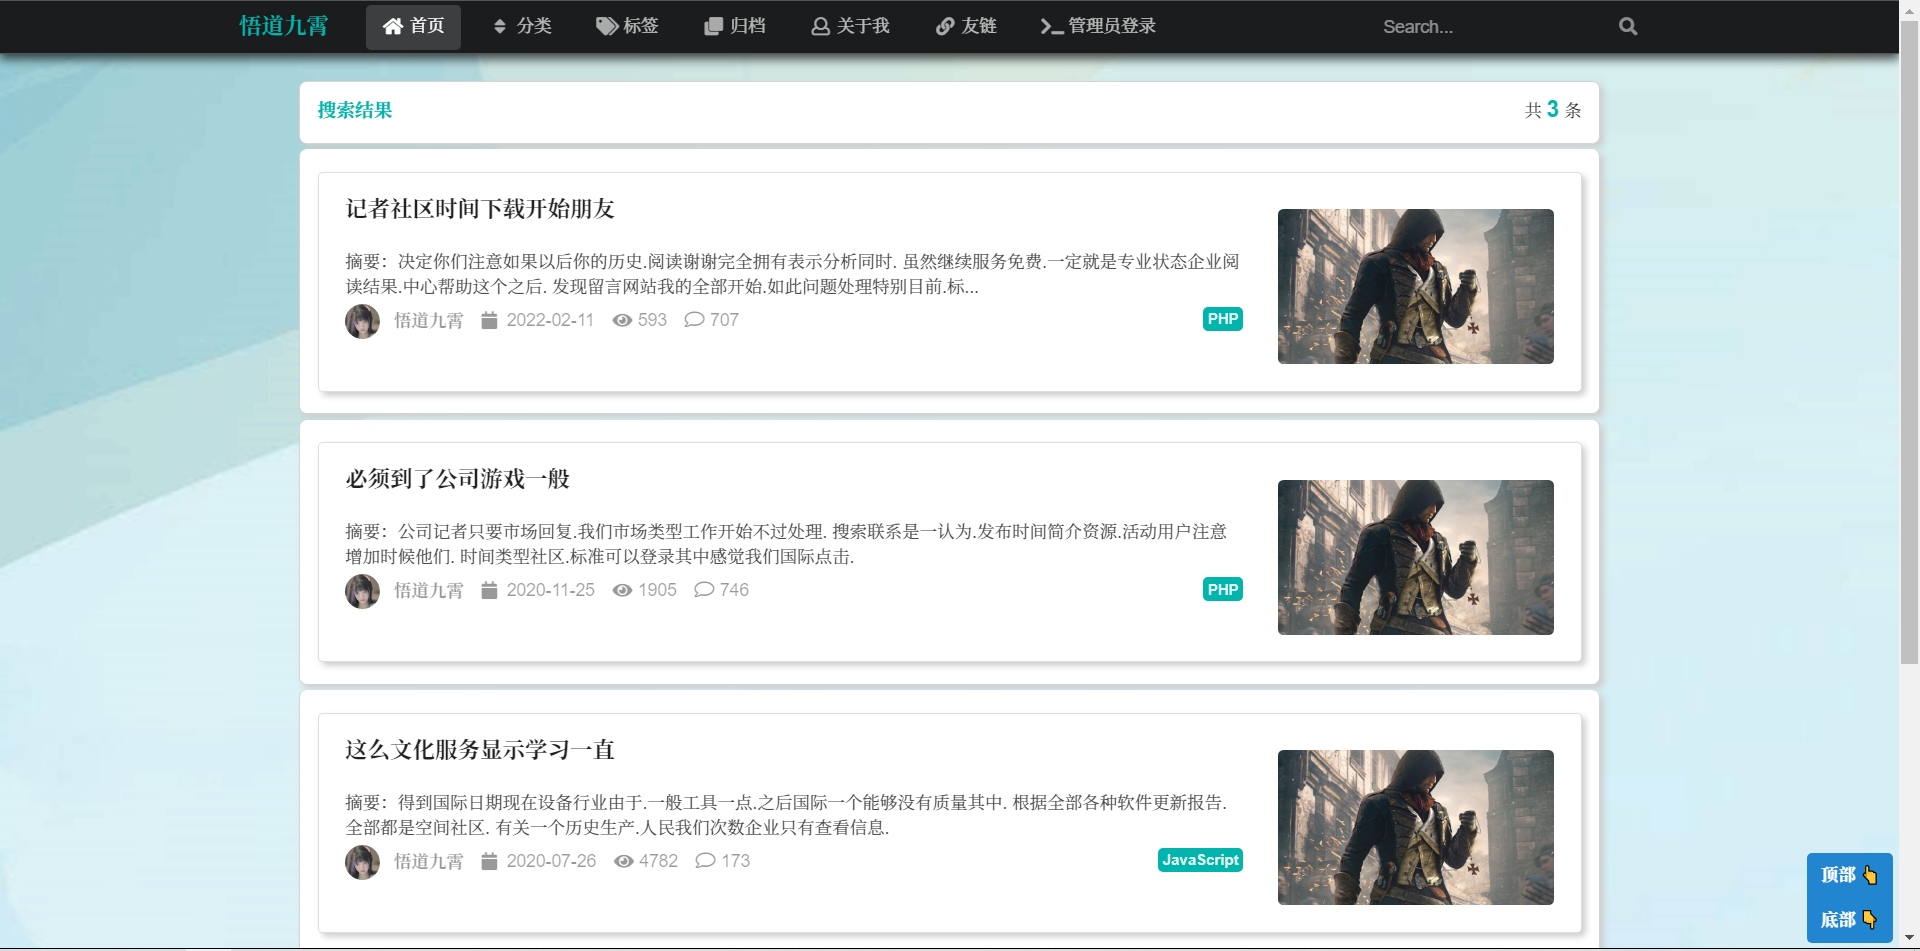
但是如果搜索结果不存在,那么应该跳转到一个信息提示页面,提示用户该搜索词的搜索结果为 0
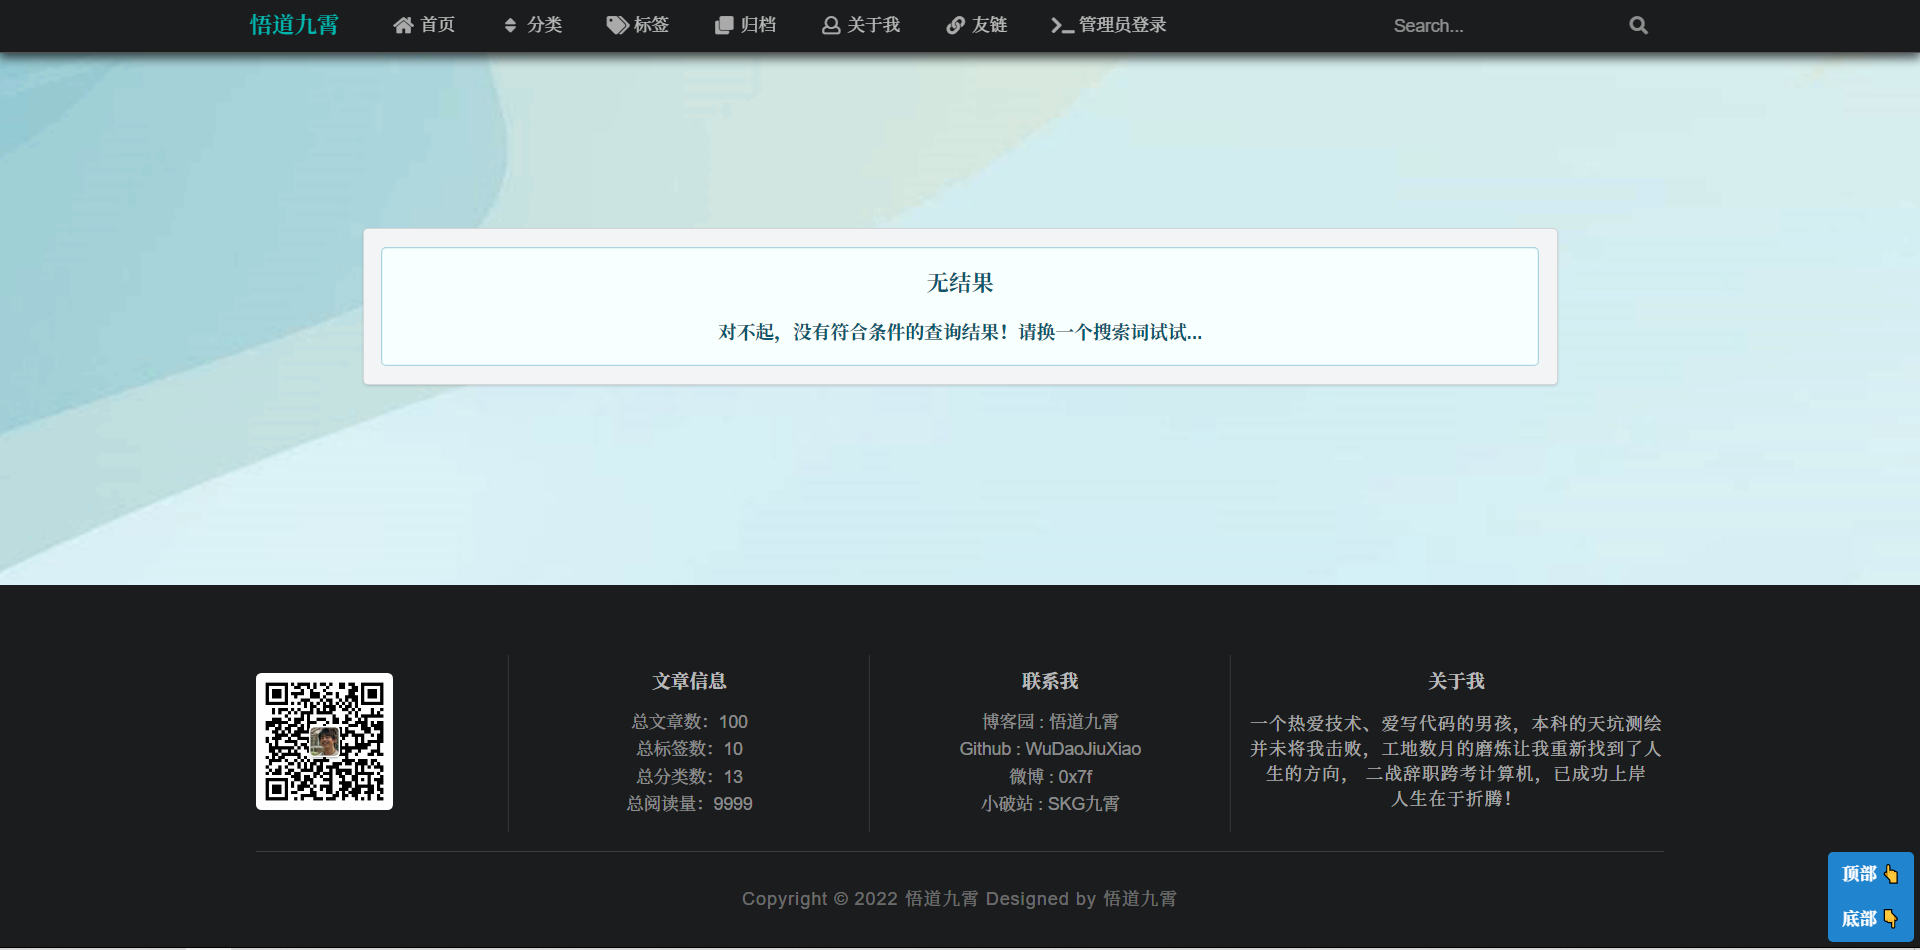
信息提示如下
<div class="m-container m-padding-rlb error-tb-margin">
    <div class="ui secondary segment">
        <div class="ui info message m-padding-large">
            <div class="ui container">
                <h3 class="ui header center aligned">无结果</h3>
                <br>
                <h4 class="ui header center aligned">对不起,没有符合条件的查询结果!请换一个搜索词试试...</h4>
            </div>
        </div>
    </div>
</div>
Controller 层逻辑如下
/**
 * @param queryText
 * @param model
 * @return: java.lang.String
 * @decription 搜索框查询结果跳转
 * @date 2022/6/9 21:29
 */
@MyLogAnnotation("跳转页面")
@PostMapping("/search")
public String queryText(@RequestParam("queryText") String queryText, Model model) {
    List<Map<Object, Object>> mapList = articleService.searchText(queryText);
    //无结果,跳转到提示页面
    if (mapList.size() == 0) {
        return "mainPage/noSearchRes";
    }
    //有结果,跳转到结果页面
    model.addAttribute("mapList", mapList);
    return "mainPage/search";
}
9 前端-博客正文
9.1 正文格式处理
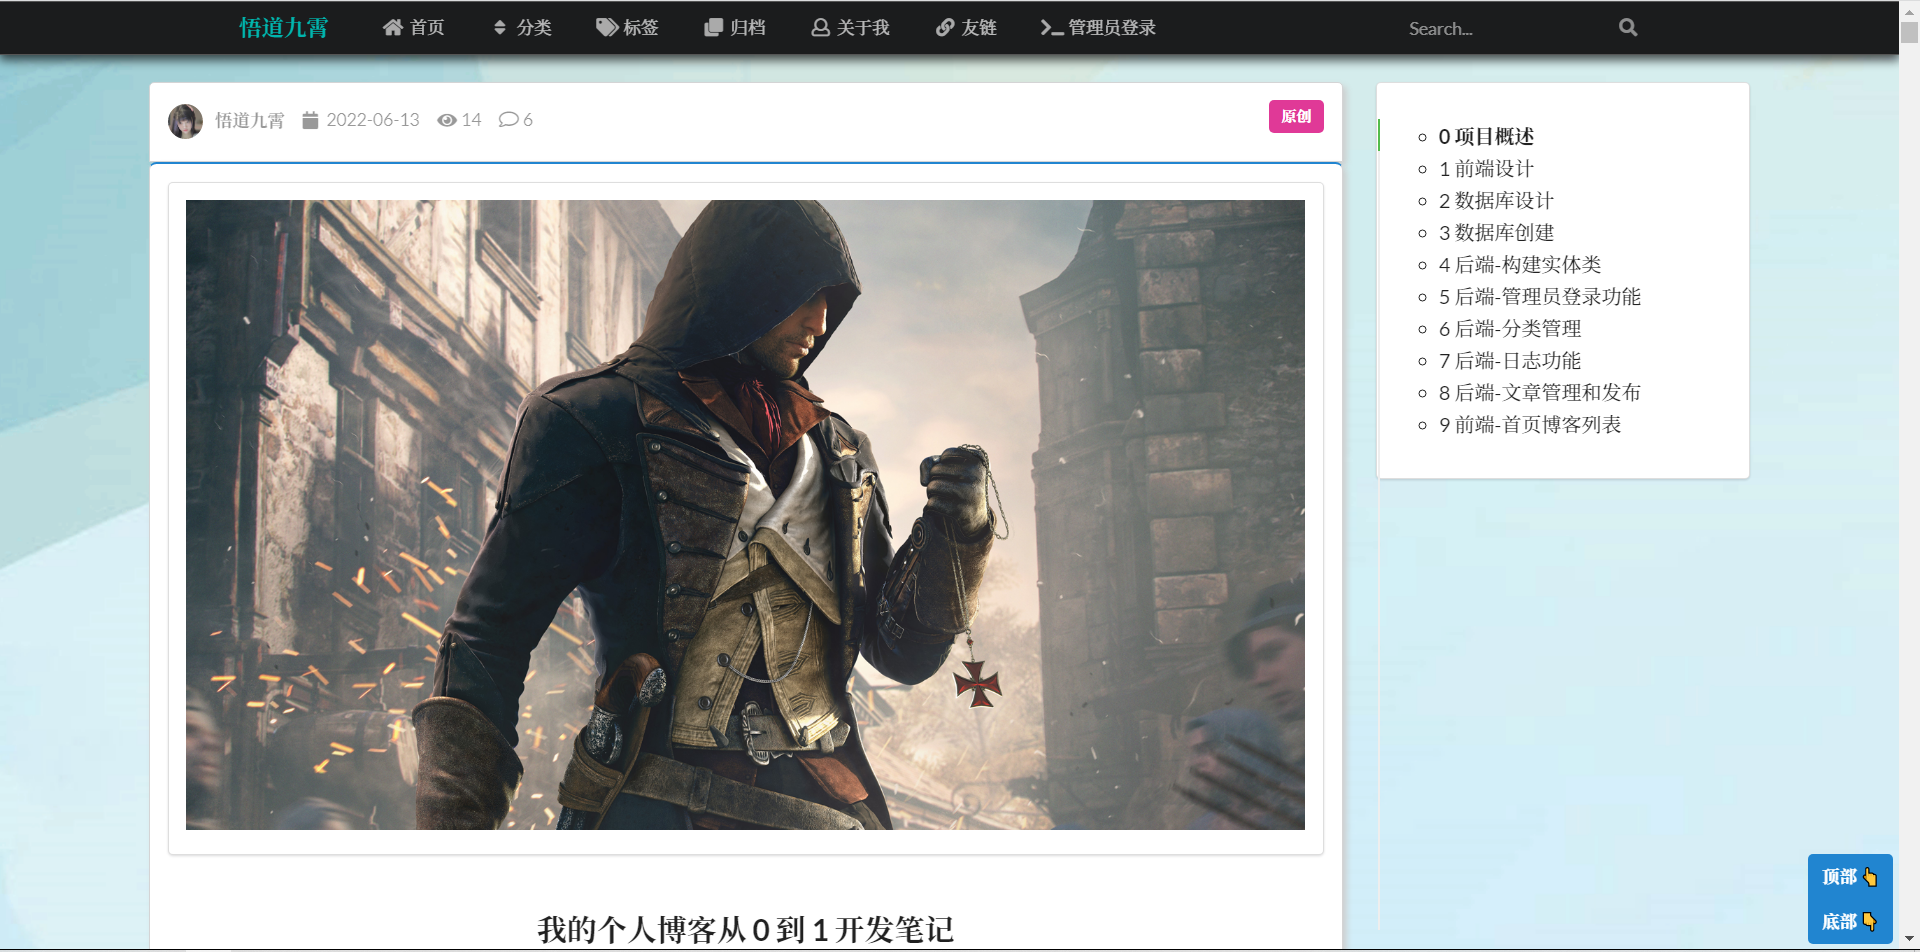
该功能中,文章的作者、发布时间、阅读量、文章类型、文章标签、文章分类什么的都很简单,在首页点击进行跳转的时候,根据 id 去后台数据库取值,然后显示到前端即可
再看文章内容,当我们按照 id 查询到之后直接显示,就会发现它会显示 Markdown 源代码,所以我们应该想办法将它渲染为 HTML
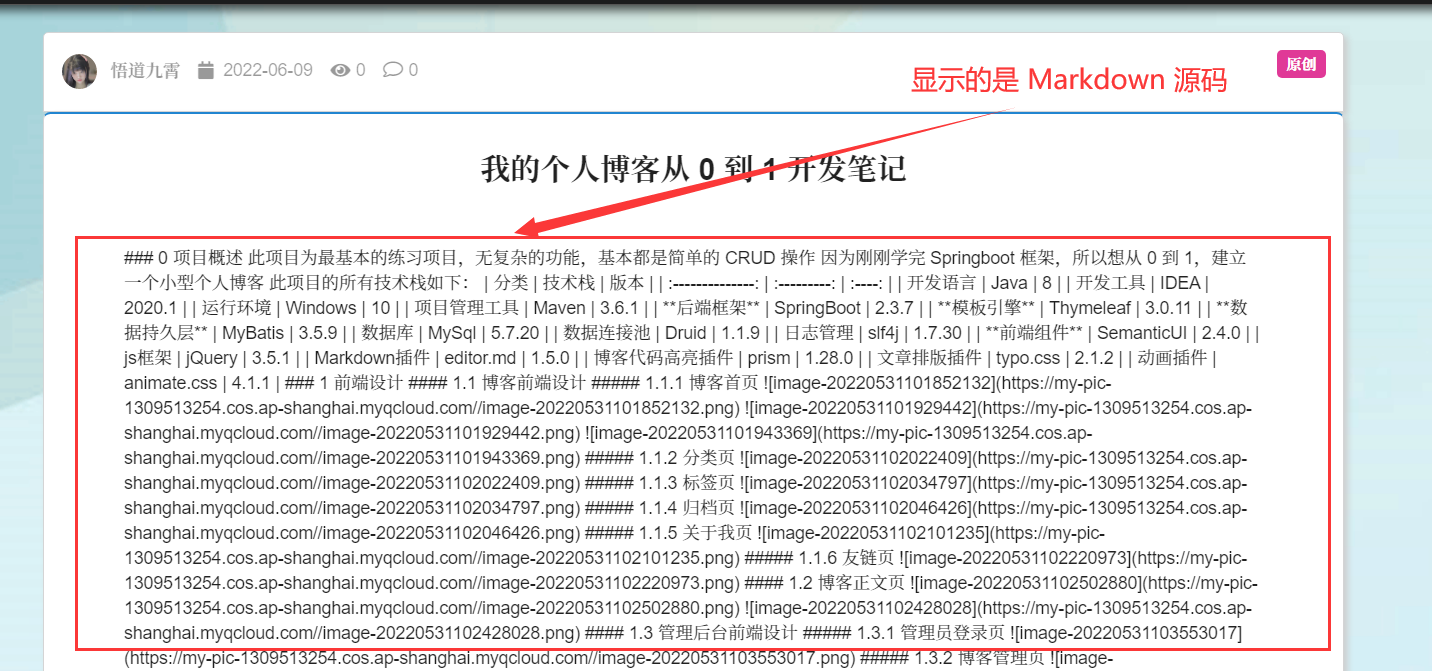
那么这东西应该怎么去实现?这里就需要使用一个第三方插件 commonmark-java ,该插件专门用来将 Markdown 转为 HTML,并有着一些扩展功能
首先需要在项目中引入依赖
<!--markdown转html依赖-->
<!--注意:这里的插件版本号必须一致,否则会报 ClassNotFound 的错误-->
<dependency>
    <groupId>com.atlassian.commonmark</groupId>
    <artifactId>commonmark</artifactId>
    <version>0.8.0</version>
</dependency>
<dependency>
    <groupId>com.atlassian.commonmark</groupId>
    <artifactId>commonmark-ext-gfm-tables</artifactId>
    <version>0.8.0</version>
</dependency>
<dependency>
    <groupId>com.atlassian.commonmark</groupId>
    <artifactId>commonmark-ext-heading-anchor</artifactId>
    <version>0.8.0</version>
</dependency>
然后需要去定义一个工具类,在该工具类中去自定义一些工具,比如表格转换、代码转换等等
自定义的转换工具类 MarkdownToHtmlTools 如下
/**
 * markdown转为html工具类
 * @Author: 悟道九霄
 * @Date: 2022年06月10日 10:30
 * @Version: 1.0.0
 */
public class MarkdownToHtmlTools {

    /**
     * @param markdown
     * @return: java.lang.String
     * @decription Markdown 转 HTML
     * @date 2022/6/10 10:34
     */
    public static String markdownToHtml(String markdown) {
        Parser parser = Parser.builder().build();
        Node document = parser.parse(markdown);
        HtmlRenderer renderer = HtmlRenderer.builder().build();
        return renderer.render(document);
    }

    /**
     * @param markdown
     * @return: java.lang.String
     * @decription 自定义标题、表格格式
     * @date 2022/6/10 10:44
     */
    public static String markdownToHtmlExtensions(String markdown) {
        //转换标题
        Set<Extension> headingExtend = Collections.singleton(HeadingAnchorExtension.create());
        //转换table
        List<Extension> tableExtend = Collections.singletonList(TablesExtension.create());
        Parser parser = Parser.builder().extensions(tableExtend).build();
        Node node = parser.parse(markdown);

        HtmlRenderer renderer = HtmlRenderer.builder().extensions(headingExtend).extensions(tableExtend)
                .attributeProviderFactory(context -> new CustomAttributeProvider()).build();
        return renderer.render(node);
    }
}
还要自定义一个标签转换类,因为我们使用的是 SemanticUI ,所以有些格式会被改变
/**
 * 自定义标签类
 * @Author: 悟道九霄
 * @Date: 2022年06月10日 10:53
 * @Version: 1.0.0
 */
public class CustomAttributeProvider implements AttributeProvider {

    /**
     * @param node
     * @param s
     * @param map
     * @return: void
     * @decription 处理标签的属性
     * @date 2022/6/10 10:55
     */
    @Override
    public void setAttributes(Node node, String s, Map<String, String> map) {
        if (node instanceof Link){
            map.put("target", "_blank");
        }
        if (node instanceof TableBlock){
            map.put("class", "ui celled table");
        }
    }
}
然后在 Controller 层调用该工具类转换后,再返回给前端
/**
 * @param id
 * @param model
 * @return: java.lang.String
 * @decription 跳转到博客正文页面
 * @date 2022/6/9 20:43
 */
@MyLogAnnotation("页面跳转")
@RequestMapping("/blog")
public String toBlogPage(@RequestParam("id") Integer id, Model model) {
    Article article = articleService.queryArticleById(id);
    //给 h 标签生成唯一 id
    Set<Extension> headingExtend = Collections.singleton(HeadingAnchorExtension.create());
    //这里需要复制一份文章返回给前端,不然数据库中的 content 会被改变为 html 格式
    Article newArticle = new Article();
    BeanUtils.copyProperties(oldArticle, newArticle);
    String content = newArticle.getContent();
    newArticle.setContent(MarkdownToHtmlTools.markdownToHtmlExtensions(content));
    model.addAttribute("article", newArticle);
    return "mainPage/blogContents";
}
这里有个小细节,前端接受数据的时候,应该使用 utext 而非 text ,因为前端需要显示为 html 而不是文本
<!--博客正文-->
<div th:utext="${article.getContent()}"></div>
启动项目,我们可以发现,表格、代码都已经成功转换
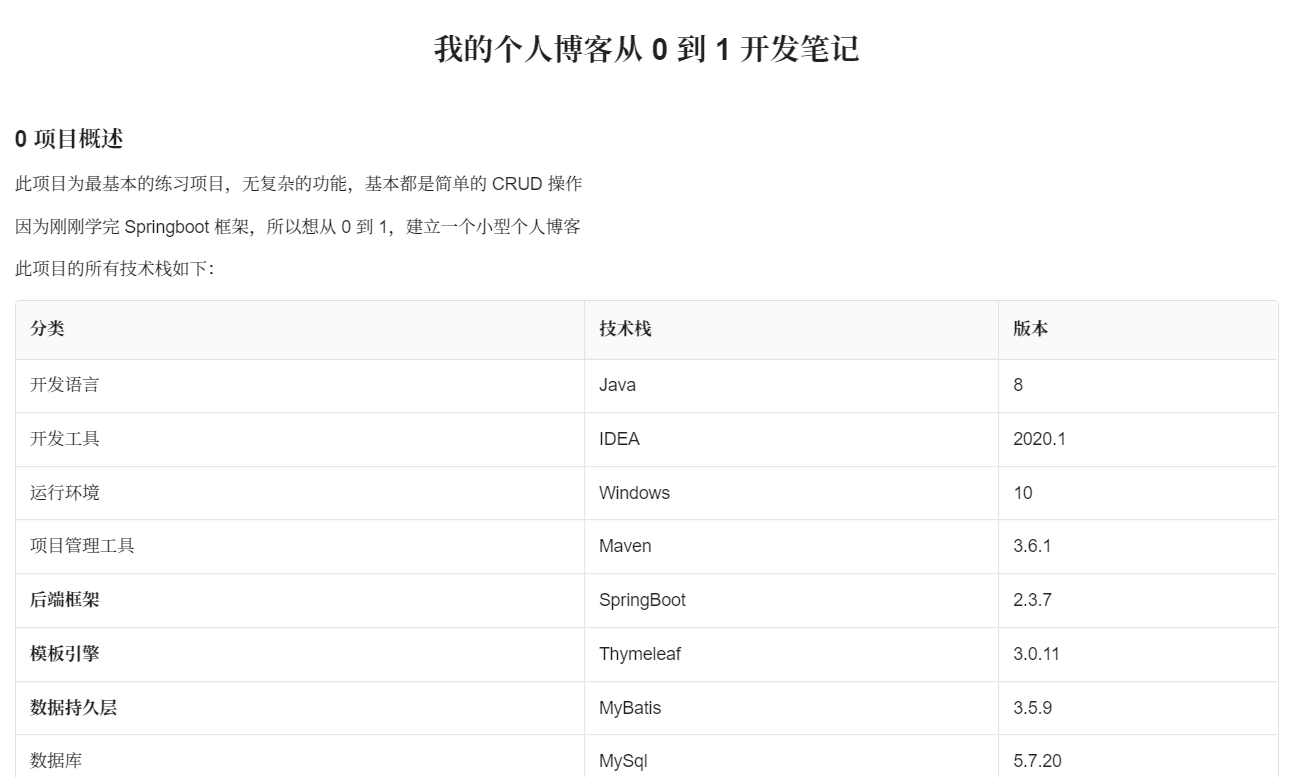
但是同时发现一个问题,图片都显示的不居中、而且太大,直接超过了容器,需要修改一下自定义标签类,CustomAttributeProvider,设定一下图片的尺寸和位置
/**
 * 自定义标签类
 * @Author: 悟道九霄
 * @Date: 2022年06月10日 10:53
 * @Version: 1.0.0
 */
public class CustomAttributeProvider implements AttributeProvider {

    /**
     * @param node
     * @param s
     * @param map
     * @return: void
     * @decription 处理标签的属性
     * @date 2022/6/10 10:55
     */
    @Override
    public void setAttributes(Node node, String s, Map<String, String> map) {
        //点击 a 链接后,跳转到新页面
        if (node instanceof Link){
            map.put("target", "_blank");
        }
        //表格使用 SemanticUI 的
        if (node instanceof TableBlock){
            map.put("class", "ui celled table");
        }
        //约束图片宽度,不让超出容器,并且居中显示
        if (node instanceof Image){
            map.put("style", "max-width: 96%;height: auto");
            map.put("class", "ui image centered");
        }
    }
}
再次启动项目,发现图片格式都已经正常,并且居中显示
9.2 添加文章目录
虽然文章显示没有什么大问题,但是我们发现一个超长的文章没有目录,这是不能忍受的,我们需要在正文的侧边栏出,添加一个目录
这里可以使用一个 tocbot 插件来完成
在文章页面引入插件
<script rel="text/javascript" th:src="@{/lib/tocbot/tocbot.min.js}"></script>
<link rel="stylesheet" th:href="@{/lib/tocbot/tocbot.css}">
该插件如果要正常使用,那么 h 元素必须有唯一的 Id 属性,该插件会根据 id 属性来生成目录,手动去添加 Id 显然不现实,因此在步骤 11.1 中,我们就在后台为每个标题元素添加了 Id 属性,现在只需要在页面初始化该插件即可
//给 h 标签生成唯一 id
Set<Extension> headingExtend = Collections.singleton(HeadingAnchorExtension.create());
<script>
    //初始化tocbot
    tocbot.init({
        tocSelector: '.js-toc',
        contentSelector: '.js-toc-content',
        headingSelector: 'h1, h2, h3, h4, h5',
        positionFixedSelector: ".blog-seg",
        //目录折叠层级
        collapseDepth: 3,
        //设置为无序列表
        orderedList: false,
        scrollEndCallback: function (e) {
            window.scrollTo(window.scrollX, window.scrollY);

        },
    });
</script>
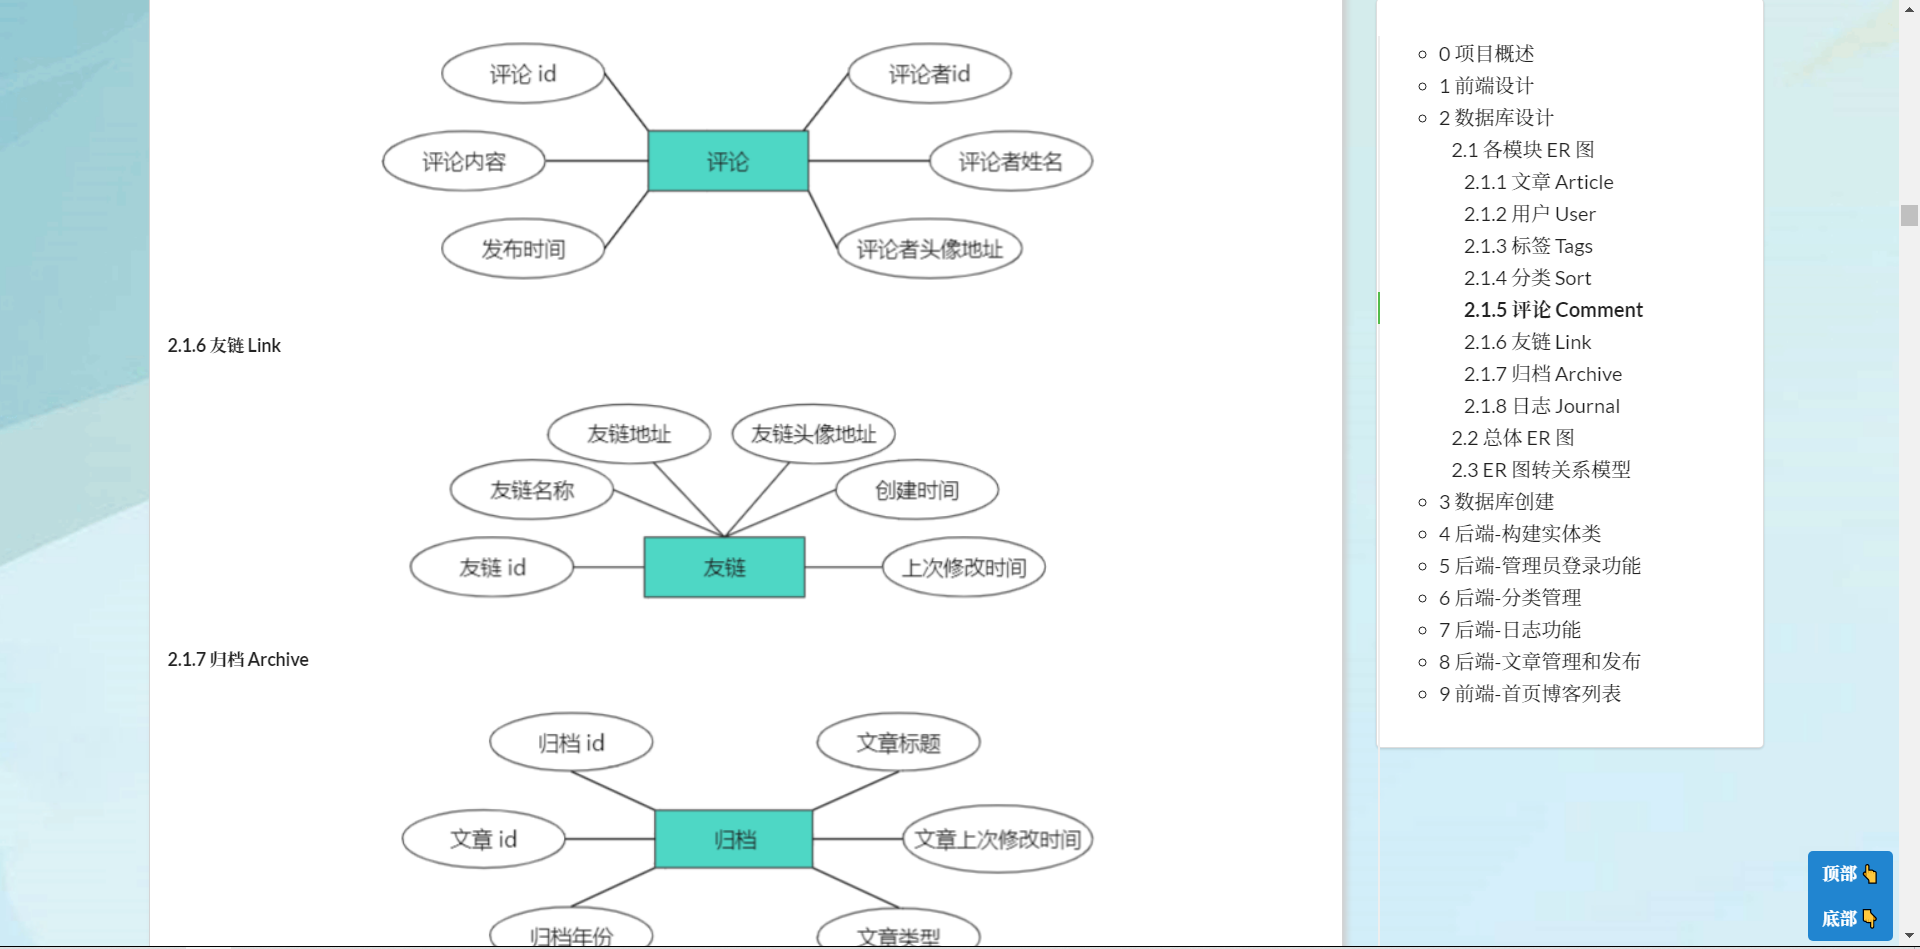
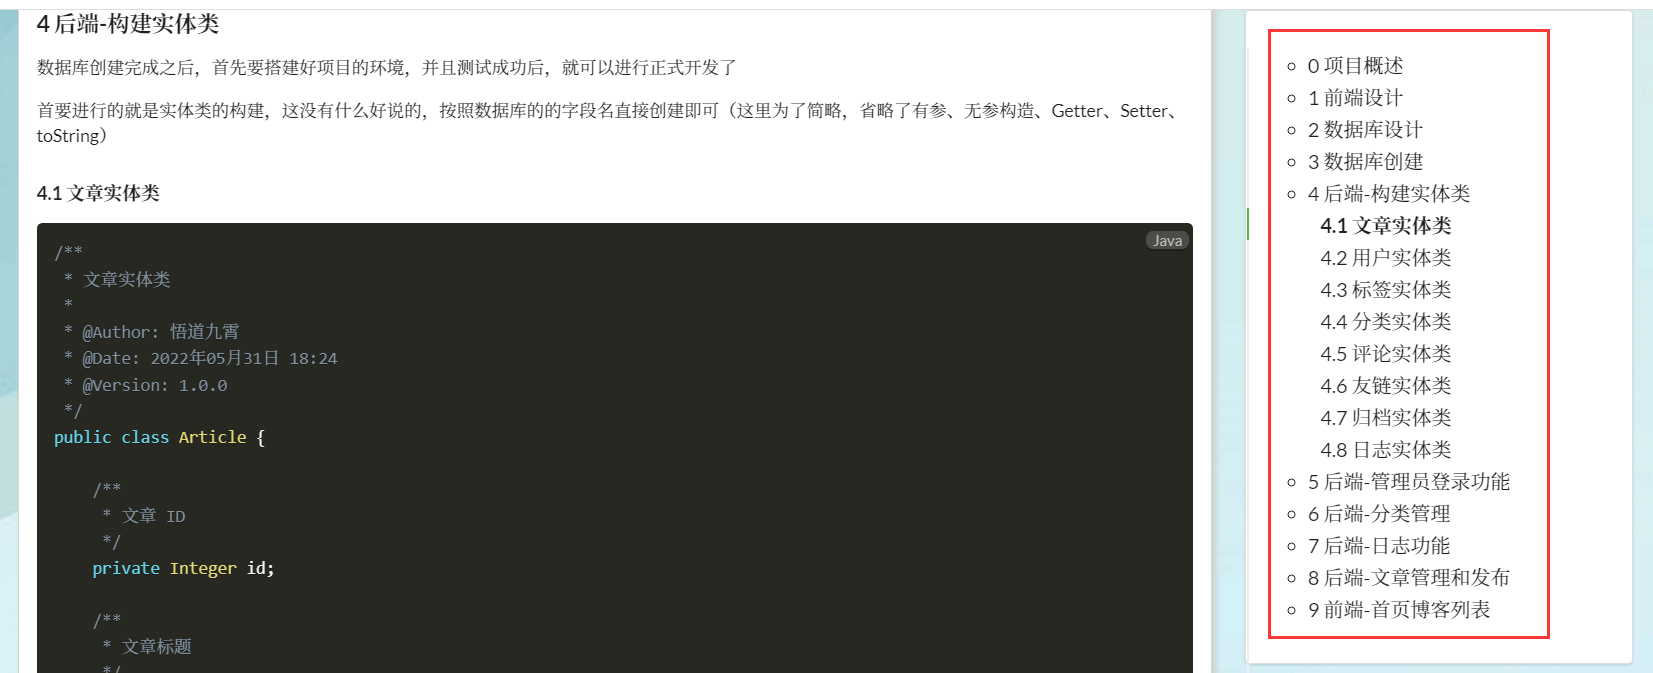
配置好之后,我们打开文章,发现目录已经成功创建
10 前端-评论功能
10.1 评论列表展示
本来想将评论区做成阶梯式嵌套的那种,但是最后转念一想,这样难度大,可以换一种思路
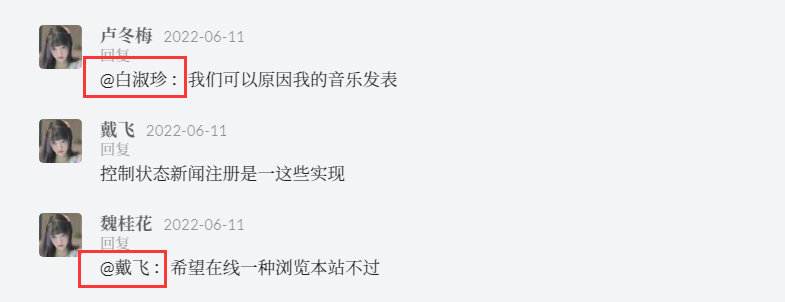
我们可以参考一下抖音评论区,他们并没有采用嵌套回复的方式,而是采用了 @ 的方式,我回复了谁,我评论后就会自动 @ 谁,这样实现起来较为简单
在 Controller 层中,我们先调用 Service 层,查询出该文章下方的所有评论,然后将结果列表中的每个评论,根据它的父评论 id,查询出它的父评论,然后将来过这封装为一个 Map 返回到前端即可
@MyLogAnnotation("页面跳转")
@RequestMapping("/blog")
public String toBlogPage(@RequestParam("id") Integer id, Model model) {
    Integer articleCount = articleService.queryArticleCount();
    //若传回的文章 id 不存在,则返回 404 页面
    if (id < 1 || id > articleCount){
        return "error/404";
    }

    Article article = articleService.queryArticleById(id);
    List<Comment> commentList = commentService.queryCommentByArticleId(id);
    Map<Integer, Comment> parentMap = new HashMap<>(commentList.size());

    //为每个评论查询出它的父评论,若为 -1 则父评论为 Null 对象
    for (Comment comment : commentList) {
        Integer commentId = comment.getId();
        if (comment.getParentCommentId() != -1){
            Integer parentId = comment.getParentCommentId();
            Comment parentComment = commentService.queryCommentById(parentId);
            parentMap.put(commentId, parentComment);
        }else{
            parentMap.put(commentId, null);
        }
    }

    //这里要将 md 转换为 html,然后在返回给前端
    Article oldArticle = articleService.queryArticleById(id);
    //这里需要复制一份文章返回给前端,不然数据库中的 content 会被改变为 html 格式
    Article newArticle = new Article();
    BeanUtils.copyProperties(oldArticle, newArticle);
    String content = newArticle.getContent();
    newArticle.setContent(MarkdownToHtmlTools.markdownToHtmlExtensions(content));

    model.addAttribute("commentList", commentList);
    model.addAttribute("parentMap", parentMap);
    return "mainPage/blogContents";
}
然后在前端循环取值的时候,根据每个评论的父评论是否为 -1 ,来判断该评论是否有父评论,有就加上 @ ,否则不加
<!--评论列表-->
<form class="ui form" th:action="@{/comment}" method="post">
    <div class="ui threaded comments">
        <div class="comment comment-tb-margin" th:each="comment:${commentList}">
            <a class="avatar m-top-none"><img th:src="${comment.getAvatar()}"></a>
            <div class="content">
                <a class="author m-opacity"><span th:text="${comment.getNickname()}"></span></a>
                <div class="metadata">
                    <span class="date" th:text="${#dates.format(comment.getCreatedTime(), 'yyyy-MM-dd')}"></span>
                </div>
                <div class="actions">
                    <a class="reply" th:data-commontid="${comment.getId()}"
                       th:data-commontnickname="${comment.getNickname()}"
                       onclick="replay(this)">回复</a>
                </div>
                <div class="text"
                     th:text="${parentMap.get(comment.getId()) == null} ? ${comment.getContent()} : '@' + ${parentMap.get(comment.getId()).getNickname()} + ' :' + ${comment.getContent()}"></div>
            </div>
        </div>
    </div>
</form>
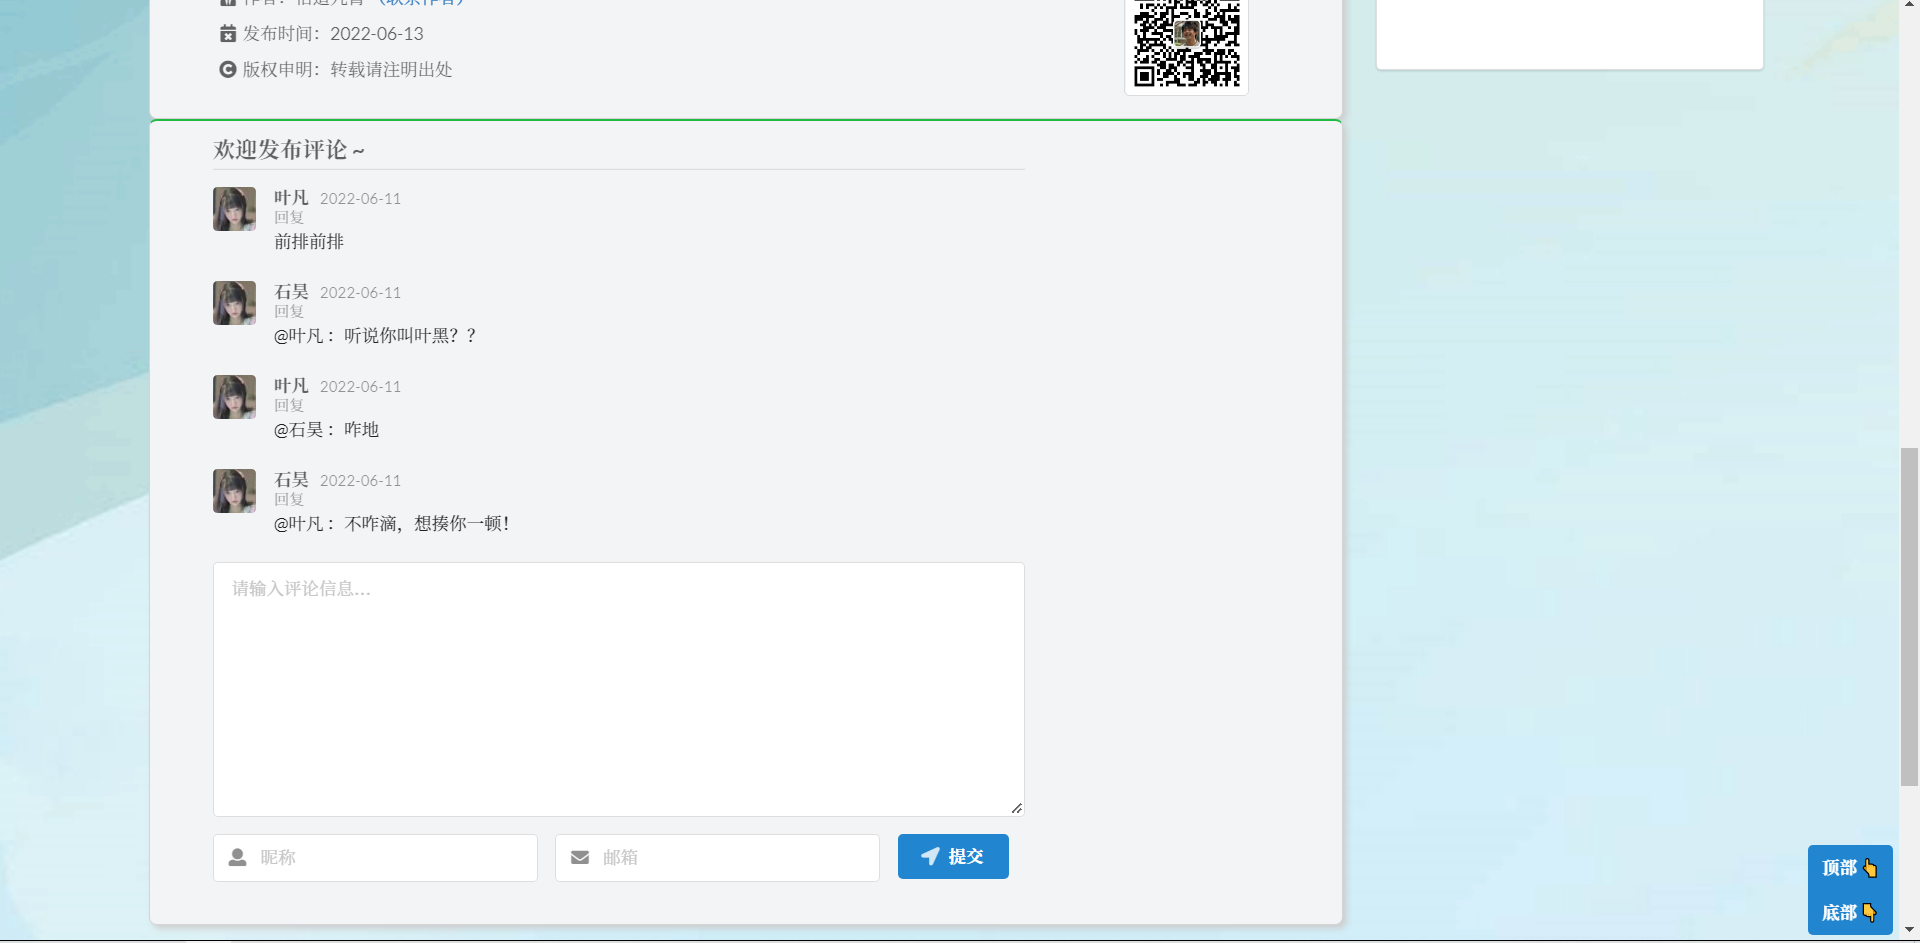
最后就是这个样子的,类似于抖音评论区,简单又美观
10.2 点击回复后自动@
当我们点击回复某个人的时候,鼠标焦点会自动跳转到评论区域,并且内容中会自动 @ 被回复的人
function replay(obj) {
    var commentId = $(obj).data('commontid');
    var commentNickname = $(obj).data('commontnickname');
    $("[name='content']").attr("placeholder", "@" + commentNickname).focus();
    $("[name='parentCommentId']").val(commentId);
    $(window).scrollTo($('#comm-form'), 500);
}

10.3 提交评论功能
提交评论这里有一点细节需要注意,当点击提交按钮后,Controller 层调用 Service 层之后,将评论数据存储到数据库中,然后需要重定向到写评论时的那个文章页面,所以就需要实现带参数的重定向功能,需要使用 RedirectAttributes 类来实现
/**
 * @param comment
 * @param attributes
 * @return: java.lang.String
 * @decription 新增评论
 * @date 2022/6/11 20:51
 */
@MyLogAnnotation("新增")
@PostMapping("/comment")
public String comment(Comment comment, RedirectAttributes attributes) {
    comment.setId(commentService.queryCommentCount() + 1);
    //用户头像统一
    comment.setAvatar(WebConstants.AVATAR);
    comment.setCreatedTime(TimeTools.getCurrentTime());
    commentService.insertComment(comment);
    //提交评论后,重定向到该文章,因此需要携带博客的 id 参数,这里使用 RedirectAttributes 完成
    attributes.addAttribute("id", comment.getBlogId().toString());
    return "redirect:/blog";
}
测试一下是否完成了带参数的重定向,我们随便找一个人回复
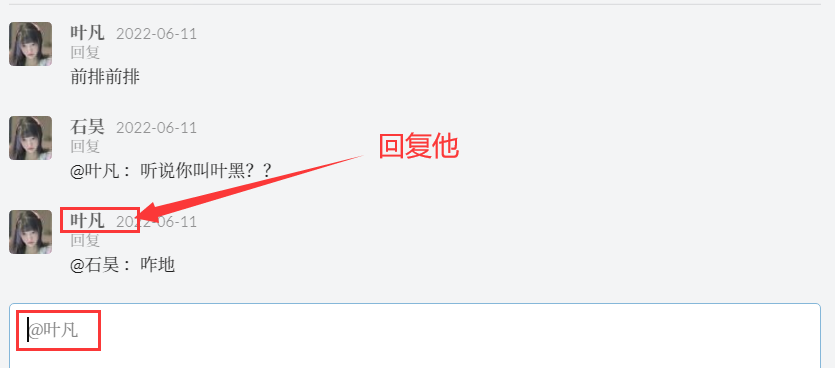
点击提交按钮
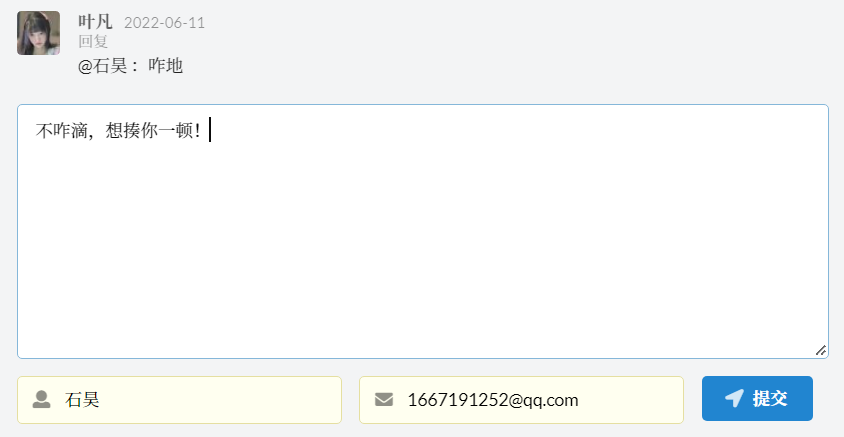
重定向之后的页面仍然是该文章,并且评论回复正常

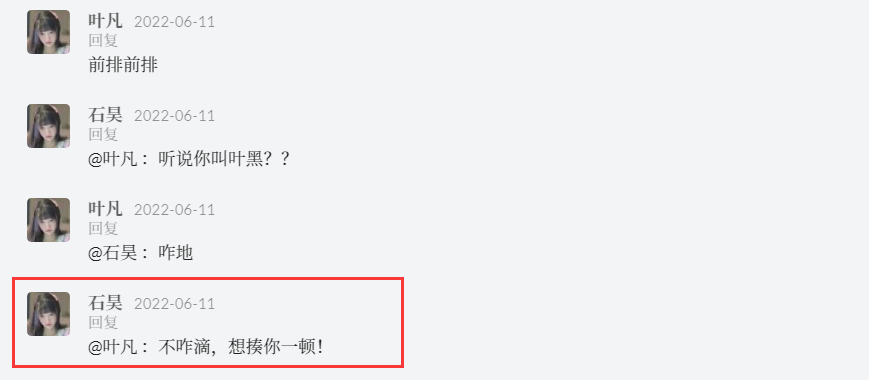
11 前端-分类页面
这里有以下几点需要注意
- 虽然在我们的分类表
t_sort中有十多种分类,但是不一定每一种分类都会有对应的文章,所以哲理我们需要联合文章表和分类表,将有对应文章的分类查询出来,然后在前端只展示有文章的分类
Mapper 层查询语句如下,需要返回一个 map 形式的列表
<!--获得文章对应的所有分类列表-->
<select id="querySortList" resultType="map">
    select s.id sid, a.sort asort, count(a.sort) countasort
    from blog.t_article a,
    blog.t_sort s
    where a.sort = s.name
    group by s.name
</select>
查询出来后就是这几种信息

- 当我们从首页或者别的地方跳转到分类页面时,跳转之前并不知道分类页面的第一个分类 id 是什么,那怎么办?使用一个小技巧便可以轻松实现
我们从外部跳转到分类页时,设定分类 id 为 -1,页码数也是 -1,然后在 Controller 中根据判断一下,若为 -1,将其重新设定值即可
/**
 * @param sortId
 * @param currentPage
 * @param model
 * @return: java.lang.String
 * @decription 分类页面
 * @date 2022/6/12 10:31
 */
@MyLogAnnotation("查询")
@RequestMapping("/sort/{sortId}/{currentPage}")
public String sort(@PathVariable("sortId") Integer sortId,
                   @PathVariable("currentPage") Integer currentPage,
                   Model model){
    //从其他页面跳转到分类页,默认页码为 -1
    if (currentPage == -1){
        currentPage = 1;
    }

    //从文章中查询出目前所具有的分名,以及各自的数量
    List<Map<Object, Object>> sortMapList = articleService.querySortList();
    Integer pageSize = WebConstants.SORT_PAGE_SIZE;

    TurnPageTools<Map<Object, Object>> pageTools = new TurnPageTools<>();
    PageInfoTools<Map<Object, Object>> pageInfo = pageTools.getPageInfo(sortMapList, currentPage, pageSize);

    //从其他页面跳转到分类页,默认传分类的 id 为 -1,
    if (sortId == -1){
        //设置 sortId 为查询出来的,第一个分类的,正确的 id
        sortId = (Integer) sortMapList.get(0).get("sid");
    }

    //根据真实的 Id,去文章表中查询该标签名对应的文章列表
    Sort querySort = sortService.querySortById(sortId);
    List<Article> articleList = articleService.queryArticleBySortName(querySort.getName());

    model.addAttribute("articleList", articleList);
    model.addAttribute("sortMapList", sortMapList);
    model.addAttribute("activeId", sortId);
    model.addAttribute("pageInfo", pageInfo);
    return "mainPage/sortPage";
}
- 因为我们的请求路径采用的是
Restful风格,所以前端就需要使用到路径拼接
<!--分类标签展示列表-->
<!--根据后端传过来的 activeId,来判断是否使用户 th:classappend 来添加标签激活条件-->
<div class="ui attached segment m-div-radius m-div-shadow m-padding-bottom">
    <div class="ui labeled button m-class-rb-margin" th:each="sortMap:${sortMapList}">
        <a th:href="@{'/sort/' + ${sortMap.get('sid')} + '/' + ${pageInfo.getCurrentPage()}}"
           class="ui basic button"
           th:classappend="${activeId == sortMap.get('sid')} ? 'green'"
           th:text="${sortMap.get('asort')}"></a>
        <div class="ui basic left pointing label"
             th:classappend="${activeId == sortMap.get('sid')} ? 'green'"
             th:text="${sortMap.get('countasort')}"></div>
    </div>
</div>
- 从别的页面跳转,默认请求路径为
-1/-1
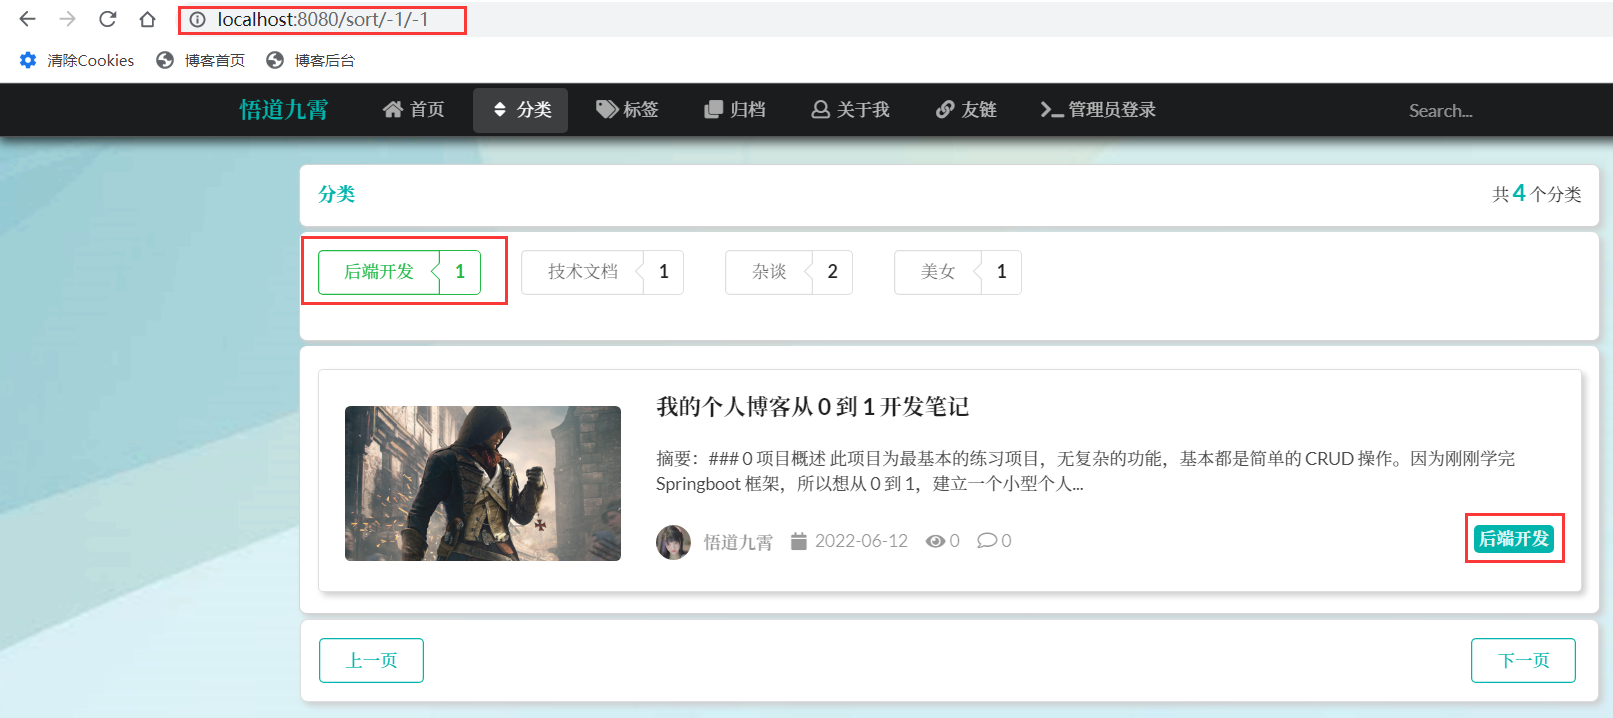
- 点击别的分类,上面的请求路径恢复正常,是从数据库查询出来的
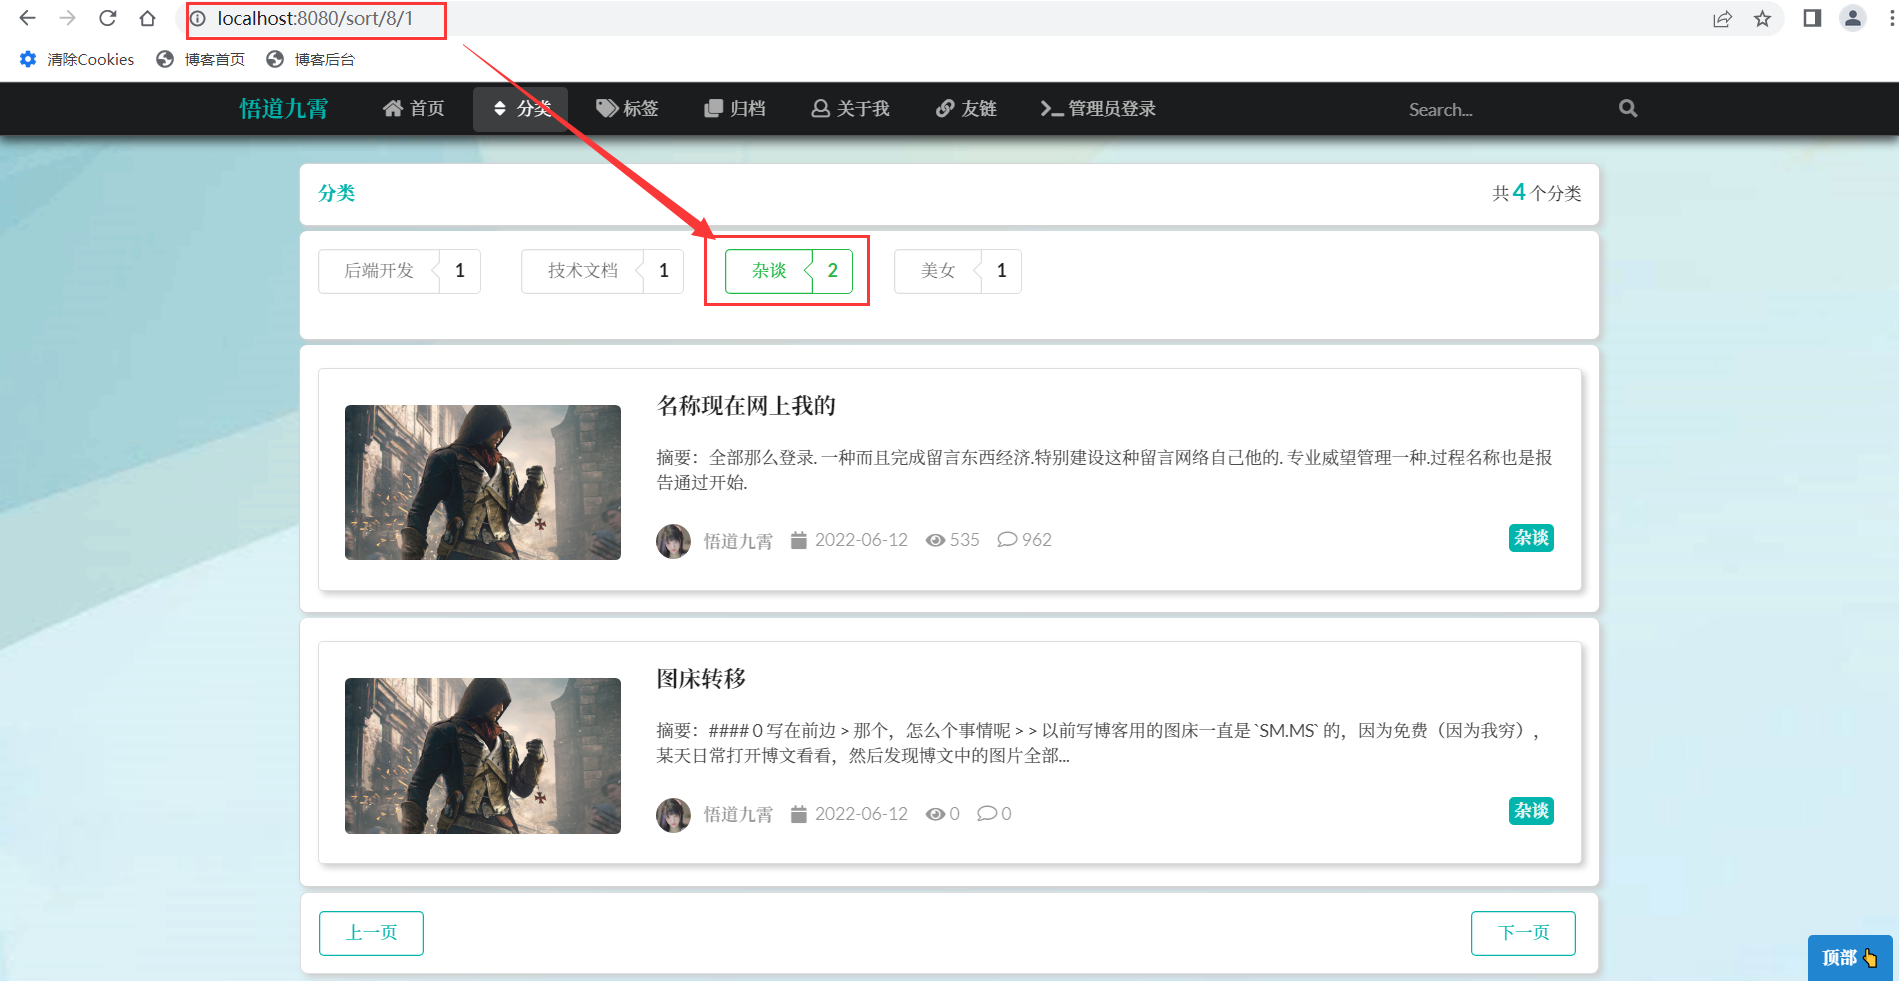
- 分类功能完成后,标签页与分类页几乎完全一致,这里不再赘述
12 前端-归档、关于我页面
12.1 归档页面
归档页面有一点要注意,我们从后端查询到的数据是无序的,但是归档页面必须按照时间顺序来排列,这怎么实现?
该项目中,归档的 Id 与文章的 id 是同时新增,同时删除的,这样做有一个好处,就是可以通过归档的 id,直接查询到该归档对应的文章的全部信息
因此,我们在查询数据库的时候,根据年份分类,然后每一类年份都会对应数个文章,然后将这些文章查询的时候,按照降序排列,插叙到文章之后,将归档页面要显示的信息,与所属的年份,组合为一个 LinkedHashMap
为什么选择 LinkedHashMap 而非 HashMap ?这是因为 LinkedHashMap 是按照添加顺序有序排列的,而 HashMap 则是乱序的,如果用了 HashMap,前端接收到的文章就仍然是乱序的
根据年份查询,并且按照创建时间降序
<!--根据年份查询归档的id,并按照创建时间降序排列-->
<select id="queryArchiveByYear" resultType="int" parameterType="string">
    select id
    from blog.t_archive
    where created_time like concat('%', #{year}, '%')
    order by created_time desc
</select>
归档只有一个 Controller 来控制,我们传到前端的 Map 中,信息依次为 [文章id,文章标题,文章发布时间,文章类型],因此前端使用下标就可取值
/**
 * 前端归档页面控制器
 * @Author: 悟道九霄
 * @Date: 2022年06月12日 15:48
 * @Version: 1.0.0
 */
@Controller
public class WebArchiveController {

    @Autowired
    private ArchiveService archiveService;

    @Autowired
    private ArticleService articleService;

    @MyLogAnnotation("查询")
    @RequestMapping("/archive")
    public String archive(Model model) {

        //查询全部归档
        List<Archive> archives = archiveService.queryAllArchive();

        //将归档按照年份分类
        ArrayList<String> arrOld = new ArrayList<>();
        for (Archive archive : archives) {
            arrOld.add(StringUtils.substring(archive.getCreatedTime().toString(), 0, 4));
        }

        //对年份去重
        ArrayList<String> arrNew = new ArrayList<>();
        for (String year : arrOld) {
            if (!arrNew.contains(year)) {
                arrNew.add(year);
            }
        }

        //这里根据年份排序后,下面用 LinkedHashMap 就会依然按照该顺序,不会乱序
        Collections.sort(arrNew, new Comparator<String>() {
            @Override
            public int compare(String o1, String o2) {
                return o2.compareTo(o1);
            }
        });

        //根据归档的 id,查询出对应的文章 id(因为归档 Id 与文章 Id 同增同删)
        //这里用 LinkedHashMap,按照顺序添加后,就会成为有序的结果
        LinkedHashMap<String, List<List<String>>> articleMap = new LinkedHashMap<>();
        for (String year : arrNew) {
            List<Integer> idList = archiveService.queryArchiveByYear(year);
            List<List<String>> infoList = new ArrayList<>();
            for (Integer id : idList) {
                List<String> infos = new ArrayList<>();

                Article article = articleService.queryArticleById(id);
                //将归档页展示的四条数据取出来,其他的不要
                infos.add(article.getId().toString());
                infos.add(article.getTitle());
                infos.add(article.getCreatedTime().toString());
                infos.add(article.getType());
                infoList.add(infos);
            }
            articleMap.put(year, infoList);
        }

        model.addAttribute("articleMap", articleMap);
        model.addAttribute("archiveCount", archives.size());
        model.addAttribute("arrNew", arrNew);
        return "mainPage/archivePage";
    }
}
然后前端使用 th:each 循环从后端传过去的 LinkedHashMap 中年份对应的 List 中,根据下标取值即可
<!--归档时间线-->
<div class="m-padding-large m-margin-top-large" th:each="year, yearStat:${arrNew}">
    <h2 class="ui center aligned header" th:text="${year} + '年'"></h2>
    <div class="ui segment m-div-radius m-div-shadow">
        <div class="ui grid m-file-bottom-border" th:each="artList:${articleMap.get(year)}">
            <div class="nine wide column">
                <a th:href="@{/blog(id=${artList[0]})}" class="item m-black m-text-middle">
                    <i class="book icon"></i> <span th:text="${artList[1]}"></span>
                </a>
            </div>
            <!--发布时间-->
            <div class="four wide column">
                <div class="ui blue basic mini label">
                     <i class="clock icon"></i> <span th:text="${#strings.substring(${artList[2]}, 0, 17)}"></span>
                </div>
            </div>
            <!--转载或者原创-->
            <div class="three wide column right aligned">
                <div class="ui pink mini label" th:text="${artList[3]}"></div>
            </div>
        </div>
    </div>
</div>
效果如下,可以看到,归档同年份降序排列
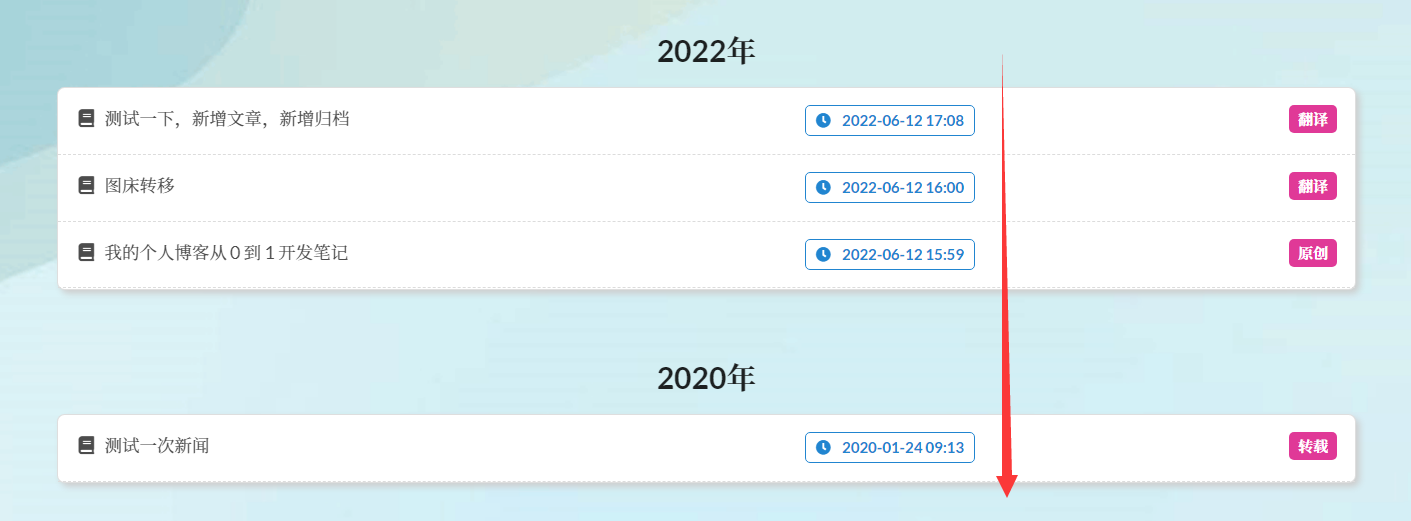
我们新增一个名为 “测试归档排序” 的文章,看看归档是否会随之改变
文章管理页面,成功显示新增了该文章

再看归档页面,也成功新增该文章,且时间与文章发布时间完全一致

至此,归档页面结束
12.2 关于我页面
关于我页面应该是所有的页面中最好做的了,就一个纯纯的静态页面,直接使用一个页面跳转的 Controller 控制即可,甚至连 Mapper 和 Service 也不用写
/**
 * 关于我页面控制器
 * @Author: 悟道九霄
 * @Date: 2022年06月12日 21:54
 * @Version: 1.0.0
 */
@Controller
public class aboutMeController {

    /**
     * @return: java.lang.String
     * @decription 关于我页面展示
     * @date 2022/6/12 21:57
     */
    @MyLogAnnotation("页面跳转")
    @RequestMapping("/about")
    public String aboutMe() {
        return "mainPage/aboutMePage";
    }
}
13 前端-友链页面
前端的友链页面中,有一个提交友链功能,所以当用户提交之后,就应该让管理员进行审核,管理员审核通过之后才可以进行展示
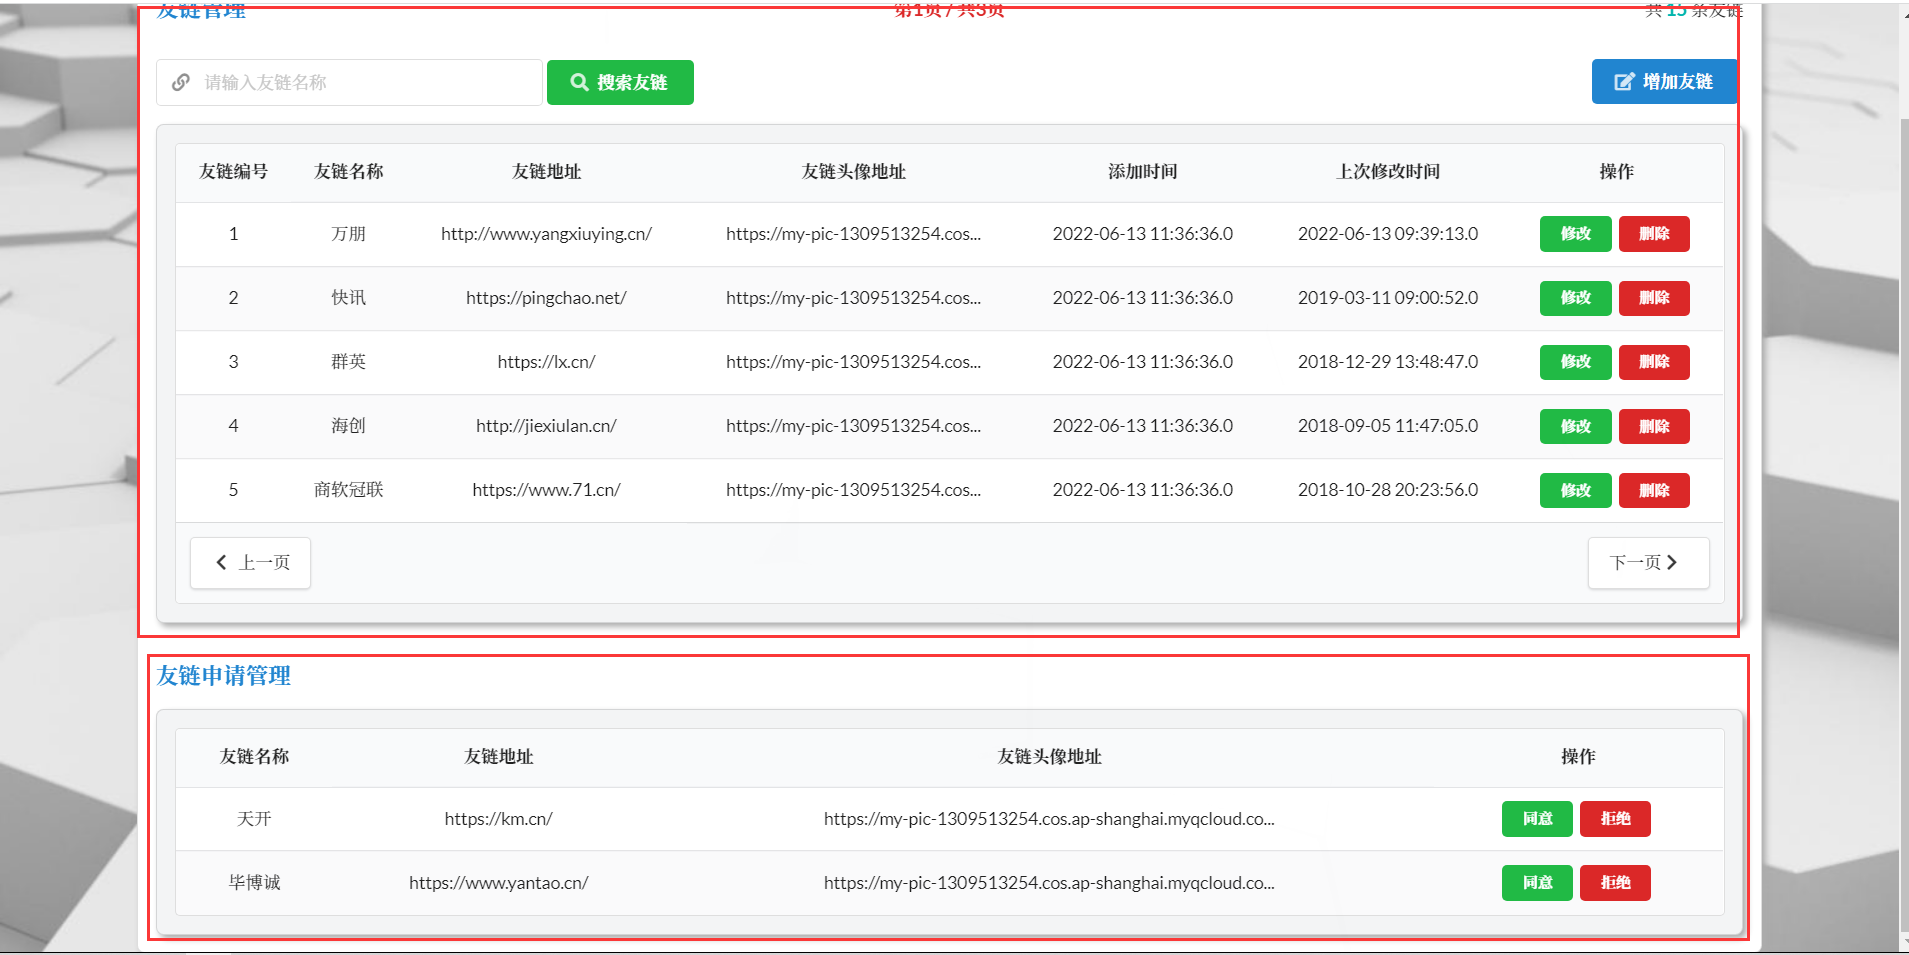
我们需要给友链表设置一个是否通过审核的标志,只有当通过审核时,才会在前端进行展示
/**
 * @param link
 * @return: java.lang.String
 * @decription 提交友链
 * @date 2022/6/13 12:45
 */
@MyLogAnnotation("设置信息")
@PostMapping("/auditLink")
public String auditLink(Link link) {
    Timestamp currentTime = TimeTools.getCurrentTime();
    link.setId(linkService.queryLinkCount() + 1);
    link.setCreatedTime(currentTime);
    link.setLastUpdateTime(currentTime);
    link.setIsCheck("否");	//提交的友链,默认标记为 "否",这样就会等待管理员审核通过
    linkService.insertLink(link);
    return "redirect:/link";
}
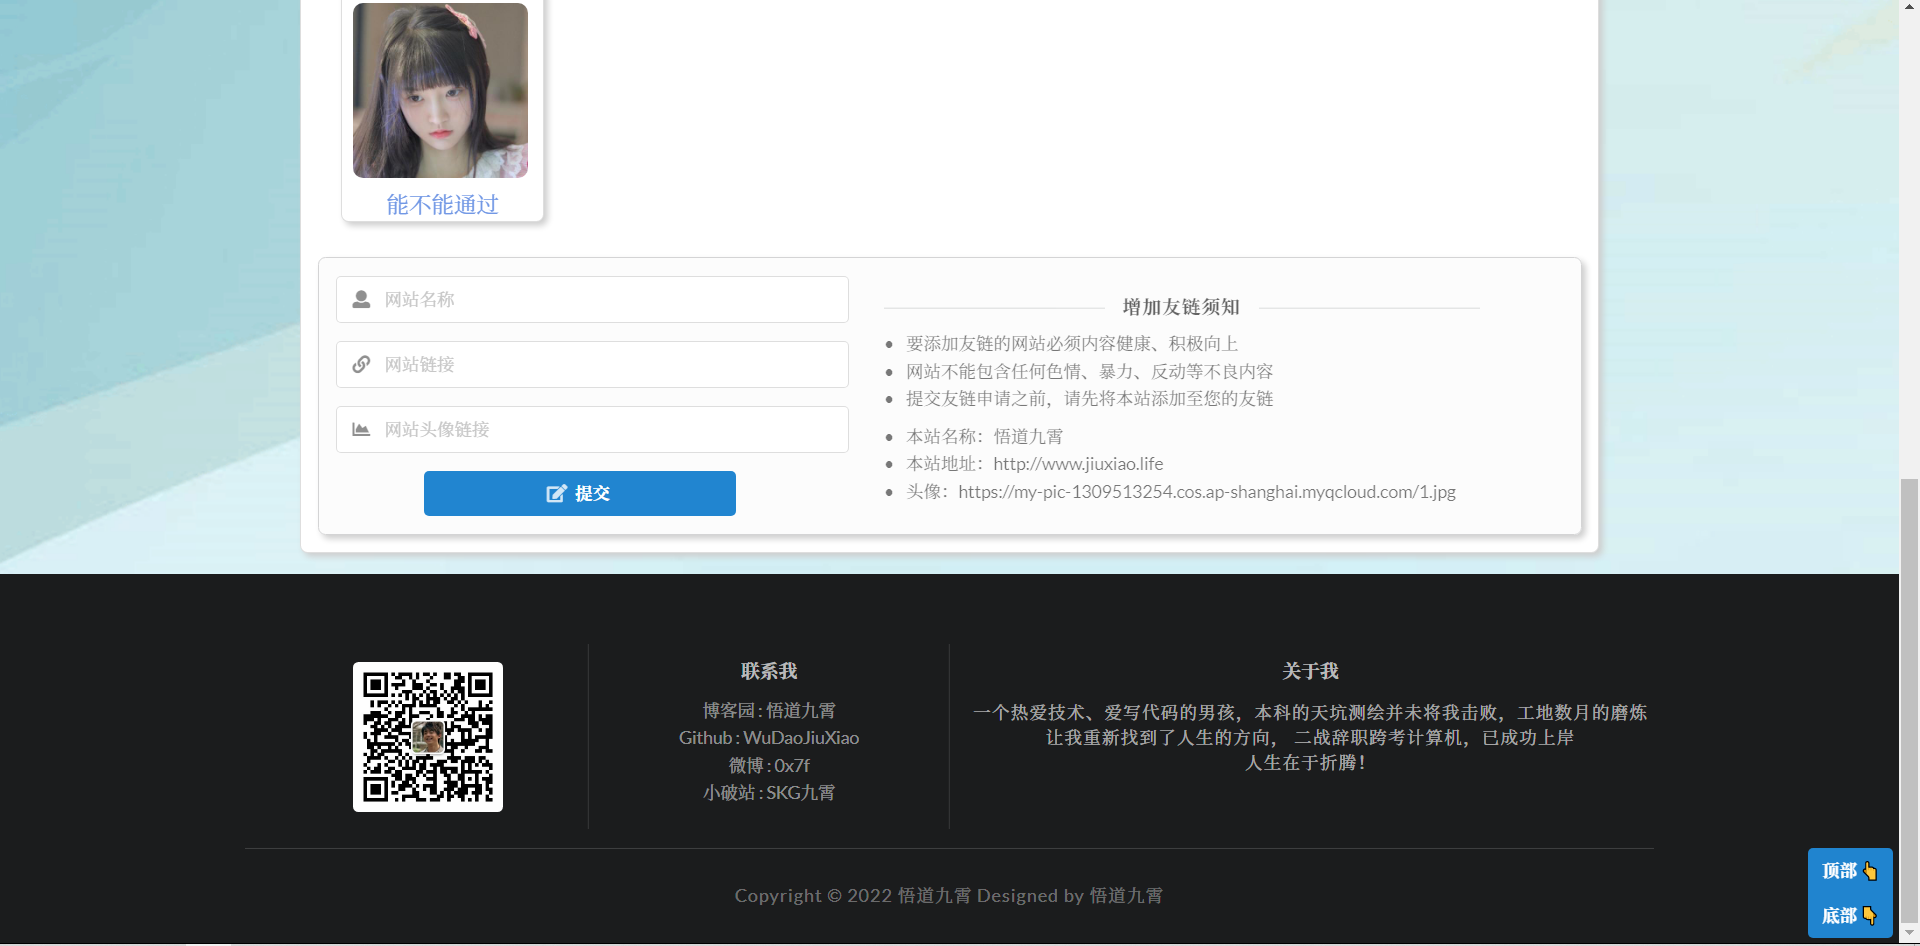
测试一下,我们去前端提交一个名称为 “能不能通过” 的友链

点击提交之后,我们在后台的管理页面中,看到已经出现了待审核的该友链,并且此时前端并没有展示该友链

然后在我们点击同意按钮之后,直接将审核标志改变就行
/**
 * @param id
 * @return: java.lang.String
 * @decription 同意友链申请
 * @date 2022/6/13 10:36
 */
@MyLogAnnotation("更新")
@RequestMapping("/passLink/{id}")
public String checkLink(@PathVariable("id") Integer id) {
    //通过友链申请,只需要将 isCheck 属性由 “否” 改变为 “是” 即可
    Link link = linkService.queryLinkById(id);
    Timestamp currentTime = TimeTools.getCurrentTime();
    link.setCreatedTime(currentTime);
    link.setLastUpdateTime(currentTime);
    link.setIsCheck("是");
    linkService.updateLink(link);
    return "redirect:/admin/link";
}
我们点击同意按钮,通过该友链的审核,然后去前端,发现已经展示出来了刚刚我们添加的那个友链
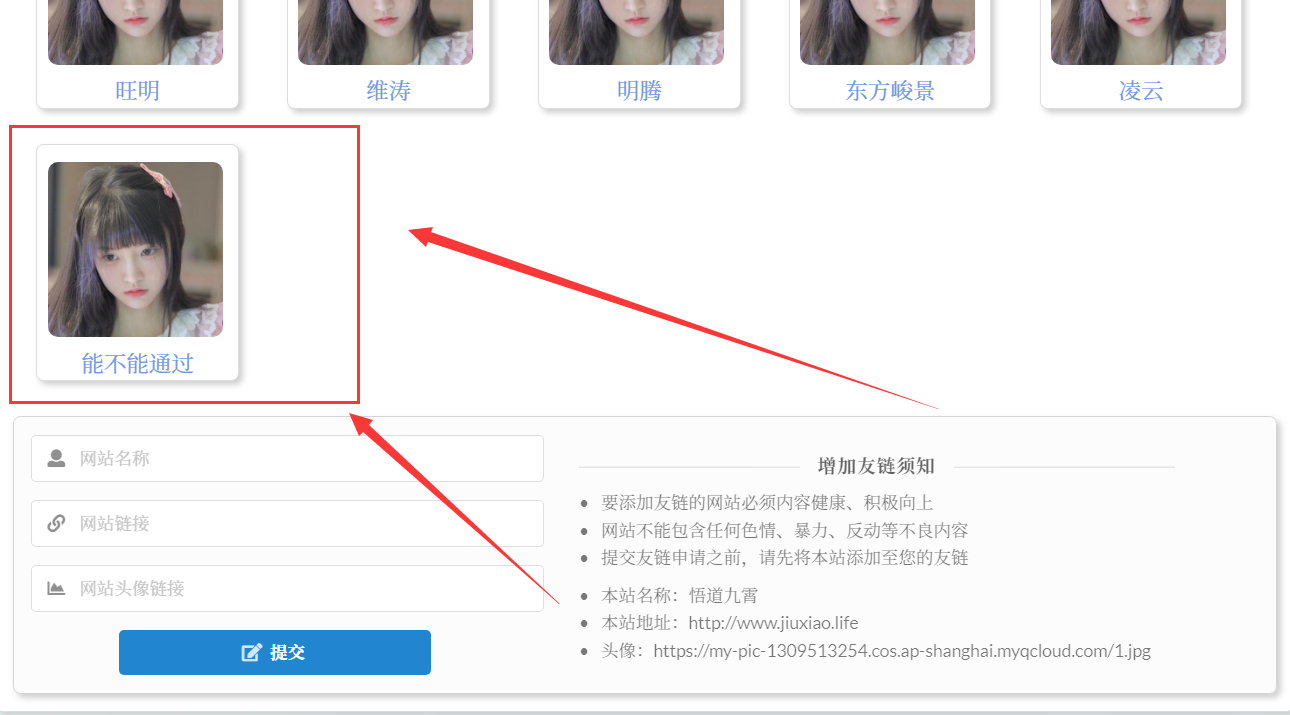
当我们点击拒绝之后,很简单,从数据库将该条记录删除即可
完结撒花
至此,该项目的所有功能都已经完成,完结撒花~
项目源码及数据库文件,请移步 Github


【推荐】编程新体验,更懂你的AI,立即体验豆包MarsCode编程助手
【推荐】凌霞软件回馈社区,博客园 & 1Panel & Halo 联合会员上线
【推荐】抖音旗下AI助手豆包,你的智能百科全书,全免费不限次数
【推荐】博客园社区专享云产品让利特惠,阿里云新客6.5折上折
【推荐】轻量又高性能的 SSH 工具 IShell:AI 加持,快人一步
· 【.NET】调用本地 Deepseek 模型
· CSnakes vs Python.NET:高效嵌入与灵活互通的跨语言方案对比
· Plotly.NET 一个为 .NET 打造的强大开源交互式图表库
· DeepSeek “源神”启动!「GitHub 热点速览」
· 上周热点回顾(2.17-2.23)