
idea 使用spring boot 搭建freemarker模板
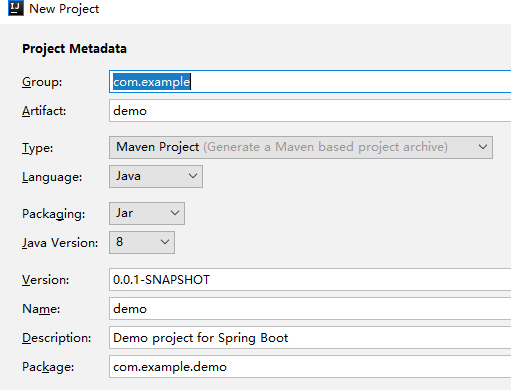
一丶新建maven spring boot 项目


新建好了开始使用模板
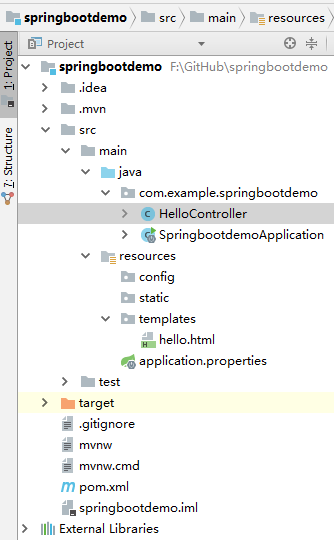
先看一个目录结构
二丶配置pox.xml
<?xml version="1.0" encoding="UTF-8"?>
 <project  xmlns="http://maven.apache.org/POM/4.0.0" xmlns:xsi="http://www.w3.org/2001/XMLSchema-instance" xsi:schemaLocation="http://maven.apache.org/POM/4.0.0 http://maven.apache.org/xsd/maven-4.0.0.xsd">
    <modelVersion>4.0.0</modelVersion>
    <groupId>com.example</groupId>
    <artifactId>springbootdemo</artifactId>
    <version>0.0.1-SNAPSHOT</version>
    <packaging>jar</packaging>

    <name>springbootdemo</name>
    <description>Demo project for Spring Boot</description>

    <parent>
        <groupId>org.springframework.boot</groupId>
        <artifactId>spring-boot-starter-parent</artifactId>
        <version>2.0.1.RELEASE</version>
        <relativePath/> <!-- lookup parent from repository -->
    </parent>

    <properties>
        <project.build.sourceEncoding>UTF-8</project.build.sourceEncoding>
        <project.reporting.outputEncoding>UTF-8</project.reporting.outputEncoding>
        <java.version>1.8</java.version>
    </properties>

    <dependencies>

        <dependency>
            <groupId>org.springframework.boot</groupId>
            <artifactId>spring-boot-starter-web</artifactId>
        </dependency>

        <dependency>
            <groupId>org.springframework.boot</groupId>
            <artifactId>spring-boot-starter-test</artifactId>
            <scope>test</scope>
        </dependency>
        <dependency>
            <groupId>org.springframework.boot</groupId>
            <artifactId>spring-boot-starter-freemarker</artifactId> <!--引入依赖 这里特别重要-->
        </dependency>
    </dependencies>

    <build>
        <plugins>
            <plugin>
                <groupId>org.springframework.boot</groupId>
                <artifactId>spring-boot-maven-plugin</artifactId>
            </plugin>
        </plugins>
    </build>


</project>
引入依赖后
点项目后右键

等待加载完毕
三丶编写helloController
package com.example.springbootdemo;
import org.springframework.stereotype.Controller;
import org.springframework.web.bind.annotation.*;

import java.util.*;

@Controller
//如果你不想使用模板,请使用ResControllre 这个是不渲染模板的
public class HelloController {
@RequestMapping(value = "/index")
    public String hello(Map<String,Object> map){
        map.put("hello","Hello FreeMarker");
        map.put("message","这是一条信息");
        return "hello";
}

}
编写 application.properties
#选择自己喜欢的端口,这个随意
server.port=8000
########################################################

###FREEMARKER (FreeMarkerAutoConfiguration)

########################################################

spring.freemarker.allow-request-override=false
#Enable template caching.启用模板缓存。
spring.freemarker.cache=false

spring.freemarker.check-template-location=true

spring.freemarker.charset=UTF-8

spring.freemarker.content-type=text/html

spring.freemarker.expose-request-attributes=false

spring.freemarker.expose-session-attributes=false

spring.freemarker.expose-spring-macro-helpers=false

#spring.freemarker.prefix=

#spring.freemarker.request-context-attribute=

#spring.freemarker.settings.*=
#设置面板后缀
spring.freemarker.suffix=.html

#spring.freemarker.template-loader-path=classpath:/templates/ #comma-separated list

#spring.freemarker.view-names= # whitelist of view names that can be resolved
编写html
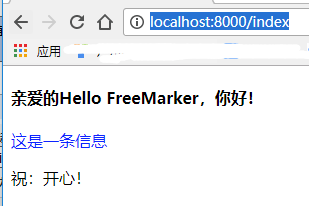
<!DOCTYPE html>
<html>
<body>
<h4>亲爱的${hello},你好!</h4>
<p style="color:blue;">${message}</p>
祝:开心!
</br>
</body>
</html>
运行....
更多模板教程请查看官方文档 http://freemarker.foofun.cn/

 浙公网安备 33010602011771号