CentOS 7 编译 Linux64位 Hadoop
Hadoop 64 位编译
编译前准备:
jdk: jdk-8u181-linux-x64.tar.gz(1.8)
下载地址:https://www.oracle.com/technetwork/java/javase/downloads/jdk8-downloads-2133151.html
查找想要的jdk版本方法:
https://www.oracle.com/technetwork/java/javase/downloads/index.html
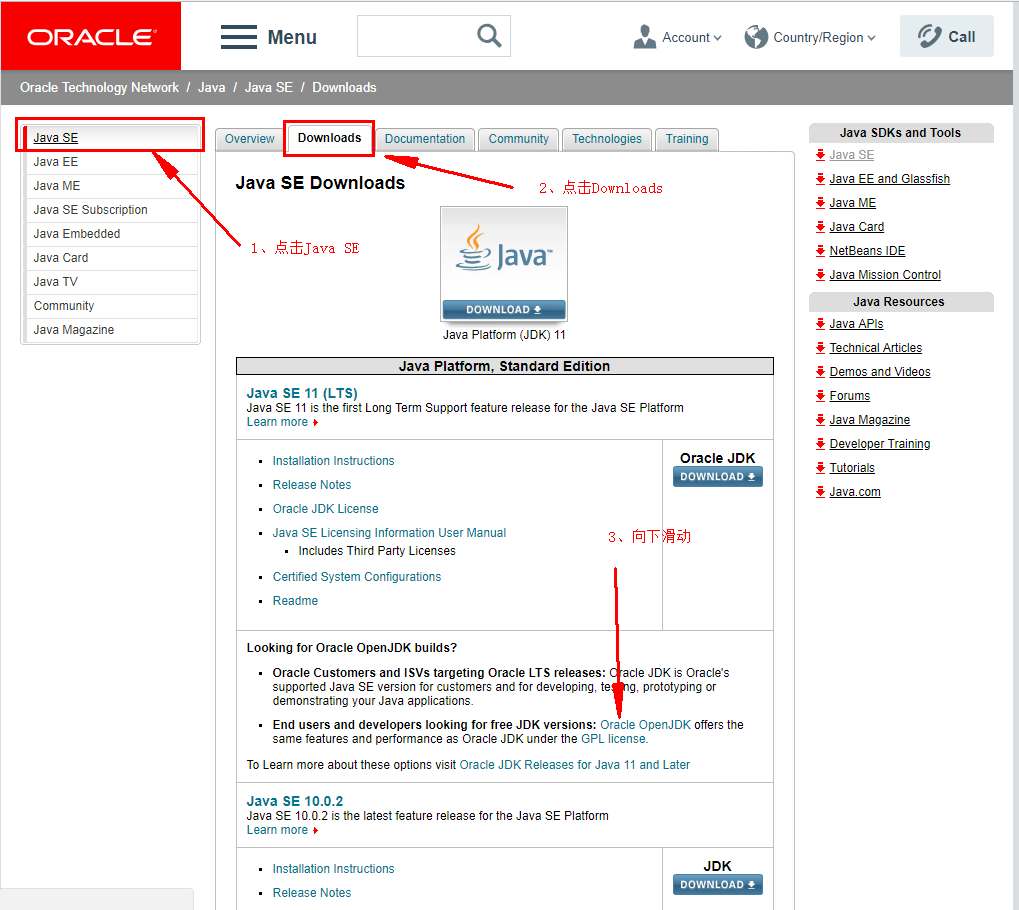
点击DOWNLOAD进入下载界面完成下载。
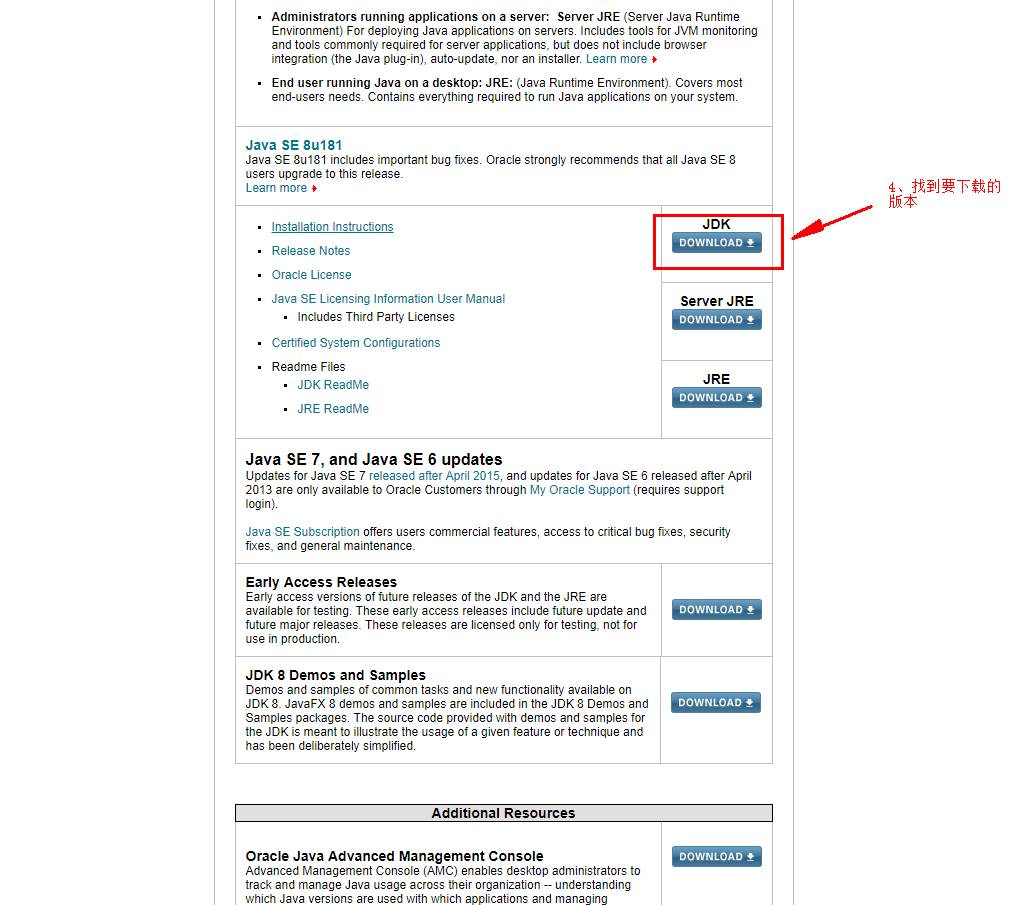
如果想下载历史版本JDK,将网页拉到最底部。
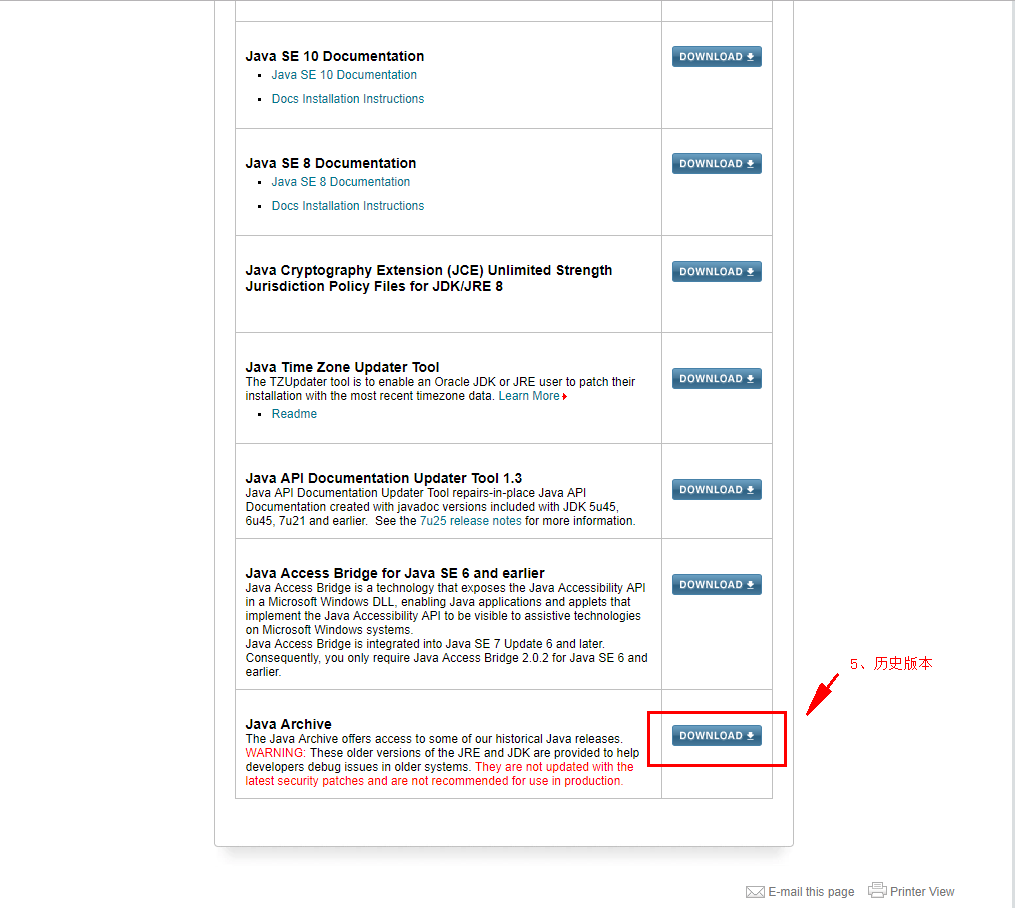
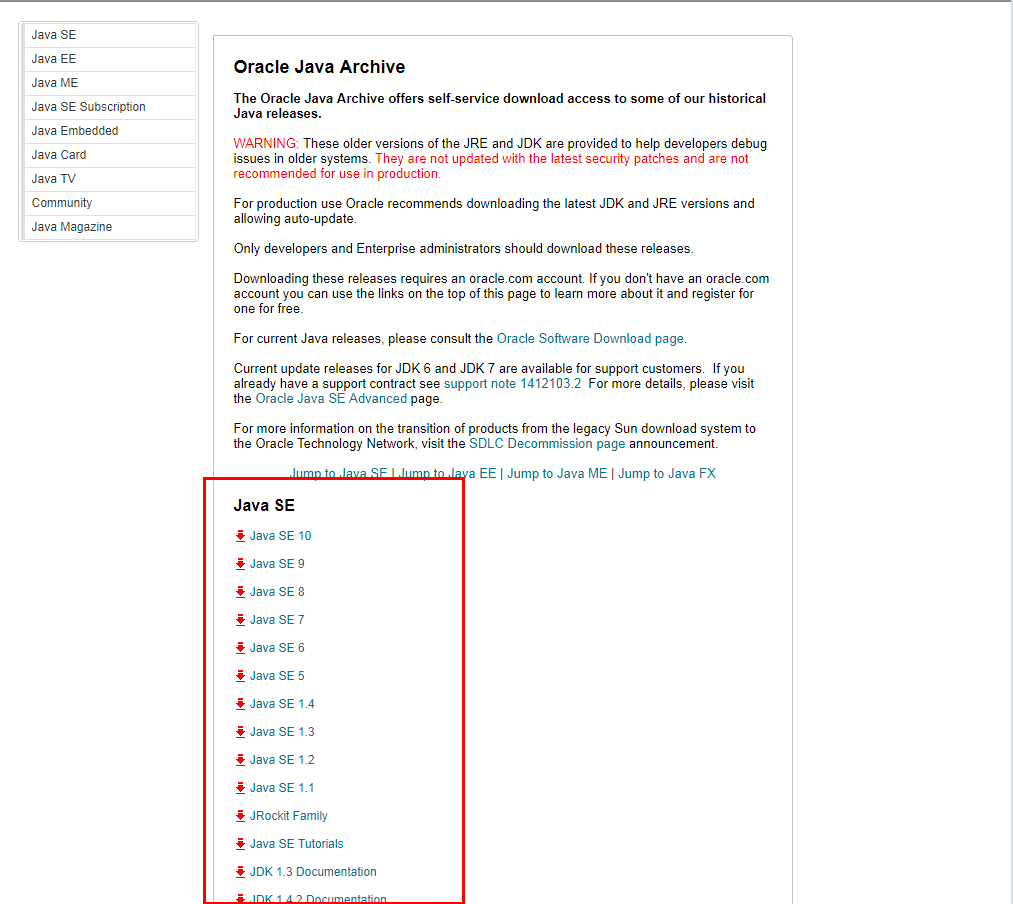
点击想要下载的版本即可。
maven:apache-maven-3.5.4-bin.tar.gz(jdk1.7执行mvn --version 异常 换成1.8后正常)
下载地址:http://maven.apache.org/download.cgi
地址:http://maven.apache.org/ (和ant的地址像)
ant:apache-ant-1.10.5-bin.tar.gz(最新版本)
下载地址:https://ant.apache.org/bindownload.cgi
地址:http://ant.apache.org/ (和maven的地址像)
findbugs:findbugs-3.0.1.tar.gz (最新版本).
下载地址:http://findbugs.sourceforge.net/downloads.html
地址:http://findbugs.sourceforge.net/
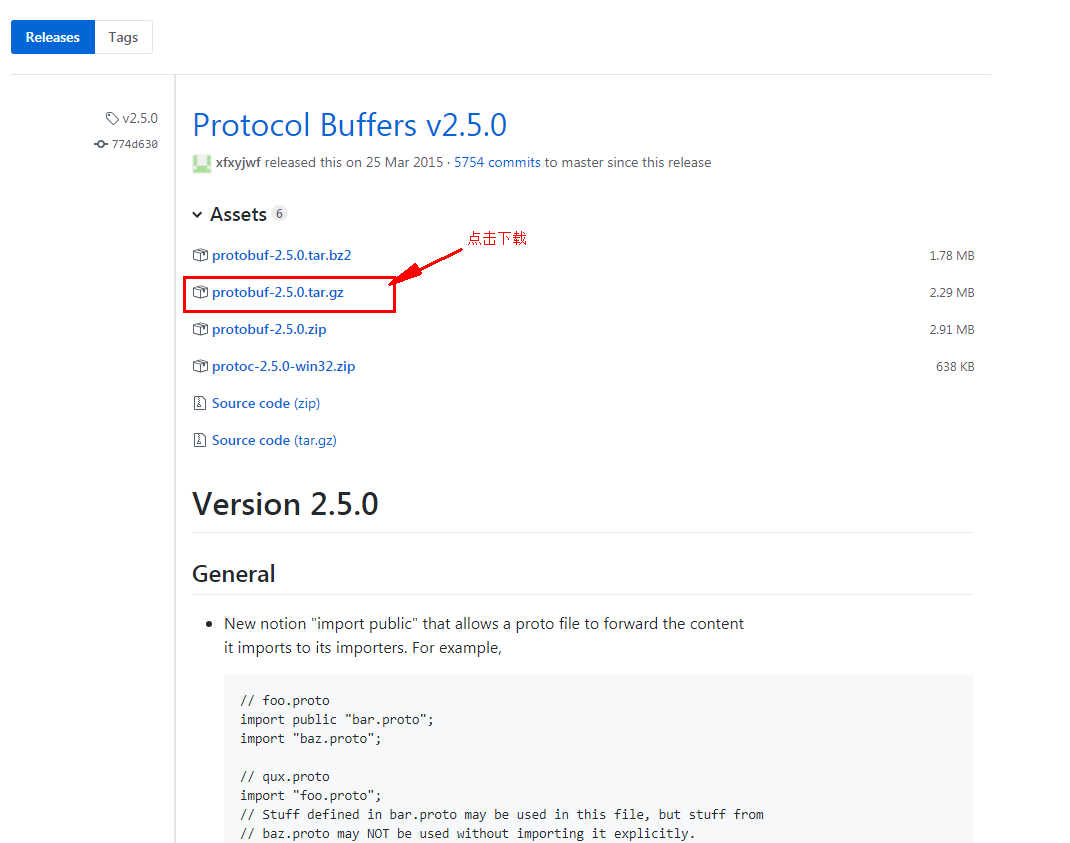
protobuf :protobuf-2.5.0.tar.gz(2.5.0版本,最新版编译不通过,换成2.5.0后正常编译)
protobuf是不很好找,百度收录的官网打不开。不过没关系,我们有github这个开源软件项目托管平台。
github地址:https://github.com/
点击进入后左上角搜索:
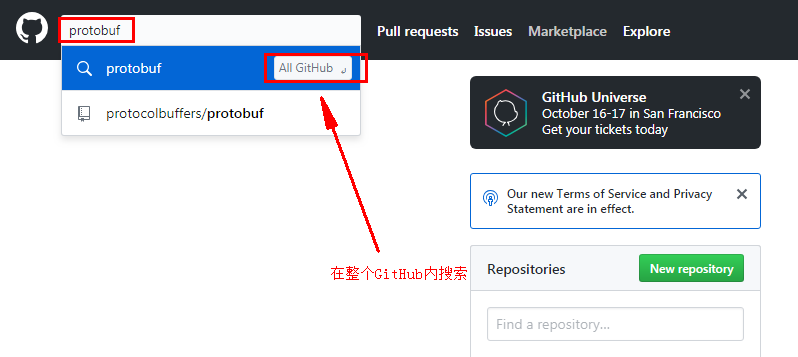
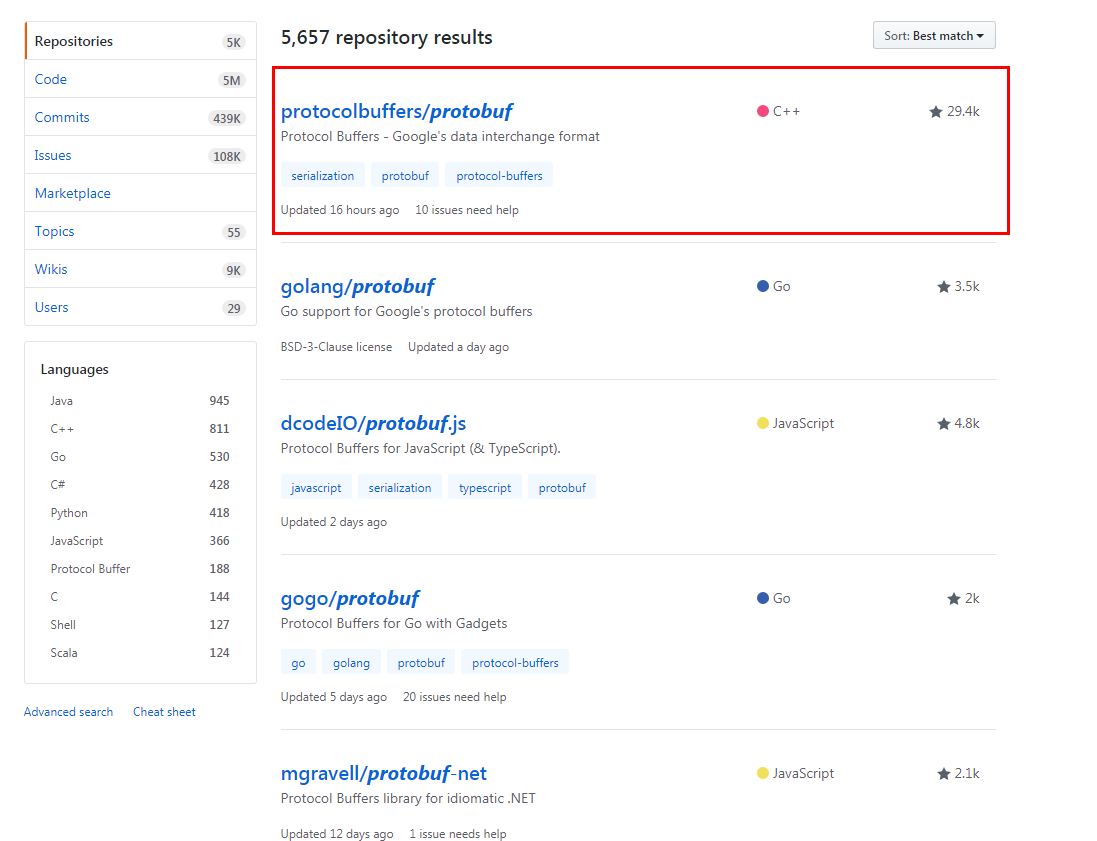
搜索出的第一个就是我们需要用到的protobuf项目,点击进入:
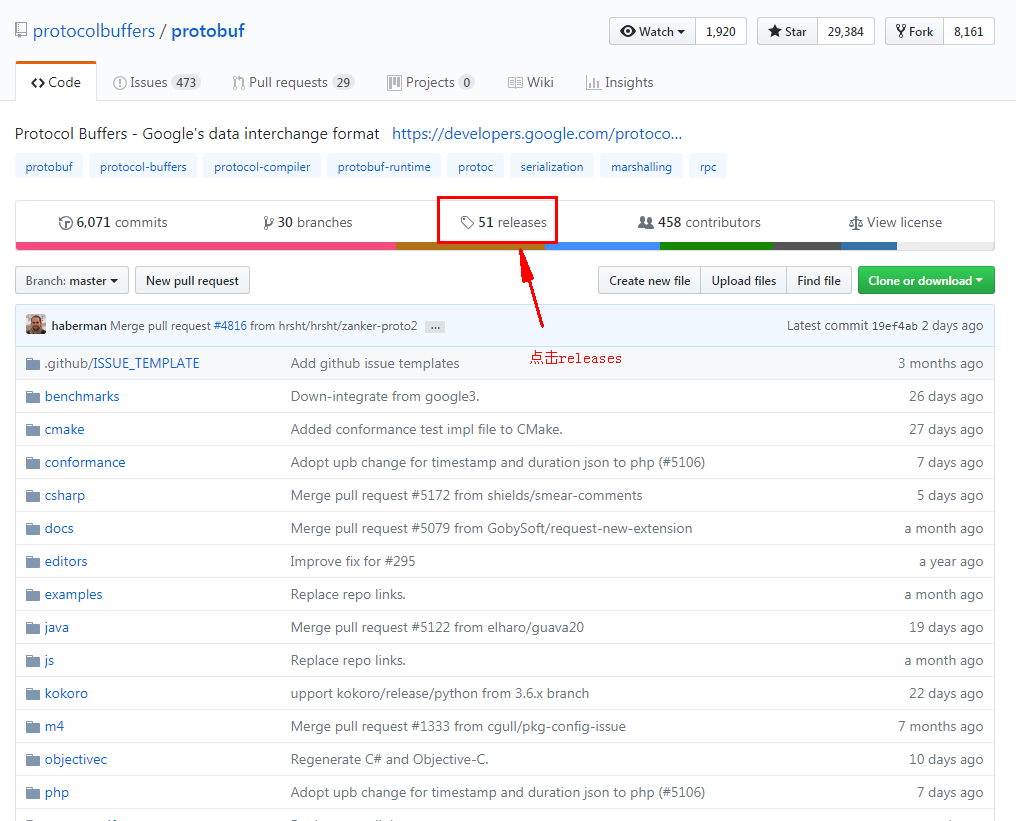
进入releases界面后,拉到页面最底,点击netx向后翻页直到找到2.5.0版本
hadoop:hadoop-2.7.5-src.tar.gz (2.7.5 其他版本没有尝试)
下载地址:https://hadoop.apache.org/releases.html
地址:http://hadoop.apache.org/ (我们的apache产品地址都很相似,前缀是项目名称,后面跟apache.org)
如果嫌麻烦的话可以到网盘直接下载本文使用的全部安装包
网盘地址:链接:https://pan.baidu.com/s/1oSi_n5nM65QWvNjskhrgNQ 提取码:0ael
一、编译前的配置工作
1、文件目录创建
在/opt目录下创建两个文件夹
mkdir /opt/software
mkdir /opt/modules
software 存放软件包
modules 存放解压后的软件目录
2、文件上传至Linux系统
使用filezilla将软件包上传至/opt/software目录
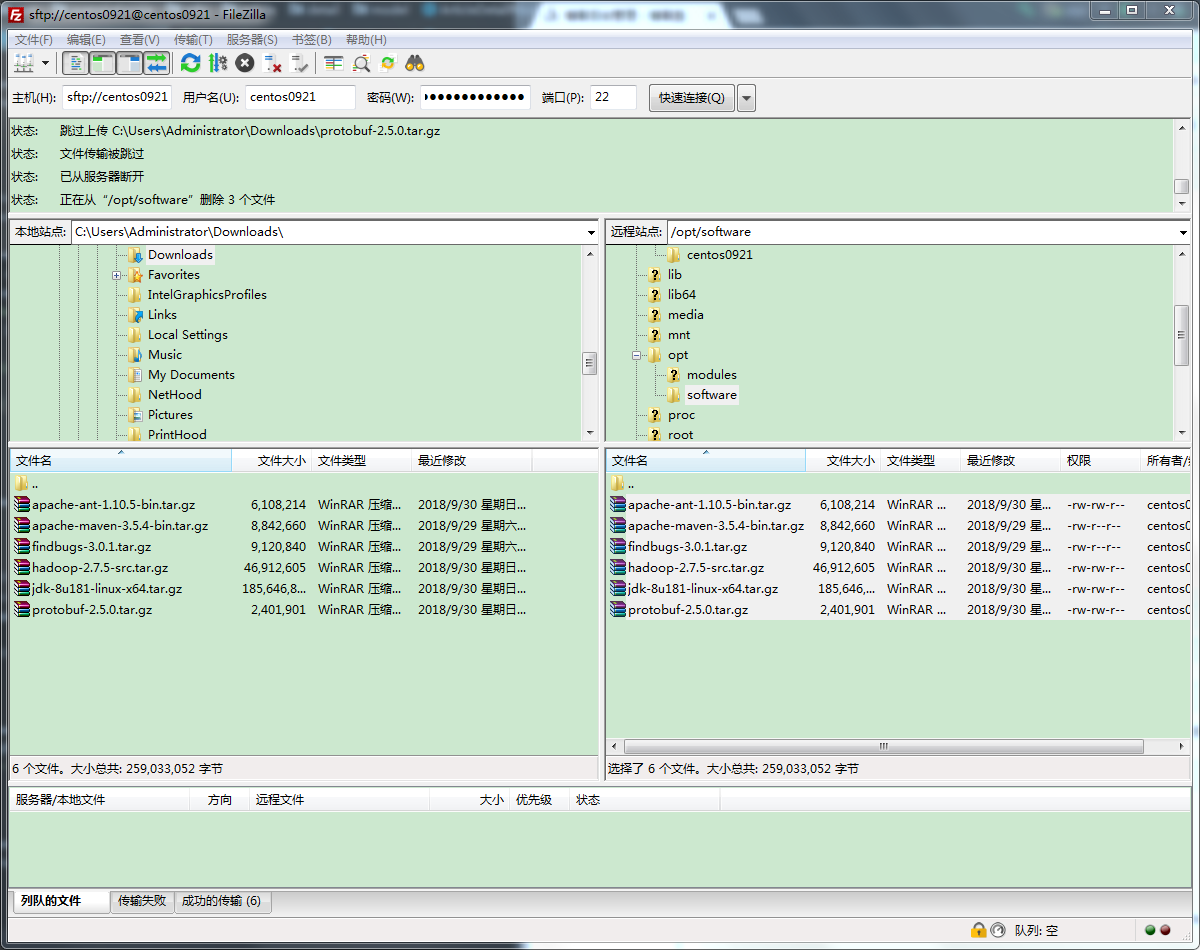
不会使用个软件的可以研究一下。
另外一种方式是,通过 rz上传
先通过yum安装 lrzsz
yum -y install lrzsz
安装完成后,使用 rz命令 上传文件。
3、安装和配置环境变量
建议解压一个安装包,配置一次环境变量,验证一下是否正确。
这里偷懒统一配置了。
[root@centos0921 software]# cd /opt/software/
[root@centos0921 software]# ll
total 252972
-rw-rw-r--. 1 centos0921 centos0921   6108214 Sep 29 22:23 apache-ant-1.10.5-bin.tar.gz
-rw-r--r--. 1 centos0921 centos0921   8842660 Sep 29 05:30 apache-maven-3.5.4-bin.tar.gz
-rw-r--r--. 1 centos0921 centos0921   9120840 Sep 29 05:45 findbugs-3.0.1.tar.gz
-rw-rw-r--. 1 centos0921 centos0921  46912605 Sep 29 22:14 hadoop-2.7.5-src.tar.gz
-rw-rw-r--. 1 centos0921 centos0921 185646832 Sep 29 22:43 jdk-8u181-linux-x64.tar.gz
-rw-rw-r--. 1 centos0921 centos0921   2401901 Sep 29 23:34 protobuf-2.5.0.tar.gz
cd进入software文件夹,ll查看一下文件夹下所有压缩包
通过tar命令将所有压缩包,解压到/opt/modules文件夹
tar -zxvf /opt/software/apache-ant-1.10.5-bin.tar.gz -C /opt/modules/

tar -zxvf /opt/software/apache-maven-3.5.4-bin.tar.gz -C /opt/modules/
tar -zxvf /opt/software/findbugs-3.0.1.tar.gz -C /opt/modules/

tar -zxvf /opt/software/hadoop-2.7.5-src.tar.gz -C /opt/modules/

tar -zxvf /opt/software/jdk-8u181-linux-x64.tar.gz -C /opt/modules/

tar -zxvf /opt/software/protobuf-2.5.0.tar.gz -C /opt/modules/
全部解压完成后;切换至modules目录查看
[root@centos0921 modules]# cd /opt/modules/
[root@centos0921 modules]# ll
total 8
drwxr-xr-x.  6 centos0921 centos0921  235 Jul 10 00:49 apache-ant-1.10.5
drwxr-xr-x.  6 centos0921 centos0921   99 Sep 29 05:34 apache-maven-3.5.4
drwxr-xr-x.  8 centos0921 centos0921  104 Sep 29 05:46 findbugs-3.0.1
drwxr-xr-x. 19 centos0921 centos0921 4096 Sep 29 23:25 hadoop-2.7.5-src
drwxr-xr-x.  7 centos0921 centos0921  245 Jul  7 04:09 jdk1.8.0_181
drwxr-xr-x. 10 centos0921 centos0921 4096 Sep 29 23:38 protobuf-2.5.0
所有文件正确解压完成后,下一步配置环境变量:
使用vi编辑器 编辑 /etc/profile文件,在profile最下面增加如下
#JAVA_HOME
#export JAVA_HOME=/opt/modules/jdk1.7.0_80
export JAVA_HOME=/opt/modules/jdk1.8.0_181
export PATH=$PATH:$JAVA_HOME/bin

#MAVEN_HOME
export MAVEN_HOME=/opt/modules/apache-maven-3.5.4
export PATH=$PATH:$MAVEN_HOME/bin

#ANT_HOME
ANT_HOME=/opt/modules/apache-ant-1.9.13
export PATH=$PATH:$ANT_HOME/bin

#FINDBUGS_HOME
export FINDBUGS_HOME=/opt/modules/findbugs-3.0.1
export PATH=$PATH:$FINDBUGS_HOME/bin

#PROTOC_HOME
export PROTOC_HOME=/opt/modules/protobuf-2.5.0.x
export PATH=$PATH:$PROTOC_HOME/bin
:wq 保存并退出,source 使环境变量生效
source /etc/profile
这里的最后一条 PROTOC_HOME(在第四步添加,暂时还没有这个目录不要急),先测试一下前面5个环境变量配置后命令是否能够正常使用。
JDK:
[root@centos0921 modules]# java -version
java version "1.8.0_181"
Java(TM) SE Runtime Environment (build 1.8.0_181-b13)
Java HotSpot(TM) 64-Bit Server VM (build 25.181-b13, mixed mode)
MAVEN:
[root@centos0921 modules]# mvn -version
Apache Maven 3.5.4 (1edded0938998edf8bf061f1ceb3cfdeccf443fe; 2018-06-17T14:33:14-04:00)
Maven home: /opt/modules/apache-maven-3.5.4
Java version: 1.8.0_181, vendor: Oracle Corporation, runtime: /opt/modules/jdk1.8.0_181/jre
Default locale: en_US, platform encoding: UTF-8
OS name: "linux", version: "3.10.0-862.el7.x86_64", arch: "amd64", family: "unix"
ANT:
[root@centos0921 modules]# ant -version
Apache Ant(TM) version 1.10.5 compiled on July 10 2018
FINDBUGS:
[root@centos0921 modules]# findbugs -version
3.0.1
如果所有显示正常,就可以进行下一步了。
4、安装依赖库
不安装无法完成protobuf和hadoop的编译
sudo apt-get install g++ autoconf automake libtool cmake zlib1g-dev pkg-config libssl-dev
5、安装protobuf
[root@centos0921 modules]# mkdir /opt/modules/protobuf-2.5.0.x  <==先创建protobuf安装目录
[root@centos0921 modules]# cd /opt/modules/protobuf-2.5.0    <==切换到protobuf源码目录
[root@centos0921 modules]# ./configure --prefix=/opt/modules/protobuf-2.5.0.x/ <==进行配置设置
[root@centos0921 modules]# make
[root@centos0921 modules]# make install
验证:
[root@centos0921 modules]# protoc --version
libprotoc 2.5.0
出现libprotoc 2.5.0说明成功了。
6、更改maven源(不替换可能导致一些源无法下载或下载速度慢问题,导致编译无法完成)
修改/opt/modules/apache-maven-3.5.4/conf/setting.xml
  <mirrors>
    <!-- mirror
     | Specifies a repository mirror site to use instead of a given repository. The repository that
     | this mirror serves has an ID that matches the mirrorOf element of this mirror. IDs are used
     | for inheritance and direct lookup purposes, and must be unique across the set of mirrors.
     |
    <mirror>
      <id>mirrorId</id>
      <mirrorOf>repositoryId</mirrorOf>
      <name>Human Readable Name for this Mirror.</name>
      <url>http://my.repository.com/repo/path</url>
    </mirror>
     -->
      <mirror>
            <id>alimaven</id>
            <mirrorOf>central</mirrorOf>
            <name>aliyun maven</name>
            <url>http://maven.aliyun.com/nexus/content/repositories/central/</url>
    </mirror>
  </mirrors>
在<mirrors></mirrors>标签内添加阿里maven源。
修改maven源后还需要对hadoop的repository进行配置
<repositories>
    <repository>
    <id>alimaven</id>
    <name>aliyun maven</name>
    <url>http://maven.aliyun.com/nexus/content/repositories/central/</url>
    </repository>
    ……

  </repositories>
二、编译hadoop
1、开始编译
[root@centos0921 modules]# cd hadoop-2.7.5-src/
[root@centos0921 hadoop-2.7.5-src]# ll
total 148
-rw-r--r--.  1 centos0921 centos0921 13050 Dec 15  2017 BUILDING.txt
drwx------.  3 centos0921 centos0921   181 Sep 29 22:16 dev-support
drwx------.  5 centos0921 centos0921    63 Sep 30 00:00 hadoop-assemblies
drwx------.  4 centos0921 centos0921    89 Sep 30 00:00 hadoop-build-tools
drwx------.  4 centos0921 centos0921    52 Sep 30 00:20 hadoop-client
drwxr-xr-x.  9 centos0921 centos0921   234 Dec 15  2017 hadoop-client-modules
drwxr-xr-x.  3 centos0921 centos0921    34 Dec 15  2017 hadoop-cloud-storage-project
drwx------. 11 centos0921 centos0921   206 Sep 30 00:06 hadoop-common-project
drwx------.  4 centos0921 centos0921    52 Sep 30 00:20 hadoop-dist
drwx------.  9 centos0921 centos0921   181 Sep 30 00:14 hadoop-hdfs-project
drwx------. 10 centos0921 centos0921   197 Sep 30 00:18 hadoop-mapreduce-project
drwx------.  5 centos0921 centos0921    63 Sep 30 00:00 hadoop-maven-plugins
drwx------.  4 centos0921 centos0921    52 Sep 30 00:20 hadoop-minicluster
drwx------.  5 centos0921 centos0921    63 Sep 30 00:00 hadoop-project
drwx------.  4 centos0921 centos0921    70 Sep 30 00:00 hadoop-project-dist
drwx------. 22 centos0921 centos0921  4096 Sep 30 00:20 hadoop-tools
drwx------.  4 centos0921 centos0921    73 Sep 30 00:17 hadoop-yarn-project
-rw-r--r--.  1 centos0921 centos0921 86424 Dec 15  2017 LICENSE.txt
-rw-r--r--.  1 centos0921 centos0921 14978 Dec 15  2017 NOTICE.txt
-rw-r--r--.  1 centos0921 centos0921 19165 Sep 29 23:25 pom.xml
-rw-r--r--.  1 centos0921 centos0921  1366 Jul 24  2017 README.txt
切换目录到hadoop-2.7.5-src
执行命令
mvn clean package -Pdist,native,docs -Dtar
编译时不加clean,会接着上次结束的地方下载jar包等。如果一次编译没成功,可以接着多次编译。
建议编译时加native参数,否则在运行hadoop时会出现warning。
[INFO] Apache Hadoop Mini-Cluster ......................... SUCCESS [  1.902 s]
[INFO] Apache Hadoop Scheduler Load Simulator ............. SUCCESS [  8.209 s]
[INFO] Apache Hadoop Tools Dist ........................... SUCCESS [  9.538 s]
[INFO] Apache Hadoop Tools ................................ SUCCESS [  0.072 s]
[INFO] Apache Hadoop Distribution ......................... SUCCESS [ 38.443 s]
[INFO] ------------------------------------------------------------------------
[INFO] BUILD SUCCESS
[INFO] ------------------------------------------------------------------------
[INFO] Total time: 15:11 min
[INFO] Finished at: 2017-01-04T12:46:30+08:00
[INFO] Final Memory: 166M/454M
[INFO] ---------------------------------------------------------------------------------------------
编译完成后会提示 BUILD SUCCESS
2、测试编译后的hadoop与拷贝安装
编译好的hadoop在hadoop-dist/target/目录下
[root@centos0921 hadoop-2.7.5-src]# cd hadoop-dist/target/
[root@centos0921 target]# ll
total 857848
drwxr-xr-x. 2 centos0921 centos0921        28 Sep 30 00:20 antrun
drwxr-xr-x. 3 centos0921 centos0921        22 Sep 30 00:20 classes
-rw-r--r--. 1 centos0921 centos0921      1869 Sep 30 00:20 dist-layout-stitching.sh
-rw-r--r--. 1 centos0921 centos0921       642 Sep 30 00:21 dist-tar-stitching.sh
drwxr-xr-x. 9 centos0921 centos0921       149 Sep 30 00:20 hadoop-2.7.5
-rw-r--r--. 1 centos0921 centos0921 290092572 Sep 30 00:21 hadoop-2.7.5.tar.gz
-rw-r--r--. 1 centos0921 centos0921     26521 Sep 30 00:21 hadoop-dist-2.7.5.jar
-rw-r--r--. 1 centos0921 centos0921 588252418 Sep 30 00:22 hadoop-dist-2.7.5-javadoc.jar
-rw-r--r--. 1 centos0921 centos0921     24050 Sep 30 00:21 hadoop-dist-2.7.5-sources.jar
-rw-r--r--. 1 centos0921 centos0921     24050 Sep 30 00:21 hadoop-dist-2.7.5-test-sources.jar
drwxr-xr-x. 2 centos0921 centos0921        51 Sep 30 00:22 javadoc-bundle-options
drwxr-xr-x. 2 centos0921 centos0921        28 Sep 30 00:21 maven-archiver
drwxr-xr-x. 3 centos0921 centos0921        22 Sep 30 00:20 maven-shared-archive-resources
drwxr-xr-x. 3 centos0921 centos0921        22 Sep 30 00:20 test-classes
drwxr-xr-x. 2 centos0921 centos0921         6 Sep 30 00:20 test-dir
我们先测试一下,进入hadoop-2.7.5/lib/native/目录
[root@centos0921 target]# cd hadoop-2.7.5/lib/native/
[root@centos0921 native]# ll
total 4648
-rw-r--r--. 1 centos0921 centos0921 1236734 Sep 30 00:20 libhadoop.a
-rw-r--r--. 1 centos0921 centos0921 1607192 Sep 30 00:21 libhadooppipes.a
lrwxrwxrwx. 1 centos0921 centos0921      18 Sep 30 00:20 libhadoop.so -> libhadoop.so.1.0.0
-rwxr-xr-x. 1 centos0921 centos0921  725320 Sep 30 00:20 libhadoop.so.1.0.0
-rw-r--r--. 1 centos0921 centos0921  474962 Sep 30 00:21 libhadooputils.a
-rw-r--r--. 1 centos0921 centos0921  433732 Sep 30 00:20 libhdfs.a
lrwxrwxrwx. 1 centos0921 centos0921      16 Sep 30 00:20 libhdfs.so -> libhdfs.so.0.0.0
-rwxr-xr-x. 1 centos0921 centos0921  272296 Sep 30 00:20 libhdfs.so.0.0.0
执行如下命令:
[root@centos0921 native]# file ./libhadoop.so.1.0.0
./libhadoop.so.1.0.0: ELF 64-bit LSB shared object, x86-64, version 1 (SYSV), dynamically linked, BuildID[sha1]=a35b404b0dfcfbf6ac9fdb6259b99bb2672e29b1, not stripped
可以看到 ELF 64-bit 表示成功编译了64位的hadoop。
在hadoop-dist/target/目录下的hadoop-2.7.5.tar.gz 是编译好后的64位的hadoop压缩包,可以复制来用了。
三、伪集群搭建
1、环境搭建
将上面编译好的64位的hadoop复制到/opt/software目录
[root@centos0921 target]# cp hadoop-2.7.5.tar.gz /opt/software/
[root@centos0921 target]# cd /opt/software/
[root@centos0921 software]# ll
total 536268
-rw-rw-r--. 1 centos0921 centos0921   6108214 Sep 29 22:23 apache-ant-1.10.5-bin.tar.gz
-rw-r--r--. 1 centos0921 centos0921   8842660 Sep 29 05:30 apache-maven-3.5.4-bin.tar.gz
-rw-r--r--. 1 centos0921 centos0921   9120840 Sep 29 05:45 findbugs-3.0.1.tar.gz
-rw-rw-r--. 1 centos0921 centos0921  46912605 Sep 29 22:14 hadoop-2.7.5-src.tar.gz
-rw-r--r--. 1 root       root       290092572 Sep 30 04:12 hadoop-2.7.5.tar.gz
-rw-rw-r--. 1 centos0921 centos0921 185646832 Sep 29 22:43 jdk-8u181-linux-x64.tar.gz
-rw-rw-r--. 1 centos0921 centos0921   2401901 Sep 29 23:34 protobuf-2.5.0.tar.gz
解压hadoop-2.7.5.tar.gz文件到/opt/modules
[root@centos0921 software]# tar -zxvf hadoop-2.7.5.tar.gz -C /opt/modules/
[root@centos0921 software]# cd /opt/modules/
[root@centos0921 modules]# ll
total 8
drwxr-xr-x.  6 centos0921 centos0921  235 Jul 10 00:49 apache-ant-1.10.5
drwxr-xr-x.  6 centos0921 centos0921   99 Sep 29 05:34 apache-maven-3.5.4
drwxr-xr-x.  8 centos0921 centos0921  104 Sep 29 05:46 findbugs-3.0.1
drwxr-xr-x.  9 root       root        149 Sep 30 00:20 hadoop-2.7.5
drwxr-xr-x. 19 centos0921 centos0921 4096 Sep 29 23:25 hadoop-2.7.5-src
drwxr-xr-x.  7 centos0921 centos0921  245 Jul  7 04:09 jdk1.8.0_181
drwxr-xr-x. 10 centos0921 centos0921 4096 Sep 29 23:38 protobuf-2.5.0
drwxr-xr-x.  5 centos0921 centos0921   43 Sep 29 23:40 protobuf-2.5.0.x
[root@centos0921 modules]#
hadoop-2.7.5正常解压到了modules目录,配置环境变量
[root@centos0921 hadoop-2.7.5]# vi /etc/profile
#HADOOP_HOME
export HADOOP_HOME=/opt/modules/hadoop-2.7.5
export PATH=$PATH:$HADOOP_HOME/bin:#HADOOP_HOME/sbin
[root@centos0921 hadoop-2.7.5]# source /etc/profile
验证
[root@centos0921 hadoop-2.7.5]# hadoop version
Hadoop 2.7.5
Subversion Unknown -r Unknown
Compiled by root on 2018-09-30T04:01Z
Compiled with protoc 2.5.0
From source with checksum 9f118f95f47043332d51891e37f736e9
This command was run using /opt/modules/hadoop-2.7.5/share/hadoop/common/hadoop-common-2.7.5.jar
OK,到这里环境变量设置完成。
2、进一步配置
[root@centos0921 modules]# cd hadoop-2.7.5
[root@centos0921 hadoop-2.7.5]# cd etc/hadoop/
[root@centos0921 hadoop]# ll
total 152
-rw-r--r--. 1 centos0921 centos0921  4436 Sep 30 00:21 capacity-scheduler.xml
-rw-r--r--. 1 centos0921 centos0921  1335 Sep 30 00:21 configuration.xsl
-rw-r--r--. 1 centos0921 centos0921   318 Sep 30 00:21 container-executor.cfg
-rw-r--r--. 1 centos0921 centos0921   774 Sep 30 00:20 core-site.xml
-rw-r--r--. 1 centos0921 centos0921  3670 Sep 30 00:20 hadoop-env.cmd
-rw-r--r--. 1 centos0921 centos0921  4224 Sep 30 00:20 hadoop-env.sh
-rw-r--r--. 1 centos0921 centos0921  2598 Sep 30 00:20 hadoop-metrics2.properties
-rw-r--r--. 1 centos0921 centos0921  2490 Sep 30 00:20 hadoop-metrics.properties
-rw-r--r--. 1 centos0921 centos0921  9683 Sep 30 00:20 hadoop-policy.xml
-rw-r--r--. 1 centos0921 centos0921   775 Sep 30 00:20 hdfs-site.xml
-rw-r--r--. 1 centos0921 centos0921  1449 Sep 30 00:21 httpfs-env.sh
-rw-r--r--. 1 centos0921 centos0921  1657 Sep 30 00:21 httpfs-log4j.properties
-rw-r--r--. 1 centos0921 centos0921    21 Sep 30 00:21 httpfs-signature.secret
-rw-r--r--. 1 centos0921 centos0921   620 Sep 30 00:21 httpfs-site.xml
-rw-r--r--. 1 centos0921 centos0921  3518 Sep 30 00:21 kms-acls.xml
-rw-r--r--. 1 centos0921 centos0921  1527 Sep 30 00:21 kms-env.sh
-rw-r--r--. 1 centos0921 centos0921  1631 Sep 30 00:21 kms-log4j.properties
-rw-r--r--. 1 centos0921 centos0921  5540 Sep 30 00:21 kms-site.xml
-rw-r--r--. 1 centos0921 centos0921 11237 Sep 30 00:20 log4j.properties
-rw-r--r--. 1 centos0921 centos0921   951 Sep 30 00:21 mapred-env.cmd
-rw-r--r--. 1 centos0921 centos0921  1383 Sep 30 00:21 mapred-env.sh
-rw-r--r--. 1 centos0921 centos0921  4113 Sep 30 00:21 mapred-queues.xml.template
-rw-r--r--. 1 centos0921 centos0921   758 Sep 30 00:21 mapred-site.xml.template
-rw-r--r--. 1 centos0921 centos0921    10 Sep 30 00:21 slaves
-rw-r--r--. 1 centos0921 centos0921  2316 Sep 30 00:20 ssl-client.xml.example
-rw-r--r--. 1 centos0921 centos0921  2697 Sep 30 00:20 ssl-server.xml.example
-rw-r--r--. 1 centos0921 centos0921  2191 Sep 30 00:21 yarn-env.cmd
-rw-r--r--. 1 centos0921 centos0921  4567 Sep 30 00:21 yarn-env.sh
-rw-r--r--. 1 centos0921 centos0921   690 Sep 30 00:21 yarn-site.xml
配置hadoop-env.sh
JAVA_HOME=/opt/modules/jdk1.8.0_181
配置core-site.xml,创建hadoop临时文件夹/opt/modules/hadoop-2.7.5/data/tmp/
<configuration>
    <property>
        <name>fs.defaultFS</name>
        <value>hdfs://localhost:9000</value>
    </property>
    <property>
        <name>hadoop.tmp.dir</name>
        <value>/opt/modules/hadoop-2.7.5/data/tmp/</value>
    </property>
</configuration>
配置hdfs-site.xml
<configuration>
    <property>
        <name>dfs.replication</name>
        <value>1</value>
    </property>
</configuration>
3、运行前处理
a)格式化文件系统
[root@centos0921 hadoop-2.7.5]# hdfs namenode -format
……
18/09/30 04:48:01 INFO namenode.NNStorageRetentionManager: Going to retain 1 images with txid >= 0
18/09/30 04:48:01 INFO util.ExitUtil: Exiting with status 0
18/09/30 04:48:01 INFO namenode.NameNode: SHUTDOWN_MSG:
/************************************************************
SHUTDOWN_MSG: Shutting down NameNode at centos0921/192.168.128.200
************************************************************/
b)启动NameNode守护进程和DataNode守护进程:
[root@centos0921 hadoop]# start-dfs.sh
Starting namenodes on [centos0921]
centos0921: starting namenode, logging to /opt/modules/hadoop-2.7.5/logs/hadoop-root-namenode-centos0921.out
localhost: starting datanode, logging to /opt/modules/hadoop-2.7.5/logs/hadoop-root-datanode-centos0921.out
Starting secondary namenodes [0.0.0.0]
0.0.0.0: starting secondarynamenode, logging to /opt/modules/hadoop-2.7.5/logs/hadoop-root-secondarynamenode-centos0921.out
[root@centos0921 hadoop]# jps
103685 SecondaryNameNode
103860 Jps
103529 DataNode
103407 NameNode
通过jps命令查看NameNode和DataNode是否正常启动。
c)浏览器浏览NameNode接口,从默认的地址
NameNode- http://centos0921:50070/
d)创建执行MapReduce的HDFS目录
[root@centos0921 hadoop]# hdfs dfs -mkdir -p /user/centos0921/input
e)将输入文件复制到分布式文件系统
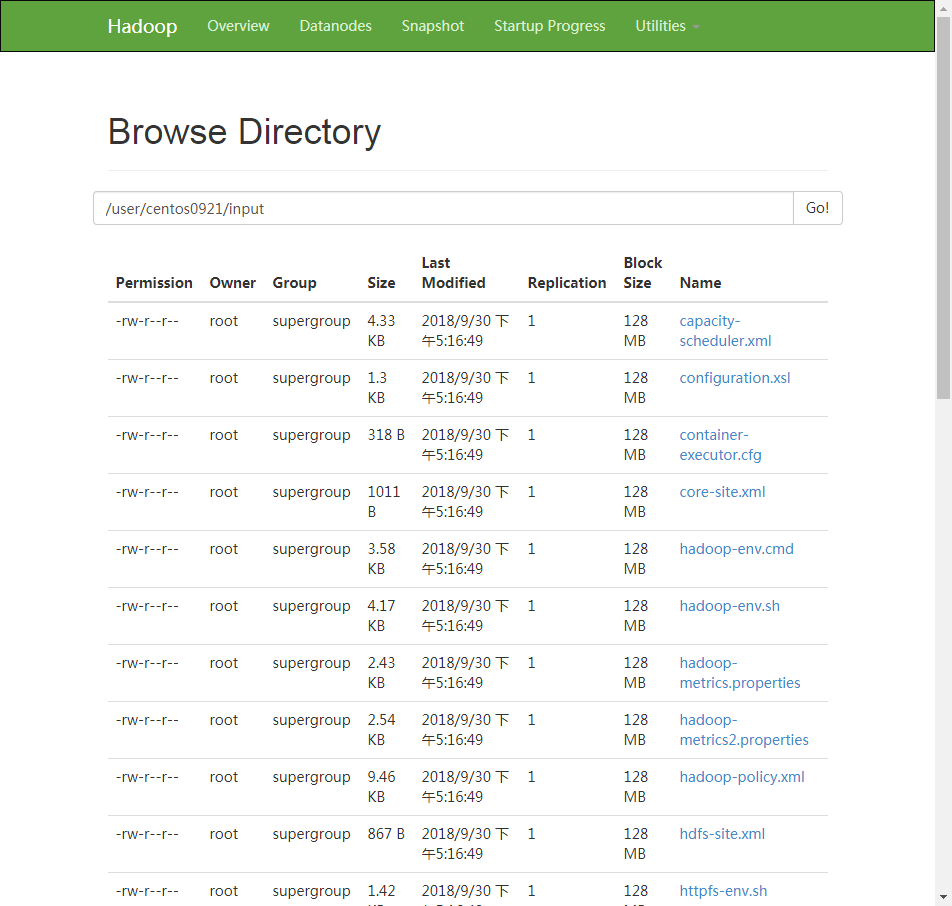
[root@centos0921 hadoop-2.7.5]# hdfs dfs -put etc/hadoop/*/user/centos0921/input
这时在http://centos0921:50070/中可以看到文件目录
f) 运行提供的一些示例
[root@centos0921 hadoop-2.7.5]# hadoop jar share/hadoop/mapreduce/hadoop-mapreduce-examples-2.7.5.jar grep /user/centos0921/input /user/centos0921/output 'dfs[a-z.]+'
g)检查输出文件:将输出文件从分布式文件系统复制到本地文件系统并检查它们
[root@centos0921 hadoop-2.7.5]# hdfs dfs -cat /user/centos0921/output/*
6    dfs.audit.logger
4    dfs.class
3    dfs.server.namenode.
2    dfs.period
2    dfs.audit.log.maxfilesize
2    dfs.audit.log.maxbackupindex
1    dfsmetrics.log
1    dfsadmin
1    dfs.servers
1    dfs.replication
1    dfs.file
或者
[root@centos0921 hadoop-2.7.5]# hdfs dfs -get /user/centos0921/output output
[root@centos0921 hadoop-2.7.5]# cat output/*
6    dfs.audit.logger
4    dfs.class
3    dfs.server.namenode.
2    dfs.period
2    dfs.audit.log.maxfilesize
2    dfs.audit.log.maxbackupindex
1    dfsmetrics.log
1    dfsadmin
1    dfs.servers
1    dfs.replication
1    dfs.file
h)停止守护进程
[root@centos0921 hadoop-2.7.5]# stop-dfs.sh
Stopping namenodes on [centos0921]
centos0921: stopping namenode
localhost: stopping datanode
Stopping secondary namenodes [0.0.0.0]
0.0.0.0: stopping secondarynamenode

 浙公网安备 33010602011771号