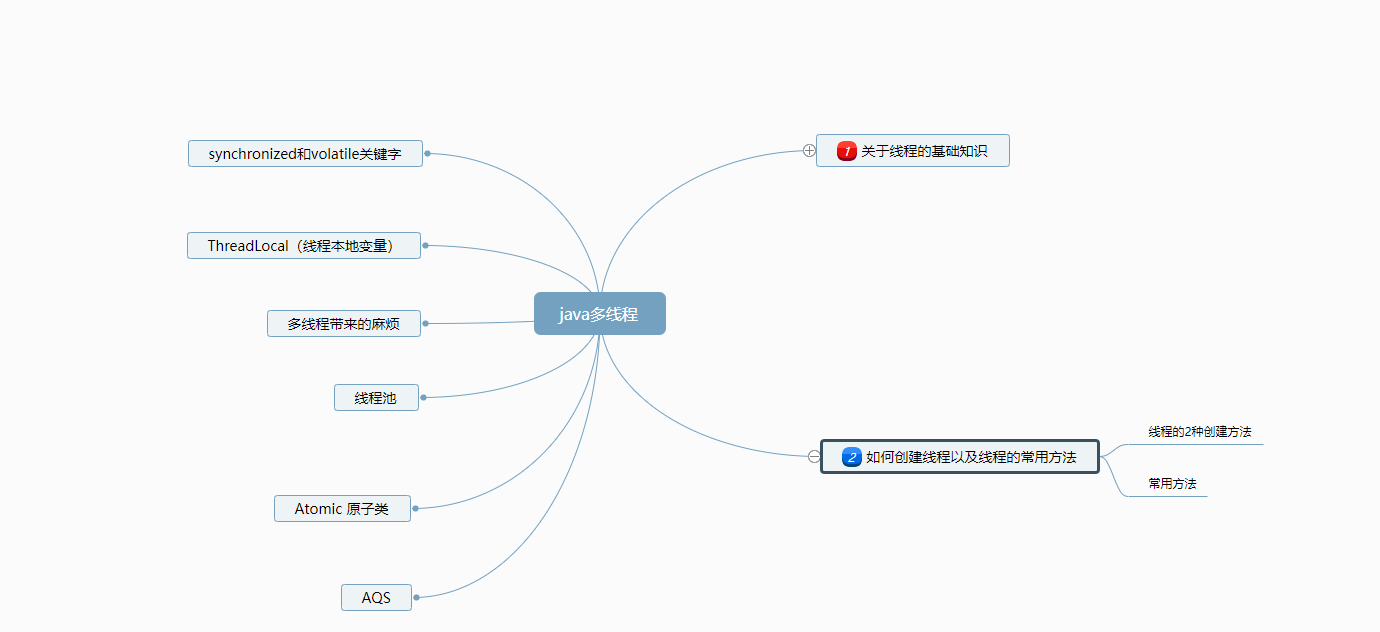
java多线程学习二:如何创建线程以及线程的常用方法

1.线程的创建方法
1.1继承Thread类,然后重写run()方法。
public class CreadThread1 {

    //继承Thread类
    public static class aThread extends Thread{
        @Override
        public void run() {
            //输出线程的信息
            System.out.println(Thread.currentThread()+"创建成功1");
        }
    }
    public static void main(String[] args) {
        //调用run()方法
        new Thread() {
            @Override
            public void run() {
                //输出线程的信息
                System.out.println(Thread.currentThread()+"创建成功1");
            }
        }.start();
        //创建aThread对象
        aThread a = new aThread();
        //调用start()方法
        a.start();

    }
}
运行结果:
Thread[Thread-0,5,main]创建成功1
Thread[Thread-1,5,main]创建成功1

Process finished with exit code 0
1.2实现Runnable接口,重写run()方法
public class CreatThread {

    //实现Runnable接口
    public static class aThread implements Runnable{
        @Override
        public void run() {
            //输出线程的信息
            System.out.println(Thread.currentThread()+"创建成功0");
        }
    }
    public static void main(String[] args) {
        //匿名内部类,继承Runnable方法,直接调用start()方法
        new Thread(new Runnable() {
            @Override
            public void run() {
                //输出线程的信息
                System.out.println(Thread.currentThread()+"创建成功0");
            }
        }).start();
        //创建aThread对象
        aThread a = new aThread();
        Thread thread = new Thread(a);
        //调用start()方法
        thread.start();
    }
}
运行结果:
Thread[Thread-0,5,main]创建成功0
Thread[Thread-1,5,main]创建成功0

Process finished with exit code 0
1.3总结
注意的是2种方法都需要重写run()方法,用于创建线程的自定义代码。
查看Thread类的源码会发现,Thread类本来就是Runnable接口的一个实现。
public class Thread implements Runnable {
    @Override
    public void run() {
        if (target != null) {
            target.run();
        }
    }
}
Runnable接口:以及声明了run()方法,所以我们不管是继承Thread还是实现Runnable接口,都需要重写run方法。不同的是,在IntelliJ IDEA 中,实现Runnable类,如果不重写run()会出错误提示,因为Runnable是普通的接口,而不是抽象类,实现的时候必须重写该接口所声明的方法,继承Thread类如果不重写run()方法则不会出现错误提示,但线程就无意义了。
@FunctionalInterface
public interface Runnable {
    /**
     * When an object implementing interface {@code Runnable} is used
     * to create a thread, starting the thread causes the object's
     * {@code run} method to be called in that separately executing
     * thread.
     * <p>
     * The general contract of the method {@code run} is that it may
     * take any action whatsoever.
     *
     * @see     java.lang.Thread#run()
     */
    public abstract void run();
}
再看2种方法的有哪些区别:
先看关系,java本身定义了Runnable,自带Thread实现了该接口。
- 开个玩笑:如果有的选,当然是选择当爸爸。由于java的单继承,通过继承Thread类的话,则不能继承其他的类了,但实现Runnable接口就不会有这种烦恼。而且通过接口的方式,可以让代码和线程分离,更加的清晰,
- 继承Thread类所创建的对象,都是分开的,也就是每个线程都是独立的对象,而实现Runnable接口,多线程可以共享同一个Runnable实例。这里说明下,就像开公司,继承Thread类好比开了3家新公司,而实现Runnable接口,则是开了3家子公司。对于这点https://www.cnblogs.com/CryOnMyShoulder/p/8028122.html写的挺透彻的,大家可以去看看。
2 线程的常用方法
2.1.start()方法与run()方法
当我们创建完线程后,当然想到的是怎么启动,顾名思义,start()方法就是启动线程,或者说是在当前线程中,启动一个新的线程。比如在main方法中调用线程的start()方法,就会在main()线程中启动一个新的线程。
嗯?那我们重写run()方法干嘛,这里要注意,start()方法启动是创建一个新的线程,而run()方法则是把重写的方法当作一个普通方法来证明,有图有真相,请看下面的代码。
public class CreatThread {

    //实现Runnable接口
    public static class aThread implements Runnable{
        @Override
        public void run() {
            //输出线程的信息
            System.out.println(Thread.currentThread()+"创建成功0");
        }
    }
    public static void main(String[] args) {
        //匿名内部类,继承Runnable方法,直接调用start()方法
        new Thread(new Runnable() {
            @Override
            public void run() {
                //输出线程的信息
                System.out.println(Thread.currentThread()+"创建成功1");
            }
        }).run();
        //创建aThread对象
        aThread a = new aThread();
        Thread thread = new Thread(a);
        //调用start()方法
        thread.start();
    }
}
结果可以看到,输出“创建成功1”的时候,输出的第一个参数是main,表示的是该线程的名称。
Thread[main,5,main]创建成功1
Thread[Thread-1,5,main]创建成功0

Process finished with exit code 0
2.2.sleep()方法和yield()方法

2.2.1sleep()方法
顾名思义,sleep()作用是让一个线程睡过去。
sleep()是Thread类中的静态方法,也就是说,只能够使当前线程sleep,而不能通过t.sleep()来使另外的线程进入睡眠。
同时需要注意的是,sleep()方法没有释放锁,也就是说,虽然睡过去了,但是该线程运行所需要的资源还是属于该线程的,别的线程用不了,所以使用sleep()的时候需要注意死锁问题的发生。
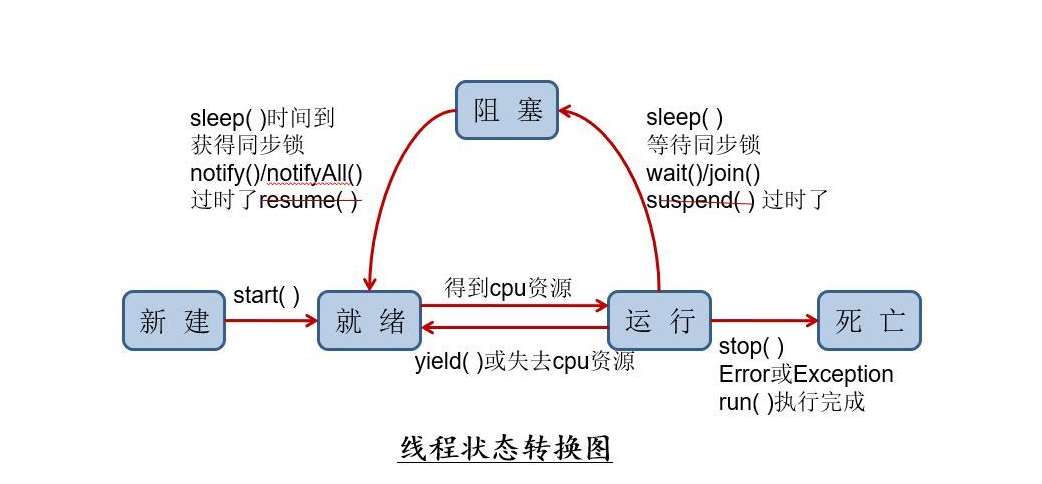
当前运行线程调用sleep()后,空出来的时间片,会被其他准备与运行的线程去竞争,标记一下,暂且不表,记住关键点:yield()方法。
要注意的是,当sleep()所等待的时间完了后,会变成就绪状态,而不是直接继续执行该线程。
public static void sleep(long millis)throws InterruptedException意思是让该线程停止运行millis毫秒,
public static void sleep(long millis,int nanos)throws InterruptedException意思是让该线程停止运行millis毫秒加nanos纳秒(居然还能这么细节,我看Thread类的时候才发现)
public class TestSleep {

	public static class Threads implements Runnable{
		private int i = 0;
		@Override
		public void run() {
				for(; i<10; i++) {
					try{
						Thread.sleep(1000);
						System.out.println(Thread.currentThread()+"第"+(i+1)+"次等待中:");
					} catch(InterruptedException  e){
						e.printStackTrace();
					}
					System.out.println(Thread.currentThread()+"第"+(i+1)+"次执行完!");

				}
		}
	}

	public static void main(String[] args) {
		// TODO Auto-generated method stub
		Threads p = new Threads();
		new Thread(p,"线程1").start();
	}

}
结果如下:你会发现,在每一次执行完之后,控制台输出是一点一点跳出来的。
Thread[线程1,5,main]第1次等待中:
Thread[线程1,5,main]第1次执行完!
Thread[线程1,5,main]第2次等待中:
Thread[线程1,5,main]第2次执行完!
Thread[线程1,5,main]第3次等待中:
Thread[线程1,5,main]第3次执行完!
Thread[线程1,5,main]第4次等待中:
Thread[线程1,5,main]第4次执行完!
Thread[线程1,5,main]第5次等待中:
Thread[线程1,5,main]第5次执行完!
Thread[线程1,5,main]第6次等待中:
Thread[线程1,5,main]第6次执行完!
Thread[线程1,5,main]第7次等待中:
Thread[线程1,5,main]第7次执行完!
Thread[线程1,5,main]第8次等待中:
Thread[线程1,5,main]第8次执行完!
Thread[线程1,5,main]第9次等待中:
Thread[线程1,5,main]第9次执行完!
Thread[线程1,5,main]第10次等待中:
Thread[线程1,5,main]第10次执行完!
2.2.2yield()方法
yield方法,会给调度器一个提示,表示该线程愿意让出CPU,重新进入准备运行的状态,不会释放锁,但不一定会停止,该线程有可能会继续运行。
2.3.wait()方法和notify()/notifyAll()方法
首先wait()和notify()/notifyAll()方法是属于是Object类中的final方法,无法被重写。
和sleep()方法相同的是,wait()可以让运行中的线程停止下来,区别在于,wait()会释放锁,作用的是利用资源的线程,把线程变成阻塞态,并且释放该资源,notify()/notifyAll()则是把线程从等待的状态,也就是阻塞态拉出来,当然也不是直接运行,而是需要等待cpu拥有空闲的时间片。
而且wait()和notify()/notifyAll()只能出现在同步方法或者同步代码块中,就如同一个洗澡的房间,一次只能一个人洗,那么wait()对应的便是走出来,让别人洗;notify则对应的是有人出来了,等待的人可以进去洗了。所以只能在洗的人调用wait(),等了一半的人调用notify()。假如没有这个条件,外面有个人说,我出来了,你们先洗,我等你们,有人听到后就想进去,结果里面还有人在洗,那就乱套了。
2种方法jdk的内如下:
    public final void wait() throws InterruptedException {
        wait(0L);
    }
public final native void wait(long timeoutMillis) throws InterruptedException;
    public final void wait(long timeoutMillis, int nanos) throws InterruptedException {
        if (timeoutMillis < 0) {
            throw new IllegalArgumentException("timeoutMillis value is negative");
        }

        if (nanos < 0 || nanos > 999999) {
            throw new IllegalArgumentException(
                                "nanosecond timeout value out of range");
        }

        if (nanos > 0 && timeoutMillis < Long.MAX_VALUE) {
            timeoutMillis++;
        }

        wait(timeoutMillis);
    }
public final native void notify();
public final native void notify();
可以发现,wait()方法与sleep类似,可以指定等待的时长。
当参数大于0,会报错
当参数等于0,效果等效于wait(),无期限wait
当参数大于0,则是等待参数毫秒数,如何则会脱离阻塞,进入就绪态
下列代码中出现的synchronized大家可以先理解为所修饰的代码块,每次最多只能有一个线程运行。
public class WaitAndNotify {

    public final static Object object = new Object();

    public static void main(String[] args) throws InterruptedException {

        new Thread() {
            @Override
            public void run() {
                synchronized (object) {
                    System.out.println("T1开始运行");
                    try {
                        System.out.println("T1开始等待");
                        object.wait();
                        System.out.println("T1结束运行");
                    } catch (InterruptedException e) {
                        e.printStackTrace();
                    }
                }
            }
        }.start();

        new Thread() {
            @Override
            public void run() {
                synchronized (object) {
                    System.out.println("T2开始运行");
                    System.out.println("释放T1");
                    object.notify();
                    System.out.println("T2结束运行");
                }
            }
        }.start();


    }
}


