Redis安装 主从 哨兵 集群安装
redis模式讲解 ( 讲的很棒 )
一 Redis安装
1.上传文件
把文件 redis-5.0.0.tar.gz 上传到服务器的/app目录下。
2.创建用户
[root@wsongl-01 /]# groupadd redis
[root@wsongl-01 /]# useradd redis -g redis
3.解压安装
[root@wsongl-01 app]# tar -xvf redis-5.0.0.tar.gz
[root@wsongl-01 app]# cd redis-5.0.0
[root@wsongl-01 redis-5.0.0]# make
###  !!!如果出现如下错误,则使用 make MALLOC=libc 编译!!!

[root@wsongl-01 redis-5.0.0]# make MALLOC=libc  # make编译出错,则用这命令编译
[root@wsongl-01 redis-5.0.0]# make install PREFIX=/app/redis   # 指定安装路径
[root@wsongl-01 redis-5.0.0]# mkdir -p /app/redis/conf
[root@wsongl-01 redis-5.0.0]# cp redis.conf /app/redis/conf/   # 拷贝配置文件到安装目录下
[root@wsongl-01 redis-5.0.0]# /app/redis/bin/redis-server /app/redis/conf/redis.conf  # 启动redis
4.关闭redis服务
方式一:
[root@wsongl-02 bin]# /app/redis/bin/redis-cli shutdown
方式二:
[root@wsongl-01 bin]# killall redis-server
5.设置进程后台服务
上面方式启动,窗口关闭,进程就结束了,不方便redis持续提供服务
解决方法:
1.在redis.conf文件里,修改daemonize no,变成daemonize yes
2.重启服务( /app/redis/bin/redis-server /app/redis/conf/redis.conf )
二 Redis主从安装
服务器信息:
| Master节点 | 192.168.154.129 | 6379 |
| Node节点 | 192.168.154.130 | 6379 |
!以下操作以第一步redis安装为基础进行!
1.在master节点上操作
[root@wsongl-01 conf]# cd /app/redis/conf
[root@wsongl-01 conf]# cp redis.conf redis-M-6379.conf
[root@wsongl-01 conf]# vim redis-M-6379.conf
1>.修改bind 127.0.0.1
修改为 bind 192.168.154.129
2.在node节点上操作
[root@wsongl-01 conf]# cd /app/redis/conf
[root@wsongl-01 conf]# cp redis.conf redis-N-6379.conf
1>.修改bind 127.0.0.1
修改为 bind 192.168.154.130
2>.在该行 # replicaof <masterip> <masterport> 下添加如下(添加主节点内容)
replicaof 192.168.154.129 6379
注意点: redis5之前的版本,是slaveof <masterip> <masterport>
3.启动服务
[root@wsongl-01 conf]# /app/redis/bin/redis-server /app/redis/conf/redis-M-6379.conf  # Master节点启动服务
[root@wsongl-02 conf]# /app/redis/bin/redis-server /app/redis/conf/redis-N-6379.conf  # Node节点启动服务
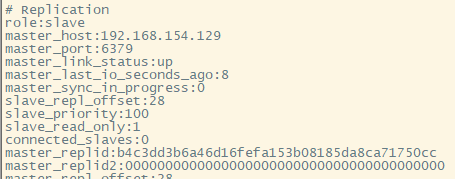
Master节点查看:
[root@wsongl-01 conf]# /app/redis/bin/redis-cli -h 192.168.154.129 -p 6379
192.168.154.129:6379> info

Node节点查看:
[root@wsongl-02 conf]# /app/redis/bin/redis-cli -h 192.168.154.130 -p 6379
192.168.154.130:6379> info

4.常用命令测试主从

5.停服务
[root@wsongl-01 bin]# ./redis-cli -h 192.168.154.129 -p 6379 shutdown
[root@wsongl-02 bin]# ./redis-cli -h 192.168.154.130 -p 6379 shutdown
三 Redis哨兵安装
服务器信息:
| sentinel-01 | 192.168.154.129 | 8001 |
| sentinel-02 | 192.168.154.129 | 8002 |
| sentinel-03 | 192.168.154.130 | 8001 |
| sentinel-04 | 192.168.154.130 | 8002 |
!以下操作以第一步redis安装为基础进行!
1.拷贝相关配置文件
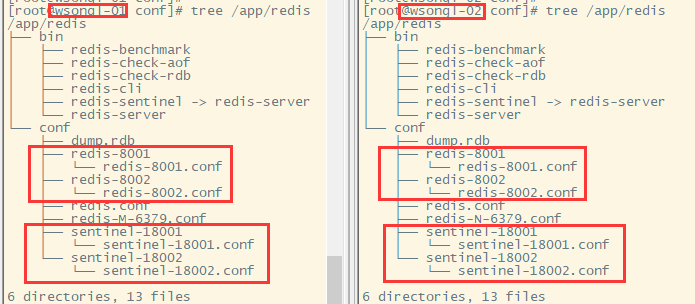
以如下两个配置文件为模板,构建目录结构,两台服务器都要做相同操作
[root@wsongl-01 conf]# cd /app/redis/conf/redis.conf
[root@wsongl-01 conf]# cd /app/redis-5.0.0/sentinel.conf
配置文件构建的目录如下

2.修改redis配置
Master节点(一个,129:8001):
1. # port 6379
    修改成port <自己端口>
2. #bind 127.0.0.1
    修改成port <本机IP>
Node节点(三个,129:8002 130:8001 130:8002):
1. # port 6379
    修改成port <自己端口>
2. #bind 127.0.0.1
    修改成port <本机IP>
3. #在 # replicaof <masterip> <masterport>这行下面添加
    replicaof <master节点IP> <master节点端口>
3.启动redis服务
分别在两台服务器上都执行如下操作,总共启动4个服务
[root@wsongl-01 conf]# cd /app/redis/conf
[root@wsongl-01 conf]# redis-server ./redis-8001/redis-8001.conf
[root@wsongl-01 conf]# redis-server ./redis-8002/redis-8002.conf
4.修改sentinel配置,每个sentinel.conf文件都要修改
0.> # # protected-mode no
        修改成 去掉注释
1.> # port 26379
        修改成 port <定义的端口>
2.> # daemonize no
        修改成 daemonize yes
3.> # pidfile /var/run/redis-sentinel.pid
        修改成 pidfile /var/run/redis-sentinel-<定义的端口>.pid
4.> # dir /tmp
        修改成 dir .
5.> # sentinel monitor mymaster 127.0.0.1 6379 2
        修改成 sentinel monitor master-sl 192.168.154.129 8001 2
6.> # sentinel down-after-milliseconds mymaster 30000
        修改成 sentinel down-after-milliseconds master-sl 10000
7.> # sentinel parallel-syncs mymaster 1
        修改成 sentinel parallel-syncs master-sl 2
8.> # sentinel failover-timeout mymaster 18000
        修改成 sentinel failover-timeout master-sl 8000
5.启动sentinel服务
[root@wsongl-01 conf]# cd /app/redis/conf
[root@wsongl-01 conf]# redis-sentinel ./sentinel-18001/sentinel-18001.conf
[root@wsongl-01 conf]# redis-sentinel ./sentinel-18002/sentinel-18002.conf

[root@wsongl-02 conf]# cd /app/redis/conf
[root@wsongl-02 conf]# redis-sentinel ./sentinel-18001/sentinel-18001.conf
[root@wsongl-02 conf]# redis-sentinel ./sentinel-18002/sentinel-18002.conf
6.测试哨兵安装使用情况
过程如下:
1.> 停止master节点,看看是否会从node节点里选择出心的master;
2.> 选出新的master节点后,启动原来的master,看看会不会加入到主从,变成新的node节点;
3.> 都能实现的话,就表示配置成功。
四 Redis集群安装
服务器信息:
| cluster-01 | 192.168.154.129 | 9001 |
| cluster-02 | 192.168.154.129 | 9002 |
| cluster-03 | 192.168.154.129 | 9003 |
| cluster-04 | 192.168.154.130 | 9001 |
| cluster-05 | 192.168.154.130 | 9002 |
| cluster-06 | 192.168.154.130 | 9003 |
!以下操作以第一步redis安装为基础进行!
1.配置集群文件
1.> # port 6379
        修改成 port <定义的端口>
2.> # bind 127.0.0.1
        修改成 bind <本机IP>
3.> # # cluster-enabled yes
        修改成 cluster-enabled yes
4.># cluster-config-file nodes-6379.conf
        修改成 cluster-config-file nodes-<定义的端口>.conf

启动六个redis服务
2.安装集群依赖ruby !!!---redis5.0版本开始不用redis-trib.rb---!!! 这一步已经不在用了
[root@wsongl-01 app]# cd /app
[root@wsongl-01 app]# tar -xvf ruby-2.2.10.tar.gz
[root@wsongl-01 app]# cd ruby-2.2.10
[root@wsongl-01 app]# ./configure
[root@wsongl-01 app]# make
[root@wsongl-01 app]# make install

[root@wsongl-01 ruby-2.2.10]# yum install rubygems
[root@wsongl-01 ruby-2.2.10]# gem install redis

[root@wsongl-01 app]# cd /app/redis-5.0.0/src      # 源码目录
[root@wsongl-01 src]# cp redis-trib.rb /app/redis/bin/
[root@wsongl-01 bin]# redis-trib.rb create --replicas 1 192.168.154.129:9001 192.168.154.129:9002 192.168.154.129:9003 192.168.154.130:9001 192.168.154.130:9002 192.168.154.130:9003
3.启动集群
[root@wsongl-01 bin]# redis-cli --cluster create 192.168.154.129:9001 192.168.154.129:9002 192.168.154.129:9003 192.168.154.130:9001 192.168.154.130:9002 192.168.154.130:9003 --cluster-replicas 1
4.登陆集群任意节点
# redis-cli -c -h <IP> -p <端口>
[root@wsongl-01 bin]# redis-cli -c -h 192.168.154.129 -p 9001


