Struts2学习笔记——Struts2搭建和第一个小程序
1.新建web项目

2.配置Struts2核心过滤器
(1)打开web.xml文件,做以下配置:
<?xml version="1.0" encoding="UTF-8"?>
<web-app xmlns:xsi="http://www.w3.org/2001/XMLSchema-instance" xmlns="http://java.sun.com/xml/ns/javaee" xsi:schemaLocation="http://java.sun.com/xml/ns/javaee http://java.sun.com/xml/ns/javaee/web-app_3_0.xsd" id="WebApp_ID" version="3.0">
  <welcome-file-list>
      <welcome-file>login.jsp</welcome-file>
  </welcome-file-list>

  <!-- 配置Struts2的核心过滤器,过滤所有请求 -->
  <filter>
      <filter-name>struts2</filter-name>
      <filter-class>org.apache.struts2.dispatcher.ng.filter.StrutsPrepareAndExecuteFilter</filter-class>
  </filter>

  <filter-mapping>
      <filter-name>struts2</filter-name>
      <url-pattern>/*</url-pattern>
  </filter-mapping>
</web-app>
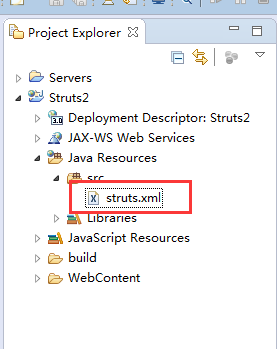
(2)在src目录下新建一个struts.xml文件:

3.完成第一个小程序:签到
要求:
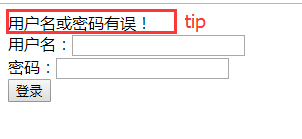
①登录:在WEB-INF目录下新建一个login.jsp页面,输入用户名和密码,传入后端进行判断,如果用户名为admin且密码为1234,则跳转到签到页面,否则跳转到登录页面并提示“用户名或密码不正确!”。
②签到:在WEB-INF目录下新建一个sign.jsp页面,进行签到和签退,并提示相应操作的时间。
(1)login.jsp页面:
<%@ page language="java" contentType="text/html; charset=UTF-8"
    pageEncoding="UTF-8"%>
<!DOCTYPE html PUBLIC "-//W3C//DTD HTML 4.01 Transitional//EN" "http://www.w3.org/TR/html4/loose.dtd">
<html>
<head>
<meta http-equiv="Content-Type" content="text/html; charset=UTF-8">
<title>Insert title here</title>
</head>
<body>
    <form action="sign_signLogin" method="post">
        ${tip}<br>
        用户名:<input type="text" name="name"><br>
        密码:<input type="password" name="pwd"><br>
        <input type="submit" value="登录">

    </form>
</body>
</html>
(2)sign.jsp页面:
<%@ page language="java" contentType="text/html; charset=UTF-8"
    pageEncoding="UTF-8"%>
<!DOCTYPE html PUBLIC "-//W3C//DTD HTML 4.01 Transitional//EN" "http://www.w3.org/TR/html4/loose.dtd">
<html>
<head>
<meta http-equiv="Content-Type" content="text/html; charset=UTF-8">
<title>Insert title here</title>
</head>
<body>
    <a href="sign_signIn">签到</a><br>
    <a href="sign_signOut">签退</a><br>
    ${tip}<br>

</body>
</html>
(3)新建SignAction.java类:
package com.struts2_01;

import java.util.Date;
import javax.servlet.http.HttpServletRequest;
import org.apache.struts2.ServletActionContext;

public class SignAction {

    /**
     * 登录
     */
    public String signLogin() {
        HttpServletRequest req = ServletActionContext.getRequest();//获取HttpServletRequest对象
        String username = req.getParameter("name");//获取输入的用户名
        String pwd = req.getParameter("pwd");//获取密码
        if ("admin".equals(username) && "1234".equals(pwd)) {
            return "sign";//返回的字符串,在struts.xml文件中配置
        }
        req.setAttribute("tip", "用户名或密码有误!");
        return "login";//返回的字符串,在struts.xml文件中配置
    }

    /**
     * 签到
     */
     public String signIn(){
           HttpServletRequest req = ServletActionContext.getRequest();
           req.setAttribute("tip", "签到时间:"+new Date());
           return "sign";
       }

     /**
      * 签退
      */
     public String signOut() {
         HttpServletRequest req = ServletActionContext.getRequest();
          req.setAttribute("tip", "签退时间:"+new Date());
        return "sign";
    }
}
(4)最重要的一步:配置struts.html文件:
<?xml version="1.0" encoding="UTF-8"?>
<!DOCTYPE struts PUBLIC
    "-//Apache Software Foundation//DTD Struts Configuration 2.3//EN"
    "http://struts.apache.org/dtds/struts-2.3.dtd">

<struts>

    <package name="default" namespace="/" extends="struts-default">
        <!-- 配置调用哪个类中的哪个方法,action中的name表示前端访问的url地址,method是方法名,class是完整类名 -->
        <!-- <action name="signIn" method="signIn" class="com.struts2_01.SignAction"></action>
        <action name="signOut" method="signOut" class="com.struts2_01.SignAction"></action> -->

        <!-- struts2动态方法调用,作用是不用想上面那样每次调用方法都要创建一个action标签
             sign_* :*号是占位符,代表方法名,url用sign_为前缀,如sign_signIn、sign_signOut。
             {1} :表示name中的第一个*号
         -->
        <action name="sign_*" method="{1}" class="com.struts2_01.SignAction">
            <!-- 指定方法执行后跳转的路径
                 name的值和方法中返回的字符串一致
                 /sign.jsp是跳转的页面
                 -->
            <result name="sign">/sign.jsp</result>
            <result name="login">/login.jsp</result>
        </action>
    </package>

</struts>
4.测试(Tomcat环境下)

登录成功后跳转页面,点击签到后的效果(签到时间显示):


