wxPython 绘图演示——模拟雷达信号图(2)
 wxPython绘图实战——模拟雷达信号图
参考此前 wxpython 实现简易画板(1),wxPython 实现绘图有直接法和缓冲法。推荐使用缓冲法来避免屏闪。
1.1. 基本框架
下面以“雷达信号图”为例,回顾 wxPython 的绘图的基本框架:
class RadarGraph(wx.Window):

    def __init__(self, *args, **kw):
        super().__init__(*args, **kw)

        # 自定义的数据
        # Add your codes

        # 设置并重绘缓冲区
        self.buffer = None # 缓冲区
        self.InitBuffer()

        # 绑定事件
        self.Bind(wx.EVT_SIZE, self.OnSize)
        self.Bind(wx.EVT_PAINT, self.OnPaint)
        # add other events you need

    def InitBuffer(self):
        '''设置并重绘缓冲区'''
        w, h = self.GetClientSize()
        self.buffer = wx.Bitmap(w, h)
        dc = wx.BufferedDC(wx.ClientDC(self), self.buffer)

        # 你的绘制内容
        self.DrawGraph(dc)

    def DrawGraph(self, dc:wx.BufferedPaintDC):
        pass

    # ----- 事件响应函数 -----
    def OnSize(self, event):
        """响应窗口大小改变"""

        # 每次窗口大小变换,都需要重新设置缓冲区大小,重绘窗口
        self.InitBuffer()

    def OnPaint(self, event):
        """响应Paint Event"""

        wx.BufferedPaintDC(self, self.buffer)
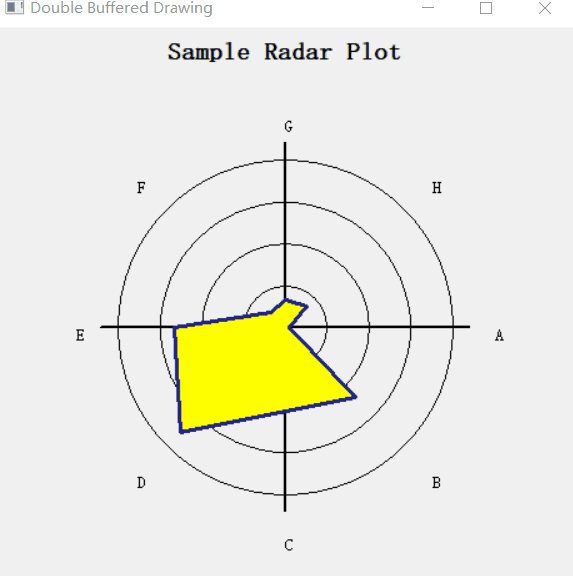
1.2. 运行结果
设置了一个定时器 wx.Timer,让数据随着时间而变化,形成一个动图效果。
1.3. 完整代码
# -*- encoding: utf-8 -*-
# Python 3.9.6 64bit
'''
@File        : a_sample_radar_graph.py
@Time        : 2022/01/04 11:02
@Author      : Wreng
@Description : 雷达信号图,参考 Python in action / Chapter 12 / example 12.2
@Other       : version - Python 3.9.6 64bit, wxPython 4.1.1
'''


import wx
import math
import random

class RadarGraph(wx.Window):

    def __init__(self, parent, title, labels):
        super().__init__(parent)

        # 窗口标题
        self.title = title
        self.titleFont = wx.Font(14, wx.FONTFAMILY_SWISS, wx.FONTSTYLE_NORMAL, wx.FONTWEIGHT_BOLD)

        # 图中的标签
        self.labels = labels
        self.labelFont = wx.Font(10, wx.FONTFAMILY_SWISS, wx.FONTSTYLE_NORMAL, wx.FONTWEIGHT_NORMAL)

        self.data = [0.0] * len(labels)
        self.xy = None

        self.buffer = None # 缓冲区

        # 设置并重绘缓冲区
        self.InitBuffer()

        # 绑定事件
        self.Bind(wx.EVT_SIZE, self.OnSize)
        self.Bind(wx.EVT_PAINT, self.OnPaint)

    def InitBuffer(self):
        '''创建缓冲区'''
        w, h = self.GetClientSize()
        self.buffer = wx.Bitmap(w, h)
        dc = wx.BufferedDC(wx.ClientDC(self), self.buffer)

        # 你的绘制内容
        self.DrawGraph(dc)

    def DrawGraph(self, dc:wx.BufferedPaintDC):
        '''绘制图形'''
        spacer = 10
        scaledmax = 150.0

        dc.SetBackground(wx.Brush(self.GetBackgroundColour()))
        dc.Clear()
        dw, dh = dc.GetSize()

        # 绘制标题
        dc.SetFont(self.titleFont)
        tw, th = dc.GetTextExtent(self.title)
        dc.DrawText(self.title, (dw-tw)/2, spacer)

        # 找到中心点
        th = th + 2*spacer
        cx = dw / 2
        cy = (dh - th)/2 + th

        # 计算比率
        mindim = min(cx, (dh - th)/2)
        scale = mindim / scaledmax

        # 绘制轴线,以25为刻度
        dc.SetPen(wx.Pen("black", 1))
        dc.SetBrush(wx.TRANSPARENT_BRUSH)
        dc.DrawCircle(cx, cy, 25*scale)
        dc.DrawCircle(cx, cy, 50*scale)
        dc.DrawCircle(cx, cy, 75*scale)
        dc.DrawCircle(cx, cy, 100*scale)

        dc.SetPen(wx.Pen("black", 2))
        dc.DrawLine(cx-110*scale, cy, cx+110*scale, cy)
        dc.DrawLine(cx, cy-110*scale, cx, cy+110*scale)

        # 寻找了每个点的坐标,绘制标签以及最大的数据点
        dc.SetFont(self.labelFont)
        maxval = 0
        angle = 0
        polypoints = []
        for i, label in enumerate(self.labels):
            val = self.data[i]
            point = self.PolarToCartesian(val*scale, angle, cx, cy) # 将极坐标转化为直角坐标
            polypoints.append(point)
            x, y = self.PolarToCartesian(125*scale, angle, cx, cy)
            dc.DrawText(label, x, y) # 绘制标签
            if val > maxval:
                maxval = val
            angle = angle + 360 / len(self.labels)

        # 根据最大值确定brush的颜色, green is good; red is bad
        c = "forest green"
        if maxval > 70:
            c = "yellow"
        if maxval > 95:
            c = "red"
        dc.SetBrush(wx.Brush(c)) # 设置画刷的颜色
        dc.SetPen(wx.Pen("navy", 3))
        dc.DrawPolygon(polypoints) # 绘制采集的形状

    def PolarToCartesian(self, radius, angle, cx,cy):
        '''将极坐标转化为直角坐标'''
        x = radius * math.cos(math.radians(angle))
        y = radius * math.sin(math.radians(angle))
        return (int(cx+x+0.5), int(cy+y+0.5)) # 四舍五入转化为整数

    def GetData(self):
        return self.data

    def SetData(self, newData):
        assert len(newData) == len(self.data)
        self.data = newData[:]

        # 数据改变了,因此更新缓冲和窗口
        dc = wx.BufferedDC(wx.ClientDC(self), self.buffer)
        self.DrawGraph(dc)

    # ====================================================================
    # 事件响应函数
    # ====================================================================
    def OnSize(self, event):
        """响应窗口大小改变"""

        # 每次窗口大小变换,都需要重新设置缓冲区大小,重绘窗口
        self.InitBuffer()

    def OnPaint(self, event):
        """响应Paint Event"""

        wx.BufferedPaintDC(self, self.buffer)


class TestFrame(wx.Frame):
    def __init__(self):
        wx.Frame.__init__(self, None, title="Double Buffered Drawing", size=(480, 480))
        self.plot = RadarGraph(self, "Sample Radar Plot", ['A', 'B', 'C', 'D', 'E', 'F', 'G', 'H'])

        data = []
        for d in self.plot.GetData():
            data.append(random.randint(0, 75))
        self.plot.SetData(data)

        # 设置一个定时器,使数据随时间随机变化
        self.timer = wx.Timer(self)
        self.timer.Start(500) # 每 500ms 触发一次 EVT_TIMER

        self.Bind(wx.EVT_TIMER, self.OnTimeout)

    def OnTimeout(self, event):
        data = []
        for d in self.plot.GetData():
            val = d + random.uniform(-5, 5)
            if val < 0:
                val = 0
            if val > 110:
                val = 110
            data.append(val)
        self.plot.SetData(data)

if __name__ == '__main__':
    app = wx.App()
    frm = TestFrame()
    frm.Show()
    app.MainLoop()
1.4. 相关参考
- https://docs.wxpython.org/
- wxpython 实现简易画板(1)
- wxPython in Action by Noel Rappin, Robin Dunn, Chapter 12
- 蓝奏云下载:https://wwe.lanzoup.com/b01oz824f,密码:g7np
- 书中的代码可以在这找到:https://github.com/freephys/wxPython-In-Action

 浙公网安备 33010602011771号