scrapy框架持久化存储
1.基于终端指令的持久化存储
- 保证爬虫文件的parse方法中有可迭代类型对象(通常为列表or字典)的返回,该返回值可以通过终端指令的形式写入指定格式的文件中进行持久化操作。
1 2 3 4 | 执行输出指定格式进行存储:将爬取到的数据写入不同格式的文件中进行存储 scrapy crawl 爬虫名称 -o xxx.json scrapy crawl 爬虫名称 -o xxx.xml scrapy crawl 爬虫名称 -o xxx.csv |
2.基于管道的持久化存储
scrapy框架中已经为我们专门集成好了高效、便捷的持久化操作功能,我们直接使用即可。要想使用scrapy的持久化操作功能,我们首先来认识如下两个文件:
1 2 3 4 5 6 7 8 | items.py:数据结构模板文件。定义数据属性。 pipelines.py:管道文件。接收数据(items),进行持久化操作。持久化流程: 1.爬虫文件爬取到数据后,需要将数据封装到items对象中。 2.使用yield关键字将items对象提交给pipelines管道进行持久化操作。 3.在管道文件中的process_item方法中接收爬虫文件提交过来的item对象,然后编写持久化存储的代码将item对象中存储的数据进行持久化存储 4.settings.py配置文件中开启管道 |
小试牛刀:将Boss直聘中的数据爬去下来,然后进行持久化存储
爬虫文件:
1 2 3 4 5 6 7 8 9 10 11 12 13 14 15 16 17 18 19 20 21 22 23 24 25 26 27 28 29 30 | # # -*- coding: utf-8 -*-import scrapyfrom bossPro.items import BossproItemclass BossSpider(scrapy.Spider): name = 'boss' # allowed_domains = ['www.xxx.com'] start_urls = ['https://www.zhipin.com/job_detail/?query=python%E7%88%AC%E8%99%AB&scity=101010100&industry=&position='] def parse(self, response): all_data = [] li_list = response.xpath('//div[@class="job-list"]/ul/li') for li in li_list: job_name = li.xpath('.//div[@class = "info-primary"]/h3/a/div/text()').extract_first() salary = li.xpath('.//div[@class = "info-primary"]/h3/a/span/text()').extract_first() company = li.xpath('.//div[@class = "company-text"]/h3/a/text()').extract_first() #实例化一个item对象 item = BossproItem() #把解析到的数据全部封装到item对象中 item["job_name"] =job_name item["salary"] = salary item["company"] = company #将item提交给管道 yield item |
- items文件:items.py
1 2 3 4 5 6 7 8 9 10 11 12 13 14 15 16 | # -*- coding: utf-8 -*-# Define here the models for your scraped items## See documentation in:# https://doc.scrapy.org/en/latest/topics/items.htmlimport scrapyclass BossproItem(scrapy.Item): # define the fields for your item here like: # name = scrapy.Field() job_name = scrapy.Field() salary = scrapy.Field() company = scrapy.Field() |
- 管道文件:pipelines.py 基于mysql和redis存储
1 2 3 4 5 6 7 8 9 10 11 12 13 14 15 16 17 18 19 20 21 22 23 24 25 26 27 28 29 30 31 32 33 34 35 36 37 38 39 40 41 42 43 44 45 46 47 48 49 50 51 52 53 54 55 56 57 58 59 60 61 62 63 64 | # -*- coding: utf-8 -*-# Define your item pipelines here## Don't forget to add your pipeline to the ITEM_PIPELINES setting# See: https://doc.scrapy.org/en/latest/topics/item-pipeline.htmlimport pymysqlfrom redis import Redisclass BossproPipeline(object): fp = None def open_spider(self, spider): print('开始爬虫>>>>>') self.fp = open('./boss.txt', 'w', encoding='utf-8') def close_spider(self, spider): print('结束爬虫>>>>>') self.fp.close() def process_item(self, item, spider): self.fp.write(item['job_name']+':'+item['salary']+':'+item['company']+'\n') return itemclass mysqlPileLine(object): coon = None cursor = None # 创建数据库的连接 def open_spider(self,spider): self.coon = pymysql.Connect(host = '127.0.0.1',port = 3306,user='root',password = '',db = 'scrapy',charset = 'utf8') print(self.coon)# #存储数据 def process_item(self,item,spider): self.cursor = self.coon.cursor()#创建游标 #开始存储数据 try: self.cursor.execute('insert into boss values ("%s","%s","%s")' %(item['job_name'],item['salary'],item['company'])) self.coon.commit() except Ellipsis as e : print(e) self.coon.rollback() def close_spider(self,spider): self.coon.close() self.cursor.close()class redisPileLine(object): conn = None def open_spider(self,spider): self.conn = Redis(host='127.0.0.1',port=6379) print(self.conn) def process_item(self,item,spider): dic = { 'name':item['job_name'], 'salary':item['salary'], 'company':item['company'] } self.conn.lpush('boss',dic) |
- settings.py 配置
1 2 3 4 5 6 7 8 9 10 11 12 13 | USER_AGENT = 'Mozilla/5.0 (Windows NT 10.0; WOW64) AppleWebKit/537.36 (KHTML, like Gecko) Chrome/72.0.3626.109 Safari/537.36'# Obey robots.txt rulesROBOTSTXT_OBEY = FalseITEM_PIPELINES = { 'bossPro.pipelines.BossproPipeline': 300, 'bossPro.pipelines.mysqlPileLine': 301,'bossPro.pipelines.redisPileLine': 302,} |
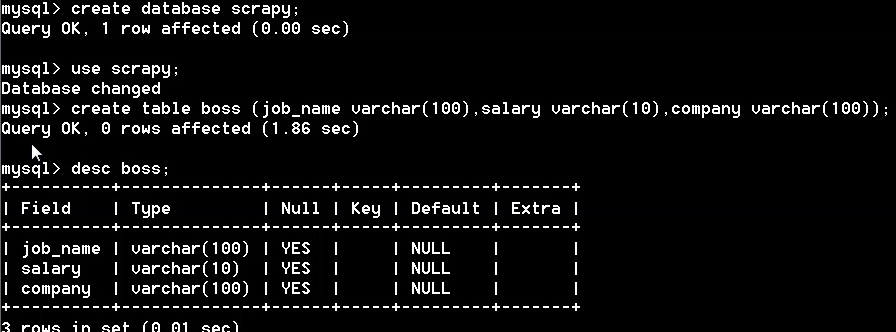
MySQL创建表:
在终端查看:
1 | scrapy crawl boss |
【备注:】
如果redis数据库在存储字典的时候出现报错,原因是因为当前使用的redis模块不支持存储字典类型的数据,需要在终端中执行如下指令即可:pip install -U redis== 2.10.6

【推荐】国内首个AI IDE,深度理解中文开发场景,立即下载体验Trae
【推荐】编程新体验,更懂你的AI,立即体验豆包MarsCode编程助手
【推荐】抖音旗下AI助手豆包,你的智能百科全书,全免费不限次数
【推荐】轻量又高性能的 SSH 工具 IShell:AI 加持,快人一步