Phoenix使用及搭建 bulkLoad实现批量导入
Phoenix
Phoenix和hbase共用一个zookeeper,但是在刚建好Phoenix的时候是读不到hbase中的表的,在Phoenix中建过表之后在hbase中可以看到,在hbase中建过表Phoenix中看不到
Phoenix 基于Hbase给面向业务的开发人员提供了以标准SQL的方式对Hbase进行查询操作,并支持标准SQL中大部分特性:条件运算,分组,分页,等高级查询语法。
1.Phoenix搭建
Phoenix 4.15 HBase 1.4.6 hadoop 2.7.6
1.关闭hbase集群,在master中执行
stop-hbase.sh
解压
tar -xvf apache-phoenix-4.15.0-HBase-1.4-bin.tar.gz -C /usr/local/soft/
改名
mv apache-phoenix-4.15.0-HBase-1.4-bin phoenix-4.15.0
在/etc/profile中配置环境变量
scp /usr/local/soft/phoenix-4.15.0/phoenix-4.15.0-HBase-1.4-server.jar master:/usr/local/soft/hbase-1.4.6/lib/

scp /usr/local/soft/phoenix-4.15.0/phoenix-4.15.0-HBase-1.4-server.jar node1:/usr/local/soft/hbase-1.4.6/lib/

scp /usr/local/soft/phoenix-4.15.0/phoenix-4.15.0-HBase-1.4-server.jar node2:/usr/local/soft/hbase-1.4.6/lib/
都要启动
zkServer.sh start
zkServer.sh status
jps
start-all.sh
jps
start-hbase.sh
2.Phoenix使用
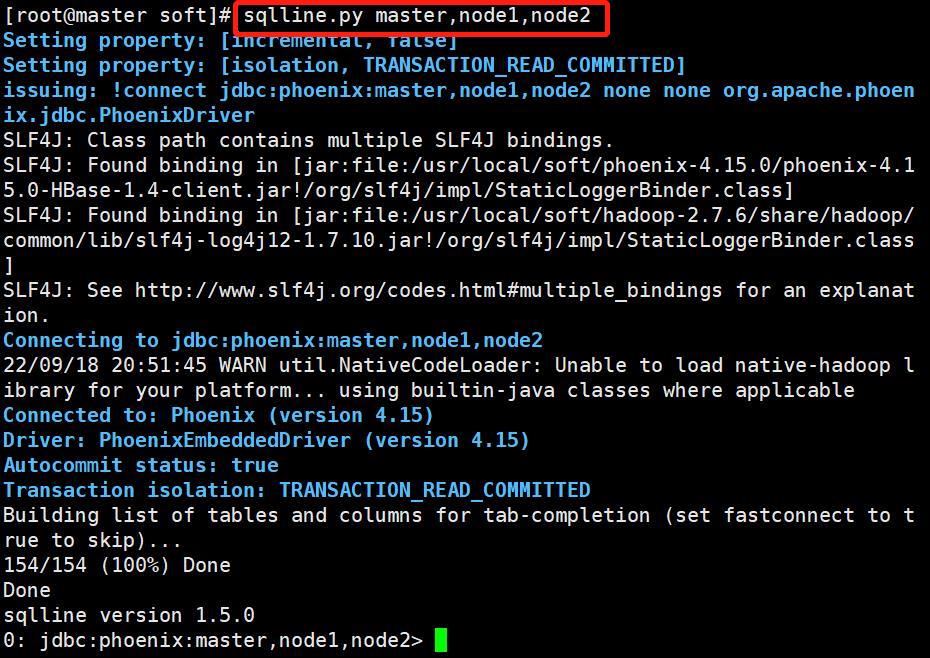
1.连接sqlline
复制master会话
sqlline.py master,node1,node2

2.常用命令
1、严重区分大小写
2、对于常量字符串,使用单引号,对于表名,字段名的小写使用双引导,大写的可以不用
3、在Phoenix中创建的表,名字是大写的,在HBase中是能看到的
4、在HBase中创建的表,Phoenix中看不到
5、在Phoenix创建表与HBase中表的映射时(Phoenix中创建与HBase中相同的表时,列名一定要相同),表名一定要对应上,并且查询时表名是需要加上双引号的,在Phoenix中创建的表是不需要加双引号的
# 1、创建表

CREATE TABLE IF NOT EXISTS student (
 id VARCHAR NOT NULL PRIMARY KEY,
 name VARCHAR,
 age BIGINT,
 gender VARCHAR ,
 clazz VARCHAR
);

# 2、显示所有表
 !table

# 3、插入数据
upsert into STUDENT values('1500100004','阿坤',19,'男','理科三班');
upsert into STUDENT values('1500100005','糖糖',18,'女','理科三班');
upsert into STUDENT values('1500100006','潘潘',18,'女','理科三班');
upsert into STUDENT values('1500100007','小玉',18,'女','理科六班');
upsert into STUDENT values('1500100008','小宋',19,'男','理科六班');
upsert into STUDENT values('1500100009','阿梦',18,'女','理科六班');

# 4、查询数据,支持大部分sql语法,
select * from STUDENT ;
select * from STUDENT where age=19;
select gender ,count(*) from STUDENT group by gender;
select * from student order by gender;

# 5、删除数据
delete from STUDENT where id='1500100004';


# 6、删除表(不需要先禁用)
drop table STUDENT;


# 7、退出命令行
!quit

更多语法参照官网
https://phoenix.apache.org/language/index.html#upsert_select
默认情况下,直接在hbase中创建的表,通过phoenix是查看不到的
Phoenix创建的视图是只读的,所以只能用来做查询,无法通过视图对源数据进行修改等操作
# hbase shell 进入hbase命令行
hbase shell

# 创建hbase表
create 'test','name','company'

# 插入数据
put 'test','001','name:firstname','zhangsan1'
put 'test','001','name:lastname','zhangsan2'
put 'test','001','company:name','数加'
put 'test','001','company:address','合肥'


upsert into TEST values('002','xiao','xiaoxiao','数加','合肥');


# 在phoenix创建视图, primary key 对应到hbase中的rowkey

create view "test"(
empid varchar primary key,
"name"."firstname" varchar,
"name"."lastname"  varchar,
"company"."name"  varchar,
"company"."address" varchar
);

CREATE view "students" (
 id VARCHAR NOT NULL PRIMARY KEY,
 "info"."name" VARCHAR,
 "info"."age" VARCHAR,
 "info"."gender" VARCHAR ,
 "info"."clazz" VARCHAR
) column_encoded_bytes=0;

# 在phoenix查询数据,表名通过双引号引起来
select * from "test";

# 删除视图
drop view "test";
使用Apache Phoenix创建对HBase的表映射,有两类:
1) 当HBase中已经存在表时,可以以类似创建视图的方式创建关联表,只需要将create view改为create table即可。
2)当HBase中不存在表时,可以直接使用create table指令创建需要的表,并且在创建指令中可以根据需要对HBase表结构进行显示的说明。
第1)种情况下,如在之前的基础上已经存在了test表,则表映射的语句如下:
create table "test" (
empid varchar primary key,
"name"."firstname" varchar,
"name"."lastname"varchar,
"company"."name"  varchar,
"company"."address" varchar
)column_encoded_bytes=0;

upsert into "students" values('150011000100','xiaohu','24','男','理科三班');

upsert into  "test"  values('1001','xiao','xiaoxiao','数加','合肥');

CREATE table  "students" (
 id VARCHAR NOT NULL PRIMARY KEY,
 "info"."name" VARCHAR,
 "info"."age" VARCHAR,
 "info"."gender" VARCHAR ,
 "info"."clazz" VARCHAR
) column_encoded_bytes=0;

upsert into "students" values('150011000100','xiaohu','24','男','理科三班');

CREATE table  "scores" (
 id VARCHAR NOT NULL PRIMARY KEY,
 "info"."score_dan" VARCHAR
) column_encoded_bytes=0;
使用create table创建的关联表,如果对表进行了修改,源数据也会改变,同时如果关联表被删除,源表也会被删除。但是视图就不会,如果删除视图,源数据不会发生改变。
bulkLoad实现批量导入
-
如果我们一次性入库hbase巨量数据,处理速度慢不说,还特别占用Region资源, 一个比较高效便捷的方法就是使用 “Bulk Loading”方法,即HBase提供的HFileOutputFormat类。
-
它是利用hbase的数据信息按照特定格式存储在hdfs内这一原理,直接生成这种hdfs内存储的数据格式文件,然后上传至合适位置,即完成巨量数据快速入库的办法。配合mapreduce完成,高效便捷,而且不占用region资源,增添负载。
限制:
-
仅适合初次数据导入,即表内数据为空,或者每次入库表内都无数据的情况。
-
HBase集群与Hadoop集群为同一集群,即HBase所基于的HDFS为生成HFile的MR的集群
提前在Hbase中创建好表
生成Hfile基本流程:
设置Mapper的输出KV类型:
K: ImmutableBytesWritable(代表行键)
V: KeyValue (代表cell)
2. 开发Mapper
读取你的原始数据,按你的需求做处理
输出rowkey作为K,输出一些KeyValue(Put)作为V
3. 配置job参数
a. Zookeeper的连接地址
b. 配置输出的OutputFormat为HFileOutputFormat2,并为其设置参数
4. 提交job
导入HFile到RegionServer的流程
构建一个表描述对象
构建一个region定位工具
然后用LoadIncrementalHFiles来doBulkload操作
pom文件:
<?xml version="1.0" encoding="UTF-8"?>
<project xmlns="http://maven.apache.org/POM/4.0.0"
         xmlns:xsi="http://www.w3.org/2001/XMLSchema-instance"
         xsi:schemaLocation="http://maven.apache.org/POM/4.0.0 http://maven.apache.org/xsd/maven-4.0.0.xsd">
    <parent>
        <artifactId>hadoop-bigdata17</artifactId>
        <groupId>com.shujia</groupId>
        <version>1.0-SNAPSHOT</version>
    </parent>
    <modelVersion>4.0.0</modelVersion>

    <artifactId>had-hbase-demo</artifactId>

    <properties>
        <maven.compiler.source>8</maven.compiler.source>
        <maven.compiler.target>8</maven.compiler.target>
    </properties>
    <dependencies>
        <dependency>
            <groupId>org.apache.hadoop</groupId>
            <artifactId>hadoop-common</artifactId>
        </dependency>
        <dependency>
            <groupId>org.apache.hadoop</groupId>
            <artifactId>hadoop-client</artifactId>
        </dependency>
        <dependency>
            <groupId>org.apache.hadoop</groupId>
            <artifactId>hadoop-hdfs</artifactId>
        </dependency>

        <dependency>
            <groupId>org.apache.hbase</groupId>
            <artifactId>hbase-client</artifactId>
        </dependency>
        <dependency>
            <groupId>org.apache.hbase</groupId>
            <artifactId>hbase-server</artifactId>
        </dependency>
        <dependency>
            <groupId>junit</groupId>
            <artifactId>junit</artifactId>
        </dependency>
        <dependency>
            <groupId>org.apache.phoenix</groupId>
            <artifactId>phoenix-core</artifactId>
        </dependency>
        <dependency>
            <groupId>com.lmax</groupId>
            <artifactId>disruptor</artifactId>
        </dependency>


    </dependencies>

    <build>
        <plugins>
            <!-- compiler插件, 设定JDK版本 -->
            <plugin>
                <groupId>org.apache.maven.plugins</groupId>
                <artifactId>maven-compiler-plugin</artifactId>
                <version>2.3.2</version>
                <configuration>
                    <encoding>UTF-8</encoding>
                    <source>1.8</source>
                    <target>1.8</target>
                    <showWarnings>true</showWarnings>
                </configuration>
            </plugin>


            <!-- 带依赖jar 插件-->
            <plugin>
                <artifactId>maven-assembly-plugin</artifactId>
                <configuration>
                    <descriptorRefs>
                        <descriptorRef>jar-with-dependencies</descriptorRef>
                    </descriptorRefs>
                </configuration>
                <executions>
                    <execution>
                        <id>make-assembly</id>
                        <phase>package</phase>
                        <goals>
                            <goal>single</goal>
                        </goals>
                    </execution>
                </executions>
            </plugin>
        </plugins>

    </build>

</project>
电信数据
手机号,网格编号,城市编号,区县编号,停留时间,进入时间,离开时间,时间分区
D55433A437AEC8D8D3DB2BCA56E9E64392A9D93C,117210031795040,83401,8340104,301,20180503190539,20180503233517,20180503

手机号和进入时间
代码:
package hbasebulkloading;

import org.apache.hadoop.fs.Path;
import org.apache.hadoop.hbase.HBaseConfiguration;
import org.apache.hadoop.hbase.KeyValue;
import org.apache.hadoop.hbase.TableName;
import org.apache.hadoop.hbase.client.*;
import org.apache.hadoop.hbase.io.ImmutableBytesWritable;
import org.apache.hadoop.hbase.mapreduce.HFileOutputFormat2;
import org.apache.hadoop.hbase.mapreduce.KeyValueSortReducer;
import org.apache.hadoop.hbase.mapreduce.LoadIncrementalHFiles;
import org.apache.hadoop.hbase.mapreduce.SimpleTotalOrderPartitioner;
import org.apache.hadoop.io.LongWritable;
import org.apache.hadoop.io.Text;
import org.apache.hadoop.mapreduce.Job;
import org.apache.hadoop.mapreduce.Mapper;
import org.apache.hadoop.mapreduce.lib.input.FileInputFormat;
import org.apache.hadoop.mapreduce.lib.output.FileOutputFormat;

import java.io.IOException;

class BulkLoadMapper extends Mapper<LongWritable, Text, ImmutableBytesWritable, KeyValue>{
    @Override
    protected void map(LongWritable key, Text value, Mapper<LongWritable, Text, ImmutableBytesWritable, KeyValue>.Context context) throws IOException, InterruptedException {
        String line = value.toString();

        String[] strings = line.split("\t");
        //行键
        if(strings.length>7 && !("\\N".equals(strings[1]))){
            String phoneNum = strings[0];
            String wg = strings[1];
            String city = strings[2];
            String qx = strings[3];
            String stayTime = strings[4];
            String startTime = strings[5];
            String endTime = strings[6];
            String date = strings[7];

            //将手机号与开始时间拼接在一起作为rowkey,避免重复的rowkey覆盖
            String id = phoneNum + "_" + startTime;

            ImmutableBytesWritable rowKey = new ImmutableBytesWritable(id.getBytes());

            //byte[] row, byte[] family, byte[] qualifier, byte[] value
            KeyValue keyValue = new KeyValue(id.getBytes(), "info".getBytes(), "wg".getBytes(), wg.getBytes());
            KeyValue keyValue2 = new KeyValue(id.getBytes(), "info".getBytes(), "city".getBytes(), city.getBytes());
            KeyValue keyValue3 = new KeyValue(id.getBytes(), "info".getBytes(), "qx".getBytes(), qx.getBytes());
            KeyValue keyValue4 = new KeyValue(id.getBytes(), "info".getBytes(), "stayTime".getBytes(), stayTime.getBytes());
            KeyValue keyValue5 = new KeyValue(id.getBytes(), "info".getBytes(), "endTime".getBytes(), endTime.getBytes());
            KeyValue keyValue6 = new KeyValue(id.getBytes(), "info".getBytes(), "date".getBytes(), date.getBytes());

            context.write(rowKey,keyValue);
            context.write(rowKey,keyValue2);
            context.write(rowKey,keyValue3);
            context.write(rowKey,keyValue4);
            context.write(rowKey,keyValue5);
            context.write(rowKey,keyValue6);

        }


    }
}


public class HBaseBulkLoadDemo {
    public static void main(String[] args) throws Exception {
        //获取配置文件(hadoop的配置文件或者Hbase的配置文件,因为他们是共用一个集群)
        HBaseConfiguration conf = new HBaseConfiguration();
        conf.set("hbase.zookeeper.quorum", "node1:2181,node2:2181,master:2181");

        //创建Job作业
        Job job = Job.getInstance(conf);
        //给作业设置名字
        job.setJobName("HBaseBulkLoadDemo MR");
        job.setJarByClass(HBaseBulkLoadDemo.class);

        //设置map类
        job.setMapperClass(BulkLoadMapper.class);
        //设置map的输出key,value类型
        job.setMapOutputKeyClass(ImmutableBytesWritable.class);
        job.setMapOutputValueClass(KeyValue.class);

        //设置reduce之间的顺序以及reduce内部的排序
        job.setPartitionerClass(SimpleTotalOrderPartitioner.class);

        //做reduce内部排序
        job.setReducerClass(KeyValueSortReducer.class);

        //设置文件输入路径和输出路径
        FileInputFormat.setInputPaths(job,new Path("/shujia/bigdata19/DIANXIN/input/dianxin_data.txt"));
        FileOutputFormat.setOutputPath(job,new Path("/shujia/bigdata19/DIANXIN/out1"));

        Connection conn = ConnectionFactory.createConnection(conf);
        Admin admin = conn.getAdmin();
        Table dianxin_bulk = conn.getTable(TableName.valueOf("dianxin_bulk"));
        String tableName = dianxin_bulk.getName().toString();
        RegionLocator dianxin_bulk1 = conn.getRegionLocator(TableName.valueOf("dianxin_bulk"));
        HFileOutputFormat2.configureIncrementalLoad(job,dianxin_bulk,dianxin_bulk1);

        boolean b = job.waitForCompletion(true);

        //b的值如果是true表示作业执行成功
        //b的值如果是false表示作业执行失败
        if (b){
            System.out.println("===================HFile文件生成成功,开始与"+tableName+"表建立映射关系!!====================================");
            //LoadIncrementalHFiles
            LoadIncrementalHFiles loadIncrementalHFiles = new LoadIncrementalHFiles(conf);
            loadIncrementalHFiles.doBulkLoad(new Path("/shujia/bigdata19/DIANXIN/out1"),admin,dianxin_bulk,dianxin_bulk1);
        }else {
            System.out.println("===================HFile文件生成失败!!====================================");
        }
    }
}

/**
 *  1、打包上传(带依赖的)
 *  2、提前将dianxin_data.txt上传到/shujia/bigdata19/DIANXIN/input/下
 *  3、在Hbase表中建立dianxin_bulk表,并且要有info列簇
 *  4、执行mapreduce任务
 *
 */

-
最终输出结果,无论是map还是reduce,输出部分key和value的类型必须是: < ImmutableBytesWritable, KeyValue>或者< ImmutableBytesWritable, Put>。
-
最终输出部分,Value类型是KeyValue 或Put,对应的Sorter分别是KeyValueSortReducer或PutSortReducer。
-
MR例子中HFileOutputFormat2.configureIncrementalLoad(job, dianxin_bulk, regionLocator);自动对job进行配置。SimpleTotalOrderPartitioner是需要先对key进行整体排序,然后划分到每个reduce中,保证每一个reducer中的的key最小最大值区间范围,是不会有交集的。因为入库到HBase的时候,作为一个整体的Region,key是绝对有序的。
-
MR例子中最后生成HFile存储在HDFS上,输出路径下的子目录是各个列族。如果对HFile进行入库HBase,相当于move HFile到HBase的Region中,HFile子目录的列族内容没有了,但不能直接使用mv命令移动,因为直接移动不能更新HBase的元数据。
-
HFile入库到HBase通过HBase中 LoadIncrementalHFiles的doBulkLoad方法,对生成的HFile文件入库


