netty学习笔记
说明:此笔记来源于b站,尚硅谷,工作之余充电。
视频链接:https://www.bilibili.com/video/BV1DJ411m7NR?from=search&seid=2660152924173334595
第 1章 Netty介绍和应用场景
1.1本课程学习要求
1)本课程不适用于 0基础的学员
2)要求已经掌握了 Java编程,主要技术构成: Java OOP编程、Java多线程编程、Java IO编程、Java网
络编程、常用的 Java设计模式(比如观察者模式,命令模式,职责链模式 )、常用的数据结构(比如链表)
3)本课程的 <<Netty核心源码剖析章节>>要求学员最好有项目开发和阅读源码的经历
1.2 Netty的介绍
1) Netty是由 JBOSS提供的一个 Java开源框架,现为 Github上的独立项目。
2) Netty是一个异步的、基于事件驱动的网络应用框架,用以快速开发高性能、高可靠性的网络 IO程序。

1.3 Netty 的应用场景
1.3.1互联网行业
1.3.2游戏行业

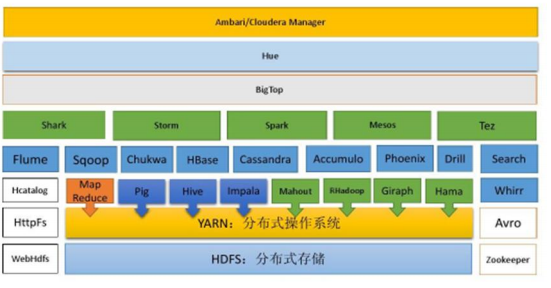
1.3.3大数据领域

第 2 章 Java BIO 编程
2.1 I/O 模型
2.1.1 I/O 模型基本说明
- 1) I/O 模型简单的理解:就是用什么样的通道进行数据的发送和接收,很大程度上决定了程序通信的性能
- 2) Java 共支持 3 种网络编程模型/IO 模式:BIO、NIO、AIO
- 3) Java BIO : 同步并阻塞(传统阻塞型),服务器实现模式为一个连接一个线程,即客户端有连接请求时服务器
- 4) Java NIO : 同步非阻塞,服务器实现模式为一个线程处理多个请求(连接),即客户端发送的连接请求都会注
- 5) Java AIO(NIO.2) : 异步非阻塞,AIO 引入异步通道的概念,采用了 Proactor 模式,简化了程序编写,有效
- 6) 我们依次展开讲解
2.2 BIO、NIO、AIO 适用场景分析
- 1) BIO 方式适用于连接数目比较小且固定的架构,这种方式对服务器资源要求比较高,并发局限于应用中,JDK1.4
- 2) NIO 方式适用于连接数目多且连接比较短(轻操作)的架构,比如聊天服务器,弹幕系统,服务器间通讯等。编程比较复杂,JDK1.4 开始支持。
- 3) AIO 方式使用于连接数目多且连接比较长(重操作)的架构,比如相册服务器,充分调用 OS 参与并发操作,
2.3 Java BIO 基本介绍
- 1) Java BIO 就是传统的 java io 编程,其相关的类和接口在 java.io
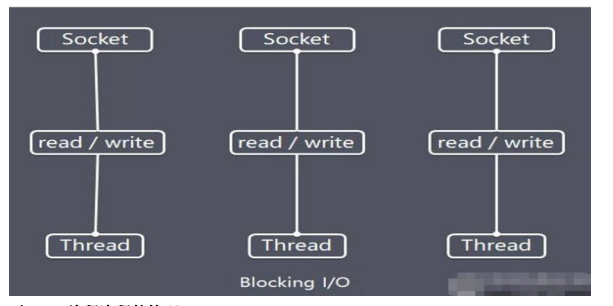
- 2) BIO(blocking I/O) : 同步阻塞,服务器实现模式为一个连接一个线程,即客户端有连接请求时服务器端就需
- 3) BIO 方式适用于连接数目比较小且固定的架构,这种方式对服务器资源要求比较高,并发局限于应用中,JDK1.4
2.4 Java BIO 工作机制
对 BIO 编程流程的梳理
2.5 Java BIO 应用实例
package com.atguigu.bio;
import java.io.InputStream;
import java.net.ServerSocket;
import java.net.Socket;
import java.util.concurrent.ExecutorService;
import java.util.concurrent.Executors;
public class BIOServer {
public static void main(String[] args) throws Exception {
//线程池机制//思路
//1.创建一个线程池
//2.如果有客户端连接,就创建一个线程,与之通讯(单独写一个方法)
ExecutorService newCachedThreadPool = Executors.newCachedThreadPool();
//创建  ServerSocket
ServerSocket serverSocket = new ServerSocket(6666);
System.out.println("服务器启动了");
while (true) {
System.out.println("线程信息
id   ="   +   Thread.currentThread().getId()   +   "名字         ="   +
Thread.currentThread().getName());
//监听,等待客户端连接
System.out.println("等待连接....");
final Socket socket = serverSocket.accept();
System.out.println("连接到一个客户端");
//就创建一个线程,与之通讯(单独写一个方法)
newCachedThreadPool.execute(new Runnable() {
public void run() { //我们重写
//可以和客户端通讯
handler(socket);
}
});
}
}
//编写一个 handler方法,和客户端通讯
public static void handler(Socket socket) {
try {
System.out.println("线程信息
Thread.currentThread().getName());
byte[] bytes = new byte[1024];
//通过 socket获取输入流
id   ="   +   Thread.currentThread().getId()   +   "名字         ="   +
InputStream inputStream = socket.getInputStream();
//循环的读取客户端发送的数据
while (true) {
System.out.println("线程信息
id   ="  +   Thread.currentThread().getId()  +   "名字       ="   +
Thread.currentThread().getName());
System.out.println("read....");
int read =   inputStream.read(bytes);
if(read != -1) {
System.out.println(new String(bytes, 0, read
)); //输出客户端发送的数据
} else {
break;
}
}
}catch (Exception e) {
e.printStackTrace();
}finally {
System.out.println("关闭和 client的连接");
try {
socket.close();
}catch (Exception e) {
e.printStackTrace();
}
}
}
}
2.6 Java BIO问题分析
1)每个请求都需要创建独立的线程,与对应的客户端进行数据 Read,业务处理,数据 Write。
2)当并发数较大时,需要创建大量线程来处理连接,系统资源占用较大。
3)连接建立后,如果当前线程暂时没有数据可读,则线程就阻塞在 Read操作上,造成线程资源浪费
第 3章 Java NIO编程
3.1 Java NIO基本介绍
- 1) Java NIO全称 java non-blocking IO,是指 JDK提供的新 API。从 JDK1.4开始,Java提供了一系列改进的
输入/输出的新特性,被统称为 NIO(即 New IO),是同步非阻塞的
- 2) NIO相关类都被放在 java.nio包及子包下,并且对原 java.io包中的很多类进行改写。【基本案例】
- 3) NIO有三大核心部分:Channel(通道),Buffer(缓冲区), Selector(选择器)
- 4) NIO是面向缓冲区,或者面向块编程的。数据读取到一个它稍后处理的缓冲区,需要时可在缓冲区中前后
移动,这就增加了处理过程中的灵活性,使用它可以提供非阻塞式的高伸缩性网络
- 5) Java NIO的非阻塞模式,使一个线程从某通道发送请求或者读取数据,但是它仅能得到目前可用的数据,如果
目前没有数据可用时,就什么都不会获取,而不是保持线程阻塞,所以直至数据变的可以读取之前,该线程可
以继续做其他的事情。非阻塞写也是如此,一个线程请求写入一些数据到某通道,但不需要等待它完全写入,
这个线程同时可以去做别的事情。【后面有案例说明】
6)通俗理解:NIO是可以做到用一个线程来处理多个操作的。假设有 10000个请求过来,根据实际情况,可以分配
50或者 100个线程来处理。不像之前的阻塞 IO那样,非得分配 10000个。
7) HTTP2.0使用了多路复用的技术,做到同一个连接并发处理多个请求,而且并发请求的数量比 HTTP1.1大了好
几个数量级
8)案例说明 NIO的 Buffer
package com.atguigu.nio;
import java.nio.IntBuffer;public class BasicBuffer {
public static void main(String[] args) {
//举例说明 Buffer的使用   (简单说明)
//创建一个 Buffer,大小为   5,即可以存放   5个  int
IntBuffer intBuffer = IntBuffer.allocate(5);
//向 buffer存放数据
//
//
//
//
//
intBuffer.put(10);
intBuffer.put(11);
intBuffer.put(12);
intBuffer.put(13);
intBuffer.put(14);
for(int i = 0; i < intBuffer.capacity(); i++) {
intBuffer.put( i * 2);
}
//如何从 buffer读取数据
//将 buffer转换,读写切换(!!!)
intBuffer.flip();
while (intBuffer.hasRemaining()) {
System.out.println(intBuffer.get());
}
}

}
3.2 NIO和 BIO的比较
- 1) BIO以流的方式处理数据,而 NIO以块的方式处理数据,块 I/O的效率比流 I/O高很多
- 2) BIO是阻塞的,NIO则是非阻塞的
- 3) BIO基于字节流和字符流进行操作,而 NIO基于 Channel(通道)和 Buffer(缓冲区)进行操作,数据总是从通道
读取到缓冲区中,或者从缓冲区写入到通道中。Selector(选择器)用于监听多个通道的事件(比如:连接请求,
数据到达等),因此使用单个线程就可以监听多个客户端通道
3.3 NIO三大核心原理示意图
一张图描述 NIO的 Selector、 Channel和 Buffer的关系
3.3.1Selector、 Channel和 Buffer的关系图(简单版)
关系图的说明:
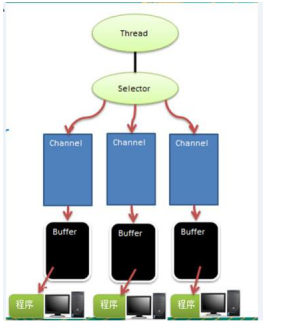
- 1)每个 channel都会对应一个 Buffer
- 2) Selector对应一个线程,一个线程对应多个 channel(连接)
- 3)该图反应了有三个 channel注册到该 selector //程序
- 4)程序切换到哪个 channel是有事件决定的, Event就是一个重要的概念
- 5) Selector会根据不同的事件,在各个通道上切换
- 6) Buffer就是一个内存块,底层是有一个数组
- 7)数据的读取写入是通过 Buffer,这个和 BIO , BIO中要么是输入流,或者是
输出流,不能双向,但是 NIO的 Buffer是可以读也可以写,需要 flip方法切换
channel是双向的,可以返回底层操作系统的情况,比如 Linux ,底层的操作系统通道就是双向的.
3.4缓冲区(Buffer)
3.4.1基本介绍
缓冲区(Buffer):缓冲区本质上是一个可以读写数据的内存块,可以理解成是一个容器对象 (含数组),该对
象提供了一组方法,可以更轻松地使用内存块,,缓冲区对象内置了一些机制,能够跟踪和记录缓冲区的状态变化
情况。Channel提供从文件、网络读取数据的渠道,但是读取或写入的数据都必须经由 Buffer,如图:【后面举例说明】

3.4.2Buffer类及其子类
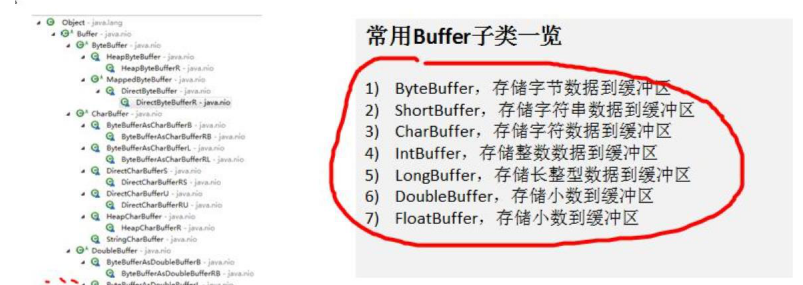
- 1)在 NIO中,Buffer是一个顶层父类,它是一个抽象类,类的层级关系图:
- 2) Buffer类定义了所有的缓冲区都具有的四个属性来提供关于其所包含的数据元素的信息:
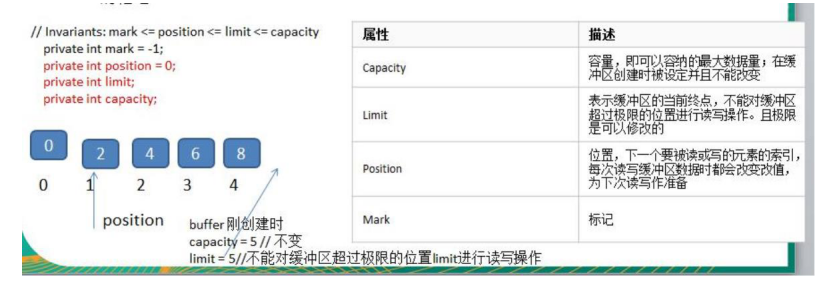
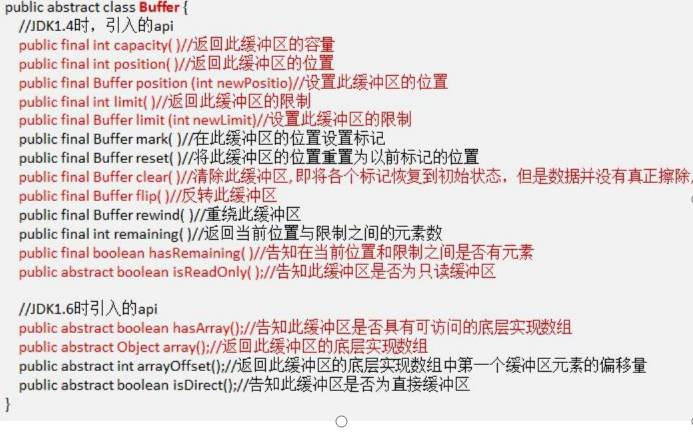
- 3) Buffer类相关方法一览
3.4.3ByteBuffer
从前面可以看出对于 Java中的基本数据类型(boolean除外),都有一个 Buffer类型与之相对应,最常用的自
然是 ByteBuffer类(二进制数据),该类的主要方法如下:

3.5通道(Channel)
3.6基本介绍
- 1) NIO的通道类似于流,但有些区别如下:
l通道可以同时进行读写,而流只能读或者只能写
l通道可以实现异步读写数据
l通道可以从缓冲读数据,也可以写数据到缓冲:
- 2) BIO中的 stream是单向的,例如 FileInputStream对象只能进行读取数据的操作,而 NIO中的通道(Channel)
是双向的,可以读操作,也可以写操作。
- 3) Channel在 NIO中是一个接口
public interface Channel extends Closeable{}
- 4)常用的 Channel类有: FileChannel、 DatagramChannel、 ServerSocketChannel和 SocketChannel。
【ServerSocketChanne类似 ServerSocket , SocketChannel类似 Socket】
- 5) FileChannel用于文件的数据读写,DatagramChannel用于 UDP的数据读写,ServerSocketChannel和
SocketChannel用于 TCP的数据读写。
6)图示

3.6.1FileChannel类
FileChannel主要用来对本地文件进行 IO操作,常见的方法有
- public int read(ByteBuffer dst),从通道读取数据并放到缓冲区中
- public int write(ByteBuffer src),把缓冲区的数据写到通道中
- public long transferFrom(ReadableByteChannel src, long position, long count),从目标通道中复制数据到当前通道
- public long transferTo(long position, long count, WritableByteChannel target),把数据从当前通道复制给目标通道
3.6.2应用实例 1-本地文件写数据
1)使用前面学习后的 ByteBuffer(缓冲)和 FileChannel(通道),将 "hello,尚硅谷"写入到 file01.txt中
2)文件不存在就创建
3)代码演示
package com.atguigu.nio;

import java.io.FileOutputStream;

import java.nio.ByteBuffer;

import java.nio.channels.FileChannel;

public class NIOFileChannel01 {

public static void main(String[] args) throws Exception{

String str = "hello,尚硅谷";

//创建一个输出流->channel

FileOutputStream fileOutputStream = new FileOutputStream("d:\\file01.txt");

//通过  fileOutputStream获取对应的     FileChannel

//这个  fileChannel真实类型是      FileChannelImpl

FileChannel fileChannel = fileOutputStream.getChannel();

//创建一个缓冲区  ByteBuffer

ByteBuffer byteBuffer = ByteBuffer.allocate(1024);

//将  str放入   byteBuffer

byteBuffer.put(str.getBytes());


//对 byteBuffer进行   flip


byteBuffer.flip();


//将 byteBuffer数据写入到   fileChannel

fileChannel.write(byteBuffer);

fileOutputStream.close();

}

}
3.6.3应用实例 2-本地文件读数据
实例要求:
1)使用前面学习后的 ByteBuffer(缓冲)和 FileChannel(通道),将 file01.txt中的数据读入到程序,并显示在控制
台屏幕
2)假定文件已经存在
3)代码演示
package com.atguigu.nio;


import java.io.File;


import java.io.FileInputStream;


import java.nio.ByteBuffer;


import java.nio.channels.FileChannel;

public class NIOFileChannel02 {

public static void main(String[] args) throws Exception {

//创建文件的输入流

File file = new File("d:\\file01.txt");

FileInputStream fileInputStream = new FileInputStream(file);

//通过 fileInputStream获取对应的  FileChannel ->实际类型     FileChannelImpl

FileChannel fileChannel = fileInputStream.getChannel();

//创建缓冲区

ByteBuffer byteBuffer = ByteBuffer.allocate((int) file.length());

//将通道的数据读入到   Buffer

fileChannel.read(byteBuffer);

//将 byteBuffer的字节数据转成       String

System.out.println(new String(byteBuffer.array()));

fileInputStream.close();

}

}
3.6.4应用实例 3-使用一个 Buffer完成文件读取、写入
实例要求:
1)使用 FileChannel(通道)和方法 read , write,完成文件的拷贝
2)拷贝一个文本文件 1.txt ,放在项目下即可
3)代码演示

package com.atguigu.nio;
import java.io.FileInputStream;
import java.io.FileOutputStream;
import java.nio.ByteBuffer;
import java.nio.channels.FileChannel;
public class NIOFileChannel03 {
public static void main(String[] args) throws Exception {
FileInputStream fileInputStream = new FileInputStream("1.txt");
FileChannel fileChannel01 = fileInputStream.getChannel();
FileOutputStream fileOutputStream = new FileOutputStream("2.txt");
FileChannel fileChannel02 = fileOutputStream.getChannel();
ByteBuffer byteBuffer = ByteBuffer.allocate(512);
while (true) { //循环读取
//这里有一个重要的操作,一定不要忘了
/*
public final Buffer clear() {
position = 0;
limit = capacity;
mark = -1;
return this;
}
*/
byteBuffer.clear(); //清空  buffer
int read = fileChannel01.read(byteBuffer);
System.out.println("read =" + read);
if(read == -1) { //表示读完
break;
}
//将 buffer中的数据写入到   fileChannel02 -- 2.txt
byteBuffer.flip();
fileChannel02.write(byteBuffer);
}
//关闭相关的流
fileInputStream.close();
fileOutputStream.close();
}
}
3.6.5应用实例 4-拷贝文件 transferFrom方法
1)实例要求:
2)使用 FileChannel(通道)和方法 transferFrom,完成文件的拷贝
3)拷贝一张图片
4)代码演示
package com.atguigu.nio;
import java.io.FileInputStream;
import java.io.FileOutputStream;
import java.nio.channels.FileChannel;
public class NIOFileChannel04 {
public static void main(String[] args)   throws Exception {
//创建相关流
FileInputStream fileInputStream = new FileInputStream("d:\\a.jpg");
FileOutputStream fileOutputStream = new FileOutputStream("d:\\a2.jpg");
//获取各个流对应的  filechannel
FileChannel sourceCh = fileInputStream.getChannel();
FileChannel destCh = fileOutputStream.getChannel();
//使用 transferForm完成拷贝
destCh.transferFrom(sourceCh,0,sourceCh.size());
//关闭相关通道和流
sourceCh.close();
destCh.close();
fileInputStream.close();
fileOutputStream.close();

}

}
3.6.6关于 Buffer和 Channel的注意事项和细节
1) ByteBuffer支持类型化的 put和 get, put放入的是什么数据类型,get就应该使用相应的数据类型来取出,否
则可能有 BufferUnderflowException异常。[举例说明]
package com.atguigu.nio;

import java.nio.ByteBuffer;


public class NIOByteBufferPutGet {
public static void main(String[] args) {

//创建一个  Buffer
ByteBuffer buffer = ByteBuffer.allocate(64);
//类型化方式放入数据
buffer.putInt(100);
buffer.putLong(9);
buffer.putChar('尚');
buffer.putShort((short) 4);
//取出
buffer.flip();
System.out.println();
System.out.println(buffer.getInt());
System.out.println(buffer.getLong());
System.out.println(buffer.getChar());
System.out.println(buffer.getShort());

}

}
2)可以将一个普通 Buffer转成只读 Buffer [举例说明]
package com.atguigu.nio;
import java.nio.ByteBuffer;
public class ReadOnlyBuffer {
public static void main(String[] args) {
//创建一个  buffer
ByteBuffer buffer = ByteBuffer.allocate(64);
for(int i = 0; i < 64; i++) {
buffer.put((byte)i);
}
//读取
buffer.flip();
//得到一个只读的  Buffer
ByteBuffer readOnlyBuffer = buffer.asReadOnlyBuffer();
System.out.println(readOnlyBuffer.getClass());
//读取
while (readOnlyBuffer.hasRemaining()) {
System.out.println(readOnlyBuffer.get());
}
readOnlyBuffer.put((byte)100);
//ReadOnlyBufferException

}

}
3) NIO还提供了 MappedByteBuffer,可以让文件直接在内存(堆外的内存)中进行修改,而如何同步到文件
由 NIO来完成. [举例说明]
package com.atguigu.nio;
import java.io.RandomAccessFile;
import java.nio.MappedByteBuffer;
import java.nio.channels.FileChannel;
/*

说明

1. MappedByteBuffer可让文件直接在内存(堆外内存)修改,操作系统不需要拷贝一次

*/


public class MappedByteBufferTest {
public static void main(String[] args) throws Exception {
RandomAccessFile randomAccessFile = new RandomAccessFile("1.txt", "rw");
//获取对应的通道
FileChannel channel = randomAccessFile.getChannel();
/**
*参数  1: FileChannel.MapMode.READ_WRITE使用的读写模式
*参数  2:  0 :可以直接修改的起始位置
*参数  3:    5:是映射到内存的大小(不是索引位置)  ,即将  1.txt的多少个字节映射到内存
*可以直接修改的范围就是   0-5
*实际类型   DirectByteBuffer
*/

MappedByteBuffer mappedByteBuffer = channel.map(FileChannel.MapMode.READ_WRITE, 0, 5);
mappedByteBuffer.put(0, (byte) 'H');
mappedByteBuffer.put(3, (byte) '9');
mappedByteBuffer.put(5, (byte) 'Y');//IndexOutOfBoundsException
randomAccessFile.close();
System.out.println("修改成功~~");

}

}
4)前面我们讲的读写操作,都是通过一个 Buffer完成的,NIO还支持通过多个 Buffer (即 Buffer数组)完成读
写操作,即 Scattering和 Gathering【举例说明】
package com.atguigu.nio;
import java.net.InetSocketAddress;
import java.nio.ByteBuffer;
import java.nio.channels.ServerSocketChannel;
import java.nio.channels.SocketChannel;
import java.util.Arrays;
/**

* Scattering:将数据写入到 buffer时,可以采用 buffer数组,依次写入     [分散]
* Gathering:从  buffer读取数据时,可以采用  buffer数组,依次读

*/
public class ScatteringAndGatheringTest {
public static void main(String[] args) throws Exception {
//使用  ServerSocketChannel和   SocketChannel网络
ServerSocketChannel serverSocketChannel = ServerSocketChannel.open();
InetSocketAddress inetSocketAddress = new InetSocketAddress(7000);
//绑定端口到 socket,并启动
serverSocketChannel.socket().bind(inetSocketAddress);
//创建 buffer数组
ByteBuffer[] byteBuffers = new ByteBuffer[2];
byteBuffers[0] = ByteBuffer.allocate(5);
byteBuffers[1] = ByteBuffer.allocate(3);
//等客户端连接(telnet)
SocketChannel socketChannel = serverSocketChannel.accept();
int messageLength = 8;     //假定从客户端接收 8个字节
//循环的读取
while (true) {
int byteRead = 0;
while (byteRead < messageLength ) {
long l = socketChannel.read(byteBuffers);
byteRead += l; //累计读取的字节数
System.out.println("byteRead=" + byteRead);
//使用流打印,看看当前的这个  buffer的  position和    limit
Arrays.asList(byteBuffers).stream().map(buffer  ->   "postion="  +   buffer.position()  +   ",  limit="   +
buffer.limit()).forEach(System.out::println);
}


//将所有的 buffer进行  flip
Arrays.asList(byteBuffers).forEach(buffer -> buffer.flip());
//将数据读出显示到客户端
long byteWirte = 0;
while (byteWirte < messageLength) {
long l = socketChannel.write(byteBuffers); //
byteWirte += l;
}
//将所有的 buffer进行   clear
Arrays.asList(byteBuffers).forEach(buffer-> {
buffer.clear();
});
System.out.println("byteRead:="  +   byteRead  +   "  byteWrite="  +   byteWirte  +   ",  messagelength"  +
messageLength);
}
}
}
3.7 Selector(选择器)
3.7.1基本介绍
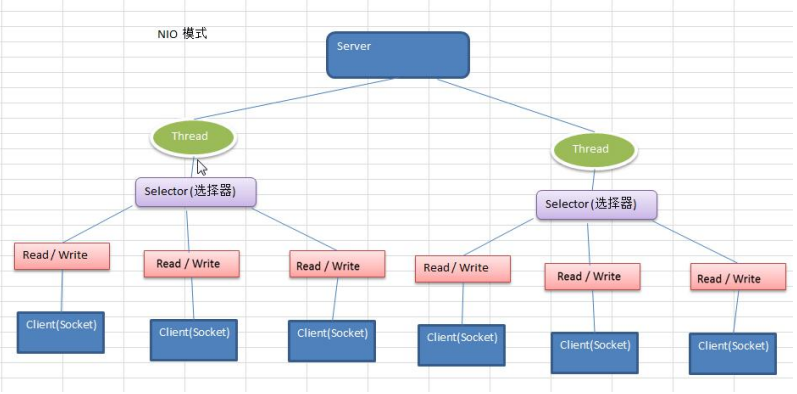
- 1) Java的 NIO,用非阻塞的 IO方式。可以用一个线程,处理多个的客户端连接,就会使用到 Selector(选择器)
- 2) Selector能够检测多个注册的通道上是否有事件发生 (注意:多个 Channel以事件的方式可以注册到同一个
Selector),如果有事件发生,便获取事件然后针对每个事件进行相应的处理。这样就可以只用一个单线程去管
理多个通道,也就是管理多个连接和请求。【示意图】
- 3)只有在连接/ 通道真正有读写事件发生时,才会进行读写,就大大地减少了系统开销,并且不必为每个连接都
创建一个线程,不用去维护多个线程
- 4)避免了多线程之间的上下文切换导致的开销
3.7.2Selector示意图和特点说明

说明如下:
- 1) Netty的 IO线程 NioEventLoop聚合了 Selector(选择器,也叫多路复用器),可以同时并发处理成百上千个客
户端连接。
- 2)当线程从某客户端 Socket通道进行读写数据时,若没有数据可用时,该线程可以进行其他任务。
- 3)线程通常将非阻塞 IO的空闲时间用于在其他通道上执行 IO操作,所以单独的线程可以管理多个输入和输出
通道。
- 4)由于读写操作都是非阻塞的,这就可以充分提升 IO线程的运行效率,避免由于频繁 I/O阻塞导致的线程挂
起。
- 5)一个 I/O线程可以并发处理 N个客户端连接和读写操作,这从根本上解决了传统同步阻塞 I/O一连接一线
程模型,架构的性能、弹性伸缩能力和可靠性都得到了极大的提升。
3.7.3 Selector类相关方法
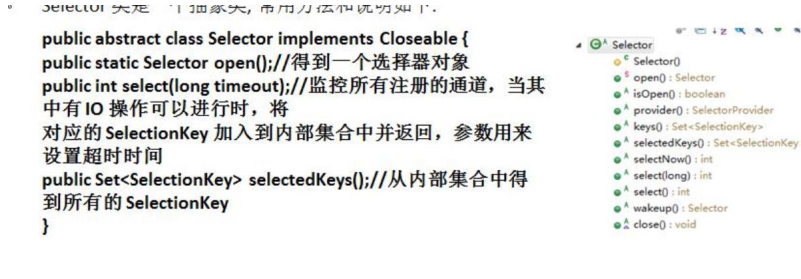
Selector类是一个抽象类,常用方法和说明如下:
3.7.4注意事项
- 1) NIO中的 ServerSocketChannel功能类似 ServerSocket,SocketChannel功能类似 Socket
- 2) selector相关方法说明
selector.select()//阻塞
selector.select(1000);//阻塞 1000毫秒,在 1000毫秒后返回
selector.wakeup();//唤醒 selector
selector.selectNow();//不阻塞,立马返还
3.8 NIO非阻塞网络编程原理分析图
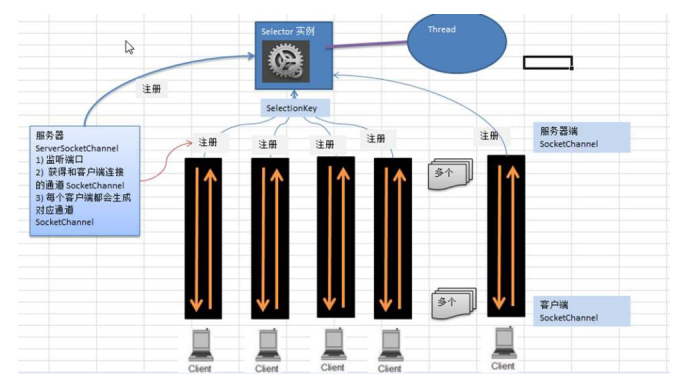
NIO非阻塞网络编程相关的(Selector、SelectionKey、ServerScoketChannel和 SocketChannel)关系梳理图
对上图的说明:
- 1)当客户端连接时,会通过 ServerSocketChannel得到 SocketChannel
- 2) Selector进行监听 select方法,返回有事件发生的通道的个数.
- 3)将 socketChannel注册到 Selector上, register(Selector sel, int ops),一个 selector上可以注册多个 SocketChannel
- 4)注册后返回一个 SelectionKey,会和该 Selector关联(集合)
- 5)进一步得到各个 SelectionKey (有事件发生)
- 6)在通过 SelectionKey反向获取 SocketChannel ,方法 channel()
- 7)可以通过得到的 channel ,完成业务处理
- 8)代码撑腰。。。
3.9 NIO非阻塞网络编程快速入门
案例要求:
- 1)编写一个 NIO入门案例,实现服务器端和客户端之间的数据简单通讯(非阻塞)
- 2)目的:理解 NIO非阻塞网络编程机制
- 3)看老师代码演示
NIOServer
package com.atguigu.nio;

import java.net.InetSocketAddress;
import java.nio.ByteBuffer;
import java.nio.channels.*;
import java.util.Iterator;
import java.util.Set;
public class NIOServer {
public static void main(String[] args) throws Exception{
//创建 ServerSocketChannel -> ServerSocket
ServerSocketChannel serverSocketChannel = ServerSocketChannel.open();
//得到一个 Selecor对象
Selector selector = Selector.open();
//绑定一个端口 6666,在服务器端监听
serverSocketChannel.socket().bind(new InetSocketAddress(6666));
//设置为非阻塞
serverSocketChannel.configureBlocking(false);
//把  serverSocketChannel注册到     selector关心事件为     OP_ACCEPT
serverSocketChannel.register(selector, SelectionKey.OP_ACCEPT);
//循环等待客户端连接

while (true) {
//这里我们等待 1秒,如果没有事件发生,返回
if(selector.select(1000) == 0) { //没有事件发生
System.out.println("服务器等待了 1秒,无连接");
continue;

}
//如果返回的>0,就获取到相关的   selectionKey集合
//1.如果返回的>0 ,表示已经获取到关注的事件
//2. selector.selectedKeys()返回关注事件的集合
//
通过  selectionKeys反向获取通道
Set<SelectionKey> selectionKeys = selector.selectedKeys();
//遍历  Set<SelectionKey>,使用迭代器遍历
Iterator<SelectionKey> keyIterator = selectionKeys.iterator();
while (keyIterator.hasNext()) {
//获取到  SelectionKey
SelectionKey key = keyIterator.next();
//根据 key对应的通道发生的事件做相应处理
if(key.isAcceptable()) { //如果是 OP_ACCEPT,有新的客户端连接
//该该客户端生成一个  SocketChannel
SocketChannel socketChannel = serverSocketChannel.accept();
System.out.println("客户端连接成功生成了一个socketChannel   "   +
 socketChannel.hashCode());
//将   SocketChannel设置为非阻塞
socketChannel.configureBlocking(false);
//将 socketChannel注册到  selector,关注事件为    OP_READ,同时给   socketChannel
//关联一个  Buffer
socketChannel.register(selector, SelectionKey.OP_READ, ByteBuffer.allocate(1024));
}
if(key.isReadable()) {   //发生  OP_READ
/通过 key反向获取到对应   channel
SocketChannel channel = (SocketChannel)key.channel();
//获取到该 channel关联的  buffer
ByteBuffer buffer = (ByteBuffer)key.attachment();
channel.read(buffer);
System.out.println("form客户端   " + new String(buffer.array()));
}

//手动从集合中移动当前的 selectionKey,防止重复操作
keyIterator.remove();

}

}

}

}
NIOClient.java
package com.atguigu.nio;
import java.net.InetSocketAddress;
import java.nio.ByteBuffer;

import java.nio.channels.SocketChannel;
public class NIOClient {
public static void main(String[] args) throws Exception{
//得到一个网络通道
SocketChannel socketChannel = SocketChannel.open();
//设置非阻塞
socketChannel.configureBlocking(false);
//提供服务器端的 ip 和端口
InetSocketAddress inetSocketAddress = new InetSocketAddress("127.0.0.1", 6666);
//连接服务器
if (!socketChannel.connect(inetSocketAddress)) {
while (!socketChannel.finishConnect()) {
System.out.println("因为连接需要时间,客户端不会阻塞,可以做其它工作..");

}


}

//...如果连接成功,就发送数据
String str = "hello,尚硅谷~";

//Wraps a byte array into a buffer
ByteBuffer buffer = ByteBuffer.wrap(str.getBytes());

//发送数据,将  buffer数据写入   channel
socketChannel.write(buffer);
System.in.read();
}

}
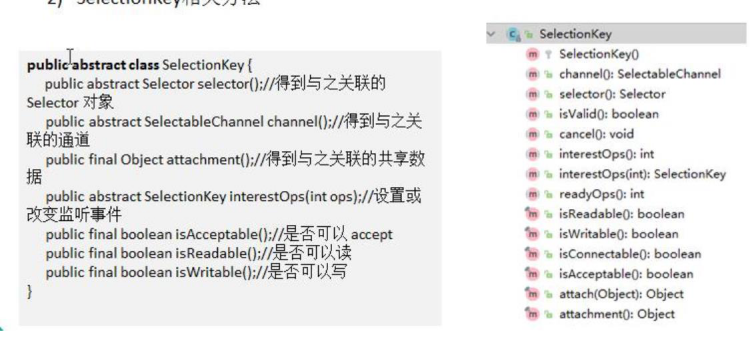
3.10 SelectionKey
1) SelectionKey,表示 Selector和网络通道的注册关系,共四种:
int OP_ACCEPT:有新的网络连接可以 accept,值为 16
int OP_CONNECT:代表连接已经建立,值为 8
int OP_READ:代表读操作,值为 1
int OP_WRITE:代表写操作,值为 4
源码中:
public static final int OP_READ = 1 << 0;
public static final int OP_WRITE = 1 << 2;
public static final int OP_CONNECT = 1 << 3;
public static final int OP_ACCEPT = 1 << 4;
2) SelectionKey相关方法
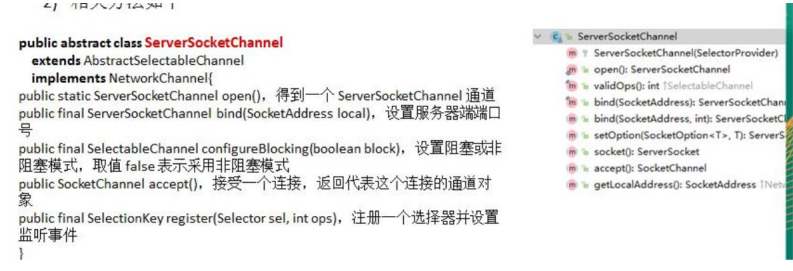
3.11 ServerSocketChannel
- 1) ServerSocketChannel在服务器端监听新的客户端 Socket连接
- 2)相关方法如下
3.12 SocketChannel
- 1) SocketChannel,网络IO通道,具体负责进行读写操作。NIO把缓冲区的数据写入通道,或者把通道里的数据读到缓冲区。
- 2)相关方法如下

3.13 NIO网络编程应用实例-群聊系统
实例要求:
- 1)编写一个 NIO群聊系统,实现服务器端和客户端之间的数据简单通讯(非阻塞)
- 2)实现多人群聊
- 3)服务器端:可以监测用户上线,离线,并实现消息转发功能
- 4)客户端:通过 channel可以无阻塞发送消息给其它所有用户,同时可以接受其它用户发送的消息(有服务器转发得到)
- 5)目的:进一步理解 NIO非阻塞网络编程机制
- 6)示意图分析和代码

//服务器端
package com.atguigu.nio.groupchat;
import java.io.IOException;
import java.net.InetSocketAddress;
import java.nio.ByteBuffer;
import java.nio.channels.*;
import java.util.Iterator;
public class GroupChatServer {
//定义属性
private Selector selector;
private ServerSocketChannel listenChannel;
private static final int PORT = 6667;
//构造器
//初始化工作
public GroupChatServer() {
try {
//得到选择器
selector = Selector.open();
//ServerSocketChannel
listenChannel =   ServerSocketChannel.open();
//绑定端口
listenChannel.socket().bind(new InetSocketAddress(PORT));
//设置非阻塞模式
listenChannel.configureBlocking(false);
//将该 listenChannel注册到   selector
listenChannel.register(selector, SelectionKey.OP_ACCEPT);
}catch (IOException e) {
e.printStackTrace();
}
}
//监听
public void listen() {
try {
//循环处理
while (true) {
int count = selector.select();
if(count > 0) {//有事件处理
//遍历得到 selectionKey集合
Iterator<SelectionKey> iterator = selector.selectedKeys().iterator();
while (iterator.hasNext()) {
//取出  selectionkey
SelectionKey key = iterator.next();
//监听到  accept
if(key.isAcceptable()) {
SocketChannel sc = listenChannel.accept();
sc.configureBlocking(false);
//将该  sc注册到   seletor
sc.register(selector, SelectionKey.OP_READ);
//提示
System.out.println(sc.getRemoteAddress() + "上线   ");
}
if(key.isReadable()) { //通道发送 read事件,即通道是可读的状态
//处理读  (专门写方法..)
readData(key);
}
//当前的 key删除,防止重复处理
iterator.remove();
}
} else {
System.out.println("等待....");
}
}
}catch (Exception e) {
e.printStackTrace();
}finally//发生异常处理....

}
}
//读取客户端消息
private void readData(SelectionKey key) {
//取到关联的  channle
SocketChannel channel = null;
try {
//得到  channel
channel = (SocketChannel) key.channel();
//创建  buffer
ByteBuffer buffer = ByteBuffer.allocate(1024);
int count = channel.read(buffer);
//根据 count的值做处理
if(count > 0) {
//把缓存区的数据转成字符串
String msg = new String(buffer.array());
//输出该消息
System.out.println("form客户端:  " + msg);
//向其它的客户端转发消息(去掉自己),专门写一个方法来处理
sendInfoToOtherClients(msg, channel);
}
}catch (IOException e) {
try {

System.out.println(channel.getRemoteAddress() + "离线了..");

//取消注册
key.cancel();
//关闭通道
channel.close();
}catch (IOException e2) {
e2.printStackTrace();;
}

}

}

//转发消息给其它客户(通道)
private void sendInfoToOtherClients(String msg, SocketChannel self ) throws  IOException{
System.out.println("服务器转发消息中...");
//遍历所有注册到  selector上的    SocketChannel,并排除  self
for(SelectionKey key: selector.keys()) {
//通过  key取出对应的     SocketChannel
Channel targetChannel = key.channel();
//排除自己
if(targetChannel instanceof   SocketChannel && targetChannel != self) {
//转型
SocketChannel dest = (SocketChannel)targetChannel;
//将 msg存储到   buffer
ByteBuffer buffer = ByteBuffer.wrap(msg.getBytes());
//将 buffer的数据写入通道
dest.write(buffer);
}
}
}
public static void main(String[] args) {

//创建服务器对象

GroupChatServer groupChatServer = new GroupChatServer();
groupChatServer.listen();
}
}
客户端
package com.atguigu.nio.groupchat;
import java.io.IOException;
import java.net.InetSocketAddress;
import java.nio.ByteBuffer;
import java.nio.channels.SelectionKey;
import java.nio.channels.Selector;
import java.nio.channels.SocketChannel;
import java.util.Iterator;
import java.util.Scanner;
import java.util.Set;

public class GroupChatClient {
//定义相关的属性
private final String HOST = "127.0.0.1"; //服务器的   ip
private final int PORT = 6667; //服务器端口
private Selector selector;
private SocketChannel socketChannel;
private String username;
//构造器,完成初始化工作
public GroupChatClient() throws IOException {
selector = Selector.open();
//连接服务器
socketChannel = socketChannel.open(new InetSocketAddress("127.0.0.1", PORT));
//设置非阻塞
socketChannel.configureBlocking(false);
//将 channel注册到   selector
socketChannel.register(selector, SelectionKey.OP_READ);
//得到  username
username = socketChannel.getLocalAddress().toString().substring(1);
System.out.println(username + " is ok...");
}

//向服务器发送消息
public void sendInfo(String info) {
info = username + "说:"  + info;
try {
socketChannel.write(ByteBuffer.wrap(info.getBytes()));
}catch (IOException e) {
e.printStackTrace();
}
}
//读取从服务器端回复的消息
public void readInfo() {
try {
int readChannels = selector.select();
if(readChannels > 0) {//有可以用的通道
Iterator<SelectionKey> iterator = selector.selectedKeys().iterator();
while (iterator.hasNext()) {
SelectionKey key = iterator.next();
if(key.isReadable()) {
//得到相关的通道
SocketChannel sc = (SocketChannel) key.channel();
//得到一个  Buffer
ByteBuffer buffer = ByteBuffer.allocate(1024);
//读取
sc.read(buffer);
//把读到的缓冲区的数据转成字符串
String msg = new String(buffer.array());
System.out.println(msg.trim());
}
}
iterator.remove(); //删除当前的 selectionKey,防止重复操作
} else {
//System.out.println("没有可以用的通道...");
}
}catch (Exception e) {
e.printStackTrace();
}
}
public static void main(String[] args) throws Exception {
//启动我们客户端
GroupChatClient chatClient = new GroupChatClient();
//启动一个线程,每个  3秒,读取从服务器发送数据
new Thread() {
public void run() {
while (true) {
chatClient.readInfo();
try {
Thread.currentThread().sleep(3000);
}catch (InterruptedException e) {
e.printStackTrace();
}
}
}
}.start();
//发送数据给服务器端
Scanner scanner = new Scanner(System.in);
while (scanner.hasNextLine()) {
String s = scanner.nextLine();
chatClient.sendInfo(s);
}
}

}
3.14 NIO与零拷贝
3.14.1零拷贝基本介绍
1)零拷贝是网络编程的关键,很多性能优化都离不开。
2)在 Java程序中,常用的零拷贝有 mmap(内存映射)和 sendFile。那么,他们在 OS里,到底是怎么样的一个
的设计?我们分析 mmap和 sendFile这两个零拷贝
3)另外我们看下 NIO中如何使用零拷贝
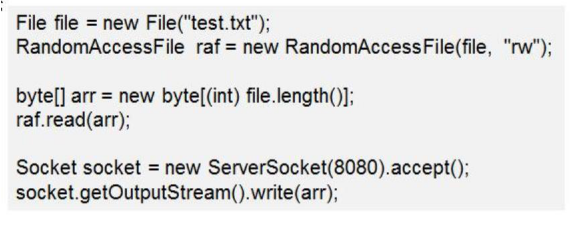
3.14.2传统 IO数据读写
Java传统 IO 和网络编程的一段代码
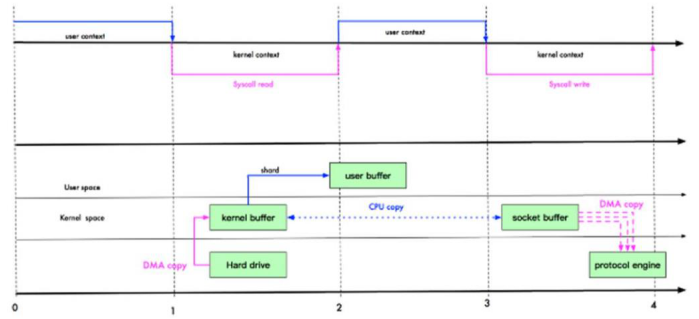
3.14.3传统 IO模型
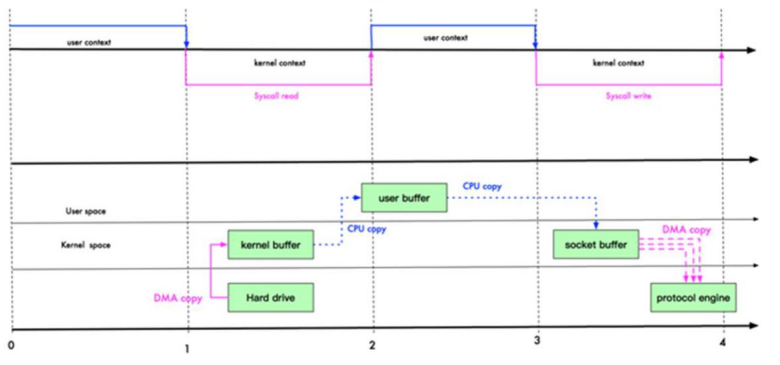
DMA: direct memory access直接内存拷贝(不使用 CPU)
3.14.4 mmap优化
1) mmap通过内存映射,将文件映射到内核缓冲区,同时,用户空间可以共享内核空间的数据。这样,在进行网
络传输时,就可以减少内核空间到用户空间的拷贝次数。如下图
2) mmap示意图
3.14.5 sendFile优化
1) Linux 2.1版本提供了 sendFile函数,其基本原理如下:数据根本不经过用户态,直接从内核缓冲区进入到
Socket Buffer,同时,由于和用户态完全无关,就减少了一次上下文切换
2)示意图和小结

3)提示:零拷贝从操作系统角度,是没有 cpu拷贝
4) Linux在 2.4版本中,做了一些修改,避免了从内核缓冲区拷贝到 Socket buffer的操作,直接拷贝到协议栈,
从而再一次减少了数据拷贝。具体如下图和小结:
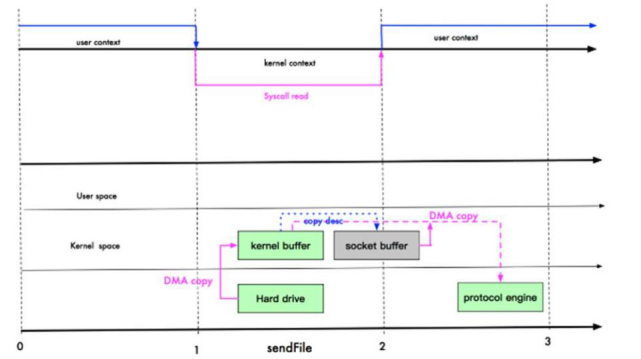
5)这里其实有一次 cpu拷贝
kernel buffer -> socket buffer
但是,拷贝的信息很少,比如 lenght , offset ,消耗低,可以忽略
3.14.6零拷贝的再次理解
- 1)我们说零拷贝,是从操作系统的角度来说的。因为内核缓冲区之间,没有数据是重复的(只有 kernel buffer有
一份数据)。
- 2)零拷贝不仅仅带来更少的数据复制,还能带来其他的性能优势,例如更少的上下文切换,更少的 CPU缓存伪
共享以及无 CPU校验和计算。
3.14.7 mmap和 sendFile的区别
- 1) mmap适合小数据量读写,sendFile适合大文件传输。
- 2) mmap需要 4次上下文切换,3次数据拷贝;sendFile需要 3次上下文切换,最少 2次数据拷贝。
- 3) sendFile可以利用 DMA方式,减少 CPU拷贝,mmap则不能(必须从内核拷贝到 Socket缓冲区)。
3.14.8 NIO零拷贝案例
案例要求:
- 1)使用传统的 IO方法传递一个大文件
- 2)使用 NIO零拷贝方式传递(transferTo)一个大文件
- 3)看看两种传递方式耗时时间分别是多少
NewIOServer.java
package com.atguigu.nio.zerocopy;

import java.net.InetSocketAddress;

import java.net.ServerSocket;

import java.nio.ByteBuffer;

import java.nio.channels.ServerSocketChannel;

import java.nio.channels.SocketChannel;

//服务器

public class NewIOServer {

public static void main(String[] args) throws Exception {
InetSocketAddress address = new InetSocketAddress(7001);
ServerSocketChannel serverSocketChannel = ServerSocketChannel.open();
ServerSocket serverSocket = serverSocketChannel.socket();
serverSocket.bind(address);
//创建  buffer
ByteBuffer byteBuffer = ByteBuffer.allocate(4096);
while (true) {
SocketChannel socketChannel = serverSocketChannel.accept();
int readcount = 0;
while (-1 != readcount) {
try {
readcount = socketChannel.read(byteBuffer);
}catch (Exception ex) {

// ex.printStackTrace();

break;

}

//

byteBuffer.rewind(); //倒带 position = 0 mark作废

}

}

}

}
NewIOClient.java
package com.atguigu.nio.zerocopy;
import java.io.FileInputStream;
import java.net.InetSocketAddress;
import java.nio.channels.FileChannel;
import java.nio.channels.SocketChannel;
public class NewIOClient {
public static void main(String[] args) throws Exception {
SocketChannel socketChannel = SocketChannel.open();
socketChannel.connect(new InetSocketAddress("localhost", 7001));
String filename = "protoc-3.6.1-win32.zip";
//得到一个文件  channel
FileChannel fileChannel = new FileInputStream(filename).getChannel();
//准备发
long startTime = System.currentTimeMillis();
//在 linux下一个 transferTo方法就可以完成传输
//在 windows下一次调用     transferTo只能发送  8m ,就需要分段传输文件,而且要主要
//传输时的位置  =》课后思考...
//transferTo底层使用到零拷贝
long transferCount = fileChannel.transferTo(0, fileChannel.size(), socketChannel);
System.out.println("发送的总的字节数        ="  + transferCount  + "耗时    :" +  (System.currentTimeMillis() -startTime));
//关闭
fileChannel.close();
}
}
3.15 Java AIO基本介绍
- 1) JDK 7引入了 Asynchronous I/O,即 AIO。在进行 I/O编程中,常用到两种模式:Reactor和 Proactor。Java的
NIO就是 Reactor,当有事件触发时,服务器端得到通知,进行相应的处理
- 2) AIO即 NIO2.0,叫做异步不阻塞的 IO。AIO引入异步通道的概念,采用了 Proactor模式,简化了程序编写,
有效的请求才启动线程,它的特点是先由操作系统完成后才通知服务端程序启动线程去处理,一般适用于连接
数较多且连接时间较长的应用
- 3)目前 AIO还没有广泛应用,Netty也是基于NIO,而不是 AIO,因此我们就不详解 AIO了,有兴趣的同学可
以参考
<<Java新一代网络编程模型 AIO原理及 Linux系统AIO介绍>>
http://www.52im.net/thread-306-1-1.html
3.16 BIO、NIO、AIO对比表

第 4章 Netty概述
4.1原生 NIO存在的问题
- 1) NIO的类库和 API繁杂,使用麻烦:需要熟练掌握 Selector、ServerSocketChannel、SocketChannel、ByteBuffer
等。
- 2)需要具备其他的额外技能:要熟悉 Java多线程编程,因为 NIO编程涉及到 Reactor模式,你必须对多线程和网络编程非常熟悉,才能编写出高质量的 NIO程序。
- 3)开发工作量和难度都非常大:例如客户端面临断连重连、网络闪断、半包读写、失败缓存、网络拥塞和异常流
的处理等等。
- 4) JDK NIO的 Bug:例如臭名昭著的 Epoll Bug,它会导致 Selector空轮询,最终导致 CPU 100%。直到 JDK 1.7版本该问题仍旧存在,没有被根本解决。
4.2 Netty官网说明
官网:https://netty.io/
Netty is an asynchronous event-driven network application framework
for rapid development of maintainable high performance protocol servers & clients
4.3 Netty的优点
Netty对 JDK自带的 NIO的 API进行了封装,解决了上述问题。
- 1)设计优雅:适用于各种传输类型的统一 API阻塞和非阻塞 Socket;基于灵活且可扩展的事件模型,可以清晰地分离关注点;高度可定制的线程模型 -单线程,一个或多个线程池.
- 2)使用方便:详细记录的 Javadoc,用户指南和示例;没有其他依赖项,JDK 5(Netty 3.x)或 6(Netty 4.x)就足够了。
- 3)高性能、吞吐量更高:延迟更低;减少资源消耗;最小化不必要的内存复制。
- 4)安全:完整的 SSL/TLS和 StartTLS支持。
- 5)社区活跃、不断更新:社区活跃,版本迭代周期短,发现的 Bug可以被及时修复,同时,更多的新功能会被加入
4.4 Netty版本说明
- 1) netty版本分为 netty3.x和 netty4.x、netty5.x
- 2)因为 Netty5出现重大 bug,已经被官网废弃了,目前推荐使用的是 Netty4.x的稳定版本
- 3)目前在官网可下载的版本 netty3.x netty4.0.x和 netty4.1.x
- 4)在本套课程中,我们讲解 Netty4.1.x版本
- 5) netty下载地址: https://bintray.com/netty/downloads/netty/
第 5章 Netty高性能架构设计
5.1线程模型基本介绍
- 1)不同的线程模式,对程序的性能有很大影响,为了搞清 Netty线程模式,我们来系统的讲解下各个线程模式,最后看看 Netty线程模型有什么优越性.
- 2)目前存在的线程模型有:
- 传统阻塞 I/O服务模型
- Reactor模式
- 3)根据 Reactor的数量和处理资源池线程的数量不同,有 3种典型的实现
- 单 Reactor单线程;
- 单 Reactor多线程;
- 主从 Reactor多线程
- 4) Netty线程模式(Netty主要基于主从 Reactor多线程模型做了一定的改进,其中主从 Reactor多线程模型有多个 Reactor)
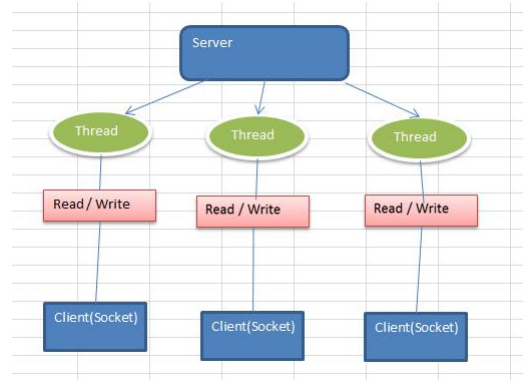
5.2传统阻塞 I/O服务模型
5.2.1工作原理图
- 1)黄色的框表示对象,蓝色的框表示线程
- 2)白色的框表示方法(API)
5.2.2模型特点
- 1)采用阻塞 IO模式获取输入的数据
- 2)每个连接都需要独立的线程完成数据的输入,业务处理,
数据返回
5.2.3问题分析
- 1)当并发数很大,就会创建大量的线程,占用很大系统资源
- 2)连接创建后,如果当前线程暂时没有数据可读,该线程会阻塞在 read操作,造成线程资源浪费

5.3 Reactor模式
https://www.cnblogs.com/dirt2/p/5590320.html
5.3.1针对传统阻塞 I/O服务模型的 2个缺点,解决方案:
- 1)基于I/O复用模型:多个连接共用一个阻塞对象,应用程序只需要在一个阻塞对象等待,无需阻塞等待所有连
接。当某个连接有新的数据可以处理时,操作系统通知应用程序,线程从阻塞状态返回,开始进行业务处理
Reactor对应的叫法: 1.反应器模式 2.分发者模式(Dispatcher) 3.通知者模式(notifier)
- 2)基于线程池复用线程资源:不必再为每个连接创建线程,将连接完成后的业务处理任务分配给线程进行处理,
一个线程可以处理多个连接的业务。
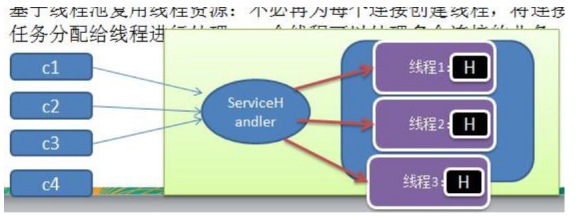
5.3.2I/O复用结合线程池,就是 Reactor模式基本设计思想,如图
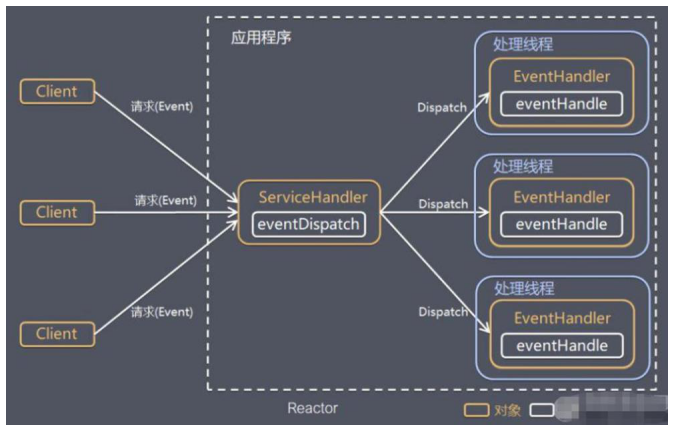
对上图说明:
- 1) Reactor模式,通过一个或多个输入同时传递给服务处理器的模式(基于事件驱动)
- 2)服务器端程序处理传入的多个请求 ,并将它们同步分派到相应的处理线程,因此 Reactor模式也叫 Dispatcher模式
- 3) Reactor模式使用 IO复用监听事件,收到事件后,分发给某个线程(进程),这点就是网络服务器高并发处理关键
5.3.3Reactor模式中核心组成:
- 1) Reactor:Reactor在一个单独的线程中运行,负责监听和分发事件,分发给适当的处理程序来对 IO事件做出
反应。它就像公司的电话接线员,它接听来自客户的电话并将线路转移到适当的联系人;
- 2) Handlers:处理程序执行 I/O事件要完成的实际事件,类似于客户想要与之交谈的公司中的实际官员。Reactor
通过调度适当的处理程序来响应 I/O事件,处理程序执行非阻塞操作。
5.3.4Reactor模式分类:
根据 Reactor的数量和处理资源池线程的数量不同,有 3种典型的实现
- 1)单 Reactor单线程
- 2)单 Reactor多线程
- 3)主从 Reactor多线程
5.4单 Reactor单线程
原理图,并使用 NIO群聊系统验证

5.4.1方案说明:
- 1) Select是前面 I/O复用模型介绍的标准网络编程 API,可以实现应用程序通过一个阻塞对象监听多路连接请求
- 2) Reactor对象通过 Select监控客户端请求事件,收到事件后通过 Dispatch进行分发
- 3)如果是建立连接请求事件,则由 Acceptor通过 Accept处理连接请求,然后创建一个 Handler对象处理连接完成后的后续业务处理
- 4)如果不是建立连接事件,则 Reactor会分发调用连接对应的 Handler来响应
- 5) Handler会完成 Read→业务处理→Send的完整业务流程
结合实例:服务器端用一个线程通过多路复用搞定所有的 IO操作(包括连接,读、写等),编码简单,清晰明了,
但是如果客户端连接数量较多,将无法支撑,前面的 NIO案例就属于这种模型。
5.4.2方案优缺点分析:
1)优点:模型简单,没有多线程、进程通信、竞争的问题,全部都在一个线程中完成
2)缺点:性能问题,只有一个线程,无法完全发挥多核 CPU的性能。Handler在处理某个连接上的业务时,整个进程无法处理其他连接事件,很容易导致性能瓶颈
3)缺点:可靠性问题,线程意外终止,或者进入死循环,会导致整个系统通信模块不可用,不能接收和处理外部消息,造成节点故障
4)使用场景:客户端的数量有限,业务处理非常快速,比如 Redis在业务处理的时间复杂度 O(1)的情况
5.5单 Reactor多线程
5.5.1原理图

5.5.2对上图的小结
- 1) Reactor对象通过 select监控客户端请求事件,收到事件后,通过 dispatch进行分发
- 2)如果建立连接请求,则右 Acceptor通过accept处理连接请求,然后创建一个 Handler对象处理完成连接后的各种事件
- 3)如果不是连接请求,则由 reactor分发调用连接对应的 handler来处理
- 4) handler只负责响应事件,不做具体的业务处理,通过 read读取数据后,会分发给后面的 worker线程池的某个线程处理业务
- 5) worker线程池会分配独立线程完成真正的业务,并将结果返回给 handler
- 6) handler收到响应后,通过 send将结果返回给 client
5.5.3方案优缺点分析:
- 1)优点:可以充分的利用多核 cpu的处理能力
- 2)缺点:多线程数据共享和访问比较复杂, reactor处理所有的事件的监听和响应,在单线程运行,在高并发场景容易出现性能瓶颈.
5.6主从 Reactor多线程
5.6.1工作原理图
针对单 Reactor多线程模型中,Reactor在单线程中运行,高并发场景下容易成为性能瓶颈,可以让 Reactor在多线程中运行
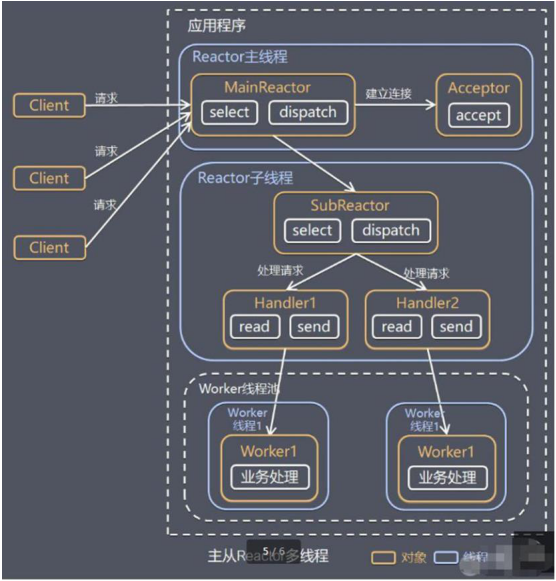
5.6.2上图的方案说明
- 1) Reactor主线程 MainReactor对象通过 select监听连接事件,收到事件后,通过 Acceptor处理连接事件
- 2)当 Acceptor处理连接事件后,MainReactor将连接分配给 SubReactor
- 3)subreactor将连接加入到连接队列进行监听,并创建 handler进行各种事件处理
- 4)当有新事件发生时, subreactor就会调用对应的 handler处理
- 5)handler通过 read读取数据,分发给后面的 worker线程处理
- 6)worker线程池分配独立的 worker线程进行业务处理,并返回结果
- 7)handler收到响应的结果后,再通过 send将结果返回给 client
- 8)Reactor主线程可以对应多个 Reactor子线程,即 MainRecator可以关联多个 SubReactor
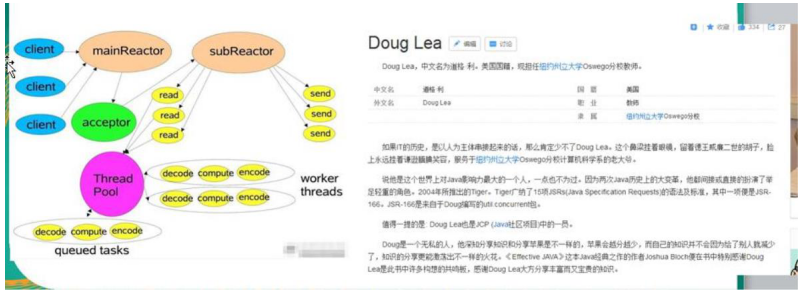
5.6.3Scalable IO in Java对 Multiple Reactors的原理图解:
5.6.4方案优缺点说明:
- 1)优点:父线程与子线程的数据交互简单职责明确,父线程只需要接收新连接,子线程完成后续的业务处理。
- 2)优点:父线程与子线程的数据交互简单,Reactor主线程只需要把新连接传给子线程,子线程无需返回数据。
- 3)缺点:编程复杂度较高
- 4)结合实例:这种模型在许多项目中广泛使用,包括 Nginx主从 Reactor多进程模型,Memcached主从多线程,
Netty主从多线程模型的支持
5.7 Reactor模式小结
5.7.13种模式用生活案例来理解
- 1)单Reactor单线程,前台接待员和服务员是同一个人,全程为顾客服
- 2)单Reactor多线程,1个前台接待员,多个服务员,接待员只负责接待
- 3)主从Reactor多线程,多个前台接待员,多个服务生
5.7.2 Reactor模式具有如下的优点:
1)响应快,不必为单个同步时间所阻塞,虽然 Reactor本身依然是同步的
2)可以最大程度的避免复杂的多线程及同步问题,并且避免了多线程/进程的切换开销
3)扩展性好,可以方便的通过增加 Reactor实例个数来充分利用 CPU资源
4)复用性好,Reactor模型本身与具体事件处理逻辑无关,具有很高的复用性
5.8 Netty模型
5.8.1工作原理示意图 1-简单版
Netty主要基于主从 Reactors多线程模型(如图)做了一定的改进,其中主从 Reactor多线程模型有多个 Reactor

5.8.2对上图说明
1) BossGroup线程维护 Selector ,只关注 Accecpt
2)当接收到 Accept事件,获取到对应的 SocketChannel,封装成 NIOScoketChannel并注册到 Worker线程(事件循环),并进行维护
3)当 Worker线程监听到 selector中通道发生自己感兴趣的事件后,就进行处理 (就由 handler),注意 handler已经加入到通道
5.8.3工作原理示意图 2-进阶版
5.8.4工作原理示意图-详细版

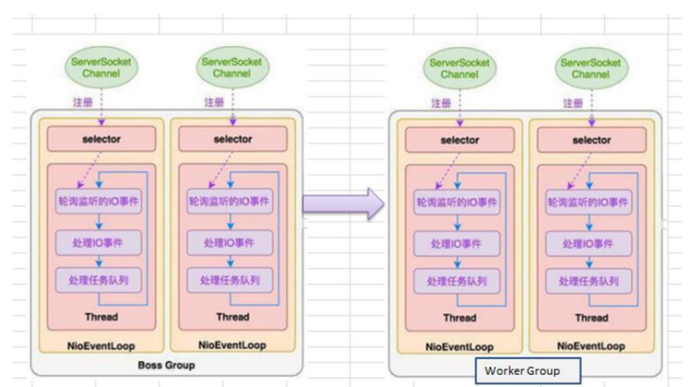
5.8.5对上图的说明小结
- 1) Netty抽象出两组线程池 BossGroup专门负责接收客户端的连接, WorkerGroup专门负责网络的读写
- 2) BossGroup和 WorkerGroup类型都是 NioEventLoopGroup
- 3) NioEventLoopGroup相当于一个事件循环组,这个组中含有多个事件循环,每一个事件循环是 NioEventLoop
- 4) NioEventLoop表示一个不断循环的执行处理任务的线程,每个 NioEventLoop都有一个 selector ,用于监听绑定在其上的 socket的网络通讯
- 5) NioEventLoopGroup可以有多个线程,即可以含有多个 NioEventLoop
- 6)每个Boss NioEventLoop循环执行的步骤有 3步
- l轮询 accept事件
- l处理 accept事件 ,与 client建立连接 ,生成 NioScocketChannel ,并将其注册到某个 worker NIOEventLoop上的 selector
- l处理任务队列的任务,即 runAllTasks
- 7)每个 Worker NIOEventLoop循环执行的步骤
- l轮询 read, write事件
- l处理 i/o事件,即 read , write事件,在对应 NioScocketChannel处理
- l处理任务队列的任务,即 runAllTasks
- 8)每个Worker NIOEventLoop处理业务时,会使用pipeline(管道), pipeline中包含了 channel ,即通过pipeline可以获取到对应通道,管道中维护了很多的处理器
5.8.6Netty快速入门实例-TCP服务
实例要求:使用 IDEA创建 Netty项目
- 1) Netty服务器在 6668端口监听,客户端能发送消息给服务器 "hello,服务器~"
- 2)服务器可以回复消息给客户端 "hello,客户端~"
- 3)目的:对 Netty线程模型有一个初步认识,便于理解 Netty模型理论
- 4)看老师代码演示
5.1编写服务端
5.2编写客户端
5.3对 netty程序进行分析,看看 netty模型特点
说明:创建 Maven项目,并引入 Netty包
5)代码如下
NettyServer.java
package com.atguigu.netty.simple;
import io.netty.bootstrap.ServerBootstrap;
import io.netty.channel.ChannelFuture;
import io.netty.channel.ChannelInitializer;
import io.netty.channel.ChannelOption;
import io.netty.channel.EventLoopGroup;
import io.netty.channel.nio.NioEventLoopGroup;
import io.netty.channel.socket.SocketChannel;
import io.netty.channel.socket.nio.NioServerSocketChannel;
import io.netty.channel.socket.nio.NioSocketChannel;


public class NettyServer {

public static void main(String[] args) throws Exception {

//创建 BossGroup和   WorkerGroup

//说明
//1.创建两个线程组   bossGroup和    workerGroup
//2. bossGroup只是处理连接请求   ,真正的和客户端业务处理,会交给    workerGroup完成
//3.两个都是无限循环
//4. bossGroup和   workerGroup含有的子线程(NioEventLoop)的个数
//默认实际  cpu核数  * 2

EventLoopGroup bossGroup = new NioEventLoopGroup(1);
EventLoopGroup workerGroup = new NioEventLoopGroup();

try {

//创建服务器端的启动对象,配置参数

ServerBootstrap bootstrap = new ServerBootstrap();
//使用链式编程来进行设置
bootstrap.group(bossGroup, workerGroup) //设置两个线程组
.channel(NioServerSocketChannel.class) //使用 NioSocketChannel作为服务器的通道实现
.option(ChannelOption.SO_BACKLOG, 128) //设置线程队列得到连接个数
.childOption(ChannelOption.SO_KEEPALIVE, true) //设置保持活动连接状态
.childHandler(new ChannelInitializer<SocketChannel>() {//创建一个通道测试对象(匿名对象)
//给 pipeline设置处理器
@Override
protected void initChannel(SocketChannel ch) throws Exception {
ch.pipeline().addLast(new NettyServerHandler());
}
}); //给我们的  workerGroup的    EventLoop对应的管道设置处理器
System.out.println(".....服务器  is ready...");
//绑定一个端口并且同步,生成了一个   ChannelFuture对象
//启动服务器(并绑定端口)
ChannelFuture cf = bootstrap.bind(6668).sync();
//对关闭通道进行监听
cf.channel().closeFuture().sync()
}finally {
bossGroup.shutdownGracefully();
workerGroup.shutdownGracefully();
}
}
}
NettyServerHandler.java
package com.atguigu.netty.simple;
import io.netty.buffer.ByteBuf;
import io.netty.buffer.Unpooled;
import io.netty.channel.Channel;
import io.netty.channel.ChannelHandlerContext;
import io.netty.channel.ChannelInboundHandlerAdapter;
import io.netty.channel.ChannelPipeline;
import io.netty.util.CharsetUtil;
/*
说明
1.我们自定义一个 Handler需要继续 netty规定好的某个 HandlerAdapter(规范)
2.这时我们自定义一个 Handler ,才能称为一个 handler
*/


public class NettyServerHandler extends ChannelInboundHandlerAdapter {
//读取数据实际(这里我们可以读取客户端发送的消息)

/*

1. ChannelHandlerContext ctx:上下文对象,含有管道    pipeline ,通道  channel,地址

2. Object msg:就是客户端发送的数据默认     Object

*/

@Override
public void channelRead(ChannelHandlerContext ctx, Object msg) throws Exception {

System.out.println("服务器读取线程  " + Thread.currentThread().getName());
System.out.println("server ctx =" + ctx);
System.out.println("看看 channel和   pipeline的关系");
Channel channel = ctx.channel();
ChannelPipeline pipeline = ctx.pipeline(); //本质是一个双向链接,出站入站
//将  msg转成一个   ByteBuf
//ByteBuf是   Netty提供的,不是    NIO的   ByteBuffer.
ByteBuf buf = (ByteBuf) msg;
System.out.println("客户端发送消息是:" + buf.toString(CharsetUtil.UTF_8));
System.out.println("客户端地址:" + channel.remoteAddress());
}


//数据读取完毕

@Override
public void channelReadComplete(ChannelHandlerContext ctx) throws Exception {
//writeAndFlush是   write + flush
//将数据写入到缓存,并刷新
//一般讲,我们对这个发送的数据进行编码
ctx.writeAndFlush(Unpooled.copiedBuffer("hello,客户端~(>^ω^<)喵",   CharsetUtil.UTF_8));

}

//处理异常,一般是需要关闭通道
@Override
public void exceptionCaught(ChannelHandlerContext ctx, Throwable cause) throws Exception {
ctx.close();
}
}
NettyClient.java
package com.atguigu.netty.simple;
import io.netty.bootstrap.Bootstrap;
import io.netty.channel.ChannelFuture;
import io.netty.channel.ChannelInitializer;
import io.netty.channel.EventLoopGroup;
import io.netty.channel.nio.NioEventLoopGroup;
import io.netty.channel.socket.SocketChannel;
import io.netty.channel.socket.nio.NioSocketChannel;
public class NettyClient {
public static void main(String[] args) throws Exception {
//客户端需要一个事件循环组
EventLoopGroup group = new NioEventLoopGroup();
try {
//创建客户端启动对象
//注意客户端使用的不是  ServerBootstrap而是   Bootstrap
Bootstrap bootstrap = new Bootstrap();
//设置相关参数
bootstrap.group(group) //设置线程组
.channel(NioSocketChannel.class) //设置客户端通道的实现类(反射)
.handler(new ChannelInitializer<SocketChannel>() {
@Override
protected void initChannel(SocketChannel ch) throws Exception {
ch.pipeline().addLast(new NettyClientHandler()); //加入自己的处理器
}

});

System.out.println("客户端  ok..");
//启动客户端去连接服务器端
//关于  ChannelFuture要分析,涉及到  netty的异步模型
ChannelFuture channelFuture = bootstrap.connect("127.0.0.1", 6668).sync();
//给关闭通道进行监听
channelFuture.channel().closeFuture().sync();

}finally {
group.shutdownGracefully();

}

}

}
NettyClientHandler.java
package com.atguigu.netty.simple;
import io.netty.buffer.ByteBuf;
import io.netty.buffer.Unpooled;
import io.netty.channel.ChannelHandlerContext;
import io.netty.channel.ChannelInboundHandlerAdapter;
import io.netty.util.CharsetUtil;
public class NettyClientHandler extends ChannelInboundHandlerAdapter {
//当通道就绪就会触发该方法
@Override
public void channelActive(ChannelHandlerContext ctx) throws Exception {
System.out.println("client " + ctx);
ctx.writeAndFlush(Unpooled.copiedBuffer("hello, server: (>^ω^<)喵", CharsetUtil.UTF_8));

}

//当通道有读取事件时,会触发
@Override
public void channelRead(ChannelHandlerContext ctx, Object msg) throws Exception {
ByteBuf buf = (ByteBuf) msg;
System.out.println("服务器回复的消息:" + buf.toString(CharsetUtil.UTF_8));
System.out.println("服务器的地址:  "+ ctx.channel().remoteAddress());
}
@Override
public void exceptionCaught(ChannelHandlerContext ctx, Throwable cause) throws Exception {
cause.printStackTrace();
ctx.close();
}

}
5.8.7任务队列中的 Task有 3种典型使用场景
- 1)用户程序自定义的普通任务 [举例说明]
- 2)用户自定义定时任务
- 3)非当前Reactor线程调用 Channel的各种方法
例如在推送系统的业务线程里面,根据用户的标识,找到对应的 Channel引用,然后调用 Write类方法向该
用户推送消息,就会进入到这种场景。最终的 Write会提交到任务队列中后被异步消费
- 4)代码演示
package com.atguigu.netty.simple;


import io.netty.buffer.ByteBuf;


import io.netty.buffer.Unpooled;


import io.netty.channel.Channel;


import io.netty.channel.ChannelHandlerContext;


import io.netty.channel.ChannelInboundHandlerAdapter;


import io.netty.channel.ChannelPipeline;


import io.netty.util.CharsetUtil;


import java.util.concurrent.TimeUnit;


/*

说明

1.我们自定义一个  Handler需要继续   netty规定好的某个   HandlerAdapter(规范)

2.这时我们自定义一个  Handler ,才能称为一个    handler

*/

public class NettyServerHandler extends ChannelInboundHandlerAdapter {

//读取数据实际(这里我们可以读取客户端发送的消息)

/*

1. ChannelHandlerContext ctx:上下文对象,含有管道    pipeline ,通道  channel,地址

2. Object msg:就是客户端发送的数据默认     Object

*/

@Override

public void channelRead(ChannelHandlerContext ctx, Object msg) throws Exception {

//比如这里我们有一个非常耗时长的业务->异步执行   ->提交该   channel对应的

//NIOEventLoop的   taskQueue中,

//解决方案 1用户程序自定义的普通任务

ctx.channel().eventLoop().execute(new Runnable() {

@Override

public void run() {

try {

Thread.sleep(5 * 1000);

ctx.writeAndFlush(Unpooled.copiedBuffer("hello,客户端~(>^ω^<)喵   2", CharsetUtil.UTF_8));

System.out.println("channel code=" + ctx.channel().hashCode());

} catch (Exception ex) {

System.out.println("发生异常" + ex.getMessage());

}

}

});

ctx.channel().eventLoop().execute(new Runnable() {

@Override

public void run() {

try {

Thread.sleep(5 * 1000);

ctx.writeAndFlush(Unpooled.copiedBuffer("hello,客户端~(>^ω^<)喵   3", CharsetUtil.UTF_8));

System.out.println("channel code=" + ctx.channel().hashCode());

} catch (Exception ex) {

System.out.println("发生异常" + ex.getMessage());

}

}

});
//解决方案 2 :用户自定义定时任务   -》该任务是提交到    scheduledTaskQueue中
ctx.channel().eventLoop().schedule(new Runnable() {

@Override
public void run() {
try {
Thread.sleep(5 * 1000);
ctx.writeAndFlush(Unpooled.copiedBuffer("hello,客户端~(>^ω^<)喵   4", CharsetUtil.UTF_8));
System.out.println("channel code=" + ctx.channel().hashCode());
} catch (Exception ex) {
System.out.println("发生异常" + ex.getMessage());
}

}

}, 5, TimeUnit.SECONDS);

System.out.println("go on ...");

//
//
//
//
//
//
//
//
//
//
//
//
System.out.println("服务器读取线程  " + Thread.currentThread().getName());
System.out.println("server ctx =" + ctx);
System.out.println("看看 channel和   pipeline的关系");
Channel channel = ctx.channel();
ChannelPipeline pipeline = ctx.pipeline(); //本质是一个双向链接,出站入站
//将  msg转成一个   ByteBuf
//ByteBuf是   Netty提供的,不是    NIO的   ByteBuffer.
ByteBuf buf = (ByteBuf) msg;
System.out.println("客户端发送消息是:" + buf.toString(CharsetUtil.UTF_8));
System.out.println("客户端地址:" + channel.remoteAddress());

}

//数据读取完毕
@Override
public void channelReadComplete(ChannelHandlerContext ctx) throws Exception {
//writeAndFlush是   write + flush
//将数据写入到缓存,并刷新

//一般讲,我们对这个发送的数据进行编码

ctx.writeAndFlush(Unpooled.copiedBuffer("hello,客户端~(>^ω^<)喵   1", CharsetUtil.UTF_8));

}

//处理异常,一般是需要关闭通道

@Override

public void exceptionCaught(ChannelHandlerContext ctx, Throwable cause) throws Exception {

ctx.close();

}

}
5.8.8方案再说明
- 1) Netty抽象出两组线程池,BossGroup专门负责接收客户端连接,WorkerGroup专门负责网络读写操作。
- 2) NioEventLoop表示一个不断循环执行处理任务的线程,每个 NioEventLoop都有一个 selector,用于监听绑定在其上的 socket网络通道。
- 3) NioEventLoop内部采用串行化设计,从消息的读取->解码->处理->编码->发送,始终由 IO线程 NioEventLoop负责
NioEventLoopGroup下包含多个 NioEventLoop
每个 NioEventLoop中包含有一个 Selector,一个 taskQueue
每个 NioEventLoop的 Selector上可以注册监听多个 NioChannel
每个 NioChannel只会绑定在唯一的 NioEventLoop上
每个 NioChannel都绑定有一个自己的 ChannelPipeline
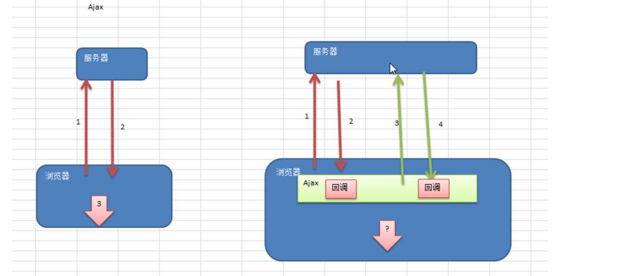
5.9异步模型
5.9.1基本介绍
- 1)异步的概念和同步相对。当一个异步过程调用发出后,调用者不能立刻得到结果。实际处理这个调用的组件在
- 完成后,通过状态、通知和回调来通知调用者。
- 2) Netty中的 I/O操作是异步的,包括 Bind、Write、Connect等操作会简单的返回一个 ChannelFuture。
- 3)调用者并不能立刻获得结果,而是通过 Future-Listener机制,用户可以方便的主动获取或者通过通知机制获得IO操作结果
- 4) Netty的异步模型是建立在 future和 callback的之上的。callback就是回调。重点说 Future,它的核心思想
是:假设一个方法 fun,计算过程可能非常耗时,等待 fun返回显然不合适。那么可以在调用 fun的时候,立
马返回一个 Future,后续可以通过 Future去监控方法 fun的处理过程(即: Future-Listener机制)
5.9.2Future说明
1)表示异步的执行结果,可以通过它提供的方法来检测执行是否完成,比如检索计算等等.
2) ChannelFuture是一个接口: public interface ChannelFuture extends Future<Void>
我们可以添加监听器,当监听的事件发生时,就会通知到监听器.案例说明
5.9.3工作原理示意图
说明:
1)在使用 Netty进行编程时,拦截操作和转换出入站数据只需要您提供 callback或利用 future即可。这使得链式操作简单、高效,并有利于编写可重用的、通用的代码。
2) Netty框架的目标就是让你的业务逻辑从网络基础应用编码中分离出来、解脱出来
5.9.4Future-Listener机制
1)当 Future对象刚刚创建时,处于非完成状态,调用者可以通过返回的 ChannelFuture来获取操作执行的状态,注册监听函数来执行完成后的操作。
2)常见有如下操作
- 通过 isDone方法来判断当前操作是否完成;
- 通过 isSuccess方法来判断已完成的当前操作是否成功;
- 通过 getCause方法来获取已完成的当前操作失败的原因;
- 通过 isCancelled方法来判断已完成的当前操作是否被取消;
- 通过 addListener方法来注册监听器,当操作已完成 (isDone方法返回完成 ),将会通知指定的监听器;如果Future对象已完成,则通知指定的监听器
1)举例说明
演示:绑定端口是异步操作,当绑定操作处理完,将会调用相应的监听器处理逻辑
//绑定一个端口并且同步,生成了一个 ChannelFuture对象
//启动服务器(并绑定端口)
ChannelFuture cf = bootstrap.bind(6668).sync();
//给 cf注册监听器,监控我们关心的事件
cf.addListener(new ChannelFutureListener() {
@Override
public void operationComplete(ChannelFuture future) throws Exception {
if (cf.isSuccess()) {
System.out.println("监听端口 6668成功");
} else {
System.out.println("监听端口 6668失败");
}
}
});
5.10快速入门实例-HTTP服务
- 1)实例要求:使用 IDEA创建 Netty项目
- 2) Netty服务器在 6668端口监听,浏览器发出请求 "http://localhost:6668/ "
- 3)服务器可以回复消息给客户端 "Hello!我是服务器 5 " ,并对特定请求资源进行过滤.
- 4)目的:Netty可以做 Http服务开发,并且理解 Handler实例和客户端及其请求的关系.
- 5)看老师代码演示
TestServer.java
package com.atguigu.netty.http;
import io.netty.bootstrap.ServerBootstrap;
import io.netty.channel.ChannelFuture;
import io.netty.channel.EventLoopGroup;
import io.netty.channel.nio.NioEventLoopGroup;
import io.netty.channel.socket.nio.NioServerSocketChannel;
public class TestServer {
public static void main(String[] args) throws Exception {
EventLoopGroup bossGroup = new NioEventLoopGroup(1);
EventLoopGroup workerGroup = new NioEventLoopGroup();
try {
ServerBootstrap serverBootstrap = new ServerBootstrap();
serverBootstrap.group(bossGroup,
workerGroup).channel(NioServerSocketChannel.class).childHandler(new TestServerInitializer());
ChannelFuture channelFuture = serverBootstrap.bind(6668).sync();
channelFuture.channel().closeFuture().sync();
}finally {
bossGroup.shutdownGracefully();
workerGroup.shutdownGracefully();
}
}
}
TestServerInitializer.java
package com.atguigu.netty.http;
import io.netty.channel.ChannelInitializer;
import io.netty.channel.ChannelPipeline;
import io.netty.channel.socket.SocketChannel;
import io.netty.handler.codec.http.HttpServerCodec;
public class TestServerInitializer extends ChannelInitializer<SocketChannel> {

@Override
protected void initChannel(SocketChannel ch) throws Exception {
//向管道加入处理器
//得到管道
ChannelPipeline pipeline = ch.pipeline();
//加入一个 netty提供的  httpServerCodec codec =>[coder - decoder]
//HttpServerCodec说明
//1. HttpServerCodec是  netty提供的处理   http的编-解码器
pipeline.addLast("MyHttpServerCodec",new HttpServerCodec());
//2.增加一个自定义的   handler
pipeline.addLast("MyTestHttpServerHandler", new TestHttpServerHandler());
}
}
TestHttpServerHandler.java
package com.atguigu.netty.http;
import io.netty.buffer.ByteBuf;
import io.netty.buffer.Unpooled;
import io.netty.channel.ChannelHandlerContext;
import io.netty.channel.SimpleChannelInboundHandler;
import io.netty.handler.codec.http.*;
import io.netty.util.CharsetUtil;
import java.net.URI;
/*
说明
1. SimpleChannelInboundHandler是   ChannelInboundHandlerAdapter
2. HttpObject客户端和服务器端相互通讯的数据被封装成   HttpObject
*/
public class TestHttpServerHandler extends SimpleChannelInboundHandler<HttpObject> {
//channelRead0读取客户端数据
@Override
protected void channelRead0(ChannelHandlerContext ctx, HttpObject msg) throws Exception {
//判断  msg是不是   httprequest请求
if(msg instanceof HttpRequest) {
System.out.println("pipeline  hashcode" +  ctx.pipeline().hashCode()  + "  TestHttpServerHandler  hash=" +
this.hashCode());
System.out.println("msg类型="  + msg.getClass());
System.out.println("客户端地址" + ctx.channel().remoteAddress());
//获取到
HttpRequest httpRequest = (HttpRequest) msg;
//获取 uri,过滤指定的资源
URI uri = new URI(httpRequest.uri());
if("/favicon.ico".equals(uri.getPath())) {
System.out.println("请求了  favicon.ico,不做响应");
return;
}
//回复信息给浏览器  [http协议]
ByteBuf content = Unpooled.copiedBuffer("hello,我是服务器",  CharsetUtil.UTF_8);
//构造一个 http的相应,即  httpresponse
FullHttpResponse
response=new DefaultFullHttpResponse(HttpVersion.HTTP_1_1,HttpResponseStatus.OK, content);
response.headers().set(HttpHeaderNames.CONTENT_TYPE,"text/plain");
response.headers().set(HttpHeaderNames.CONTENT_LENGTH, content.readableBytes());
//将构建好  response返回
ctx.writeAndFlush(response);
}
}
}
第 6章 Netty核心模块组件
6.1 Bootstrap、ServerBootstrap
- 1) Bootstrap意思是引导,一个 Netty应用通常由一个 Bootstrap开始,主要作用是配置整个 Netty程序,串联
各个组件,Netty中 Bootstrap类是客户端程序的启动引导类,ServerBootstrap是服务端启动引导类
- 2)常见的方法有public ServerBootstrap group(EventLoopGroup parentGroup, EventLoopGroup childGroup),该方法用于服务器端,用来设置两个
EventLoop public B group(EventLoopGroup group),该方法用于客户端,用来设置一个
EventLoop public B channel(Class<? extends C> channelClass),该方法用来设置一个服务器端的通道实现
public <T> B option(ChannelOption<T> option, T value),用来给 ServerChannel添加配置
public <T> ServerBootstrap childOption(ChannelOption<T> childOption, T value),用来给接收到的通道添加配置
public ServerBootstrap childHandler(ChannelHandler childHandler),该方法用来设置业务处理类(自定义的handler)
public ChannelFuture bind(int inetPort),该方法用于服务器端,用来设置占用的端口号
public ChannelFuture connect(String inetHost, int inetPort),该方法用于客户端,用来连接服务器端
6.2 Future、ChannelFuture
Netty中所有的 IO操作都是异步的,不能立刻得知消息是否被正确处理。但是可以过一会等它执行完成或者直接注册一个监听,具体的实现就是通过 Future和 ChannelFutures,他们可以注册一个监听,当操作执行成功
或失败时监听会自动触发注册的监听事件
常见的方法有
Channel channel(),返回当前正在进行 IO操作的通道
ChannelFuture sync(),等待异步操作执行完毕
6.3 Channel
- 1) Netty网络通信的组件,能够用于执行网络 I/O操作。
- 2)通过Channel可获得当前网络连接的通道的状态
- 3)通过Channel可获得网络连接的配置参数(例如接收缓冲区大小)
- 4) Channel提供异步的网络I/O操作(如建立连接,读写,绑定端口),异步调用意味着任何 I/O调用都将立即返回,并且不保证在调用结束时所请求的 I/O操作已完成
- 5)调用立即返回一个 ChannelFuture实例,通过注册监听器到 ChannelFuture上,可以 I/O操作成功、失败或取消时回调通知调用方
- 6)支持关联 I/O操作与对应的处理程序
- 7)不同协议、不同的阻塞类型的连接都有不同的 Channel类型与之对应,常用的 Channel类型:
NioSocketChannel,异步的客户端 TCP Socket连接。
NioServerSocketChannel,异步的服务器端 TCP Socket连接。
NioDatagramChannel,异步的 UDP连接。
NioSctpChannel,异步的客户端 Sctp连接。
NioSctpServerChannel,异步的 Sctp服务器端连接,这些通道涵盖了 UDP和 TCP网络 IO以及文件IO。
6.4 Selector
- 1) Netty基于 Selector对象实现 I/O多路复用,通过 Selector一个线程可以监听多个连接的 Channel事件。
- 2) 当向一个 Selector中注册 Channel后,Selector内部的机制就可以自动不断地查询 (Select)这些注册的Channel是否有已就绪的 I/O事件(例如可读,可写,网络连接完成等),这样程序就可以很简单地使用一个线程高效地管理多个 Channel
6.5 ChannelHandler及其实现类
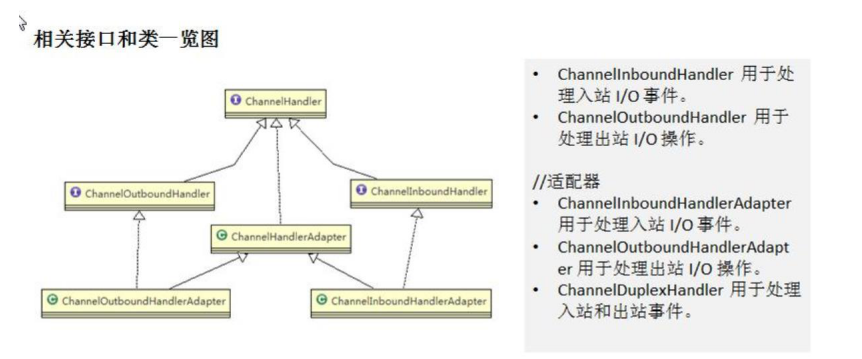
- 1) ChannelHandler是一个接口,处理 I/O事件或拦截 I/O操作,并将其转发到其 ChannelPipeline(业务处理链)
中的下一个处理程序。
- 2) ChannelHandler本身并没有提供很多方法,因为这个接口有许多的方法需要实现,方便使用期间,可以继承它
的子类
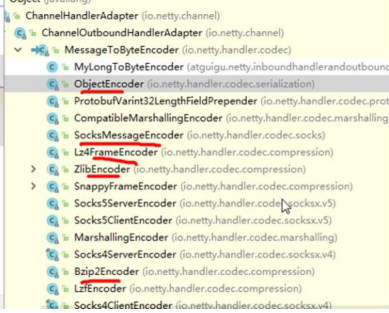
- 3) ChannelHandler及其实现类一览图(后)
- 4)我们经常需要自定义一个 Handler类去继承 ChannelInboundHandlerAdapter,然后通过重写相应方法实现业务
逻辑,我们接下来看看一般都需要重写哪些方法

6.6 Pipeline和 ChannelPipeline
ChannelPipeline是一个重点:
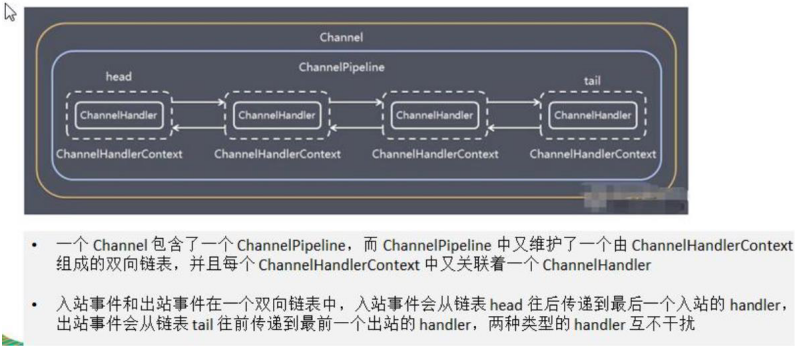
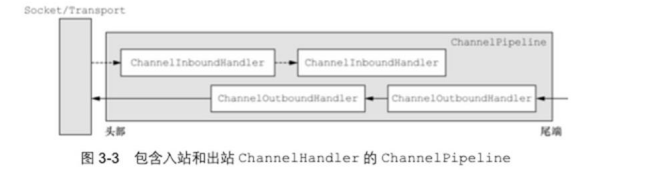
- 1) ChannelPipeline是一个 Handler的集合,它负责处理和拦截 inbound或者 outbound的事件和操作,相当于
一个贯穿 Netty的链。(也可以这样理解:ChannelPipeline是保存 ChannelHandler的 List,用于处理或拦截
Channel的入站事件和出站操作)
- 2) ChannelPipeline实现了一种高级形式的拦截过滤器模式,使用户可以完全控制事件的处理方式,以及 Channel
中各个的 ChannelHandler如何相互交互
- 3)在 Netty中每个 Channel都有且仅有一个 ChannelPipeline与之对应,它们的组成关系如下
4)常用方法
- ChannelPipeline addFirst(ChannelHandler... handlers),把一个业务处理类(handler)添加到链中的第一个位置
- ChannelPipeline addLast(ChannelHandler... handlers),把一个业务处理类(handler)添加到链中的最后一个位置
6.7 ChannelHandlerContext
- 1)保存 Channel相关的所有上下文信息,同时关联一个 ChannelHandler对象
- 2)即 ChannelHandlerContext中包含一个具体的事件处理器 ChannelHandler,同时ChannelHandlerContext中也绑定了对应的 pipeline和 Channel的信息,方便对 ChannelHandler进行调用.
- 3)常用方法

6.8 ChannelOption
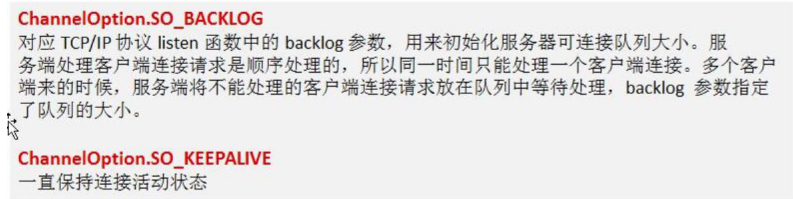
- 1) Netty在创建 Channel实例后,一般都需要设置 ChannelOption参数。
- 2) ChannelOption参数如下:
6.9 EventLoopGroup和其实现类 NioEventLoopGroup
- 1) EventLoopGroup是一组 EventLoop的抽象,Netty为了更好的利用多核 CPU资源,一般会有多个 EventLoop
同时工作,每个 EventLoop维护着一个 Selector实例。
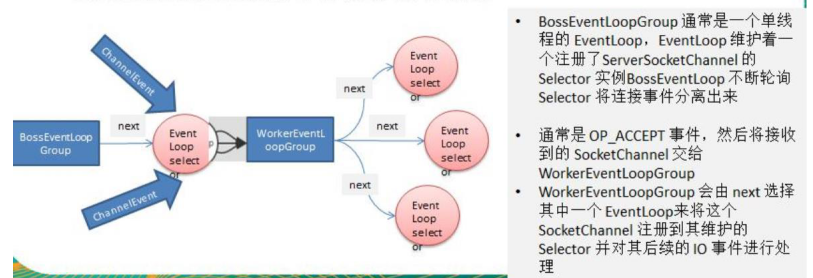
- 2) EventLoopGroup提供 next接口,可以从组里面按照一定规则获取其中一个 EventLoop来处理任务。在 Netty
服务器端编程中,我们一般都需要提供两个 EventLoopGroup,例如: BossEventLoopGroup和WorkerEventLoopGroup。
- 3)通常一个服务端口即一个 ServerSocketChannel对应一个 Selector和一个 EventLoop线程。BossEventLoop负责
接收客户端的连接并将 SocketChannel交给 WorkerEventLoopGroup来进行 IO处理,如下图所示
- 4)常用方法
public NioEventLoopGroup(),构造方法
public Future<?> shutdownGracefully(),断开连接,关闭线程
6.10 Unpooled类
- 1) Netty提供一个专门用来操作缓冲区(即 Netty的数据容器)的工具类
- 2) 常用方法如下所示

- 3)举例说明 Unpooled获取 Netty的数据容器 ByteBuf的基本使用【案例演示】
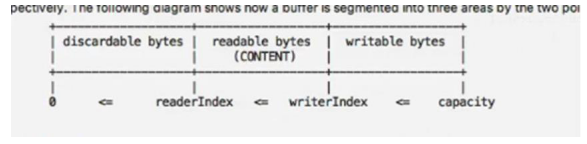
package com.atguigu.netty.buf;

import io.netty.buffer.ByteBuf;

import io.netty.buffer.Unpooled;

public class NettyByteBuf01 {

public static void main(String[] args) {

//创建一个  ByteBuf

//说明

//1.创建对象,该对象包含一个数组    arr ,是一个    byte[10]

//2.在  netty的   buffer中,不需要使用  flip进行反转

//底层维护了  readerindex和   writerIndex

//3.通过   readerindex和     writerIndex和      capacity,将  buffer分成三个区域

// 0---readerindex已经读取的区域

// readerindex---writerIndex ,可读的区域

// writerIndex -- capacity,可写的区域

ByteBuf buffer = Unpooled.buffer(10);

for(int i = 0; i < 10; i++) {

buffer.writeByte(i);

}

System.out.println("capacity=" + buffer.capacity());//10

//输出

//

//

//

for(int i = 0; i<buffer.capacity(); i++) {

System.out.println(buffer.getByte(i));

}

for(int i = 0; i < buffer.capacity(); i++) {

System.out.println(buffer.readByte());

}

System.out.println("执行完毕");

}

}
案例 2
package com.atguigu.netty.buf;

import io.netty.buffer.ByteBuf;

import io.netty.buffer.Unpooled;

import java.nio.charset.Charset;

public class NettyByteBuf02 {
public static void main(String[] args) {
//创建  ByteBuf
ByteBuf byteBuf = Unpooled.copiedBuffer("hello,world!", Charset.forName("utf-8"));
//使用相关的方法
if(byteBuf.hasArray()) { // true
byte[] content = byteBuf.array();
//将  content转成字符串
System.out.println(new String(content, Charset.forName("utf-8")));
System.out.println("byteBuf=" + byteBuf);
System.out.println(byteBuf.arrayOffset()); // 0
System.out.println(byteBuf.readerIndex()); // 0
System.out.println(byteBuf.writerIndex()); // 12
System.out.println(byteBuf.capacity()); // 36
//System.out.println(byteBuf.readByte()); //
System.out.println(byteBuf.getByte(0)); // 104
int len = byteBuf.readableBytes(); //可读的字节数   12
System.out.println("len=" + len);
//使用 for取出各个字节
for(int i = 0; i < len; i++) {
System.out.println((char) byteBuf.getByte(i));
}
//按照某个范围读取
System.out.println(byteBuf.getCharSequence(0, 4, Charset.forName("utf-8")));
System.out.println(byteBuf.getCharSequence(4, 6, Charset.forName("utf-8")));
}
}
}
6.11 Netty应用实例-群聊系统
实例要求:
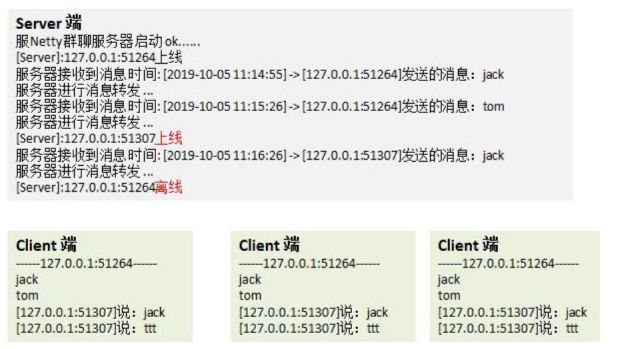
- 1)编写一个 Netty群聊系统,实现服务器端和客户端之间的数据简单通讯(非阻塞)
- 2)实现多人群聊
- 3)服务器端:可以监测用户上线,离线,并实现消息转发功能
- 4)客户端:通过 channel可以无阻塞发送消息给其它所有用户,同时可以接受其它用户发送的消息(有服务器转发得到)
- 5)目的:进一步理解 Netty非阻塞网络编程机制
- 6)看老师代码演示
代码如下:
package com.atguigu.netty.groupchat;

import io.netty.bootstrap.ServerBootstrap;

import io.netty.channel.*;

import io.netty.channel.nio.NioEventLoopGroup;

import io.netty.channel.socket.SocketChannel;

import io.netty.channel.socket.nio.NioServerSocketChannel;

import io.netty.handler.codec.string.StringDecoder;

import io.netty.handler.codec.string.StringEncoder;

public class GroupChatServer {

private int port; //监听端口

public GroupChatServer(int port) {

this.port = port;

}

//编写 run方法,处理客户端的请求

public void run() throws   Exception{

//创建两个线程组

EventLoopGroup bossGroup = new NioEventLoopGroup(1);

EventLoopGroup workerGroup = new NioEventLoopGroup(); //8个  NioEventLoop

try {

ServerBootstrap b = new ServerBootstrap();

b.group(bossGroup, workerGroup)

.channel(NioServerSocketChannel.class)

.option(ChannelOption.SO_BACKLOG, 128)

.childOption(ChannelOption.SO_KEEPALIVE, true)

.childHandler(new ChannelInitializer<SocketChannel>() {

@Override

protected void initChannel(SocketChannel ch) throws Exception {

//获取  pipeline

ChannelPipeline pipeline = ch.pipeline();

//向 pipeline加入解码器

pipeline.addLast("decoder", new StringDecoder());

//向 pipeline加入编码器

pipeline.addLast("encoder", new StringEncoder());

//加入自己的业务处理  handler

pipeline.addLast(new GroupChatServerHandler());

}

});

System.out.println("netty服务器启动");

ChannelFuture channelFuture = b.bind(port).sync();

//监听关闭

channelFuture.channel().closeFuture().sync();

}finally {

bossGroup.shutdownGracefully();

workerGroup.shutdownGracefully();

}

}

public static void main(String[] args) throws Exception {

new GroupChatServer(7000).run();

}

}
package com.atguigu.netty.groupchat;

import io.netty.channel.Channel;

import io.netty.channel.ChannelHandlerContext;

import io.netty.channel.SimpleChannelInboundHandler;

import io.netty.channel.group.ChannelGroup;

import io.netty.channel.group.DefaultChannelGroup;

import io.netty.util.concurrent.GlobalEventExecutor;

import java.text.SimpleDateFormat;

import java.util.ArrayList;

import java.util.HashMap;

import java.util.List;

import java.util.Map;

public class GroupChatServerHandler extends SimpleChannelInboundHandler<String> {

//public static List<Channel> channels = new ArrayList<Channel>();

//使用一个 hashmap管理

//public static Map<String, Channel> channels = new HashMap<String,Channel>();

//定义一个 channle组,管理所有的   channel

//GlobalEventExecutor.INSTANCE)是全局的事件执行器,是一个单例

private static ChannelGroup   channelGroup = new DefaultChannelGroup(GlobalEventExecutor.INSTANCE);

SimpleDateFormat sdf = new SimpleDateFormat("yyyy-MM-dd HH:mm:ss");

//handlerAdded表示连接建立,一旦连接,第一个被执行

//将当前 channel加入到     channelGroup

@Override

public void handlerAdded(ChannelHandlerContext ctx) throws Exception {

Channel channel = ctx.channel();

//将该客户加入聊天的信息推送给其它在线的客户端

/*

该方法会将  channelGroup中所有的  channel遍历,并发送消息,

我们不需要自己遍历

*/

channelGroup.writeAndFlush("[客户端    ]"  + channel.remoteAddress()  +  "加入聊天       "  + sdf.format(new

java.util.Date()) + " \n");

channelGroup.add(channel);

}

//断开连接,将  xx客户离开信息推送给当前在线的客户

@Override

public void handlerRemoved(ChannelHandlerContext ctx) throws Exception {

Channel channel = ctx.channel();

channelGroup.writeAndFlush("[客户端]" + channel.remoteAddress() + "离开了\n");

System.out.println("channelGroup size" + channelGroup.size());

}

//表示 channel处于活动状态,提示     xx上线

@Override

public void channelActive(ChannelHandlerContext ctx) throws Exception {

System.out.println(ctx.channel().remoteAddress() + "上线了~");

}

//表示 channel处于不活动状态,提示     xx离线了

@Override

public void channelInactive(ChannelHandlerContext ctx) throws Exception {

System.out.println(ctx.channel().remoteAddress() + "离线了~");

}

//读取数据

@Override

protected void channelRead0(ChannelHandlerContext ctx, String msg) throws Exception {

//获取到当前  channel

Channel channel = ctx.channel();

//这时我们遍历 channelGroup,根据不同的情况,回送不同的消息

channelGroup.forEach(ch -> {

if(channel != ch) { //不是当前的 channel,转发消息

ch.writeAndFlush("[客户]" + channel.remoteAddress() + "发送了消息"  + msg + "\n");

}else {//回显自己发送的消息给自己

ch.writeAndFlush("[自己]发送了消息" + msg + "\n");

}

});

}

@Override

public void exceptionCaught(ChannelHandlerContext ctx, Throwable cause) throws Exception {

//关闭通道

ctx.close();

}

}
package com.atguigu.netty.groupchat;

import io.netty.bootstrap.Bootstrap;

import io.netty.channel.*;

import io.netty.channel.nio.NioEventLoopGroup;

import io.netty.channel.socket.SocketChannel;

import io.netty.channel.socket.nio.NioSocketChannel;

import io.netty.handler.codec.string.StringDecoder;

import io.netty.handler.codec.string.StringEncoder;

import java.util.Scanner;

public class GroupChatClient {

//属性

private final String host;

private final int port;

public GroupChatClient(String host, int port) {

this.host = host;

this.port = port;

}

public void run() throws Exception{

EventLoopGroup group = new NioEventLoopGroup();

try {

Bootstrap bootstrap = new Bootstrap()

.group(group)

.channel(NioSocketChannel.class)

.handler(new ChannelInitializer<SocketChannel>() {

@Override

protected void initChannel(SocketChannel ch) throws Exception {

//得到  pipeline

ChannelPipeline pipeline = ch.pipeline();

//加入相关  handler

pipeline.addLast("decoder", new StringDecoder());

pipeline.addLast("encoder", new StringEncoder());

//加入自定义的  handler

pipeline.addLast(new GroupChatClientHandler());

}

});

ChannelFuture channelFuture = bootstrap.connect(host, port).sync();

//得到  channel

Channel channel = channelFuture.channel();

System.out.println("-------" + channel.localAddress()+ "--------");

//客户端需要输入信息,创建一个扫描器

Scanner scanner = new Scanner(System.in);

while (scanner.hasNextLine()) {

String msg = scanner.nextLine();

//通过 channel发送到服务器端

channel.writeAndFlush(msg + "\r\n");

}

}finally {

group.shutdownGracefully();

}

}

public static void main(String[] args) throws Exception {

new GroupChatClient("127.0.0.1", 7000).run();

}

}
package com.atguigu.netty.groupchat;

import io.netty.channel.ChannelHandlerContext;

import io.netty.channel.SimpleChannelInboundHandler;

public class GroupChatClientHandler extends SimpleChannelInboundHandler<String> {

@Override

protected void channelRead0(ChannelHandlerContext ctx, String msg) throws Exception {

System.out.println(msg.trim());

}

}
6.12 Netty心跳检测机制案例
实例要求:
- 1)编写一个 Netty心跳检测机制案例,当服务器超过 3秒没有读时,就提示读空闲
- 2)当服务器超过 5秒没有写操作时,就提示写空闲
- 3)实现当服务器超过 7秒没有读或者写操作时,就提示读写空闲
- 4)代码如下:
//MyServer.java
package com.atguigu.netty.heartbeat;
import io.netty.bootstrap.ServerBootstrap;
import io.netty.channel.ChannelFuture;
import io.netty.channel.ChannelInitializer;
import io.netty.channel.ChannelPipeline;
import io.netty.channel.EventLoopGroup;
import io.netty.channel.nio.NioEventLoopGroup;
import io.netty.channel.socket.SocketChannel;
import io.netty.channel.socket.nio.NioServerSocketChannel;
import io.netty.handler.logging.LogLevel;
import io.netty.handler.logging.LoggingHandler;
import io.netty.handler.timeout.IdleStateHandler;
import java.util.concurrent.TimeUnit;
public class MyServer {
public static void main(String[] args) throws Exception{
//创建两个线程组
EventLoopGroup bossGroup = new NioEventLoopGroup(1);
EventLoopGroup workerGroup = new NioEventLoopGroup(); //8个  NioEventLoop
try {
ServerBootstrap serverBootstrap = new ServerBootstrap();
serverBootstrap.group(bossGroup, workerGroup);
serverBootstrap.channel(NioServerSocketChannel.class);
serverBootstrap.handler(new LoggingHandler(LogLevel.INFO));
serverBootstrap.childHandler(new ChannelInitializer<SocketChannel>() {
@Override
protected void initChannel(SocketChannel ch) throws Exception {
ChannelPipeline pipeline = ch.pipeline();
//加入一个 netty提供   IdleStateHandler
/*
说明
1. IdleStateHandler是  netty提供的处理空闲状态的处理器
2. long readerIdleTime :表示多长时间没有读,就会发送一个心跳检测包检测是否连接
3. long writerIdleTime :表示多长时间没有写,就会发送一个心跳检测包检测是否连接
4. long allIdleTime :表示多长时间没有读写,就会发送一个心跳检测包检测是否连接
5.文档说明

triggers an {@link IdleStateEvent} when a {@link Channel} has not performed
* read, write, or both operation for a while.
*

6.当   IdleStateEvent触发后    ,就会传递给管道的下一个    handler去处理

通过调用(触发)下一个 handler的    userEventTiggered ,在该方法中去处理   IdleStateEvent(读空闲,写空闲,读写空闲)

*/

pipeline.addLast(new IdleStateHandler(13,5,2, TimeUnit.SECONDS));
//加入一个对空闲检测进一步处理的 handler(自定义)
pipeline.addLast(new MyServerHandler());

}

});

//启动服务器
ChannelFuture channelFuture = serverBootstrap.bind(7000).sync();
channelFuture.channel().closeFuture().sync();
}finally {
bossGroup.shutdownGracefully();
workerGroup.shutdownGracefully();
}
}

}
MyServerHandler.java
package com.atguigu.netty.heartbeat;
import io.netty.channel.ChannelHandlerContext;
import io.netty.channel.ChannelInboundHandlerAdapter;
import io.netty.handler.timeout.IdleStateEvent;
public class MyServerHandler extends ChannelInboundHandlerAdapter {
/**
*
* @param ctx上下文
* @param evt事件
* @throws Exception
*/
@Override
public void userEventTriggered(ChannelHandlerContext ctx, Object evt) throws Exception {
if(evt instanceof IdleStateEvent) {
//将   evt向下转型    IdleStateEvent
IdleStateEvent event = (IdleStateEvent) evt;
String eventType = null;
switch (event.state()) {
case READER_IDLE:
eventType = "读空闲";
break;
case WRITER_IDLE:
eventType = "写空闲";
break;
case ALL_IDLE:
eventType = "读写空闲";
break;
}
System.out.println(ctx.channel().remoteAddress() + "--超时时间--" + eventType);
System.out.println("服务器做相应处理..");
//如果发生空闲,我们关闭通道
// ctx.channel().close();
}
}
}
6.13 Netty通过 WebSocket编程实现服务器和客户端长连接
实例要求:
1) Http协议是无状态的,浏览器和服务器间的请求响应一次,下一次会重新创建连接.
2)要求:实现基于 webSocket的长连接的全双工的交互
3)改变 Http协议多次请求的约束,实现长连接了,服务器可以发送消息给浏览器
4)客户端浏览器和服务器端会相互感知,比如服务器关闭了,浏览器会感知,同样浏览器关闭了,服务器会感知
5)运行界面

6)代码演示
package com.atguigu.netty.websocket;

import com.atguigu.netty.heartbeat.MyServerHandler;

import io.netty.bootstrap.ServerBootstrap;

import io.netty.channel.ChannelFuture;

import io.netty.channel.ChannelInitializer;

import io.netty.channel.ChannelPipeline;

import io.netty.channel.EventLoopGroup;

import io.netty.channel.nio.NioEventLoopGroup;

import io.netty.channel.socket.SocketChannel;

import io.netty.channel.socket.nio.NioServerSocketChannel;

import io.netty.handler.codec.http.HttpObjectAggregator;

import io.netty.handler.codec.http.HttpServerCodec;

import io.netty.handler.codec.http.websocketx.WebSocketServerProtocolHandler;

import io.netty.handler.logging.LogLevel;

import io.netty.handler.logging.LoggingHandler;

import io.netty.handler.stream.ChunkedWriteHandler;

import io.netty.handler.timeout.IdleStateHandler;

import java.util.concurrent.TimeUnit;

public class MyServer {

public static void main(String[] args) throws Exception{

//创建两个线程组

EventLoopGroup bossGroup = new NioEventLoopGroup(1);

EventLoopGroup workerGroup = new NioEventLoopGroup(); //8个  NioEventLoop

try {

ServerBootstrap serverBootstrap = new ServerBootstrap();

serverBootstrap.group(bossGroup, workerGroup);

serverBootstrap.channel(NioServerSocketChannel.class);

serverBootstrap.handler(new LoggingHandler(LogLevel.INFO));

serverBootstrap.childHandler(new ChannelInitializer<SocketChannel>() {

@Override

protected void initChannel(SocketChannel ch) throws Exception {

ChannelPipeline pipeline = ch.pipeline();

//因为基于 http协议,使用 http的编码和解码器

pipeline.addLast(new HttpServerCodec());

//是以块方式写,添加 ChunkedWriteHandler处理器

pipeline.addLast(new ChunkedWriteHandler());

/*

说明

1. http数据在传输过程中是分段, HttpObjectAggregator,就是可以将多个段聚合

2.这就就是为什么,当浏览器发送大量数据时,就会发出多次  http请求

*/

pipeline.addLast(new HttpObjectAggregator(8192));

/*

说明

1.对应  websocket,它的数据是以帧(frame)形式传递

2.可以看到  WebSocketFrame下面有六个子类

3.浏览器请求时   ws://localhost:7000/hello表示请求的    uri

4. WebSocketServerProtocolHandler核心功能是将   http协议升级为   ws协议  ,保持长连接

5.是通过一个状态码     101

*/

pipeline.addLast(new WebSocketServerProtocolHandler("/hello2"));

//自定义的 handler,处理业务逻辑

pipeline.addLast(new MyTextWebSocketFrameHandler());

}

});

//启动服务器

ChannelFuture channelFuture = serverBootstrap.bind(7000).sync();

channelFuture.channel().closeFuture().sync();

}finally {

bossGroup.shutdownGracefully();

workerGroup.shutdownGracefully();

}

}

}
package com.atguigu.netty.websocket;

import io.netty.channel.ChannelHandlerContext;

import io.netty.channel.SimpleChannelInboundHandler;

import io.netty.handler.codec.http.websocketx.TextWebSocketFrame;

import java.time.LocalDateTime;

//这里  TextWebSocketFrame类型,表示一个文本帧(frame)

public class MyTextWebSocketFrameHandler extends SimpleChannelInboundHandler<TextWebSocketFrame>{

@Override

protected void channelRead0(ChannelHandlerContext ctx, TextWebSocketFrame msg) throws Exception {

System.out.println("服务器收到消息  " + msg.text());

//回复消息

ctx.channel().writeAndFlush(new  TextWebSocketFrame("服务器时间      "  +  LocalDateTime.now()  +  "  "  +

msg.text()));

}

//当 web客户端连接后,触发方法

@Override

public void handlerAdded(ChannelHandlerContext ctx) throws Exception {

//id表示唯一的值,LongText是唯一的     ShortText不是唯一

System.out.println("handlerAdded被调用"  + ctx.channel().id().asLongText());

System.out.println("handlerAdded被调用"  + ctx.channel().id().asShortText());

}

@Override

public void handlerRemoved(ChannelHandlerContext ctx) throws Exception {

System.out.println("handlerRemoved被调用"  + ctx.channel().id().asLongText());

}

@Override

public void exceptionCaught(ChannelHandlerContext ctx, Throwable cause) throws Exception {

System.out.println("异常发生  " + cause.getMessage());

ctx.close(); //关闭连接

}

}
hello.html
<!DOCTYPE html>
<html lang="en">
<head>
<meta charset="UTF-8">
<title>Title</title>
</head>
<body>
<script>
var socket;
//判断当前浏览器是否支持  websocket

if(window.WebSocket) {
//go on
socket = new WebSocket("ws://localhost:7000/hello2");
//相当于 channelReado, ev收到服务器端回送的消息
socket.onmessage = function (ev) {
var rt = document.getElementById("responseText");
rt.value = rt.value + "\n" + ev.data;

}

//相当于连接开启(感知到连接开启)
socket.onopen = function (ev) {
var rt = document.getElementById("responseText");
rt.value = "连接开启了.."
}

//相当于连接关闭(感知到连接关闭)
socket.onclose = function (ev) {
var rt = document.getElementById("responseText");
rt.value = rt.value + "\n" + "连接关闭了.."
}
} else {
alert("当前浏览器不支持  websocket")
}
//发送消息到服务器
function send(message) {
if(!window.socket) { //先判断 socket是否创建好
return;
}
if(socket.readyState == WebSocket.OPEN) {
//通过 socket发送消息
socket.send(message)
} else {
alert("连接没有开启");
}

}
</script>
<form onsubmit="return false">
<textarea name="message" style="height: 300px; width: 300px"></textarea>
<input type="button" value="发生消息" onclick="send(this.form.message.value)">
<textarea id="responseText" style="height: 300px; width: 300px"></textarea>
<input type="button" value="清空内容" onclick="document.getElementById('responseText').value=''">
</form>
</body>
</html>
第 7章 Google Protobuf
7.1编码和解码的基本介绍
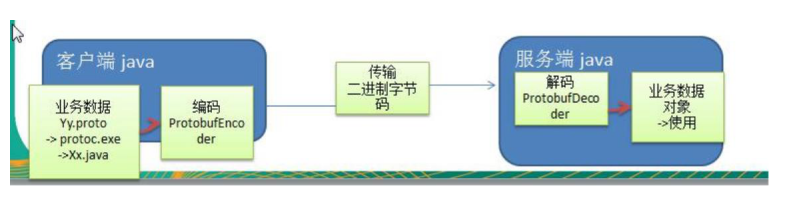
- 1)编写网络应用程序时,因为数据在网络中传输的都是二进制字节码数据,在发送数据时就需要编码,接收数据时就需要解码 [示意图]
- 2) codec(编解码器)的组成部分有两个:decoder(解码器)和 encoder(编码器)。encoder负责把业务数据转换成字节码数据,decoder负责把字节码数据转换成业务数据

7.2 Netty本身的编码解码的机制和问题分析
- 1) Netty自身提供了一些 codec(编解码器)
- 2) Netty提供的编码器
StringEncoder,对字符串数据进行编码
ObjectEncoder,对 Java对象进行编码
...
- 3) Netty提供的解码器
StringDecoder,对字符串数据进行解码
ObjectDecoder,对 Java对象进行解码
...
- 4) Netty本身自带的 ObjectDecoder和 ObjectEncoder可以用来实现 POJO对象或各种业务对象的编码和解码,底层使用的仍是 Java序列化技术 ,而 Java序列化技术本身效率就不高,存在如下问题
无法跨语言
序列化后的体积太大,是二进制编码的 5倍多。
序列化性能太低
5) =>引出新的解决方案 [Google的 Protobuf]
7.3 Protobuf
- 1) Protobuf基本介绍和使用示意图
- 2) Protobuf是 Google发布的开源项目,全称 Google Protocol Buffers,是一种轻便高效的结构化数据存储格式,
可以用于结构化数据串行化,或者说序列化。它很适合做数据存储或 RPC[远程过程调用 remote procedure call ]数据交换格式。
目前很多公司 http+json
tcp+protobuf
- 3)参考文档 : https://developers.google.com/protocol-buffers/docs/proto
- 4) Protobuf是以 message的方式来管理数据的语言指南
- 5)支持跨平台、跨语言,即[客户端和服务器端可以是不同的语言编写的](支持目前绝大多数语言,例如 C++、C#、Java、python等)
- 6)高性能,高可靠性
- 7)使用 protobuf编译器能自动生成代码,Protobuf是将类的定义使用.proto文件进行描述。说明,在 idea中编写 .proto文件时,会自动提示是否下载 .ptotot编写插件.可以让语法高亮。
- 8)然后通过 protoc.exe编译器根据.proto自动生成.java文件
- 9) protobuf使用示意图
7.4 Protobuf快速入门实例
编写程序,使用 Protobuf完成如下功能
- 1)客户端可以发送一个 Student PoJo对象到服务器 (通过 Protobuf编码)
- 2)服务端能接收 Student PoJo对象,并显示信息(通过 Protobuf解码)
- 3) 具体看老师演示步骤
Student.proto

syntax = "proto3"; //版本

option java_outer_classname = "StudentPOJO";//生成的外部类名,同时也是文件名

//protobuf使用  message管理数据

message Student

{

//会在 StudentPOJO外部类生成一个内部类    Student,他是真正发送的  POJO对象

int32 id = 1; // Student类中有一个属性名字为      id类型为   int32(protobuf类型) 1表示属性序号,不是值

string name = 2;

}
编译
protoc.exe --java_out=. Student.proto
将生成的 StudentPOJO放入到项目使用
代码
codec.zip
7.5 Protobuf快速入门实例 2
- 1)编写程序,使用 Protobuf完成如下功能
- 2)客户端可以随机发送 Student PoJo/ Worker PoJo对象到服务器 (通过 Protobuf编码)
- 3)服务端能接收 Student PoJo/ Worker PoJo对象(需要判断是哪种类型),并显示信息(通过 Protobuf解码)
- 4) 具体看老师演示步骤
Student.proto

syntax = "proto3";

option optimize_for = SPEED; //加快解析

option java_package="com.atguigu.netty.codec2";

//指定生成到哪个包下

option java_outer_classname="MyDataInfo"; //外部类名,文件名

//protobuf可以使用  message管理其他的    message

message MyMessage {

//定义一个枚举类型

enum DataType {

StudentType = 0; //在 proto3要求  enum的编号从  0开始

WorkerType = 1;

}

//用 data_type来标识传的是哪一个枚举类型

DataType data_type = 1;

//表示每次枚举类型最多只能出现其中的一个,节省空间

oneof dataBody {

Student student = 2;

Worker worker = 3;

}

}

message Student {

int32 id = 1;//Student类的属性

string name = 2; //

}

message Worker {

string name=1;

int32 age=2;

}
第 8章 Netty编解码器和 handler的调用机制
8.1基本说明
- 1) netty的组件设计:Netty的主要组件有 Channel、EventLoop、ChannelFuture、ChannelHandler、ChannelPipe等
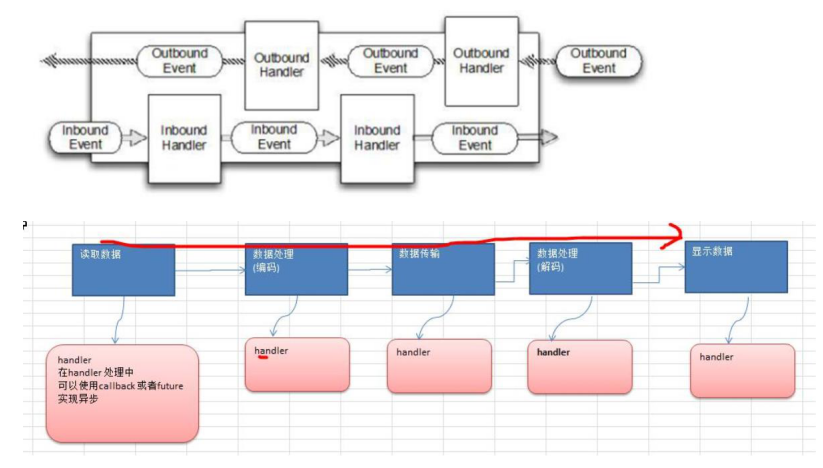
- 2) ChannelHandler充当了处理入站和出站数据的应用程序逻辑的容器。例如,实现 ChannelInboundHandler接口(或ChannelInboundHandlerAdapter),你就可以接收入站事件和数据,这些数据会被业务逻辑处理。当要给客户端发送响应时,也可以从 ChannelInboundHandler冲刷数据。业务逻辑通常写在一个或者多个ChannelInboundHandler中。ChannelOutboundHandler原理一样,只不过它是用来处理出站数据的
- 3) ChannelPipeline提供了 ChannelHandler链的容器。以客户端应用程序为例,如果事件的运动方向是从客户端到 服务端的,那么我们称这些事件为出站的,即客户端发送给服务端的数据会通过pipeline 中的一系列ChannelOutboundHandler,并被这些 Handler处理,反之则称为入站的
8.2编码解码器
1)当 Netty发送或者接受一个消息的时候,就将会发生一次数据转换。入站消息会被解码:从字节转换为另一种
格式(比如 java对象);如果是出站消息,它会被编码成字节。
2) Netty提供一系列实用的编解码器,他们都实现了 ChannelInboundHadnler或者 ChannelOutboundHandler接口。在这些类中,channelRead方法已经被重写了。以入站为例,对于每个从入站 Channel读取的消息,这个方法会被调用。随后,它将调用由解码器所提供的 decode()方法进行解码,并将已经解码的字节转发给 ChannelPipeline中的下一个 ChannelInboundHandler。
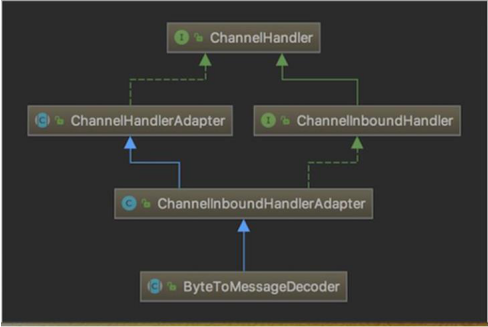
8.3解码器-ByteToMessageDecoder
- 1)关系继承图
- 2)由于不可能知道远程节点是否会一次性发送一个完整的信息, tcp有可能出现粘包拆包的问题,这个类会对入
站数据进行缓冲,直到它准备好被处理.
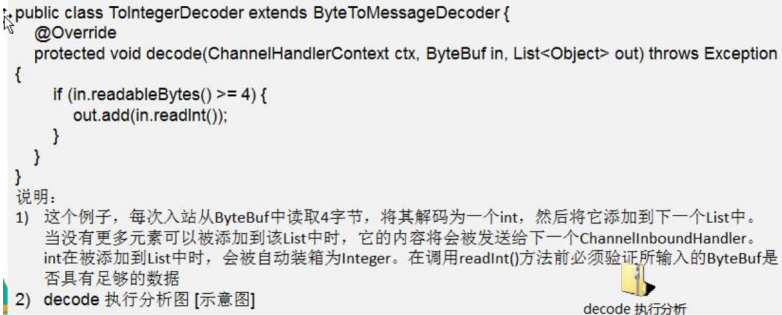
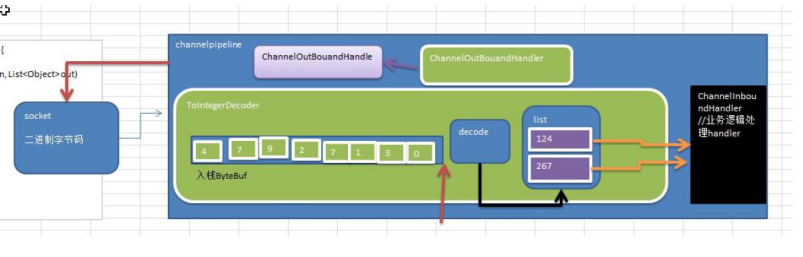
- 3)一个关于 ByteToMessageDecoder实例分析
8.4 Netty的 handler链的调用机制
实例要求:
- 1)使用自定义的编码器和解码器来说明 Netty的 handler调用机制
客户端发送 long ->服务器
服务端发送 long ->客户端
- 2)案例演示


- 3)结论
不论解码器 handler还是编码器 handler即接收的消息类型必须与待处理的消息类型一致,否则该 handler不会被执行
在解码器进行数据解码时,需要判断缓存区(ByteBuf)的数据是否足够,否则接收到的结果会期望结果可能不一致
8.5解码器-ReplayingDecoder
- 1) public abstract class ReplayingDecoder<S> extends ByteToMessageDecoder
- 2) ReplayingDecoder扩展了 ByteToMessageDecoder类,使用这个类,我们不必调用 readableBytes()方法。参数 S指定了用户状态管理的类型,其中 Void代表不需要状态管理
- 3)应用实例:使用 ReplayingDecoder编写解码器,对前面的案例进行简化 [案例演示]
package com.atguigu.netty.inboundhandlerandoutboundhandler;
import io.netty.buffer.ByteBuf;
import io.netty.channel.ChannelHandlerContext;
import io.netty.handler.codec.ReplayingDecoder;
import java.util.List;
public class MyByteToLongDecoder2 extends ReplayingDecoder<Void> {
@Override
protected void decode(ChannelHandlerContext ctx, ByteBuf in, List<Object> out) throws Exception {
System.out.println("MyByteToLongDecoder2被调用");
//在  ReplayingDecoder不需要判断数据是否足够读取,内部会进行处理判断
out.add(in.readLong());

}

}
- 4) ReplayingDecoder使用方便,但它也有一些局限性:
1.并不是所有的ByteBuf操作都被支持,如果调用了一个不被支持的方法,将会抛出一个UnsupportedOperationException。
2. ReplayingDecoder在某些情况下可能稍慢于 ByteToMessageDecoder,例如网络缓慢并且消息格式复杂时,
消息会被拆成了多个碎片,速度变慢
8.6其它编解码器
8.6.1其它解码器
1) LineBasedFrameDecoder:这个类在 Netty内部也有使用,它使用行尾控制字符( \n或者\r\n)作为分隔符来解析数据。
2) DelimiterBasedFrameDecoder:使用自定义的特殊字符作为消息的分隔符。
3) HttpObjectDecoder:一个 HTTP数据的解码器
4) LengthFieldBasedFrameDecoder:通过指定长度来标识整包消息,这样就可以自动的处理黏包和半包消息。
8.6.2其它编码器
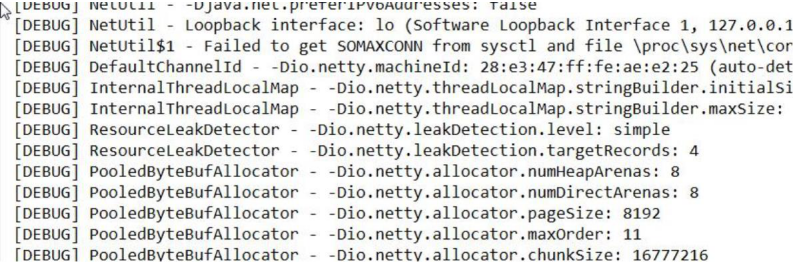
8.7 Log4j整合到 Netty
- 1)在 Maven中添加对 Log4j的依赖在 pom.xml
<dependency>

<groupId>log4j</groupId>

<artifactId>log4j</artifactId>

<version>1.2.17</version>

</dependency>

<dependency>

<groupId>org.slf4j</groupId>

<artifactId>slf4j-api</artifactId>

<version>1.7.25</version>

</dependency>

<dependency>

<groupId>org.slf4j</groupId>

<artifactId>slf4j-log4j12</artifactId>

<version>1.7.25</version>

<scope>test</scope>

</dependency>

<dependency>

<groupId>org.slf4j</groupId>

<artifactId>slf4j-simple</artifactId>

<version>1.7.25</version>

<scope>test</scope>

</dependency>
- 2)配置 Log4j ,在 resources/log4j.properties
log4j.rootLogger=DEBUG, stdout

log4j.appender.stdout=org.apache.log4j.ConsoleAppender

log4j.appender.stdout.layout=org.apache.log4j.PatternLayout

log4j.appender.stdout.layout.ConversionPattern=[%p] %C{1} - %m%n
- 3)演示整合
第 9章 TCP粘包和拆包及解决方案
9.1 TCP粘包和拆包基本介绍
- 1) TCP是面向连接的,面向流的,提供高可靠性服务。收发两端(客户端和服务器端)都要有一一成对的 socket,
因此,发送端为了将多个发给接收端的包,更有效的发给对方,使用了优化方法(Nagle算法),将多次间隔
较小且数据量小的数据,合并成一个大的数据块,然后进行封包。这样做虽然提高了效率,但是接收端就难于
分辨出完整的数据包了,因为面向流的通信是无消息保护边界的
- 2)由于 TCP无消息保护边界,需要在接收端处理消息边界问题,也就是我们所说的粘包、拆包问题,看一张图
- 3)示意图 TCP粘包、拆包图解
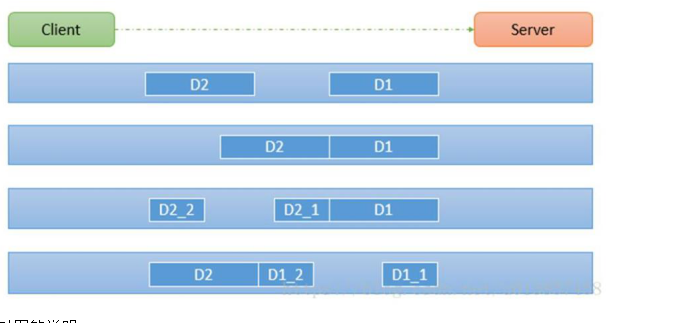
对图的说明:
假设客户端分别发送了两个数据包 D1和 D2给服务端,由于服务端一次读取到字节数是不确定的,故可能存在以
下四种情况:
- 1)服务端分两次读取到了两个独立的数据包,分别是 D1和 D2,没有粘包和拆包
- 2)服务端一次接受到了两个数据包,D1和 D2粘合在一起,称之为 TCP粘包
- 3)服务端分两次读取到了数据包,第一次读取到了完整的 D1包和 D2包的部分内容,第二次读取到了 D2包的剩余内容,这称之为 TCP拆包
- 4)服务端分两次读取到了数据包,第一次读取到了 D1包的部分内容 D1_1,第二次读取到了 D1包的剩余部
分内容 D1_2和完整的 D2包。
9.2 TCP粘包和拆包现象实例
在编写 Netty程序时,如果没有做处理,就会发生粘包和拆包的问题
看一个具体的实例:
核心代码
MyClientHandler.java
package com.atguigu.netty.tcp;

import io.netty.buffer.ByteBuf;

import io.netty.buffer.Unpooled;

import io.netty.channel.ChannelHandlerContext;

import io.netty.channel.SimpleChannelInboundHandler;

import java.nio.charset.Charset;

public class MyClientHandler extends SimpleChannelInboundHandler<ByteBuf> {

private int count;

@Override

public void channelActive(ChannelHandlerContext ctx) throws Exception {

//使用客户端发送 10条数据  hello,server编号

for(int i= 0; i< 10; ++i) {

ByteBuf buffer = Unpooled.copiedBuffer("hello,server " + i, Charset.forName("utf-8"));

ctx.writeAndFlush(buffer);

}

}

@Override

protected void channelRead0(ChannelHandlerContext ctx, ByteBuf msg) throws Exception {

byte[] buffer = new byte[msg.readableBytes()];

msg.readBytes(buffer);

String message = new String(buffer, Charset.forName("utf-8"));

System.out.println("客户端接收到消息=" + message);

System.out.println("客户端接收消息数量=" + (++this.count));

}

@Override

public void exceptionCaught(ChannelHandlerContext ctx, Throwable cause) throws Exception {

cause.printStackTrace();

ctx.close();

}

}
MyServerHandler.java
package com.atguigu.netty.tcp;


import io.netty.buffer.ByteBuf;


import io.netty.buffer.Unpooled;


import io.netty.channel.ChannelHandlerContext;


import io.netty.channel.SimpleChannelInboundHandler;


import java.nio.charset.Charset;


import java.util.UUID;


public class MyServerHandler extends SimpleChannelInboundHandler<ByteBuf>{


private int count;


@Override


public void exceptionCaught(ChannelHandlerContext ctx, Throwable cause) throws Exception {


//cause.printStackTrace();


ctx.close();


}


@Override


protected void channelRead0(ChannelHandlerContext ctx, ByteBuf msg) throws Exception {
byte[] buffer = new byte[msg.readableBytes()];
msg.readBytes(buffer);
//将 buffer转成字符串
String message = new String(buffer, Charset.forName("utf-8"));
System.out.println("服务器接收到数据  " + message);
System.out.println("服务器接收到消息量=" + (++this.count));
//服务器回送数据给客户端,回送一个随机  id ,
ByteBuf responseByteBuf=Unpooled.copiedBuffer(UUID.randomUUID().toSring()+"",Charset.forName("utf-8"));
ctx.writeAndFlush(responseByteBuf);

}

}
9.3 TCP粘包和拆包解决方案
1)使用自定义协议 +编解码器来解决
2)关键就是要解决服务器端每次读取数据长度的问题 ,这个问题解决,就不会出现服务器多读或少读数据的问
题,从而避免的 TCP粘包、拆包。
9.4看一个具体的实例:
- 1)要求客户端发送 5个 Message对象,客户端每次发送一个 Message对象
- 2)服务器端每次接收一个 Message,分 5次进行解码,每读取到一个 Message ,会回复一个 Message 对象给客户端.
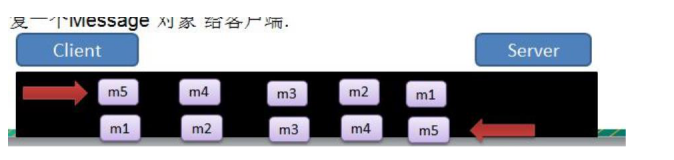
- 3)代码演示
核心
package com.atguigu.netty.protocoltcp;
//协议包
public class MessageProtocol {
private int len; //关键
private byte[] content;
public int getLen() {
return len;
}
public void setLen(int len) {
this.len = len;
}
public byte[] getContent() {
return content;
}
public void setContent(byte[] content) {
this.content = content;
}
}
package com.atguigu.netty.protocoltcp;

import io.netty.buffer.ByteBuf;

import io.netty.buffer.Unpooled;

import io.netty.channel.ChannelHandlerContext;

import io.netty.channel.SimpleChannelInboundHandler;

import java.nio.charset.Charset;

public class MyClientHandler extends SimpleChannelInboundHandler<MessageProtocol> {

private int count;

@Override

public void channelActive(ChannelHandlerContext ctx) throws Exception {

//使用客户端发送 10条数据  "今天天气冷,吃火锅"编号

for(int i = 0; i< 5; i++) {

String mes = "今天天气冷,吃火锅";

byte[] content = mes.getBytes(Charset.forName("utf-8"));

int length = mes.getBytes(Charset.forName("utf-8")).length;

//创建协议包对象

MessageProtocol messageProtocol = new MessageProtocol();

messageProtocol.setLen(length);

messageProtocol.setContent(content);

ctx.writeAndFlush(messageProtocol);

}

}

//

@Override

protected void channelRead0(ChannelHandlerContext ctx, MessageProtocol msg) throws Exception {

int len = msg.getLen();

byte[] content = msg.getContent();

System.out.println("客户端接收到消息如下");

System.out.println("长度=" + len);

System.out.println("内容=" + new String(content, Charset.forName("utf-8")));

System.out.println("客户端接收消息数量=" + (++this.count));

}

@Override

public void exceptionCaught(ChannelHandlerContext ctx, Throwable cause) throws Exception {

System.out.println("异常消息=" + cause.getMessage());

ctx.close();

}

}
package com.atguigu.netty.protocoltcp;
import io.netty.buffer.ByteBuf;
import io.netty.channel.ChannelHandlerContext;
import io.netty.handler.codec.MessageToByteEncoder;
public class MyMessageEncoder extends MessageToByteEncoder<MessageProtocol> {
@Override
protected void encode(ChannelHandlerContext ctx, MessageProtocol msg, ByteBuf out) throws Exception {
System.out.println("MyMessageEncoder encode方法被调用");
out.writeInt(msg.getLen());
out.writeBytes(msg.getContent());
}
}
package com.atguigu.netty.protocoltcp;

import io.netty.buffer.ByteBuf;
import io.netty.channel.ChannelHandlerContext;
import io.netty.handler.codec.ReplayingDecoder;
import java.util.List;
public class MyMessageDecoder extends ReplayingDecoder<Void> {
@Override
protected void decode(ChannelHandlerContext ctx, ByteBuf in, List<Object> out) throws Exception {
System.out.println("MyMessageDecoder decode被调用");
//需要将得到二进制字节码-> MessageProtocol数据包(对象)
int length = in.readInt();
byte[] content = new byte[length];
in.readBytes(content);
//封装成  MessageProtocol对象,放入   out,传递下一个   handler业务处理
MessageProtocol messageProtocol = new MessageProtocol();
messageProtocol.setLen(length);
messageProtocol.setContent(content);
out.add(messageProtocol);
}

}
package com.atguigu.netty.protocoltcp;
import io.netty.buffer.ByteBuf;
import io.netty.buffer.Unpooled;
import io.netty.channel.ChannelHandlerContext;
import io.netty.channel.SimpleChannelInboundHandler;
import java.nio.charset.Charset;
import java.util.UUID;

//处理业务的  handler
public class MyServerHandler extends SimpleChannelInboundHandler<MessageProtocol>{
private int count;

@Override
public void exceptionCaught(ChannelHandlerContext ctx, Throwable cause) throws Exception {
//cause.printStackTrace();
ctx.close();
}


@Override
protected void channelRead0(ChannelHandlerContext ctx, MessageProtocol msg) throws Exception {
//接收到数据,并处理
int len = msg.getLen();
byte[] content = msg.getContent();
System.out.println();
System.out.println();
System.out.println();
System.out.println("服务器接收到信息如下");
System.out.println("长度=" + len);
System.out.println("内容=" + new String(content, Charset.forName("utf-8")));
System.out.println("服务器接收到消息包数量=" + (++this.count));
//回复消息
String responseContent = UUID.randomUUID().toString();
int responseLen = responseContent.getBytes("utf-8").length;
byte[]   responseContent2 = responseContent.getBytes("utf-8");
//构建一个协议包
MessageProtocol messageProtocol = new MessageProtocol();
messageProtocol.setLen(responseLen);
messageProtocol.setContent(responseContent2);
ctx.writeAndFlush(messageProtocol);

}


}
netty粘包半包处理:
https://www.cnblogs.com/wq-9/p/15189584.html

