VSFTPD
VSFTPD
一、 FTP 服务器
FTP 是 File Transfer Protocol(文件传输协议)的英文简称,而中文简称为“文传协议”。
用于 Internet 上的控制文件的双向传输。同时,它也是一个应用程序(Application)。
基于不同的操作系统有不同的 FTP 应用程序,而所有这些应用程序都遵守同一种协议以传
输文件。
在 FTP 的使用当中,用户经常遇到两个概念:"下载"(Download)和"上传"(Upload)。
"下载"文件就是从远程主机拷贝文件至自己的计算机上;"上传"文件就是将文件从自己的计
算机中拷贝至远程主机上。用 Internet 语言来说,用户可通过客户机程序向(从)远程主机
上传(下载)文件。

二、 VSFTPD简介
vsftpd 是“very secure FTP daemon”的缩写,安全性是它的一个最大的特点。vsftpd
是一个 UNIX 类操作系统上运行的服务器的名字,它可以运行在诸如 Linux、BSD、Solaris、HP-UNIX 等系统上面,
是一个完全免费的、开放源代码的 ftp 服务器软件,支持很多其他的FTP 服务器所不支持的特征。

三、 项目中图片服务器
1 单体架构中的图片管理
在传统的单体架构项目中,可以在 web 项目中添加一个文件夹,来存放上传的图片。
例如在工程的根目录 WebRoot 下创建一个 images 文件夹用于保存已上传的图片。
优点:使用方便,便于管理
缺点:
1、如果是分布式环境中图片引用会出现问题。
2、图片的下载会给服务器增加额外的压力
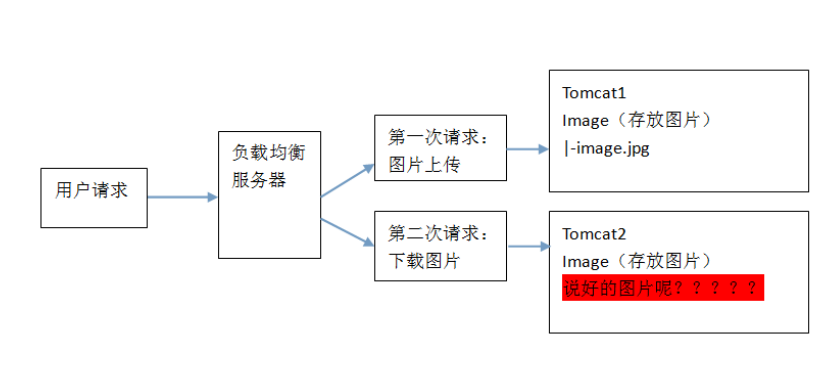
2 单体架构图片存储架构图

3 传统图片管理方式在分布式环境中的问题:
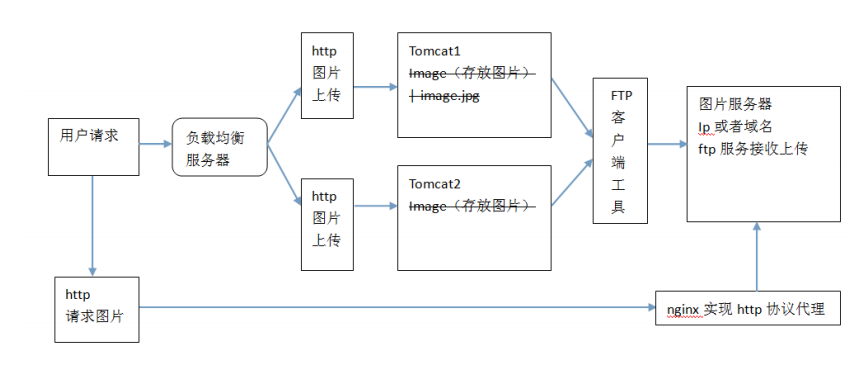
4 分布式环境的图片管理
四、 安装 VSFTP
1 安装 vsftpd 组件
yum -y install vsftpd
安装完后,有/etc/vsftpd/vsftpd.conf 文件,是 vsftp 的配置文件。
2 添加一个 Linux 用户
此用户就是用来登录 ftp 服务器用的。
useradd ftpuser
这样一个用户建完,可以用这个登录。登录后默认的路径为 /home/ftpuser.
3 给用户添加密码。
passwd ftpuser
输入两次密码后修改密码。
4 防火墙开启 21 端口
因为 ftp 默认的端口为 21,而 centos 默认是没有开启的,所以要修改 iptables 文件
vim /etc/sysconfig/iptables
在行上面有 22 -j ACCEPT 下面另起一行输入跟那行差不多的,只是把 22 换成 21,然后:
wq 保存。
还要运行下,重启 iptables
service iptables restart
5 修改 selinux
外网是可以访问上去了,可是发现没法返回目录(使用 ftp 的主动模式,被动模式还是无法
访问),也上传不了,因为 selinux 作怪了。
修改 selinux:
执行以下命令查看状态:
[root@bogon ~]# getsebool -a | grep ftp
allow_ftpd_anon_write --> off
allow_ftpd_full_access --> off
allow_ftpd_use_cifs --> off
allow_ftpd_use_nfs --> off
ftp_home_dir --> off
ftpd_connect_db --> off
ftpd_use_passive_mode --> off
httpd_enable_ftp_server --> off
tftp_anon_write --> off
[root@bogon ~]#
执行上面命令,再返回的结果看到两行都是 off,代表,没有开启外网的访问
[root@bogon ~]# setsebool -P allow_ftpd_full_access on
[root@bogon ~]# setsebool -P ftp_home_dir on
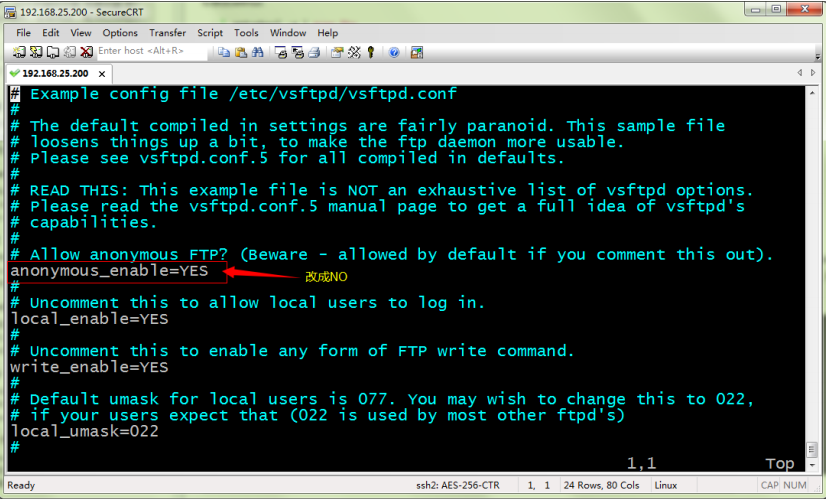
6 关闭匿名访问
修改/etc/vsftpd/vsftpd.conf 文件:
重启 ftp 服务:
service vsftpd restart
7 设置开机启动 vsftpd ftp 服务
五、 图片上传
1 使用 FileZilla 上传图片
chkconfig vsftpd on

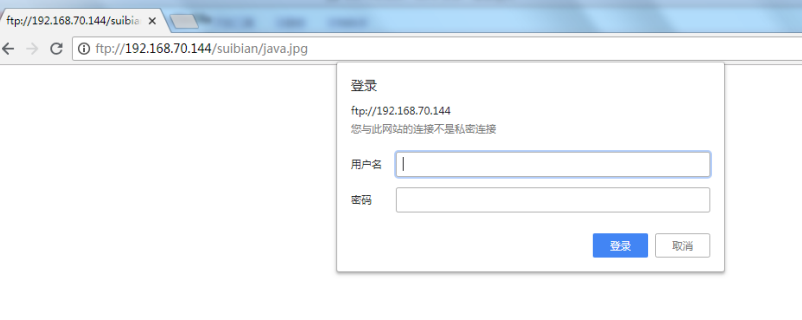
2 使用 FTP 协议访问图片服务器
2.1FTP 协议的 URL 格式
ftp://username:userpassword@IP/路径/图片名称
在 VSFTPD 的插件中。不允许这样访问。必须要有登录环节。
3 FTPClient 工具
3.1FTPClient 介绍
FTPClient 是 Apache 提供的一个开源的基于 JAVA 语言的 FTP 客户端工具。
FTPClient 位于 Apache 的 commons-net 项目中
3.2FTPClient 的使用
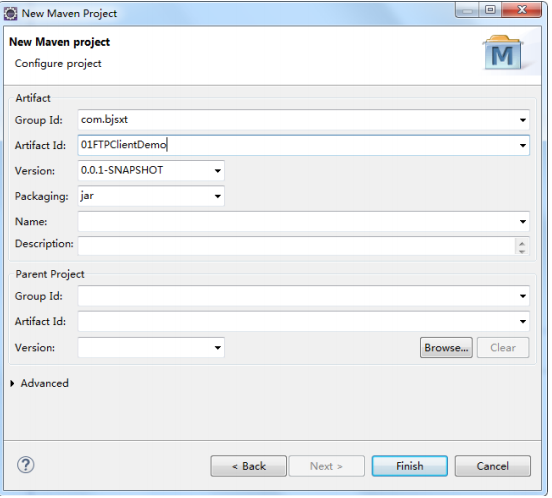
3.2.1创建项目
3.2.2编写测试代码


public class Test {
public static void main(String[] args) throws
Exception {
Test t = new Test();
t.FTPClientTest();
}
//FTPClient 的使用
public void FTPClientTest()throws Exception{
//创建 FTPClient 对象
FTPClient ftp = new FTPClient();
//链接 端口使用的 21
ftp.connect("192.168.70.144",21);
//给定用户名与密码,链接时完成登录
ftp.login("ftpuser", "ftpuser");
//操作上传文件
InputStream is = new
FileInputStream("d:/1.jpg");
//指定上传文件的保存目录
ftp.changeWorkingDirectory("/home/ftpuser/sui
bian");
//开启字节流传输
ftp.setFileType(FTPClient.BINARY_FILE_TYPE);
//文件上传
ftp.storeFile("aa.jpg", is);
//退出登录
ftp.logout();
}
}
3.3封装 FTPClient 的工具类的使用
/**
* ftp 上传下载工具类
*/
public class FtpUtil {
/**
* Description: 向 FTP 服务器上传文件
* @param host FTP 服务器 hostname
* @param port FTP 服务器端口
* @param username FTP 登录账号
* @param password FTP 登录密码
* @param basePath FTP 服务器基础目录
* @param filePath FTP 服务器文件存放路径。例如分
日期存放:/2018/01/01。文件的路径为 basePath+filePath
* @param filename 上传到 FTP 服务器上的文件名
* @param input 输入流
* @return 成功返回 true,否则返回 false
*/
public static boolean uploadFile(String host, int
port, String username, String password, String
basePath,
String filePath, String filename,
InputStream input) {
boolean result = false;
FTPClient ftp = new FTPClient();
try {
int reply;
ftp.connect(host, port);// 连接 FTP 服务器
// 如果采用默认端口,可以使用
ftp.connect(host)的方式直接连接 FTP 服务器
ftp.login(username, password);// 登录
reply = ftp.getReplyCode();
if
(!FTPReply.isPositiveCompletion(reply)) {
ftp.disconnect();
return result;
}
//切换到上传目录
if
(!ftp.changeWorkingDirectory(basePath+filePath)) {
//如果目录不存在创建目录
String[] dirs = filePath.split("/");
String tempPath = basePath;
for (String dir : dirs) {
if (null == dir || "".equals(dir))
continue;
tempPath += "/" + dir;
if
(!ftp.changeWorkingDirectory(tempPath)) {
if (!ftp.makeDirectory(tempPath))
{
return result;
} else {
ftp.changeWorkingDirectory(tempPath);
}
}
}
}
//设置上传文件的类型为二进制类型
ftp.setFileType(FTP.BINARY_FILE_TYPE);
//上传文件
if (!ftp.storeFile(filename, input)) {
return result;
}
input.close();
ftp.logout();
result = true;
} catch (IOException e) {
e.printStackTrace();
} finally {
if (ftp.isConnected()) {
try {
ftp.disconnect();
} catch (IOException ioe) {
}
}
}
return result;
}
/**
* Description: 从 FTP 服务器下载文件
* @param host FTP 服务器 hostname
* @param port FTP 服务器端口
* @param username FTP 登录账号
* @param password FTP 登录密码
* @param remotePath FTP 服务器上的相对路径
* @param fileName 要下载的文件名
* @param localPath 下载后保存到本地的路径
* @return
*/
public static boolean downloadFile(String host,
int port, String username, String password, String
remotePath,
String fileName, String localPath) {
boolean result = false;
FTPClient ftp = new FTPClient();
try {
int reply;
ftp.connect(host, port);
// 如果采用默认端口,可以使用
ftp.connect(host)的方式直接连接 FTP 服务器
ftp.login(username, password);// 登录
reply = ftp.getReplyCode();
if
(!FTPReply.isPositiveCompletion(reply)) {
ftp.disconnect();
return result;
}
ftp.changeWorkingDirectory(remotePath);// 转移到
FTP 服务器目录
FTPFile[] fs = ftp.listFiles();
for (FTPFile ff : fs) {
if (ff.getName().equals(fileName)) {
File localFile = new File(localPath +
"/" + ff.getName());
OutputStream is = new
FileOutputStream(localFile);
ftp.retrieveFile(ff.getName(), is);
is.close();
}
}
ftp.logout();
result = true;
} catch (IOException e) {
e.printStackTrace();
} finally {
if (ftp.isConnected()) {
try {
ftp.disconnect();
} catch (IOException ioe) {
}
}
}
return result;
}
}
六、 KindEditor 简介
KindEditor 是一套开源的 HTML 可视化编辑器,主要用于让用户在网站上获得所见即
所得编辑效果,兼容 IE、Firefox、Chrome、Safari、Opera 等主流浏览器。
KindEditor 使用 JavaScript 编写,可以无缝的于 Java、.NET、PHP、ASP 等程序接合。
KindEditor 非常适合在 CMS、商城、论坛、博客、Wiki、电子邮件等互联网应用上使用,
2006 年 7 月首次发布 2.0 以来,KindEditor 依靠出色的用户体验和领先的技术不断扩大编
辑器市场占有率,目前在国内已经成为最受欢迎的编辑器之一。
官网:http://kindeditor.net
七、 基于 KindEditor 实现图片上传
1 创建项目
1.1创建 parent 项目
POM 文件
<project
xmlns="http://maven.apache.org/POM/4.0.0"
xmlns:xsi="http://www.w3.org/2001/XMLSchema-instan
ce"
xsi:schemaLocation="http://maven.apache.org/P
OM/4.0.0
http://maven.apache.org/xsd/maven-4.0.0.xsd">
<modelVersion>4.0.0</modelVersion>
<groupId>com.bjsxt</groupId>
<artifactId>parent</artifactId>
<version>0.0.1-SNAPSHOT</version>
<packaging>pom</packaging>
<!-- 对依赖的 jar 包的版本统一进行定义 -->
<properties>
<junit.version>4.12</junit.version>
<spring.version>4.1.3.RELEASE</spring.version>
<mybatis.version>3.2.8</mybatis.version>
<mybatis.spring.version>1.2.2</mybatis.spring.v
ersion>
<mysql.version>5.1.32</mysql.version>
<slf4j.version>1.6.4</slf4j.version>
<druid.version>1.0.9</druid.version>
<jstl.version>1.2</jstl.version>
<servlet-api.version>2.5</servlet-api.version>
<tomcat.version>2.2</tomcat.version>
<jsp-api.version>2.0</jsp-api.version>
<zkClient-version>0.10</zkClient-version>
<dubbo-version>2.5.4</dubbo-version>
<jackson.version>2.4.2</jackson.version>
<commons-net.version>3.3</commons-net.version>
<commons-fileupload.version>1.3.1</commons-file
upload.version>
</properties>
<!-- jar 包的依赖注入 ,由于该工程是一个父工程,所
以 jar 包在该 pom 文件中只是声明 -->
<dependencyManagement>
<dependencies>
<!-- 单元测试 -->
<dependency>
<groupId>junit</groupId>
<artifactId>junit</artifactId>
<version>${junit.version}</version>
</dependency>
<!-- 日志处理 -->
<dependency>
<groupId>org.slf4j</groupId>
<artifactId>slf4j-log4j12</artifactId>
<version>${slf4j.version}</version>
</dependency>
<!-- Mybatis -->
<dependency>
<groupId>org.mybatis</groupId>
<artifactId>mybatis</artifactId>
<version>${mybatis.version}</version>
</dependency>
<dependency>
<groupId>org.mybatis</groupId>
<artifactId>mybatis-spring</artifactId>
<version>${mybatis.spring.version}</version>
</dependency>
<!-- MySql -->
<dependency>
<groupId>mysql</groupId>
<artifactId>mysql-connector-java</artifactId>
<version>${mysql.version}</version>
</dependency>
<!-- 连接池 -->
<dependency>
<groupId>com.alibaba</groupId>
<artifactId>druid</artifactId>
<version>${druid.version}</version>
</dependency>
<!-- Spring -->
<dependency>
<groupId>org.springframework</groupId>
<artifactId>spring-context</artifactId>
<version>${spring.version}</version>
</dependency>
<dependency>
<groupId>org.springframework</groupId>
<artifactId>spring-beans</artifactId>
<version>${spring.version}</version>
</dependency>
<dependency>
<groupId>org.springframework</groupId>
<artifactId>spring-webmvc</artifactId>
<version>${spring.version}</version>
</dependency>
<dependency>
<groupId>org.springframework</groupId>
<artifactId>spring-jdbc</artifactId>
<version>${spring.version}</version>
</dependency>
<dependency>
<groupId>org.springframework</groupId>
<artifactId>spring-aspects</artifactId>
<version>${spring.version}</version>
</dependency>
<!-- JSP 相关 -->
<dependency>
<groupId>jstl</groupId>
<artifactId>jstl</artifactId>
<version>${jstl.version}</version>
</dependency>
<dependency>
<groupId>javax.servlet</groupId>
<artifactId>servlet-api</artifactId>
<version>${servlet-api.version}</version>
<scope>provided</scope>
</dependency>
<dependency>
<groupId>javax.servlet</groupId>
<artifactId>jsp-api</artifactId>
<version>${jsp-api.version}</version>
<scope>provided</scope>
</dependency>
<!-- 文件上传组件 -->
<dependency>
<groupId>commons-fileupload</groupId>
<artifactId>commons-fileupload</artifactId>
<version>${commons-fileupload.version}</version
>
</dependency>
<dependency>
<groupId>commons-net</groupId>
<artifactId>commons-net</artifactId>
<version>${commons-net.version}</version>
</dependency>
<!-- Jackson Json 处理工具包 -->
<dependency>
<groupId>com.fasterxml.jackson.core</groupId>
<artifactId>jackson-databind</artifactId>
<version>${jackson.version}</version>
</dependency>
</dependencies>
</dependencyManagement>
<build>
<resources>
<resource>
<directory>src/main/java</directory>
<includes>
<include>**/*.xml</include>
</includes>
</resource>
<resource>
<directory>src/main/resources</directory>
<includes>
<include>**/*.xml</include>
<include>**/*.properties</include>
</includes>
</resource>
</resources>
<!-- tomcat 插件,由于子项目不一定每个都是 web
项目,所以该插件只是声明,并未开启 -->
<pluginManagement>
<plugins>
<!-- 配置 Tomcat 插件 -->
<plugin>
<groupId>org.apache.tomcat.maven</groupId>
<artifactId>tomcat7-maven-plugin</artifactId>
<version>${tomcat.version}</version>
</plugin>
</plugins>
</pluginManagement>
</build>
</project>
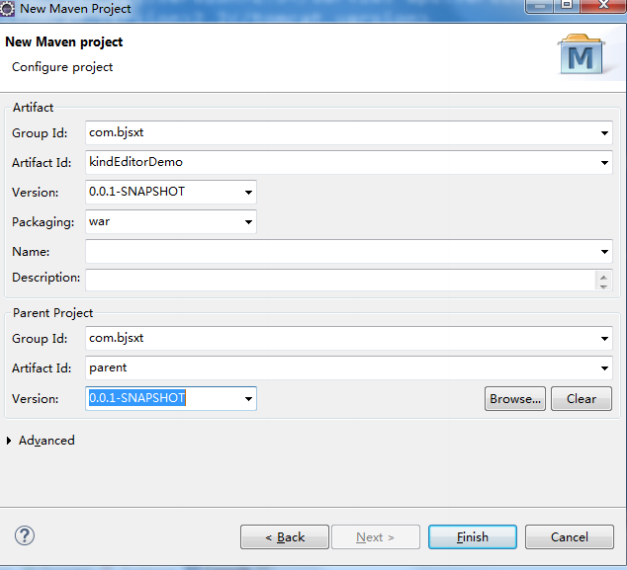
1.2创建 kindEditorDemo
1.2.1创建项目
1.2.2修改 POM 文件
<project
xmlns="http://maven.apache.org/POM/4.0.0"
xmlns:xsi="http://www.w3.org/2001/XMLSchema-instan
ce"
xsi:schemaLocation="http://maven.apache.org/POM/4.
0.0 http://maven.apache.org/xsd/maven-4.0.0.xsd">
 <modelVersion>4.0.0</modelVersion>
 <parent>
 <groupId>com.bjsxt</groupId>
 <artifactId>parent</artifactId>
 <version>0.0.1-SNAPSHOT</version>
 </parent>
 <artifactId>kindEditorDemo</artifactId>
 <packaging>war</packaging>

 <dependencies>
 <!-- 单元测试 -->
<dependency>
<groupId>junit</groupId>
<artifactId>junit</artifactId>
</dependency>
<!-- 日志处理 -->
<dependency>
<groupId>org.slf4j</groupId>
<artifactId>slf4j-log4j12</artifactId>
</dependency>
<dependency>
<groupId>org.springframework</groupId>
<artifactId>spring-context</artifactId>
</dependency>
<dependency>
<groupId>org.springframework</groupId>
<artifactId>spring-beans</artifactId>
</dependency>
<dependency>
<groupId>org.springframework</groupId>
<artifactId>spring-webmvc</artifactId>
</dependency>
<!-- JSP 相关 -->
<dependency>
<groupId>jstl</groupId>
<artifactId>jstl</artifactId>
</dependency>
<dependency>
<groupId>javax.servlet</groupId>
<artifactId>servlet-api</artifactId>
<scope>provided</scope>
</dependency>
<dependency>
<groupId>javax.servlet</groupId>
<artifactId>jsp-api</artifactId>
<scope>provided</scope>
</dependency>
<!-- 文件上传组件 -->
<dependency>
<groupId>commons-fileupload</groupId>
<artifactId>commons-fileupload</artifactId>
</dependency>
<dependency>
<groupId>commons-net</groupId>
<artifactId>commons-net</artifactId>
</dependency>
<!-- Jackson Json 处理工具包 -->
<dependency>
<groupId>com.fasterxml.jackson.core</groupId>
<artifactId>jackson-databind</artifactId>
</dependency>
 </dependencies>

 <build>
 <plugins>
<!-- 配置 Tomcat 插件 -->
<plugin>
<groupId>org.apache.tomcat.maven</groupId>
<artifactId>tomcat7-maven-plugin</artifactId>
<configuration>
<path>/</path>
<port>8080</port>
</configuration>
</plugin>
</plugins>
 </build>
</project>
1.3框架整合
Web.xml
<?xml version="1.0" encoding="UTF-8"?>
<web-app
xmlns:xsi="http://www.w3.org/2001/XMLSchema-instan
ce"
xmlns="http://java.sun.com/xml/ns/javaee"
xsi:schemaLocation="http://java.sun.com/xml/n
s/javaee
http://java.sun.com/xml/ns/javaee/web-app_3_0.xsd"
id="WebApp_ID" version="3.0">
<!-- 上下文参数,告诉 Spring 配置文件路径 -->
<context-param>
<param-name>contextConfigLocation</param-name>
<param-value>classpath:applicationContext-*.xml
</param-value>
</context-param>
<listener>
<listener-class>org.springframework.web.context
.ContextLoaderListener</listener-class>
</listener>
<!-- 配置 springmvc -->
<servlet>
<servlet-name>springmvc</servlet-name>
<servlet-class>org.springframework.web.servlet.
DispatcherServlet</servlet-class>
<init-param>
<param-name>contextConfigLocation</param-name>
<param-value>classpath:springmvc.xml</param-val
ue>
</init-param>
<load-on-startup>1</load-on-startup>
</servlet>
<servlet-mapping>
<servlet-name>springmvc</servlet-name>
<url-pattern>/</url-pattern>
</servlet-mapping>
<filter>
<filter-name>encoding</filter-name>
<filter-class>org.springframework.web.filter.Ch
aracterEncodingFilter</filter-class>
<init-param>
<param-name>encoding</param-name>
<param-value>utf-8</param-value>
</init-param>
</filter>
<filter-mapping>
<filter-name>encoding</filter-name>
<url-pattern>/*</url-pattern>
</filter-mapping>
<welcome-file-list>
<welcome-file>index.html</welcome-file>
<welcome-file>index.htm</welcome-file>
<welcome-file>index.jsp</welcome-file>
<welcome-file>default.html</welcome-file>
<welcome-file>default.htm</welcome-file>
<welcome-file>default.jsp</welcome-file>
</welcome-file-list>
</web-app>
springmvc.xml
<?xml version="1.0" encoding="UTF-8"?>
<beans
xmlns="http://www.springframework.org/schema/beans
"
xmlns:xsi="http://www.w3.org/2001/XMLSchema-i
nstance"
xmlns:p="http://www.springframework.org/schema/p"
xmlns:context="http://www.springframework.org
/schema/context"
xmlns:mvc="http://www.springframework.org/sch
ema/mvc"
xsi:schemaLocation="http://www.springframewor
k.org/schema/beans
http://www.springframework.org/schema/beans/spring
-beans.xsd

http://www.springframework.org/schema/mvc
http://www.springframework.org/schema/mvc/spring-m
vc-4.0.xsd

http://www.springframework.org/schema/context
http://www.springframework.org/schema/context/spri
ng-context.xsd">
 <!-- 包的扫描器主要是扫描@controller -->
 <context:component-scan
base-package="com.bjsxt.web.controller"/>
 <!-- 注册两个新对象 主要是为了来处理
springmvc 中的其他 anntation 如:@requestmapping -->
 <mvc:annotation-driven/>

 <!-- 视图解析器 -->
 <bean
class="org.springframework.web.servlet.view.Intern
alResourceViewResolver">
<property name="prefix"
value="/WEB-INF/jsp/" /><!-- jsp 所在的前缀 -->
<property name="suffix" value=".jsp" />
 </bean>
 <!-- 文件上传处理器 -->
 <bean id="multipartResolver"
class="org.springframework.web.multipart.commons.C
ommonsMultipartResolver">
 <property name="defaultEncoding"
value="utf-8"></property>
 <property name="maxInMemorySize"
value="1024"></property>
 <!-- 单位字节 -->
 <!--
org.springframework.web.multipart.MaxUploadSizeExc
eededException -->
 <property name="maxUploadSize"
value="1000000"></property>
 </bean>
 <!-- 配置静态资源映射 -->
 <mvc:resources location="/WEB-INF/css/"
mapping="/css/**"/>
<mvc:resources location="/WEB-INF/js/"
mapping="/js/**"/>
</beans>
applicationContext-service.xml
<?xml version="1.0" encoding="UTF-8"?>
<beans
xmlns="http://www.springframework.org/schema/beans
"
xmlns:xsi="http://www.w3.org/2001/XMLSchema-i
nstance"
xmlns:p="http://www.springframework.org/schema/p"
xmlns:context="http://www.springframework.org
/schema/context"
xmlns:mvc="http://www.springframework.org/sch
ema/mvc"
xsi:schemaLocation="http://www.springframewor
k.org/schema/beans
http://www.springframework.org/schema/beans/spring
-beans.xsd

http://www.springframework.org/schema/mvc
http://www.springframework.org/schema/mvc/spring-m
vc-4.0.xsd

http://www.springframework.org/schema/context
http://www.springframework.org/schema/context/spri
ng-context.xsd">
<context:property-placeholder
location="classpath:resource.properties"/>
<!-- 扫描 bean 对象 -->
<context:component-scan
base-package="com.bjsxt.service"/>
</beans>
resource.properties
FTP_HOST=192.168.70.144
FTP_PORT=21
FTP_USERNAME=ftpuser
FTP_PASSWORD=ftpuser
FTP_BASEPATH=/home/ftpuser/
HTTP_BASE_PATH=http://192.168.70.144
2 KindEditor 使用方式
2.1自定义工具类介绍
FtpUtil:FTPClient 工具类
package cn.ego.util;

import java.io.File;
import java.io.FileInputStream;
import java.io.FileNotFoundException;
import java.io.FileOutputStream;
import java.io.IOException;
import java.io.InputStream;
import java.io.OutputStream;

import org.apache.commons.net.ftp.FTP;
import org.apache.commons.net.ftp.FTPClient;
import org.apache.commons.net.ftp.FTPFile;
import org.apache.commons.net.ftp.FTPReply;

/**
 * ftp上传下载工具类
 */
public class FtpUtil {

    /**
     * Description: 向FTP服务器上传文件
     * @param host FTP服务器hostname
     * @param port FTP服务器端口
     * @param username FTP登录账号
     * @param password FTP登录密码
     * @param basePath FTP服务器基础目录
     * @param filePath FTP服务器文件存放路径。例如分日期存放:/2015/01/01。文件的路径为basePath+filePath
     * @param filename 上传到FTP服务器上的文件名
     * @param input 输入流
     * @return 成功返回true,否则返回false
     */
public static boolean uploadFile(String host, int port, String username, String password, String basePath,
            String filePath, String filename, InputStream input) {
        boolean result = false;
        FTPClient ftp = new FTPClient();
        try {
            int reply;
            ftp.connect(host, port);// 连接FTP服务器
            // 如果采用默认端口,可以使用ftp.connect(host)的方式直接连接FTP服务器
            ftp.login(username, password);// 登录
            reply = ftp.getReplyCode();
            if (!FTPReply.isPositiveCompletion(reply)) {
                ftp.disconnect();
                return result;
            }
            //切换到上传目录
            if (!ftp.changeWorkingDirectory(basePath+filePath)) {
                //如果目录不存在创建目录
                String[] dirs = filePath.split("/");
                String tempPath = basePath;
                for (String dir : dirs) {
                    if (null == dir || "".equals(dir)) continue;
                    tempPath += "/" + dir;
                    if (!ftp.changeWorkingDirectory(tempPath)) {
                        if (!ftp.makeDirectory(tempPath)) {
                            return result;
                        } else {
                            ftp.changeWorkingDirectory(tempPath);
                        }
                    }
                }
            }
            //设置上传文件的类型为二进制类型
            ftp.setFileType(FTP.BINARY_FILE_TYPE);
            //上传文件
            if (!ftp.storeFile(filename, input)) {
                return result;
            }
            input.close();
            ftp.logout();
            result = true;
        } catch (IOException e) {
            e.printStackTrace();
        } finally {
            if (ftp.isConnected()) {
                try {
                    ftp.disconnect();
                } catch (IOException ioe) {
                }
            }
        }
        return result;
    }

    /**
     * Description: 从FTP服务器下载文件
     * @param host FTP服务器hostname
     * @param port FTP服务器端口
     * @param username FTP登录账号
     * @param password FTP登录密码
     * @param remotePath FTP服务器上的相对路径
     * @param fileName 要下载的文件名
     * @param localPath 下载后保存到本地的路径
     * @return
     */
    public static boolean downloadFile(String host, int port, String username, String password, String remotePath,
            String fileName, String localPath) {
        boolean result = false;
        FTPClient ftp = new FTPClient();
        try {
            int reply;
            ftp.connect(host, port);
            // 如果采用默认端口,可以使用ftp.connect(host)的方式直接连接FTP服务器
            ftp.login(username, password);// 登录
            reply = ftp.getReplyCode();
            if (!FTPReply.isPositiveCompletion(reply)) {
                ftp.disconnect();
                return result;
            }
            ftp.changeWorkingDirectory(remotePath);// 转移到FTP服务器目录
            FTPFile[] fs = ftp.listFiles();
            for (FTPFile ff : fs) {
                if (ff.getName().equals(fileName)) {
                    File localFile = new File(localPath + "/" + ff.getName());

                    OutputStream is = new FileOutputStream(localFile);
                    ftp.retrieveFile(ff.getName(), is);
                    is.close();
                }
            }

            ftp.logout();
            result = true;
        } catch (IOException e) {
            e.printStackTrace();
        } finally {
            if (ftp.isConnected()) {
                try {
                    ftp.disconnect();
                } catch (IOException ioe) {
                }
            }
        }
        return result;
    }

    public static void main(String[] args) {
        try {
            FileInputStream in=new FileInputStream(new File("D:\\1.jpg"));
            boolean flag = uploadFile("192.168.10.128", 21, "ftpuser", "ftpuser", "/home/ftpuser/www/images","/2015/01/21", "gaigeming.jpg", in);
            System.out.println(flag);
        } catch (FileNotFoundException e) {
            e.printStackTrace();
        }
    }
}
IDUtils:生成一切 ID 的策略的工具类。可以使用他生成图片名称
package com.bjsxt.commons;

import java.util.Random;
import java.util.UUID;

/**
 * 各种id生成策略
 * @version 1.0
 */
public class IDUtils {

    /**
     * 图片名生成
     */
    public static String genImageName() {
        //取当前时间的长整形值包含毫秒
        long millis = System.currentTimeMillis();
        //long millis = System.nanoTime();
        //加上三位随机数
        Random random = new Random();
        int end3 = random.nextInt(999);
        //如果不足三位前面补0
        String str = millis + String.format("%03d", end3);
        return str;
    }

    /**
     * 商品id生成
     */
    public static long genItemId() {
        //取当前时间的长整形值包含毫秒
        long millis = System.currentTimeMillis();
        //long millis = System.nanoTime();
        //加上两位随机数
        Random random = new Random();
        int end2 = random.nextInt(99);
        //如果不足两位前面补0
        String str = millis + String.format("%02d", end2);
        long id = new Long(str);
        return id;
    }

}
JsonUtils:对象与 json 格式转换的工具类
package com.bjsxt.commons;

import java.util.List;

import com.fasterxml.jackson.core.JsonProcessingException;
import com.fasterxml.jackson.databind.JavaType;
import com.fasterxml.jackson.databind.ObjectMapper;

/**
 * JSON转换工具类
 */
public class JsonUtils {

    // 定义jackson对象
    private static final ObjectMapper MAPPER = new ObjectMapper();

    /**
     * 将对象转换成json字符串。
     * <p>Title: pojoToJson</p>
     * <p>Description: </p>
     * @param data
     * @return
     */
    public static String objectToJson(Object data) {
        try {
            String string = MAPPER.writeValueAsString(data);
            return string;
        } catch (JsonProcessingException e) {
            e.printStackTrace();
        }
        return null;
    }

    /**
     * 将json结果集转化为对象
     *
     * @param jsonData json数据
     * @param clazz 对象中的object类型
     * @return
     */
    public static <T> T jsonToPojo(String jsonData, Class<T> beanType) {
        try {
            T t = MAPPER.readValue(jsonData, beanType);
            return t;
        } catch (Exception e) {
            e.printStackTrace();
        }
        return null;
    }

    /**
     * 将json数据转换成pojo对象list
     * <p>Title: jsonToList</p>
     * <p>Description: </p>
     * @param jsonData
     * @param beanType
     * @return
     */
    public static <T>List<T> jsonToList(String jsonData, Class<T> beanType) {
        JavaType javaType = MAPPER.getTypeFactory().constructParametricType(List.class, beanType);
        try {
            List<T> list = MAPPER.readValue(jsonData, javaType);
            return list;
        } catch (Exception e) {
            e.printStackTrace();
        }

        return null;
    }

}
2.2在 JSP 中使用 KindEditor
2.2.1使用步骤
2.2.1.1 在项目中添加 KindEditor 与 Jquery 的 js 文件
2.2.1.2 在 JSP 页面中通过 script 标签引入 js
2.2.1.3 在 JSP 中添加 textarea 标签
2.2.1.4 调用 KindEditor 的 API 将 KindEditor 渲染到 textarea
2.2.2KindEditor 初始化参数介绍
2.2.2.1 uploadJson:指定上传文件的服务器端程序
2.2.2.2 FilePostName:指定上传文件 form 名称。
2.2.2.3 dir:指定上传文件类型
2.3实现图片上传
PicUploadController
PicUploadController
/**
* 图片上传 Controller
* @author Administrator
*
*/
@Controller
@RequestMapping("/pic")
public class PicUploadController {
@Autowired
private PicUploadService picUploadService;
/**
* 图片上传
*/
@RequestMapping("/upload")
@ResponseBody
public String fileUpload(MultipartFile
fileName){
Map<String, Object> map =
this.picUploadService.fileUpload(fileName);
return JsonUtils.objectToJson(map);
}
}
PicUploadService
public interface PicUploadService {
Map<String, Object> fileUpload(MultipartFile
filename);
}
PicUploadServiceImpl
/**
* 图片上传 Service
* @author Administrator
*
*/
@Service
public class PicUploadServiceImpl implements
PicUploadService {
@Value("${FTP_HOST}")
 private String FTP_HOST;
@Value("${FTP_PORT}")
 private int FTP_PORT;
@Value("${FTP_USERNAME}")
 private String FTP_USERNAME;
@Value("${FTP_PASSWORD}")
 private String FTP_PASSWORD;
@Value("${FTP_BASEPATH}")
 private String FTP_BASEPATH;
@Value("${HTTP_BASE_PATH}")
private String HTTP_BASE_PATH;
@Override
public Map<String, Object>
fileUpload(MultipartFile filename) {
Map<String, Object> map = new HashMap<>();
Date date = new Date();
try {
SimpleDateFormat sdf = new
SimpleDateFormat("/yyyy/MM/dd/");
String path = sdf.format(date);
String newFileName =
IDUtils.genImageName()+filename.getOriginalFilenam
e().substring(filename.getOriginalFilename().lastI
ndexOf("."));
boolean flag =
FtpUtil.uploadFile(this.FTP_HOST, this.FTP_PORT,
this.FTP_USERNAME, this.FTP_PASSWORD,
this.FTP_BASEPATH, path, newFileName,
filename.getInputStream());
if(flag){
map.put("error", 0);
//http://192.168.70.144/yyyy/MM/dd/newFileName
map.put("url",
this.HTTP_BASE_PATH+path+newFileName);
}else{
map.put("error", 1);
map.put("message","上传失败");
}
} catch (IOException e) {
map.put("error", 1);
map.put("message","上传失败");
e.printStackTrace();
}
return map;
}
}
2.4提交 KindEditor 中的数据
2.4.1在 KindEditor 中提交方式需要使用 Ajax 方式提交。
2.4.2需要使用 KindEditor 的一个 sync()的方法将数据同步到
textarea
jsp
<%@ page language="java" contentType="text/html;
charset=UTF-8"
 pageEncoding="UTF-8"%>
<!DOCTYPE html PUBLIC "-//W3C//DTD HTML 4.01
Transitional//EN"
"http://www.w3.org/TR/html4/loose.dtd">
<html>
<head>
<meta http-equiv="Content-Type"
content="text/html; charset=UTF-8">
<title>Insert title here</title>
<script type="text/javascript"
src="/js/kindeditor/kindeditor.js"></script>
<script type="text/javascript"
src="/js/kindeditor/lang/zh_CN.js"></script>
<script type="text/javascript"
src="/js/jquery-1.7.2.js"></script>
<script type="text/javascript">
$(function(){
var obj;
KindEditor.ready(function(K) {
 obj= K.create('#text_id', {
 uploadJson : '/pic/upload',
 filePostName:'fileName',
 dir:"image"
 });
 });
//给按钮添加点击事件
$("#but").click(function(){
//将 KindEditor 中的数据同步到 textarea 中
obj.sync();
//通过 ajax 方式提交表单 serialize()作
用:将表单中的数据序列化为 key=value&key=value.....
$.post("/content/save",$("#myForm").serialize()
,function(data){
if(data.status == 200){
alert("提交成功");
}else{
alert("提交失败");
}
});
});
});
</script>
</head>
<body>
<form id="myForm">
<textarea rows="20" cols="20" id="text_id"
name="desc"></textarea>
<input type="button" value="OK" id="but"/>
</form>
</body>
</html>
Controller
/**
* 内容 Controller
* @author Administrator
*
*/
@Controller
@RequestMapping("/content")
public class ContentController {
/**
* 内容保存
*/
@RequestMapping(value="/save",produces=MediaT
ype.APPLICATION_JSON_VALUE)
@ResponseBody
public String saveContent(String desc){
System.out.println(desc);
Map<String, Object> map = new HashMap<>();
map.put("status",200);
return JsonUtils.objectToJson(map);
}
}

 浙公网安备 33010602011771号