spring
spring
概念:
- Spring 是一个轻量级控制反转(IOC)和面向切面(AOP)的容器框架。
- IOC:Inversion of Version 控制反转就是对对象控制权的转移,从程序代码本身反转到外部容器。把对象的创建、初始化、销毁等工作交给spring容器来做。由spring控制对象的生命周期。
- DI:Dependency Injection 依赖注入DI是指程序运行过程中,若需要调用另一个对象协助时,无须在代码中创建被调用者,而是依赖外部容器,由外部容器创建后传递给程序。
- AOP:Aspect Oriented Programming
control +n :select a wizard
Spring 官方压缩包介绍
dist:.dist后缀表示该文件夹下存放的是jar包,文档和项目
docs: 文档
libs:jar包
schema:约束
license.txt:许可
notice.txt:注意
readme.txt:说明
常用jar包:
spring-aop-4.2.1.RELEASE.JAR 字节码jar包
spring -aop-4.2.1.RELEASE-javadoc.jar 文档
spring-aop-4.2.1.RELEASE-sources.jar 源码
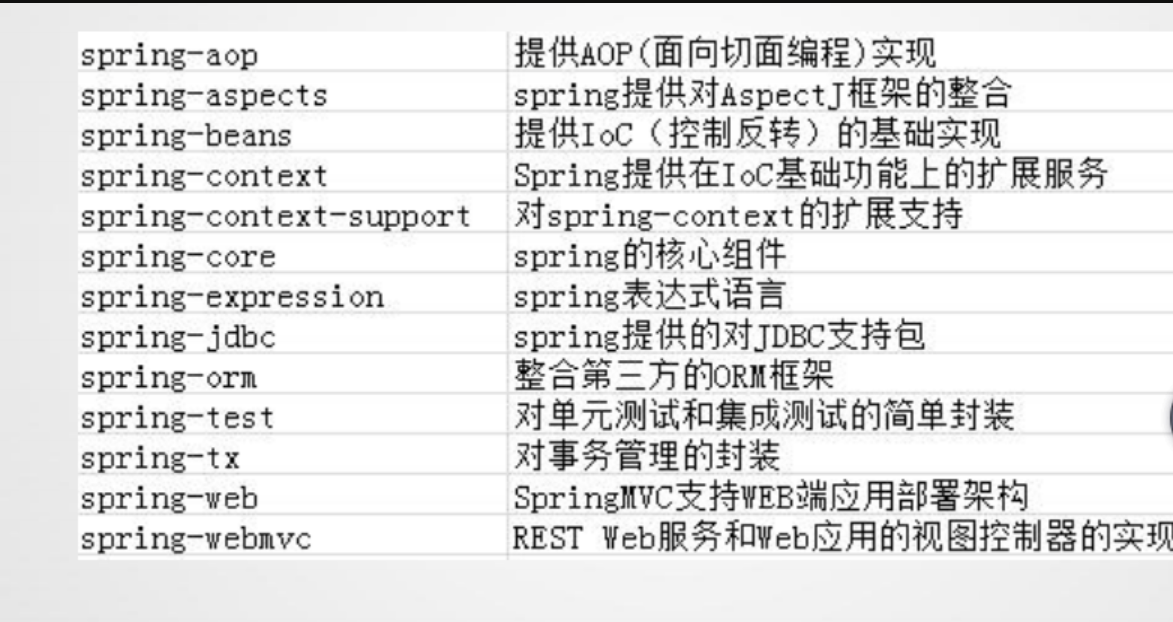
spring的体系结构
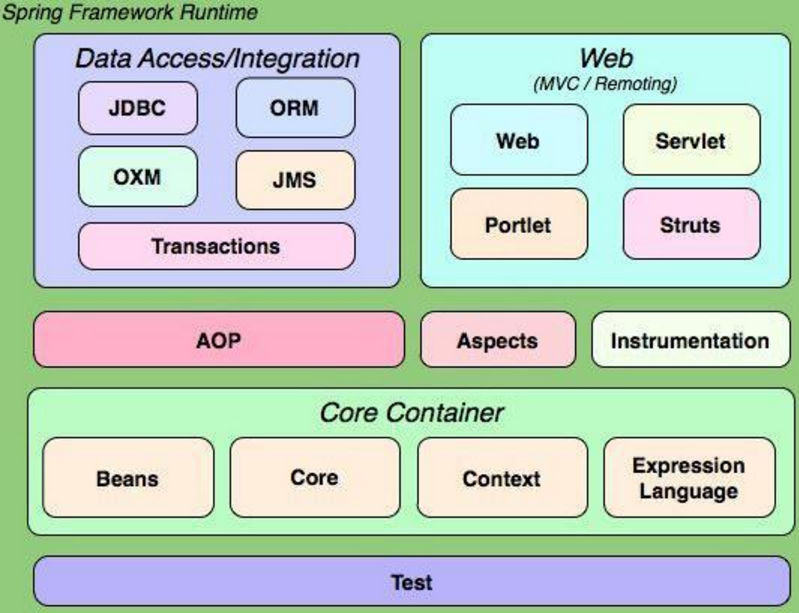
core
core部分包含4个模块
- spring-core:依赖注入IoC与DI的最基本实现
- spring-beans:Bean工厂与bean的装配
- spring-context:spring的context上下文即IoC容器
- spring-expression:spring表达式语言
它们的完整依赖关系
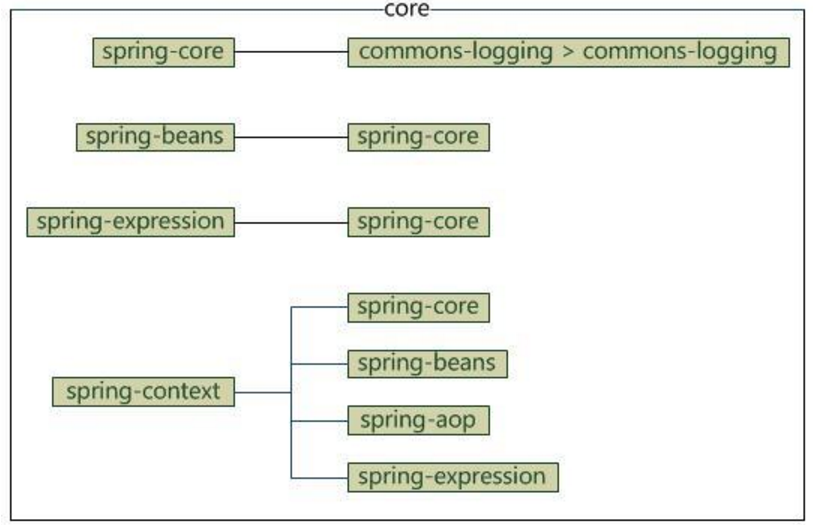
aop
aop部分包含4个模块
- spring-aop:面向切面编程
- spring-aspects:集成AspectJ
- spring-instrument:提供一些类级的工具支持和ClassLoader级的实现,用于服务器
- spring-instrument-tomcat:针对tomcat的instrument实现
它们的依赖关系
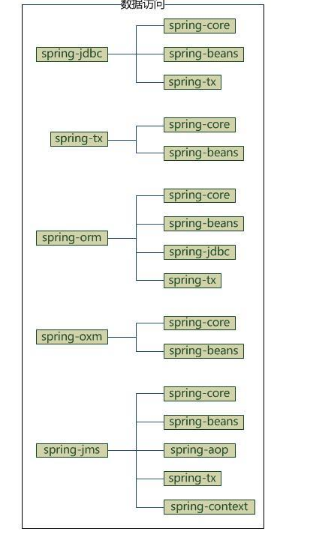
data access
data access部分包含5个模块
- spring-jdbc:jdbc的支持
- spring-tx:事务控制
- spring-orm:对象关系映射,集成orm框架
- spring-oxm:对象xml映射
- spring-jms:java消息服务
它们的依赖关系
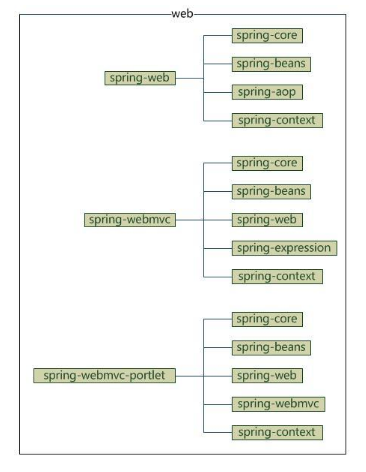
web
web部分包含4个模块
- spring-web:基础web功能,如文件上传
- spring-webmvc:mvc实现
- spring-webmvc-portlet:基于portlet的mvc实现
- spring-struts:与struts的集成,不推荐,spring4不再提供
它们的依赖关系
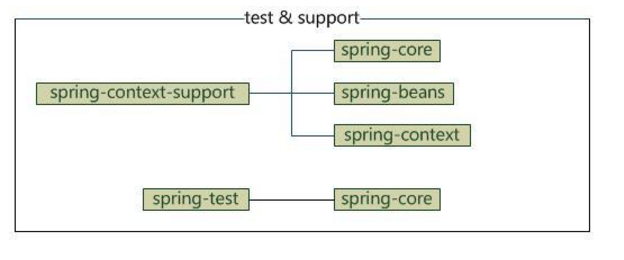
test
test部分只有一个模块,我将spring-context-support也放在这吧
- spring-test:spring测试,提供junit与mock测试功能
- spring-context-support:spring额外支持包,比如邮件服务、视图解析等
它们的依赖关系
第一个IOC程序
1.IoC与DI
1.1 IoC
控制反转(IoC,Inversion of Control),是一个概念,是一种思想。控制反转就
是对对象控制权的转移,从程序代码本身反转到了外部容器。把对象的创建、初始化、
销毁等工作交给spring容器来做。由spring容器控制对象的生命周期。
Spring为我们提供了两种IOC容器,分别为BeanFactory和ApplicationContext。
BeanFactory
BeanFactoy是基础类型的IOC容器,由org.springframework.beans.factory.BeanFactory接口定义,并提供了完整的IOC服务支持。BeanFactory就是一个管理Bean
的工程,它负责初始化各种Bean,并调用他们的生命周期方法。
BeanFactory接口有多种实现,最常用的是使用org.springframework.beans.factory.xml.XmlBeanFactory根据XML配置文件中的定义来装配Bean.
创建BeanFactory实例时,需要提供Spring所需管理的详细配置信息,这些信息通常采用XML文件的形式来管理,加载配置信息的语法如下:
BeanFactory beanFactory=
new XmlBeanFactory(new FileSystemResource("F:/applicationContext.xml"));
ApplicationContext
ApplicationContext是BeanFactory的子接口,也就是称为上下文。该接口的全路径为org.springframework.context. ApplicationContext,它不仅提供BeanFactory所
有的功能,还以一种更加面向框架的方式增强了BeanFactory的功能。主要体现在Context包使用了分层和有继承关系的上下文类,具体情况如下:
- MessgaeSouce,提供对il8n消息的访问。
- 资源访问,例如URL和文件。
- 事件传递给实现了ApplicationListener接口的Bean。
- 载入多个(有继承关系)上下文类,使得每一个上下文类都专注于一个特定的层次,例如应用的Web层。
创建ApplicationContext接口实例,通常采用两种方法,具体如下。
- ClassPathXmlApplicationContext:从类路径中的xml文件载入上下文定义信息,把上下文定义文件当作类路径资源,创建语法如下:
ApplicationContext applicationContext=new ClassPathXmlApplicationContext("applicationContext.xml");
- FileSystemXmlApplicationContext:从文件系统中(指定的路径下)的XML文件载入上下文定义信息,创建语法如下:
ApplicationContext applicationContext=new FileSystemXmlApplicationContext("F:\\workspaces\\chapter12\\src\\cn\\ioc\\applicationContext.xml");
1.2 DI
依赖注入:Dependency Injection。依赖注入DI是指程序运行过程中,若需要调用另一个对象协助时,无须在代码中创建被调用者,而是依赖于外部容器,由外部容器创建后传递给程序。
依赖注入是目前最优秀的解耦方式。依赖注入让Spring的Bean之间以配置文件的方式组织在一起,而不是以硬编码的方式耦合在一起的。
1.3 IoC与DI的关系
IoC是一个概念,是一种思想,其实现方式多种多样。当前比较流行的实现方式之一是DI(Dependency Injection 依赖注入)。
依赖注入存在三种方式,分别是
- 属性setter注入:指IOC容器使用setter方法来注入被依赖的实例。通过调用无参构造器或者无参static工厂方法实例化Bean后,调用该Bean的setter方法,即可实现基于setter的DI。
- 构造方法注入:指IOC容器使用构造方法来注入被依赖的实例。基于构造器的DI通过调用带参数的构造方法来实现,每个参数代表着一个依赖。
- 接口注入:Spring容器不支持接口注入。
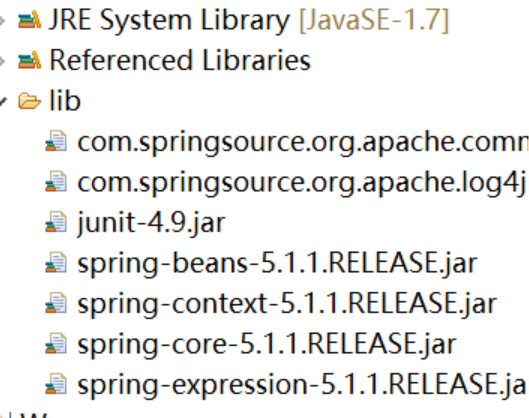
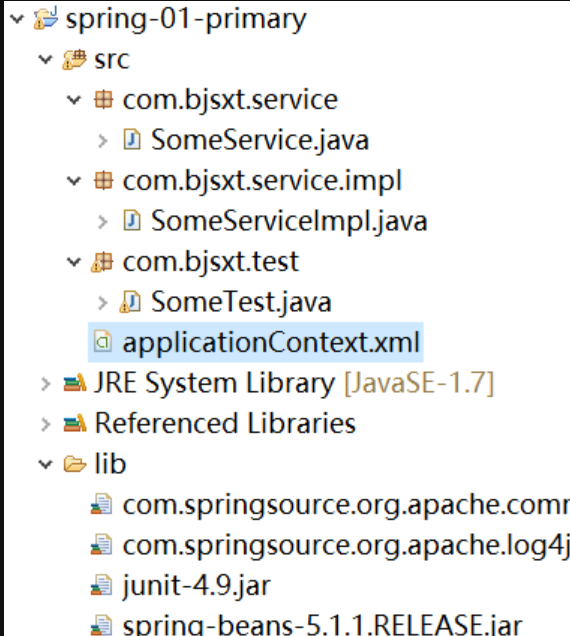
1 导入jar包(基本7个)
2 创建spring配置文件
3 Bean的定义与注册
4 从spring容器中获取Bean
- 导入jar包(基本七个)
- 创建spring配置文件
- bean的定义与注册

- 从spring容器中获取bean
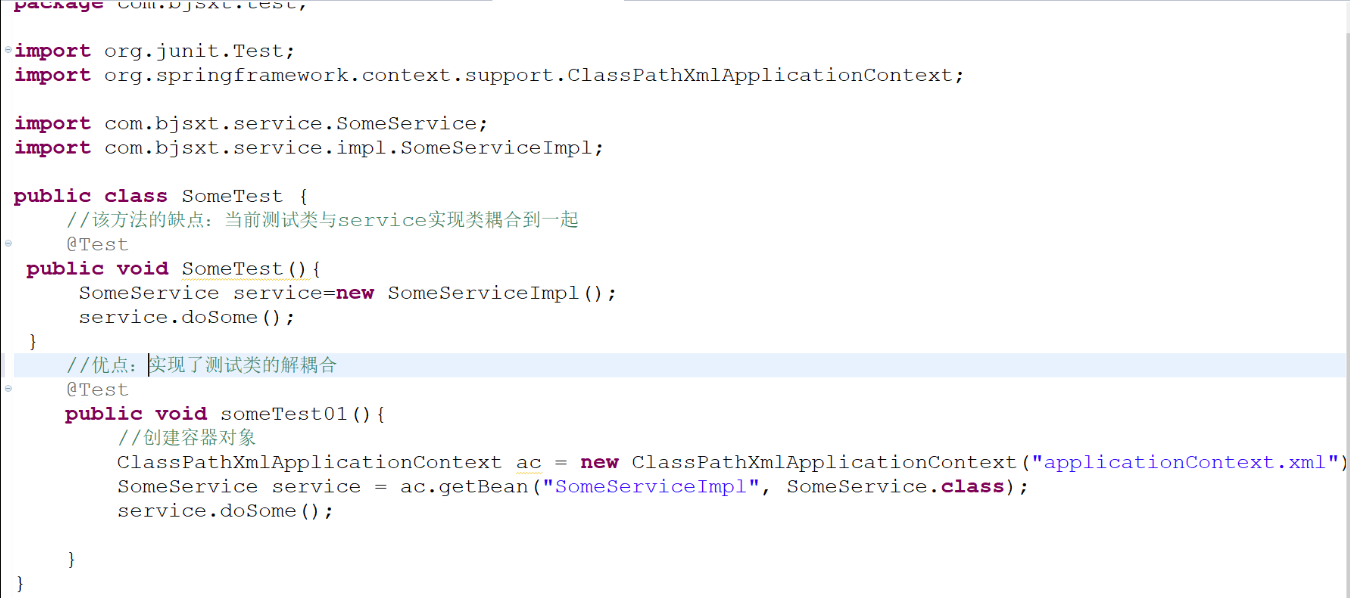

//优点:实现了测试类的解耦合
@Test
public void someTest01(){
//创建容器对象,ApplicationContext容器初始化时,所有容器中的bean创建完毕

//创建容器对象
//容器接口里面的一个实现类,通过这个实现类来创建对象
ApplicationContext ac = new ClassPathXmlApplicationContext("applicationContext.xml");
SomeService service = ac.getBean("SomeServiceImpl", SomeService.class);
service.doSome();


}
@Test
public void someTest02(){
//创建容器对象,BeanFactory调用getBean获取相应对象时,才创建对象。
BeanFactory bf=new XmlBeanFactory(new ClassPathResource("applictionContext.xml"));
SomeService service1 = bf.getBean("someServiceImpl",SomeService.class);
service1.doSome();
}

}

Bean的生命周期
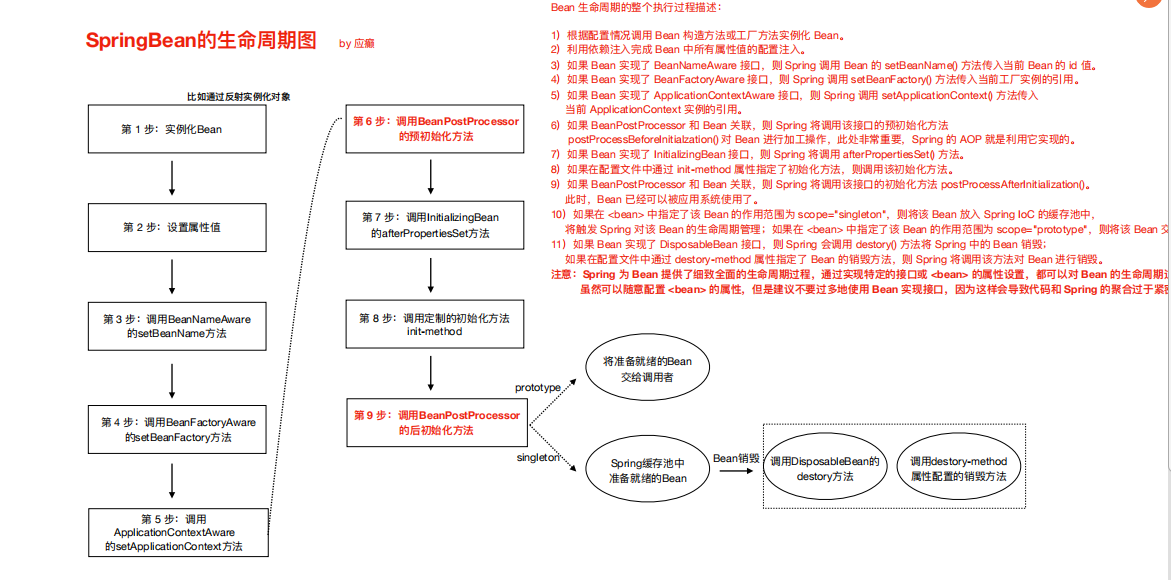
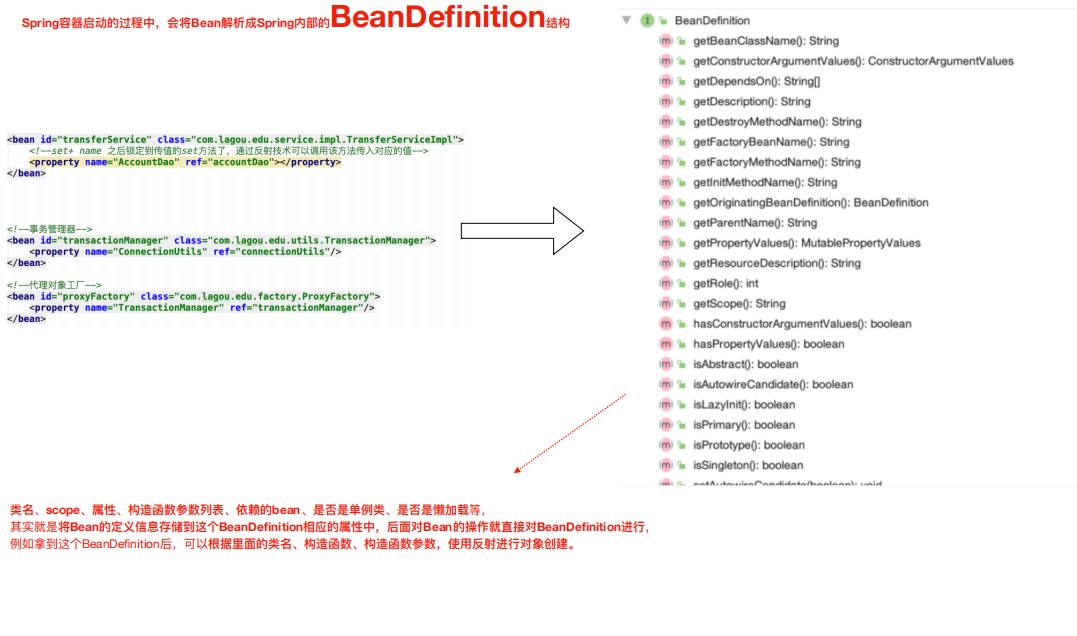
spring容器可以管理singleton作用域下的bean的生命周期,在此作用域下,spring能够精确地知道bean何时被创建,何时初始化完成,以及何时被销毁。而对prototype作用域的bean,spring只负责创建,当容器创建了bean实例后,bean的实例就交给客户端代码来管理,spring容器将不再跟踪其生命周期。每次客户端请求prototype作用域的bean时,spring容器都会创建一个新的实例,并且不会管那些被配置成prototype作用域的bean的生命周期。
Spring生命周期的意义在于,可以利用bean在其存活期间的指定时刻完成一些相关操作。
https://blog.csdn.net/chuyuqing/article/details/8846369
https://www.zhihu.com/question/38597960/answer/248763219
https://www.cnblogs.com/zrtqsk/p/3735273.html
Bean的装配
可以把spring看作一个大型的工厂,而spring容器中的Bean就是该工厂的产品。要是想使用这个工厂生产和管理Bean,就需要在配置文件中告诉它需要哪些bean,
以及需要使用何种方式将这些Bean装配到一起。
Spring支持两种格式的配置文件,分别为Properties文件格式和XML文件的格式。
在实际开发中,最常用的是xml文件格式的配置方式,这种配置方式是通过xml文件来注册并管理Bean之间的依赖关系的。
Bean的实例化
-
默认装配方式(构造方式)
-
动态工厂Bean
-
静态工厂Bean
动态工厂方式代码如下:
factory

package com.bjsxt.factory;

import com.bjsxt.service.SomeService;
import com.bjsxt.service.impl.SomeServiceImpl;

public class ServiceFactory {
    //实例工厂方式创建bean对象
    public SomeService getSomeService(){
        SomeService someServiceImpl = new SomeServiceImpl();
        return someServiceImpl;
    }
}
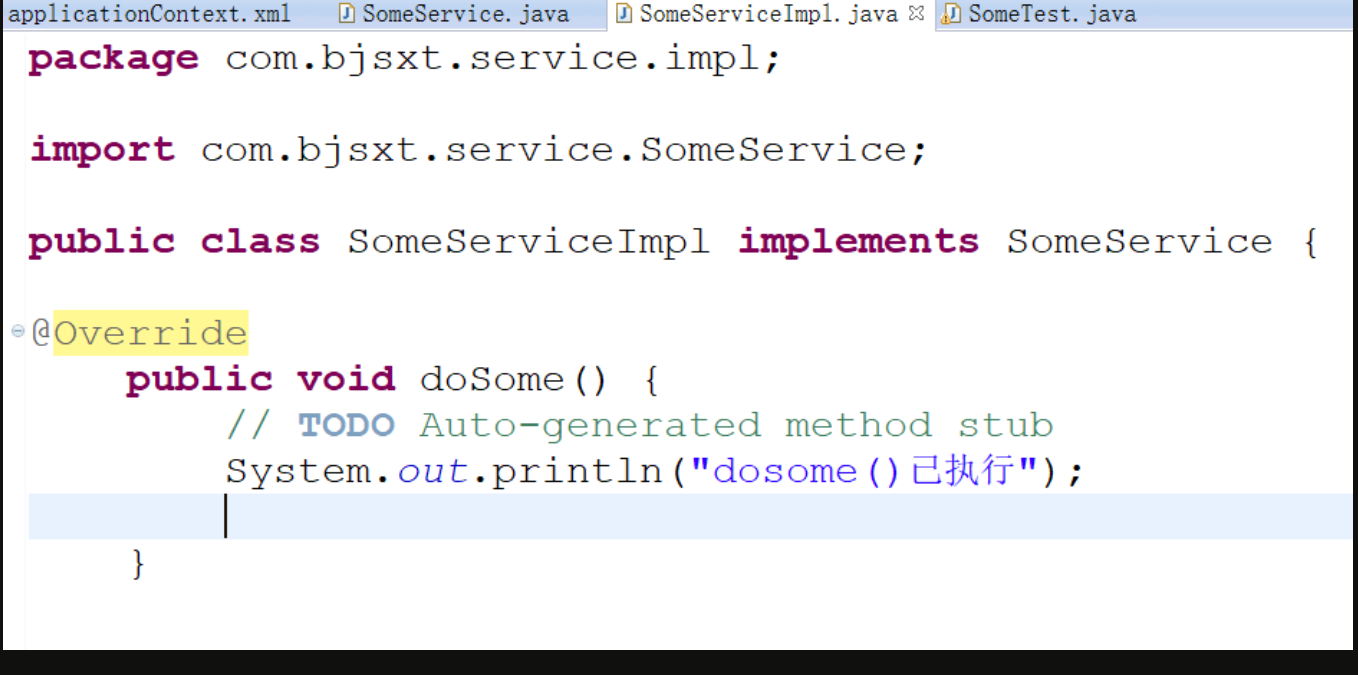
someserviceimpl

package com.bjsxt.service.impl;

import com.bjsxt.service.SomeService;

public class SomeServiceImpl implements SomeService {


    public SomeServiceImpl() {
        System.out.println("无参构造器执行!");
    }

    @Override
    public void doSome() {
        System.out.println("doSome()方法执行!");
    }

}
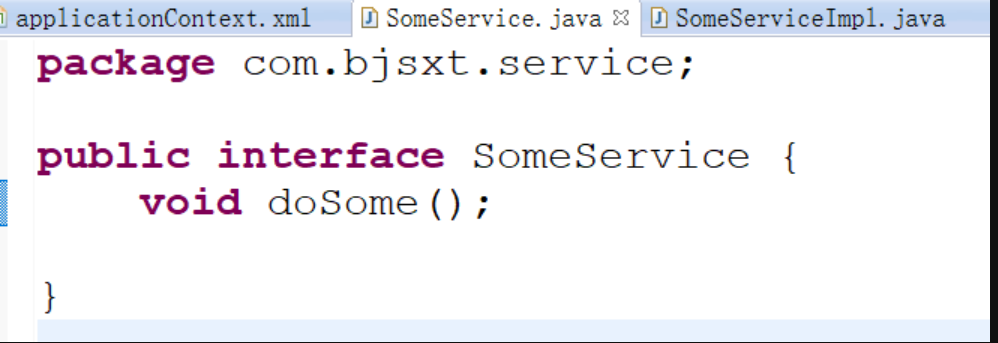
someservice

package com.bjsxt.service;

public interface SomeService {
    void doSome();
}
Test

package com.bjsxt.test;

import org.junit.Test;
import org.springframework.beans.factory.BeanFactory;
import org.springframework.beans.factory.xml.XmlBeanFactory;
import org.springframework.context.ApplicationContext;
import org.springframework.context.support.ClassPathXmlApplicationContext;
import org.springframework.core.io.ClassPathResource;

import com.bjsxt.service.SomeService;
import com.bjsxt.service.impl.SomeServiceImpl;

public class SomeTest {
    //该方式的优点:实现了测试类与service实现类的解耦合
    @Test
    public void someTest01(){
        //创建容器对象,ApplicationContext容器初始化时,所有的容器中的bean创建完毕
        ApplicationContext ac = new ClassPathXmlApplicationContext("applicationContext.xml");
        SomeService service = ac.getBean("someServiceImpl", SomeService.class);
        service.doSome();
    }
}
applicationcontext.xml

<?xml version="1.0" encoding="UTF-8"?>
<beans xmlns="http://www.springframework.org/schema/beans"
    xmlns:xsi="http://www.w3.org/2001/XMLSchema-instance"
    xsi:schemaLocation="
        http://www.springframework.org/schema/beans
        http://www.springframework.org/schema/beans/spring-beans.xsd">
    <!-- 注册工厂 -->
    <bean id="serviceFactory" class="com.bjsxt.factory.ServiceFactory"></bean>
    <!-- 从工厂中获取someServiceImpl的bean对象 -->
    <bean id="someServiceImpl" factory-bean="serviceFactory" factory-method="getSomeService"></bean>
</beans>
静态工厂方式:
factory

package com.bjsxt.factory;

import com.bjsxt.service.SomeService;
import com.bjsxt.service.impl.SomeServiceImpl;

public class ServiceFactory {
    //静态工厂方式创建bean对象
    public static SomeService getSomeService(){
        SomeService someServiceImpl = new SomeServiceImpl();
        return someServiceImpl;
    }
}
service

package com.bjsxt.service.impl;

import com.bjsxt.service.SomeService;

public class SomeServiceImpl implements SomeService {


    public SomeServiceImpl() {
        System.out.println("无参构造器执行!");
    }

    @Override
    public void doSome() {
        System.out.println("doSome()方法执行!");
    }

}

package com.bjsxt.service;

public interface SomeService {
    void doSome();
}
Test

package com.bjsxt.test;

import org.junit.Test;
import org.springframework.beans.factory.BeanFactory;
import org.springframework.beans.factory.xml.XmlBeanFactory;
import org.springframework.context.ApplicationContext;
import org.springframework.context.support.ClassPathXmlApplicationContext;
import org.springframework.core.io.ClassPathResource;

import com.bjsxt.service.SomeService;
import com.bjsxt.service.impl.SomeServiceImpl;

public class SomeTest {
    //该方式的优点:实现了测试类与service实现类的解耦合
    @Test
    public void someTest01(){
        //创建容器对象,ApplicationContext容器初始化时,所有的容器中的bean创建完毕
        ApplicationContext ac = new ClassPathXmlApplicationContext("applicationContext.xml");
        SomeService service = ac.getBean("someServiceImpl", SomeService.class);
        service.doSome();
    }
}
applicationcontext.xml

<?xml version="1.0" encoding="UTF-8"?>
<beans xmlns="http://www.springframework.org/schema/beans"
    xmlns:xsi="http://www.w3.org/2001/XMLSchema-instance"
    xsi:schemaLocation="
        http://www.springframework.org/schema/beans
        http://www.springframework.org/schema/beans/spring-beans.xsd">
    <!-- 从工厂中获取someServiceImpl的bean对象 -->
    <bean id="someServiceImpl" class="com.bjsxt.factory.ServiceFactory" factory-method="getSomeService"></bean>
</beans>
Bean的作用域
单例模式singleton
原型模式prototype
在applicationcontext.xml 的bean标签里添加一个属性 scope="prototype"。默认是singleton。
service

package com.bjsxt.service;

public interface SomeService {
    void doSome();
}

package com.bjsxt.service.impl;

import com.bjsxt.service.SomeService;

public class SomeServiceImpl implements SomeService {


    public SomeServiceImpl() {
        System.out.println("无参构造器执行!");
    }

    @Override
    public void doSome() {
        System.out.println("doSome()方法执行!");
    }

}
Test

package com.bjsxt.test;

import org.junit.Test;
import org.springframework.beans.factory.BeanFactory;
import org.springframework.beans.factory.xml.XmlBeanFactory;
import org.springframework.context.ApplicationContext;
import org.springframework.context.support.ClassPathXmlApplicationContext;
import org.springframework.core.io.ClassPathResource;

import com.bjsxt.service.SomeService;
import com.bjsxt.service.impl.SomeServiceImpl;

public class SomeTest {

    @Test
    public void someTest01(){
        //创建容器对象
        ApplicationContext ac = new ClassPathXmlApplicationContext("applicationContext.xml");
        SomeService service1 = ac.getBean("someServiceImpl", SomeService.class);
        SomeService service2 = ac.getBean("someServiceImpl", SomeService.class);
        SomeService service3 = ac.getBean("someServiceImpl1", SomeService.class);
        System.out.println(service1==service2);
        System.out.println(service1==service3);
    }
}
applicatoncontext.xml

<?xml version="1.0" encoding="UTF-8"?>
<beans xmlns="http://www.springframework.org/schema/beans"
    xmlns:xsi="http://www.w3.org/2001/XMLSchema-instance"
    xsi:schemaLocation="
        http://www.springframework.org/schema/beans
        http://www.springframework.org/schema/beans/spring-beans.xsd">
    <!-- bean的定义:以下配置相当于SomeService service = new SomeServiceImpl(); -->
    <bean id="someServiceImpl" class="com.bjsxt.service.impl.SomeServiceImpl" scope="prototype"></bean>
    <bean id="someServiceImpl1" class="com.bjsxt.service.impl.SomeServiceImpl"></bean>
</beans>
Bean的装配方式
1 基于XML的DI
所谓注入,可以理解为对象的属性赋值
设值注入
-
简单数据类型和引用数据类型注入
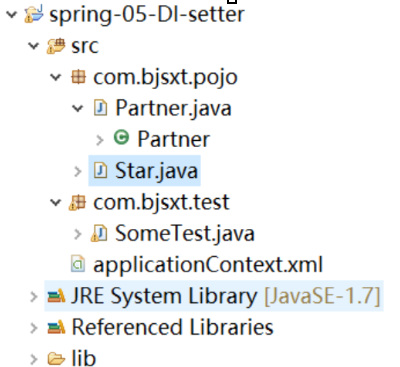

package com.bjsxt.pojo;

public class Partner {
private String name;

public String getName() {
return name;
}

public void setName(String name) {
this.name = name;
}

@Override
public String toString() {
return "Partner [name=" + name + "]";
}

}

package com.bjsxt.pojo;

public class Star {
private String name;
private int age;
private Partner partner;

public Partner getPartner() {
return partner;
}
public void setPartner(Partner partner) {
this.partner = partner;
}
public String getName() {
return name;
}
public void setName(String name) {
this.name = name;
}
public int getAge() {
return age;
}
public void setAge(int age) {
this.age = age;
}
@Override
public String toString() {
return "Star [name=" + name + ", age=" + age + ", partner=" + partner + "]";
}


}
applicationcontext.xml

<?xml version="1.0" encoding="UTF-8"?>
<beans xmlns="http://www.springframework.org/schema/beans"
xmlns:xsi="http://www.w3.org/2001/XMLSchema-instance"
xsi:schemaLocation="
http://www.springframework.org/schema/beans
http://www.springframework.org/schema/beans/spring-beans.xsd">

<!-- -设值方式; -->
<bean id="star" class="com.bjsxt.pojo.Star">
<property name="name" value="贝壳反目"></property>
<property name="age" value="37"></property>
<property name="partner" ref="partner"></property>
</bean>

<bean id="partner" class="com.bjsxt.pojo.Partner">
<property name="name" value="维多利亚"></property>
</bean>

</beans>
Test

package com.bjsxt.test;

import org.junit.Test;
import org.springframework.beans.factory.BeanFactory;
import org.springframework.beans.factory.xml.XmlBeanFactory;
import org.springframework.context.ApplicationContext;
import org.springframework.context.support.ClassPathXmlApplicationContext;
import org.springframework.core.io.ClassPathResource;

import com.bjsxt.pojo.Star;


public class SomeTest {

@Test
public void someTest01(){
//创建容器对象
//容器接口里面的一个实现类,通过这个实现类来创建对象
ApplicationContext ac = new ClassPathXmlApplicationContext("applicationContext.xml");
Star star= ac.getBean("star", Star.class);
System.out.println(star);


}


}
-
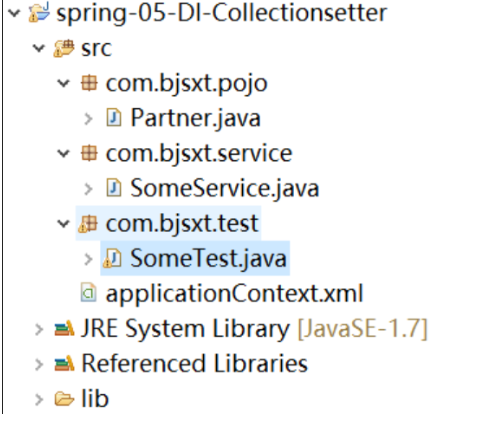
集合属性注入(array.set.list.map.propertes)

package com.bjsxt.pojo;

public class Partner {
private String name;

public String getName() {
return name;
}

public void setName(String name) {
this.name = name;
}

@Override
public String toString() {
return "Partner [name=" + name + "]";
}

}

package com.bjsxt.pojo;

public class Partner {
private String name;

public String getName() {
return name;
}

public void setName(String name) {
this.name = name;
}

@Override
public String toString() {
return "Partner [name=" + name + "]";
}

}

<?xml version="1.0" encoding="UTF-8"?>
<beans xmlns="http://www.springframework.org/schema/beans"
xmlns:xsi="http://www.w3.org/2001/XMLSchema-instance"
xsi:schemaLocation="
http://www.springframework.org/schema/beans
http://www.springframework.org/schema/beans/spring-beans.xsd">

<bean id="partner1" class="com.bjsxt.pojo.Partner">
<property name="name" value="贝壳反目"></property>

</bean>

<bean id="partner2" class="com.bjsxt.pojo.Partner">
<property name="name" value="维多利亚"></property>
</bean>
<bean id="someSerivce" class="com.bjsxt.service.SomeService">
<property name="myArray">
<array>
<value>北京</value>
<value>上海</value>
</array>
</property>
<property name="mySet">
<set>
<ref bean="partner1"/>
<ref bean="partner2"/>
</set>
</property>
<property name="myList">
<list>
<value>男</value>
<value>女</value>
</list>
</property>
<property name="myMap">
<map>
<entry key="qq" value="123456"></entry>
<entry key="moblie" value="13300000"></entry>
</map>
</property>
<property name="myProps">
<props>
<prop key="兴趣">足球</prop>
<prop key="爱好">下棋</prop>
</props>
</property>
</bean>

</beans>

-
域属性自动注入(byName\byType;局部和全局配置) 默认是byname
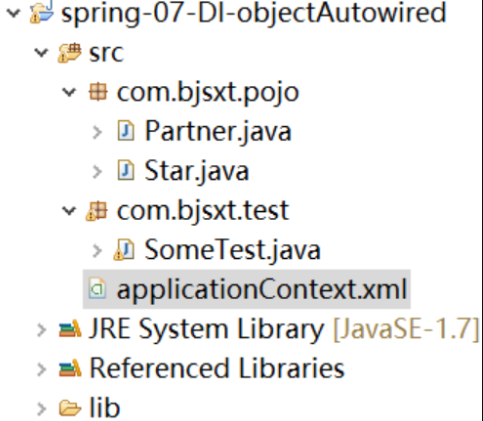
在跟标签下添加default-uatowire="bytype"或者“byname”是全局配置。
applicationContext.xml

<?xml version="1.0" encoding="UTF-8"?>
<beans xmlns="http://www.springframework.org/schema/beans"
    xmlns:xsi="http://www.w3.org/2001/XMLSchema-instance"
    xsi:schemaLocation="
        http://www.springframework.org/schema/beans
        http://www.springframework.org/schema/beans/spring-beans.xsd"
    default-autowire="byType">
    <!-- byName方式域属性自动注入:要求注入的bean的id必须和被注入的bean对象的属性名一致 -->
    <!--
    <bean id="star" class="com.bjsxt.pojo.Star" autowire="byName">
        <property name="name" value="贝克汉姆"></property>
        <property name="age" value="39"></property>
    </bean>
     -->

    <!-- byType方式域属性自动注入:spring配置文件中查询与属性类型一致的bean并进行注入 -->
    <!--
    <bean id="star" class="com.bjsxt.pojo.Star" autowire="byType">
        <property name="name" value="贝克汉姆"></property>
        <property name="age" value="39"></property>
    </bean>
     -->

    <bean id="star" class="com.bjsxt.pojo.Star">
        <property name="name" value="贝克汉姆"></property>
        <property name="age" value="39"></property>
    </bean>

    <bean id="partner" class="com.bjsxt.pojo.Partner">
        <property name="name" value="维多利亚"></property>
    </bean>


</beans>
-
空字符串或null注入
applicationContext.xml

<?xml version="1.0" encoding="UTF-8"?>
<beans xmlns="http://www.springframework.org/schema/beans"
    xmlns:xsi="http://www.w3.org/2001/XMLSchema-instance"
    xsi:schemaLocation="
        http://www.springframework.org/schema/beans
        http://www.springframework.org/schema/beans/spring-beans.xsd">
    <!-- 设值方式DI -->
    <bean id="star" class="com.bjsxt.pojo.Star">
        <!-- 给属性注入空字符串:通过<value/> -->
        <!-- <property name="name"><value/></property> -->

        <!-- 给属性注入null值:通过<null/> -->
        <property name="name"><null/></property>
        <property name="age" value="39"></property>
        <property name="partner" ref="partner"></property>
    </bean>

    <bean id="partner" class="com.bjsxt.pojo.Partner">
        <property name="name" value="维多利亚"></property>
    </bean>


</beans>
test

package com.bjsxt.test;

import org.junit.Test;
import org.springframework.context.ApplicationContext;
import org.springframework.context.support.ClassPathXmlApplicationContext;

import com.bjsxt.pojo.Star;

public class SomeTest {

    @Test
    public void someTest01(){
        //创建容器对象
        ApplicationContext ac = new ClassPathXmlApplicationContext("applicationContext.xml");
        Star star = ac.getBean("star", Star.class);
        System.out.println(star);
    }
}
pojo

package com.bjsxt.pojo;

public class Partner {
    private String name;

    public String getName() {
        return name;
    }

    public void setName(String name) {
        this.name = name;
    }

    @Override
    public String toString() {
        return "Partner [name=" + name + "]";
    }

}

package com.bjsxt.pojo;

public class Star {
    private String name;
    private int age;
    private Partner partner;

    public Partner getPartner() {
        return partner;
    }
    public void setPartner(Partner partner) {
        this.partner = partner;
    }
    public String getName() {
        return name;
    }
    public void setName(String name) {
        this.name = name;
    }
    public int getAge() {
        return age;
    }
    public void setAge(int age) {
        this.age = age;
    }
    @Override
    public String toString() {
        return "Star [name=" + name + ", age=" + age + ", partner=" + partner + "]";
    }


}
2.构造注入
pojo

package com.bjsxt.pojo;

public class Partner {
    private String name;

    public String getName() {
        return name;
    }

    public void setName(String name) {
        this.name = name;
    }

    @Override
    public String toString() {
        return "Partner [name=" + name + "]";
    }

}

package com.bjsxt.pojo;

public class Star {
    private String name;
    private int age;
    private Partner partner;
    public Star() {
        super();
    }
    //带参构造器
    public Star(String name, int age, Partner partner) {
        super();
        this.name = name;
        this.age = age;
        this.partner = partner;
    }

    @Override
    public String toString() {
        return "Star [name=" + name + ", age=" + age + ", partner=" + partner + "]";
    }


}
Test

package com.bjsxt.test;

import org.junit.Test;
import org.springframework.context.ApplicationContext;
import org.springframework.context.support.ClassPathXmlApplicationContext;

import com.bjsxt.pojo.Star;

public class SomeTest {

    @Test
    public void someTest01(){
        //创建容器对象
        ApplicationContext ac = new ClassPathXmlApplicationContext("applicationContext.xml");
        Star star = ac.getBean("star", Star.class);
        System.out.println(star);
    }
}
applicationContext.xml

<?xml version="1.0" encoding="UTF-8"?>
<beans xmlns="http://www.springframework.org/schema/beans"
    xmlns:xsi="http://www.w3.org/2001/XMLSchema-instance"
    xsi:schemaLocation="
        http://www.springframework.org/schema/beans
        http://www.springframework.org/schema/beans/spring-beans.xsd">
    <!-- 构造方式DI -->
    <!--
    <bean id="star" class="com.bjsxt.pojo.Star">
        <constructor-arg name="name" value="郭靖"></constructor-arg>
        <constructor-arg name="age" value="25"></constructor-arg>
        <constructor-arg name="partner" ref="partner"></constructor-arg>
    </bean>
     -->
    <!--
    <bean id="star" class="com.bjsxt.pojo.Star">
        <constructor-arg index="0" value="郭靖"></constructor-arg>
        <constructor-arg index="1" value="25"></constructor-arg>
        <constructor-arg index="2" ref="partner"></constructor-arg>
    </bean>
     -->
    <bean id="star" class="com.bjsxt.pojo.Star">
        <constructor-arg value="郭靖"></constructor-arg>
        <constructor-arg value="25"></constructor-arg>
        <constructor-arg ref="partner"></constructor-arg>
    </bean>
    <bean id="partner" class="com.bjsxt.pojo.Partner">
        <property name="name" value="维多利亚"></property>
    </bean>


</beans>
3基于注解的DI
-
环境搭建:导入aop包、添加context约束信息(组件扫描器)
-
常用注解:@Component(是当前类作为一个主键,交给spring进行管理)、
@Scope(bean作用域管理)、@Value(对简单数据类型的注入)
@Resource(域属性自动注入)、@Autowired(域属性自动注入)实现类上
-
与@Component具有相同功能的还有三个注解。
-
@Repository:该注解添加在Dao实现类上,@Service:该注解添加在Service实现类上, @Controller:该注解添加在Controller类上
引入数据类型通过@Autowired,默认情况下是bytype方式注入;
如果使用byname方式自动注入,需要@Qualifier联合使用
@Autowired spring
@Qualifier("myPartner")
@Resource引用数据类型通过也可以注入;默认情况下是byname方式注入 jdk
如果找不到与名称匹配的bean才会按照类型进行注入。
详细说明:
pojo

package com.bjsxt.pojo;

import org.springframework.beans.factory.annotation.Value;
import org.springframework.stereotype.Component;
//表示当前类交给Spring容器管理
@Component("myPartner")
public class Partner {
    @Value("张三")
    private String name;


    @Override
    public String toString() {
        return "Partner [name=" + name + "]";
    }

}

package com.bjsxt.pojo;

import javax.annotation.Resource;


import org.springframework.beans.factory.annotation.Autowired;
import org.springframework.beans.factory.annotation.Qualifier;
import org.springframework.beans.factory.annotation.Value;
import org.springframework.context.annotation.Scope;
import org.springframework.stereotype.Component;
/**
 * 与@Component具有相同功能的还有另外3个注解
 * @Repository:该注解添加在Dao实现类上
 * @Service:该注解添加在Service实现类上
 * @Controller:该注解添加在Controller类上
 *
 */
//表明当前类交给spring容器管理
@Component
@Scope("prototype")
public class Star {
    //简单数据类型通过@Value注入
    @Value("李四")
    private String name;
    @Value("23")
    private int age;
    //引用数据类型通过@Autowired注入;默认情况下是byType方式注入;如果使用byName方式自动注入,
    //需要与@Qualifier联合使用
    /*
    @Autowired
    @Qualifier("myPartner")
    */
    //引用数据类型通过@Resource也可以实现注入;默认情况下是byName方式注入,
    //只有找不到与名称匹配的bean的时候才会按照类型来进行注入
    @Resource
    private Partner partner;

    @Override
    public String toString() {
        return "Star [name=" + name + ", age=" + age + ", partner=" + partner + "]";
    }


}
Test

package com.bjsxt.test;

import org.junit.Test;
import org.springframework.context.ApplicationContext;
import org.springframework.context.support.ClassPathXmlApplicationContext;

import com.bjsxt.pojo.Star;

public class SomeTest {

    @Test
    public void someTest01(){
        //创建容器对象
        ApplicationContext ac = new ClassPathXmlApplicationContext("applicationContext.xml");
        Star star = ac.getBean("star", Star.class);
        System.out.println(star);
    }
}
applicationContext.xml

<?xml version="1.0" encoding="UTF-8"?>
<beans xmlns="http://www.springframework.org/schema/beans"
    xmlns:xsi="http://www.w3.org/2001/XMLSchema-instance"
    xmlns:context="http://www.springframework.org/schema/context" xsi:schemaLocation="
        http://www.springframework.org/schema/beans http://www.springframework.org/schema/beans/spring-beans.xsd
        http://www.springframework.org/schema/context http://www.springframework.org/schema/context/spring-context.xsd"> <!-- bean definitions here -->

    <context:component-scan base-package="com.bjsxt.pojo"></context:component-scan>
</beans>
1.Aop引入
1.1 什么是代理?
1.2 为什么使用代理?
1.2.1 可以隐藏目标类的具体实现;
1.2.2 在不修改目标类代码的情况下能够对其功能进行增强。
1.3 代理分类:代理分为静态代理和动态代理
2.静态代理
若代理类在程序运行前就已经存在,那么这种代理方式被成为 静态代理 ,
这种情况下的代理类通常都是我们在Java代码中定义的。 通常情况下, 静
态代理中的代理类和目标类会实现同一接口或是派生自相同的父类。
代码示例:
2.1 测试环境的搭建
2.2 静态代理的实现(目标类和代理类实现相同接口)
静态代理

package com.bjsxt.proxy;

import com.bjsxt.service.SomeService;

//静态代理类,要和目标类实现相同接口
public class ServiceProxy implements SomeService {
    SomeService target;

    public ServiceProxy() {
        super();
    }


    public ServiceProxy(SomeService target) {
        super();
        this.target = target;
    }


    public String doSome(){
        return target.doSome().toUpperCase();
    }
}

package com.bjsxt.service;

//主业务接口
public interface SomeService {
    String doSome();
}

package com.bjsxt.service.impl;

import com.bjsxt.service.SomeService;

//目标类
public class SomeServiceImpl implements SomeService {


    public SomeServiceImpl() {
        System.out.println("无参构造器执行!");
    }

    @Override
    public String doSome() {
        return "China";
    }

}
复制代码

package com.bjsxt.test;

import com.bjsxt.proxy.ServiceProxy;
import com.bjsxt.service.SomeService;
import com.bjsxt.service.impl.SomeServiceImpl;

public class SomeTest {
    public static void main(String[] args) {
        //定义目标对象
        SomeService target = new SomeServiceImpl();
        //定义目标对象的代理对象
        SomeService proxy = new ServiceProxy(target);
        String result = proxy.doSome();
        System.out.println(result);
    }
}
复制代码

<?xml version="1.0" encoding="UTF-8"?>
<beans xmlns="http://www.springframework.org/schema/beans"
    xmlns:xsi="http://www.w3.org/2001/XMLSchema-instance"
    xsi:schemaLocation="
        http://www.springframework.org/schema/beans
        http://www.springframework.org/schema/beans/spring-beans.xsd">
    <!-- bean的定义:以下配置相当于SomeService service = new SomeServiceImpl(); -->
    <bean id="someServiceImpl" class="com.bjsxt.service.impl.SomeServiceImpl"></bean>
</beans>
动态代理
3.动态代理
代理类在程序运行时创建的代理方式被成为 动态代理。 也就是说,这种情
况下,代理类并不是在Java代码中定义的,而是在运行时根据我们在Java代
码中的“指示”动态生成的。
3.1 常用的动态代理有两类:JDK动态代理和CGLIB动态代理
3.2 两者应用场景:
3.2.1如果目标对象实现了接口,采用JDK的动态代理
3.2.2如果目标对象没有实现了接口,必须采用CGLIB动态代理
3.3 代码示例:
JDK动态代理(JDK 提供的代理实现)
CGLIB动态代理(引入cglib的jar包)
分为:jdk动态代理和CGLIB动态代理
jdk动态代理
service

package com.bjsxt.service;

//主业务接口
public interface SomeService {
    String doSome();
}

package com.bjsxt.service.impl;

import com.bjsxt.service.SomeService;

//目标类
public class SomeServiceImpl implements SomeService {


    public SomeServiceImpl() {
        System.out.println("无参构造器执行!");
    }

    @Override
    public String doSome() {
        return "China";
    }

}
Test

package com.bjsxt.test;

import java.lang.reflect.InvocationHandler;
import java.lang.reflect.Method;
import java.lang.reflect.Proxy;

import com.bjsxt.service.SomeService;
import com.bjsxt.service.impl.SomeServiceImpl;

public class SomeTest {
    public static void main(String[] args) {
        //定义目标对象
        final SomeService target = new SomeServiceImpl();
        //定义目标对象的代理对象
        SomeService proxy = (SomeService) Proxy.newProxyInstance(target.getClass().getClassLoader(),//目标类的类加载器
                                                    target.getClass().getInterfaces(),//目标类实现的所有接口
                                                    new InvocationHandler() {//调用处理器
                                                        //proxy:代理对象
                                                        //method:目标方法
                                                        //args:目标方法参数
                                                        @Override
                                                        public Object invoke(Object proxy, Method method, Object[] args) throws Throwable {
                                                            String result = (String) method.invoke(target, args);
                                                            return result.toUpperCase();
                                                        }
                                                    });
        String result1 = proxy.doSome();
        System.out.println(result1);
    }
}
applicationContext.xml

<?xml version="1.0" encoding="UTF-8"?>
<beans xmlns="http://www.springframework.org/schema/beans"
    xmlns:xsi="http://www.w3.org/2001/XMLSchema-instance"
    xsi:schemaLocation="
        http://www.springframework.org/schema/beans
        http://www.springframework.org/schema/beans/spring-beans.xsd">
    <!-- bean的定义:以下配置相当于SomeService service = new SomeServiceImpl(); -->
    <bean id="someServiceImpl" class="com.bjsxt.service.impl.SomeServiceImpl"></bean>
</beans>
CGLIB代理
proxyfactory和service

package com.bjsxt.factory;

import java.lang.reflect.Method;

import com.bjsxt.service.impl.SomeServiceImpl;

import net.sf.cglib.proxy.Enhancer;
import net.sf.cglib.proxy.MethodInterceptor;
import net.sf.cglib.proxy.MethodProxy;

//cglib动态代理工厂
public class CglibProxyFactory implements MethodInterceptor{

    private SomeServiceImpl target;

    public CglibProxyFactory() {
        super();
    }

    public CglibProxyFactory(SomeServiceImpl target) {
        super();
        this.target = target;
    }

    //创建cglib代理对象的方法
    public SomeServiceImpl proxyCreator(){
        //创建增强器
        Enhancer enhancer = new Enhancer();
        //指定父类(指定目标类)
        enhancer.setSuperclass(SomeServiceImpl.class);
        //指定回调接口对象
        enhancer.setCallback(this);
        //创建cglib代理对象
        return (SomeServiceImpl) enhancer.create();
    }

    @Override
    public Object intercept(Object obj, Method method, Object[] args, MethodProxy proxy) throws Throwable {
        String result = (String) method.invoke(target, args);
        return result.toUpperCase();
    }


}

package com.bjsxt.service.impl;

//目标类
public class SomeServiceImpl {


    public SomeServiceImpl() {
        System.out.println("无参构造器执行!");
    }

    public String doSome() {
        return "China";
    }

}
Test

package com.bjsxt.test;

import com.bjsxt.factory.CglibProxyFactory;
import com.bjsxt.service.impl.SomeServiceImpl;

public class SomeTest {
    public static void main(String[] args) {
        //定义目标对象
        SomeServiceImpl target = new SomeServiceImpl();
        //定义目标对象的代理对象
        SomeServiceImpl proxy = new CglibProxyFactory(target).proxyCreator();
        String result1 = proxy.doSome();
        System.out.println(result1);
    }
}
applicationcontext.xml

<?xml version="1.0" encoding="UTF-8"?>
<beans xmlns="http://www.springframework.org/schema/beans"
    xmlns:xsi="http://www.w3.org/2001/XMLSchema-instance"
    xsi:schemaLocation="
        http://www.springframework.org/schema/beans
        http://www.springframework.org/schema/beans/spring-beans.xsd">
    <!-- bean的定义:以下配置相当于SomeService service = new SomeServiceImpl(); -->
    <bean id="someServiceImpl" class="com.bjsxt.service.impl.SomeServiceImpl"></bean>
</beans>
Aop介绍:
面向切面编程,就是将交叉业务逻辑封装成切面,利用AOP的功能将切面织入到主业务逻辑中。所谓交叉业务逻辑是指,通用的、与主业务逻辑无关的代码,如安全、检查、事物、日志等。
若不使用Aop,则会出现代码纠缠,即交叉业务逻辑与主业务逻辑混合在一起。这样,会使主业务逻辑变得混杂不清。
Aop基本术语介绍
- 切面 泛指交叉业务逻辑。比如事务处理、日志处理就可以理解为切面。常用的切面有顾问和通知。实际就是对主业务逻辑的一种增强。
- 织入 织入是将切面代码插入到目标对象的过程。
- 连接点 指切面可以织入的位置。
- 切入点 指切面具体织入的位置。
- 通知(advice) 是切面的一种体现,可以完成简单的织入功能(织入功能就是在这里完成的)。通知定义了增强代码切入到目标代码的时间点,是目标方法执行之前执行,还是之后执行等。通知类型不同,切入时间不同。
- 顾问(Advisor) 顾问是切面的另一种实现,能够将通知以更为复杂的方式织入到目标对象中,是将通知包装为更复杂切面的装配器。不仅指定了切入时间点,还可以指定具体的切入点。
Spring 之Aop基本实现
Aop 编程环境搭建
导入两个jar包(Aop/aopalliance)
Spring 对Aop的实现(基于Schema-based方式)
通常通知类
前置通知(MethodBeforeAdvice)
后置通知(AfterReturningADvice)
环绕通知(MethoInterceptor)
异常处理通知(ThrowsAdvice)
前置通知:

package com.bjsxt.aspects;

import java.lang.reflect.Method;

import org.springframework.aop.MethodBeforeAdvice;
//切面:前置通知
public class MyMethodBeforeAdvice implements MethodBeforeAdvice {
/**
 * method:目标方法
 * args:目标方法的参数列表
 * target:目标对象
 */
    @Override
    public void before(Method method, Object[] args, Object target)
            throws Throwable {
        System.out.println("前置通知before()方法执行!");
    }


}

package com.bjsxt.service.impl;

import com.bjsxt.service.SomeService;

public class SomeServiceImpl implements SomeService {

    public SomeServiceImpl(){
        System.out.println("无参构造方法执行!");
    }
@Override
    public void doSome() {
        // TODO Auto-generated method stub
        System.out.println("dosome()已执行");

    }

@Override
public String doOther() {
    System.out.println("doOther()方法执行");

    return "love";
}


}

package com.bjsxt.service;

public interface SomeService {
    void doSome();
    String doOther();
}

package com.bjsxt.test;

import org.junit.Test;
import org.springframework.beans.factory.BeanFactory;
import org.springframework.beans.factory.xml.XmlBeanFactory;
import org.springframework.context.ApplicationContext;
import org.springframework.context.support.ClassPathXmlApplicationContext;
import org.springframework.core.io.ClassPathResource;

import com.bjsxt.service.SomeService;
import com.bjsxt.service.impl.SomeServiceImpl;

public class SomeTest {

    //优点:实现了测试类的解耦合
    @Test
    public void someTest01(){
        //创建容器对象
        //容器接口里面的一个实现类,通过这个实现类来创建对象
        ApplicationContext ac = new ClassPathXmlApplicationContext("applicationContext.xml");
        SomeService service = ac.getBean("proxyFactoryBean", SomeService.class);
        service.doSome();
        String result = service.doOther();
        System.out.println(result);


    }


}
配置文件

<?xml version="1.0" encoding="UTF-8"?>
<beans xmlns="http://www.springframework.org/schema/beans"
       xmlns:xsi="http://www.w3.org/2001/XMLSchema-instance"
       xsi:schemaLocation="
http://www.springframework.org/schema/beans
http://www.springframework.org/schema/beans/spring-beans.xsd">
<!-- 注册目标类 -->
<!-- -bean的定义: 以下配置相当于SomeService service=new SomeServiceImpl(); -->
<bean id="SomeServiceImpl" class="com.bjsxt.service.impl.SomeServiceImpl"></bean>
<!-- 注册切面:前置通知 -->
<bean id="myMethodBeforeAdvice" class="com.bjsxt.aspects.MyMethodBeforeAdvice"></bean>
<!-- 注册代理 -->
<bean id="proxyFactoryBean" class="org.springframework.aop.framework.ProxyFactoryBean">
    <!-- 指定目标对象 -->
    <property name="target" ref="SomeServiceImpl"></property>
    <!-- 指定目标类的实现接口 -->
    <property name="interfaces" value="com.bjsxt.service.SomeService"></property>
    <!-- 制定切面 -->
    <property name="interceptorNames" value="myMethodBeforeAdvice"></property>
</bean>
</beans>
后置通知:

package com.bjsxt.aspects;

import java.lang.reflect.Method;

import org.springframework.aop.AfterReturningAdvice;

public class MyAfterReturning implements AfterReturningAdvice {

    @Override
    public void afterReturning(Object returnValue, Method method,
            Object[] args, Object target) throws Throwable {
            System.out.println("后置方法执行afterReturning returnValue:"+returnValue);
            if(returnValue!=null){
                System.out.println("后置方法执行afterReturning"+((String) returnValue).toUpperCase());
            }
    }

}

<?xml version="1.0" encoding="UTF-8"?>
<beans xmlns="http://www.springframework.org/schema/beans"
       xmlns:xsi="http://www.w3.org/2001/XMLSchema-instance"
       xsi:schemaLocation="
http://www.springframework.org/schema/beans
http://www.springframework.org/schema/beans/spring-beans.xsd">
<!-- 注册目标类 -->
<!-- -bean的定义: 以下配置相当于SomeService service=new SomeServiceImpl(); -->
<bean id="SomeServiceImpl" class="com.bjsxt.service.impl.SomeServiceImpl"></bean>
<!-- 注册切面:前置通知 -->
<bean id="myMethodBeforeAdvice" class="com.bjsxt.aspects.MyMethodBeforeAdvice"></bean>
<!-- 后置通知 -->
<bean id="myAfterReturning" class="com.bjsxt.aspects.MyAfterReturning"></bean>
<!-- 注册代理 -->
<bean id="proxyFactoryBean" class="org.springframework.aop.framework.ProxyFactoryBean">
    <!-- 指定目标对象 -->
    <property name="target" ref="SomeServiceImpl"></property>
    <!-- 指定目标类的实现接口 -->
    <property name="interfaces" value="com.bjsxt.service.SomeService"></property>
    <!-- 制定切面 -->
    <property name="interceptorNames" value="myAfterReturning"></property>
</bean>
</beans>

package com.bjsxt.test;

import org.junit.Test;
import org.springframework.beans.factory.BeanFactory;
import org.springframework.beans.factory.xml.XmlBeanFactory;
import org.springframework.context.ApplicationContext;
import org.springframework.context.support.ClassPathXmlApplicationContext;
import org.springframework.core.io.ClassPathResource;

import com.bjsxt.service.SomeService;
import com.bjsxt.service.impl.SomeServiceImpl;

public class SomeTest {

    //优点:实现了测试类的解耦合
    @Test
    public void someTest01(){
        //创建容器对象
        //容器接口里面的一个实现类,通过这个实现类来创建对象
        ApplicationContext ac = new ClassPathXmlApplicationContext("applicationContext.xml");
        SomeService service = ac.getBean("proxyFactoryBean", SomeService.class);
        service.doSome();
        String result = service.doOther();
        System.out.println(result);


    }


}
环绕通知:

package com.bjsxt.test;

import org.junit.Test;
import org.springframework.beans.factory.BeanFactory;
import org.springframework.beans.factory.xml.XmlBeanFactory;
import org.springframework.context.ApplicationContext;
import org.springframework.context.support.ClassPathXmlApplicationContext;
import org.springframework.core.io.ClassPathResource;

import com.bjsxt.service.SomeService;
import com.bjsxt.service.impl.SomeServiceImpl;

public class SomeTest {

    //优点:实现了测试类的解耦合
    @Test
    public void someTest01(){
        //创建容器对象
        //容器接口里面的一个实现类,通过这个实现类来创建对象
        ApplicationContext ac = new ClassPathXmlApplicationContext("applicationContext.xml");
        SomeService service = ac.getBean("proxyFactoryBean", SomeService.class);
        service.doSome();
        String result = service.doOther();
        System.out.println(result);


    }


}

<?xml version="1.0" encoding="UTF-8"?>
<beans xmlns="http://www.springframework.org/schema/beans"
       xmlns:xsi="http://www.w3.org/2001/XMLSchema-instance"
       xsi:schemaLocation="
http://www.springframework.org/schema/beans
http://www.springframework.org/schema/beans/spring-beans.xsd">
<!-- 注册目标类 -->
<!-- -bean的定义: 以下配置相当于SomeService service=new SomeServiceImpl(); -->
<bean id="SomeServiceImpl" class="com.bjsxt.service.impl.SomeServiceImpl"></bean>
<!-- 注册切面:前置通知 -->
<bean id="myMethodBeforeAdvice" class="com.bjsxt.aspects.MyMethodBeforeAdvice"></bean>
<!-- 后置通知 -->
<bean id="myAfterReturning" class="com.bjsxt.aspects.MyAfterReturning"></bean>
<!-- 环绕通知 -->
<bean id="myMethodInterceptor" class="com.bjsxt.aspects.MyMethodInterceptor"></bean>
<!-- 注册代理 -->
<bean id="proxyFactoryBean" class="org.springframework.aop.framework.ProxyFactoryBean">
    <!-- 指定目标对象 -->
    <property name="target" ref="SomeServiceImpl"></property>
    <!-- 指定目标类的实现接口 -->
    <property name="interfaces" value="com.bjsxt.service.SomeService"></property>
    <!-- 制定切面 -->
    <property name="interceptorNames" value="myMethodInterceptor"></property>
</bean>
</beans>
异常通知:

package com.bjsxt.aspects;

import org.springframework.aop.ThrowsAdvice;

public class MyThrowAdvice implements ThrowsAdvice {
    public void afterThrowing(Exception ex){
        System.out.println("异常通知执行");
    }
}

<?xml version="1.0" encoding="UTF-8"?>
<beans xmlns="http://www.springframework.org/schema/beans"
       xmlns:xsi="http://www.w3.org/2001/XMLSchema-instance"
       xsi:schemaLocation="
http://www.springframework.org/schema/beans
http://www.springframework.org/schema/beans/spring-beans.xsd">
<!-- 注册目标类 -->
<!-- -bean的定义: 以下配置相当于SomeService service=new SomeServiceImpl(); -->
<bean id="SomeServiceImpl" class="com.bjsxt.service.impl.SomeServiceImpl"></bean>
<!-- 注册切面:前置通知 -->
<bean id="myMethodBeforeAdvice" class="com.bjsxt.aspects.MyMethodBeforeAdvice"></bean>
<!-- 后置通知 -->
<bean id="myAfterReturning" class="com.bjsxt.aspects.MyAfterReturning"></bean>
<!-- 环绕通知 -->
<bean id="myMethodInterceptor" class="com.bjsxt.aspects.MyMethodInterceptor"></bean>
<!-- 异常通知 -->
<bean id="myThrowAdvice" class="com.bjsxt.aspects.MyThrowAdvice"></bean>
<!-- 注册代理 -->
<bean id="proxyFactoryBean" class="org.springframework.aop.framework.ProxyFactoryBean">
    <!-- 指定目标对象 -->
    <property name="target" ref="SomeServiceImpl"></property>
    <!-- 指定目标类的实现接口 -->
    <property name="interfaces" value="com.bjsxt.service.SomeService"></property>
    <!-- 制定切面 -->
    <property name="interceptorNames" value="myThrowAdvice"></property>
</bean>
</beans>
三、Spring之AOP
8. AspectJ对AOP的实现
对于AOP这种编程思想,很多框架都进行了实现。Spring就是其中之一,可
以完成面向切面编程。然而,AspectJ也实现了AOP的功能,且其实现方式更为简捷,
使用更为方便,而且还支持注解式开发。所以,Spring又将AspectJ的对于AOP的实
现也引入到了自己的框架中。
在Spring中使用AOP开发时,一般使用AspectJ的实现方式。
9. AspectJ的通知类型
AspectJ中常用的通知有五种类型:
- 前置通知
- 后置通知
- 环绕通知
- 异常通知
- 最终通知:无论程序执行是否正常,该通知都会执行。类似于try..catch中finally代码块。
10. AspectJ的切入点表达式

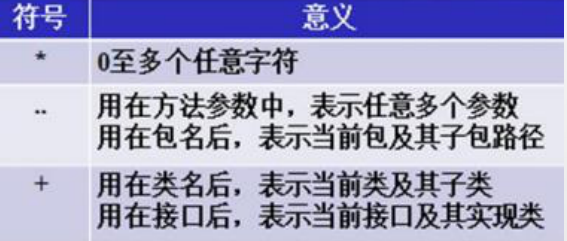
切入点表达式要匹配的对象就是目标方法的方法名。所以,execution表达式中明显就是方法
的签名。注意,表达式中加[ ]的部分表示可省略部分,各部分间用空格分开。在其中可以使
用以下符号:
11. AspectJ的切入点表达式
举例:
execution(public * *(..))
指定切入点为:任意公共方法。
execution(* set *(..))
指定切入点为:任何一个以“set”开始的方法。
execution(* com.xyz.service.*.*(..))
指定切入点为:定义在service包里的任意类的任意方法。
execution(* com.xyz.service..*.*(..))
指定切入点为:定义在service包或者子包里的任意类的任意方法。“..”出现在类名中时,
后面必须跟“*”,表示包、子包下的所有类。
execution(* *.service.*.*(..))
指定只有一级包下的serivce子包下所有类(接口)中的所有方法为切入点
execution(* *..service.*.*(..))
指定所有包下的serivce子包下所有类(接口)中的所有方法为切入点
12.搭建AspectJ的开发环境
13.1 导入两个Jar包 spring-aspects-5.1.1.RELEASE.jar com.springsource.org.aspectj.weaver-1.6.8.RELEASE.jar
13.2 引入AOP约束
13. AspectJ对于AOP的实现有两种方式:
注解方式
XML方式
注解方式:
前置通知

package com.bjsxt.service;

public interface SomeService {
    void doSome();
    String doOther();
}

package com.bjsxt.service.impl;

import com.bjsxt.service.SomeService;

public class SomeServiceImpl implements SomeService {

    public SomeServiceImpl(){
        System.out.println("无参构造方法执行!");
    }
@Override
    public void doSome() {
        // TODO Auto-generated method stub
        System.out.println("dosome()已执行");

    }

@Override
public String doOther() {
    System.out.println("doOther()方法执行");

    return "love";
}


}

package com.bjsxt.aspects;

import org.aspectj.lang.annotation.Aspect;
import org.aspectj.lang.annotation.Before;

//切面
@Aspect  //表明当前类是一个切面
public class MyAspect {
    @Before( "execution(* *. .service.*.doSome(. .))")
     public void before(){
         System.out.println("aspecj的前置通知执行");
     }

}

package com.bjsxt.test;

import org.junit.Test;
import org.springframework.beans.factory.BeanFactory;
import org.springframework.beans.factory.xml.XmlBeanFactory;
import org.springframework.context.ApplicationContext;
import org.springframework.context.support.ClassPathXmlApplicationContext;
import org.springframework.core.io.ClassPathResource;

import com.bjsxt.service.SomeService;
import com.bjsxt.service.impl.SomeServiceImpl;

public class SomeTest {

    //优点:实现了测试类的解耦合
    @Test
    public void someTest01(){
        //创建容器对象
        //容器接口里面的一个实现类,通过这个实现类来创建对象
        ApplicationContext ac = new ClassPathXmlApplicationContext("applicationContext.xml");
        SomeService service = ac.getBean("SomeServiceImpl", SomeService.class);
        service.doSome();
        String result = service.doOther();
        System.out.println(result);


    }


}
application.xml:

<?xml version="1.0" encoding="UTF-8"?>
<beans xmlns="http://www.springframework.org/schema/beans"
     xmlns:xsi="http://www.w3.org/2001/XMLSchema-instance"
     xmlns:aop="http://www.springframework.org/schema/aop"
     xsi:schemaLocation="http://www.springframework.org/schema/beans
         http://www.springframework.org/schema/beans/spring-beans.xsd
         http://www.springframework.org/schema/aop
         http://www.springframework.org/schema/aop/spring-aop.xsd">
<!-- 注册目标类 -->
<!-- -bean的定义: 以下配置相当于SomeService service=new SomeServiceImpl(); -->
<bean id="SomeServiceImpl" class="com.bjsxt.service.impl.SomeServiceImpl"></bean>
<!-- 注册切面:前置通知 -->
<bean id="myAspect" class="com.bjsxt.aspects.MyAspect"></bean>
<!-- 注册自动代理 -->

<aop:aspectj-autoproxy/>
</beans>
后置通知:

package com.bjsxt.aspects;

import org.aspectj.lang.annotation.AfterReturning;
import org.aspectj.lang.annotation.Aspect;
import org.aspectj.lang.annotation.Before;

//切面
@Aspect  //表明当前类是一个切面
public class MyAspect {
    /*
     * @Before( "execution(* *. .service.*.doSome(. .))")
     public void before(){
         System.out.println("aspecj的前置通知执行");
     }*/
    //该注解表明当前方法是后置通知方法
   @AfterReturning(value="execution(* *. .service.*.doOther(..))",returning="result")
    public  void afterReturning(Object result){

       System.out.println("aspecj的后置通知执行!目标方法的返回值是"+result);
    }

}
环绕通知:

package com.bjsxt.aspects;

import org.aspectj.lang.ProceedingJoinPoint;
import org.aspectj.lang.annotation.AfterReturning;
import org.aspectj.lang.annotation.Around;
import org.aspectj.lang.annotation.Aspect;
import org.aspectj.lang.annotation.Before;

//切面
@Aspect  //表明当前类是一个切面
public class MyAspect {
    /*
     * @Before( "execution(* *. .service.*.doSome(. .))")
     public void before(){
         System.out.println("aspecj的前置通知执行");
     }*/
    @Around(value = "execution(* *..service.*.doOther(..))")
    public Object around( ProceedingJoinPoint pjp) throws Throwable{
        System.out.println("环绕通知,目标方法执行之前!");
        String result =(String)  pjp.proceed();
        if(result!=null){
            result=result.toUpperCase();
        }
        System.out.println("环绕通知,目标方法执行之后!");
        return result;

    }
}
异常通知:

package com.bjsxt.aspects;

import org.aspectj.lang.ProceedingJoinPoint;
import org.aspectj.lang.annotation.AfterReturning;
import org.aspectj.lang.annotation.AfterThrowing;
import org.aspectj.lang.annotation.Around;
import org.aspectj.lang.annotation.Aspect;
import org.aspectj.lang.annotation.Before;

//切面
@Aspect  //表明当前类是一个切面
public class MyAspect {
    /*
     * @Before( "execution(* *. .service.*.doSome(. .))")
     public void before(){
         System.out.println("aspecj的前置通知执行");
     }*/
     //该注解表明当前方法是后置通知方法
     /*  @AfterReturning(value="execution(* *. .service.*.doOther(..))",returning="result")
        public  void afterReturning(Object result){

           System.out.println("aspecj的后置通知执行!目标方法的返回值是"+result);
        }
    @Around(value = "execution(* *..service.*.doOther(..))")
    public Object around( ProceedingJoinPoint pjp) throws Throwable{
        System.out.println("环绕通知,目标方法执行之前!");
        String result =(String)  pjp.proceed();
        if(result!=null){
            result=result.toUpperCase();
        }
        System.out.println("环绕通知,目标方法执行之后!");
        return result;

    }*/

       @AfterThrowing(value="execution(* *..service.*.doSome(..))",throwing="ex")
       public void throwing(Exception ex){
           System.out.println("异常通知方法执行 异常信息为:"+ex);
       }
}
最终通知:

package com.bjsxt.aspects;

import org.aspectj.lang.ProceedingJoinPoint;
import org.aspectj.lang.annotation.After;
import org.aspectj.lang.annotation.AfterReturning;
import org.aspectj.lang.annotation.AfterThrowing;
import org.aspectj.lang.annotation.Around;
import org.aspectj.lang.annotation.Aspect;
import org.aspectj.lang.annotation.Before;

//切面
@Aspect  //表明当前类是一个切面
public class MyAspect {
    /*
     * @Before( "execution(* *. .service.*.doSome(. .))")
     public void before(){
         System.out.println("aspecj的前置通知执行");
     }*/
     //该注解表明当前方法是后置通知方法
     /*  @AfterReturning(value="execution(* *. .service.*.doOther(..))",returning="result")
        public  void afterReturning(Object result){

           System.out.println("aspecj的后置通知执行!目标方法的返回值是"+result);
        }
    @Around(value = "execution(* *..service.*.doOther(..))")
    public Object around( ProceedingJoinPoint pjp) throws Throwable{
        System.out.println("环绕通知,目标方法执行之前!");
        String result =(String)  pjp.proceed();
        if(result!=null){
            result=result.toUpperCase();
        }
        System.out.println("环绕通知,目标方法执行之后!");
        return result;

    }*/
    /*
       @AfterThrowing(value="execution(* *..service.*.doSome(..))",throwing="ex")
       public void throwing(Exception ex){
           System.out.println("异常通知方法执行 异常信息为:"+ex);
       }*/
       @After("execution(* *..service.*.doSome(. .))")
       public void after(){
           System.out.println("最终通知方法执行!");
       }
}
XML方式
前置通知:

<?xml version="1.0" encoding="UTF-8"?>
<beans xmlns="http://www.springframework.org/schema/beans"
     xmlns:xsi="http://www.w3.org/2001/XMLSchema-instance"
     xmlns:aop="http://www.springframework.org/schema/aop"
     xsi:schemaLocation="http://www.springframework.org/schema/beans
         http://www.springframework.org/schema/beans/spring-beans.xsd
         http://www.springframework.org/schema/aop
         http://www.springframework.org/schema/aop/spring-aop.xsd">
<!-- 注册目标类 -->
<!-- -bean的定义: 以下配置相当于SomeService service=new SomeServiceImpl(); -->
<bean id="someServiceImpl" class="com.bjsxt.service.impl.SomeServiceImpl"></bean>
<!-- 注册切面:前置通知 -->
<bean id="myAspect" class="com.bjsxt.aspects.MyAspect"></bean>
<!-- 注册自动代理 -->

<aop:config>
    <!-- 定义切入点 -->
    <aop:pointcut expression="execution(* *..service.*.doSome(..))" id="doSomePC"/>
     <aop:pointcut expression="execution(* *..service.*.doOther(..))" id="doOtherPC"/>
    <aop:aspect ref="myAspect">
        <aop:before method="before" pointcut-ref="doSomePC"/>
    </aop:aspect>

</aop:config>
</beans>

package com.bjsxt.aspects;

import org.aspectj.lang.ProceedingJoinPoint;
import org.aspectj.lang.annotation.After;
import org.aspectj.lang.annotation.AfterReturning;
import org.aspectj.lang.annotation.AfterThrowing;
import org.aspectj.lang.annotation.Around;
import org.aspectj.lang.annotation.Aspect;
import org.aspectj.lang.annotation.Before;

//切面
@Aspect  //表明当前类是一个切面
public class MyAspect {

     public void before(){
         System.out.println("aspecj的前置通知执行");
     }
     //该注解表明当前方法是后置通知方法
     /*
        public  void afterReturning(Object result){

           System.out.println("aspecj的后置通知执行!目标方法的返回值是"+result);
        }
    public Object around( ProceedingJoinPoint pjp) throws Throwable{
        System.out.println("环绕通知,目标方法执行之前!");
        String result =(String)  pjp.proceed();
        if(result!=null){
            result=result.toUpperCase();
        }
        System.out.println("环绕通知,目标方法执行之后!");
        return result;

    }*/
    /*
       public void throwing(Exception ex){
           System.out.println("异常通知方法执行 异常信息为:"+ex);
       }*/
    /*
       public void after(){
           System.out.println("最终通知方法执行!");
       }*/
}
带参的前置通知:

package com.bjsxt.aspects;

import org.aspectj.lang.JoinPoint;
import org.aspectj.lang.ProceedingJoinPoint;
import org.aspectj.lang.annotation.After;
import org.aspectj.lang.annotation.AfterReturning;
import org.aspectj.lang.annotation.AfterThrowing;
import org.aspectj.lang.annotation.Around;
import org.aspectj.lang.annotation.Aspect;
import org.aspectj.lang.annotation.Before;

//切面
@Aspect  //表明当前类是一个切面
public class MyAspect {

     public void before(){
         System.out.println("aspecj的前置通知执行");
     }
     public void before(JoinPoint jp){
            System.out.println("前置通知方法执行!jp="+jp);
        }
     //该注解表明当前方法是后置通知方法
     /*
        public  void afterReturning(Object result){

           System.out.println("aspecj的后置通知执行!目标方法的返回值是"+result);
        }
    public Object around( ProceedingJoinPoint pjp) throws Throwable{
        System.out.println("环绕通知,目标方法执行之前!");
        String result =(String)  pjp.proceed();
        if(result!=null){
            result=result.toUpperCase();
        }
        System.out.println("环绕通知,目标方法执行之后!");
        return result;

    }*/
    /*
       public void throwing(Exception ex){
           System.out.println("异常通知方法执行 异常信息为:"+ex);
       }*/
    /*
       public void after(){
           System.out.println("最终通知方法执行!");
       }*/
}

<?xml version="1.0" encoding="UTF-8"?>
<beans xmlns="http://www.springframework.org/schema/beans"
     xmlns:xsi="http://www.w3.org/2001/XMLSchema-instance"
     xmlns:aop="http://www.springframework.org/schema/aop"
     xsi:schemaLocation="http://www.springframework.org/schema/beans
         http://www.springframework.org/schema/beans/spring-beans.xsd
         http://www.springframework.org/schema/aop
         http://www.springframework.org/schema/aop/spring-aop.xsd">
<!-- 注册目标类 -->
<!-- -bean的定义: 以下配置相当于SomeService service=new SomeServiceImpl(); -->
<bean id="someServiceImpl" class="com.bjsxt.service.impl.SomeServiceImpl"></bean>
<!-- 注册切面:前置通知 -->
<bean id="myAspect" class="com.bjsxt.aspects.MyAspect"></bean>
<!-- 注册自动代理 -->

<aop:config>
    <!-- 定义切入点 -->
    <aop:pointcut expression="execution(* *..service.*.doSome(..))" id="doSomePC"/>
     <aop:pointcut expression="execution(* *..service.*.doOther(..))" id="doOtherPC"/>
    <aop:aspect ref="myAspect">
        <aop:before method="before" pointcut-ref="doSomePC"/>
        <aop:before method="before(org.aspectj.lang.JoinPoint)" pointcut-ref="doSomePC"/>
    </aop:aspect>

</aop:config>
</beans>
后置通知:

package com.bjsxt.aspects;

import org.aspectj.lang.JoinPoint;
import org.aspectj.lang.ProceedingJoinPoint;
import org.aspectj.lang.annotation.After;
import org.aspectj.lang.annotation.AfterReturning;
import org.aspectj.lang.annotation.AfterThrowing;
import org.aspectj.lang.annotation.Around;
import org.aspectj.lang.annotation.Aspect;
import org.aspectj.lang.annotation.Before;

//切面
@Aspect  //表明当前类是一个切面
public class MyAspect {
/*
     public void before(){
         System.out.println("aspecj的前置通知执行");
     }
     public void before(JoinPoint jp){
            System.out.println("前置通知方法执行!jp="+jp);
        }*/
     //该注解表明当前方法是后置通知方法

        public  void afterReturning(Object result){

           System.out.println("aspecj的后置通知执行!目标方法的返回值是"+result);
        }
    /*public Object around( ProceedingJoinPoint pjp) throws Throwable{
        System.out.println("环绕通知,目标方法执行之前!");
        String result =(String)  pjp.proceed();
        if(result!=null){
            result=result.toUpperCase();
        }
        System.out.println("环绕通知,目标方法执行之后!");
        return result;

    }*/
    /*
       public void throwing(Exception ex){
           System.out.println("异常通知方法执行 异常信息为:"+ex);
       }*/
    /*
       public void after(){
           System.out.println("最终通知方法执行!");
       }*/
}

<?xml version="1.0" encoding="UTF-8"?>
<beans xmlns="http://www.springframework.org/schema/beans"
     xmlns:xsi="http://www.w3.org/2001/XMLSchema-instance"
     xmlns:aop="http://www.springframework.org/schema/aop"
     xsi:schemaLocation="http://www.springframework.org/schema/beans
         http://www.springframework.org/schema/beans/spring-beans.xsd
         http://www.springframework.org/schema/aop
         http://www.springframework.org/schema/aop/spring-aop.xsd">
<!-- 注册目标类 -->
<!-- -bean的定义: 以下配置相当于SomeService service=new SomeServiceImpl(); -->
<bean id="someServiceImpl" class="com.bjsxt.service.impl.SomeServiceImpl"></bean>
<!-- 注册切面:前置通知 -->
<bean id="myAspect" class="com.bjsxt.aspects.MyAspect"></bean>
<!-- 注册自动代理 -->

<aop:config>
    <!-- 定义切入点 -->
    <aop:pointcut expression="execution(* *..service.*.doSome(..))" id="doSomePC"/>
     <aop:pointcut expression="execution(* *..service.*.doOther(..))" id="doOtherPC"/>
    <aop:aspect ref="myAspect">
        <!--  <aop:before method="before" pointcut-ref="doSomePC"/>-->
      <!--   <aop:before method="before(org.aspectj.lang.JoinPoint)" pointcut-ref="doSomePC"/> -->
        <aop:after-returning method="afterReturning(java.lang.Object)" pointcut-ref="doOtherPC" returning="result"/>
    </aop:aspect>

</aop:config>
</beans>
环绕通知:

package com.bjsxt.aspects;

import org.aspectj.lang.JoinPoint;
import org.aspectj.lang.ProceedingJoinPoint;
import org.aspectj.lang.annotation.After;
import org.aspectj.lang.annotation.AfterReturning;
import org.aspectj.lang.annotation.AfterThrowing;
import org.aspectj.lang.annotation.Around;
import org.aspectj.lang.annotation.Aspect;
import org.aspectj.lang.annotation.Before;

//切面
@Aspect  //表明当前类是一个切面
public class MyAspect {
/*
     public void before(){
         System.out.println("aspecj的前置通知执行");
     }
     public void before(JoinPoint jp){
            System.out.println("前置通知方法执行!jp="+jp);
        }*/
     //该注解表明当前方法是后置通知方法

      /*  public  void afterReturning(Object result){

           System.out.println("aspecj的后置通知执行!目标方法的返回值是"+result);
        }*/
    public Object around( ProceedingJoinPoint pjp) throws Throwable{
        System.out.println("环绕通知,目标方法执行之前!");
        String result =(String)  pjp.proceed();
        if(result!=null){
            result=result.toUpperCase();
        }
        System.out.println("环绕通知,目标方法执行之后!");
        return result;

    }
    /*
       public void throwing(Exception ex){
           System.out.println("异常通知方法执行 异常信息为:"+ex);
       }*/
    /*
       public void after(){
           System.out.println("最终通知方法执行!");
       }*/
}

<?xml version="1.0" encoding="UTF-8"?>
<beans xmlns="http://www.springframework.org/schema/beans"
     xmlns:xsi="http://www.w3.org/2001/XMLSchema-instance"
     xmlns:aop="http://www.springframework.org/schema/aop"
     xsi:schemaLocation="http://www.springframework.org/schema/beans
         http://www.springframework.org/schema/beans/spring-beans.xsd
         http://www.springframework.org/schema/aop
         http://www.springframework.org/schema/aop/spring-aop.xsd">
<!-- 注册目标类 -->
<!-- -bean的定义: 以下配置相当于SomeService service=new SomeServiceImpl(); -->
<bean id="someServiceImpl" class="com.bjsxt.service.impl.SomeServiceImpl"></bean>
<!-- 注册切面:前置通知 -->
<bean id="myAspect" class="com.bjsxt.aspects.MyAspect"></bean>
<!-- 注册自动代理 -->

<aop:config>
    <!-- 定义切入点 -->
    <aop:pointcut expression="execution(* *..service.*.doSome(..))" id="doSomePC"/>
     <aop:pointcut expression="execution(* *..service.*.doOther(..))" id="doOtherPC"/>
    <aop:aspect ref="myAspect">
        <!--  <aop:before method="before" pointcut-ref="doSomePC"/>-->
      <!--   <aop:before method="before(org.aspectj.lang.JoinPoint)" pointcut-ref="doSomePC"/> -->
        <!-- <aop:after-returning method="afterReturning(java.lang.Object)" pointcut-ref="doOtherPC" returning="result"/> -->
        <aop:around method="around" pointcut-ref="doOtherPC"/>
    </aop:aspect>

</aop:config>
</beans>
异常通知:

package com.bjsxt.aspects;

import org.aspectj.lang.JoinPoint;
import org.aspectj.lang.ProceedingJoinPoint;
import org.aspectj.lang.annotation.After;
import org.aspectj.lang.annotation.AfterReturning;
import org.aspectj.lang.annotation.AfterThrowing;
import org.aspectj.lang.annotation.Around;
import org.aspectj.lang.annotation.Aspect;
import org.aspectj.lang.annotation.Before;

//切面
@Aspect  //表明当前类是一个切面
public class MyAspect {
/*
     public void before(){
         System.out.println("aspecj的前置通知执行");
     }
     public void before(JoinPoint jp){
            System.out.println("前置通知方法执行!jp="+jp);
        }*/
     //该注解表明当前方法是后置通知方法

      /*  public  void afterReturning(Object result){

           System.out.println("aspecj的后置通知执行!目标方法的返回值是"+result);
        }*/
    /*public Object around( ProceedingJoinPoint pjp) throws Throwable{
        System.out.println("环绕通知,目标方法执行之前!");
        String result =(String)  pjp.proceed();
        if(result!=null){
            result=result.toUpperCase();
        }
        System.out.println("环绕通知,目标方法执行之后!");
        return result;

    }*/

       public void throwing(Exception ex){
           System.out.println("异常通知方法执行 异常信息为:"+ex);
       }
    /*
       public void after(){
           System.out.println("最终通知方法执行!");
       }*/
}

<?xml version="1.0" encoding="UTF-8"?>
<beans xmlns="http://www.springframework.org/schema/beans"
     xmlns:xsi="http://www.w3.org/2001/XMLSchema-instance"
     xmlns:aop="http://www.springframework.org/schema/aop"
     xsi:schemaLocation="http://www.springframework.org/schema/beans
         http://www.springframework.org/schema/beans/spring-beans.xsd
         http://www.springframework.org/schema/aop
         http://www.springframework.org/schema/aop/spring-aop.xsd">
<!-- 注册目标类 -->
<!-- -bean的定义: 以下配置相当于SomeService service=new SomeServiceImpl(); -->
<bean id="someServiceImpl" class="com.bjsxt.service.impl.SomeServiceImpl"></bean>
<!-- 注册切面:前置通知 -->
<bean id="myAspect" class="com.bjsxt.aspects.MyAspect"></bean>
<!-- 注册自动代理 -->

<aop:config>
    <!-- 定义切入点 -->
    <aop:pointcut expression="execution(* *..service.*.doSome(..))" id="doSomePC"/>
     <aop:pointcut expression="execution(* *..service.*.doOther(..))" id="doOtherPC"/>
    <aop:aspect ref="myAspect">
        <!--  <aop:before method="before" pointcut-ref="doSomePC"/>-->
      <!--   <aop:before method="before(org.aspectj.lang.JoinPoint)" pointcut-ref="doSomePC"/> -->
        <!-- <aop:after-returning method="afterReturning(java.lang.Object)" pointcut-ref="doOtherPC" returning="result"/> -->
       <!--  <aop:around method="around" pointcut-ref="doOtherPC"/> -->
       <aop:after-throwing method="throwing(java.lang.Exception)" pointcut-ref="doSomePC" throwing="ex"/>
    </aop:aspect>

</aop:config>
</beans>
最终通知:

package com.bjsxt.aspects;

import org.aspectj.lang.JoinPoint;
import org.aspectj.lang.ProceedingJoinPoint;
import org.aspectj.lang.annotation.After;
import org.aspectj.lang.annotation.AfterReturning;
import org.aspectj.lang.annotation.AfterThrowing;
import org.aspectj.lang.annotation.Around;
import org.aspectj.lang.annotation.Aspect;
import org.aspectj.lang.annotation.Before;

//切面
@Aspect  //表明当前类是一个切面
public class MyAspect {
/*
     public void before(){
         System.out.println("aspecj的前置通知执行");
     }
     public void before(JoinPoint jp){
            System.out.println("前置通知方法执行!jp="+jp);
        }*/
     //该注解表明当前方法是后置通知方法

      /*  public  void afterReturning(Object result){

           System.out.println("aspecj的后置通知执行!目标方法的返回值是"+result);
        }*/
    /*public Object around( ProceedingJoinPoint pjp) throws Throwable{
        System.out.println("环绕通知,目标方法执行之前!");
        String result =(String)  pjp.proceed();
        if(result!=null){
            result=result.toUpperCase();
        }
        System.out.println("环绕通知,目标方法执行之后!");
        return result;

    }*/

    /*   public void throwing(Exception ex){
           System.out.println("异常通知方法执行 异常信息为:"+ex);
       }*/

       public void after(){
           System.out.println("最终通知方法执行!");
       }
}

<?xml version="1.0" encoding="UTF-8"?>
<beans xmlns="http://www.springframework.org/schema/beans"
     xmlns:xsi="http://www.w3.org/2001/XMLSchema-instance"
     xmlns:aop="http://www.springframework.org/schema/aop"
     xsi:schemaLocation="http://www.springframework.org/schema/beans
         http://www.springframework.org/schema/beans/spring-beans.xsd
         http://www.springframework.org/schema/aop
         http://www.springframework.org/schema/aop/spring-aop.xsd">
<!-- 注册目标类 -->
<!-- -bean的定义: 以下配置相当于SomeService service=new SomeServiceImpl(); -->
<bean id="someServiceImpl" class="com.bjsxt.service.impl.SomeServiceImpl"></bean>
<!-- 注册切面:前置通知 -->
<bean id="myAspect" class="com.bjsxt.aspects.MyAspect"></bean>
<!-- 注册自动代理 -->

<aop:config>
    <!-- 定义切入点 -->
    <aop:pointcut expression="execution(* *..service.*.doSome(..))" id="doSomePC"/>
     <aop:pointcut expression="execution(* *..service.*.doOther(..))" id="doOtherPC"/>
    <aop:aspect ref="myAspect">
        <!--  <aop:before method="before" pointcut-ref="doSomePC"/>-->
      <!--   <aop:before method="before(org.aspectj.lang.JoinPoint)" pointcut-ref="doSomePC"/> -->
        <!-- <aop:after-returning method="afterReturning(java.lang.Object)" pointcut-ref="doOtherPC" returning="result"/> -->
       <!--  <aop:around method="around" pointcut-ref="doOtherPC"/> -->
      <!--  <aop:after-throwing method="throwing(java.lang.Exception)" pointcut-ref="doSomePC" throwing="ex"/> -->
      <aop:after method="after" pointcut-ref="doSomePC"/>
    </aop:aspect>

</aop:config>
</beans>
事务原本是数据库中的概念,在DAO层。但一般情况下,需要将事务提升到业务层,即Service层。这样做是为了能够使用事务的特性来管理具体的业务。
1.Spring事务管理API介绍
- 事务管理器是PlatformTransactionManager接口对象。其主要用于完成事务的提交、回滚、及获取事务的状态信息。
platformTransactionManager接口常用的两个实现类。
DataSourceTransactionManager:使用JDBC或者Mybatis进行持久化数据时使用
HibernateTransactionManager:使用Hibernate进行持久化数据时使用。
- Spring的回滚方式
Spring事务默认的回滚方式 是:发生运行时异常时回滚,发生受查异常时提交。
-
事务定义接口
事务定义接口TransactionDefinition中定义了事务描述相关的三类常量:事务隔离级别、事务传播行为、事务默认超时时限,即对他们的操作。
所谓事务传播行为是指,处于不同事务中的方法在互相调用时,执行期间事务的维护情况。如,A事务中的方法doSome()调用B事务中的方法doOther(),在调用执行期间事务的维护情况,就称为事务传播行为。
环境搭建(导入JAR包、添加约束)
使用AspectJ的AOP配置管理事务(重点)

package com.bjsxt.pojo;
//账户类
public class Acount {
   private Integer aid;
   private String aname;
   private double balance;
public Integer getAid() {
    return aid;
}
public void setAid(Integer aid) {
    this.aid = aid;
}
public String getAname() {
    return aname;
}
public void setAname(String aname) {
    this.aname = aname;
}
public double getBalance() {
    return balance;
}
public void setBalance(double balance) {
    this.balance = balance;
}
public Acount(String aname, double balance) {
    super();

    this.aname = aname;
    this.balance = balance;
}
@Override
public String toString() {
    return "Acount [aid=" + aid + ", aname=" + aname + ", balance=" + balance
            + "]";
}
public Acount() {
    super();
    // TODO Auto-generated constructor stub
}

}

package com.bjsxt.pojo;
//基金类
public class Fund {
    private Integer fid;
    private String fname;
    private int count;
    public Integer getFid() {
        return fid;
    }
    public void setFid(Integer fid) {
        this.fid = fid;
    }
    public String getFname() {
        return fname;
    }
    public void setFname(String fname) {
        this.fname = fname;
    }
    public int getCount() {
        return count;
    }
    public void setCount(int count) {
        this.count = count;
    }
    public Fund( String fname, int count) {
        super();

        this.fname = fname;
        this.count = count;
    }
    public Fund() {
        super();
        // TODO Auto-generated constructor stub
    }
    @Override
    public String toString() {
        return "Fund [fid=" + fid + ", fname=" + fname + ", count=" + count
                + "]";
    }

}
dao

package com.bjsxt.dao.impl;

import org.springframework.jdbc.core.support.JdbcDaoSupport;

import com.bjsxt.dao.AccountDao;

public class AccountDaoImpl extends JdbcDaoSupport  implements AccountDao {
    //开银行账户
    @Override
    public void insertAccout(String aname, double money) {
        String sql="insert into account(aname,balance)values(?,?)";
        this.getJdbcTemplate().update(sql, aname, money);
    }
    //更新银行账户
    @Override
    public void updateAccount(String aname, double money) {
        String sql="update account set balance=balance-? where aname=?";
        this.getJdbcTemplate().update(sql, money, aname);
    }

}

package com.bjsxt.dao.impl;

import org.springframework.jdbc.core.support.JdbcDaoSupport;

import com.bjsxt.dao.FundDao;

public class FundDaoImpl extends JdbcDaoSupport implements FundDao {
//开基金账户
    @Override
    public void insertFund(String fname, int amount) {
        String sql="insert into fund(fname,count)values(?,?)";
      this.getJdbcTemplate().update(sql, fname, amount);
    }

    @Override
    public void updateFund(String fname, int amount) {
        String sql="update fund set count =count+? where fname=?";
         this.getJdbcTemplate().update(sql,amount,fname);
    }

}
exception

package com.bjsxt.exceptions;

public class FundException extends Exception{

    public FundException() {
        super();
    }

    public FundException(String message) {
        super(message);
    }


}
service

package com.bjsxt.service.impl;

import com.bjsxt.dao.AccountDao;
import com.bjsxt.dao.FundDao;
import com.bjsxt.exceptions.FundException;
import com.bjsxt.service.FundService;

public class FundServiceImpl implements FundService {

     private AccountDao accountDaoImpl;
     private FundDao fundDaoImpl;

    public AccountDao getAccountDaoImpl() {
        return accountDaoImpl;
    }

    public void setAccountDaoImpl(AccountDao accountDaoImpl) {
        this.accountDaoImpl = accountDaoImpl;
    }

    public FundDao getFundDaoImpl() {
        return fundDaoImpl;
    }

    public void setFundDaoImpl(FundDao fundDaoImpl) {
        this.fundDaoImpl = fundDaoImpl;
    }

    @Override
    public void openAccount(String aname, double money) {
            accountDaoImpl.insertAccout(aname, money);
    }

    @Override
    public void openFund(String fname, int amount) {
        fundDaoImpl.insertFund(fname, amount);
    }

    @Override

    public void buyFund(String aname, double money, String fname, int amount) throws FundException  {
        accountDaoImpl.updateAccount(aname, money);
        if (1==1) {
            throw new FundException("购买基金出现异常!");
        }
        fundDaoImpl.updateFund(fname, amount);
    }

}

package com.bjsxt.service;

import com.bjsxt.exceptions.FundException;

public interface FundService {
  //开银行账户
    void openAccount(String aname,double money);
    //开基金账户
    void openFund(String fname,int amount);
    //购买基金
    void buyFund(String aname,double money,String fname,int amount)throws  FundException;
}
test

package com.bjsxt.test;

import org.junit.Before;
import org.junit.Test;
import org.springframework.context.support.ClassPathXmlApplicationContext;

import com.bjsxt.exceptions.FundException;
import com.bjsxt.service.FundService;

public class SomeTest {
    private FundService service;
    @Before
    public void before(){
        ClassPathXmlApplicationContext ac = new ClassPathXmlApplicationContext("applicationContext.xml");
        service = ac.getBean("fundServiceImpl",FundService.class);
    }
    @Test
    public void openAccount(){
        service.openAccount("工商银行", 10000);
    }
    @Test
    public void openFund(){
        service.openFund("余额宝", 2000);
    }
    @Test
    public void buyFund() throws FundException{
        service.buyFund("工商银行", 2000, "余额宝", 2000);
    }
}
TX:声明式事务
1.为什么使用事务
我们当时学习mybatis的时候,mybatis中的事务和jdbc中事务是一致的,那么spring中的事务是如何进行事务管理的呢?
2.事务管理
编程式事务:整个事务管理都是需要程序员自己手动编写,自己提交或者回滚事务管理
声明式事务:就是整个事务的管理操作,不需要我们自己书写,现在spring已经帮你处理好了,我们自己只要在代码中声明配置即可。
3.事务使用的场景
当我们执行的是两条或者是两条以上的添加、修改、删除的时候才使用事务。
4.使用我们spring中声明式事务
给方法增加事务,就是给切点增加通知。
切点:需要的方法。
通知:事务。
构成切面:
使用事务注解管理事务

<?xml version="1.0" encoding="UTF-8"?>
<beans xmlns="http://www.springframework.org/schema/beans"
    xmlns:xsi="http://www.w3.org/2001/XMLSchema-instance"
    xmlns:context="http://www.springframework.org/schema/context"
    xmlns:aop="http://www.springframework.org/schema/aop"
    xmlns:tx="http://www.springframework.org/schema/tx"
    xsi:schemaLocation="http://www.springframework.org/schema/beans
        http://www.springframework.org/schema/beans/spring-beans.xsd
        http://www.springframework.org/schema/aop
        http://www.springframework.org/schema/aop/spring-aop.xsd
        http://www.springframework.org/schema/tx
        http://www.springframework.org/schema/tx/spring-tx.xsd
        http://www.springframework.org/schema/context
        http://www.springframework.org/schema/context/spring-context.xsd">
    <!-- 加载jdbc属性文件 -->
    <context:property-placeholder location="jdbc.properties"/>
    <!-- 注册c3p0数据源 -->
    <bean id="dataSource" class="com.mchange.v2.c3p0.ComboPooledDataSource">
        <property name="driverClass" value="${jdbc.driver}"/>
        <property name="jdbcUrl" value="${jdbc.url}"/>
        <property name="user" value="${jdbc.username}"/>
        <property name="password" value="${jdbc.password}"/>
    </bean>
    <!-- 注册accountDao -->
    <bean id="accountDaoImpl" class="com.bjsxt.dao.impl.AccountDaoImpl">
        <property name="dataSource" ref="dataSource"></property>
    </bean>
    <!-- 注册fundDao -->
    <bean id="fundDaoImpl" class="com.bjsxt.dao.impl.FundDaoImpl">
        <property name="dataSource" ref="dataSource"></property>
    </bean>
    <!-- 注册service -->
    <bean id="fundServiceImpl" class="com.bjsxt.service.impl.FundServiceImpl">
        <property name="accountDaoImpl" ref="accountDaoImpl"></property>
        <property name="fundDaoImpl" ref="fundDaoImpl"></property>
    </bean>
    <!-- 注册事务管理器 -->
    <bean id="transactionManager" class="org.springframework.jdbc.datasource.DataSourceTransactionManager">
        <property name="dataSource" ref="dataSource"></property>
    </bean>
    <!-- 配置事务注解驱动 -->
    <tx:annotation-driven transaction-manager="transactionManager"/>
</beans>

package com.bjsxt.service.impl;

import org.springframework.transaction.annotation.Transactional;

import com.bjsxt.dao.AccountDao;
import com.bjsxt.dao.FundDao;
import com.bjsxt.exceptions.FundException;
import com.bjsxt.service.FundService;

public class FundServiceImpl implements FundService {

    private AccountDao accountDaoImpl;
    private FundDao fundDaoImpl;

    public AccountDao getAccountDaoImpl() {
        return accountDaoImpl;
    }

    public void setAccountDaoImpl(AccountDao accountDaoImpl) {
        this.accountDaoImpl = accountDaoImpl;
    }

    public FundDao getFundDaoImpl() {
        return fundDaoImpl;
    }

    public void setFundDaoImpl(FundDao fundDaoImpl) {
        this.fundDaoImpl = fundDaoImpl;
    }

    @Override
    public void openAccount(String aname, double money) {
        accountDaoImpl.insertAccount(aname, money);
    }

    @Override
    public void openFund(String fname, int amount) {
        fundDaoImpl.insertFund(fname, amount);
    }

    @Override
    @Transactional(rollbackFor=FundException.class)
    public void buyFund(String aname, double money, String fname, int amount) throws FundException {
        accountDaoImpl.updateAccount(aname, money);
        if (1==1) {
            throw new FundException("购买基金出现异常!");
        }
        fundDaoImpl.updateFund(fname, amount);
    }

}
<!--声明事务的对象-->
    <bean id="transactionManager" class="org.springframework.jdbc.datasource.DataSourceTransactionManager">
        <property name="dataSource" ref="ds"></property>
    </bean>
    <tx:advice id="ad" transaction-manager="transactionManager">
       < tx:attributes>
            <tx:method name="login" />
        </tx:attributes>
  <  /tx:advice>
    <!--通过配置切面的方式增加通知-->

<aop:config>

    <aop:pointcut id="pt" expression="execution(* com.bjsxt.service.impl.AdminServiceImpl.*(..))"></aop:pointcut>
    <aop:advisor advice-ref="ad" pointcut-ref="pt"></aop:advisor>

</aop:config>

<?xml version="1.0" encoding="UTF-8"?>
<beans xmlns="http://www.springframework.org/schema/beans"
       xmlns:xsi="http://www.w3.org/2001/XMLSchema-instance"
       xsi:schemaLocation="http://www.springframework.org/schema/beans
     http://www.springframework.org/schema/beans/spring-beans.xsd">
    <!-- 构造方式DI -->
    <bean id="star" class="com.bjsxt.pojo.Star"><constructor-arg name="name" value="郭靖">
    </constructor-arg>
        <constructor-arg name="age" value="25">
        </constructor-arg>
        <constructor-arg name="partner" ref="partner">
        </constructor-arg></bean>
    <bean id="star" class="com.bjsxt.pojo.Star">
        <constructor-arg index="0" value="郭靖">
        </constructor-arg>
        <constructor-arg index="1" value="25">
        </constructor-arg>
        <constructor-arg index="2" ref="partner">
        </constructor-arg>
    </bean>

    <bean id="star" class="com.bjsxt.pojo.Star">
        <constructor-arg value="郭靖"></constructor-arg>
        <constructor-arg value="25"></constructor-arg>
        <constructor-arg ref="partner"></constructor-arg>
    </bean>
    <bean id="partner" class="com.bjsxt.pojo.Partner">
        <property name="name" value="维多利亚">
        </property>
    </bean>
</beans>
1


