
java图像处理:灰度化,二值化,降噪,切割,裁剪,识别,找相似等
前段时间做爬虫,涉及到对图片验证码的破解,这里罗列一些常用的图像处理方法,都很简单并没用到什么复杂的算法,所以不涉及opencv,都是一些直接对rgb像素点的操作,很简单也很好理解,至于识别直接用的tesseract-ocr,也可以用svm。(ps:图片的像素值矩阵的原点在左上角,上边是x轴,左边是y轴)
1、灰度化和二值化,即把彩色图片经过灰度化和二值化变成只有黑白(只有0,1的矩阵)的数据,便于后续对图片的处理
public static BufferedImage grayImage(BufferedImage bufferedImage) throws Exception {

        int width = bufferedImage.getWidth();
        int height = bufferedImage.getHeight();

        BufferedImage grayBufferedImage = new BufferedImage(width, height, bufferedImage.getType());
        for (int i = 0; i < bufferedImage.getWidth(); i++) {
            for (int j = 0; j < bufferedImage.getHeight(); j++) {
                final int color = bufferedImage.getRGB(i, j);
                final int r = (color >> 16) & 0xff;
                final int g = (color >> 8) & 0xff;
                final int b = color & 0xff;
                int gray = (int) (0.3 * r + 0.59 * g + 0.11 * b);
                int newPixel = colorToRGB(255, gray, gray, gray);
                grayBufferedImage.setRGB(i, j, newPixel);
            }
        }

        return grayBufferedImage;

    }

    /**
     * 颜色分量转换为RGB值
     *
     * @param alpha
     * @param red
     * @param green
     * @param blue
     * @return
     */
    private static int colorToRGB(int alpha, int red, int green, int blue) {

        int newPixel = 0;
        newPixel += alpha;
        newPixel = newPixel << 8;
        newPixel += red;
        newPixel = newPixel << 8;
        newPixel += green;
        newPixel = newPixel << 8;
        newPixel += blue;

        return newPixel;

    }

    public static BufferedImage binaryImage(BufferedImage image) throws Exception {
        int w = image.getWidth();
        int h = image.getHeight();
        float[] rgb = new float[3];
        double[][] zuobiao = new double[w][h];
        int black = new Color(0, 0, 0).getRGB();
        int white = new Color(255, 255, 255).getRGB();
        BufferedImage bi= new BufferedImage(w, h,
                BufferedImage.TYPE_BYTE_BINARY);;
        for (int x = 0; x < w; x++) {
            for (int y = 0; y < h; y++) {
                int pixel = image.getRGB(x, y);
                rgb[0] = (pixel & 0xff0000) >> 16;
                rgb[1] = (pixel & 0xff00) >> 8;
                rgb[2] = (pixel & 0xff);
                float avg = (rgb[0]+rgb[1]+rgb[2])/3;
                zuobiao[x][y] = avg;

            }
        }
            //这里是阈值,白底黑字还是黑底白字,大多数情况下建议白底黑字,后面都以白底黑字为例
        double SW = 192;
        for (int x = 0; x < w; x++) {
            for (int y = 0; y < h; y++) {
                if (zuobiao[x][y] < SW) {
                    bi.setRGB(x, y, black);
                }else{
                    bi.setRGB(x, y, white);
                }
            }
        }


        return bi;
    }
        // 自己加周围8个灰度值再除以9,算出其相对灰度值
    public static double getGray(double[][] zuobiao, int x, int y, int w, int h) {
        double rs = zuobiao[x][y] + (x == 0 ? 255 : zuobiao[x - 1][y]) + (x == 0 || y == 0 ? 255 : zuobiao[x - 1][y - 1])
                + (x == 0 || y == h - 1 ? 255 : zuobiao[x - 1][y + 1]) + (y == 0 ? 255 : zuobiao[x][y - 1])
                + (y == h - 1 ? 255 : zuobiao[x][y + 1]) + (x == w - 1 ? 255 : zuobiao[x + 1][y])
                + (x == w - 1 || y == 0 ? 255 : zuobiao[x + 1][y - 1])
                + (x == w - 1 || y == h - 1 ? 255 : zuobiao[x + 1][y + 1]);
        return rs / 9;
    }
2、降噪(领域检测法),针对二值化后的图片来说(白底黑字),噪点就是图片中一堆密集黑色像素点中少许白色像素点(字体里的白点或背景里的黑点),这时,解决方法可以遍历像素点,一个像素点周围有8个像素点,如果这个像素点周围有6个以上像素点是黑色就可以把这个像素点也认为是黑色:
/**
     * 降噪,以1个像素点为单位(实际使用中可以循环降噪,或者把单位可以扩大为多个像素点)
     * @param image
     * @return
     */
    public static BufferedImage denoise(BufferedImage image){
        int w = image.getWidth();
        int h = image.getHeight();
        int white = new Color(255, 255, 255).getRGB();

        if(isWhite(image.getRGB(1, 0)) && isWhite(image.getRGB(0, 1)) && isWhite(image.getRGB(1, 1))){
            image.setRGB(0,0,white);
        }
        if(isWhite(image.getRGB(w-2, 0)) && isWhite(image.getRGB(w-1, 1)) && isWhite(image.getRGB(w-2, 1))){
            image.setRGB(w-1,0,white);
        }
        if(isWhite(image.getRGB(0, h-2)) && isWhite(image.getRGB(1, h-1)) && isWhite(image.getRGB(1, h-2))){
            image.setRGB(0,h-1,white);
        }
        if(isWhite(image.getRGB(w-2, h-1)) && isWhite(image.getRGB(w-1, h-2)) && isWhite(image.getRGB(w-2, h-2))){
            image.setRGB(w-1,h-1,white);
        }

        for(int x = 1; x < w-1; x++){
            int y = 0;
            if(isBlack(image.getRGB(x, y))){
                int size = 0;
                if(isWhite(image.getRGB(x-1, y))){
                    size++;
                }
                if(isWhite(image.getRGB(x+1, y))){
                    size++;
                }
                if(isWhite(image.getRGB(x, y+1))){
                    size++;
                }
                if(isWhite(image.getRGB(x-1, y+1))){
                    size++;
                }
                if(isWhite(image.getRGB(x+1, y+1))){
                    size++;
                }
                if(size>=5){
                    image.setRGB(x,y,white);
                }
            }
        }
        for(int x = 1; x < w-1; x++){
            int y = h-1;
            if(isBlack(image.getRGB(x, y))){
                int size = 0;
                if(isWhite(image.getRGB(x-1, y))){
                    size++;
                }
                if(isWhite(image.getRGB(x+1, y))){
                    size++;
                }
                if(isWhite(image.getRGB(x, y-1))){
                    size++;
                }
                if(isWhite(image.getRGB(x+1, y-1))){
                    size++;
                }
                if(isWhite(image.getRGB(x-1, y-1))){
                    size++;
                }
                if(size>=5){
                    image.setRGB(x,y,white);
                }
            }
        }

        for(int y = 1; y < h-1; y++){
            int x = 0;
            if(isBlack(image.getRGB(x, y))){
                int size = 0;
                if(isWhite(image.getRGB(x+1, y))){
                    size++;
                }
                if(isWhite(image.getRGB(x, y+1))){
                    size++;
                }
                if(isWhite(image.getRGB(x, y-1))){
                    size++;
                }
                if(isWhite(image.getRGB(x+1, y-1))){
                    size++;
                }
                if(isWhite(image.getRGB(x+1, y+1))){
                    size++;
                }
                if(size>=5){
                    image.setRGB(x,y,white);
                }
            }
        }

        for(int y = 1; y < h-1; y++){
            int x = w - 1;
            if(isBlack(image.getRGB(x, y))){
                int size = 0;
                if(isWhite(image.getRGB(x-1, y))){
                    size++;
                }
                if(isWhite(image.getRGB(x, y+1))){
                    size++;
                }
                if(isWhite(image.getRGB(x, y-1))){
                    size++;
                }
                //斜上下为空时,去掉此点
                if(isWhite(image.getRGB(x-1, y+1))){
                    size++;
                }
                if(isWhite(image.getRGB(x-1, y-1))){
                    size++;
                }
                if(size>=5){
                    image.setRGB(x,y,white);
                }
            }
        }

        //降噪,以1个像素点为单位
        for(int y = 1; y < h-1; y++){
            for(int x = 1; x < w-1; x++){
                if(isBlack(image.getRGB(x, y))){
                    int size = 0;
                    //上下左右均为空时,去掉此点
                    if(isWhite(image.getRGB(x-1, y))){
                        size++;
                    }
                    if(isWhite(image.getRGB(x+1, y))){
                        size++;
                    }
                    //上下均为空时,去掉此点
                    if(isWhite(image.getRGB(x, y+1))){
                        size++;
                    }
                    if(isWhite(image.getRGB(x, y-1))){
                        size++;
                    }
                    //斜上下为空时,去掉此点
                    if(isWhite(image.getRGB(x-1, y+1))){
                        size++;
                    }
                    if(isWhite(image.getRGB(x+1, y-1))){
                        size++;
                    }
                    if(isWhite(image.getRGB(x+1, y+1))){
                        size++;
                    }
                    if(isWhite(image.getRGB(x-1, y-1))){
                        size++;
                    }
                    if(size>=8){
                        image.setRGB(x,y,white);
                    }
                }
            }
        }

        return image;
    }

     public static boolean isBlack(int colorInt)
     {
         Color color = new Color(colorInt);
         if (color.getRed() + color.getGreen() + color.getBlue() <= 300)
         {
             return true;
         }
         return false;
     }

     public static boolean isWhite(int colorInt)
     {
         Color color = new Color(colorInt);
         if (color.getRed() + color.getGreen() + color.getBlue() > 300)
         {
             return true;
         }
         return false;
     }

     public static int isBlack(int colorInt, int whiteThreshold) {
         final Color color = new Color(colorInt);
         if (color.getRed() + color.getGreen() + color.getBlue() <= whiteThreshold) {
             return 1;
         }
         return 0;
     }
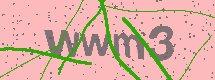
3、切割字符串,比如识别验证码时,可能需要将每个字符给单独切割下来进行单独识别,准确率会高得多,如果验证码字符之间粘连度不高,可以使用最简单的投影法,即,x轴上的每一列有多少个黑色像素点,这样形成了一个数组,针对这个数组可以想象成一个折线图,如果图片没有粘连那最理想的效果是这样:
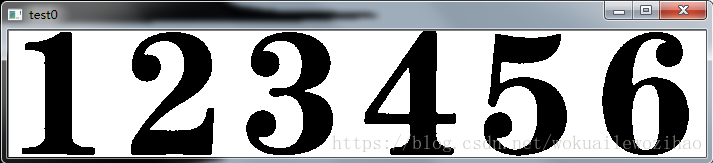
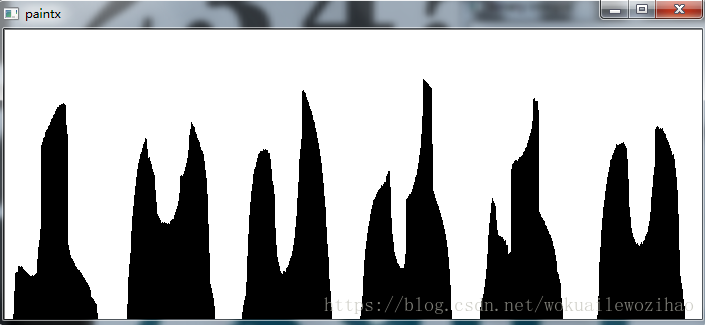
如果有粘连,那就是一个有波峰波谷的折线图,只有通过算法找到波峰波谷来切割了;同理,对y轴也可以进行投影。opencv的话,还有个常用的轮廓法,需要的可以了解下(吐槽:java版的opencv和c++版本的api稍有不同,这个只有看官方文档了)
4、裁剪,把上一步的像素点区域找到(原点+宽高)即可裁剪。
5、识别,如果字体扭曲的不是很严重的话,推荐直接使用tesseract-ocr简单方便,java包好像叫tess4j,也可以自己用svm;字体扭曲严重的话,只有自己写算法了,这种情况还是建议使用opencv来处理,有相应的处理方法的。
6、图片相似度,像有些验证码扭曲的厉害确实破解不了的(md,难道要上神经网络喂几万张图片去识别么,拜托,我只是爬个数据而已,还是不费力气了~~),

但是,我之前碰到过有些网站虽然破解不了,但是验证码图片数量是固定的,比如裁判文书网,爬了几千张下来才发现基本上都是重复的,之前的白弄了。其实可以直接hash的,但是为了扩展和复用,还是弄个图片相似度,其实原理差的不多,还是图片预处理后再进行hash,形成每张图片独有的指纹。
PS:简单的可以自己处理像素,也便于学习和加深理解,更复杂的建议还是使用opencv吧~~
这里可以简单说说我最开始怎么处理裁判文书网的验证码的,准确率只有60%左右(大部分8,90%多的图片能分割出来,识别就不行了);字体,背景色,干扰线,噪点,颜色基本都不一样,通过某些算法区分这几个区域(分类算法很多,kmeans最简单效果也行),然后挨着边缘的是干扰线先去掉(需要与二值化后的进行对比确认干扰线),中间区域分类颜色最多的是字体,然后去掉其他区域,再二值化分割判断。缺点:有些图片干扰线和字体颜色很接近分不出来,去掉干扰线把字体的一部分也除掉了。大家还有没有什么好的方法
本文转载自:https://blog.csdn.net/wokuailewozihao/article/details/79742651

 浙公网安备 33010602011771号