
Spring学习笔记(五)——Spring基于注解的配置
1.基于注解的配置
从 Spring 2.5 开始就可以使用注解来配置依赖注入。而不是采用 XML 来描述一个 bean 连线,你可以使用相关类,方法或字段声明的注解,将 bean 配置移动到组件类本身。
在 XML 注入之前进行注解注入,因此后者的配置将通过两种方式的属性连线被前者重写。
一旦 被配置后,你就可以开始注解你的代码,表明 Spring 应该自动连接值到属性,方法和构造函数。让我们来看看几个重要的注解,并且了解它们是如何工作的:
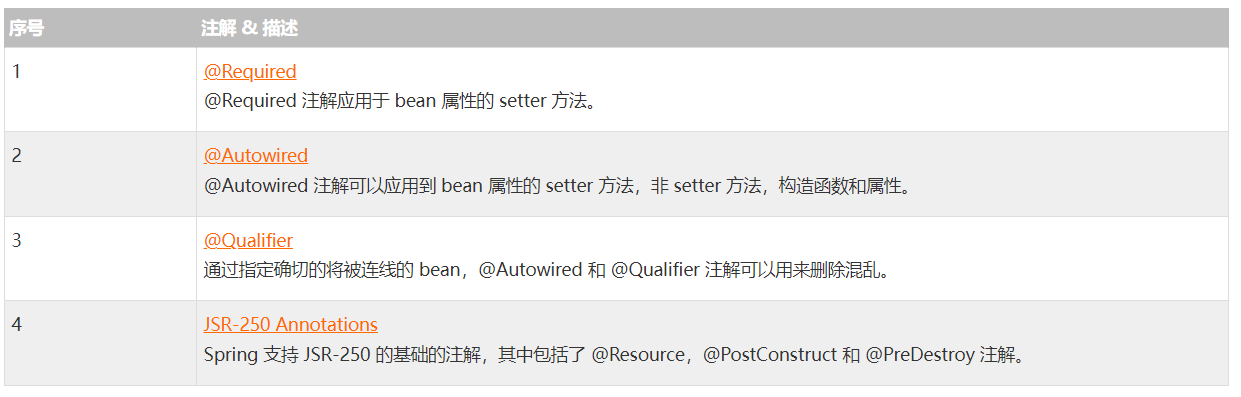
2.@Required注解
@Required 注解应用于 bean 属性的 setter 方法,它表明受影响的 bean 属性在配置时必须放在 XML 配置文件中,否则容器就会抛出一个 BeanInitializationException 异常。下面显示的是一个使用 @Required 注解的示例。
下面是 Student.java 文件的内容:
注意@Required注解修饰setter方法。
public class Student {
   private Integer age;
   private String name;
   @Required
   public void setAge(Integer age) {
      this.age = age;
   }
   public Integer getAge() {
      return age;
   }
   @Required
   public void setName(String name) {
      this.name = name;
   }
   public String getName() {
      return name;
   }
}
下面是配置文件 Beans.xml: 文件的内容:
注意我们把其中一个属性设值给注释掉了。
<?xml version="1.0" encoding="UTF-8"?>

<beans xmlns="http://www.springframework.org/schema/beans"
    xmlns:xsi="http://www.w3.org/2001/XMLSchema-instance"
    xmlns:context="http://www.springframework.org/schema/context"
    xsi:schemaLocation="http://www.springframework.org/schema/beans
    http://www.springframework.org/schema/beans/spring-beans-3.0.xsd
    http://www.springframework.org/schema/context
    http://www.springframework.org/schema/context/spring-context-3.0.xsd">

   <context:annotation-config/>
   <!-- Definition for student bean -->
   <bean id="student" class="com.tutorialspoint.Student">
      <property name="name"  value="Zara" />

      <!-- try without passing age and check the result -->
      <!-- property name="age"  value="11"-->
   </bean>

</beans>
再看一下子类代码:
public class MainApp {
   public static void main(String[] args) {
      ApplicationContext context = new ClassPathXmlApplicationContext("Beans.xml");
      Student student = (Student) context.getBean("student");
      System.out.println("Name : " + student.getName() );
      System.out.println("Age : " + student.getAge() );
   }
}
不出意外,抛出了BeanInitializationException 异常,信息如下:
Property 'age' is required for bean 'student'
接下来如果我们将beans.xml中的注释去掉:
<?xml version="1.0" encoding="UTF-8"?>

<beans xmlns="http://www.springframework.org/schema/beans"
    xmlns:xsi="http://www.w3.org/2001/XMLSchema-instance"
    xmlns:context="http://www.springframework.org/schema/context"
    xsi:schemaLocation="http://www.springframework.org/schema/beans
    http://www.springframework.org/schema/beans/spring-beans-3.0.xsd
    http://www.springframework.org/schema/context
    http://www.springframework.org/schema/context/spring-context-3.0.xsd">

   <context:annotation-config/>

   <!-- Definition for student bean -->
   <bean id="student" class="com.tutorialspoint.Student">
      <property name="name"  value="Zara" />
      <property name="age"  value="11"/>
   </bean>

</beans>
就可以正常运行了。
Name : Zara
Age : 11
3.@Autowired注解
我们使用最多的注解应该就是 @Autowired 注解了。这个注解的功能就是为我们注入一个定义好的 bean。
3.1@Autowired注解的作用
我们可以直接从字面意思来看,@autowired 注解来源于英文单词 autowire,这个单词的意思是自动装配的意思。自动装配又是什么意思?这个词语本来的意思是指的一些工业上的用机器代替人口,自动将一些需要完成的组装任务,或者别的一些任务完成。而在 Spring 的世界当中,自动装配指的就是使用将 Spring 容器中的 bean 自动的和我们需要这个 bean 的类组装在一起,再需要显示获得容器工厂并在工厂中getBean。
3.2@Autowired注解的用法
将 @Autowired 注解应用于构造函数,如以下示例所示:
public class MovieRecommender {

    private final CustomerPreferenceDao customerPreferenceDao;

    @Autowired
    public MovieRecommender(CustomerPreferenceDao customerPreferenceDao) {
        this.customerPreferenceDao = customerPreferenceDao;
    }

}
将 @Autowired 注解应用于 setter 方法:
public class SimpleMovieLister {

    private MovieFinder movieFinder;

    @Autowired
    public void setMovieFinder(MovieFinder movieFinder) {
        this.movieFinder = movieFinder;
    }
}
将 @Autowired 注解应用于具有任意名称和多个参数的方法:
public class MovieRecommender {
    private MovieCatalog movieCatalog;
    private CustomerPreferenceDao customerPreferenceDao;

    @Autowired
    public void prepare(MovieCatalog movieCatalog,
            CustomerPreferenceDao customerPreferenceDao) {
        this.movieCatalog = movieCatalog;
        this.customerPreferenceDao = customerPreferenceDao;
    }
}
直接应用于字段是我们使用的最多的一种方式,但是使用构造方法注入从代码层面却是更加好的。
public class MovieRecommender {
    private final CustomerPreferenceDao customerPreferenceDao;
    @Autowired
    private MovieCatalog movieCatalog;
    @Autowired
    public MovieRecommender(CustomerPreferenceDao customerPreferenceDao) {
        this.customerPreferenceDao = customerPreferenceDao;
    }
}
除此之外,还有以下不太常见的几种方式:
将 @Autowired 注解添加到需要该类型数组的字段或方法,则 Spring 会从 ApplicationContext 中搜寻符合指定类型的所有 bean,如以下示例所示:
public class MovieRecommender {

    @Autowired
    private MovieCatalog[] movieCatalogs;
 }
数组可以,我们可以马上举一反三,那容器也可以吗,答案是肯定的,下面是 set 以及 map 的例子:
public class MovieRecommender {

    private Set<MovieCatalog> movieCatalogs;

    @Autowired
    public void setMovieCatalogs(Set<MovieCatalog> movieCatalogs) {
        this.movieCatalogs = movieCatalogs;
    }
 }
public class MovieRecommender {

    private Map<String, MovieCatalog> movieCatalogs;

    @Autowired
    public void setMovieCatalogs(Map<String, MovieCatalog> movieCatalogs) {
        this.movieCatalogs = movieCatalogs;
    }
}
4.@Qualifier用法
可能会有这样一种情况,当你创建多个具有相同类型的 bean 时,并且只用它们其中的一个进行装配,在这种情况下,你可以使用 @Qualifier 注解和 @Autowired 注解通过指定哪一个真正的 bean 将会被装配来消除混乱。下面显示的是使用 @Qualifier 注解的一个示例。
这里是 Student.java 文件的内容:
public class Student {
   private Integer age;
   private String name;
   public void setAge(Integer age) {
      this.age = age;
   }
   public Integer getAge() {
      return age;
   }
   public void setName(String name) {
      this.name = name;
   }
   public String getName() {
      return name;
   }
}
这里是 Profile.java 文件的内容:
public class Profile {
   @Autowired
   @Qualifier("student1")
   private Student student;
   public Profile(){
      System.out.println("Inside Profile constructor." );
   }
   public void printAge() {
      System.out.println("Age : " + student.getAge() );
   }
   public void printName() {
      System.out.println("Name : " + student.getName() );
   }
}
下面是 MainApp.java 文件的内容:
public class MainApp {
   public static void main(String[] args) {
      ApplicationContext context = new ClassPathXmlApplicationContext("Beans.xml");
      Profile profile = (Profile) context.getBean("profile");
      profile.printAge();
      profile.printName();
   }
}
考虑下面配置文件 Beans.xml 的示例:
<?xml version="1.0" encoding="UTF-8"?>

<beans xmlns="http://www.springframework.org/schema/beans"
    xmlns:xsi="http://www.w3.org/2001/XMLSchema-instance"
    xmlns:context="http://www.springframework.org/schema/context"
    xsi:schemaLocation="http://www.springframework.org/schema/beans
    http://www.springframework.org/schema/beans/spring-beans-3.0.xsd
    http://www.springframework.org/schema/context
    http://www.springframework.org/schema/context/spring-context-3.0.xsd">

   <context:annotation-config/>

   <!-- Definition for profile bean -->
   <bean id="profile" class="com.tutorialspoint.Profile">
   </bean>

   <!-- Definition for student1 bean -->
   <bean id="student1" class="com.tutorialspoint.Student">
      <property name="name"  value="Zara" />
      <property name="age"  value="11"/>
   </bean>

   <!-- Definition for student2 bean -->
   <bean id="student2" class="com.tutorialspoint.Student">
      <property name="name"  value="Nuha" />
      <property name="age"  value="2"/>
   </bean>

</beans>
一旦你在源文件和 bean 配置文件中完成了上面两处改变,让我们运行一下应用程序。如果你的应用程序一切都正常的话,这将会输出以下消息:
Inside Profile constructor.
Age : 11
Name : Zara
5.Spring JSR-250注释
Spring还使用基于 JSR-250 注释,它包括 @PostConstruct, @PreDestroy 和 @Resource 注释。因为你已经有了其他的选择,尽管这些注释并不是真正所需要的,但是关于它们仍然让我给出一个简短的介绍。
5.1@PostConstruct 和 @PreDestroy 注释:
为了定义一个 bean 的安装和卸载,我们使用 init-method 和/或 destroy-method 参数简单的声明一下 。init-method 属性指定了一个方法,该方法在 bean 的实例化阶段会立即被调用。同样地,destroy-method 指定了一个方法,该方法只在一个 bean 从容器中删除之前被调用。
你可以使用 @PostConstruct 注释作为初始化回调函数的一个替代,@PreDestroy 注释作为销毁回调函数的一个替代,其解释如下示例所示。
这里是 HelloWorld.java 文件的内容:
public class HelloWorld {
   private String message;
   public void setMessage(String message){
      this.message  = message;
   }
   public String getMessage(){
      System.out.println("Your Message : " + message);
      return message;
   }
   @PostConstruct
   public void init(){
      System.out.println("Bean is going through init.");
   }
   @PreDestroy
   public void destroy(){
      System.out.println("Bean will destroy now.");
   }
}
下面是 MainApp.java 文件的内容。这里你需要注册一个关闭钩 registerShutdownHook() 方法,该方法在 AbstractApplicationContext 类中被声明。这将确保一个完美的关闭并调用相关的销毁方法。
public class MainApp {
   public static void main(String[] args) {
      AbstractApplicationContext context =
                          new ClassPathXmlApplicationContext("Beans.xml");
      HelloWorld obj = (HelloWorld) context.getBean("helloWorld");
      obj.getMessage();
      context.registerShutdownHook();
   }
}
下面是配置文件 Beans.xml,该文件在初始化和销毁方法中需要使用。
<?xml version="1.0" encoding="UTF-8"?>

<beans xmlns="http://www.springframework.org/schema/beans"
    xmlns:xsi="http://www.w3.org/2001/XMLSchema-instance"
    xmlns:context="http://www.springframework.org/schema/context"
    xsi:schemaLocation="http://www.springframework.org/schema/beans
    http://www.springframework.org/schema/beans/spring-beans-3.0.xsd
    http://www.springframework.org/schema/context
    http://www.springframework.org/schema/context/spring-context-3.0.xsd">

   <context:annotation-config/>

   <bean id="helloWorld"
       class="com.tutorialspoint.HelloWorld"
   //这一行注释掉    init-method="init" destroy-method="destroy">
       <property name="message" value="Hello World!"/>
   </bean>

</beans>
一旦你在源文件和 bean 配置文件中完成了上面两处改变,让我们运行一下应用程序。如果你的应用程序一切都正常的话,这将会输出以下消息:
Bean is going through init.
Your Message : Hello World!
Bean will destroy now.
5.2@Resource注解
@Resource注解和@Autowired注解一样,都是为了装配Bean,但是两者在使用上又有少许区别。
@Autowired是默认按照类型装配Bean,当需要用名称装配时,可以在@Autowired后面使用@Qualifier注解指定name属性,来告知容器加载哪个bean。
@Resource默认按照名字装配Bean,即会按照name属性的值来找到具有相同id的Bean Definition 并注入。如果@Resource没有指定name属性,则会根据这个将要被注入的属性的名字来进行Bean装配。这段话有点绕口,下面结合例子来展示。
我们先来定义一个Bean(通过注解的方式定义):
@Component(value = "renlei")
public class Person {
    String name;

    Integer age;

    //getter

    //setter
}
然后我们再来定义一个类House,并引用上面的Person,使容器对它自动装配。
@Component
public class House {

    //@Resource的name属性的值与Person类的@Component的value值相对应【都是 renlei】,所以可以进行装配
    @Resource(name = "renlei")
    private Person p1;

    //@Resource的name属性的值与Person类的@Component的value值不对应,一个是relei,一个是person,所以装配失败
    @Resource(name = "person")
    private Person p1;

    //@Reource 没有指定name的值,所以容器会拿这个p1变量的名字去Bean池子中查找id为renlei的bean并装配到这个renlei变量中。装配成功
    @Reource
    private Person renlei;

    //@Reource 没有指定name的值,所以容器会拿这个p1变量的名字去Bean池子中查找id为p1的bean并装配到这个p1变量中。如果找不到,就按照类型来进行装配,都是Person类,所以装配成功
    @Reource
    private Person p1;
}
6.Spring基于java的配置
6.1 为什么要有基于java的配置
到目前为止,你已经看到如何使用 XML 配置文件来配置 Spring bean。如果你熟悉使用 XML 配置,那么我会说,不需要再学习如何进行基于 Java 的配置是,因为你要达到相同的结果,可以使用其他可用的配置。
基于 Java 的配置选项,可以使你在不用配置 XML 的情况下编写大多数的 Spring,但是一些有帮助的基于 Java 的注解,解释如下:
6.2 @Configuration 和 @Bean 注解
package com.tutorialspoint;
import org.springframework.context.annotation.*;
@Configuration
public class HelloWorldConfig {
   @Bean
   public HelloWorld helloWorld(){
      return new HelloWorld();
   }
}
上面的代码将等同于下面的 XML 配置:
<beans>
   <bean id="helloWorld" class="com.tutorialspoint.HelloWorld" />
</beans>
在这里,带有 @Bean 注解的方法名称作为 bean 的 ID,它创建并返回实际的 bean。你的配置类可以声明多个 @Bean。一旦定义了配置类,你就可以使用 AnnotationConfigApplicationContext 来加载并把他们提供给 Spring 容器,如下所示:
public static void main(String[] args) {
   ApplicationContext ctx =
   new AnnotationConfigApplicationContext(HelloWorldConfig.class);
   HelloWorld helloWorld = ctx.getBean(HelloWorld.class);
   helloWorld.setMessage("Hello World!");
   helloWorld.getMessage();
}
你可以加载各种配置类,如下所示:
public static void main(String[] args) {
   AnnotationConfigApplicationContext ctx =
   new AnnotationConfigApplicationContext();
   ctx.register(AppConfig.class, OtherConfig.class);
   ctx.register(AdditionalConfig.class);
   ctx.refresh();
   MyService myService = ctx.getBean(MyService.class);
   myService.doStuff();
}
下边给一个完整例子体验下。
这里是 HelloWorldConfig.java 文件的内容:
package com.tutorialspoint;
import org.springframework.context.annotation.*;
@Configuration
public class HelloWorldConfig {
   @Bean
   public HelloWorld helloWorld(){
      return new HelloWorld();
   }
}
这里是 HelloWorld.java 文件的内容:
public class HelloWorld {
   private String message;

   public void setMessage(String message){
      this.message  = message;
   }

   public void getMessage(){
      System.out.println("Your Message : " + message);
   }
}
下面是 MainApp.java 文件的内容:
public class MainApp {
   public static void main(String[] args) {
      ApplicationContext ctx =
      new AnnotationConfigApplicationContext(HelloWorldConfig.class);

      HelloWorld helloWorld = ctx.getBean(HelloWorld.class);

      helloWorld.setMessage("Hello World!");
      helloWorld.getMessage();
   }
}
一旦你完成了创建所有的源文件并添加所需的额外的库后,我们就可以运行该应用程序。你应该注意这里不需要配置文件。如果你的应用程序一切都正常,将输出以下信息:
Your Message : Hello World!
6.3 注入 Bean 的依赖性(感觉太复杂可以用beans.xml文件)
当 @Beans 依赖对方时,表达这种依赖性非常简单,只要有一个 bean 方法调用另一个,如下所示:
package com.tutorialspoint;
import org.springframework.context.annotation.*;
@Configuration
public class AppConfig {
   @Bean
   public Foo foo() {
      return new Foo(bar());
   }
   @Bean
   public Bar bar() {
      return new Bar();
   }
}
这里,foo Bean 通过构造函数注入来接收参考基准。现在,让我们看到一个正在执行的例子:
这里是 TextEditorConfig.java 文件的内容:
package com.tutorialspoint;
import org.springframework.context.annotation.*;
@Configuration
public class TextEditorConfig {
   @Bean
   public TextEditor textEditor(){
      return new TextEditor( spellChecker() );
   }
   @Bean
   public SpellChecker spellChecker(){
      return new SpellChecker( );
   }
}
这里是 TextEditor.java 文件的内容:
package com.tutorialspoint;
public class TextEditor {
   private SpellChecker spellChecker;
   public TextEditor(SpellChecker spellChecker){
      System.out.println("Inside TextEditor constructor." );
      this.spellChecker = spellChecker;
   }
   public void spellCheck(){
      spellChecker.checkSpelling();
   }
}
下面是另一个依赖的类文件 SpellChecker.java 的内容:
package com.tutorialspoint;
public class SpellChecker {
   public SpellChecker(){
      System.out.println("Inside SpellChecker constructor." );
   }
   public void checkSpelling(){
      System.out.println("Inside checkSpelling." );
   }

}
下面是 MainApp.java 文件的内容:
public class MainApp {
   public static void main(String[] args) {
      ApplicationContext ctx =
      new AnnotationConfigApplicationContext(TextEditorConfig.class);

      TextEditor te = ctx.getBean(TextEditor.class);

      te.spellCheck();
   }
}
6.4 @Import注解
@import 注解允许从另一个配置类中加载 @Bean 定义。考虑 ConfigA 类,如下所示:
@Configuration
public class ConfigA {
   @Bean
   public A a() {
      return new A();
   }
}
你可以在另一个 Bean 声明中导入上述 Bean 声明,如下所示:
@Configuration
@Import(ConfigA.class)
public class ConfigB {
   @Bean
   public B b() {
      return new B();
   }
}
现在,当实例化上下文时,不需要同时指定 ConfigA.class 和 ConfigB.class,只有 ConfigB 类需要提供,如下所示:
public static void main(String[] args) {
   ApplicationContext ctx =
   new AnnotationConfigApplicationContext(ConfigB.class);
   // now both beans A and B will be available...
   A a = ctx.getBean(A.class);
   B b = ctx.getBean(B.class);
}
6.5生命周期回调
@Bean 注解支持指定任意的初始化和销毁的回调方法,就像在 bean 元素中 Spring 的 XML 的初始化方法和销毁方法的属性:
public class Foo {
   public void init() {
      // initialization logic
   }
   public void cleanup() {
      // destruction logic
   }
}

@Configuration
public class AppConfig {
   @Bean(initMethod = "init", destroyMethod = "cleanup" )
   public Foo foo() {
      return new Foo();
   }
}
指定 Bean 的范围:
默认范围是单实例,但是你可以重写带有 @Scope 注解的该方法,如下所示:
@Configuration
public class AppConfig {
   @Bean
   @Scope("prototype")
   public Foo foo() {
      return new Foo();
   }
}
7.Spring中的事件处理
7.1 Spring中的事件处理
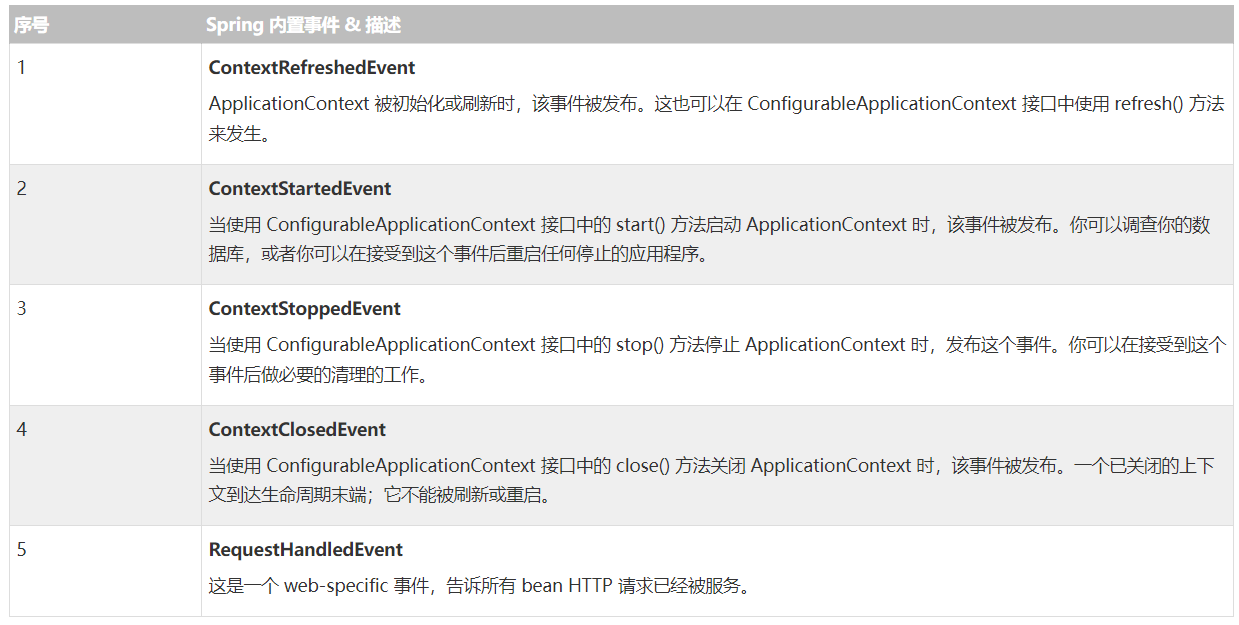
你已经看到了在所有章节中 Spring 的核心是 ApplicationContext,它负责管理 beans 的完整生命周期。当加载 beans 时,ApplicationContext 发布某些类型的事件。例如,当上下文启动时,ContextStartedEvent 发布,当上下文停止时,ContextStoppedEvent 发布。
通过 ApplicationEvent 类和 ApplicationListener 接口来提供在 ApplicationContext 中处理事件。如果一个 bean 实现 ApplicationListener,那么每次 ApplicationEvent 被发布到 ApplicationContext 上,那个 bean 会被通知。
Spring 提供了以下的标准事件:
7.2监听上下文事件
为了监听上下文事件,一个 bean 应该实现只有一个方法 onApplicationEvent() 的 ApplicationListener 接口。因此,我们写一个例子来看看事件是如何传播的,以及如何可以用代码来执行基于某些事件所需的任务。
这里是 HelloWorld.java 文件的内容:
public class HelloWorld {
   private String message;
   public void setMessage(String message){
      this.message  = message;
   }
   public void getMessage(){
      System.out.println("Your Message : " + message);
   }
}
下面是 CStartEventHandler.java 文件的内容:
public class CStartEventHandler
   implements ApplicationListener<ContextStartedEvent>{
   public void onApplicationEvent(ContextStartedEvent event) {
      System.out.println("ContextStartedEvent Received");
   }
}
下面是 CStopEventHandler.java 文件的内容:
public class CStopEventHandler
   implements ApplicationListener<ContextStoppedEvent>{
   public void onApplicationEvent(ContextStoppedEvent event) {
      System.out.println("ContextStoppedEvent Received");
   }
}
下面是 MainApp.java 文件的内容:
public class MainApp {
   public static void main(String[] args) {
      ConfigurableApplicationContext context =
      new ClassPathXmlApplicationContext("Beans.xml");

      // Let us raise a start event.
      context.start();

      HelloWorld obj = (HelloWorld) context.getBean("helloWorld");

      obj.getMessage();

      // Let us raise a stop event.
      context.stop();
   }
}
下面是配置文件 Beans.xml 文件:
<?xml version="1.0" encoding="UTF-8"?>

<beans xmlns="http://www.springframework.org/schema/beans"
    xmlns:xsi="http://www.w3.org/2001/XMLSchema-instance"
    xsi:schemaLocation="http://www.springframework.org/schema/beans
    http://www.springframework.org/schema/beans/spring-beans-3.0.xsd">

   <bean id="helloWorld" class="com.tutorialspoint.HelloWorld">
      <property name="message" value="Hello World!"/>
   </bean>

   <bean id="cStartEventHandler"
         class="com.tutorialspoint.CStartEventHandler"/>

   <bean id="cStopEventHandler"
         class="com.tutorialspoint.CStopEventHandler"/>

</beans>
一旦你完成了创建源和 bean 的配置文件,我们就可以运行该应用程序。如果你的应用程序一切都正常,将输出以下消息:
ContextStartedEvent Received
Your Message : Hello World!
ContextStoppedEvent Received

 浙公网安备 33010602011771号