
day39---mysql基础三
1、索引:
字典得目录,便于数据查找。
原理:将列信息存储在其相关的文件,这些信息使用便于检索的方式如B-tree、哈希来存储
索引的分类:
普通所有:name,只能帮助查找
唯一索引:name,帮助查找,约束内容不能重复,null,
也可做联合唯一索引
主键索引:与唯一索引类似,但不允许null,一张表只能有一个主键
支持联合主键
组合索引:多列公共组成索引
普通多列索引(name,email):用处不大
联合唯一索引(name,email):有用
全文索引:类似对长的字段做了一个分词的操作,对中文支持不好。
常用:solr ,lucence,sphix来做全文搜索
2、创建索引:
*普通索引:加快查找速度
验证:使用命令explain 若type 是all表示全表搜索,若为ref 表示通过索引搜索
*唯一索引:关键词unique
type =const ,查找效率高
*联合索引:索引最左原则,
单独使用右边的并不启用索引
3、正确的使用索引:
@*like ‘%xx’ 不走索引 like ‘xx%’走索引
@*使用函数 : select coun(1) from tb2 where reverse(name) = 'xxx' 不走索引,select coun(1) from tb2 where name = reverse('xxx') 走索引
@*or : select * from tb1 where nid = 1 or email = 'xxxx' ,nid email都有索引才走索引
@*类型不一致:select * from tb1 where name = 'xxxx' 会走索引,select * from tb1 where name = 111 不走索引
@*!= 和 > : 不走索引,特殊的 若该列为主键则走索引,否则不走索引;;;;;其他比较的走索引
@*orderby: select email from tb1 order by name desc 不走索引; select name form tb1 order by name desc 走索引
@*组合索引最左侧走索引,eg(name,email) name and email 走索引,name 走索引,email 不走索引
覆盖索引:所有数据都拿到叫做覆盖索引
索引合并:2个单个索引一起使用叫做索引合并
组合索引:2列做成一个索引
4、小知识:在加上limit后可在没有索引的时候可能会快速的完成查询
5、mysql 使用注意实现:
• 避免使用select *
• count(1) or count(列) 代替count(*)
• 创建表时尽量使用char代替varchar
• 表得字段顺序固定长度的字段优先
• 组合索引代替多个单列索引(经查使用多个条件查询时)
• 尽量使用短索引(否则会导致产生超大索引文件,方法在创建索引时列名标长度)
• 使用连接(join)来代替子查询(sub-Quries)
• 连表时注意条件类型要一致
• 索引散列值(重复少)不做索引,例:性别不适合
• 适度创建索引,不要过度创建
• 大批量导入导出数据时可先删除索引而后在添加索引以提高效率
6、分页的最佳方案:
select * from tb limit 200000,5;
第一种优化方案:
select * from tb1 where nid > (select nid from tb1 limit 200000,1 ) limit 5
此方案效率不高
第二种优化方案:
每页显示10条数据,供1000条
a. 上一页,下一页(使用应用传过来的nid值)
select * from tb1 where nid <9989 order by nid desc limit 10;
b. 上一页,100 99 98 97 96 95 94 下一页
select * from tb1 where nid <9989 order by nid desc limit 10;
#9989 ... 9959
select nid form (select nid from tb1 where nid < 9989 order by nid desc limit 40) as A order by nid asc limit 1 ;
select * from tb1 where nid < 动态最新id order by nid desc limit 10;
7、执行计划:
语法:explain + 查询SQL
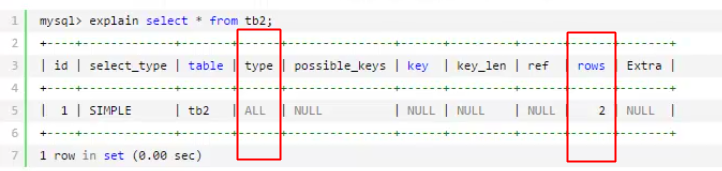
id 表示查询个数 ,id大的先执行
8、慢查询:
*配置文件(win):win my-default.ini
slow_query_log = off
long_query_time = 2
slow_query_log_file = /xxxxx/log
log_queries_not_using_indexes = off -- 记录没有使用索引的查询
查看当前配置信息:
show GLOBAL VARIABLES like '%query%'
设置:
set global slow_query_log = on;
set global long_query_time =1 ;
set global log_queries_not_using_indexes = on
*查看mysql慢日志
eg: mysqldumpslow
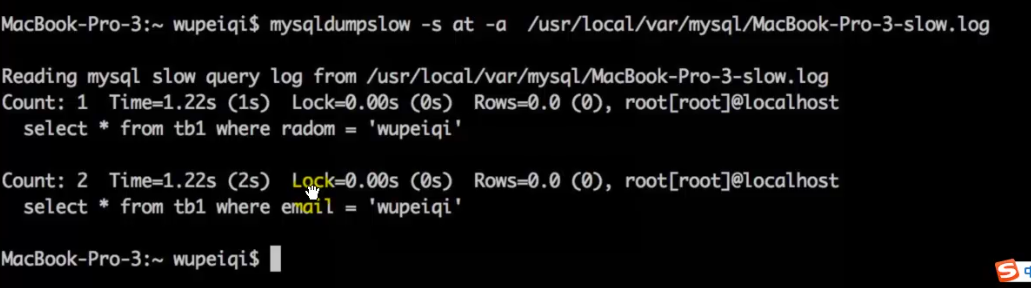
-s at 需要我们关注
r 反序 a 显示全部值 g 匹配符合正则的结果 l 总时间不显示锁定时间
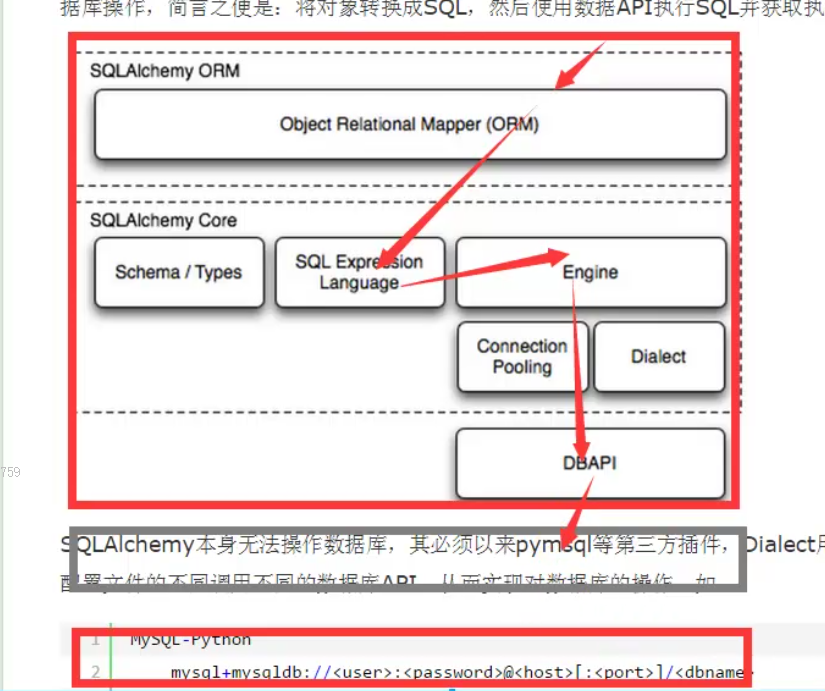
9、SQLAlchemy
SQLAlchemy 是python 下的一个ORM框架

SQLAlchemy 本身无法操作数据库,必须依靠pymysql等第三插件,Dialect拥有和数据api进行交流,依据配置文件得不同调用不同得数据api从而实现对数据库得操作。
1)底层处理


eg:
MySQL-Python
mysql+mysqldb://<user>:<password>@<host>[:<port>]/<dbname> pymysql mysql+pymysql://<username>:<password>@<host>/<dbname>[?<options>] MySQL-Connector mysql+mysqlconnector://<user>:<password>@<host>[:<port>]/<dbname> cx_Oracle oracle+cx_oracle://user:pass@host:port/dbname[?key=value&key=value...] 更多详见:http://docs.sqlalchemy.org/en/latest/dialects/index.html

#!/usr/bin/env python
# -*- coding:utf-8 -*-
import pymysql

# 创建连接
conn = pymysql.connect(host='10.10.8.12', port=3306, user='sysadmin', passwd='password01!', db='q2')
# 创建游标
cursor = conn.cursor(cursor=pymysql.cursors.DictCursor)

# 执行SQL,并返回收影响行数
# effect_row = cursor.execute("UPDATE users set name = 'john1'")

effect_row = cursor.execute("insert into users(name,password)  VALUES ('john33','123.123')")
conn.commit()
#cursor.lastrowid 可获取自增列的id
print(cursor.lastrowid)

# u = input("pls input username>>>>")
# p = input("pls input passwd>>>>>>")
# effect_row = cursor.execute("insert into users(name,password)  VALUES (%s,%s)",(u,p))

#批量插入数据:
# effect_row = cursor.executemany("insert into users(name,password)  VALUES (%s,%s)",
#                             [('john3','john3333'),('john5','john555')])
# print(effect_row)
# 提交,不然无法保存新建或者修改的数据
# conn.commit()

#查询数据
# # effect_row = cursor.execute("select * from users")
# effect_row = cursor.execute('select * from users where nid > %s ORDER BY nid DESC ',(5,))
# #fetchall--- 拿到所有的数据, fetchone 第一次执行拿到第一个数据,第二次执行拿到第二个数据,
# #cursor.scroll(2, mode='relative')可用来移动游标
#
# # result = cursor.fetchall()
# # print(result)
# result = cursor.fetchone()
# print(result)
# result = cursor.fetchone()
# print(result)
# #游标的移动,mode="relative"相对移动,mode='absolute'绝对移动
# # cursor.scroll(-1, mode='relative')
# # cursor.scroll(2, mode='relative')
# cursor.scroll(0, mode='absolute')
# result = cursor.fetchone()
# print(result)
# 关闭游标
cursor.close()
# 关闭连接
conn.close()

 浙公网安备 33010602011771号