

极客时间运维进阶训练营第五周作业
1、完全基于 Pipeline 实现完整的代码部署流水线
#!groovy
pipeline {
    agent any
    // agent { label 'jenkins-slave01' }
    options {
        buildDiscarder(logRotator(numToKeepStr: '5'))
        disableConcurrentBuilds()
        timeout(time: 5, unit: 'MINUTES') //任务执行超时时间,默认单位小时
        timestamps()  //在控制台显示命令执行时间,格式10:33:29
        retry(2) //流水线构建失败后重置次数为2次
    }
    // 声明环境变量
    environment {
        // def GIT_URL = 'https://gitlab.iclinux.com/linux/app1.git'
        // def HARBOR_URL = 'harbor.iclinux.com'
        // def IMAGE_PROJECT = 'app'
        // def IMAAGE_NAME = 'nginx'
        def IMAGE_BUILD_NODE="192.168.56.201"
        def DOCKER_NODE="192.168.56.202"
        def DATE = sh(script: "date +%F_%H-%M-%S", returnStdout: true).trim()

    }
    // 参数定义
    parameters {
        string(name: 'BRANCH', defaultValue: 'develop', description: 'branck select')
        choice(name: 'DEPLOY_ENV', choices: ['develop', 'production'], description: 'deploy env')
    }
    // 流水线开始工作
    stages {
        stage('code clone'){
            // agent { label 'master' }
            steps {
                deleteDir()  //清空目录
                script {
                    if ( env.BRANCH == 'main' ){
                        git branch: 'main', credentialsId: 'root', url: 'https://gitlab.iclinux.com/linux/app1.git'

                    } else if ( env.BRANCH == 'develop' ) {
                        git branch: 'develop', credentialsId: 'root', url: 'https://gitlab.iclinux.com/linux/app1.git'

                    } else {
                        echo 'BRANCH ERROR, please check it.'
                    }
                GIT_COMMIT_TAG = sh(returnStdout: true, script: 'git rev-parse --short HEAD').trim()
                }
                // echo "${GIT_COMMIT_TAG}"
            }
        }

        stage('sonarqube-scanner'){
            // agent { label 'master' }
            steps{
                sh 'pwd'
                dir('/var/lib/jenkins/workspace/pipeline-groovy-test') {
                    // some block
                    sh '/apps/sonar-scanner/bin/sonar-scanner -Dsonar.projectKey=iclinx -Dsonar.projectName=iclinux-python-app3 -Dsonar.projectVersion=1.3 -Dsonar.sources=./src -Dsonar.language=py -Dsonar.sourceEncoding=UTF-8'
                }
            }
        }

        stage('code build'){
            steps{
                dir('/var/lib/jenkins/workspace/pipeline-groovy-test'){
                    sh 'tar cvzf frontend.tar.gz ./index.html ./images'
                }
            }
        }

        stage('file sync'){
            steps {
                echo "file sync"
                sh "scp frontend.tar.gz root@${IMAGE_BUILD_NODE}:/opt/dockerfiles/app/web1"
            }

        }

        stage("image build"){
            steps{
                echo "sync file to docker images server and make docker image"
                sh """
                    ssh root@${IMAGE_BUILD_NODE} "cd /opt/dockerfiles/app/web1 && bash build-command.sh ${GIT_COMMIT_TAG}-${DATE}"
                """
            }
        }

        stage('docker-compose image update'){
            steps{
                sh """
                    #ssh root@192.168.56.202 "echo 123"
                    ssh root@${DOCKER_NODE} "cd /opt/iclinux-web && sed -i  's#image: harbor.iclinux.com/app/iclinux-web1:.*#image: harbor.iclinux.com/app/iclinux-web1:${GIT_COMMIT_TAG}-${DATE}#' docker-compose.yml && sleep 1 && docker-compose pull"
                    """

            }
        }

        stage('docker-compose app update'){
            steps{
                echo 'update app'
                sh """
                    ssh root@${DOCKER_NODE} "cd /opt/iclinux-web && docker-compose  up -d"
                """
            }
        }

        stage('send email'){
            steps {
                sh 'echo send email'
            }
            post {
                always{
                    script {
                    mail to: '1330430077@qq.com',
                    subject: "Pipeline Name: ${currentBuild.fullDisplayName}",
                    body: " ${env.JOB_NAME} -Build Number-${env.BUILD_NUMBER}\n 点击链接 ${env.BUILD_URL} 查看详情"
                    }

                }
            }
        }

    }
}
2、熟悉 ELK 各组件的功能、Elasticsearch 的节点角色类型
ELK主要组件
E-elasticsearch:数据存储及检索
L-logstash:日志收集、处理、发送给 elasticsearch
K-kibana:从ES读取数据进行可视化展示及数据管理
节点类型
data node:数据节点,数据的存储
master node: 主节点,index管理,分片的分配,node节点的添加三处,一个es集群只有一个活跃的master节点
client node/coordinationg-node: 客户端节点或协调节点,将数据读写请求发送到data node,它只作为集群的入口,不存储数据,也不参与master角色的选举
ingest节点:预处理节点,在检索数据前进行预处理,可以在管道对数据实现字段删除、文本提前等操作,所有节点默认都支持ingest节点
data_cold: 冷数据节点
data_swarm: 热数据节点
data_frozen:冻结数据节点
配置文件没有定义则可以做任何角色
3、熟悉索引、doc、分片与副本的概念
Index:一类相同的数据,在逻辑上通过一个index查询、修改
Document:文档,存储在ES的数据
shard:分片,对index的逻辑拆分存储,多个分片合起来就是index的所有数据
Replica:副本,一个分片的跨主机完整备份
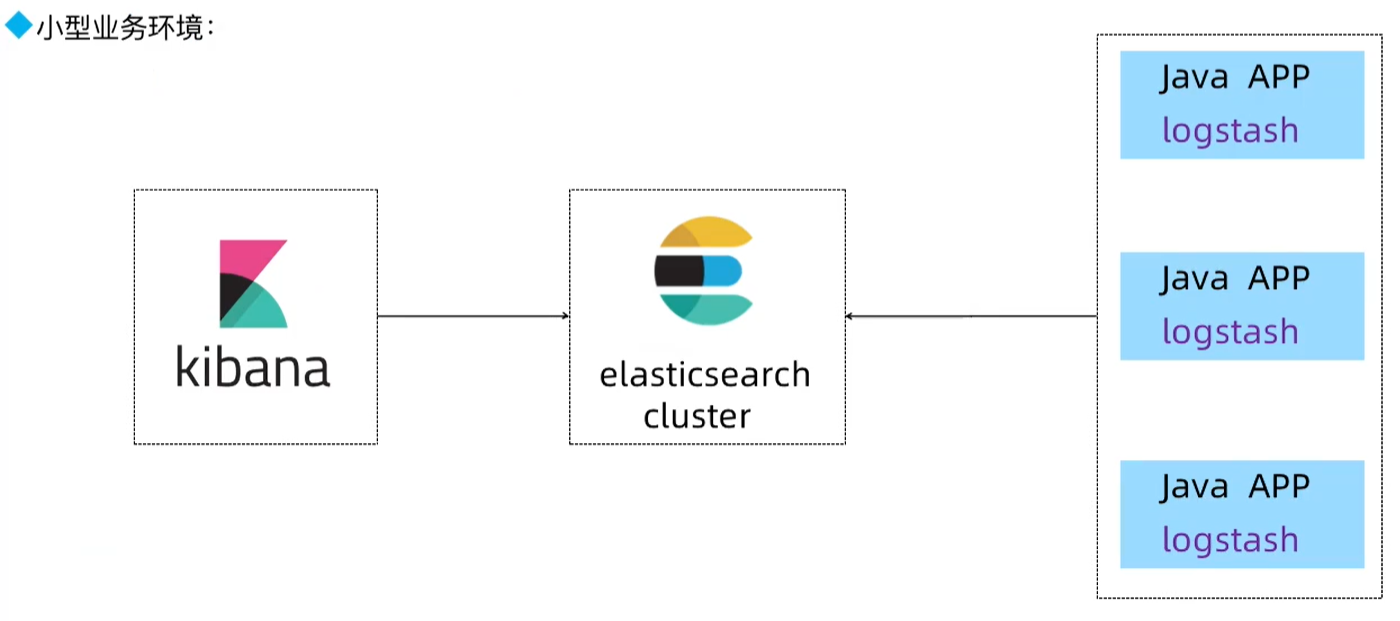
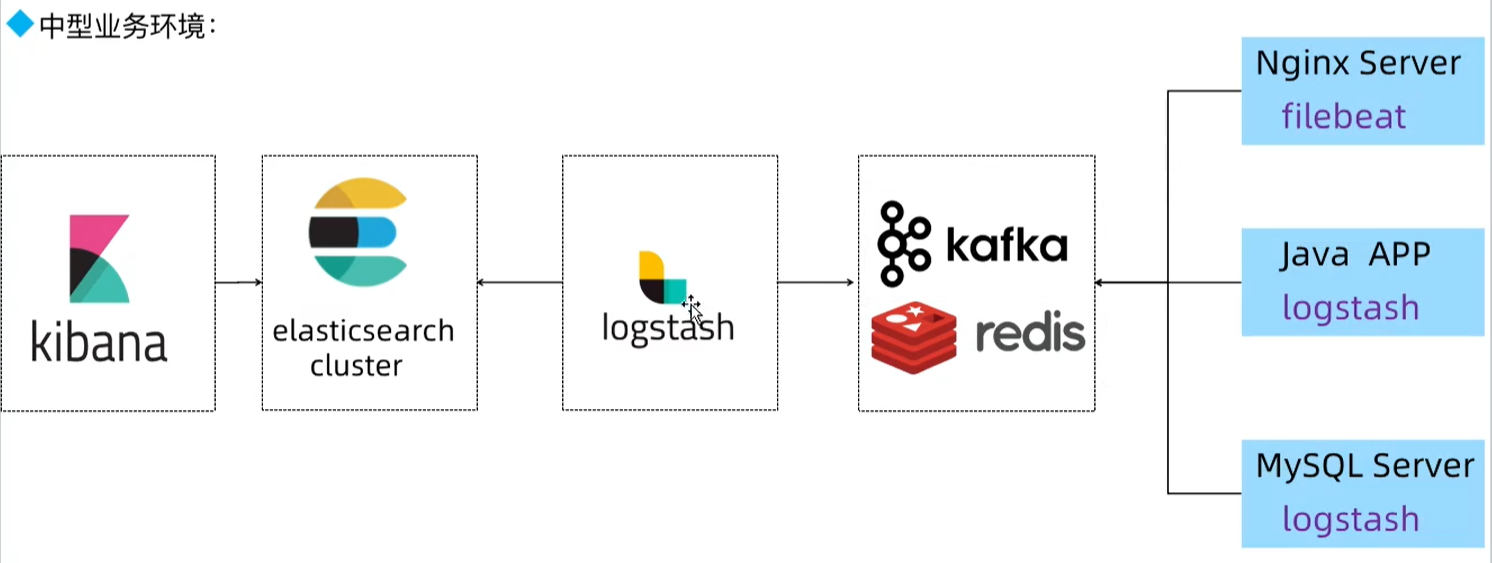
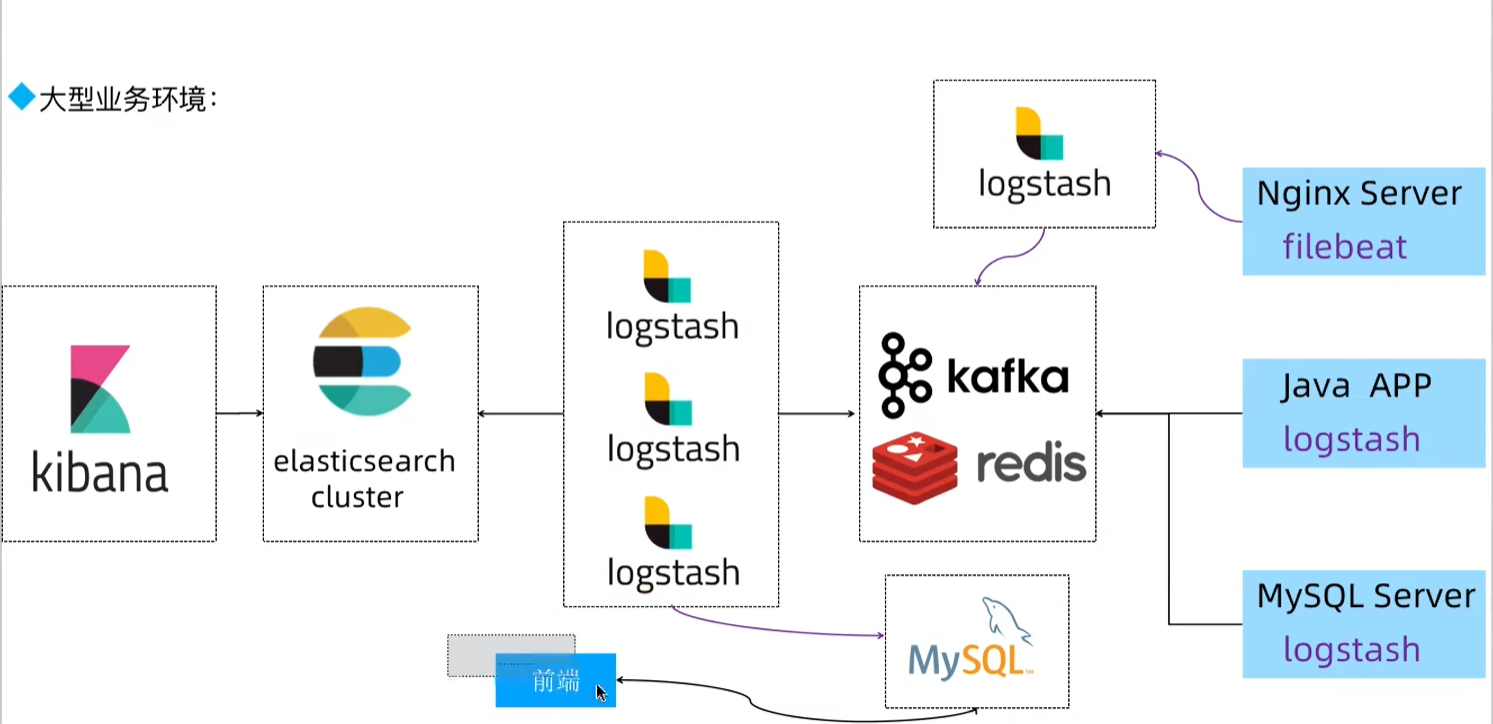
4、掌握不同环境的 ELK 部署规划,基于 deb 或二进制部署 Elasticsearch 集群
安装elasticsearch集群
node1
# 准备工作
BASE_DIR="/apps"
install -d "${BASE_DIR}"
tar xzf  /usr/local/src/elasticsearch-8.5.1-linux-x86_64.tar.gz -C  "${BASE_DIR}"

echo "vm.max_map_count=262144" >> /etc/sysctl.conf && sysctl -p


  sysctl -a|grep 'vm.max_map_count'


tee -a  /etc/hosts << "EOF"
192.168.56.111 elk-node1 elk-node1.iclinux.com
192.168.56.112 elk-node2 elk-node2.iclinux.com
192.168.56.113 elk-node3 elk-node3.iclinux.com
EOF

## elk 对资源消耗大此处要完成基本优化
cat /etc/security/limits.conf

reboot

## 创建运行环境
groupadd -g 2888 elasticsearch && useradd -u 2888 -g 2888 -r -m -s /bin/bash elasticsearch &&\
mkdir /data/esdata /data/eslogs /apps -pv
passwd elasticsearch # 密码设置为123456


ln -sv /apps/elasticsearch-8.5.1 /apps/elasticsearch

chown elasticsearch.elasticsearch /data /apps/ -R

# 配置 x-pack 认证
## 配置证书
su - elasticsearch
cd /apps/elasticsearch &&\
tee instances.yml << "EOF"
instances:
  - name: "elk-node1.iclinux.com"
    ip:
      - "192.168.56.111"
  - name: "elk-node2.iclinux.com"
    ip:
      - "192.168.56.112"
  - name: "elk-node3.iclinux.com"
    ip:
      - "192.168.56.113"
EOF

## ⽣成CA私钥,默认名字为elastic-stack-ca.p12
bin/elasticsearch-certutil ca
## ⽣产CA公钥,默认名称为elastic-certificates.p12
bin/elasticsearch-certutil cert --ca elastic-stack-ca.p12
## 至此证书签发机构ca证书签发完毕

## 签发 es 集群主机证书
bin/elasticsearch-certutil cert --silent --in instances.yml --out certs.zip --pass magedu123 --ca elastic-stack-ca.p12

## 分发证书
unzip certs.zip
mkdir config/certs
cp -rp elk-node1.iclinux.com/elk-node1.iclinux.com.p12  config/certs/

scp -r elk-node2.iclinux.com root@elk-node2:/tmp
scp -r elk-node3.iclinux.com root@elk-node3:/tmp


## ⽣成 keystore ⽂件(keystore是保存了证书密码的认证⽂件magedu123)
./bin/elasticsearch-keystore create #创建keystore⽂件
./bin/elasticsearch-keystore add xpack.security.transport.ssl.keystore.secure_password
./bin/elasticsearch-keystore add xpack.security.transport.ssl.truststore.secure_password
#magedu123

## 分发keystore 文件
scp /apps/elasticsearch/config/elasticsearch.keystore elasticsearch@elk-node2:/apps/elasticsearch/config/elasticsearch.keystore
scp /apps/elasticsearch/config/elasticsearch.keystore elasticsearch@elk-node3:/apps/elasticsearch/config/elasticsearch.keystore

# 编辑配置文件

cp /apps/elasticsearch/config/elasticsearch.yml{,.bak}

tee /apps/elasticsearch/config/elasticsearch.yml << "EOF"
cluster.name: magedu-es-cluster1
node.name: node1
path.data: /data/esdata
path.logs: /data/eslogs
network.host: 0.0.0.0
http.port: 9200
# 创建集群时的通过ip,全部写上#
discovery.seed_hosts: ["192.168.56.111", "192.168.56.112", "192.168.56.113"]

# 可以成为master的主机
cluster.initial_master_nodes: ["192.168.56.111", "192.168.56.112", "192.168.56.113"]

action.destructive_requires_name: true

xpack.security.enabled: true
xpack.security.transport.ssl.enabled: true
xpack.security.transport.ssl.keystore.path: /apps/elasticsearch/config/certs/elk-node1.iclinux.com.p12
xpack.security.transport.ssl.truststore.path: /apps/elasticsearch/config/certs/elk-node1.iclinux.com.p12
EOF

## 配置systemd启动
tee /lib/systemd/system/elasticsearch.service << "EOF"
[Unit]
Description=Elasticsearch
Documentation=http://www.elastic.co
Wants=network-online.target
After=network-online.target

[Service]
RuntimeDirectory=elasticsearch
Environment=ES_HOME=/apps/elasticsearch
Environment=ES_PATH_CONF=/apps/elasticsearch/config
Environment=PID_DIR=/apps/elasticsearch

WorkingDirectory=/apps/elasticsearch

User=elasticsearch
Group=elasticsearch

ExecStart=/apps/elasticsearch/bin/elasticsearch --quiet

# StandardOutput is configured to redirect to journalctl since
# some error messages may be logged in standard output before
# elasticsearch logging system is initialized. Elasticsearch
# stores its logs in /var/log/elasticsearch and does not use
# journalctl by default. If you also want to enable journalctl
# logging, you can simply remove the "quiet" option from ExecStart.
StandardOutput=journal
StandardError=inherit

# Specifies the maximum file descriptor number that can be opened by this process
LimitNOFILE=65536

# Specifies the maximum number of processes
LimitNPROC=4096

# Specifies the maximum size of virtual memory
LimitAS=infinity

# Specifies the maximum file size
LimitFSIZE=infinity

# Disable timeout logic and wait until process is stopped
TimeoutStopSec=0

# SIGTERM signal is used to stop the Java process
KillSignal=SIGTERM

# Send the signal only to the JVM rather than its control group
KillMode=process

# Java process is never killed
SendSIGKILL=no

# When a JVM receives a SIGTERM signal it exits with code 143
SuccessExitStatus=143

[Install]
WantedBy=multi-user.target

EOF

chown elasticsearch.elasticsearch /data /apps/ -R &&\
systemctl daemon-reload && systemctl start elasticsearch.service && systemctl enable elasticsearch.service

 systemctl restart elasticsearch.service

## 查看系统启动日志
  tail -fn1111 /data/eslogs/magedu-es-cluster1.log


## 初始化账号
su - elasticsearch
/apps/elasticsearch/bin/elasticsearch-setup-passwords interactive
#密码均设置为: elastic  123456
node2
#准备工作
BASE_DIR="/apps"
install -d "${BASE_DIR}"
tar xzf  /usr/local/src/elasticsearch-8.5.1-linux-x86_64.tar.gz -C  "${BASE_DIR}"

echo "vm.max_map_count=262144" >> /etc/sysctl.conf && sysctl -p


sysctl -a|grep 'vm.max_map_count'


tee -a  /etc/hosts << "EOF"
192.168.56.111 elk-node1 elk-node1.iclinux.com
192.168.56.112 elk-node2 elk-node2.iclinux.com
192.168.56.113 elk-node3 elk-node3.iclinux.com
EOF

# elk 对资源消耗大此处要完成基本优化
cat /etc/security/limits.conf


reboot

#创建运行环境
groupadd -g 2888 elasticsearch && useradd -u 2888 -g 2888 -r -m -s /bin/bash elasticsearch &&\
mkdir /data/esdata /data/eslogs /apps -pv
passwd elasticsearch # 密码设置为123456


ln -sv /apps/elasticsearch-8.5.1 /apps/elasticsearch
chown elasticsearch.elasticsearch /data /apps/ -R


install -d /apps/elasticsearch/config/certs
cp  /tmp/elk-node2.iclinux.com/elk-node2.iclinux.com.p12 /apps/elasticsearch/config/certs

chown elasticsearch.elasticsearch /data /apps/ -R


# 编辑配置文件

cp /apps/elasticsearch/config/elasticsearch.yml{,.bak}

tee /apps/elasticsearch/config/elasticsearch.yml << "EOF"
cluster.name: magedu-es-cluster1
node.name: node2
path.data: /data/esdata
path.logs: /data/eslogs
network.host: 0.0.0.0
http.port: 9200
# 创建集群时的通过ip,全部写上#
discovery.seed_hosts: ["192.168.56.111", "192.168.56.112", "192.168.56.113"]

# 可以成为master的主机
cluster.initial_master_nodes: ["192.168.56.111", "192.168.56.112", "192.168.56.113"]

action.destructive_requires_name: true

xpack.security.enabled: true
xpack.security.transport.ssl.enabled: true
xpack.security.transport.ssl.keystore.path: /apps/elasticsearch/config/certs/elk-node2.iclinux.com.p12
xpack.security.transport.ssl.truststore.path: /apps/elasticsearch/config/certs/elk-node2.iclinux.com.p12
EOF


## 配置systemd启动
tee /lib/systemd/system/elasticsearch.service << "EOF"
[Unit]
Description=Elasticsearch
Documentation=http://www.elastic.co
Wants=network-online.target
After=network-online.target

[Service]
RuntimeDirectory=elasticsearch
Environment=ES_HOME=/apps/elasticsearch
Environment=ES_PATH_CONF=/apps/elasticsearch/config
Environment=PID_DIR=/apps/elasticsearch

WorkingDirectory=/apps/elasticsearch

User=elasticsearch
Group=elasticsearch

ExecStart=/apps/elasticsearch/bin/elasticsearch --quiet

# StandardOutput is configured to redirect to journalctl since
# some error messages may be logged in standard output before
# elasticsearch logging system is initialized. Elasticsearch
# stores its logs in /var/log/elasticsearch and does not use
# journalctl by default. If you also want to enable journalctl
# logging, you can simply remove the "quiet" option from ExecStart.
StandardOutput=journal
StandardError=inherit

# Specifies the maximum file descriptor number that can be opened by this process
LimitNOFILE=65536

# Specifies the maximum number of processes
LimitNPROC=4096

# Specifies the maximum size of virtual memory
LimitAS=infinity

# Specifies the maximum file size
LimitFSIZE=infinity

# Disable timeout logic and wait until process is stopped
TimeoutStopSec=0

# SIGTERM signal is used to stop the Java process
KillSignal=SIGTERM

# Send the signal only to the JVM rather than its control group
KillMode=process

# Java process is never killed
SendSIGKILL=no

# When a JVM receives a SIGTERM signal it exits with code 143
SuccessExitStatus=143

[Install]
WantedBy=multi-user.target

EOF

chown elasticsearch.elasticsearch /data /apps/ -R


systemctl daemon-reload && systemctl start elasticsearch.service &&
systemctl enable elasticsearch.service
node3
#准备工作
BASE_DIR="/apps"
install -d "${BASE_DIR}"
tar xzf  /usr/local/src/elasticsearch-8.5.1-linux-x86_64.tar.gz -C  "${BASE_DIR}"

echo "vm.max_map_count=262144" >> /etc/sysctl.conf && sysctl -p &&  sysctl -a|grep 'vm.max_map_count'


tee -a  /etc/hosts << "EOF"
192.168.56.111 elk-node1 elk-node1.iclinux.com
192.168.56.112 elk-node2 elk-node2.iclinux.com
192.168.56.113 elk-node3 elk-node3.iclinux.com
EOF

# elk 对资源消耗大此处要完成基本优化
cat /etc/security/limits.conf

reboot

#创建运行环境
groupadd -g 2888 elasticsearch && useradd -u 2888 -g 2888 -r -m -s /bin/bash elasticsearch &&\
mkdir /data/esdata /data/eslogs /apps -pv
passwd elasticsearch # 密码设置为123456

ln -sv /apps/elasticsearch-8.5.1 /apps/elasticsearch
chown elasticsearch.elasticsearch /data /apps/ -R

install -d /apps/elasticsearch/config/certs
cp /tmp/elk-node3.iclinux.com/elk-node3.iclinux.com.p12 /apps/elasticsearch/config/certs

chown elasticsearch.elasticsearch /data /apps/ -R


# 编辑配置文件

cp /apps/elasticsearch/config/elasticsearch.yml{,.bak}

tee /apps/elasticsearch/config/elasticsearch.yml << "EOF"
cluster.name: magedu-es-cluster1
node.name: node3
path.data: /data/esdata
path.logs: /data/eslogs
network.host: 0.0.0.0
http.port: 9200
# 创建集群时的通过ip,全部写上#
discovery.seed_hosts: ["192.168.56.111", "192.168.56.112", "192.168.56.113"]

# 可以成为master的主机
cluster.initial_master_nodes: ["192.168.56.111", "192.168.56.112", "192.168.56.113"]

action.destructive_requires_name: true

xpack.security.enabled: true
xpack.security.transport.ssl.enabled: true
xpack.security.transport.ssl.keystore.path: /apps/elasticsearch/config/certs/elk-node3.iclinux.com.p12
xpack.security.transport.ssl.truststore.path: /apps/elasticsearch/config/certs/elk-node3.iclinux.com.p12
EOF


## 配置systemd启动
tee /lib/systemd/system/elasticsearch.service << "EOF"
[Unit]
Description=Elasticsearch
Documentation=http://www.elastic.co
Wants=network-online.target
After=network-online.target

[Service]
RuntimeDirectory=elasticsearch
Environment=ES_HOME=/apps/elasticsearch
Environment=ES_PATH_CONF=/apps/elasticsearch/config
Environment=PID_DIR=/apps/elasticsearch

WorkingDirectory=/apps/elasticsearch

User=elasticsearch
Group=elasticsearch

ExecStart=/apps/elasticsearch/bin/elasticsearch --quiet

# StandardOutput is configured to redirect to journalctl since
# some error messages may be logged in standard output before
# elasticsearch logging system is initialized. Elasticsearch
# stores its logs in /var/log/elasticsearch and does not use
# journalctl by default. If you also want to enable journalctl
# logging, you can simply remove the "quiet" option from ExecStart.
StandardOutput=journal
StandardError=inherit

# Specifies the maximum file descriptor number that can be opened by this process
LimitNOFILE=65536

# Specifies the maximum number of processes
LimitNPROC=4096

# Specifies the maximum size of virtual memory
LimitAS=infinity

# Specifies the maximum file size
LimitFSIZE=infinity

# Disable timeout logic and wait until process is stopped
TimeoutStopSec=0

# SIGTERM signal is used to stop the Java process
KillSignal=SIGTERM

# Send the signal only to the JVM rather than its control group
KillMode=process

# Java process is never killed
SendSIGKILL=no

# When a JVM receives a SIGTERM signal it exits with code 143
SuccessExitStatus=143

[Install]
WantedBy=multi-user.target

EOF

chown elasticsearch.elasticsearch /data /apps/ -R


systemctl daemon-reload && systemctl start elasticsearch.service &&
systemctl enable elasticsearch.service
5、了解 Elasticsearch API 的简单使用,安装 head 插件管理 ES 的数据
5.1 api的简单使用
### 查看服务器状态
curl -u magedu:123456 http://192.168.56.111:9200
curl -u magedu:123456 http://192.168.56.112:9200
curl -u magedu:123456 http://192.168.56.113:9200


curl -u magedu:123456 -X GET http://192.168.56.111:9200/_cat
curl -u magedu:123456 -X GET http://192.168.56.111:9200/_cat/health
 curl -u magedu:123456 -X GET http://192.168.56.111:9200/_cat/master?v
 curl -u magedu:123456 -X GET http://192.168.56.111:9200/_cat/nodes?v

### 创建索引
 curl -u magedu:123456 -X PUT http://192.168.56.111:9200/creat_by_api?pretty
### 查看索引
 curl -u magedu:123456 -X GET http://192.168.56.111:9200/creat_by_api?pretty

curl -u magedu:123456 -X POST "http://192.168.56.111:9200/creat_by_api/_doc/1?pretty" -H 'Content-Type: application/json' -d '{"name": "Jack", "age": 19}'

### 查看索引配置
 curl -u magedu:123456 -X GET http://192.168.56.111:9200/creat_by_api/_settings?pretty

### 关闭索引
 curl -u magedu:123456 -X POST http://192.168.56.111:9200/creat_by_api/_close

### 打开索引
 curl -u magedu:123456 -X POST http://192.168.56.111:9200/creat_by_api/_open?pretty

### 删除索引
curl -u magedu:123456 -X DELETE "http://192.168.56.111:9200/creat_by_api?pretty"

### 修改集群每个节点的最大可分配的分片数,es7默认1000,用完后报错状态码400
curl -u magedu:123456 -X PUT http://192.168.56.111:9200/_cluster/settings -H 'Content-Type: application/json' -d '{"persistent":{"cluster.max_shards_per_node":"1000000"}}'

### 磁盘最低和最高使用百分比95%,默认85%不会在当前节点创建新的分配副本,90%开始将副本移动到其他节点,95所有索引只读
curl -u magedu:123456 -X PUT http://192.168.56.111:9200/_cluster/settings -H 'Content-Type: application/json' -d '{
  "persistent":{
    "cluster.routing.allocation.disk.watermark.low": "95%",
    "cluster.routing.allocation.disk.watermark.high": "95%"
  }
}'

### 查看集群配置
curl -u magedu:123456 -X GET http://192.168.56.111:9200/_cluster/settings?pretty
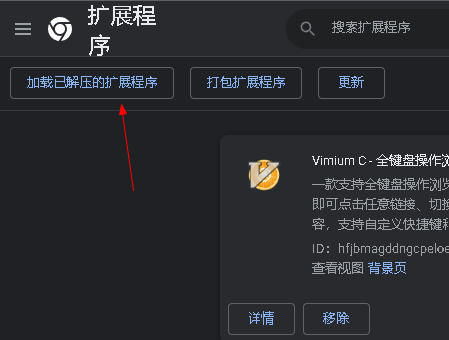
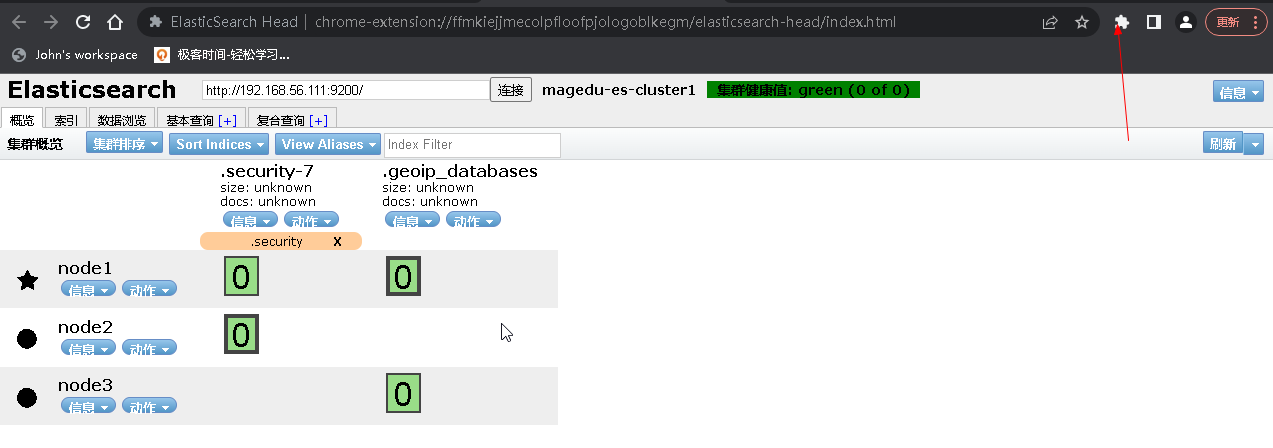
5.2 安装head插件

6、安装 Logstash 收集不同类型的系统日志并写入到 ES 的不同 index
6.1 安装logstash
#安装logstash
dpkg -i /usr/local/src/logstash-8.5.1-amd64.deb

cp /lib/systemd/system/logstash.service{,.bak}
sed -i 's/User=logstash/User=root/g' /lib/systemd/system/logstash.service
sed -i 's/Group=logstash/Group=root/g' /lib/systemd/system/logstash.service
systemctl daemon-reload
6.2 收集不同类型的日志并写入不同的es集群
tee /etc/logstash/conf.d/file-es-test.conf << "EOF"
input {
file {
path => "/var/log/syslog"
stat_interval => "1"
start_position => "beginning"
type => "syslog"
}
file {
path => "/var/log/auth.log"
stat_interval => "1"
start_position => "beginning"
type => "aulog"
}
}
output {
if [type] == "syslog" {
elasticsearch {
hosts => ["192.168.56.111:9200"]
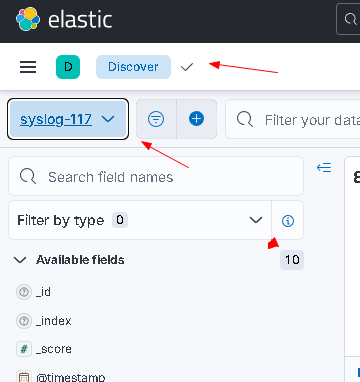
index => "syslog-117-%{+YYYY.MM.dd}"
user => "magedu"
password => "123456"
}
}
if [type] == "aulog" {
elasticsearch {
hosts => ["192.168.56.111:9200"]
index => "authlog-117-%{+YYYY.MM.dd}"
user => "magedu"
password => "123456"
}
}
}
EOF
/usr/share/logstash/bin/logstash -f /etc/logstash/conf.d/file-es-test.conf
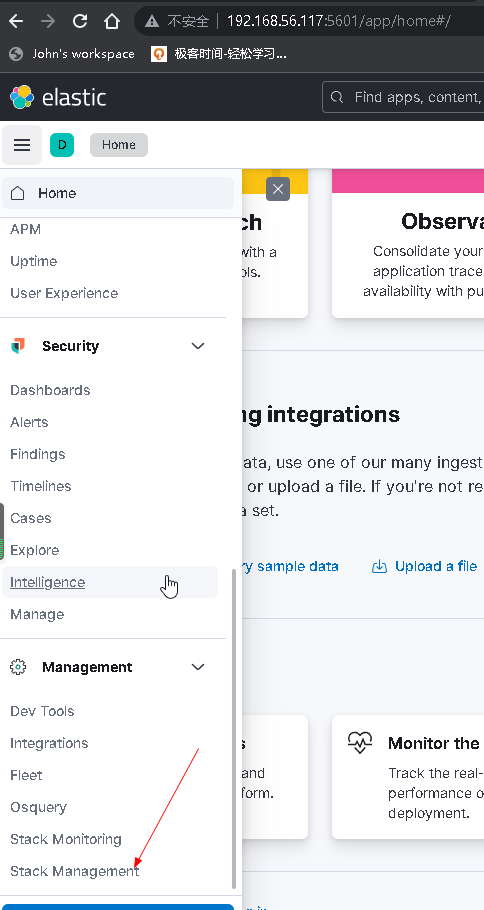
7、安装 Kibana、查看 ES 集群的数据
7.1 安装kibana
dpkg -i /usr/local/src/kibana-8.5.1-amd64.deb
cp  /etc/kibana/kibana.yml{,.bak}
tee /etc/kibana/kibana.yml << "EOF"
server.port: 5601
server.host: "0.0.0.0"
elasticsearch.hosts: ["http://192.168.56.113:9200"]
elasticsearch.username: "kibana_system"
elasticsearch.password: "123456"
logging:
  appenders:
    file:
      type: file
      fileName: /var/log/kibana/kibana.log
      layout:
        type: json
  root:
    appenders:
      - default
      - file
pid.file: /run/kibana/kibana.pid
EOF

systemctl restart kibana && systemctl enable kibana

#登录地址http://192.168.56.117:5601/
7.2 查看es集群


 浙公网安备 33010602011771号