PXE工作原理(有图有真相)
source: http://blog.51cto.com/lavenliu/1629922
PXE工作原理(有图有真相)
有两年的时间没有安装过Gnu/Linux系统了,今天领导让安装20台机器,说是要一下午全部搞定,所以就使用了PXE的安装方式。具体怎么配置及操作,本文就省略了,因为网上有很多大神的博客里都会有详细的配置,本文仅做原理性的介绍。知道了其中的原理,然后,再去动手实验将会达到事半功倍的效果。
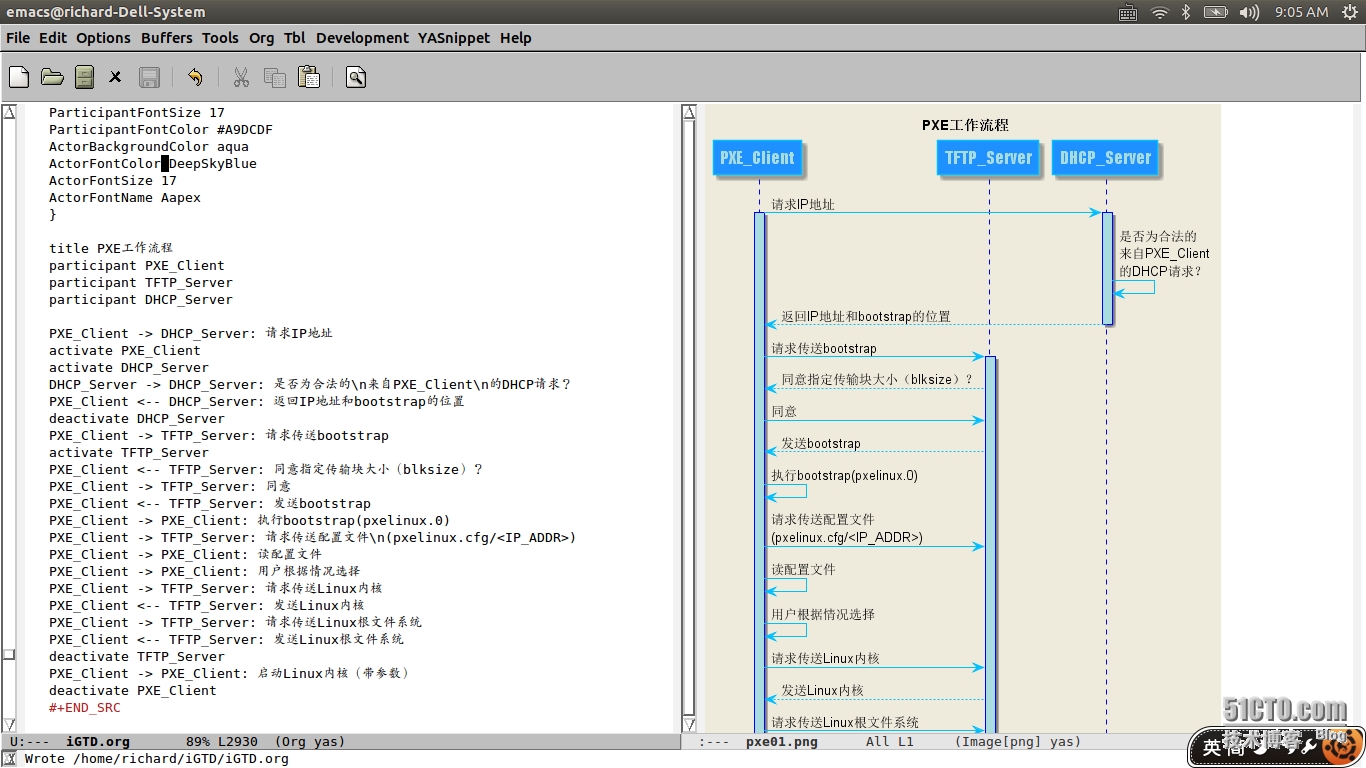
下面的插图使用PlantUML语言绘制,本文的绘制工具使用的是Emacs编辑器,这里贴出来该流程图的源码,供大家参考及修改,如果使使用其他PlantUML的绘制工具的话,源代码需要做少许修改即可,把#+BEGIN_SRC plantuml :file images/pxe01.png及#+END_SRC这两行去掉,替换为@startuml及@enduml就行了。贴出源代码的主要目的是为了让大家可以有自己的原图,而不是从其他博客上复制过来的图片,而且不清晰,更重要的是不能修改使其成为自己想要的。所以,这里贴出来制作的过程,供有需要的童鞋参考。
我的Emacs截图为:
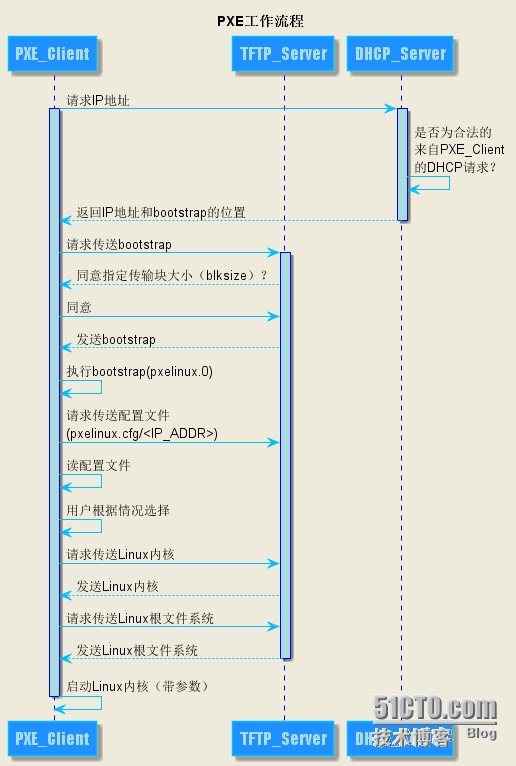
经过两次修改流程图的源代码,最终效果为下面的代码,每个角色加入了生命线(LifeLine),这样,我们可以知道PXE_Client、TFTP_Server、DHCP_Server在什么时候开始起作用的了,此处的生命线可以理解为作用域。
|
1
2
3
4
5
6
7
8
9
10
11
12
13
14
15
16
17
18
19
20
21
22
23
24
25
26
27
28
29
30
31
32
33
34
35
36
37
38
39
40
41
42
43
44
|
#+BEGIN_SRC plantuml :file images/pxe01.png
skinparam backgroundColor
#EEEBDC
skinparam sequence {
ArrowColor DeepSkyBlue
ActorBorderColor DeepSkyBlue
LifeLineBorderColor blue
LifeLineBackgroundColor
#A9DCDF
ParticipantBorderColor DeepSkyBlue
ParticipantBackgroundColor DodgerBlue
ParticipantFontName Impact
ParticipantFontSize 17
ParticipantFontColor
#A9DCDF
ActorBackgroundColor aqua
ActorFontColor DeepSkyBlue
ActorFontSize 17
ActorFontName Aapex
}
title PXE工作流程
participant PXE_Client
participant TFTP_Server
participant DHCP_Server
PXE_Client -> DHCP_Server: 请求IP地址
activate PXE_Client
activate DHCP_Server
DHCP_Server -> DHCP_Server: 是否为合法的\n来自PXE_Client\n的DHCP请求?
PXE_Client <-- DHCP_Server: 返回IP地址和bootstrap的位置
deactivate DHCP_Server
PXE_Client -> TFTP_Server: 请求传送bootstrap
activate TFTP_Server
PXE_Client <-- TFTP_Server: 同意指定传输块大小(blksize)?
PXE_Client -> TFTP_Server: 同意
PXE_Client <-- TFTP_Server: 发送bootstrap
PXE_Client -> PXE_Client: 执行bootstrap(pxelinux.0)
PXE_Client -> TFTP_Server: 请求传送配置文件\n(pxelinux.cfg/<IP_ADDR>)
PXE_Client -> PXE_Client: 读配置文件
PXE_Client -> PXE_Client: 用户根据情况选择
PXE_Client -> TFTP_Server: 请求传送Linux内核
PXE_Client <-- TFTP_Server: 发送Linux内核
PXE_Client -> TFTP_Server: 请求传送Linux根文件系统
PXE_Client <-- TFTP_Server: 发送Linux根文件系统
deactivate TFTP_Server
PXE_Client -> PXE_Client: 启动Linux内核(带参数)
deactivate PXE_Client
#+END_SRC
|
PXE工作原理示意图说明:
1. Client向PXE Server上的DHCP发送IP地址请求消息,DHCP检测Client是否
合法(主要是检测Client的网卡MAC地址),如果合法则返回Client的IP地
址,同时将启动文件pxelinux.0的位置信息一并传送给Client。
2. Client向PXE Server上的TFTP发送获取pxelinux.0请求消息,TFTP接收到
消息之后再向Client发送pxelinux.0大小信息,试探Client是否满意,当
TFTP收到Client发回的同意大小信息之后,正式向Client发送pxelinux.0。
3. Client执行接收到的pxelinux.0文件。
4. Client向TFTP发送针对本机的配置信息(记录在TFTP的pxelinux.cfg目录
下),TFTP将配置文件发回Client,继而Client根据配置文件执行后续操
作。
5. Client向TFTP发送Linux内核请求信息,TFTP接收到消息之后将内核文件发
送给Client。
6. Client向TFTP发送根文件请求信息,TFTP接收到消息之后返回Linux根文件
系统。
7. Client启动Linux内核(启动参数已经在4中的配置文件中设置好了)。
8. Client通过NFS下载镜像文件,读取autoyast自动化安装脚本。
至此,Client正式进入自动化安装模式开始安装系统直到完成。


