Unity3D 背包系统
作业:
UI 效果制作(你仅需要实现以下效果之一)
- 进入 NGUI 官方网站,使用 UGUI 实现以下效果
实现效果

参考博客:
背包系统制作: https://blog.kinpzz.com/2016/05/21/unity3d-ugui-Inventory/
人物模型改变:https://blog.uwa4d.com/archives/avartar.html
这次作业,我融合和两篇博客的精髓,实现了官方样例的功能。
通过拖曳装备,可以改变人物身上的模型。完成度十分高。
背包系统的制作过程,师兄的博客里已经十分详细,不再赘述。
接下来介绍一下人物模型的改变。
在人物模型的改变中,将人物模型生成的类Director.cs设置为单例模式。
在Director.cs中:改变武器,只需要按照下面的例子,引用函数即可(身体的其他部位雷同)
public void ChangeWeapon(int num)
    {
		if (!weapon_list[num])
		{
			for (int j = 0; j < weapon_list.Length; j++)
			{
				weapon_list[j] = false;
			}
			weapon_list[num] = true;

			character.ChangeWeapon("ch_we_one_hou_" + index[num]);
		}
	}
在DragItem.cs中,拖动位置的识别,是通过对应位置的名称改变的。所以Wear,和collection中Image名称一定要对应!不可以改变。Bag中的名称无所谓。
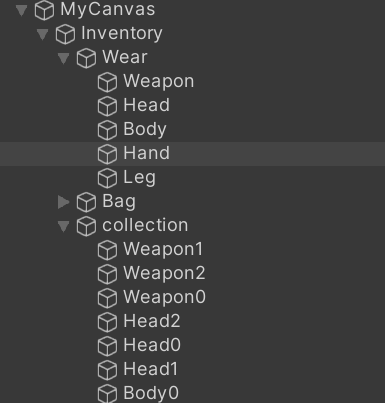
在DragItem.cs中,例如Weapon1只能拖动到Weapon位置,或者Weapon0和Weapon1位置。
if (curEnter == null)
        {
            myTransform.position = originalPosition;
        }
        else if (curEnter.GetComponent<DragItem>().inWear || inWear)
        {
            string Pre_thisName = this.name.Substring(0, this.name.Length - 1);
            string Pre_curEnterName = curEnter.name.Substring(0, this.name.Length - 1);
            //移动至物品格子上
            if (curEnter.name == Pre_thisName)
            {
                UnityEngine.Debug.Log("移动至物品格子上");
                UnityEngine.Debug.Log(this.name);
                UnityEngine.Debug.Log(this.transform.position);
                UnityEngine.Debug.Log(curEnter.name);
                UnityEngine.Debug.Log(curEnter.transform.position);
                if (this.transform.position.x < 0)
                {
                    string name = this.name;
                    string num_s = name.Substring(name.Length - 1, 1);
                    int num = Convert.ToInt32(num_s);
                    changeBody(num, Pre_thisName, Pre_curEnterName);
                }

                myTransform.position = curEnter.transform.position;
                originalPosition = myTransform.position;
                curEnter.GetComponent<Image>().color = lastEnterNormalColor;//当前格子恢复正常颜色

                curEnter.GetComponent<DragItem>().inWear = !curEnter.GetComponent<DragItem>().inWear;
                inWear = !inWear;
            }
            else if (Pre_curEnterName == Pre_thisName)
            {
                //移动至包裹中的其它物品上
                UnityEngine.Debug.Log("移动至包裹中的其它物品上");
                /*curEnter.name == eventData.pointerDrag.name &&*/
                if (curEnter != eventData.pointerDrag)
                {
                    UnityEngine.Debug.Log("交换:this.name:" + this.name);
                    UnityEngine.Debug.Log(this.transform.position);
                    UnityEngine.Debug.Log("交换:curEnter:" + curEnter.name);
                    UnityEngine.Debug.Log(curEnter.transform.position);
                    if (this.transform.position.x < 0)
                    {
                        string name = this.name;
                        string num_s = name.Substring(name.Length - 1, 1);
                        int num = Convert.ToInt32(num_s);
                        changeBody(num, Pre_thisName, Pre_curEnterName);
                    }
                    else if (this.transform.position.x > 0)
                    {
                        string name = curEnter.name;
                        string num_s = name.Substring(name.Length - 1, 1);
                        int num = Convert.ToInt32(num_s);
                        changeBody(num, Pre_thisName, Pre_curEnterName);
                    }

                    Vector3 targetPostion = curEnter.transform.position;
                    curEnter.transform.position = originalPosition;
                    myTransform.position = targetPostion;
                    originalPosition = myTransform.position;

                    curEnter.GetComponent<DragItem>().inWear = !curEnter.GetComponent<DragItem>().inWear;
                    inWear = !inWear;
                }
                else//拖拽至其它对象上面(包裹上的其它区域)
                {
                    myTransform.position = originalPosition;
                }
            } else
            {
                myTransform.position = originalPosition;
            }
        } else
        {
            myTransform.position = originalPosition;
        }
具体代码可以参考我的gitee:
https://gitee.com/woodx9/unity-3D-homework/tree/master/PackSystem

 浙公网安备 33010602011771号