Spring AOP 编程基础
更多内容参见个人技术博客,无广告欢迎关注
1.Spring AOP 概述
1.1. AOP是什么?
AOP 是软件设计领域中的面向切面编程,它是面向对象编程的一种补充和完善
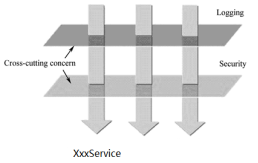
实际项目中我们通常将面向对象理解为一个静态过程(例如一个系统有多少模块,一个模块有哪些对象,对象有哪些属性),面向切面中包含一个一个动态过程(在对象运行时动态织入一些功能。)
面向切面应用案例:如图所示

1.2. AOP要解决什么问题?
实际项目中通常会将系统两大部分:核心关注点和非核心关注点
思考?
编程过程中首先要完成的是什么?核心关注点(核心业务)
非核心关注点如何切入到系统中?硬编码(违背OCP),AOP(推荐)
AOP就是要在基于OCP(开闭原则)在不改变原有系统核心业务代码的基础上动态添加一些扩展功能并可以控制对象的执行。
1.3. AOP实际项目应用场景?
AOP 通常应用于日志的处理,事务处理,权限处理,缓存处理等等。

1.4. AOP底层原理实现分析?
AOP底层基于代理机制实现功能扩展:(了解)
1) 假如目标对象(被代理对象)实现接口,则底层默认采用JDK动态代理机制为目标对象创建代理对象(目标类和代理类会实现共同接口)
2) 假如目标对象(被代理对象)没有实现接口,则底层默认采用CGLIB代理机制为目标对象创建代理对象(默认创建的代理类会继承目标对象类型)。
JDK动态代理和CGLIB代理的区别
1.5. AOP 相关术语
切面(aspect): 横切面对象,一般为一个具体类对象(可以借助@Aspect声明)
连接点(joinpoint):程序执行过程中某个特定的点,一般指被拦截到的的方法
切入点(pointcut):对连接点拦截内容的一种定义,一般可以理解为多个连接点的结合.
通知(Advice):在切面的某个特定连接点上执行的动作(扩展功能),例如around,before,after等
很晦涩难懂,多做例子,做完就会清晰。先可以按白话去理解。
2.
2.1. AOP 基本步骤
step1:创建maven java 项目
step2:添加aop依赖
step3:配置aop 核心(基于xml,基于注解)
step4:定义核心业务(核心关注点):推荐先写接口再写实现类
step5:定义扩展业务(非核心关注点)
step6:基于配置实现非核心业务的切入
step7:编写测试类进行单元测试
2.2. AOP 基于xml实现
通过AOP为核心业务类添加日志处理
2.2.1. 创建项目添加依赖
创建maven java 项目,项目名为CGB-SPRING-DAY04-AOP-01然后在pom文件中添加依赖
<dependency>
<groupId>org.springframework</groupId>
<artifactId>spring-context</artifactId>
<version>4.3.9.RELEASE</version>
</dependency>
<!--
Spring AOP的实现依托于Aspect框架(AOP框架)
所以要引用1.8.5有问题-->
<dependency>
<groupId>org.aspectj</groupId>
<artifactId>aspectjrt</artifactId>
<version>1.8.9</version>
</dependency>
<dependency>
<groupId>org.aspectj</groupId>
<artifactId>aspectjweaver</artifactId>
<version>1.8.9</version>
</dependency>
2.2.2. 添加spring配置文件
<?xmlversion="1.0"encoding="UTF-8"?>
<beans
default-lazy-init="true"
xmlns="http://www.springframework.org/schema/beans"
xmlns:p="http://www.springframework.org/schema/p"
xmlns:xsi="http://www.w3.org/2001/XMLSchema-instance"
xmlns:context="http://www.springframework.org/schema/context"
xmlns:tx="http://www.springframework.org/schema/tx"
xmlns:aop="http://www.springframework.org/schema/aop"
xmlns:mvc="http://www.springframework.org/schema/mvc"
xmlns:util="http://www.springframework.org/schema/util"
xmlns:jpa="http://www.springframework.org/schema/data/jpa"
xsi:schemaLocation="
http://www.springframework.org/schema/beans
http://www.springframework.org/schema/beans/spring-beans-4.3.xsd
http://www.springframework.org/schema/mvc
http://www.springframework.org/schema/mvc/spring-mvc-4.3.xsd
http://www.springframework.org/schema/tx
http://www.springframework.org/schema/tx/spring-tx-4.3.xsd
http://www.springframework.org/schema/aop
http://www.springframework.org/schema/aop/spring-aop-4.3.xsd
http://www.springframework.org/schema/util
http://www.springframework.org/schema/util/spring-util-4.3.xsd
http://www.springframework.org/schema/data/jpa
http://www.springframework.org/schema/data/jpa/spring-jpa-1.3.xsd
http://www.springframework.org/schema/context
http://www.springframework.org/schema/context/spring-context-4.3.xsd">
</beans>
2.2.3. 创建核心业务类
创建接口
publicinterface HelloService {
void sayHello(String msg);
}
创建接口实现类
publicclass HelloServiceImpl implements HelloService {
publicvoid sayHello(String msg) {
//假设这条语句是我们系统中的核心业务
System.out.println(msg);
}
}
2.2.4. 创建日志处理类
后续会将此日志处理类定义为横切面,通过此横切面实现扩展业务
publicclass LoggingAspect {
publicvoid beforeMethod(){
System.out.println("method start");
}
publicvoid afterMethod(){
System.out.println("method end");
}
}
2.2.5. 配置bean对象
<?xmlversion="1.0"encoding="UTF-8"?>
<beans
default-lazy-init="true"
xmlns="http://www.springframework.org/schema/beans"
xmlns:p="http://www.springframework.org/schema/p"
xmlns:xsi="http://www.w3.org/2001/XMLSchema-instance"
xmlns:context="http://www.springframework.org/schema/context"
xmlns:tx="http://www.springframework.org/schema/tx"
xmlns:aop="http://www.springframework.org/schema/aop"
xmlns:mvc="http://www.springframework.org/schema/mvc"
xmlns:util="http://www.springframework.org/schema/util"
xmlns:jpa="http://www.springframework.org/schema/data/jpa"
xsi:schemaLocation="
http://www.springframework.org/schema/beans
http://www.springframework.org/schema/beans/spring-beans-4.3.xsd
http://www.springframework.org/schema/mvc
http://www.springframework.org/schema/mvc/spring-mvc-4.3.xsd
http://www.springframework.org/schema/tx
http://www.springframework.org/schema/tx/spring-tx-4.3.xsd
http://www.springframework.org/schema/aop
http://www.springframework.org/schema/aop/spring-aop-4.3.xsd
http://www.springframework.org/schema/util
http://www.springframework.org/schema/util/spring-util-4.3.xsd
http://www.springframework.org/schema/data/jpa
http://www.springframework.org/schema/data/jpa/spring-jpa-1.3.xsd
http://www.springframework.org/schema/context
http://www.springframework.org/schema/context/spring-context-4.3.xsd">
<!-- 核心业务对象-->
<beanid="helloService"
class="spring.beans.HelloServiceImpl"/>
<!-- 配置非核心业务对象(日志处理对象):切面-->
<beanid="log"
class="spring.aop.LoggingAspect"/>
<!-- AOP配置(切入点,切面) -->
<aop:config>
<!-- 配置切入点(bean,@annotation,within) -->
<aop:pointcut
expression="within(spring.beans.HelloServiceImpl)"
id="logPointCut"/>
<!-- 配置日志处理-->
<aop:aspectref="log">
<aop:beforemethod="beforeMethod"
pointcut-ref="logPointCut"/>
<aop:aftermethod="afterMethod"
pointcut-ref="logPointCut"/>
</aop:aspect>
</aop:config>
</beans>
2.2.6. 编写测试类
publicclass TestAOP01 {
private ClassPathXmlApplicationContext ctx;
@Before
publicvoid init(){
ctx=new ClassPathXmlApplicationContext("spring-configs.xml");
}
@Test
publicvoid testSayHello(){
HelloService helloService=
ctx.getBean("helloService",HelloService.class);
helloService.sayHello("cgb1712");
}
@After
publicvoid destory(){
ctx.close();
}
}
2.2.7. 原理分析
基于AOP应用,对其执行过程进行分析,如图所示

2.3. AOP 基于注解实现
2.3.1. 创建maven 项目添加依赖
创建MAVEN JAVA 项目CGB-SPRING-DAY20-AOP-02,然后在POM文件中添加依赖
<dependency>
<groupId>org.springframework</groupId>
<artifactId>spring-context</artifactId>
<version>4.3.9.RELEASE</version>
</dependency>
<!--
Spring AOP的实现依托于Aspect框架
所以要引用1.8.5有问题
-->
<dependency>
<groupId>org.aspectj</groupId>
<artifactId>aspectjrt</artifactId>
<version>1.8.9</version>
</dependency>
<dependency>
<groupId>org.aspectj</groupId>
<artifactId>aspectjweaver</artifactId>
<version>1.8.9</version>
</dependency>
2.3.2. 创建核心业务类
定义一个订单接口,此接口中定义多个业务操作。
publicinterface OrderService {
publicvoid saveOrder();
publicvoid deleteOrder();
}
创建接口核心业务实现类,并使用@Service注解进行修饰
2.3.3. 创建时间处理类
将此时间处理类作为核心业务增强(一个横切面对象)类,用于输出业务开始执行时间,以及业务结束执行时间。
横切面对象主要由两部分构成:切入点(用于@Pointcut标识),以及功能增强(用通知@Before,@After等进行标识)
@Aspect
@Service
publicclass TimeAspect {
@Pointcut("bean(orderService)")
publicvoid pointcut(){}
/**增强功能:前置通知(业务方法执行之前执行)*/
@Before("pointcut()")
publicvoid begin(){
System.out.println("start:"+System.nanoTime());
}
/**增强功能:最终通知(业务方法执行最后执行,
*无论业务方法是否执行成功,此功能都要执行)*/
@After("pointcut()")
publicvoid end(){
System.out.println("end:"+System.nanoTime());
}
}
其中:
@Aspect 注解用于标识此类为一个AOP横切面对象
@Pointcut 注解用于定义本类中的切入点,本案例中切入点表达式用的是bean表达式,这个表达式以bean开头,bean括号中的内容为一个spring管理的某个bean对象的id。
@Before 用于定义一个前置通知(满足切入点表达式的核心业务方法执行之前要执行的一个操作)
@After 用于定义一个后置通知(满足切入点表达式的核心业务方法执行之后要执行的一个操作)
术语增强:
切面:用于封装扩展业务的一个类的对象。
通知:切面扩展业务中的一个操作(方法)。
2.3.4. 配置AOP实现
对于基于注解方式的配置一般有两种方式,一种是直接在xml核心配置文件中进行配置,还有一种在类中基于注解进行配置。例如
基于xml方式配置对注解的应用
<?xmlversion="1.0"encoding="UTF-8"?>
<beans
default-lazy-init="true"
xmlns="http://www.springframework.org/schema/beans"
xmlns:p="http://www.springframework.org/schema/p"
xmlns:xsi="http://www.w3.org/2001/XMLSchema-instance"
xmlns:context="http://www.springframework.org/schema/context"
xmlns:tx="http://www.springframework.org/schema/tx"
xmlns:aop="http://www.springframework.org/schema/aop"
xmlns:mvc="http://www.springframework.org/schema/mvc"
xmlns:util="http://www.springframework.org/schema/util"
xmlns:jpa="http://www.springframework.org/schema/data/jpa"
xsi:schemaLocation="
http://www.springframework.org/schema/beans
http://www.springframework.org/schema/beans/spring-beans-4.3.xsd
http://www.springframework.org/schema/mvc
http://www.springframework.org/schema/mvc/spring-mvc-4.3.xsd
http://www.springframework.org/schema/tx
http://www.springframework.org/schema/tx/spring-tx-4.3.xsd
http://www.springframework.org/schema/aop
http://www.springframework.org/schema/aop/spring-aop-4.3.xsd
http://www.springframework.org/schema/util
http://www.springframework.org/schema/util/spring-util-4.3.xsd
http://www.springframework.org/schema/data/jpa
http://www.springframework.org/schema/data/jpa/spring-jpa-1.3.xsd
http://www.springframework.org/schema/context
http://www.springframework.org/schema/context/spring-context-4.3.xsd">
<!-- 配置对类组件的扫描-->
<context:component-scanbase-package="com.spring"/>
<!-- 启用AOP注解(自动为目标对象创建代理对象) -->
<aop:aspectj-autoproxy/>
</beans>
在类中基于注解方式的配置
@ComponentScan("com.spring.beans")
@EnableAspectJAutoProxy
publicclass AppConfig {
}
2.3.5. 编写测试类
基于xml方式注解配置的测试实现
publicclass TestAOP01 {
publicstaticvoid main(String[] args) {
//1.初始化容器
ClassPathXmlApplicationContext ctx=
new ClassPathXmlApplicationContext(
"applicationContext.xml");
//2.获取bean对象
OrderService os=(OrderService)
ctx.getBean("orderService",
OrderService.class);
//3.执行业务方法
os.saveOrder();
os.deleteOrder();
//4.释放资源
ctx.close();
}
}
基于类中注解方式配置的测试实现
publicclass TestAOP02 {
publicstaticvoid main(String[] args) {
//1.初始化容器对象
AnnotationConfigApplicationContext ctx=
new AnnotationConfigApplicationContext(
AppConfig.class);
//2.获取Bean对象
OrderService orderService=
ctx.getBean("orderService", OrderService.class);
//3.执行业务
orderService.saveOrder();
//orderService.deleteOrder();
//4.释放资源
ctx.close();
}
}
基于类的注解配置,初始化工厂时需要初始化
AnnotationConfigApplicationContext对象。
3.Spring AOP 编程增强
3.1. 切面表达式增强
Spring中通过切入点表达式定义具体切入点,其常用AOP切入点表达式定义及说明:
|
|
指示符 |
作用 |
|
bean |
用于匹配指定bean id的的方法执行 |
|
|
within @annotation |
用于匹配指定包名下类型内的方法执行 用于匹配指定注解修饰的方法执行 |
|
|
|
execution |
用于进行细粒度方法匹配执行具体业务 |
3.1.1. Bean表达式应用增强
bean应用于类级别,实现粗粒度的控制:
|
bean("userServiceImpl")) |
指定一个类 |
|
bean("*ServiceImpl") |
指定所有的后缀为service的类 |
3.1.2. Within表达式应用增强
within应用于类级别,实现粗粒度的切面表达式定义:
|
within("aop.service.UserServiceImpl") |
指定类,只能指定一个类 |
|
within("aop.service.*") |
只包括当前目录下的类 |
|
within("aop.service..*") |
指定当前目录包含所有子目录中的类 |
3.1.3. Execution表达式应用增强
execution方法级别,细粒度的控制:
语法:execution(返回值类型包名.类名.方法名(参数列表))
|
execution(void aop.service.UserServiceImpl.addUser()) |
匹配方法 |
|
execution(void aop.service.PersonServiceImpl.addUser(String)) |
方法参数必须为字符串 |
|
execution(* aop.service..*.*(..)) |
万能配置 |
3.1.4. @annotation表达式应用增强
@annotaion应用于方法级别,实现细粒度的控制:
|
@annotation("com.jt.common.anno.RequestLog")) |
指定一个需要实现增强功能的方法 |
说明:RequestLog为自己定义的注解(参考项目1.06)
3.2. 切面通知增强
在AOP编程中有五种类型的通知:
1) 前置通知(@Before)方法执行之前执行
2) 返回通知(@AfterReturning)方法return之后执行
3) 异常通知(@AfterThrowing)方法出现异常之后执行
4) 后置通知(@After) :又称之为最终通知(finally)
5) 环绕通知(@Around):重点掌握
其结构如下:
Try{
@Before
核心业务
@AfterReturning
}catch(Exceptione){
….
@AfterThrowing
}finally{
….
@After
}
如上四个一起使用时可以直接使用@Around通知替换
3.2.1. Xml方式通知配置增强(了解)
切入点及前置通知,后置通知,返回通知,异常通知,环绕通知的配置
<aop:config>
<aop:pointcutid="pc"expression="execution(*
com.company.spring.service..*.*(..))" >
<aop:aspectref="loggingAspect">
<aop:beforemethod="beforeMethod"pointcut-ref="pc"/>
<aop:aftermethod="afterMethod"pointcut-ref="pc"/>
<aop:after-returningmethod="returnMethod"
pointcut-ref="pc"/>
<aop:after-throwingmethod="throwMethod"
pointcut-ref="pc"/>
</aop:aspect>
</aop:config>
切入点及环绕通知的配置(了解)
<aop:config>
<aop:pointcutid="pc"expression="execution(*
com.company.spring.service..*.*(..))" >
<aop:aspectref="loggingAspect">
<aop:around method="aroundMethod"pointcut-ref="pc"/>
</aop:aspect>
</aop:config>
3.2.2. 注解方式通知配置增强
切入点及前置通知,后置通知,返回通知,异常通知,环绕通知的配置
@Aspect
@Service
publicclass LogAspect {
@Pointcut("bean(orderServiceImpl)")
publicvoid doLog(){}
@Before("doLog()")
publicvoid doBefore(){
System.out.println("log before");
}
@After("doLog()")
publicvoid doAfter(){
System.out.println("log after");
}
/**核心业务正常结束时执行
* 说明:假如有after,先执行after,再执行returning*/
@AfterReturning("doLog()")
publicvoid doAfterReturning(){
System.out.println("log doAfterReturning");
}
/**核心业务出现异常时执行
说明:假如有after,先执行after,再执行Throwing*/
@AfterThrowing("doLog()")
publicvoid doAfterThrowing(){
System.out.println("log doAfterThrowing");
}
}
切入点及环绕通知的配置(课后自己实现)
@Component
@Aspect
publicclass TxManager {
@Pointcut("execution(com.company.spring.service..*.*(..))")
publicvoid pointCut() {}
@Around("pointCut()")
public Object around(ProceedingJoinPoint joinPoint)
throws Throwable{
try{
System.out.println("事务开始");
Object result = joinPoint.proceed();//执行目标方法
System.out.println("提交事务");
returnresult;
}catch(Exception e){
System.out.println("回滚事务");
throw e;
}finally{
System.out.println("释放资源");
}
}
}
3.3. 切面执行顺序配置增强
实际项目中可能会有多个切面,切面之间的执行可能需要一定的顺序
3.3.1. Xml方式配置执行顺序
<aop:config>
<aop:pointcutid="pc"
expression="execution(*
com.company.spring.service..*.*(..))"/>
<aop:aspectref="loggingAspect"order="1">
<aop:aroundmethod="aroundMethod"pointcut-ref="pc"/>
</aop:aspect>
<aop:aspectref="txManager"order="2">
<aop:aroundmethod="aroundMethod"pointcut-ref="pc"/>
</aop:aspect>
</aop:config>
3.3.2. 注解方式配置执行顺序
注解方式顺序配置需要借助@Order注解
@Order(1)
@Aspect
@Component
publicclass TxManager {
@Pointcut("execution(* com.company.spring.service..*.(..))")
publicvoid pointCut() {}
@Around("pointCut()")
public Object around(ProceedingJoinPoint joinPoint)
throws Throwable{
System.out.println("事务开始");
Object result = joinPoint.proceed();
System.out.println("事务结束");
returnresult;
}
}
注解方式顺序配置
@Order(2)
@Aspect
@Component
publicclass LoggingAspect {
@Pointcut("execution(* com.company.spring.service..*.(..))")
publicvoid pointCut() {}
@Before("pointCut()")
publicvoid beforeMethod() {
System.out.println("beforeMethod");
}
@After("pointCut()")
publicvoid afterMethod() {
System.out.println("afterMethod");
}
}


